Go Back
- 1 large red onion, thinly sliced - 1 cup apple cider vinegar - 1 cup water - 2 tablespoons granulated sugar - 1 tablespoon salt - 1 teaspoon black peppercorns - 1 teaspoon mustard seeds - 1 clove garlic, thinly sliced - Optional: fresh herbs (like dill or thyme) for added flavor To make quick-pickled red onions, you need a few simple items. First, grab one large red onion. Slice it thinly, so it soaks up the brine well. You’ll also need one cup of apple cider vinegar. This vinegar adds a tangy taste that makes the onions pop. Next, gather one cup of water to balance the vinegar. Add two tablespoons of granulated sugar for sweetness. This sugar helps to cut through the acidity. Then, use one tablespoon of salt to enhance the flavor and help preserve the onions. For extra taste, you can add a teaspoon each of black peppercorns and mustard seeds. These spices bring warmth and depth. You can also include one thinly sliced clove of garlic. This step adds a nice punch. If you like, toss in some fresh herbs like dill or thyme. They will add a lovely aroma to your pickles. All these ingredients come together to make a delicious brine. This brine is the key to your quick-pickled red onions. For the full recipe, refer to the Zesty Quick-Pickled Red Onions section. - Peel and slice the red onion thinly. - Place the sliced onions in a clean, airtight jar or container. - In a medium saucepan, combine apple cider vinegar, water, sugar, salt, black peppercorns, mustard seeds, and sliced garlic. - Bring the mixture to a gentle boil over medium heat. Stir until the sugar and salt dissolve. - Pour the hot pickling liquid over the onions in the jar. - Ensure the onions are fully submerged and press down if necessary. - Allow the jar to cool to room temperature. - Seal tightly and refrigerate for at least 30 minutes. This quick-pickling method adds a zesty touch to any meal. You can find the full recipe for these quick-pickled red onions above! To make great quick-pickled red onions, you need fresh onions. Look for red onions that feel firm and heavy. They should have smooth skin without soft spots. Uniform slicing is key. Thin slices allow the onions to pickle evenly. Use a sharp knife or a mandoline for the best results. You can add extra spices for more flavor. Try cumin seeds or coriander seeds for a twist. Adding a pinch of chili flakes gives a nice kick. Balancing sweetness and acidity is important. If you find the pickles too sweet, add a splash more vinegar. If too sour, add a bit of sugar. Taste as you go! Quick-pickled red onions add a burst of flavor to many dishes. Use them on tacos, sandwiches, or salads. They also work well as a garnish for grilled meats. Pair them with rich foods to brighten up the meal. Their tangy taste can enhance almost any dish! For more ways to enjoy them, check out the Full Recipe. {{image_2}} You can use different types of vinegar for your quick-pickled red onions. White vinegar is a popular choice. It gives a clean, crisp flavor. It also has a strong acidity. This makes your pickles zesty and tangy. Rice vinegar is another great option. It has a milder taste and balances the sweetness well. It works well if you want a softer flavor. Try both to see which one you like best! You can spice up your pickled onions with extra ingredients. Adding chili flakes gives a nice heat. Just a pinch can change the taste. If you prefer milder flavors, skip the chili. Using fresh herbs can also enhance the taste. Cilantro works well and adds a fresh note. You can also try dill or thyme for a unique twist. Experiment with herbs to find your favorite mix! Not a fan of granulated sugar? No problem! You can use honey or maple syrup instead. Both options add sweetness and a bit of flavor. Honey gives a floral note, while maple syrup has a warm, earthy taste. Feel free to adjust the sweetness to match your taste. Start with less and add more if you want. Making quick-pickled red onions is all about personal preference. You can find your perfect balance! To keep your quick-pickled red onions fresh, use a glass jar with a tight lid. Mason jars work great for this. Avoid plastic containers, as they can affect the taste. Always clean your jar well before using it. This helps prevent any unwanted bacteria. After preparing your pickles, store them in the fridge. This keeps the onions crisp and tasty. Quick-pickled red onions last about 2 weeks in the fridge. The vinegar helps preserve them, but always check for signs of spoilage. If you see any mold or an off smell, throw them away. They may lose crunch over time, but the flavors will deepen. You can freeze quick-pickled onions, but it may change their texture. If you decide to freeze them, use freezer-safe bags or containers. Make sure to leave some space for expansion. Thaw them in the fridge before use. This way, they stay as fresh as possible. For best results, enjoy them fresh rather than frozen. Check out the Full Recipe for all the details on making these zesty onions! Quick-pickled red onions last about 2 weeks when kept in the fridge. Store them in a clean glass jar with a tight lid. As time goes on, they may lose some crunch but still taste great. Yes, you can use other onions. Sweet onions and yellow onions work well too. Each type brings a different flavor. Experiment to find your favorite! Pickled red onions are great on many dishes. They add a punch to tacos, sandwiches, and salads. Try them on burgers or as a simple snack with cheese. The bright flavor makes any meal pop! To spice up your pickles, add chili flakes or sliced jalapeños. You can also use spicy mustard seeds. Adjust the heat to your taste. Start small; you can always add more! Yes, you can easily double or halve the recipe. Just adjust the ingredients in the same ratio. This way, you can make more or less as needed. Enjoy experimenting with your flavors! For the full recipe, check out the details for making zesty quick-pickled red onions. Pickling red onions is simple and rewarding. We covered essential ingredients, step-by-step instructions, and tips for flavor and storage. You can customize your pickles by trying different vinegars or adding spices. Remember to store them correctly for the best taste. With these easy steps, you can enjoy crunchy, tangy pickled onions in just thirty minutes. Experiment with flavors and enjoy the freshness they bring to your dishes. Happy pickling!

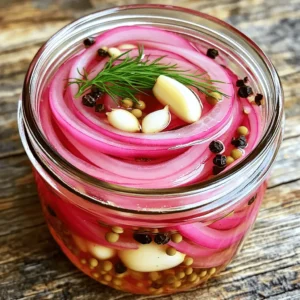
How To Make Quick-Pickled Red Onions

Elevate your meals with these zesty quick-pickled red onions! This simple recipe brings a tangy crunch to sandwiches, tacos, salads, and more. With just a few ingredients like apple cider vinegar, garlic, and easy-to-follow steps, you can create a flavorful topping in no time. Ready to add a burst of flavor to your dishes? Click through to explore the full recipe and start pickling today!

Ingredients
  

1 large red onion, thinly sliced

1 cup apple cider vinegar

1 cup water

2 tablespoons granulated sugar

1 tablespoon salt

1 teaspoon black peppercorns

1 teaspoon mustard seeds

1 clove garlic, thinly sliced

Optional: fresh herbs (like dill or thyme) for added flavor

Instructions
 

Prepare the Onions: Peel the red onion and slice it thinly using a sharp knife or mandoline. Place the sliced onions in a clean, airtight jar or container.

    Make the Pickling Liquid: In a medium saucepan, combine the apple cider vinegar, water, sugar, salt, black peppercorns, mustard seeds, and sliced garlic. Bring the mixture to a gentle boil over medium heat, stirring occasionally until the sugar and salt dissolve.

      Combine and Cool: Pour the hot pickling liquid over the sliced onions in the jar, ensuring the onions are fully submerged. You can press them down gently with a spoon if necessary.

        Add Herbs: If desired, tuck fresh herbs into the jar for added flavor.

          Seal and Chill: Allow the jar to cool to room temperature, then seal it tightly with a lid. Place the jar in the refrigerator for at least 30 minutes before using, though the flavors will deepen if left overnight.

            Serve and Enjoy: Use the quick-pickled red onions on sandwiches, tacos, salads, or as a zesty garnish for various dishes.

              Prep Time: 10 mins | Total Time: 40 mins (plus cooling time) | Servings: About 2 cups