If you love fresh tomatoes, you’ll adore this heirloom tomato galette! This simple recipe guide will show you how to create a stunning dish that bursts with flavor. Using ripe, juicy heirloom tomatoes, you’ll impress your family and friends at any meal. I’ll walk you through each step, from making the perfect crust to delicious filling options. Ready to create this summer delight? Let’s dive in!
Ingredients
Key Ingredients for the Galette
To make a delicious heirloom tomato galette, gather these key ingredients:
– 2 cups all-purpose flour
– 1/2 teaspoon salt
– 1/2 cup unsalted butter, cold and cubed
– 6-8 tablespoons ice water
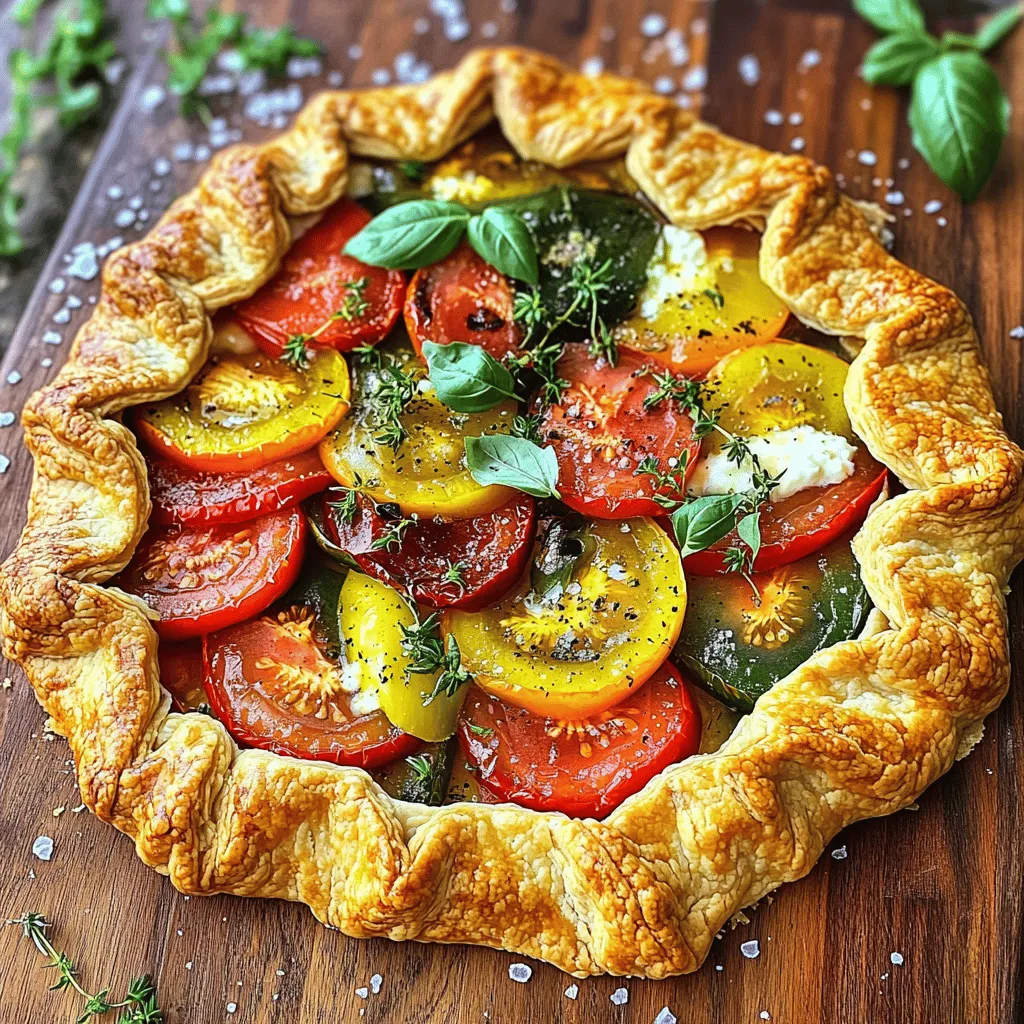
– 4-5 medium heirloom tomatoes, sliced (various colors if possible)
– 1 cup fresh ricotta cheese
– 1/2 cup grated Parmesan cheese
– 2 tablespoons fresh basil, chopped
– 1 tablespoon fresh thyme, chopped
– 1 tablespoon olive oil
– Freshly cracked black pepper to taste
– Sea salt for sprinkling
Each ingredient plays a big role in flavor and texture. The flour and butter create the flaky crust. The heirloom tomatoes bring freshness and color. The cheeses add creaminess and depth.
Best Types of Heirloom Tomatoes to Use
Choose heirloom tomatoes for their rich taste and unique shapes. Some of my favorites include:
– Brandywine: Sweet and meaty, great for layering.
– Cherokee Purple: Juicy and flavorful, adds depth.
– Green Zebra: Tart and colorful, adds fun contrast.
– Black Krim: Earthy and rich, great for variety.
Using different colors and types makes your galette pop. The mix of flavors will impress your guests.
Optional Additives for Extra Flavor
Want to take your galette up a notch? Consider these optional extras:
– A splash of balsamic vinegar for tang.
– A sprinkle of crushed red pepper for heat.
– A few olives for a briny bite.
– Sliced garlic for a savory kick.
These additives can enhance the flavor and make your galette even more special. Experiment and find your favorite combination! For the full recipe, check the section above.
Step-by-Step Instructions
Preparing the Galette Dough
To start, grab a large bowl. Mix 2 cups of all-purpose flour with 1/2 teaspoon of salt. Cut in 1/2 cup of cold, cubed unsalted butter. Use your fingers or a pastry cutter to blend until it looks like coarse crumbs. Then, slowly add 6-8 tablespoons of ice water. Add it one tablespoon at a time. Stop when the dough holds together but isn’t sticky. Shape the dough into a disk, wrap it in plastic, and chill it for at least 30 minutes.
Making the Filling
While your dough chills, preheat the oven to 400°F (200°C). In a medium bowl, mix 1 cup of fresh ricotta cheese and 1/2 cup of grated Parmesan cheese. Add 2 tablespoons of chopped fresh basil and 1 tablespoon of chopped fresh thyme. Drizzle in 1 tablespoon of olive oil and season with freshly cracked black pepper. Stir until smooth, then set it aside.
Assembling and Baking the Galette
On a floured surface, roll out your chilled dough into a large circle, about 1/8 inch thick. Carefully move the dough to a parchment-lined baking sheet. Spread the ricotta mixture over the dough, leaving a 2-inch border. Layer 4-5 medium heirloom tomato slices on top of the cheese. Pleat the edges of the dough over the tomatoes. Drizzle a little olive oil and sprinkle sea salt and black pepper on top. Bake for 35-40 minutes. The galette should be golden brown and the tomatoes lightly caramelized. Let it cool slightly, slice, and enjoy your delicious creation. For detailed directions, refer to the Full Recipe.
Tips & Tricks
How to Achieve the Perfect Crust
To get the best crust, keep your ingredients cold. Use cold butter and ice water. Mix until you see coarse crumbs. Do not overwork the dough; it should be flaky. Chill the dough for at least 30 minutes. This helps the fat firm up. Roll it out gently on a floured surface. Aim for a thickness of about 1/8 inch.
Tips for Layering Heirloom Tomatoes
When layering heirloom tomatoes, use a mix of colors. This makes your galette look stunning. Start with a layer of cheese. Place the tomato slices on top, slightly overlapping them. This allows each slice to shine. Use different varieties for unique flavors and textures. Sprinkle a bit of sea salt on the tomatoes. This enhances their natural taste.
Serving Suggestions for the Galette
Serve the galette warm or at room temperature. Present it on a rustic wooden board. Garnish with fresh herbs to add color. A drizzle of balsamic reduction offers a sweet touch. Pair with a light salad for a complete meal. Enjoy it with a glass of chilled white wine for a perfect match.

Variations
Alternative Cheese Options
You can switch up the cheese in your galette. If you want a creamier texture, try using goat cheese. It adds a tangy taste. Feta cheese is another great choice. It gives a salty flavor that pairs well with tomatoes. You can also use a mix of cheeses. This adds more depth to the dish.
Adding Vegetables or Herbs
Feel free to add more vegetables to your galette. Zucchini slices or bell peppers work great. They add color and taste. You can also mix in herbs like oregano or dill. This gives your galette a fresh twist. Try using different herbs each time. You can make a new flavor each time you bake!
Making it Vegan-Friendly
To make your galette vegan, replace the cheese. Use a dairy-free ricotta made from nuts. You can make it at home or buy it. Use vegan butter in the crust. This will keep the texture rich and flaky. Don’t forget to add your favorite veggies and herbs for extra flavor. Enjoy a delicious plant-based meal!
For the full recipe, check out the Delicious Heirloom Tomato Galette section.
Storage Info
How to Store Leftovers
Leftover galette can be stored easily. First, let it cool completely. Then, place it in an airtight container. You can also wrap it in plastic wrap. Store it in the fridge for up to 3 days. This keeps the flavors fresh and tasty.
Reheating Tips for Optimal Taste
To reheat, preheat your oven to 350°F (175°C). Place the galette on a baking sheet. Heat it for about 10-15 minutes. This way, the crust stays crisp. You can also use a microwave if you’re in a hurry. Just heat it for one minute, but the crust may not be as good.
Freezing the Galette for Future Meals
Freezing is a great option for future meals. First, let the galette cool completely. Then, wrap it tightly in plastic wrap. After that, place it in a freezer bag. It can last up to 3 months in the freezer. When you’re ready to eat, thaw it in the fridge overnight before reheating. This keeps the taste and texture just right.
FAQs
Can I use other types of tomatoes?
Yes, you can use other tomatoes. While heirloom tomatoes shine in flavor, you can swap them with Roma or vine-ripe tomatoes. These types offer a good taste and hold up well in the oven. Just remember to slice them evenly. This will help them cook properly and look nice in your galette.
How do I know when the galette is done?
The galette is done when it turns golden brown. Check if the crust looks crisp and the tomatoes bubble slightly. You can also poke a fork into the filling; if it’s hot and soft, you’re ready to serve. A good tip is to watch the edges closely. They should look flaky and browned.
What can I serve with the galette?
This galette pairs well with a simple salad. A mix of greens, like arugula or spinach, adds freshness. You can also serve it with a light vinaigrette for extra flavor. If you want a heartier meal, pair it with grilled chicken or fish. A glass of white wine could enhance the whole experience.
Full Recipe for Delicious Heirloom Tomato Galette
You can find the full recipe for this delicious heirloom tomato galette earlier in this article. It guides you step-by-step to create a perfect dish. Enjoy cooking!
This blog post covered how to make a delicious heirloom tomato galette. We discussed key ingredients, like the best tomatoes and optional flavors. You learned step-by-step directions for dough, filling, and baking. I shared tips for the perfect crust and serving ideas. You also explored variations, storage tips, and answered common questions.
Making this galette is simple and rewarding. Enjoy your cooking and share your tasty creations!
