If you crave a treat that combines the rich taste of brownies with the classic cookie goodness, you’re in for a delight! Today, I’ll share my recipe for the BEST fudgy chewy brookies that are simple and oh-so-delicious. With just a few key ingredients and easy steps, you can impress your friends and family with these mouthwatering treats. Let’s dive in and make your dessert dreams come true!
Ingredients
Brownie Layer Ingredients
– 1/2 cup (1 stick) unsalted butter
– 1 cup granulated sugar
– 2 large eggs
– 1 teaspoon vanilla extract
– 1/3 cup unsweetened cocoa powder
– 1/2 cup all-purpose flour
– 1/4 teaspoon salt
– 1/4 teaspoon baking powder
– 1/2 cup semi-sweet chocolate chips
Using quality ingredients is key for a great brownie layer. Unsalted butter gives you control over salt. Granulated sugar helps create that nice chew. The eggs add moisture and binding.
When measuring, use dry measuring cups for flour and cocoa. Fill them lightly, then level off with a knife. This helps avoid too much dry mix, which can make brownies dry.
Cookie Layer Ingredients
– 1/2 cup (1 stick) unsalted butter, softened
– 1/2 cup brown sugar
– 1/4 cup granulated sugar
– 1 large egg
– 1 teaspoon vanilla extract
– 1 1/4 cups all-purpose flour
– 1/2 teaspoon baking soda
– 1/4 teaspoon salt
– 1/2 cup semi-sweet chocolate chips
Brown sugar adds moisture and a hint of caramel flavor. Granulated sugar helps with the cookie’s spread. Softened butter is important too. It mixes better with sugars, giving the right texture.
Room temperature butter blends easily. If it’s too cold, it won’t mix well. If you forgot to set it out, microwave it for 10 seconds. This will soften it just right for mixing.
For the full recipe, check the detailed instructions for this delicious treat.
Step-by-Step Instructions
Preparation Steps Overview
First, gather your tools. You will need a medium saucepan, mixing bowls, a whisk, and a spatula. Also, grab a 9×9 inch baking pan. Grease it or line it with parchment paper for easy removal. This will help make your brookies come out nice and clean.
Making the Brownie Layer
To make the brownie layer, start by melting the unsalted butter in a saucepan over low heat. Be careful to stir it often, so it doesn’t burn. Once melted, take it off the heat. Next, mix in the granulated sugar, eggs, and vanilla extract. Stir until everything is well combined.
Now, add in the cocoa powder, flour, salt, and baking powder. Mix this until just combined. Don’t overmix, or your brownies may become tough. Finally, fold in the semi-sweet chocolate chips. This brownie batter will be rich and fudgy. Pour it into your prepared pan and spread it evenly across the bottom.
Preparing the Cookie Layer
For the cookie layer, cream the softened butter with the brown and granulated sugars. Mix until it feels light and fluffy. Then, add the egg and vanilla extract. Beat these together until smooth. In a separate bowl, combine the flour, baking soda, and salt. Gradually add the dry mix to the wet mix. Stir until you just see no dry flour.
Fold in the chocolate chips. The dough should be thick and slightly sticky, but not too wet. If it feels too dry, add a tiny splash of milk.
Assembling the Brookies
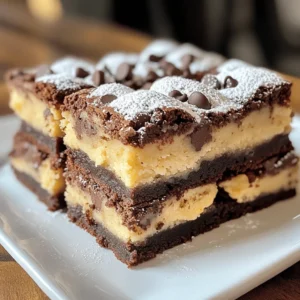
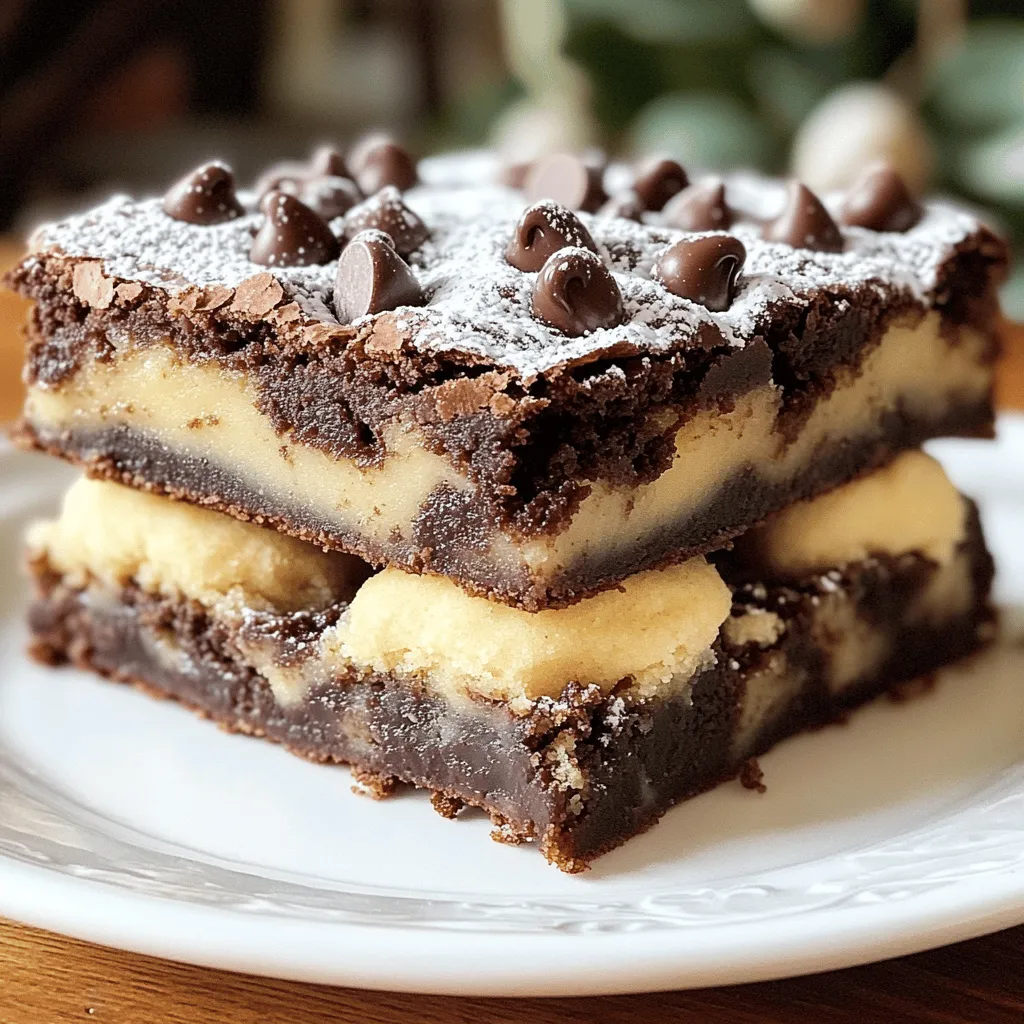
Now it’s time to assemble! Take spoonfuls of the cookie dough and dollop them on top of the brownie layer. Spread it out gently, but leave some brownie visible. This is key for the swirl effect. You want to see both layers. Using a spatula, you can lightly swirl the cookie dough into the brownie layer. Be careful not to mix them completely.
Baking and Cooling Instructions
Bake your brookies in the preheated oven at 350°F (175°C) for 25-30 minutes. To check for doneness, stick a toothpick in the center. It should come out with a few moist crumbs, not wet batter. Once done, let them cool in the pan for about 10-15 minutes. This cooling time is important. It helps them set and makes cutting easier. After cooling, transfer them to a wire rack to cool completely.
Now, you’re ready to enjoy your delicious brookies! For the full recipe, check out the details above.
Tips & Tricks
Perfecting the Fudgy Texture
To get that perfect fudgy texture, keep an eye on your oven’s temperature. If it runs hot, your brookies can bake too fast. Use an oven thermometer to check the heat. I recommend baking at 350°F. This temperature lets the brownies stay soft inside while the top gets a nice crust.
Adjusting baking time is key. Start checking your brookies at 25 minutes. Insert a toothpick into the center. If it comes out with a few moist crumbs, they are ready. Overbaking can ruin that gooey texture you want.
Enhancing Flavor
Mix-ins can take your brookies to the next level. Try adding nuts, caramel bits, or even peanut butter swirls. These add fun textures and flavors. You can also use different types of chocolate chips. Dark chocolate gives a rich taste, while white chocolate adds sweetness.
Quality matters too. Use high-quality chocolate for the best results. Good chocolate melts beautifully and enhances the flavor of your brookies. Always taste your chocolate before using it.
Common Mistakes to Avoid
Watch out for issues with batter ratios. If you add too much flour, your brookies will be dry. Always measure carefully. I use a kitchen scale for the best accuracy.
Overbaking is another common mistake. If your brookies bake too long, they lose that chewy texture. Keep an eye on them and trust your toothpick test. Underbaking can be tricky too. If your brookies are too gooey, they may fall apart when cutting. Aim for that perfect balance.
For the full recipe, check out The BEST Fudgy Chewy Brookies.
Variations
Flavor Variations
You can make brookies even more fun by adding nuts or caramel. Try walnuts for a nice crunch. Or, swirl in caramel for a sweet surprise. You can also experiment with different types of chocolate chips. Use dark chocolate for a rich taste. Or, try white chocolate for a creamy twist.
Dietary Alternatives
If you need gluten-free options, swap all-purpose flour for a gluten-free blend. This will keep your brookies tasty and safe. For vegan substitutions, use plant-based butter and a flaxseed egg instead of regular eggs. Mix one tablespoon of flaxseed meal with three tablespoons of water for each egg. These changes help everyone enjoy brookies!
Seasonal Variations
Get creative with holiday-themed ingredients. Add peppermint extract for a wintery flavor. Or, mix in chopped dried fruit in the fall. This gives your brookies a seasonal touch. You can also incorporate flavors like pumpkin spice or gingerbread for festive vibes. These variations make your brookies special for any occasion.
For more detailed instructions, check out the Full Recipe.
Storage Info
Storing Brookies
To keep your brookies fresh, let them cool completely. This step is key. If you store warm brookies, moisture builds up. It makes them soggy. Place the brookies on a wire rack. This helps air flow around them, ensuring they cool down well. Once cooled, pack them in an airtight container. A glass or plastic container works best. This keeps them soft and chewy for days.
Freezing Tips
Want to save some brookies for later? You can freeze them! First, cut them into squares. Wrap each piece in plastic wrap. Then, place the wrapped brookies in a freezer bag. Remove as much air as you can. This helps prevent freezer burn. To thaw, take them out and leave them at room temperature. For the best taste, enjoy them within three months.
Reheating Instructions
To enjoy brookies warm, preheat your oven to 350°F (175°C). Place a few brookies on a baking sheet. Heat for about 5-10 minutes. This warms them up without drying them out. You can also use a microwave. Heat for just 10-15 seconds. This keeps the center gooey. Enjoy your brookies warm, with a scoop of ice cream for an extra treat!
FAQs
How to make brookies from scratch?
To make brookies from scratch, follow these steps:
1. Preheat Your Oven: Set your oven to 350°F (175°C). Grease or line a 9×9 inch pan.
2. Make the Brownie Layer: Melt butter, mix in sugar, eggs, and vanilla. Add cocoa, flour, salt, and baking powder. Fold in chocolate chips. Pour into the pan.
3. Prepare the Cookie Layer: Cream butter and sugars, then mix in egg and vanilla. Combine flour, baking soda, and salt in a bowl. Mix dry ingredients into the wet. Fold in chocolate chips.
4. Assemble the Brookies: Spoon cookie dough over the brownie layer, leaving some brownie visible for swirls.
5. Bake: Bake for 25-30 minutes. Check doneness with a toothpick.
6. Cool and Serve: Let cool for 10-15 minutes, then cut into squares.
Why are my brookies not chewy?
If your brookies lack chewiness, a few factors might be at play:
– Overmixing: Mixing too much can lead to tough brookies. Mix just until combined.
– Baking Time: Overbaking dries them out. Check for moist crumbs.
– Flour Type: Using too much all-purpose flour can affect chewiness. Measure accurately and use a scale if possible.
Can I use different types of flour?
Yes, you can use different flours, but it changes the texture:
– Whole Wheat Flour: Adds a nutty flavor but can make them denser.
– Almond Flour: Creates a moist brookie but may need extra binding.
– Gluten-Free Flour: Use a blend designed for baking for best results.
What can I substitute for eggs?
If you need egg substitutes, try these options:
– Flaxseed Meal: Mix 1 tablespoon of flaxseed with 3 tablespoons of water for one egg.
– Applesauce: Use 1/4 cup of unsweetened applesauce per egg.
– Mashed Banana: Substitute 1/4 cup of mashed banana for each egg.
How do I know when brookies are done baking?
To check if your brookies are done:
– Toothpick Test: Insert a toothpick in the center. It should come out with a few moist crumbs.
– Visual Cues: Edges should look set, while the center may still be soft.
Can I make brookies ahead of time?
Yes, you can prepare brookies ahead of time:
– Pre-baking: You can mix the batters and store them in the fridge for up to 24 hours.
– Baked Brookies: Store in an airtight container at room temperature for up to 3 days. For longer storage, freeze them.
In this blog post, we explored the delicious world of brookies, blending brownies and cookies. I shared key ingredients and their importance, including tips for perfecting texture and flavor. We covered each step, from making layers to achieving the perfect swirl. Also, I provided handy tips and variations to tailor your brookies to your taste. Now, with storage advice and answers to your FAQs, you’re ready to bake. Enjoy your brookies warm or chilled, and remember: practice makes perfect!