Sheet Pan Green Chile Chicken Taquitos Recipe Delight

WANT TO SAVE THIS RECIPE?

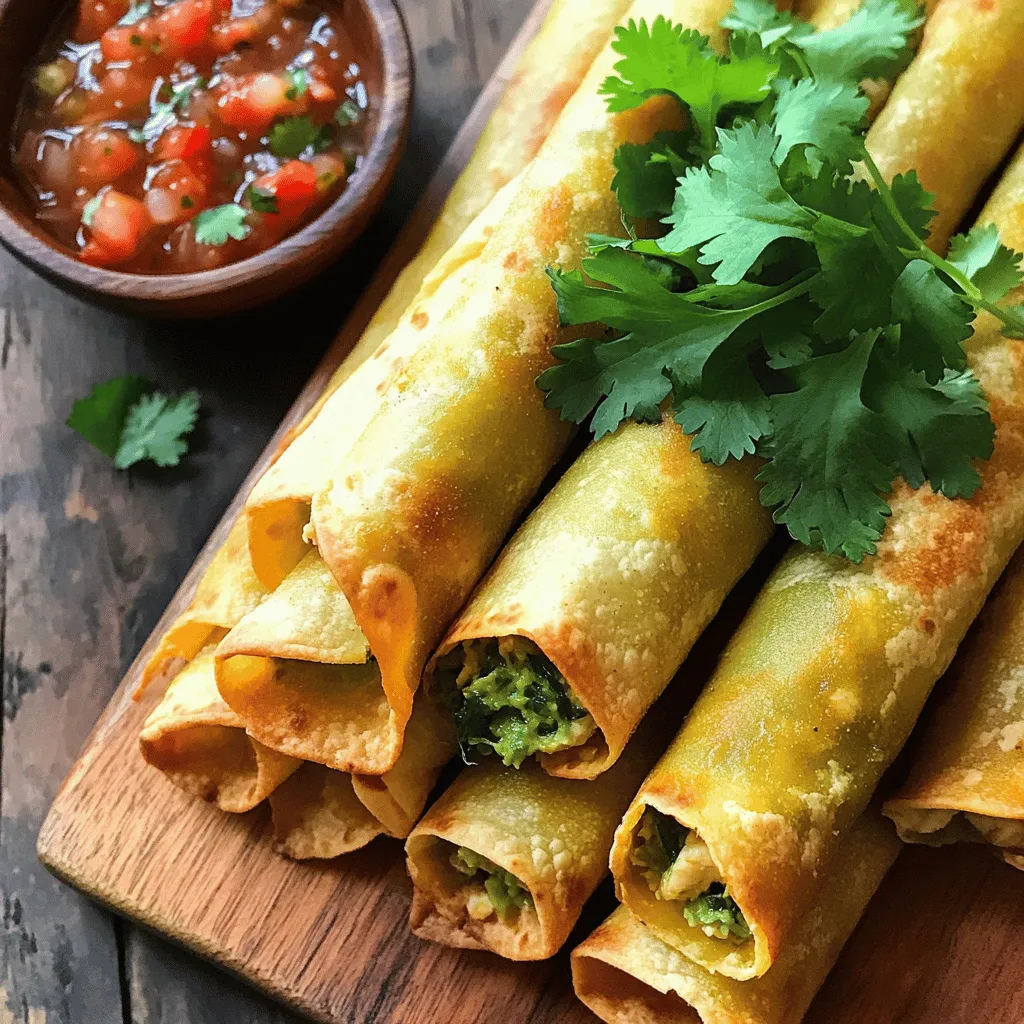
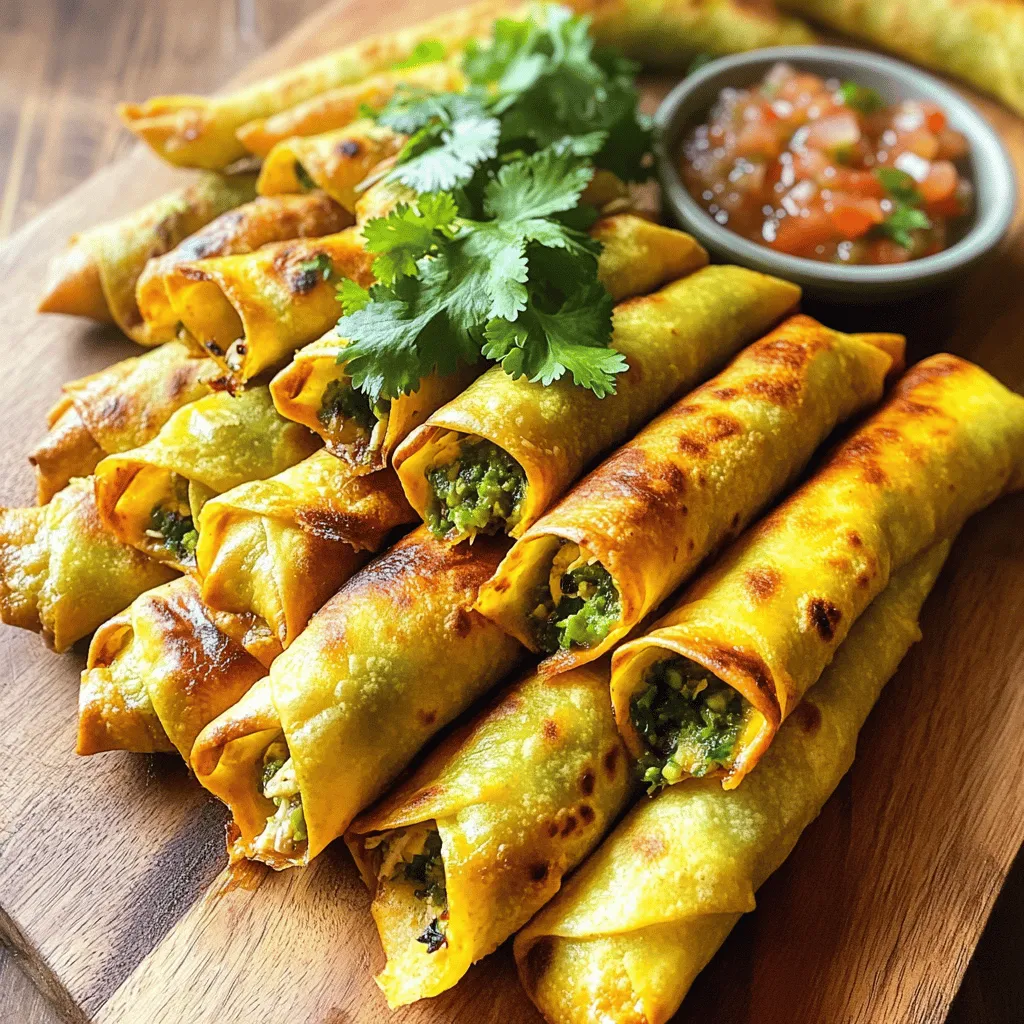
If you crave a quick and tasty meal, try my Sheet Pan Green Chile Chicken Taquitos! This easy recipe brings bold flavors that will delight your taste buds. You’ll love the mix of shredded chicken, green chiles, and creamy cheese all wrapped in warm tortillas. Plus, baking instead of frying keeps things simple and healthy. Let’s get started on these delicious taquitos that are perfect for any night of the week!

Ingredients

Main Ingredients

– 2 cups shredded cooked chicken

– 1 cup green chiles (canned, diced)

– 1 cup shredded Monterey Jack cheese

– 1/2 cup cream cheese, softened

These main ingredients create a rich and tasty filling. The shredded chicken provides a hearty base. Green chiles add a nice kick of flavor. Monterey Jack cheese melts beautifully, while cream cheese gives creaminess. Together, they make a delightful blend that fills your taquitos.

Spices and Seasonings

– 1 teaspoon cumin

– 1 teaspoon garlic powder

– 1/2 teaspoon onion powder

– 1/4 teaspoon cayenne pepper (optional for extra spice)

– Salt and pepper to taste

Spices are the magic in this recipe. Cumin adds warmth and depth. Garlic powder gives it a savory punch. Onion powder enhances the flavor without being too strong. Cayenne pepper can boost the heat, but it’s optional. Don’t forget to season with salt and pepper to taste!

Additional Items

– 12 small corn tortillas

– Olive oil spray

– Fresh cilantro, chopped (for garnish)

– Salsa (for serving)

Corn tortillas are perfect for wrapping. They hold the filling well and crisp up nicely. A light spray of olive oil helps them turn golden. Fresh cilantro brightens the dish and adds color. Salsa is fantastic for dipping and adds another layer of flavor.

Step-by-Step Instructions

Preparing the Oven and Ingredients

1. Preheating the oven: Start by preheating your oven to 400°F (200°C). This step is key for getting those taquitos crispy. Line a sheet pan with parchment paper; it keeps them from sticking.

2. Preparing the filling: In a bowl, combine 2 cups of shredded chicken, 1 cup of diced green chiles, 1 cup of shredded Monterey Jack cheese, and 1/2 cup of softened cream cheese. Add 1 teaspoon of cumin, 1 teaspoon of garlic powder, and 1/2 teaspoon of onion powder. If you like heat, toss in 1/4 teaspoon of cayenne pepper. Season with salt and pepper to taste. Mix it all until it’s smooth.

Assembling the Taquitos

1. Warming the tortillas: To make the corn tortillas soft and easy to roll, wrap them in a damp paper towel. Microwave them for about 30 seconds. This step helps prevent tears.

2. Rolling and sealing the taquitos: Take a warm tortilla and place about 2-3 tablespoons of the filling near one edge. Roll it tightly, folding in the sides as you go. Make sure the seam is down when you place it on the pan. Repeat this with all the tortillas.

Baking the Taquitos

1. Placing on the sheet pan: Lay the rolled taquitos seam side down on the lined sheet pan. This helps them stay together while baking. Lightly spray the tops with olive oil. This adds crispiness and flavor.

2. Baking instructions and tips: Put the sheet pan in the preheated oven. Bake for 20-25 minutes until they turn golden brown and crispy. Flip them halfway through for even cooking. Keep an eye on them to get your desired crispiness.

Tips & Tricks

Achieving the Perfect Crispiness

To get crispy taquitos, olive oil spray is key. A light spray helps the tortillas crisp up nicely. It also adds great flavor without too much oil. When baking, flip the taquitos halfway. This step ensures both sides get golden brown and crunchy.

Making Ahead

You can prepare these taquitos in advance. Mix the filling and roll the taquitos early in the day. Store them in the fridge until you’re ready to bake. For storage, cover the taquitos with plastic wrap. This keeps them fresh and prevents drying out before baking.

Serving Suggestions

Taquitos pair well with many sides. Try a fresh salad, rice, or beans for balance. Dips can elevate your meal. Serve with salsa for a zesty kick. You can also add guacamole or sour cream to enhance the flavors. Fresh cilantro makes a lovely garnish, adding color and taste.

Variations

Substituting Ingredients

You can change a few things in this recipe. First, for protein, use shredded beef or beans instead of chicken. Both options taste great and fit well with the flavors. If you want to try something new, use pulled pork, too.

For a dairy-free option, skip the cream cheese and swap in a dairy-free cheese. You can find many kinds that melt well. This keeps the dish creamy without using dairy.

Spice Level Adjustments

Not everyone likes spice, and that’s okay! For a milder version, leave out the cayenne pepper. You can also use sweet green chiles instead of the regular ones. This keeps the flavor without the heat.

If you love spice, add more cayenne or even some diced jalapeños. You can also mix in smoked paprika for a warm flavor. Experimenting with spices makes cooking fun!

Presentation Ideas

Plating your taquitos can impress your guests. Try serving them on a colorful plate. Arrange them in a fan shape for a nice look.

For garnishing, sprinkle fresh chopped cilantro on top. You can also add avocado slices or a dollop of sour cream. If you want a pop of color, use diced tomatoes or a drizzle of salsa. These small touches make your dish shine!

Storage Info

Storing Leftovers

After enjoying your taquitos, store any leftovers in the fridge. Place them in an airtight container. They will stay fresh for about 3 to 4 days. If you want to keep them longer, freeze them. Wrap each taquito in plastic wrap, then place them in a freezer bag. They can last up to 2 months in the freezer.

Reheating Instructions

To bring back that crispy texture, reheat your taquitos in the oven. Preheat your oven to 375°F (190°C). Place the taquitos on a baking sheet and heat for about 10 to 15 minutes. For a quick method, use the air fryer. Heat them at 350°F (175°C) for about 5 to 7 minutes. Avoid microwaving as it makes them soggy.

Shelf Life

In the fridge, taquitos last about 3 to 4 days. If frozen, they can stay good for up to 2 months. Always check for any signs of spoilage before eating. If they smell off or look strange, it’s best to toss them.

FAQs

Can I use flour tortillas instead of corn?

You can use flour tortillas, but they change the taste. Corn tortillas offer a nice corn flavor and crisp texture. They also hold the filling well. Flour tortillas are softer and easier to roll, but may get soggy. Choose based on your taste and texture preference.

How can I make these taquitos healthier?

You can swap some ingredients for healthier options. Use lean chicken, like turkey, for a lower fat meal. Replace cream cheese with Greek yogurt for added protein. You can also add veggies, like spinach or bell peppers, to boost nutrition. Use whole grain tortillas for extra fiber.

What can I serve with my taquitos?

Taquitos pair well with many sides. Try serving them with fresh salsa or guacamole. A side salad adds crunch and freshness. You can also serve them with rice or beans for a filling meal. For a fun twist, add corn on the side!

Taquitos are a fantastic dish to make at home. We covered key ingredients like chicken, cheese, and spices. You learned how to assemble and bake them for a crispy finish. Tips on prepping ahead and storage are also helpful. Feel free to adjust flavors and presentation to suit your taste. Enjoy experimenting with this fun recipe that can fit any meal. Try pairing them with your favorite dips for an even better experience. Happy cooking!

- 2 cups shredded cooked chicken - 1 cup green chiles (canned, diced) - 1 cup shredded Monterey Jack cheese - 1/2 cup cream cheese, softened These main ingredients create a rich and tasty filling. The shredded chicken provides a hearty base. Green chiles add a nice kick of flavor. Monterey Jack cheese melts beautifully, while cream cheese gives creaminess. Together, they make a delightful blend that fills your taquitos. - 1 teaspoon cumin - 1 teaspoon garlic powder - 1/2 teaspoon onion powder - 1/4 teaspoon cayenne pepper (optional for extra spice) - Salt and pepper to taste Spices are the magic in this recipe. Cumin adds warmth and depth. Garlic powder gives it a savory punch. Onion powder enhances the flavor without being too strong. Cayenne pepper can boost the heat, but it's optional. Don't forget to season with salt and pepper to taste! - 12 small corn tortillas - Olive oil spray - Fresh cilantro, chopped (for garnish) - Salsa (for serving) Corn tortillas are perfect for wrapping. They hold the filling well and crisp up nicely. A light spray of olive oil helps them turn golden. Fresh cilantro brightens the dish and adds color. Salsa is fantastic for dipping and adds another layer of flavor. 1. Preheating the oven: Start by preheating your oven to 400°F (200°C). This step is key for getting those taquitos crispy. Line a sheet pan with parchment paper; it keeps them from sticking. 2. Preparing the filling: In a bowl, combine 2 cups of shredded chicken, 1 cup of diced green chiles, 1 cup of shredded Monterey Jack cheese, and 1/2 cup of softened cream cheese. Add 1 teaspoon of cumin, 1 teaspoon of garlic powder, and 1/2 teaspoon of onion powder. If you like heat, toss in 1/4 teaspoon of cayenne pepper. Season with salt and pepper to taste. Mix it all until it’s smooth. 1. Warming the tortillas: To make the corn tortillas soft and easy to roll, wrap them in a damp paper towel. Microwave them for about 30 seconds. This step helps prevent tears. 2. Rolling and sealing the taquitos: Take a warm tortilla and place about 2-3 tablespoons of the filling near one edge. Roll it tightly, folding in the sides as you go. Make sure the seam is down when you place it on the pan. Repeat this with all the tortillas. 1. Placing on the sheet pan: Lay the rolled taquitos seam side down on the lined sheet pan. This helps them stay together while baking. Lightly spray the tops with olive oil. This adds crispiness and flavor. 2. Baking instructions and tips: Put the sheet pan in the preheated oven. Bake for 20-25 minutes until they turn golden brown and crispy. Flip them halfway through for even cooking. Keep an eye on them to get your desired crispiness. To get crispy taquitos, olive oil spray is key. A light spray helps the tortillas crisp up nicely. It also adds great flavor without too much oil. When baking, flip the taquitos halfway. This step ensures both sides get golden brown and crunchy. You can prepare these taquitos in advance. Mix the filling and roll the taquitos early in the day. Store them in the fridge until you're ready to bake. For storage, cover the taquitos with plastic wrap. This keeps them fresh and prevents drying out before baking. Taquitos pair well with many sides. Try a fresh salad, rice, or beans for balance. Dips can elevate your meal. Serve with salsa for a zesty kick. You can also add guacamole or sour cream to enhance the flavors. Fresh cilantro makes a lovely garnish, adding color and taste. {{image_2}} You can change a few things in this recipe. First, for protein, use shredded beef or beans instead of chicken. Both options taste great and fit well with the flavors. If you want to try something new, use pulled pork, too. For a dairy-free option, skip the cream cheese and swap in a dairy-free cheese. You can find many kinds that melt well. This keeps the dish creamy without using dairy. Not everyone likes spice, and that's okay! For a milder version, leave out the cayenne pepper. You can also use sweet green chiles instead of the regular ones. This keeps the flavor without the heat. If you love spice, add more cayenne or even some diced jalapeños. You can also mix in smoked paprika for a warm flavor. Experimenting with spices makes cooking fun! Plating your taquitos can impress your guests. Try serving them on a colorful plate. Arrange them in a fan shape for a nice look. For garnishing, sprinkle fresh chopped cilantro on top. You can also add avocado slices or a dollop of sour cream. If you want a pop of color, use diced tomatoes or a drizzle of salsa. These small touches make your dish shine! After enjoying your taquitos, store any leftovers in the fridge. Place them in an airtight container. They will stay fresh for about 3 to 4 days. If you want to keep them longer, freeze them. Wrap each taquito in plastic wrap, then place them in a freezer bag. They can last up to 2 months in the freezer. To bring back that crispy texture, reheat your taquitos in the oven. Preheat your oven to 375°F (190°C). Place the taquitos on a baking sheet and heat for about 10 to 15 minutes. For a quick method, use the air fryer. Heat them at 350°F (175°C) for about 5 to 7 minutes. Avoid microwaving as it makes them soggy. In the fridge, taquitos last about 3 to 4 days. If frozen, they can stay good for up to 2 months. Always check for any signs of spoilage before eating. If they smell off or look strange, it's best to toss them. You can use flour tortillas, but they change the taste. Corn tortillas offer a nice corn flavor and crisp texture. They also hold the filling well. Flour tortillas are softer and easier to roll, but may get soggy. Choose based on your taste and texture preference. You can swap some ingredients for healthier options. Use lean chicken, like turkey, for a lower fat meal. Replace cream cheese with Greek yogurt for added protein. You can also add veggies, like spinach or bell peppers, to boost nutrition. Use whole grain tortillas for extra fiber. Taquitos pair well with many sides. Try serving them with fresh salsa or guacamole. A side salad adds crunch and freshness. You can also serve them with rice or beans for a filling meal. For a fun twist, add corn on the side! Taquitos are a fantastic dish to make at home. We covered key ingredients like chicken, cheese, and spices. You learned how to assemble and bake them for a crispy finish. Tips on prepping ahead and storage are also helpful. Feel free to adjust flavors and presentation to suit your taste. Enjoy experimenting with this fun recipe that can fit any meal. Try pairing them with your favorite dips for an even better experience. Happy cooking!

Sheet Pan Green Chile Chicken Taquitos

Savor the crunch of these Crispy Green Chile Chicken Taquitos! Perfect for game days or a cozy family dinner, this easy recipe combines shredded chicken, zesty green chiles, and creamy cheese wrapped in crispy tortillas. In just 40 minutes, you can whip up a delicious dish that will impress everyone. Click through to explore the full recipe and bring flavorful fun to your table!

Ingredients
  

2 cups shredded cooked chicken

1 cup green chiles (canned, diced)

1 cup shredded Monterey Jack cheese

1/2 cup cream cheese, softened

1 teaspoon cumin

1 teaspoon garlic powder

1/2 teaspoon onion powder

1/4 teaspoon cayenne pepper (optional for extra spice)

Salt and pepper to taste

12 small corn tortillas

Olive oil spray

Fresh cilantro, chopped (for garnish)

Salsa (for serving)

Instructions
 

Preheat the Oven: Preheat your oven to 400°F (200°C) and line a sheet pan with parchment paper.

    Prepare the Filling: In a bowl, combine the shredded chicken, green chiles, Monterey Jack cheese, cream cheese, cumin, garlic powder, onion powder, and cayenne pepper. Mix until well blended. Season with salt and pepper to taste.

      Warm the Tortillas: To make the corn tortillas pliable, microwave them in a damp paper towel for about 30 seconds.

        Assemble the Taquitos: Take a tortilla and place about 2-3 tablespoons of the chicken filling near one edge. Roll it tightly, tucking in the sides as you go. Repeat with all tortillas.

          Arrange on Sheet Pan: Place the rolled taquitos seam side down on the prepared sheet pan. Lightly spray the tops with olive oil to promote crispiness.

            Bake: Bake in the preheated oven for 20-25 minutes or until golden brown and crispy, flipping halfway through for even cooking.

              Serve: Remove from the oven and let cool for a few minutes before serving. Garnish with chopped cilantro and serve with salsa on the side for dipping.

                Prep Time: 15 minutes | Total Time: 40 minutes | Servings: 4-6

                  WANT TO SAVE THIS RECIPE?