![- 1 ½ cups graham cracker crumbs - ½ cup unsalted butter, melted - 2 cups cream cheese, softened - 1 cup sugar - 3 large eggs - 1 cup sour cream These key ingredients form the base of our red velvet cheesecake. The graham cracker crumbs create a nice crust. The unsalted butter binds the crumbs together. Cream cheese gives the cheesecake its rich and creamy texture. Sugar sweetens the filling. Eggs help set the cheesecake. Sour cream adds a nice tanginess. - 1 tablespoon cocoa powder - 1 tablespoon red food coloring - ½ teaspoon baking soda - ½ teaspoon salt Here, we add special ingredients for flavor and color. Cocoa powder gives a hint of chocolate flavor. Red food coloring makes the cheesecake vibrant and eye-catching. Baking soda helps the cheesecake rise. Salt enhances all the flavors. These ingredients make the cheesecake unique and delicious. - Whipped cream - Fresh raspberries or strawberries For a finishing touch, consider optional toppings. Whipped cream adds a light, fluffy layer on top. Fresh raspberries or strawberries give a pop of color and freshness. They also provide a nice tart contrast to the sweet cheesecake. You can get creative with these toppings. For the full recipe, check out the [Full Recipe]. - Preheat the oven to 325°F (163°C). - In a bowl, combine 1 ½ cups of graham cracker crumbs, ½ cup of melted unsalted butter, and 1 tablespoon of sugar. Mix these ingredients well until the crumbs are moistened. Then, press this mixture firmly into the bottom of a 9-inch springform pan. This forms a solid base for your cheesecake. Bake the crust for 10 minutes. Once done, take it out and let it cool while you make the filling. - In a large bowl, beat 2 cups of softened cream cheese until it’s smooth. - Gradually add 1 cup of sugar and 1 teaspoon of vanilla extract. Mix until well combined. Add 3 large eggs one at a time, mixing well after each. Then, stir in 1 cup of sour cream. Next, add 1 ½ cups of all-purpose flour, 1 tablespoon of cocoa powder, 1 tablespoon of red food coloring, ½ teaspoon of baking soda, and ½ teaspoon of salt. Mix everything until the batter is smooth and creamy. - Pour the cheesecake batter into the cooled crust. - Tap the pan gently on the counter to remove any air bubbles. Place the pan in the preheated oven and bake for about 55-60 minutes. You know it's done when the edges are set and the center jiggles slightly. Once baked, turn off the oven and crack the door. Let the cheesecake cool inside for 1 hour. After that, move it to the fridge to chill for at least 4 hours or overnight for the best taste. To learn more about how to make this dessert, check the Full Recipe for all the details. To get the best texture for your red velvet cheesecake, start with room temperature ingredients. This means letting your cream cheese and eggs sit out for about 30 minutes before you mix them. Room temperature ingredients blend better and create a smooth batter. Next, avoid overmixing. Mix just until the ingredients combine. Overmixing adds too much air and can make your cheesecake crack. Gentle mixing helps keep it creamy and dense. Monitoring your oven temperature is key. An oven thermometer can help ensure the heat is just right. Too hot, and the cheesecake can bake too fast. Too cool, and it might not set properly. After baking, let the cheesecake cool gradually. Turn off the oven, crack the door, and let it sit for an hour. This helps prevent sudden changes in temperature that can cause cracks. Then, chill it in the refrigerator for at least four hours or overnight for the best flavor. When it’s time to serve, slice your cheesecake with a hot knife. Dip the knife in hot water, wipe it, then cut. This helps make clean slices and shows off the beautiful layers. For pairing, consider fresh fruits like berries. Their tartness balances the rich cheesecake. A drizzle of chocolate or caramel sauce can add extra sweetness. Another fun option is a scoop of vanilla ice cream on the side. Want more tips? Check the Full Recipe for more ideas. {{image_2}} You can make red velvet cheesecake even more fun by adding different flavors. One popular choice is chocolate swirl red velvet cheesecake. To make this, simply add melted chocolate to half of the cheesecake batter. Swirl it gently into the plain batter before baking. This gives you rich chocolate flavor and a beautiful look. Another fun option is Neapolitan-style variations. You can divide the batter into three parts: red velvet, chocolate, and vanilla. Layer them in the pan to create a lovely three-color cheesecake. This mix of flavors makes for a delightful treat. If you need gluten-free options, you can easily make a gluten-free crust. Use gluten-free graham crackers instead of regular ones. You can also use almond flour mixed with melted butter for a tasty crust. For a vegan red velvet cheesecake, replace cream cheese with vegan cream cheese. Use flax eggs or a commercial egg replacer instead of real eggs. You can also swap sour cream with a non-dairy yogurt. These ideas will help you enjoy cheesecake while sticking to your diet. You can make red velvet cheesecake fit any holiday. For example, during Christmas, add peppermint extract to the batter. Top it with crushed candy canes for a festive touch. In summer, fresh berries are a great topping. Use strawberries, blueberries, or raspberries to add color and flavor. This makes your cheesecake even more appealing and refreshing. For the full recipe, check out the complete instructions to create these variations. Refrigerate any leftover red velvet cheesecake. Place it in an airtight container. You can also cover it with plastic wrap. This keeps it fresh and prevents it from drying out. You can freeze red velvet cheesecake for up to three months. First, let it cool completely. Wrap it tightly in plastic wrap, then in aluminum foil. This method protects it from freezer burn. To thaw, place it in the fridge overnight. This keeps the texture smooth and creamy. Leftover cheesecake lasts about five days in the fridge. After that, it may lose taste and texture. Always check for signs of spoilage before eating. If it looks or smells off, it’s best to throw it away. Enjoy your dessert while it’s fresh! For the full recipe, check out the Red Velvet Cheesecake . Red velvet cake is a soft, moist cake with a hint of cocoa. It has a rich, buttery flavor and often includes cream cheese frosting. Cheesecake, on the other hand, is a creamy dessert made from cheese, sugar, and eggs. Red velvet cheesecake combines both, giving you a cake-like texture with creamy cheese filling. Yes, you can use other pans for your cheesecake. If you do not have a springform pan, use a regular cake pan. Just remember to line it with parchment paper. A cast-iron skillet also works well for a unique look. Just make sure the pan can handle the heat. Cracking happens for a few reasons. If the oven is too hot, the cheesecake cooks too fast. This causes cracks. Overmixing the batter can also lead to air bubbles that expand and crack the top. To prevent this, bake at a lower temperature and mix just until smooth. Cheesecake should not stay out for long. It is best to keep it in the fridge when not serving. If you leave it out, don’t let it sit for more than two hours. After that, it can spoil and become unsafe to eat. For best results, enjoy your cheesecake chilled. You can find the full recipe for making red velvet cheesecake in the previous sections. You now have a complete guide to making red velvet cheesecake. We covered key ingredients, step-by-step instructions, and tips for the best results. Remember to monitor your baking for perfect texture and presentation. You can also explore variations, dietary changes, and storage tips to enjoy later. Red velvet cheesecake is fun to make and share. Try different flavors or toppings for a twist. Enjoy making this sweet treat that impresses every time. Now it’s your turn to bake!](https://toastedrecipes.com/wp-content/uploads/2025/04/0ba52014-3ea4-4dde-93c7-9fd99432cb01.webp)
Do you crave something rich, creamy, and simply delicious? Then you’re in for a treat! My Red Velvet Cheesecake combines classic velvety cake flavors with smooth cheesecake for the ultimate dessert experience. It’s easy to make and perfect for any occasion. Follow me as I guide you through this simple yet irresistible recipe that will have everyone asking for seconds. Get ready to impress with every slice!
Ingredients
Key Ingredients for Red Velvet Cheesecake
– 1 ½ cups graham cracker crumbs
– ½ cup unsalted butter, melted
– 2 cups cream cheese, softened
– 1 cup sugar
– 3 large eggs
– 1 cup sour cream
These key ingredients form the base of our red velvet cheesecake. The graham cracker crumbs create a nice crust. The unsalted butter binds the crumbs together. Cream cheese gives the cheesecake its rich and creamy texture. Sugar sweetens the filling. Eggs help set the cheesecake. Sour cream adds a nice tanginess.
Special Ingredients for Flavor and Color
– 1 tablespoon cocoa powder
– 1 tablespoon red food coloring
– ½ teaspoon baking soda
– ½ teaspoon salt
Here, we add special ingredients for flavor and color. Cocoa powder gives a hint of chocolate flavor. Red food coloring makes the cheesecake vibrant and eye-catching. Baking soda helps the cheesecake rise. Salt enhances all the flavors. These ingredients make the cheesecake unique and delicious.
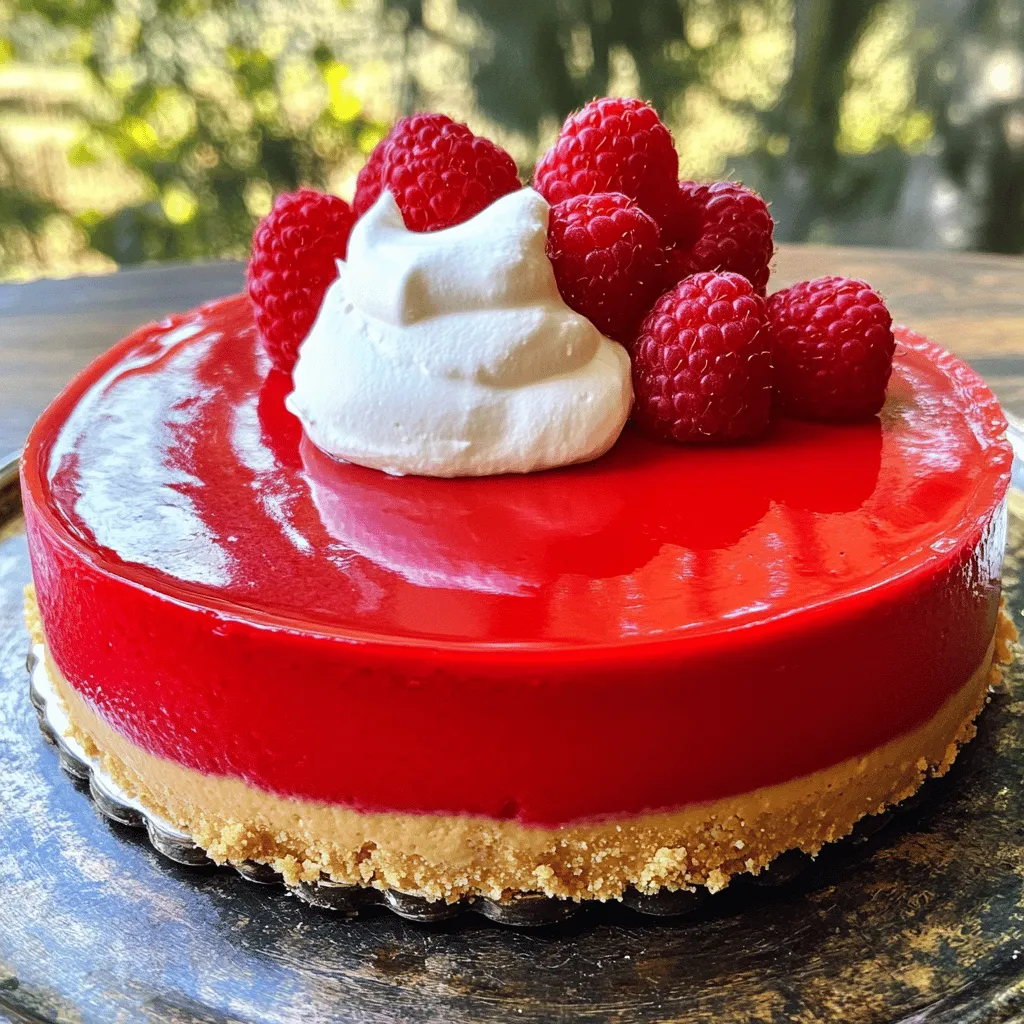
Optional Toppings and Garnishes
– Whipped cream
– Fresh raspberries or strawberries
For a finishing touch, consider optional toppings. Whipped cream adds a light, fluffy layer on top. Fresh raspberries or strawberries give a pop of color and freshness. They also provide a nice tart contrast to the sweet cheesecake. You can get creative with these toppings.
For the full recipe, check out the [Full Recipe].
Step-by-Step Instructions
Prepping the Oven and Crust
– Preheat the oven to 325°F (163°C).
– In a bowl, combine 1 ½ cups of graham cracker crumbs, ½ cup of melted unsalted butter, and 1 tablespoon of sugar.
Mix these ingredients well until the crumbs are moistened. Then, press this mixture firmly into the bottom of a 9-inch springform pan. This forms a solid base for your cheesecake. Bake the crust for 10 minutes. Once done, take it out and let it cool while you make the filling.
Making the Cheesecake Filling
– In a large bowl, beat 2 cups of softened cream cheese until it’s smooth.
– Gradually add 1 cup of sugar and 1 teaspoon of vanilla extract. Mix until well combined.
Add 3 large eggs one at a time, mixing well after each. Then, stir in 1 cup of sour cream. Next, add 1 ½ cups of all-purpose flour, 1 tablespoon of cocoa powder, 1 tablespoon of red food coloring, ½ teaspoon of baking soda, and ½ teaspoon of salt. Mix everything until the batter is smooth and creamy.
Assembling and Baking
– Pour the cheesecake batter into the cooled crust.
– Tap the pan gently on the counter to remove any air bubbles.
Place the pan in the preheated oven and bake for about 55-60 minutes. You know it’s done when the edges are set and the center jiggles slightly. Once baked, turn off the oven and crack the door. Let the cheesecake cool inside for 1 hour. After that, move it to the fridge to chill for at least 4 hours or overnight for the best taste.
To learn more about how to make this dessert, check the Full Recipe for all the details.
Tips & Tricks
Ensuring Perfect Texture
To get the best texture for your red velvet cheesecake, start with room temperature ingredients. This means letting your cream cheese and eggs sit out for about 30 minutes before you mix them. Room temperature ingredients blend better and create a smooth batter.
Next, avoid overmixing. Mix just until the ingredients combine. Overmixing adds too much air and can make your cheesecake crack. Gentle mixing helps keep it creamy and dense.
Baking and Cooling Tips
Monitoring your oven temperature is key. An oven thermometer can help ensure the heat is just right. Too hot, and the cheesecake can bake too fast. Too cool, and it might not set properly.
After baking, let the cheesecake cool gradually. Turn off the oven, crack the door, and let it sit for an hour. This helps prevent sudden changes in temperature that can cause cracks. Then, chill it in the refrigerator for at least four hours or overnight for the best flavor.
Serving Suggestions
When it’s time to serve, slice your cheesecake with a hot knife. Dip the knife in hot water, wipe it, then cut. This helps make clean slices and shows off the beautiful layers.
For pairing, consider fresh fruits like berries. Their tartness balances the rich cheesecake. A drizzle of chocolate or caramel sauce can add extra sweetness. Another fun option is a scoop of vanilla ice cream on the side. Want more tips? Check the Full Recipe for more ideas.
Variations
Different Flavors
You can make red velvet cheesecake even more fun by adding different flavors. One popular choice is chocolate swirl red velvet cheesecake. To make this, simply add melted chocolate to half of the cheesecake batter. Swirl it gently into the plain batter before baking. This gives you rich chocolate flavor and a beautiful look.
Another fun option is Neapolitan-style variations. You can divide the batter into three parts: red velvet, chocolate, and vanilla. Layer them in the pan to create a lovely three-color cheesecake. This mix of flavors makes for a delightful treat.
Dietary Adaptations
If you need gluten-free options, you can easily make a gluten-free crust. Use gluten-free graham crackers instead of regular ones. You can also use almond flour mixed with melted butter for a tasty crust.
For a vegan red velvet cheesecake, replace cream cheese with vegan cream cheese. Use flax eggs or a commercial egg replacer instead of real eggs. You can also swap sour cream with a non-dairy yogurt. These ideas will help you enjoy cheesecake while sticking to your diet.
Seasonal Adaptations
You can make red velvet cheesecake fit any holiday. For example, during Christmas, add peppermint extract to the batter. Top it with crushed candy canes for a festive touch.
In summer, fresh berries are a great topping. Use strawberries, blueberries, or raspberries to add color and flavor. This makes your cheesecake even more appealing and refreshing.
For the full recipe, check out the complete instructions to create these variations.
Storage Info
Short-term Storage
Refrigerate any leftover red velvet cheesecake. Place it in an airtight container. You can also cover it with plastic wrap. This keeps it fresh and prevents it from drying out.
Long-term Storage
You can freeze red velvet cheesecake for up to three months. First, let it cool completely. Wrap it tightly in plastic wrap, then in aluminum foil. This method protects it from freezer burn. To thaw, place it in the fridge overnight. This keeps the texture smooth and creamy.
Shelf Life Expectations
Leftover cheesecake lasts about five days in the fridge. After that, it may lose taste and texture. Always check for signs of spoilage before eating. If it looks or smells off, it’s best to throw it away. Enjoy your dessert while it’s fresh! For the full recipe, check out the Red Velvet Cheesecake .
FAQs
What is the difference between red velvet cake and cheesecake?
Red velvet cake is a soft, moist cake with a hint of cocoa. It has a rich, buttery flavor and often includes cream cheese frosting. Cheesecake, on the other hand, is a creamy dessert made from cheese, sugar, and eggs. Red velvet cheesecake combines both, giving you a cake-like texture with creamy cheese filling.
Can I use a different type of pan?
Yes, you can use other pans for your cheesecake. If you do not have a springform pan, use a regular cake pan. Just remember to line it with parchment paper. A cast-iron skillet also works well for a unique look. Just make sure the pan can handle the heat.
Why is my cheesecake cracking?
Cracking happens for a few reasons. If the oven is too hot, the cheesecake cooks too fast. This causes cracks. Overmixing the batter can also lead to air bubbles that expand and crack the top. To prevent this, bake at a lower temperature and mix just until smooth.
How long can I leave cheesecake out at room temperature?
Cheesecake should not stay out for long. It is best to keep it in the fridge when not serving. If you leave it out, don’t let it sit for more than two hours. After that, it can spoil and become unsafe to eat. For best results, enjoy your cheesecake chilled. You can find the full recipe for making red velvet cheesecake in the previous sections.
You now have a complete guide to making red velvet cheesecake. We covered key ingredients, step-by-step instructions, and tips for the best results. Remember to monitor your baking for perfect texture and presentation. You can also explore variations, dietary changes, and storage tips to enjoy later. Red velvet cheesecake is fun to make and share. Try different flavors or toppings for a twist. Enjoy making this sweet treat that impresses every time. Now it’s your turn to bake!
![- 1 ½ cups graham cracker crumbs - ½ cup unsalted butter, melted - 2 cups cream cheese, softened - 1 cup sugar - 3 large eggs - 1 cup sour cream These key ingredients form the base of our red velvet cheesecake. The graham cracker crumbs create a nice crust. The unsalted butter binds the crumbs together. Cream cheese gives the cheesecake its rich and creamy texture. Sugar sweetens the filling. Eggs help set the cheesecake. Sour cream adds a nice tanginess. - 1 tablespoon cocoa powder - 1 tablespoon red food coloring - ½ teaspoon baking soda - ½ teaspoon salt Here, we add special ingredients for flavor and color. Cocoa powder gives a hint of chocolate flavor. Red food coloring makes the cheesecake vibrant and eye-catching. Baking soda helps the cheesecake rise. Salt enhances all the flavors. These ingredients make the cheesecake unique and delicious. - Whipped cream - Fresh raspberries or strawberries For a finishing touch, consider optional toppings. Whipped cream adds a light, fluffy layer on top. Fresh raspberries or strawberries give a pop of color and freshness. They also provide a nice tart contrast to the sweet cheesecake. You can get creative with these toppings. For the full recipe, check out the [Full Recipe]. - Preheat the oven to 325°F (163°C). - In a bowl, combine 1 ½ cups of graham cracker crumbs, ½ cup of melted unsalted butter, and 1 tablespoon of sugar. Mix these ingredients well until the crumbs are moistened. Then, press this mixture firmly into the bottom of a 9-inch springform pan. This forms a solid base for your cheesecake. Bake the crust for 10 minutes. Once done, take it out and let it cool while you make the filling. - In a large bowl, beat 2 cups of softened cream cheese until it’s smooth. - Gradually add 1 cup of sugar and 1 teaspoon of vanilla extract. Mix until well combined. Add 3 large eggs one at a time, mixing well after each. Then, stir in 1 cup of sour cream. Next, add 1 ½ cups of all-purpose flour, 1 tablespoon of cocoa powder, 1 tablespoon of red food coloring, ½ teaspoon of baking soda, and ½ teaspoon of salt. Mix everything until the batter is smooth and creamy. - Pour the cheesecake batter into the cooled crust. - Tap the pan gently on the counter to remove any air bubbles. Place the pan in the preheated oven and bake for about 55-60 minutes. You know it's done when the edges are set and the center jiggles slightly. Once baked, turn off the oven and crack the door. Let the cheesecake cool inside for 1 hour. After that, move it to the fridge to chill for at least 4 hours or overnight for the best taste. To learn more about how to make this dessert, check the Full Recipe for all the details. To get the best texture for your red velvet cheesecake, start with room temperature ingredients. This means letting your cream cheese and eggs sit out for about 30 minutes before you mix them. Room temperature ingredients blend better and create a smooth batter. Next, avoid overmixing. Mix just until the ingredients combine. Overmixing adds too much air and can make your cheesecake crack. Gentle mixing helps keep it creamy and dense. Monitoring your oven temperature is key. An oven thermometer can help ensure the heat is just right. Too hot, and the cheesecake can bake too fast. Too cool, and it might not set properly. After baking, let the cheesecake cool gradually. Turn off the oven, crack the door, and let it sit for an hour. This helps prevent sudden changes in temperature that can cause cracks. Then, chill it in the refrigerator for at least four hours or overnight for the best flavor. When it’s time to serve, slice your cheesecake with a hot knife. Dip the knife in hot water, wipe it, then cut. This helps make clean slices and shows off the beautiful layers. For pairing, consider fresh fruits like berries. Their tartness balances the rich cheesecake. A drizzle of chocolate or caramel sauce can add extra sweetness. Another fun option is a scoop of vanilla ice cream on the side. Want more tips? Check the Full Recipe for more ideas. {{image_2}} You can make red velvet cheesecake even more fun by adding different flavors. One popular choice is chocolate swirl red velvet cheesecake. To make this, simply add melted chocolate to half of the cheesecake batter. Swirl it gently into the plain batter before baking. This gives you rich chocolate flavor and a beautiful look. Another fun option is Neapolitan-style variations. You can divide the batter into three parts: red velvet, chocolate, and vanilla. Layer them in the pan to create a lovely three-color cheesecake. This mix of flavors makes for a delightful treat. If you need gluten-free options, you can easily make a gluten-free crust. Use gluten-free graham crackers instead of regular ones. You can also use almond flour mixed with melted butter for a tasty crust. For a vegan red velvet cheesecake, replace cream cheese with vegan cream cheese. Use flax eggs or a commercial egg replacer instead of real eggs. You can also swap sour cream with a non-dairy yogurt. These ideas will help you enjoy cheesecake while sticking to your diet. You can make red velvet cheesecake fit any holiday. For example, during Christmas, add peppermint extract to the batter. Top it with crushed candy canes for a festive touch. In summer, fresh berries are a great topping. Use strawberries, blueberries, or raspberries to add color and flavor. This makes your cheesecake even more appealing and refreshing. For the full recipe, check out the complete instructions to create these variations. Refrigerate any leftover red velvet cheesecake. Place it in an airtight container. You can also cover it with plastic wrap. This keeps it fresh and prevents it from drying out. You can freeze red velvet cheesecake for up to three months. First, let it cool completely. Wrap it tightly in plastic wrap, then in aluminum foil. This method protects it from freezer burn. To thaw, place it in the fridge overnight. This keeps the texture smooth and creamy. Leftover cheesecake lasts about five days in the fridge. After that, it may lose taste and texture. Always check for signs of spoilage before eating. If it looks or smells off, it’s best to throw it away. Enjoy your dessert while it’s fresh! For the full recipe, check out the Red Velvet Cheesecake . Red velvet cake is a soft, moist cake with a hint of cocoa. It has a rich, buttery flavor and often includes cream cheese frosting. Cheesecake, on the other hand, is a creamy dessert made from cheese, sugar, and eggs. Red velvet cheesecake combines both, giving you a cake-like texture with creamy cheese filling. Yes, you can use other pans for your cheesecake. If you do not have a springform pan, use a regular cake pan. Just remember to line it with parchment paper. A cast-iron skillet also works well for a unique look. Just make sure the pan can handle the heat. Cracking happens for a few reasons. If the oven is too hot, the cheesecake cooks too fast. This causes cracks. Overmixing the batter can also lead to air bubbles that expand and crack the top. To prevent this, bake at a lower temperature and mix just until smooth. Cheesecake should not stay out for long. It is best to keep it in the fridge when not serving. If you leave it out, don’t let it sit for more than two hours. After that, it can spoil and become unsafe to eat. For best results, enjoy your cheesecake chilled. You can find the full recipe for making red velvet cheesecake in the previous sections. You now have a complete guide to making red velvet cheesecake. We covered key ingredients, step-by-step instructions, and tips for the best results. Remember to monitor your baking for perfect texture and presentation. You can also explore variations, dietary changes, and storage tips to enjoy later. Red velvet cheesecake is fun to make and share. Try different flavors or toppings for a twist. Enjoy making this sweet treat that impresses every time. Now it’s your turn to bake!](https://toastedrecipes.com/wp-content/uploads/2025/04/0ba52014-3ea4-4dde-93c7-9fd99432cb01-300x300.webp)