Looking for a sweet treat that’s quick and easy to make? With just a few simple ingredients, you can whip up delicious Oreo balls in no time. These delightful bites are fun to create and perfect for sharing. In this post, I’ll guide you through every step, from choosing the right tools to storing your tasty treats. Let’s dive in and make some memorable bites!
Ingredients
List of Ingredients for Quick and Easy Oreo Balls
To make these delightful Oreo balls, gather the following items:
– 1 package (14.3 oz) Oreo cookies
– 8 oz cream cheese, softened
– 1 cup semi-sweet chocolate chips
– 1 tablespoon vegetable oil
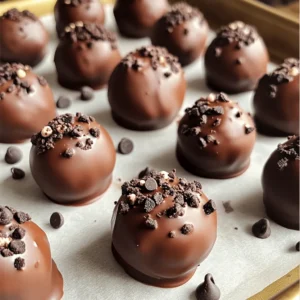
– Optional toppings: crushed Oreos, mini chocolate chips, or sprinkles
These ingredients create a sweet and creamy treat that everyone loves.
Alternatives for Ingredients
If you want to switch things up, here are some alternatives:
– Use gluten-free Oreo cookies for a gluten-free treat.
– Swap cream cheese for mascarpone for a richer flavor.
– Try dark chocolate chips if you prefer a deeper taste.
– Choose coconut oil instead of vegetable oil for a hint of coconut flavor.
These changes keep the recipe fun and fresh!
Recommended Tools and Equipment
To make your Oreo balls, you will need a few tools:
– Food processor for crushing the Oreos.
– Mixing bowl to combine the ingredients.
– Baking sheet lined with parchment paper for easy cleanup.
– Microwave-safe bowl for melting chocolate.
– Fork for dipping the balls in chocolate.
Having the right tools makes the process smooth and easy. Enjoy creating these yummy treats!
Step-by-Step Instructions
Detailed Instructions on How to Make Oreo Balls
Making Oreo balls is simple and fun. Start by gathering your ingredients. You will need:
– 1 package (14.3 oz) Oreo cookies
– 8 oz cream cheese, softened
– 1 cup semi-sweet chocolate chips
– 1 tablespoon vegetable oil
– Optional toppings: crushed Oreos, mini chocolate chips, or sprinkles
1. First, take the Oreo cookies and crush them. Use a food processor for this step. Pulse until you get fine crumbs.
2. Next, mix the crushed Oreos with the softened cream cheese in a bowl. Blend until it forms a dough-like texture.
3. Now, roll the mixture into 1-inch balls. Place them on a baking sheet lined with parchment paper.
4. Chill the balls in the fridge for 30 minutes. This helps them firm up.
5. While they chill, melt the chocolate chips. Use a microwave-safe bowl, heating them in 30-second bursts. Stir in between until smooth.
6. Once melted, add vegetable oil to the chocolate for a shiny finish.
7. Take the chilled Oreo balls out. Dip each ball into the melted chocolate. Make sure they are fully coated.
8. Lift them out with a fork. Allow excess chocolate to drip off before placing them back on the baking sheet.
9. If you want, sprinkle toppings on the balls before the chocolate hardens.
10. Finally, place the baking sheet back in the fridge for 15 minutes to let the chocolate set.
Visual Guide to Each Step
While I can’t show pictures, I can help you visualize each step. Think of the food processor whirring as you crush the Oreos. Imagine the creamy mixture as you blend it with the cream cheese. Picture rolling the dough into perfect little balls. Each step is exciting!
Tips for Successful Execution
– Make sure your cream cheese is soft. This helps mix the ingredients well.
– Chill the balls long enough. This step is key to easy dipping.
– When melting chocolate, stir often. This prevents burning.
– Use a fork to dip the balls. This helps keep your hands clean.
– Experiment with toppings. Get creative! Use what you like best.
Follow these steps, and you will make delightful Oreo balls with ease. For the full recipe, check out the details above. Enjoy your sweet treat!
Tips & Tricks
How to Perfect the Texture of Oreo Balls
To get the right texture, you want to mix the cream cheese and crushed Oreos well. Ensure the cream cheese is very soft. This helps it blend smoothly. If your mixture feels too dry, add a bit more cream cheese. If it’s too wet, add more crushed Oreos.
Common Mistakes to Avoid
One big mistake is not chilling the balls long enough. Chilling helps them firm up. If you skip this step, they may fall apart when dipped in chocolate. Another mistake is not coating them fully in chocolate. Make sure each ball gets a nice, thick layer.
Enhancements for Flavor and Presentation
Try adding a pinch of sea salt to the chocolate for a nice contrast. You can also mix in different flavors like almond or mint extract to change things up. For a fancy look, use colored sprinkles or drizzle white chocolate over the top. These small changes can make your Oreo balls stand out! If you want the full recipe, check it out!

Variations
Different Flavor Combinations for Oreo Balls
You can change the flavor of your Oreo balls easily. Start by swapping the regular Oreos for other types. Try using mint, peanut butter, or birthday cake Oreos. Each choice gives a fun twist to the dessert. You can also mix in some flavored extracts. A drop of peppermint or vanilla extract can brighten the taste.
Alternative Coatings and Toppings
The chocolate coating is key, but there are lots of options! Instead of semi-sweet chocolate, try white chocolate or dark chocolate. Each one gives a unique taste. You can also make the chocolate coating with colored candy melts for a festive look. For toppings, crushed nuts, coconut flakes, or even crushed candy canes work well. Get creative with what you like!
Dietary Adjustments for Allergies or Preferences
If you have dietary needs, you can adjust the recipe. Use dairy-free cream cheese and chocolate for a vegan option. Gluten-free Oreos are available, so you can make this treat gluten-free too. Don’t hesitate to try different nuts or seeds if you’re nut-free. The key is to keep the fun and flavor while meeting your needs. This way, everyone can enjoy these delightful treats!
Storage Info
Best Ways to Store Oreo Balls
To keep your Oreo balls fresh, place them in an airtight container. I recommend using a container with a tight seal. This method prevents air from getting in. It also keeps them from drying out. You can layer parchment paper between the balls. This way, they won’t stick together.
How Long Do Oreo Balls Last?
When stored properly, Oreo balls can last up to two weeks in the fridge. If you keep them in the freezer, they can last for about three months. Just remember to thaw them in the fridge before serving. This keeps the texture nice and creamy.
Tips for Freezing Oreo Balls
Freezing Oreo balls is simple. First, let them chill in the fridge for 15 minutes after coating. Next, place them on a baking sheet in a single layer. Once frozen, transfer them to a freezer bag. This prevents them from sticking together. When you want to enjoy them, just take out the amount you need. Let them thaw in the fridge for a few hours. Enjoy your sweet treat!
FAQs
Can I make Oreo balls ahead of time?
Yes, you can make Oreo balls ahead of time. They stay fresh in the fridge for up to one week. Just store them in an airtight container. If you need more time, freeze them. They can last for up to three months in the freezer. Just thaw them in the fridge before serving.
What can I substitute for cream cheese?
If you don’t have cream cheese, you can use Greek yogurt. It gives a similar creamy texture. You can also try mascarpone cheese for a rich flavor. Another option is cottage cheese, but blend it first for a smoother mix. These substitutes work well in the Oreo balls recipe.
How do I know when the chocolate coating has set?
You can tell the chocolate coating has set when it feels firm to the touch. It should no longer be sticky. If you see a nice shine, that’s a good sign too. To speed up the process, place the Oreo balls in the fridge. They usually take about 15 minutes to set.
Oreo balls are easy to make and fun to share. We covered the ingredients, steps, and tips that ensure sweet success. You learned about variations to suit your taste and how to store them. Remember to avoid common mistakes for the best results. With just a few ingredients and some creativity, you can make delightful treats. Try these ideas, and enjoy the smiles they bring. Happy making!