No Bake Butterfinger Pie Easy and Tasty Recipe

WANT TO SAVE THIS RECIPE?

If you love quick and easy desserts, this No Bake Butterfinger Pie recipe is for you! This pie is creamy, crunchy, and tastes just like the classic candy bar. You’ll have fun making it with simple ingredients and easy steps. I will guide you through mixing, assembling, and even storing your pie. So, grab your tools and let’s dive into creating this tasty treat that everyone will love!

Ingredients

List of Ingredients for No Bake Butterfinger Pie

To make No Bake Butterfinger Pie, gather these simple ingredients:

– 1 cup crushed graham crackers

– 1/4 cup melted butter

– 1 cup creamy peanut butter

– 1 cup powdered sugar

– 8 oz cream cheese, softened

– 1 cup whipped topping (Cool Whip or homemade)

– 1 cup Butterfinger candies, chopped (plus extra for topping)

– 1/2 cup chocolate sauce (for drizzling)

Ingredient Substitutions and Alternatives

You can swap some ingredients if needed. Here are some ideas:

– Use digestive biscuits instead of graham crackers for a different base.

– Coconut oil can replace melted butter for a dairy-free option.

– Almond butter or cashew butter works well if you want a nut change.

– For a lower sugar version, try using a sugar substitute for the powdered sugar.

– Use yogurt instead of cream cheese for a lighter twist.

Tools and Equipment Needed

You will need a few basic tools to make this pie:

– A medium mixing bowl for the crust

– A large mixing bowl for the filling

– An electric mixer or whisk to blend ingredients

– A pie dish to hold your pie

– A spatula for easy mixing and spreading

– A refrigerator to chill the pie until set

Step-by-Step Instructions

Detailed Preparation Steps

To start, gather your ingredients. You need crushed graham crackers, melted butter, creamy peanut butter, powdered sugar, softened cream cheese, whipped topping, and Butterfinger candies. In a medium bowl, mix the crushed graham crackers with melted butter. Make sure all the crumbs get coated with butter. Once mixed, press this into the bottom of your pie dish. This forms the crust. Set it aside for now.

Next, take a large mixing bowl and beat the softened cream cheese until it’s smooth. This step is important for a creamy filling. Add the creamy peanut butter and powdered sugar to the cream cheese. Beat this until everything is well combined and smooth. You want a thick and creamy texture that is easy to spread.

Tips for Mixing and Texture

When you mix the peanut butter and cream cheese, use a hand mixer or a whisk. A hand mixer makes it easier to combine the ingredients quickly. After mixing, fold in the whipped topping gently. Use a spatula for this. You want to keep the mixture light and airy. This helps your pie stay fluffy.

Don’t forget the Butterfinger candies! Stir in the chopped candies, but save a few for the top later. The candies add a nice crunch and flavor. Make sure they are evenly mixed in so every bite is tasty.

Instructions for Pie Assembly

Now it’s time to assemble your pie. Take the peanut butter mixture and spread it evenly over your prepared crust. Use a spatula to smooth the top. Once spread, cover the pie with plastic wrap. Place it in the fridge for at least 4 hours. For the best results, let it chill overnight. This gives the pie time to set.

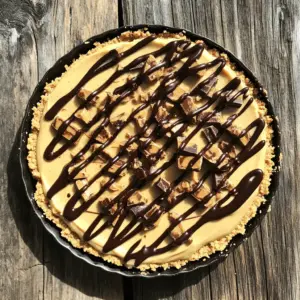
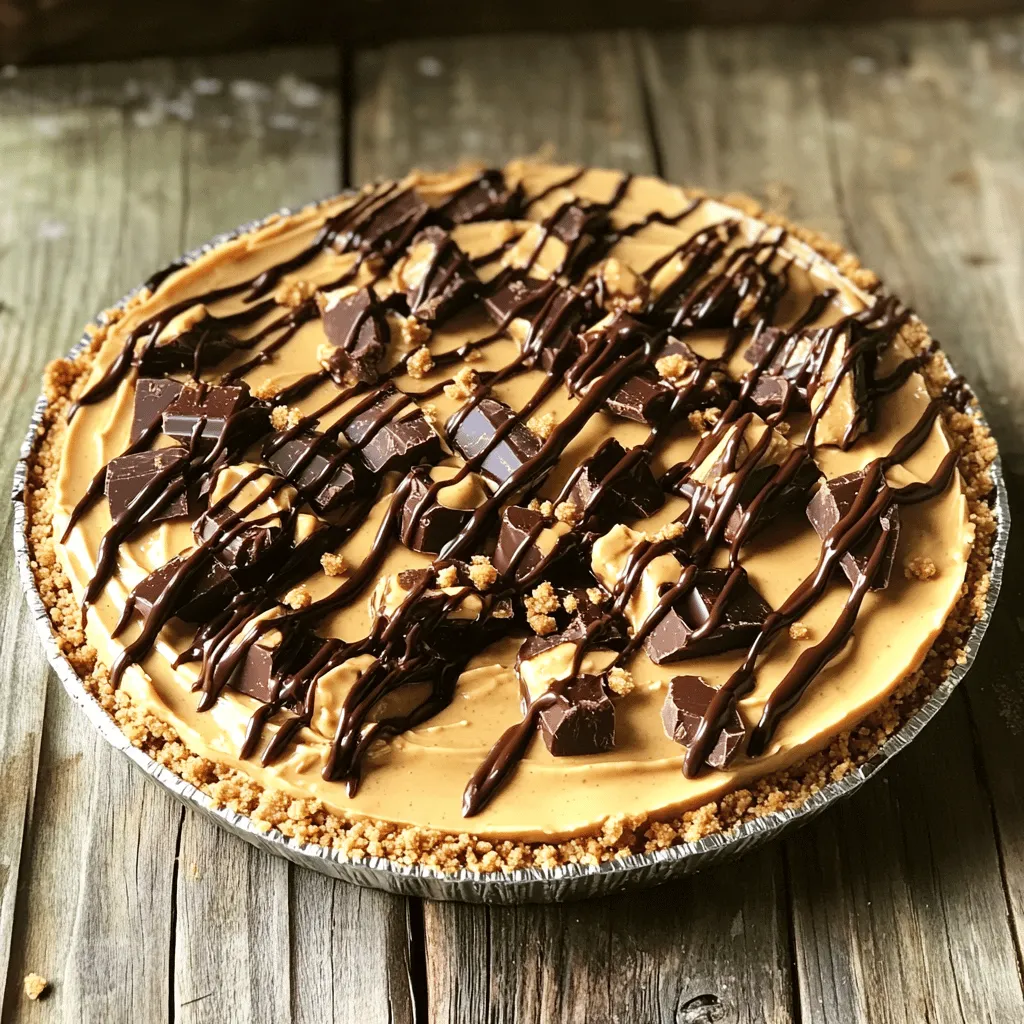
When you’re ready to serve, drizzle chocolate sauce over the top. This adds sweetness and a lovely look. Sprinkle the reserved Butterfinger pieces on top for extra crunch. For a perfect serving, slice the pie and add a dollop of whipped topping on each plate. Enjoy your delicious No Bake Butterfinger Pie!

Tips & Tricks

Common Mistakes to Avoid

When making No Bake Butterfinger Pie, avoid these common errors:

Not mixing well: Make sure to blend the cream cheese and peanut butter fully.

Skipping the chill time: Refrigerate for at least four hours for a firm pie.

Overmixing whipped topping: Fold gently to keep the light texture.

Using stale graham crackers: Fresh crumbs make the crust tastier and more crunchy.

How to Make the Perfect Crust

To create a great crust:

– Use fresh graham cracker crumbs. They should be fine for best results.

– Mix the crumbs with melted butter until all are coated.

– Press the mixture firmly into the pie dish. This helps it hold together.

– Chill the crust for a few minutes before adding the filling. This sets it better.

Serving Suggestions and Presentation Tips

For a lovely presentation, try these ideas:

– Serve slices on individual plates for a nice look.

– Top each slice with a dollop of whipped topping.

– Drizzle chocolate sauce over the pie and sprinkle more Butterfinger bits on top.

– Add some fresh berries on the side for color and a fruity touch.

Variations

Healthier Alternatives for Ingredients

You can make some swaps to make No Bake Butterfinger Pie a bit healthier. Try using:

– Whole wheat graham crackers for added fiber.

– Natural peanut butter with no added sugars.

– Low-fat cream cheese to cut some calories.

– Greek yogurt instead of whipped topping for added protein.

These changes keep the pie tasty while making it a bit better for you.

Flavor Variations to Try

You can switch up the flavors to keep things fun! Here are some ideas:

– Use crushed Oreos instead of graham crackers for a chocolate twist.

– Swap out Butterfinger for Snickers or Reese’s for different candy flavors.

– Add a splash of vanilla extract to the peanut butter cream for extra depth.

– Mix in a little sea salt for a sweet and salty combo.

Experiment and find your favorite flavor!

Creative Serving Ideas

Presentation makes a big difference. Here are ways to serve your pie:

– Serve slices on colorful plates with a dollop of whipped topping.

– Drizzle extra chocolate sauce on top for a fancy look.

– Add fresh fruit like strawberries or bananas for a fresh touch.

– Garnish with mint leaves for a pop of color.

These simple ideas can make your dessert stand out!

Storage Info

How to Properly Store Leftovers

To keep your No Bake Butterfinger Pie fresh, cover it tightly with plastic wrap. You can also use a pie dish cover if you have one. Store it in the fridge. This method keeps the pie moist and tasty. Enjoy your leftovers within 3 to 4 days for the best flavor and texture.

Freezing Instructions for Long-Term Storage

You can freeze this pie for longer storage. First, let the pie set in the fridge. Then, slice it into pieces. Wrap each slice tightly in plastic wrap, then place them in a freezer-safe bag. Label the bag with the date. You can freeze it for up to 2 months. To enjoy, thaw the slices in the fridge overnight before serving.

Shelf Life and Best Practices

The pie stays good in the fridge for about 3 to 4 days. If you freeze it, aim to eat it within 2 months for the best taste. Always check for any signs of freezer burn or changes in smell before eating. For a fun twist, add extra toppings before serving for a fresh look!

FAQs

Can I make No Bake Butterfinger Pie ahead of time?

Yes, you can make this pie ahead of time. It tastes great after sitting in the fridge. I suggest making it one day before serving. This gives it time to chill and set properly. The flavors will blend well, too. Just cover it with plastic wrap to keep it fresh.

How do I get the pie to set properly?

To help the pie set, chill it for at least four hours. I recommend leaving it overnight for the best results. Make sure your cream cheese is softened for easy mixing. This helps create a smooth filling. The crust should be pressed firmly to hold everything together.

Are there any vegan options for this recipe?

Yes, you can make a vegan version of this pie. Use vegan cream cheese instead of regular cream cheese. Replace Cool Whip with a coconut whipped topping. For the crust, choose vegan graham crackers. You can also use maple syrup instead of powdered sugar for sweetness.

What can I use if I don’t have Cool Whip?

If you don’t have Cool Whip, you can make your own whipped topping. Simply whip heavy cream until it forms soft peaks. You can sweeten it with sugar or vanilla. Alternatively, use a store-bought whipped topping if you prefer. Just make sure it has a similar texture for best results.

You learned about making No Bake Butterfinger Pie and its key ingredients. We discussed steps for great texture and assembly. You learned tips to avoid mistakes and create a perfect crust. We also covered fun variations and smart storage ideas. With this knowledge, you can make the pie your own. Enjoy sharing this tasty treat with others and have fun experimenting!

To make No Bake Butterfinger Pie, gather these simple ingredients: - 1 cup crushed graham crackers - 1/4 cup melted butter - 1 cup creamy peanut butter - 1 cup powdered sugar - 8 oz cream cheese, softened - 1 cup whipped topping (Cool Whip or homemade) - 1 cup Butterfinger candies, chopped (plus extra for topping) - 1/2 cup chocolate sauce (for drizzling) You can swap some ingredients if needed. Here are some ideas: - Use digestive biscuits instead of graham crackers for a different base. - Coconut oil can replace melted butter for a dairy-free option. - Almond butter or cashew butter works well if you want a nut change. - For a lower sugar version, try using a sugar substitute for the powdered sugar. - Use yogurt instead of cream cheese for a lighter twist. You will need a few basic tools to make this pie: - A medium mixing bowl for the crust - A large mixing bowl for the filling - An electric mixer or whisk to blend ingredients - A pie dish to hold your pie - A spatula for easy mixing and spreading - A refrigerator to chill the pie until set To start, gather your ingredients. You need crushed graham crackers, melted butter, creamy peanut butter, powdered sugar, softened cream cheese, whipped topping, and Butterfinger candies. In a medium bowl, mix the crushed graham crackers with melted butter. Make sure all the crumbs get coated with butter. Once mixed, press this into the bottom of your pie dish. This forms the crust. Set it aside for now. Next, take a large mixing bowl and beat the softened cream cheese until it's smooth. This step is important for a creamy filling. Add the creamy peanut butter and powdered sugar to the cream cheese. Beat this until everything is well combined and smooth. You want a thick and creamy texture that is easy to spread. When you mix the peanut butter and cream cheese, use a hand mixer or a whisk. A hand mixer makes it easier to combine the ingredients quickly. After mixing, fold in the whipped topping gently. Use a spatula for this. You want to keep the mixture light and airy. This helps your pie stay fluffy. Don’t forget the Butterfinger candies! Stir in the chopped candies, but save a few for the top later. The candies add a nice crunch and flavor. Make sure they are evenly mixed in so every bite is tasty. Now it's time to assemble your pie. Take the peanut butter mixture and spread it evenly over your prepared crust. Use a spatula to smooth the top. Once spread, cover the pie with plastic wrap. Place it in the fridge for at least 4 hours. For the best results, let it chill overnight. This gives the pie time to set. When you're ready to serve, drizzle chocolate sauce over the top. This adds sweetness and a lovely look. Sprinkle the reserved Butterfinger pieces on top for extra crunch. For a perfect serving, slice the pie and add a dollop of whipped topping on each plate. Enjoy your delicious No Bake Butterfinger Pie! When making No Bake Butterfinger Pie, avoid these common errors: - Not mixing well: Make sure to blend the cream cheese and peanut butter fully. - Skipping the chill time: Refrigerate for at least four hours for a firm pie. - Overmixing whipped topping: Fold gently to keep the light texture. - Using stale graham crackers: Fresh crumbs make the crust tastier and more crunchy. To create a great crust: - Use fresh graham cracker crumbs. They should be fine for best results. - Mix the crumbs with melted butter until all are coated. - Press the mixture firmly into the pie dish. This helps it hold together. - Chill the crust for a few minutes before adding the filling. This sets it better. For a lovely presentation, try these ideas: - Serve slices on individual plates for a nice look. - Top each slice with a dollop of whipped topping. - Drizzle chocolate sauce over the pie and sprinkle more Butterfinger bits on top. - Add some fresh berries on the side for color and a fruity touch. {{image_2}} You can make some swaps to make No Bake Butterfinger Pie a bit healthier. Try using: - Whole wheat graham crackers for added fiber. - Natural peanut butter with no added sugars. - Low-fat cream cheese to cut some calories. - Greek yogurt instead of whipped topping for added protein. These changes keep the pie tasty while making it a bit better for you. You can switch up the flavors to keep things fun! Here are some ideas: - Use crushed Oreos instead of graham crackers for a chocolate twist. - Swap out Butterfinger for Snickers or Reese's for different candy flavors. - Add a splash of vanilla extract to the peanut butter cream for extra depth. - Mix in a little sea salt for a sweet and salty combo. Experiment and find your favorite flavor! Presentation makes a big difference. Here are ways to serve your pie: - Serve slices on colorful plates with a dollop of whipped topping. - Drizzle extra chocolate sauce on top for a fancy look. - Add fresh fruit like strawberries or bananas for a fresh touch. - Garnish with mint leaves for a pop of color. These simple ideas can make your dessert stand out! To keep your No Bake Butterfinger Pie fresh, cover it tightly with plastic wrap. You can also use a pie dish cover if you have one. Store it in the fridge. This method keeps the pie moist and tasty. Enjoy your leftovers within 3 to 4 days for the best flavor and texture. You can freeze this pie for longer storage. First, let the pie set in the fridge. Then, slice it into pieces. Wrap each slice tightly in plastic wrap, then place them in a freezer-safe bag. Label the bag with the date. You can freeze it for up to 2 months. To enjoy, thaw the slices in the fridge overnight before serving. The pie stays good in the fridge for about 3 to 4 days. If you freeze it, aim to eat it within 2 months for the best taste. Always check for any signs of freezer burn or changes in smell before eating. For a fun twist, add extra toppings before serving for a fresh look! Yes, you can make this pie ahead of time. It tastes great after sitting in the fridge. I suggest making it one day before serving. This gives it time to chill and set properly. The flavors will blend well, too. Just cover it with plastic wrap to keep it fresh. To help the pie set, chill it for at least four hours. I recommend leaving it overnight for the best results. Make sure your cream cheese is softened for easy mixing. This helps create a smooth filling. The crust should be pressed firmly to hold everything together. Yes, you can make a vegan version of this pie. Use vegan cream cheese instead of regular cream cheese. Replace Cool Whip with a coconut whipped topping. For the crust, choose vegan graham crackers. You can also use maple syrup instead of powdered sugar for sweetness. If you don't have Cool Whip, you can make your own whipped topping. Simply whip heavy cream until it forms soft peaks. You can sweeten it with sugar or vanilla. Alternatively, use a store-bought whipped topping if you prefer. Just make sure it has a similar texture for best results. You learned about making No Bake Butterfinger Pie and its key ingredients. We discussed steps for great texture and assembly. You learned tips to avoid mistakes and create a perfect crust. We also covered fun variations and smart storage ideas. With this knowledge, you can make the pie your own. Enjoy sharing this tasty treat with others and have fun experimenting!

No Bake Butterfinger Pie

Indulge in a delightful No Bake Butterfinger Pie that’s sure to satisfy your sweet tooth! This creamy dessert combines peanut butter, cream cheese, and Butterfinger candies for a truly irresistible treat. Perfect for gatherings, this easy recipe requires no baking and only 30 minutes of prep time. Ready to impress your guests? Click through for the full recipe and enjoy a slice of heaven today!

Ingredients
  

1 cup crushed graham crackers

1/4 cup melted butter

1 cup creamy peanut butter

1 cup powdered sugar

8 oz cream cheese, softened

1 cup whipped topping (Cool Whip or homemade)

1 cup Butterfinger candies, chopped (plus extra for topping)

1/2 cup chocolate sauce (for drizzling)

Instructions
 

In a medium bowl, combine the crushed graham crackers and melted butter. Mix until the crumbs are coated in butter.

    Press the mixture firmly into the bottom of a pie dish to form the crust. Set aside.

      In a large mixing bowl, beat the cream cheese until smooth.

        Add the creamy peanut butter and powdered sugar to the cream cheese. Beat well until fully incorporated and smooth.

          Fold in the whipped topping gently until just combined.

            Stir in the chopped Butterfinger candies, reserving a few for topping.

              Spread the peanut butter mixture over the prepared crust evenly.

                Refrigerate the pie for at least 4 hours or until set, preferably overnight for best results.

                  Before serving, drizzle chocolate sauce over the top and sprinkle with remaining Butterfinger pieces.

                    Prep Time: 30 minutes | Total Time: 4 hours 30 minutes | Servings: 8

                      - Presentation Tips: Serve slices on individual dessert plates with a dollop of whipped topping and a side of chocolate sauce for an appealing and indulgent look.

                        WANT TO SAVE THIS RECIPE?