If you’re craving a fun and tasty snack, look no further! I’m excited to share my simple recipe for chicken taco dip. This crowd-pleaser is easy to make and packed with flavor. Whether you’re hosting a party or enjoying a quiet night in, this dip will impress. Let’s dive into the ingredients and steps to create this yummy dish that everyone will love!
Ingredients
List of Ingredients
To make a tasty chicken taco dip, gather these ingredients:
– 2 cups shredded cooked chicken
– 1 cup cream cheese, softened
– 1 cup sour cream
– 1 packet taco seasoning
– 1 cup shredded cheddar cheese
– 1 cup black beans, rinsed and drained
– 1 cup corn (canned or frozen)
– 1 small red onion, finely chopped
– 1 jalapeño, deseeded and minced (optional for spice)
– ½ cup fresh cilantro, chopped (for garnish)
– Tortilla chips (for serving)
Quantity and Measurement Tips
Measuring ingredients correctly makes a big difference. Use standard measuring cups for accuracy. For shredded chicken, 2 cups can come from about two cooked chicken breasts. If you prefer, you can use a kitchen scale. Cream cheese should be soft for easy mixing. If it’s too hard, microwave it for a few seconds.
Ingredient Substitutes
You can swap ingredients based on taste and availability:
– Use Greek yogurt instead of sour cream for a tangy twist.
– Substitute rotisserie chicken for homemade shredded chicken to save time.
– If you want a lighter dip, try low-fat cream cheese.
– For a vegan version, replace chicken with cooked lentils or chickpeas and use vegan cheese.
– Instead of black beans, you can use pinto beans or kidney beans.
This recipe is flexible, so feel free to mix and match! For more details, check out the Full Recipe.
Step-by-Step Instructions
Preparation Steps
To make chicken taco dip, first, gather your ingredients. You need shredded cooked chicken, cream cheese, sour cream, taco seasoning, cheddar cheese, black beans, corn, red onion, jalapeño, and cilantro. Preheat your oven to 350°F (175°C). In a large bowl, mix the softened cream cheese and sour cream together until smooth. Use a hand mixer or a whisk for this. Next, add the taco seasoning to the cream mixture and blend it well.
Now, fold in the shredded chicken, black beans, corn, and chopped red onion. If you want some heat, add the minced jalapeño. Make sure everything is mixed evenly. It should smell great by now!
Baking Instructions
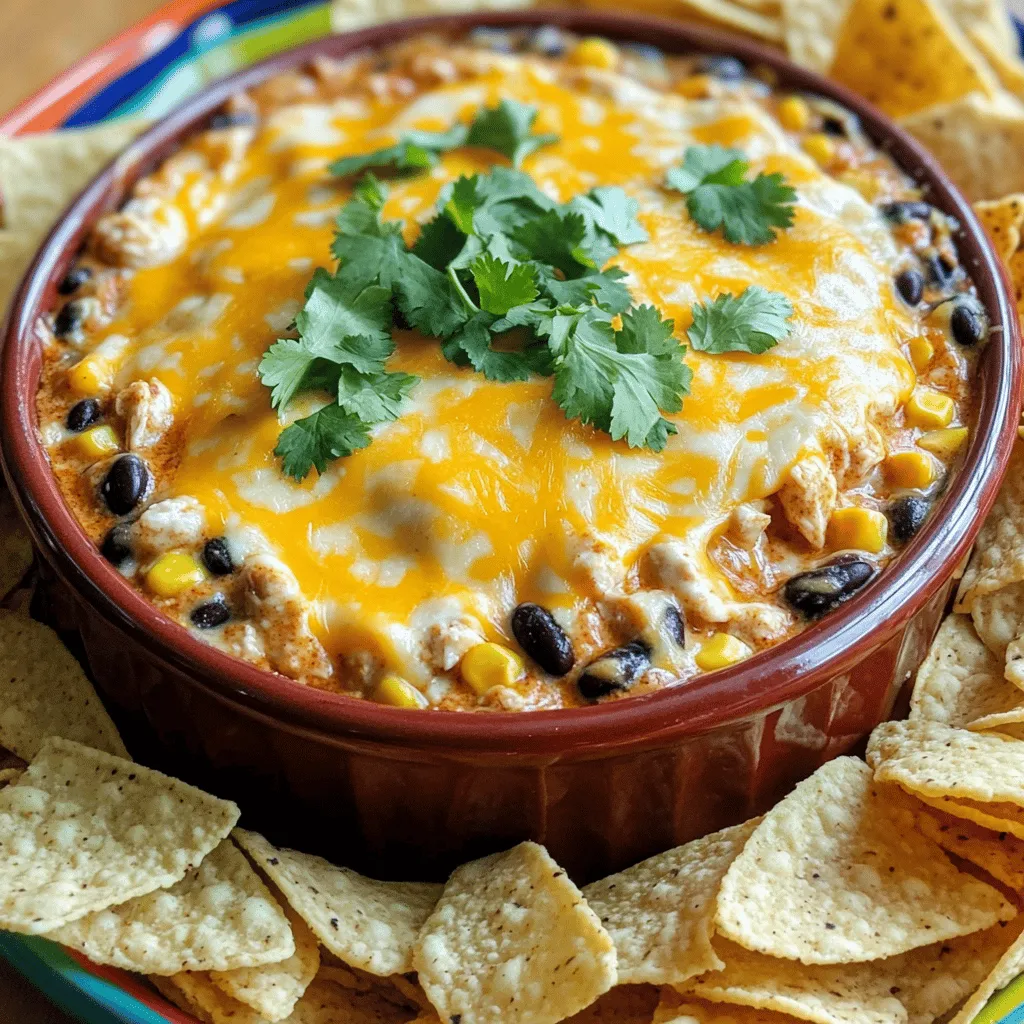
Spread the mixture into a baking dish. A 9×9 inch dish works well. Top it off with the shredded cheddar cheese. Place the dish in your preheated oven and bake for 20 to 25 minutes. The dip is ready when it bubbles and the cheese melts.
Once it’s done, carefully take it out of the oven. Let it cool for a few minutes before serving. This helps prevent burning your mouth!
Serving Suggestions
Serve the dip warm with tortilla chips. You can keep it in the baking dish for a nice look. For a pop of color, add sliced olives or extra cilantro on the side. This chicken taco dip is perfect for parties or family gatherings. Enjoy your delicious creation! For the complete recipe, check out the Full Recipe.
Tips & Tricks
Common Mistakes to Avoid
When making chicken taco dip, avoid some key errors. First, don’t skip softening the cream cheese. Cold cream cheese will create lumps. Second, measure your taco seasoning. Too much can overpower the dip. Also, don’t forget to rinse the black beans. This helps remove excess salt and preserves taste. Lastly, let the dip cool a bit before serving. It’s easier to scoop when it’s not too hot.
Best Practices for Flavor Enhancement
To enhance the flavor of your chicken taco dip, use fresh ingredients. Fresh cilantro adds a bright taste. You can also add lime juice for a zesty kick. If you want more heat, include diced jalapeños or diced green chiles. Mixing in roasted corn gives a sweet crunch. Top with sliced olives or more cheese before baking. This creates a beautiful, cheesy crust.
How to Make Ahead of Time
You can make chicken taco dip in advance. Prepare the dip a day before and store it in the fridge. Just cover the baking dish tightly with plastic wrap. Before baking, let it sit at room temperature for about 30 minutes. This helps it cook evenly. If you want to freeze it, do so before baking. Wrap it well and store for up to three months. When ready, thaw it overnight in the fridge and bake as usual. Check out the Full Recipe for more details.

Variations
Spicy Chicken Taco Dip
To make your dip spicy, add more jalapeños. You can also use hot salsa instead of regular salsa. Another option is to sprinkle red pepper flakes on top before baking. This will give your dip a nice kick. Adjust the spice level to fit your taste. If you like it hot, go for it! The spicy flavors mix well with the creamy cheese and chicken.
Vegetarian Taco Dip Option
If you want a vegetarian version, swap the chicken with extra beans. You can use black beans, pinto beans, or even kidney beans. Add more corn and diced bell peppers for texture. Cream cheese and sour cream keep it creamy, while taco seasoning adds great flavor. This dip remains tasty and satisfying without meat. Serve it with the same tortilla chips for a fun twist.
Healthier Ingredient Swaps
For a lighter dip, choose low-fat cream cheese and sour cream. Greek yogurt can replace sour cream for a protein boost. Use shredded chicken breast instead of dark meat for fewer calories. You can also add more veggies like zucchini or spinach to increase nutrition. These swaps keep your dip creamy but cut some fat. Enjoy the same great taste while being a bit healthier!
Storage Info
Refrigeration Tips
After making your chicken taco dip, let it cool. Once it cools, cover it tightly with plastic wrap or transfer it to an airtight container. You can store it in the fridge for up to three days. If you want to save time, prepare the dip a day ahead and chill it overnight. This helps the flavors blend well.
Freezing Instructions
You can freeze the chicken taco dip for later enjoyment. First, let it cool completely. Then, place it in a freezer-safe container. Make sure to leave some space at the top, as it will expand when frozen. This dip can stay fresh in the freezer for about two months. If you want to save some time, you can freeze it before baking.
Reheating Techniques
To reheat, take the dip out of the fridge or freezer. If frozen, thaw it overnight in the fridge. Preheat your oven to 350°F (175°C). Place the dip in an oven-safe dish and cover it with foil. Heat for about 20-30 minutes. Check for warmth and remove the foil for the last 5 minutes to melt the top cheese. You can also reheat it in the microwave. Heat it in short bursts, stirring in between, until hot. Enjoy your tasty dip warm!
FAQs
How can I make chicken taco dip spicier?
To make your chicken taco dip spicier, add more jalapeños. You can also use diced green chilies. Another option is to mix in hot sauce. Start with a small amount, then taste and adjust. This way, you control the heat. Spicy flavors can enhance the dip’s taste and make it exciting!
Can I use leftover chicken for this recipe?
Yes, you can use leftover chicken! Shredded rotisserie chicken works great. Simply mix it into the dip as you would with fresh chicken. Using leftovers saves time and reduces waste. Plus, it adds great flavor. It’s a simple way to enjoy a tasty dish while being smart in the kitchen.
What are the best sides to serve with chicken taco dip?
Tortilla chips are the classic choice for this dip. They add a nice crunch, making the dip enjoyable. You can also serve it with veggies like carrot sticks or celery for a fresh touch. Sliced bell peppers are colorful and tasty too. For a fun twist, try it with pita chips or crackers.
Can I make this dip in a slow cooker?
Absolutely! Making chicken taco dip in a slow cooker is easy. Combine all ingredients in the slow cooker. Set it on low for 2-3 hours or high for 1-2 hours. Stir occasionally until the dip is hot and bubbly. This method is perfect for parties or gatherings. You can keep it warm and ready to serve!
For the full recipe, check out Chicken Taco Dip Delight .
This blog post covered the key ingredients for chicken taco dip, how to measure them, and substitutes. You learned step-by-step instructions for preparing and baking the dip, along with serving ideas. I shared tips to avoid common mistakes and enhance flavors. We explored tasty variations and provided storage tips to keep your dip fresh. With your new knowledge, you’re ready to make a delicious chicken taco dip that everyone will enjoy. Don’t be afraid to get creative and make it your own!