Are you craving a sweet treat that won’t derail your health goals? I’ve got the solution! Homemade Healthy Twix Bars are an irresistible snack delight you can make right in your kitchen. Packed with wholesome ingredients, these bars are not just tasty but also nutritious. Join me as I guide you step-by-step through the simple process of creating this guilt-free indulgence that you and your family will love!
Ingredients
List of Ingredients
– 1 cup dates, pitted: Dates are natural sweeteners. They bring a soft texture and rich flavor.
– 1 cup almond flour: This flour is gluten-free. It adds a nutty taste and healthy fats.
– 1/2 cup unsweetened peanut butter or almond butter: Nut butters give creaminess and protein. Choose unsweetened for low sugar.
– 1/4 cup maple syrup: This syrup sweetens without refined sugar. It has a rich taste and is full of nutrients.
– 1/2 teaspoon vanilla extract: Vanilla adds warmth and depth to the bars. It enhances all the other flavors.
– 1/4 teaspoon sea salt: Salt balances sweetness. It brings out the flavors in your bars.
– 1/4 cup cacao powder: Cacao is rich in antioxidants. It gives a deep chocolate flavor.
– 1/4 cup coconut oil, melted: Coconut oil adds healthy fats. It helps the chocolate layer set smoothly.
– 1/2 cup dark chocolate chips (dairy-free if desired): Chocolate chips create a rich topping. Use dairy-free for a vegan option.
– Sea salt flakes for topping: These flakes add a burst of flavor. They enhance the overall taste experience.
When sourcing these ingredients, try to pick organic options. This way, you support sustainable farming. Each ingredient plays a key role in the bars’ taste and health benefits. Dates offer fiber, almond flour provides protein, and nut butters add healthy fats. These bars are not just tasty; they are also good for you!
Step-by-Step Instructions
Preparation of Base Layer
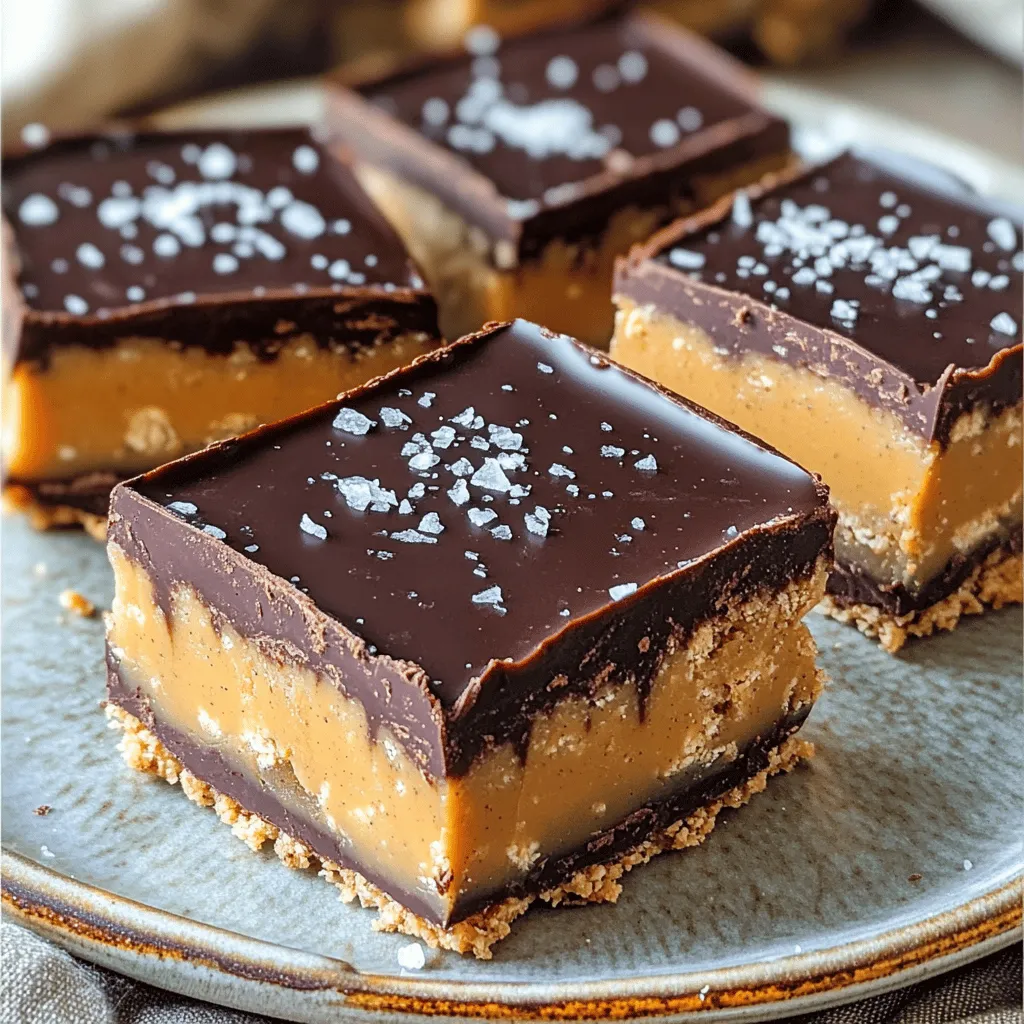
To make the base layer, start by adding the pitted dates, almond flour, and a pinch of sea salt into your food processor. Blend these ingredients on high until they form a sticky dough. The right texture is key; it should stick together but not be too wet. If it feels dry, add a little water. Once ready, line an 8×8 inch baking dish with parchment paper. Press the date-almond mixture evenly into the bottom of the dish. Make sure it’s tightly packed. Now, chill this in the freezer for about 20 minutes. This step is important for firmness, so don’t skip it!
Making the Caramel Layer
Next, let’s prepare the caramel layer. In a small bowl, mix together the peanut or almond butter, maple syrup, vanilla extract, and a pinch of sea salt. Stir until the mixture is smooth and creamy. A smooth consistency is crucial here, as it helps the caramel spread easily. If you have any leftover caramel, store it in an airtight container in the fridge. You can use it later for drizzling or as a dip!
Creating the Chocolate Layer
Now, onto the chocolate layer! In a medium bowl, melt the coconut oil. Once it’s melted, add the cacao powder and stir until you have a smooth mix. Then, mix in the dark chocolate chips until they melt and blend well. It’s vital to ensure even distribution of the chocolate over the caramel. This way, every bite is rich and chocolaty! Pour the chocolate mixture over the caramel layer in the dish, spreading it evenly.
Tips & Tricks
Expert Tips for Perfect Bars
– Best practices for blending ingredients: Use a food processor for a smooth base. Blend the dates with almond flour until they form a sticky dough. This texture is key for good bars.
– Adjusting sweetness according to taste: Each person likes different levels of sweetness. Start with the given amount of maple syrup. Taste and add more if you like it sweeter.
– Suggested toppings for added flavors: Try adding nuts, seeds, or coconut flakes on top. You can also use a sprinkle of sea salt for a perfect balance.
Common Mistakes to Avoid
– Issues with texture and how to fix them: If your bars are too crumbly, add more nut butter or a bit of water. Mix well to help it stick together.
– Overheating chocolate and remedies: Melt chocolate slowly to avoid burning. Use a double boiler or microwave in short bursts. If it gets too thick, stir in a bit of coconut oil to thin it out.
– Importance of timing when chilling: Chilling times matter. If not chilled long enough, the layers may separate. Follow the times closely for the best results.

Variations
Gluten-Free Options
If you need a gluten-free version of these bars, you can easily swap out the almond flour. Here are some great alternatives:
– Coconut flour: Use less, about 1/3 cup, as it absorbs more liquid.
– Oat flour: This is a great option. Just make sure it’s certified gluten-free.
– Brown rice flour: Adds a nice texture and taste.
To avoid cross-contamination, make sure your ingredients are certified gluten-free. Clean surfaces and tools help, too.
Vegan Adaptations
To make these bars completely plant-based, you can swap out a few ingredients. Here’s how:
– Use maple syrup instead of honey.
– For the chocolate chips, look for dairy-free dark chocolate. Many brands offer great options.
You can also use coconut cream instead of butter in the chocolate layer to keep it vegan.
Flavor Variants
You can get creative with flavors in your homemade healthy Twix bars. Here are some ideas:
– Add almond extract for a nutty twist. Just a teaspoon can make a big difference.
– Want some crunch? Try mixing in chopped nuts or seeds like sunflower or pumpkin seeds. This adds texture and boosts nutrition.
Feel free to experiment with different flavors. Your taste buds will thank you! For the full recipe, check the instructions above.
Storage Info
Best Storage Practices
To keep your Homemade Healthy Twix Bars fresh, store them in the fridge. Wrap each bar in parchment paper or plastic wrap. Place them in an airtight container to prevent moisture from getting in. This helps maintain their texture and flavor.
If you want to freeze your bars, first cut them into pieces. Wrap each piece tightly in plastic wrap. Then, place them in a freezer-safe bag or container. Make sure to label the bag with the date. This will help you keep track of freshness.
When you’re ready to eat a frozen bar, remove it from the freezer. Let it thaw in the fridge for a few hours. You can also let it sit at room temperature for about 30 minutes for quicker thawing.
Shelf Life
When stored properly in the fridge, these bars last about one week. If frozen, they can keep for up to three months. Just make sure to check the date on your container.
Look out for signs of spoilage. If the bars have an off smell, or if you see mold, it’s best to toss them. Also, if they become too hard or dry, that’s a sign they have lost their freshness. Enjoy your delicious homemade treats while they are at their best!
FAQs
Can I use different nut butters?
Yes, you can switch nut butters! Almond butter works well, too. You can even try cashew butter for a creamier taste. Each nut butter gives a unique flavor and texture. Just ensure you use unsweetened options for a healthy twist. This allows you to find the taste you love while keeping it healthy.
How can I make these bars less sweet?
To cut down the sweetness, reduce the maple syrup. You can start by using half the amount and taste as you mix. If you want it less sweet, add more almond flour to balance the flavor. You can also use a different sweetener, like stevia, for a low-calorie option. Adjust until you find the right level for your taste.
Are these bars kid-friendly?
Absolutely! These bars are full of healthy ingredients. Dates give them a sweet, chewy texture, while nut butter adds protein. Kids will love the chocolate layer on top. It’s a great way to sneak in nutrients without them noticing. You can serve them chilled or at room temperature, making them perfect for lunchboxes or snacks.
In this post, we explored the ingredients, preparation, and variations for delicious bars. We detailed how to create a great base, caramel, and chocolate layers while sharing tips to avoid common mistakes. We also discussed storage tips to keep your bars fresh.
Remember, you can adjust ingredients to fit your taste and dietary needs. Enjoy making these bars your way!
