Frozen Chocolate Strawberry Cake Delightful Dessert Recipe

WANT TO SAVE THIS RECIPE?

Are you ready to wow your friends and family with a dessert that shines? This Frozen Chocolate Strawberry Cake packs rich chocolate and fresh strawberries into every bite. It’s cool, creamy, and simply delightful for any occasion. In this article, I’ll guide you step-by-step through each part of the recipe, from making the crust to freezing the cake to perfection. Let’s dive in and create this sweet masterpiece together!

Ingredients

To make a Frozen Chocolate Strawberry Cake, you need simple yet delightful ingredients. Each one adds flavor and texture to this dessert. Here’s what you will need:

– 1 cup crushed chocolate wafers

– 1/2 cup unsalted butter, melted

– 1 cup fresh strawberries, hulled and sliced

– 2 cups heavy whipping cream

– 1 cup powdered sugar

– 1 teaspoon vanilla extract

– 1 cup semi-sweet chocolate chips, melted

– 1/2 cup strawberry puree (made from blended strawberries)

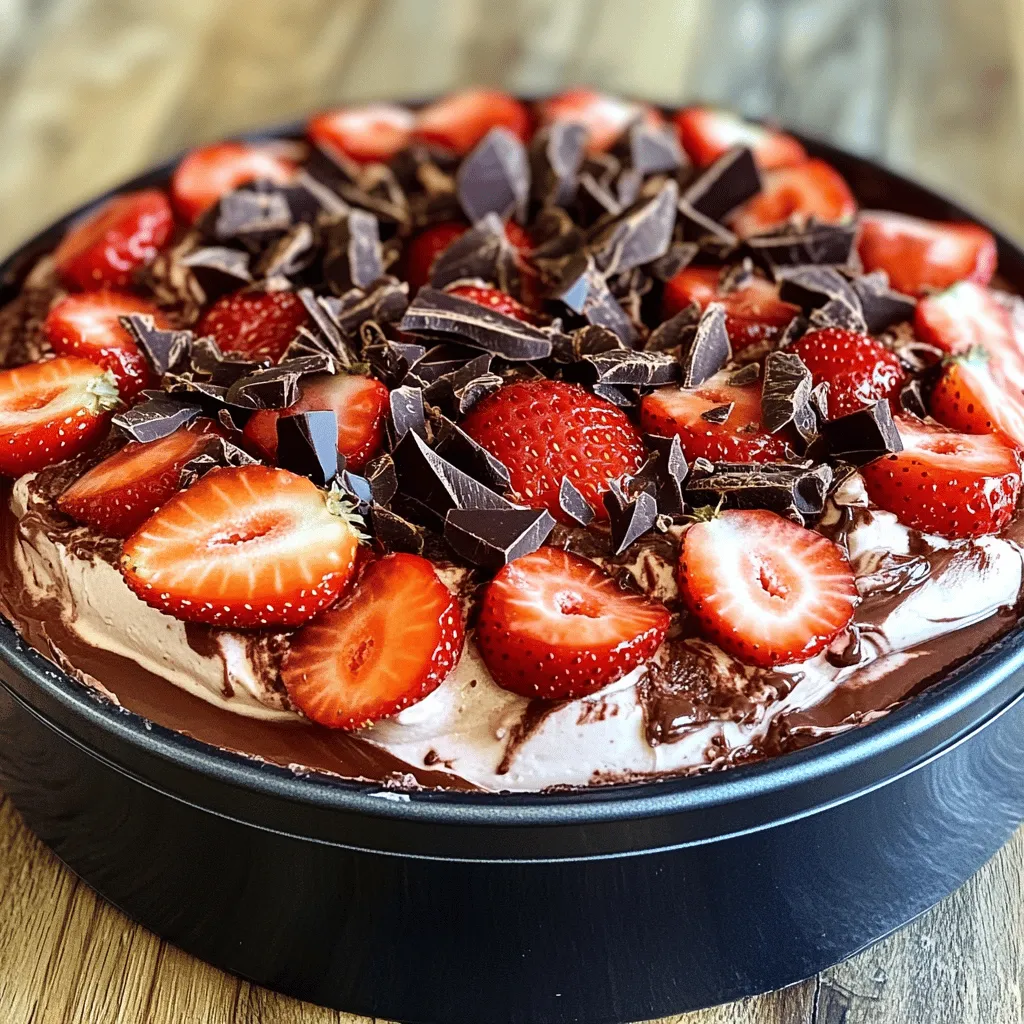
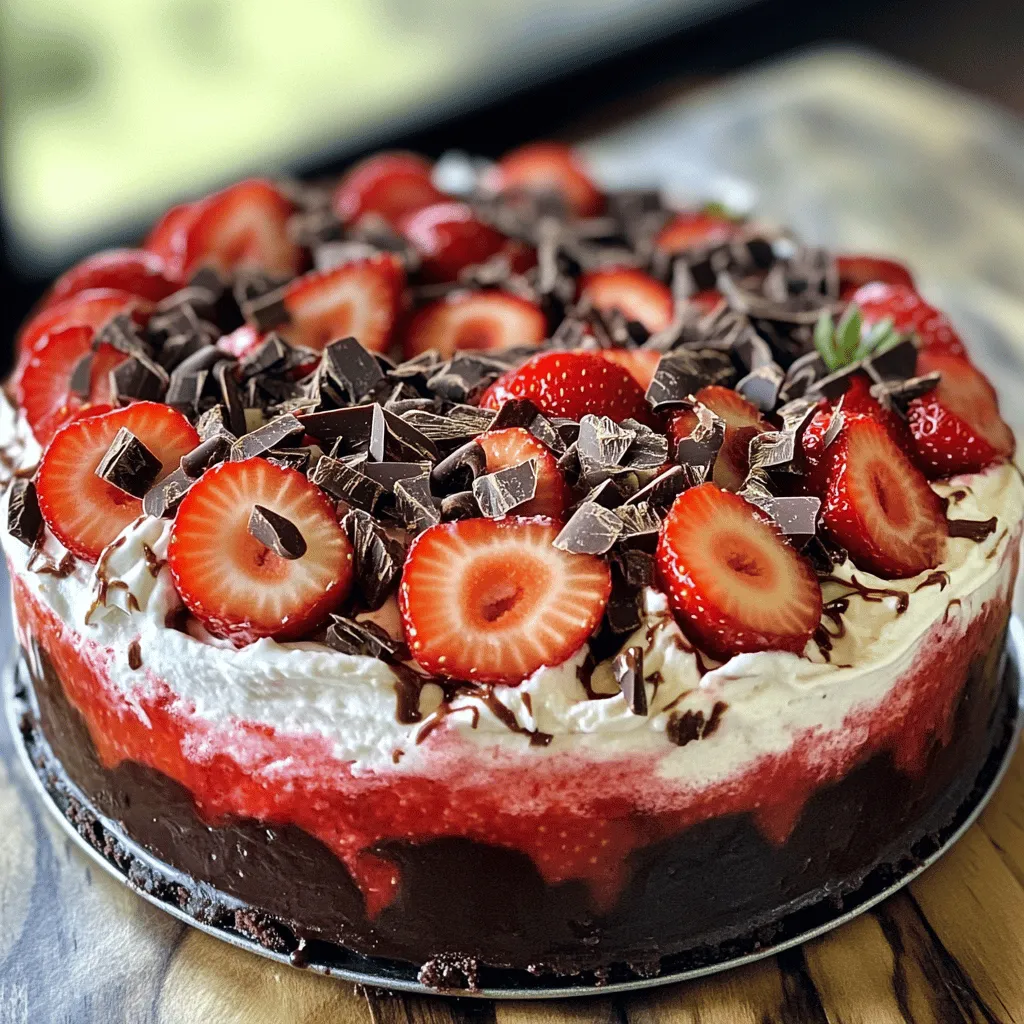
– Fresh strawberries and chocolate shavings for garnish

These ingredients come together to create a rich and satisfying dessert. The chocolate wafers form a tasty crust. The heavy cream gives a light and fluffy texture. Fresh strawberries add a burst of flavor and color.

Don’t forget to check out the Full Recipe for step-by-step instructions. This way, you can see how to use these ingredients effectively for a perfect treat.

Step-by-Step Instructions

Preparing the Crust

To start, mix 1 cup of crushed chocolate wafers with 1/2 cup of melted butter. Stir well until the mixture looks like wet sand. Next, press this mixture firmly into the bottom of a 9-inch springform pan. Make sure it is even and packed tightly. Place the pan in the freezer to help it set while you work on the filling.

Making the Whipped Cream

In a large bowl, pour in 2 cups of heavy whipping cream. Use an electric mixer to beat the cream until soft peaks form. This should take about 3 to 5 minutes. Slowly add 1 cup of powdered sugar and 1 teaspoon of vanilla extract. Keep mixing until stiff peaks appear. This creamy base is key to your cake’s texture.

Combining Chocolate and Strawberries

In a separate bowl, take half of your whipped cream. Gently fold in 1 cup of melted semi-sweet chocolate until it blends smoothly. In another bowl, fold 1/2 cup of strawberry puree into the remaining whipped cream. This will give you two lovely flavors: chocolate and strawberry.

Layering the Cake

Now it’s time to layer! Start by spreading the chocolate whipped cream evenly over the crust. Next, add a layer of sliced strawberries (1 cup). After that, spread the strawberry whipped cream on top of the strawberries. Smooth it out nicely, making it look pretty.

Freezing Process

Cover your springform pan with plastic wrap or a lid. Place it in the freezer for at least 4 hours. This allows the cake to freeze and firm up properly. You can also freeze it overnight if you want to prepare it ahead of time.

Serving Suggestions

Once the cake is fully set, carefully remove it from the springform pan. To make this easier, run a knife around the edges first. Garnish the top with fresh strawberries and chocolate shavings for an extra special touch. Slice the cake into wedges using a warm knife for cleaner cuts. Enjoy this delightful frozen treat! For the full recipe, refer to the instructions above.

Tips & Tricks

Achieving the Perfect Whipped Cream

To make great whipped cream, you need stiff peaks. Here are some tips:

Use cold cream: Always start with very cold heavy whipping cream. This helps it whip faster.

Choose the right bowl: A metal or glass bowl works best. It holds the cold better than plastic.

Whip at high speed: Use an electric mixer on high speed. This adds air and helps create volume.

Stop at the right time: Watch closely as you whip. Stop when the cream holds its shape but is not grainy.

Common mistakes include:

Over-whipping: This can turn cream into butter. Be careful and stop when you see stiff peaks.

Adding sugar too soon: Add powdered sugar only after soft peaks form. This helps the cream thicken well.

Best Practices for Freezing

Freezing your cake properly keeps it fresh and tasty. Here’s how to cover and store it:

Use plastic wrap: After you finish layering the cake, wrap it tightly with plastic wrap. This keeps out air and prevents freezer burn.

Use an airtight container: If you have one, place the wrapped cake in a container. This adds another layer of protection.

Label the cake: Write the date on the wrap or container. This helps you remember when you made it.

Slicing Techniques

Slicing a frozen cake can be tricky. Use this method for neat cuts:

Warm the knife: Run a sharp knife under hot water. Wipe it dry before slicing.

Cut slowly: Press down gently without sawing. This helps keep the layers intact.

This method makes each slice look great and keeps the layers from mixing. Enjoy your Frozen Chocolate Strawberry Cake! For the full recipe, check the previous sections.

Variations

Flavor Modifications

You can change the flavor of your Frozen Chocolate Strawberry Cake easily. Try using different fruits like bananas, raspberries, or blueberries. Each fruit brings its own special taste. If you want a twist, swap out the semi-sweet chocolate. Use dark chocolate for a richer flavor or white chocolate for a sweeter touch. These changes keep the cake fun and exciting.

Healthier Options

If you want a lighter version, consider low-fat whipping cream. It cuts down on calories while still giving great taste. For sugar, try using honey, agave, or a sugar substitute. This way, you can enjoy a sweet treat without the extra guilt.

Dietary Accommodations

Need a gluten-free option? Use gluten-free chocolate wafers for the crust. You won’t lose any flavor or texture. For vegan adaptations, replace the heavy cream with coconut cream. You can also swap the butter for coconut oil. This makes the cake dairy-free and still delicious. Enjoy this lovely dessert while meeting your dietary needs.

Storage Info

How to Store Leftovers

To keep your Frozen Chocolate Strawberry Cake fresh, store it in the freezer. Wrap the cake tightly in plastic wrap. This helps prevent freezer burn. You can also use an airtight container. Make sure it’s sealed well to keep out air.

Best Duration for Freezing

For the best taste and texture, freeze the cake for up to three months. After this time, the flavor may fade. It may still be safe to eat after three months, but it won’t be as good. So, mark your calendar to enjoy it within this time frame.

Thawing Instructions

When you’re ready to enjoy the cake, take it out of the freezer. Place it in the fridge for about four hours. This slow thawing keeps the cake’s texture nice. If you’re in a hurry, you can set it at room temperature for 30 minutes. Just don’t leave it out too long, or it may melt too much. Once it’s thawed, slice and serve! You can find the Full Recipe to help guide you in making this delightful treat.

FAQs

How long does it take to freeze the cake?

The cake needs at least 4 hours in the freezer. This time helps to set the layers right. If you want a firmer cake, freeze it overnight. The longer it freezes, the better the texture.

Can I make this cake ahead of time?

Yes, you can prepare this cake a day or two in advance. Just keep it covered in the freezer. This way, it stays fresh and ready to serve when guests arrive.

What can I use instead of chocolate wafers?

If you don’t have chocolate wafers, use crushed graham crackers or Oreo cookies. Both options work well for a tasty crust. They give a nice flavor and good texture to the cake.

Is this cake suitable for special occasions?

Absolutely! This cake is perfect for birthdays, anniversaries, or holidays. Its rich flavors and beautiful layers impress guests. You can even add candles for a birthday celebration or serve it at a summer picnic.

Can I add other toppings?

You can get creative with toppings! Try whipped cream, crushed nuts, or fresh mint. You can also use other fruits like raspberries or blueberries. These additions make the cake even more special and fun.

For the full recipe, check out the details provided earlier.

This recipe combines bright strawberries and rich chocolate for a delightful treat. You learned how to make the crust, cream, and layers. I shared helpful tips for freezing, slicing, and flavor variations. Remember, you can mix and match ingredients to fit your taste. It’s a fun dessert to make and share. Enjoy creating your unique version of this frozen cake masterpiece!

To make a Frozen Chocolate Strawberry Cake, you need simple yet delightful ingredients. Each one adds flavor and texture to this dessert. Here’s what you will need: - 1 cup crushed chocolate wafers - 1/2 cup unsalted butter, melted - 1 cup fresh strawberries, hulled and sliced - 2 cups heavy whipping cream - 1 cup powdered sugar - 1 teaspoon vanilla extract - 1 cup semi-sweet chocolate chips, melted - 1/2 cup strawberry puree (made from blended strawberries) - Fresh strawberries and chocolate shavings for garnish These ingredients come together to create a rich and satisfying dessert. The chocolate wafers form a tasty crust. The heavy cream gives a light and fluffy texture. Fresh strawberries add a burst of flavor and color. Don't forget to check out the Full Recipe for step-by-step instructions. This way, you can see how to use these ingredients effectively for a perfect treat. To start, mix 1 cup of crushed chocolate wafers with 1/2 cup of melted butter. Stir well until the mixture looks like wet sand. Next, press this mixture firmly into the bottom of a 9-inch springform pan. Make sure it is even and packed tightly. Place the pan in the freezer to help it set while you work on the filling. In a large bowl, pour in 2 cups of heavy whipping cream. Use an electric mixer to beat the cream until soft peaks form. This should take about 3 to 5 minutes. Slowly add 1 cup of powdered sugar and 1 teaspoon of vanilla extract. Keep mixing until stiff peaks appear. This creamy base is key to your cake's texture. In a separate bowl, take half of your whipped cream. Gently fold in 1 cup of melted semi-sweet chocolate until it blends smoothly. In another bowl, fold 1/2 cup of strawberry puree into the remaining whipped cream. This will give you two lovely flavors: chocolate and strawberry. Now it's time to layer! Start by spreading the chocolate whipped cream evenly over the crust. Next, add a layer of sliced strawberries (1 cup). After that, spread the strawberry whipped cream on top of the strawberries. Smooth it out nicely, making it look pretty. Cover your springform pan with plastic wrap or a lid. Place it in the freezer for at least 4 hours. This allows the cake to freeze and firm up properly. You can also freeze it overnight if you want to prepare it ahead of time. Once the cake is fully set, carefully remove it from the springform pan. To make this easier, run a knife around the edges first. Garnish the top with fresh strawberries and chocolate shavings for an extra special touch. Slice the cake into wedges using a warm knife for cleaner cuts. Enjoy this delightful frozen treat! For the full recipe, refer to the instructions above. To make great whipped cream, you need stiff peaks. Here are some tips: - Use cold cream: Always start with very cold heavy whipping cream. This helps it whip faster. - Choose the right bowl: A metal or glass bowl works best. It holds the cold better than plastic. - Whip at high speed: Use an electric mixer on high speed. This adds air and helps create volume. - Stop at the right time: Watch closely as you whip. Stop when the cream holds its shape but is not grainy. Common mistakes include: - Over-whipping: This can turn cream into butter. Be careful and stop when you see stiff peaks. - Adding sugar too soon: Add powdered sugar only after soft peaks form. This helps the cream thicken well. Freezing your cake properly keeps it fresh and tasty. Here’s how to cover and store it: - Use plastic wrap: After you finish layering the cake, wrap it tightly with plastic wrap. This keeps out air and prevents freezer burn. - Use an airtight container: If you have one, place the wrapped cake in a container. This adds another layer of protection. - Label the cake: Write the date on the wrap or container. This helps you remember when you made it. Slicing a frozen cake can be tricky. Use this method for neat cuts: - Warm the knife: Run a sharp knife under hot water. Wipe it dry before slicing. - Cut slowly: Press down gently without sawing. This helps keep the layers intact. This method makes each slice look great and keeps the layers from mixing. Enjoy your Frozen Chocolate Strawberry Cake! For the full recipe, check the previous sections. {{image_2}} You can change the flavor of your Frozen Chocolate Strawberry Cake easily. Try using different fruits like bananas, raspberries, or blueberries. Each fruit brings its own special taste. If you want a twist, swap out the semi-sweet chocolate. Use dark chocolate for a richer flavor or white chocolate for a sweeter touch. These changes keep the cake fun and exciting. If you want a lighter version, consider low-fat whipping cream. It cuts down on calories while still giving great taste. For sugar, try using honey, agave, or a sugar substitute. This way, you can enjoy a sweet treat without the extra guilt. Need a gluten-free option? Use gluten-free chocolate wafers for the crust. You won’t lose any flavor or texture. For vegan adaptations, replace the heavy cream with coconut cream. You can also swap the butter for coconut oil. This makes the cake dairy-free and still delicious. Enjoy this lovely dessert while meeting your dietary needs. To keep your Frozen Chocolate Strawberry Cake fresh, store it in the freezer. Wrap the cake tightly in plastic wrap. This helps prevent freezer burn. You can also use an airtight container. Make sure it's sealed well to keep out air. For the best taste and texture, freeze the cake for up to three months. After this time, the flavor may fade. It may still be safe to eat after three months, but it won’t be as good. So, mark your calendar to enjoy it within this time frame. When you're ready to enjoy the cake, take it out of the freezer. Place it in the fridge for about four hours. This slow thawing keeps the cake's texture nice. If you're in a hurry, you can set it at room temperature for 30 minutes. Just don’t leave it out too long, or it may melt too much. Once it's thawed, slice and serve! You can find the Full Recipe to help guide you in making this delightful treat. The cake needs at least 4 hours in the freezer. This time helps to set the layers right. If you want a firmer cake, freeze it overnight. The longer it freezes, the better the texture. Yes, you can prepare this cake a day or two in advance. Just keep it covered in the freezer. This way, it stays fresh and ready to serve when guests arrive. If you don't have chocolate wafers, use crushed graham crackers or Oreo cookies. Both options work well for a tasty crust. They give a nice flavor and good texture to the cake. Absolutely! This cake is perfect for birthdays, anniversaries, or holidays. Its rich flavors and beautiful layers impress guests. You can even add candles for a birthday celebration or serve it at a summer picnic. You can get creative with toppings! Try whipped cream, crushed nuts, or fresh mint. You can also use other fruits like raspberries or blueberries. These additions make the cake even more special and fun. For the full recipe, check out the details provided earlier. This recipe combines bright strawberries and rich chocolate for a delightful treat. You learned how to make the crust, cream, and layers. I shared helpful tips for freezing, slicing, and flavor variations. Remember, you can mix and match ingredients to fit your taste. It's a fun dessert to make and share. Enjoy creating your unique version of this frozen cake masterpiece!

Frozen Chocolate Strawberry Cake

Indulge in the delightful flavors of a Frozen Chocolate Strawberry Cake that's perfect for any occasion! This no-bake dessert features a rich chocolate wafer crust, luscious layers of whipped cream, and fresh strawberries, all frozen to perfection. It's an easy-to-follow recipe that will impress your friends and family. Ready to tantalize your taste buds? Click through to explore the full recipe and make this dreamy treat today!

Ingredients
  

1 cup crushed chocolate wafers

1/2 cup unsalted butter, melted

1 cup fresh strawberries, hulled and sliced

2 cups heavy whipping cream

1 cup powdered sugar

1 teaspoon vanilla extract

1 cup semi-sweet chocolate chips, melted

1/2 cup strawberry puree (made from blended strawberries)

Fresh strawberries and chocolate shavings for garnish

Instructions
 

Prepare the Crust: In a bowl, combine the crushed chocolate wafers with the melted butter. Mix until fully integrated. Press the mixture firmly into the bottom of a 9-inch springform pan to form the crust. Place the crust in the freezer to set while you prepare the filling.

    Make the Whipped Cream: In a large mixing bowl, beat the heavy whipping cream with an electric mixer until soft peaks form. Gradually add the powdered sugar and vanilla extract, continuing to whip until stiff peaks form.

      Combine Chocolate and Strawberries: In a separate bowl, take half of the whipped cream and gently fold in the melted semi-sweet chocolate. In another bowl, fold the strawberry puree into the remaining whipped cream.

        Layer the Cake: Start by spreading the chocolate whipped cream mixture evenly over the crust. Follow with a layer of sliced strawberries. Then, spread the strawberry whipped cream over the strawberries, smoothing out the top.

          Freeze the Cake: Cover the springform pan with plastic wrap or a lid, and freeze the cake for at least 4 hours or until firm.

            Serve: Once the cake is fully set, carefully remove it from the springform pan. Garnish with fresh strawberries and chocolate shavings on top.

              Slice and Enjoy: Using a sharp knife, slice the cake into wedges while working with a warm knife to achieve cleaner cuts. Serve immediately and enjoy the creamy, frozen treat!

                Prep Time: 30 minutes | Total Time: 4 hours 30 minutes | Servings: 10

                  WANT TO SAVE THIS RECIPE?