![- Chicken thighs - Apple cider - Onions - Olive oil - Garlic - Fresh thyme - Paprika - Salt and pepper - Fresh parsley For this cider braised chicken, I choose bone-in, skin-on chicken thighs. They stay juicy and tender during cooking. The apple cider adds sweetness and depth. Fresh onions caramelize to a rich, golden brown. Olive oil gives a nice base for cooking. Garlic brings a wonderful aroma to the dish. Fresh thyme adds an earthy note. Paprika gives warmth and color. Salt and pepper enhance all the flavors. When you gather your ingredients, focus on quality. Use fresh herbs and good cider for the best taste. Each component plays a key role in making this dish shine. You can find the full recipe in the article. Enjoy the process, and let the flavors develop! To start, heat 2 tablespoons of olive oil in a large pot over medium heat. Season the chicken thighs with salt, pepper, and paprika. Place them skin-side down in the pot. Sear for about 5 to 7 minutes until the skin turns golden brown and crispy. Remember to flip the chicken and cook for another 3 to 4 minutes. Remove the chicken and set it aside. This step locks in flavor and gives you that nice crunch. Next, add the sliced onions to the same pot. If needed, add the last tablespoon of olive oil. Keep the heat low and sprinkle a pinch of salt. Cook the onions for about 15 to 20 minutes. Stir often. Look for them to turn soft and deep golden brown. This slow cooking is key to bringing out their natural sweetness. Once the onions are caramelized, it’s time to add garlic and thyme. Add the minced garlic and fresh thyme to the pot. Cook for about 1 to 2 minutes. This adds a lovely aroma and depth to the dish. Make sure not to burn the garlic, as it can turn bitter. Now, pour in the apple cider. This is where the magic happens! Use a wooden spoon to scrape the bottom of the pot. This helps lift all those tasty browned bits. Bring the mixture to a gentle simmer. This will combine all the flavors nicely. Return the seared chicken thighs to the pot, skin-side up. Make sure they are mostly submerged in the cider and onion mix. Cover the pot and reduce the heat to low. Let it simmer for 30 to 35 minutes. This slow cooking makes the chicken tender and juicy. After braising, taste the sauce. Adjust the seasoning with more salt and pepper if needed. If you want a thicker sauce, remove the chicken and let the sauce reduce over medium heat for a few minutes. This gives you a rich, flavorful sauce. Finally, serve the chicken thighs topped with the caramelized onions. Spoon the sauce over the top. For presentation, plate the chicken on a rustic board. Garnish with fresh parsley for color. Pair it with crusty bread or mashed potatoes. Enjoy this delicious meal! For the complete recipe, check out the Full Recipe. To enhance your cider-braised chicken, consider these spices and seasonings: - Fresh thyme adds a lovely herb taste. - Paprika gives a warm, smoky hint. - Salt and pepper boost all flavors. I often add a pinch of cinnamon for warmth. The sweetness from the cider pairs well with it. Each spice brings out the best in your dish. Braising is key for this recipe. It cooks the chicken slowly in liquid. This method keeps the meat moist and tender. You might wonder why braising over baking. Baking can dry out the chicken quickly. Braising allows the chicken to absorb all the cider's flavor. It also helps the onions caramelize perfectly. A heavy-bottomed pot is a must for braising. It distributes heat evenly, preventing burning. I recommend using a Dutch oven for this dish. The tight lid helps trap steam and flavor. You also want a sturdy wooden spoon for stirring. It allows you to scrape the pot without scratching it. Each tool plays a role in making your dish a success. For the complete recipe, check out the [Full Recipe]. {{image_2}} You can add more vegetables to this dish. Carrots, parsnips, or potatoes work well. These veggies soak up the cider's flavor. You can roast them first for richer taste. Other herbs can also change the flavor. Try rosemary or sage for a warm twist. Fresh herbs add brightness to the dish. Using a mix can make your meal unique. If you want a slow cooker version, just follow a few steps. Sear the chicken first for flavor. Then, place everything in your slow cooker. Set it on low for 6 to 8 hours. The chicken will be tender and juicy. You can also braise in the oven. Preheat to 325°F. Use a Dutch oven, cover it, and cook for about 1 hour. This method gives you a nice, even heat. Side dishes can enhance your cider chicken. Mashed potatoes or rice soak up the sauce well. Roasted vegetables add color and nutrition. A crisp salad can balance the meal, too. For drinks, pair with a glass of cider. It complements the dish perfectly. You can also try a light white wine, like Sauvignon Blanc, for a refreshing taste. To keep your cider-braised chicken fresh, store it in a tight container. Place it in the fridge within two hours of cooking. This helps prevent bacteria growth. You can enjoy the chicken for up to four days when stored properly. If you want to keep it longer, freeze it. For freezing, wrap each piece tightly in plastic wrap, then place it in a freezer bag. This method stops freezer burn and keeps it tasty. You can freeze it for about three months. When you are ready to eat your leftovers, keep them juicy. The best method is to reheat on the stove. Place the chicken in a pan with a little cider or broth. Cover the pan with a lid. Heat it over low to medium heat until warm. This keeps your chicken moist and flavorful. You can also use the microwave, but be careful. Heat it in short bursts, checking often to avoid drying it out. Your cider-braised chicken can last up to four days in the fridge. If frozen, it can last around three months. Always check for signs of spoilage before eating. If the chicken smells off or has a slimy texture, throw it away. Trust your senses. Keeping your food safe is key to enjoying delicious meals. For more tips, check the Full Recipe for guidance. Yes, you can use chicken breasts. However, they cook faster than thighs. Chicken breasts may dry out if overcooked. Thighs have more fat and stay juicy. If using breasts, check for doneness after 20 minutes of simmering. This will help you keep them tender. You can use either hard or non-alcoholic cider. Hard cider adds depth and a slight tartness. Non-alcoholic cider is great for family meals. Both options work well in this recipe. Choose one that you enjoy drinking for the best flavor. To make this dish gluten-free, check all your ingredients. Use gluten-free chicken broth if needed. The ingredients listed are naturally gluten-free. Ensure your cider does not contain gluten. Many brands offer gluten-free options. Yes, you can prepare this dish in advance. Cook it fully and let it cool. Store in an airtight container in the fridge. Reheat on the stove or microwave when ready to serve. This dish tastes even better the next day as flavors meld. If you don’t have thyme, use rosemary or oregano. Both herbs add great flavor. You can also try sage for a different taste. Adjust the amount based on your preference. Fresh herbs usually have a stronger flavor than dried ones. This recipe teaches you how to create a tasty chicken dish using simple steps. We covered the key ingredients, the searing method, and the importance of flavors. You learned about cooking techniques, storage tips, and possible variations to try. Cooking can be fun and rewarding. With this recipe, you can impress your friends and family. Enjoy the process, get creative, and make this meal your own. Happy cooking!](https://toastedrecipes.com/wp-content/uploads/2025/07/90e1c497-8bd8-41d0-84c5-0b47ed2ae229.webp)
Get ready to impress your taste buds with my Cider Braised Chicken with Caramelized Onions! This comforting dish blends tender chicken thighs with sweet cider and savory onions for a mouthwatering experience. In this article, I’ll guide you through simple steps to create this flavor-packed meal. Perfect for cozy evenings, this recipe is easy and satisfying. Let’s dive in and start cooking!
Ingredients
List of Ingredients
– Chicken thighs
– Apple cider
– Onions
– Olive oil
– Garlic
– Fresh thyme
– Paprika
– Salt and pepper
– Fresh parsley
For this cider braised chicken, I choose bone-in, skin-on chicken thighs. They stay juicy and tender during cooking. The apple cider adds sweetness and depth. Fresh onions caramelize to a rich, golden brown. Olive oil gives a nice base for cooking. Garlic brings a wonderful aroma to the dish. Fresh thyme adds an earthy note. Paprika gives warmth and color. Salt and pepper enhance all the flavors.
When you gather your ingredients, focus on quality. Use fresh herbs and good cider for the best taste. Each component plays a key role in making this dish shine. You can find the full recipe in the article. Enjoy the process, and let the flavors develop!
Step-by-Step Instructions
Step 1: Sear the Chicken
To start, heat 2 tablespoons of olive oil in a large pot over medium heat. Season the chicken thighs with salt, pepper, and paprika. Place them skin-side down in the pot. Sear for about 5 to 7 minutes until the skin turns golden brown and crispy. Remember to flip the chicken and cook for another 3 to 4 minutes. Remove the chicken and set it aside. This step locks in flavor and gives you that nice crunch.
Step 2: Caramelize the Onions
Next, add the sliced onions to the same pot. If needed, add the last tablespoon of olive oil. Keep the heat low and sprinkle a pinch of salt. Cook the onions for about 15 to 20 minutes. Stir often. Look for them to turn soft and deep golden brown. This slow cooking is key to bringing out their natural sweetness.
Step 3: Add Garlic and Thyme
Once the onions are caramelized, it’s time to add garlic and thyme. Add the minced garlic and fresh thyme to the pot. Cook for about 1 to 2 minutes. This adds a lovely aroma and depth to the dish. Make sure not to burn the garlic, as it can turn bitter.
Step 4: Deglaze with Cider
Now, pour in the apple cider. This is where the magic happens! Use a wooden spoon to scrape the bottom of the pot. This helps lift all those tasty browned bits. Bring the mixture to a gentle simmer. This will combine all the flavors nicely.
Step 5: Braise the Chicken
Return the seared chicken thighs to the pot, skin-side up. Make sure they are mostly submerged in the cider and onion mix. Cover the pot and reduce the heat to low. Let it simmer for 30 to 35 minutes. This slow cooking makes the chicken tender and juicy.
Step 6: Final Touches
After braising, taste the sauce. Adjust the seasoning with more salt and pepper if needed. If you want a thicker sauce, remove the chicken and let the sauce reduce over medium heat for a few minutes. This gives you a rich, flavorful sauce.
Step 7: Serve
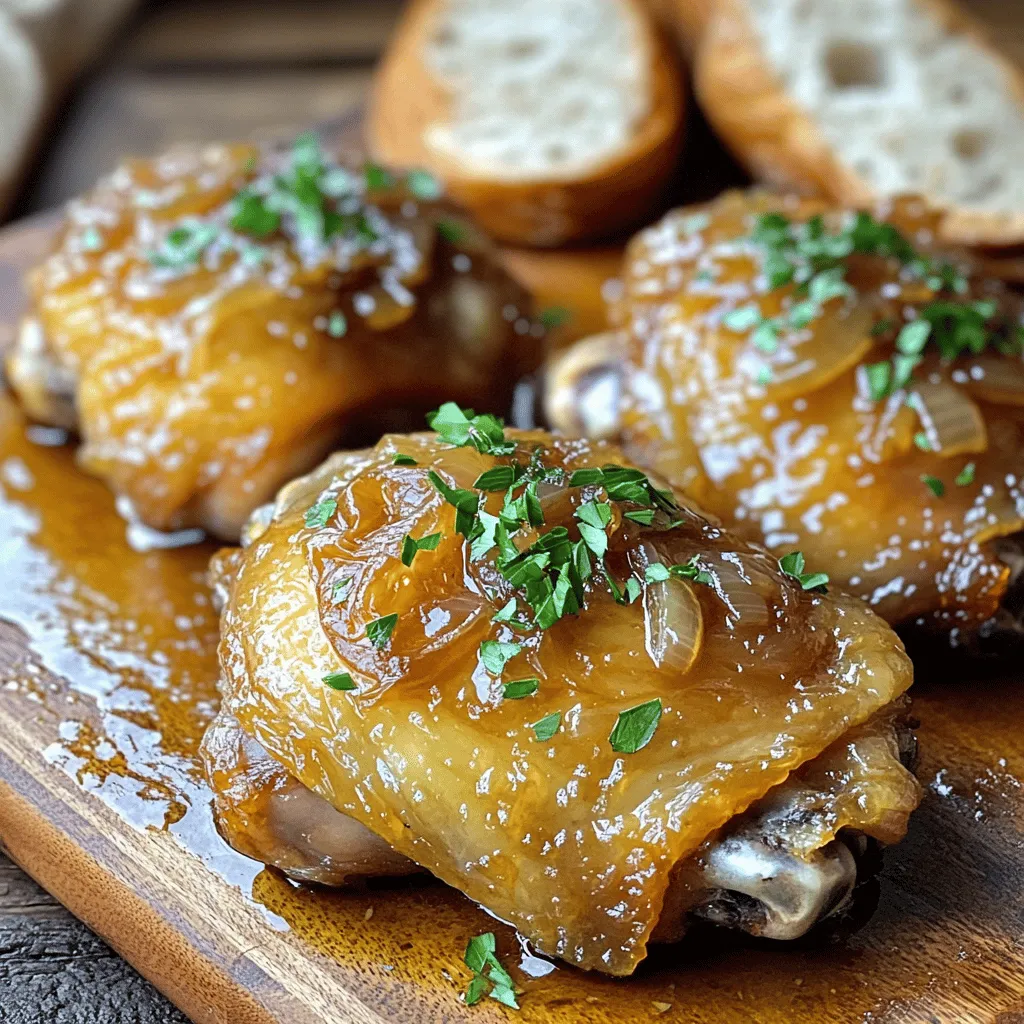
Finally, serve the chicken thighs topped with the caramelized onions. Spoon the sauce over the top. For presentation, plate the chicken on a rustic board. Garnish with fresh parsley for color. Pair it with crusty bread or mashed potatoes. Enjoy this delicious meal! For the complete recipe, check out the Full Recipe.
Tips & Tricks
Perfecting the Flavor
To enhance your cider-braised chicken, consider these spices and seasonings:
– Fresh thyme adds a lovely herb taste.
– Paprika gives a warm, smoky hint.
– Salt and pepper boost all flavors.
I often add a pinch of cinnamon for warmth. The sweetness from the cider pairs well with it. Each spice brings out the best in your dish.
Cooking Techniques
Braising is key for this recipe. It cooks the chicken slowly in liquid. This method keeps the meat moist and tender. You might wonder why braising over baking. Baking can dry out the chicken quickly. Braising allows the chicken to absorb all the cider’s flavor. It also helps the onions caramelize perfectly.
Tools and Equipment
A heavy-bottomed pot is a must for braising. It distributes heat evenly, preventing burning. I recommend using a Dutch oven for this dish. The tight lid helps trap steam and flavor. You also want a sturdy wooden spoon for stirring. It allows you to scrape the pot without scratching it. Each tool plays a role in making your dish a success. For the complete recipe, check out the [Full Recipe].
Variations
Additions to Enhance Flavor
You can add more vegetables to this dish. Carrots, parsnips, or potatoes work well. These veggies soak up the cider’s flavor. You can roast them first for richer taste. Other herbs can also change the flavor. Try rosemary or sage for a warm twist. Fresh herbs add brightness to the dish. Using a mix can make your meal unique.
Alternative Cooking Methods
If you want a slow cooker version, just follow a few steps. Sear the chicken first for flavor. Then, place everything in your slow cooker. Set it on low for 6 to 8 hours. The chicken will be tender and juicy. You can also braise in the oven. Preheat to 325°F. Use a Dutch oven, cover it, and cook for about 1 hour. This method gives you a nice, even heat.
Serving Pairings
Side dishes can enhance your cider chicken. Mashed potatoes or rice soak up the sauce well. Roasted vegetables add color and nutrition. A crisp salad can balance the meal, too. For drinks, pair with a glass of cider. It complements the dish perfectly. You can also try a light white wine, like Sauvignon Blanc, for a refreshing taste.
Storage Info
Storing Leftovers
To keep your cider-braised chicken fresh, store it in a tight container. Place it in the fridge within two hours of cooking. This helps prevent bacteria growth. You can enjoy the chicken for up to four days when stored properly. If you want to keep it longer, freeze it. For freezing, wrap each piece tightly in plastic wrap, then place it in a freezer bag. This method stops freezer burn and keeps it tasty. You can freeze it for about three months.
Reheating
When you are ready to eat your leftovers, keep them juicy. The best method is to reheat on the stove. Place the chicken in a pan with a little cider or broth. Cover the pan with a lid. Heat it over low to medium heat until warm. This keeps your chicken moist and flavorful. You can also use the microwave, but be careful. Heat it in short bursts, checking often to avoid drying it out.
Shelf Life
Your cider-braised chicken can last up to four days in the fridge. If frozen, it can last around three months. Always check for signs of spoilage before eating. If the chicken smells off or has a slimy texture, throw it away. Trust your senses. Keeping your food safe is key to enjoying delicious meals. For more tips, check the Full Recipe for guidance.
FAQs
Can I use chicken breasts instead of thighs?
Yes, you can use chicken breasts. However, they cook faster than thighs. Chicken breasts may dry out if overcooked. Thighs have more fat and stay juicy. If using breasts, check for doneness after 20 minutes of simmering. This will help you keep them tender.
What type of cider should I use?
You can use either hard or non-alcoholic cider. Hard cider adds depth and a slight tartness. Non-alcoholic cider is great for family meals. Both options work well in this recipe. Choose one that you enjoy drinking for the best flavor.
How can I make this dish gluten-free?
To make this dish gluten-free, check all your ingredients. Use gluten-free chicken broth if needed. The ingredients listed are naturally gluten-free. Ensure your cider does not contain gluten. Many brands offer gluten-free options.
Can I make this recipe ahead of time?
Yes, you can prepare this dish in advance. Cook it fully and let it cool. Store in an airtight container in the fridge. Reheat on the stove or microwave when ready to serve. This dish tastes even better the next day as flavors meld.
What can I substitute for thyme?
If you don’t have thyme, use rosemary or oregano. Both herbs add great flavor. You can also try sage for a different taste. Adjust the amount based on your preference. Fresh herbs usually have a stronger flavor than dried ones.
This recipe teaches you how to create a tasty chicken dish using simple steps. We covered the key ingredients, the searing method, and the importance of flavors. You learned about cooking techniques, storage tips, and possible variations to try.
Cooking can be fun and rewarding. With this recipe, you can impress your friends and family. Enjoy the process, get creative, and make this meal your own. Happy cooking!
![- Chicken thighs - Apple cider - Onions - Olive oil - Garlic - Fresh thyme - Paprika - Salt and pepper - Fresh parsley For this cider braised chicken, I choose bone-in, skin-on chicken thighs. They stay juicy and tender during cooking. The apple cider adds sweetness and depth. Fresh onions caramelize to a rich, golden brown. Olive oil gives a nice base for cooking. Garlic brings a wonderful aroma to the dish. Fresh thyme adds an earthy note. Paprika gives warmth and color. Salt and pepper enhance all the flavors. When you gather your ingredients, focus on quality. Use fresh herbs and good cider for the best taste. Each component plays a key role in making this dish shine. You can find the full recipe in the article. Enjoy the process, and let the flavors develop! To start, heat 2 tablespoons of olive oil in a large pot over medium heat. Season the chicken thighs with salt, pepper, and paprika. Place them skin-side down in the pot. Sear for about 5 to 7 minutes until the skin turns golden brown and crispy. Remember to flip the chicken and cook for another 3 to 4 minutes. Remove the chicken and set it aside. This step locks in flavor and gives you that nice crunch. Next, add the sliced onions to the same pot. If needed, add the last tablespoon of olive oil. Keep the heat low and sprinkle a pinch of salt. Cook the onions for about 15 to 20 minutes. Stir often. Look for them to turn soft and deep golden brown. This slow cooking is key to bringing out their natural sweetness. Once the onions are caramelized, it’s time to add garlic and thyme. Add the minced garlic and fresh thyme to the pot. Cook for about 1 to 2 minutes. This adds a lovely aroma and depth to the dish. Make sure not to burn the garlic, as it can turn bitter. Now, pour in the apple cider. This is where the magic happens! Use a wooden spoon to scrape the bottom of the pot. This helps lift all those tasty browned bits. Bring the mixture to a gentle simmer. This will combine all the flavors nicely. Return the seared chicken thighs to the pot, skin-side up. Make sure they are mostly submerged in the cider and onion mix. Cover the pot and reduce the heat to low. Let it simmer for 30 to 35 minutes. This slow cooking makes the chicken tender and juicy. After braising, taste the sauce. Adjust the seasoning with more salt and pepper if needed. If you want a thicker sauce, remove the chicken and let the sauce reduce over medium heat for a few minutes. This gives you a rich, flavorful sauce. Finally, serve the chicken thighs topped with the caramelized onions. Spoon the sauce over the top. For presentation, plate the chicken on a rustic board. Garnish with fresh parsley for color. Pair it with crusty bread or mashed potatoes. Enjoy this delicious meal! For the complete recipe, check out the Full Recipe. To enhance your cider-braised chicken, consider these spices and seasonings: - Fresh thyme adds a lovely herb taste. - Paprika gives a warm, smoky hint. - Salt and pepper boost all flavors. I often add a pinch of cinnamon for warmth. The sweetness from the cider pairs well with it. Each spice brings out the best in your dish. Braising is key for this recipe. It cooks the chicken slowly in liquid. This method keeps the meat moist and tender. You might wonder why braising over baking. Baking can dry out the chicken quickly. Braising allows the chicken to absorb all the cider's flavor. It also helps the onions caramelize perfectly. A heavy-bottomed pot is a must for braising. It distributes heat evenly, preventing burning. I recommend using a Dutch oven for this dish. The tight lid helps trap steam and flavor. You also want a sturdy wooden spoon for stirring. It allows you to scrape the pot without scratching it. Each tool plays a role in making your dish a success. For the complete recipe, check out the [Full Recipe]. {{image_2}} You can add more vegetables to this dish. Carrots, parsnips, or potatoes work well. These veggies soak up the cider's flavor. You can roast them first for richer taste. Other herbs can also change the flavor. Try rosemary or sage for a warm twist. Fresh herbs add brightness to the dish. Using a mix can make your meal unique. If you want a slow cooker version, just follow a few steps. Sear the chicken first for flavor. Then, place everything in your slow cooker. Set it on low for 6 to 8 hours. The chicken will be tender and juicy. You can also braise in the oven. Preheat to 325°F. Use a Dutch oven, cover it, and cook for about 1 hour. This method gives you a nice, even heat. Side dishes can enhance your cider chicken. Mashed potatoes or rice soak up the sauce well. Roasted vegetables add color and nutrition. A crisp salad can balance the meal, too. For drinks, pair with a glass of cider. It complements the dish perfectly. You can also try a light white wine, like Sauvignon Blanc, for a refreshing taste. To keep your cider-braised chicken fresh, store it in a tight container. Place it in the fridge within two hours of cooking. This helps prevent bacteria growth. You can enjoy the chicken for up to four days when stored properly. If you want to keep it longer, freeze it. For freezing, wrap each piece tightly in plastic wrap, then place it in a freezer bag. This method stops freezer burn and keeps it tasty. You can freeze it for about three months. When you are ready to eat your leftovers, keep them juicy. The best method is to reheat on the stove. Place the chicken in a pan with a little cider or broth. Cover the pan with a lid. Heat it over low to medium heat until warm. This keeps your chicken moist and flavorful. You can also use the microwave, but be careful. Heat it in short bursts, checking often to avoid drying it out. Your cider-braised chicken can last up to four days in the fridge. If frozen, it can last around three months. Always check for signs of spoilage before eating. If the chicken smells off or has a slimy texture, throw it away. Trust your senses. Keeping your food safe is key to enjoying delicious meals. For more tips, check the Full Recipe for guidance. Yes, you can use chicken breasts. However, they cook faster than thighs. Chicken breasts may dry out if overcooked. Thighs have more fat and stay juicy. If using breasts, check for doneness after 20 minutes of simmering. This will help you keep them tender. You can use either hard or non-alcoholic cider. Hard cider adds depth and a slight tartness. Non-alcoholic cider is great for family meals. Both options work well in this recipe. Choose one that you enjoy drinking for the best flavor. To make this dish gluten-free, check all your ingredients. Use gluten-free chicken broth if needed. The ingredients listed are naturally gluten-free. Ensure your cider does not contain gluten. Many brands offer gluten-free options. Yes, you can prepare this dish in advance. Cook it fully and let it cool. Store in an airtight container in the fridge. Reheat on the stove or microwave when ready to serve. This dish tastes even better the next day as flavors meld. If you don’t have thyme, use rosemary or oregano. Both herbs add great flavor. You can also try sage for a different taste. Adjust the amount based on your preference. Fresh herbs usually have a stronger flavor than dried ones. This recipe teaches you how to create a tasty chicken dish using simple steps. We covered the key ingredients, the searing method, and the importance of flavors. You learned about cooking techniques, storage tips, and possible variations to try. Cooking can be fun and rewarding. With this recipe, you can impress your friends and family. Enjoy the process, get creative, and make this meal your own. Happy cooking!](https://toastedrecipes.com/wp-content/uploads/2025/07/90e1c497-8bd8-41d0-84c5-0b47ed2ae229-300x300.webp)