Looking for a fun snack that’s easy to make and packed with flavor? Cheesy Pepperoni Pizza Roll-Ups are the perfect dish for pizza lovers, young and old! With gooey cheese and savory pepperoni wrapped in warm dough, these roll-ups will be a hit at any gathering. Plus, they are simple to prepare and customizable to fit your needs. Let’s dive into the delicious details!
Ingredients
List of Ingredients
– 1 large pizza dough (store-bought or homemade)
– 1 cup shredded mozzarella cheese
– 1 cup sliced pepperoni
– 1/2 cup pizza sauce (for dipping)
– 1 tablespoon olive oil
– 1 teaspoon garlic powder
– 1 teaspoon dried oregano
– 1/2 teaspoon red pepper flakes (optional)
– Fresh basil leaves for garnish (optional)
Ingredient Substitutions
You can replace mozzarella with other cheeses like cheddar or provolone for a twist. If you need gluten-free options, use a gluten-free pizza dough. You can also swap pepperoni for other meats like sausage or turkey. For a veggie option, try mushrooms, bell peppers, or olives.
Seasoning Enhancements
To make the flavor pop, add herbs like thyme or rosemary. You can also change the garlic powder with fresh minced garlic for a stronger taste. If you enjoy heat, add more red pepper flakes for a spicy kick. These small changes can make a big difference in taste!
Step-by-Step Instructions
Preparation Steps
1. Preheat your oven to 400°F (200°C). This helps cook the roll-ups evenly.
2. Prepare a baking sheet by lining it with parchment paper. This prevents sticking.
3. On a floured surface, roll out the pizza dough. Aim for a rectangle about 1/4 inch thick. This gives a nice base for your filling.
Assembling the Roll-Ups
– First, brush the rolled dough with olive oil. This adds flavor and helps crisp the outside.
– Evenly sprinkle the shredded mozzarella cheese over the dough. Then, layer the pepperoni slices on top.
– Mix garlic powder, oregano, and red pepper flakes in a small bowl. Sprinkle this mix over the cheese and pepperoni. This boosts the taste of your roll-ups.
– Start at one end and roll the dough tightly into a log. Be careful not to let the filling spill out. The tighter the roll, the better the slices will hold.
– Use a sharp knife to cut the log into 1-inch thick pieces. This makes the roll-ups bite-sized and easy to eat.
– Place the pieces on your prepared baking sheet. Keep some space between them for even cooking.
Baking Instructions
– Bake the roll-ups in the preheated oven for 15-20 minutes. Watch for a golden brown color and bubbling cheese.
– When they look golden and smell great, they are done. Let them cool for a few minutes before serving. Serve warm with pizza sauce for dipping.
This recipe is quick and fun, perfect for snacks or parties. Enjoy making these cheesy pepperoni pizza roll-ups! For the complete recipe, check out the Full Recipe section.
Tips & Tricks
Cooking Tips
To get the perfect golden brown crust, follow these steps:
– Preheat your oven to 400°F (200°C). This temp helps crisp the outside while melting the cheese inside.
– Brush the dough lightly with olive oil before baking. This adds flavor and helps achieve that nice color.
– Place your roll-ups cut-side up on the baking sheet. This allows for even browning.
To ensure gooey cheese with every bite, use the right cheese. I recommend fresh mozzarella or a blend of cheeses. Shredded cheese melts well, but using slices can give you a stringy effect that is fun.
Serving Suggestions
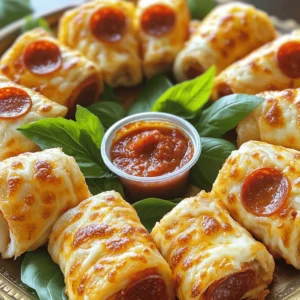
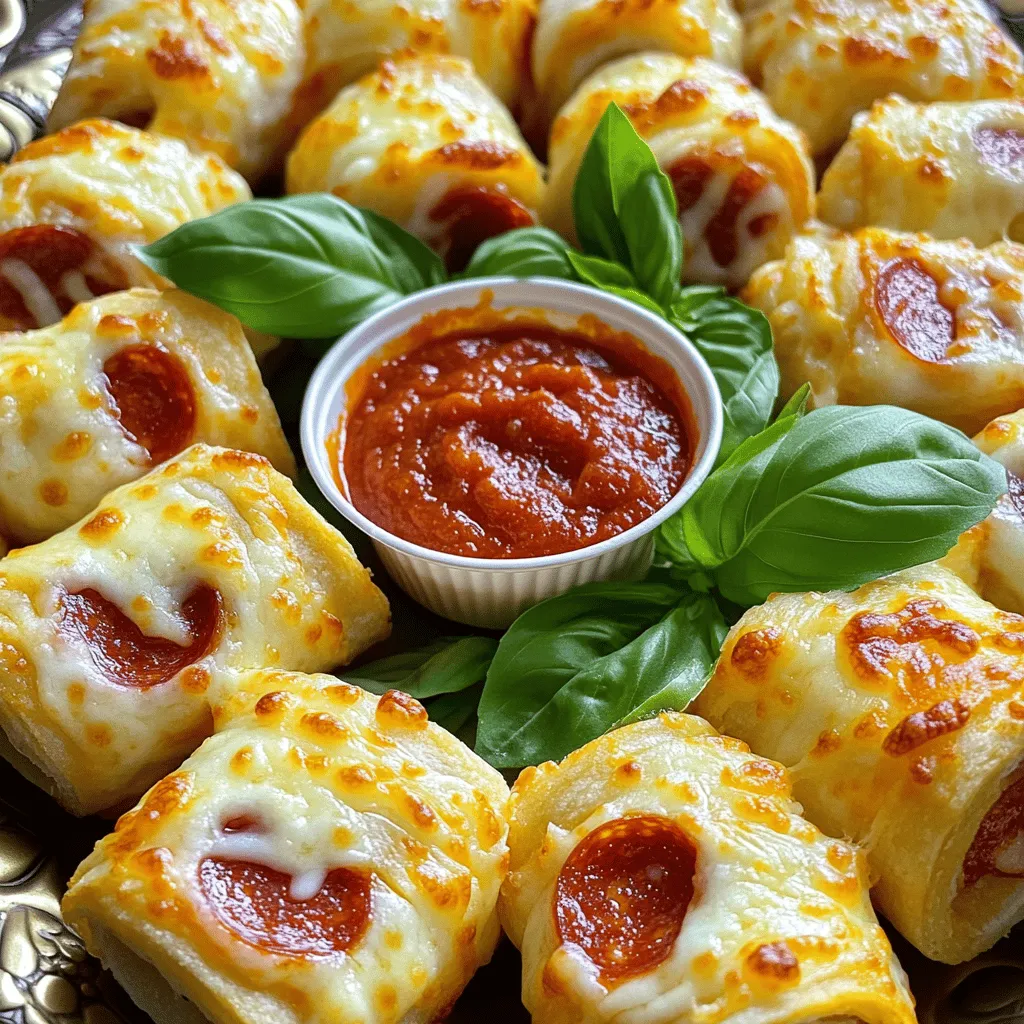
When serving Cheesy Pepperoni Pizza Roll-Ups, keep it simple. Arrange them on a large platter. This makes it easy for guests to grab one. Serve with warm pizza sauce in the center for dipping.
For drinks, pair these roll-ups with soda or sparkling water. If you want something more special, try a light beer or red wine. For sides, a fresh salad or some crunchy veggies complement the richness of the roll-ups well.
Presentation Ideas
To impress your guests, arrange the pizza roll-ups on a colorful serving platter. You can also add fresh basil leaves for a pop of green. This adds a nice touch and makes the dish look gourmet.
For added visual appeal, sprinkle some red pepper flakes around the platter. This hints at the flavors inside. You can even drizzle a little olive oil on the side for those who want extra flavor.
For the full recipe, check out the complete instructions above.
Variations
Fun Flavor Combinations
You can mix it up with different ingredients. Try using different meats like ham or sausage. You can also add vegetables like bell peppers or mushrooms. For a vegetarian option, leave out the meat and add spinach or zucchini. Use a blend of cheeses for a fun twist. Mix mozzarella with cheddar or pepper jack for extra flavor.
Dipping Sauce Ideas
Pizza roll-ups taste great with more than just pizza sauce. You can use ranch, marinara, or even honey mustard. For a homemade garlic dip, mix sour cream with minced garlic and herbs. This adds a nice touch. You can also try a spicy mayo for a kick!
Different Cooking Methods
You can bake or air fry your pizza roll-ups. Baking gives a nice golden crust, but air frying can make them crispier. If you choose to fry them, heat oil in a pan. Fry until they are golden brown on all sides. This gives you a crunchy outside and melty cheese inside.
For the full recipe, check out the details above!
Storage Info
Storing Leftovers
To keep your pizza roll-ups fresh, place them in an airtight container. You can store them in the fridge for up to three days. If you want to keep them longer, freezing is a great option. Just remember, the sooner you store them, the better they taste later!
Freezing Instructions
You can freeze pizza roll-ups before or after baking. To freeze them before baking, roll them up and wrap each one in plastic wrap. Then, place them in a freezer bag. If you freeze them after baking, let them cool first. Then, place them in a container with a lid. When ready to eat, reheat them in the oven for the best results.
1. Preheat your oven to 375°F (190°C).
2. Place the frozen roll-ups on a baking sheet.
3. Bake for about 15-20 minutes or until heated through.
Meal Prep Ideas
Pizza roll-ups make meal prep easy and fun. You can make a big batch and store them for the week. Just adjust the portions to fit your meals. For lunch, pack a few roll-ups with some veggies. They reheat quickly in the microwave or oven. Enjoy tasty snacks anytime!
FAQs
Common Questions
How can I make these pizza roll-ups in advance?
You can prepare the roll-ups ahead of time. After rolling up the dough, slice them and place them on a baking sheet. Cover the tray with plastic wrap and keep it in the fridge for up to 24 hours. When you are ready to bake, just pop them in the oven.
Can I use other types of cheese?
Absolutely! You can mix it up with cheeses like cheddar or provolone. Each cheese adds a unique flavor. You can also try a blend for a more complex taste.
What can I do if my dough is too sticky?
If your dough is sticky, sprinkle some flour on your work surface and on the dough. Use your hands to knead in a bit more flour until it is easier to work with. This helps it roll out smoothly.
Baking Questions
How do I know when the roll-ups are fully cooked?
Look for a golden brown color on the roll-ups. You will also see the cheese bubbling. If they look good, they are done.
What oven temperature is best for perfect pizza roll-ups?
Preheat your oven to 400°F (200°C). This temperature helps the dough cook evenly and become crispy.
Dietary Requests
Are there any gluten-free options for this recipe?
Yes, you can use gluten-free pizza dough. Many stores sell it ready-made. You can also make your own from gluten-free flour.
How to make Cheesy Pepperoni Pizza Roll-Ups dairy-free?
To make them dairy-free, swap mozzarella for a dairy-free cheese. Look for brands that melt well. You can also skip the cheese for a lighter roll-up.
In this post, we explored tasty Cheesy Pepperoni Pizza Roll-Ups. You learned about the key ingredients, helpful tips, and fun variations. We also covered storage methods to keep them fresh. Remember, these roll-ups can suit any taste with simple swaps. Enjoy them at parties or as a quick meal. You can always get creative with flavors and dips. Try these tips to make every bite delicious. Happy cooking!