Salads

To make this easy fruit salad, you need: - 1 ripe pineapple, diced - 2 kiwis, peeled and sliced - 1 mango, diced - 1 cup strawberries, hulled and halved - 1 cup blueberries - 1 banana, sliced These fruits bring vibrant colors and flavors to the salad. Each fruit adds its own taste, making the dish fun and tasty. You can add more fruits if you like! Consider these options: - Grapes - Oranges - Raspberries - Peaches Mixing in these fruits can change the flavor and texture. Feel free to play with what you love. For a refreshing dressing, use: - 1 tablespoon honey - Juice of 1 lime These ingredients brighten the salad. The honey adds sweetness, while the lime gives a zesty kick. For garnish, use fresh mint leaves. They add a lovely touch and a fresh scent. For the full recipe, check out the Tropical Bliss Fruit Salad. Start by washing all the fresh fruits. This step is key for clean and tasty results. Next, take your ripe pineapple and dice it into bite-sized pieces. For the kiwis, peel them and slice them into rounds. Dice the mango and slice the banana. Halve the strawberries and make sure to remove the green tops. Finally, rinse the blueberries and set them aside. In a large mixing bowl, combine all your prepared fruits: pineapple, kiwi, mango, strawberries, blueberries, and banana. In a separate small bowl, whisk together one tablespoon of honey and the juice of one lime. This honey-lime mixture will be your dressing. Drizzle this dressing over the fruit mixture. Gently toss everything together to coat the fruits without smashing them. Allow the salad to sit for about ten minutes. This lets the flavors mix well. When ready to serve, give the salad another gentle toss. I like to garnish it with fresh mint leaves. They add a nice touch and a burst of flavor. Serve this colorful salad in bowls or on a large platter. It looks great and tastes even better. Enjoy this tropical bliss fruit salad as a refreshing snack or a light dessert. For more detailed steps, check out the Full Recipe. Pick ripe, fresh fruits for the best flavor. Look for bright colors and firm textures. Soft fruits may spoil faster. Some great options are: - Pineapple - Kiwi - Mango - Strawberries - Blueberries - Bananas When you choose fruits, think about taste and texture. Mix sweet fruits with tart ones for balance. Also, consider the season. Local fruits taste better and cost less. To keep your leftover salad fresh, store it in an airtight container. This helps prevent browning and keeps it crisp. Place the container in the fridge. It will last about 2 days. If you see any brown spots, remove them before serving. You can make fruit salad a few hours in advance. This allows flavors to blend. However, add bananas last to prevent browning. If you want to prepare it even earlier, store fruits separately. Mix them together just before serving. This keeps everything looking fresh and tasty. For more guidance, check the Full Recipe. {{image_2}} You can change your fruit salad to be a tropical delight. Start with fruits like pineapple, mango, and papaya. These fruits add a sweet and juicy taste. You can also use coconut for a crunchy twist. Try adding passion fruit for a tangy flavor. This mix will bring the beach to your table! Nuts and seeds can add a nice crunch to your fruit salad. Consider using sliced almonds or chopped walnuts. They give a great texture and flavor. Pumpkin seeds or sunflower seeds are also good options. They add a healthy boost of protein and healthy fats. Just sprinkle them on top before serving. For a creamy touch, add yogurt or whipped cream. Greek yogurt works well and gives a tangy taste. It also makes the salad more filling. If you prefer something sweeter, opt for whipped cream. Just dollop some on top before serving. This makes the salad extra special and fun to eat. Feel free to explore your own twists with this Easy Fruit Salad Recipe! To keep your fruit salad fresh, use an airtight container. This helps prevent air from drying out the fruits. Make sure to cover the salad well. If you used a dressing, it can help to keep the fruits moist. Avoid using metal containers, as they can alter the taste. Always store your fruit salad in the fridge. The cool temperature slows down spoilage. If you plan to eat it later, do not mix in the dressing until just before serving. This keeps the fruits crisp and tasty. If you have leftovers, eat them within a few days for the best flavor. Generally, fruit salad lasts about 3 to 5 days in the fridge. After that, the fruits may start to get mushy. Strawberries and bananas tend to spoil faster. However, fruits like blueberries and kiwi can last a bit longer. Always check for any off smells or changes in texture before eating. Yes, you can use frozen fruit. However, it may change the texture. Frozen fruit is often softer than fresh fruit. If you choose frozen fruit, let it thaw first. Pat it dry with a paper towel to avoid extra juice. This helps keep your salad fresh and tasty. The best fruits for a fruit salad are those that mix well. Here are some top picks: - Pineapple - Kiwi - Mango - Strawberries - Blueberries - Bananas These fruits add flavor, color, and sweetness. You can also try apples, oranges, or grapes. The more colors, the better your salad will look! To keep bananas from browning, use fresh ones. You can also add lime juice. Squeeze a bit of lime on the banana slices right after cutting. This helps slow down browning. If you want to avoid bananas, try using more berries or tropical fruit. Enjoy this Easy Fruit Salad Recipe without the brown spots! You learned how to make a tasty fruit salad. I shared fresh fruit ideas, dressings, and garnishes. We covered easy steps for preparation and serving. Plus, I gave tips on choosing fruits and storing leftovers. You can mix it up with fun variations too. Enjoy your fruit salad and feel free to experiment. Simple and healthy snacks like this bring joy. Get creative and make your fruit salad unique!
Easy Fruit Salad Recipe Quick and Refreshing Mix
Looking for a simple and tasty treat? My Easy Fruit Salad Recipe is a quick and refreshing mix you can whip up in minutes. With
To make this tasty dish, you'll need: - 8 oz. rotini or fusilli pasta - 2 cups fresh corn kernels (or frozen, thawed) - 1 red bell pepper, diced - 1/2 cup red onion, finely chopped - 1/2 cup cilantro, chopped - 1 jalapeño, seeded and minced - 1/2 cup crumbled feta cheese (or cotija for authenticity) - 1/4 cup mayonnaise - 1/4 cup sour cream - Juice of 2 limes - 1 teaspoon chili powder - Salt and pepper to taste These ingredients bring flavors together and create a bright, fresh taste. The corn adds sweetness, while jalapeño gives a little heat. The creamy dressing binds everything nicely. You can enhance your salad with some fun extras, like: - Avocado for creaminess - Cherry tomatoes for extra color - Black beans for protein - Lime zest for a zesty kick Feel free to mix and match based on what you like or have at home. Experimenting is part of the fun! If you're missing an ingredient, don't worry! Here are some swaps you can try: - Use elbow macaroni instead of rotini. - Swap red onion for green onions for a milder taste. - Greek yogurt can replace sour cream for a lighter option. - If you can't find feta cheese, regular cheese works too. These substitutions keep the dish delicious and accessible. You can create your version while still capturing the essence of Mexican street corn. For the full recipe, be sure to check out the complete guide! Start by boiling water in a large pot. Add a pinch of salt to the water for flavor. Once the water is boiling, add 8 oz. of rotini or fusilli pasta. Cook until the pasta is al dente, which usually takes about 8 to 10 minutes. Drain the pasta in a colander and rinse it under cold water. This stops the cooking and cools the pasta down quickly. In a large skillet, heat over medium heat. Add 2 cups of fresh corn kernels. If you use frozen corn, make sure it is thawed first. Cook the corn for about 5 to 7 minutes. Stir the corn occasionally. You want to see some slight charring for that great flavor. Once done, remove it from the heat and let it cool. In a large bowl, combine the cooled pasta and the charred corn. Add in 1 diced red bell pepper, 1/2 cup of finely chopped red onion, 1 minced jalapeño, and 1/2 cup of chopped cilantro. Next, prepare the dressing. In a smaller bowl, whisk together 1/4 cup of mayonnaise, 1/4 cup of sour cream, the juice of 2 limes, 1 teaspoon of chili powder, and a pinch of salt and pepper. Pour this dressing over the pasta and veggies. Gently toss everything until it is well mixed. Finally, fold in 1/2 cup of crumbled feta cheese. Chill in the fridge for at least 30 minutes. Enjoy the fresh and flavorful taste! For the complete steps, check the Full Recipe. To get great flavor, start with fresh corn. If using frozen, thaw it completely. Heat your skillet over medium heat. Add the corn and let it sit still for a bit. This helps it char better. Stir every few minutes to get an even char. You want golden spots, not burnt pieces. Charred corn adds a sweet and smoky taste to your salad. Serve your pasta salad in a big bowl. Garnish it with fresh cilantro and lime wedges. A sprinkle of chili powder on top adds color and flavor. For a fun twist, use small cups for individual servings. This makes it easy for guests to grab a bite. Pair the salad with grilled chicken or fish for a complete meal. To boost the taste, add more lime juice and chili powder. A dash of cumin can also deepen the flavor. If you like it spicy, toss in more jalapeños. You can swap the feta for cotija cheese for an authentic touch. Don’t forget to taste as you go. Adjust salt and pepper to make it just right. For the full recipe, check the complete guide. {{image_2}} You can easily change up the veggies in your pasta salad. Try adding cherry tomatoes for a sweet burst. Zucchini can bring a nice crunch and color. Avocado adds creaminess and healthy fats. You can even toss in some black beans for extra fiber. These additions make the salad even more colorful and tasty! If you want to add protein, grilled chicken works great. Shrimp adds a fun twist and cooks quickly. For a plant-based option, try chickpeas or tofu. Each protein choice makes the salad more filling. You can mix and match based on your taste or dietary needs. While the classic dressing is creamy, you can try different styles. A tangy vinaigrette can lighten the dish. Use olive oil, vinegar, and herbs for a fresh flavor. You might also enjoy a yogurt-based dressing for a healthier twist. Each dressing option can change the mood of the salad while keeping it delicious. For the full recipe, check out the details above! You can store your Mexican street corn pasta salad in the fridge. Use an airtight container for best results. The salad stays fresh for about 3 to 5 days. Make sure to cover the salad well to keep it from drying out. I don’t recommend freezing this pasta salad. Freezing can change the texture of the pasta and veggies. They may become mushy when thawed. It's best to enjoy this dish fresh for the best taste. To keep your leftovers fresh, store them in the fridge right after serving. If you notice the salad getting dry, add a little more lime juice or dressing. This will help restore flavor and moisture. Enjoy the bright flavors for several days! For the full recipe, check out the previous sections. Mexican street corn, or elote, is a popular snack in Mexico. It features grilled corn on the cob topped with creamy sauce, cheese, chili powder, and lime. The flavors burst in your mouth, offering a sweet and savory experience. In our pasta salad, we capture these same flavors using fresh corn and zesty ingredients. Pasta salad can last in the fridge for 3 to 5 days. Store it in an airtight container to keep it fresh. After a day or two, you may need to add a splash of lime juice or a bit of dressing to revive its flavors. Yes, you can prepare this salad ahead of time. Making it a few hours before serving allows the flavors to blend well. You can also make it the night before. Just store it in the fridge, and it will taste even better the next day! You can serve this pasta salad with grilled meats, like chicken or steak. It pairs well with tacos or burritos for a full meal. For a lighter option, enjoy it with a fresh green salad. You can also add chips or a spicy salsa on the side for extra crunch. Check out the Full Recipe for more ideas! This blog post covered how to make Mexican Street Corn Pasta Salad. We discussed key ingredients and tips for cooking pasta and preparing corn. You learned how to assemble the salad and customize it with tasty variations. Storage tips ensure your leftovers stay fresh. Remember, this dish is easy to make. It brings bold flavors and fun to any meal. Try making it for your next gathering; it will impress your friends! Enjoy your cooking journey!
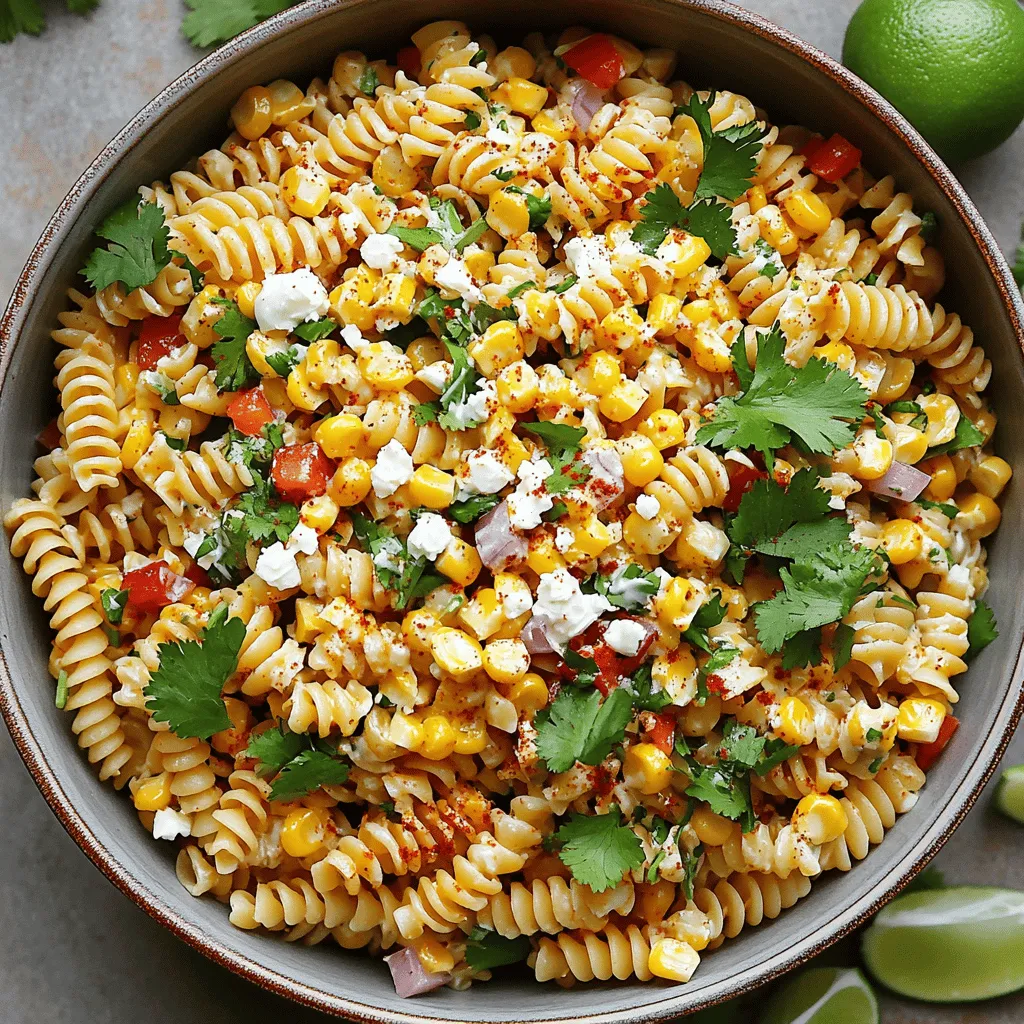
Mexican Street Corn Pasta Salad Fresh and Flavorful Dish
If you love vibrant, fresh flavors, then this Mexican Street Corn Pasta Salad is for you! With a mix of sweet corn, zesty lime, and
For a vibrant and tasty Honey Lime Fruit Salad, you need the following fresh ingredients: - 2 cups watermelon, cubed - 1 cup pineapple, diced - 1 cup strawberries, sliced - 1 cup blueberries - 1 ripe banana, sliced - 3 tablespoons honey - 2 tablespoons fresh lime juice - Zest of 1 lime - Fresh mint leaves for garnish Each fruit brings a unique flavor and texture. Watermelon adds juiciness, while pineapple offers a sweet tang. Strawberries give a bright color, and blueberries add a subtle sweetness. The banana makes the salad creamy. Honey and lime juice create a delicious dressing that ties it all together. The mint leaves on top add freshness and a pop of color. Using fresh ingredients ensures the best taste. You can find all these ingredients at your local market. Remember, the Full Recipe will guide you through making this delightful dish! - Begin by combining all the fruit in a large mixing bowl. Use 2 cups of cubed watermelon, 1 cup of diced pineapple, 1 cup of sliced strawberries, 1 cup of blueberries, and 1 ripe banana, sliced. This mix creates a colorful base. - Next, in a small bowl, whisk together 3 tablespoons of honey, 2 tablespoons of fresh lime juice, and the zest of 1 lime. This dressing adds a sweet and tangy kick to the fruit. - Drizzle the honey lime dressing over the mixed fruits. Gently toss the salad to coat all the fruits evenly with the dressing. Be careful not to mash the banana as you mix. - When you toss the salad, do it gently. This helps keep the banana slices intact and prevents them from turning mushy. - Let the salad sit for about 10 minutes. This allows the flavors to develop and blend together nicely. - For a beautiful presentation, serve the salad in individual bowls or on a large platter. This makes it easy for everyone to enjoy. - Garnish your salad with fresh mint leaves on top. This adds a nice pop of color and enhances the flavor. Make sure to check out the Full Recipe for all the details and enjoy this fresh and flavorful delight! To make your Honey Lime Fruit Salad truly shine, start with ripe fruits. Ripe fruits add natural sweetness and flavor. For example, choose watermelon that is firm and juicy. Select pineapples that smell sweet and have a golden hue. Adjust the honey and lime to match your taste. If you like it sweeter, add more honey. For a zestier kick, squeeze in more lime juice. This balance brings out the best in your fruit. Texture plays a big role in any fruit salad. You can choose fruits that have a nice crunch. Apples, pears, or even jicama can work well. Mix these with softer fruits for variety. Refrigerate the salad for a short time before serving. Aim for about 10 to 20 minutes. This chill time lets the flavors meld and enhances the salad's overall taste. This salad is not just tasty; it is also healthy. Each fruit offers lots of vitamins. For instance, strawberries are high in vitamin C, while bananas provide potassium. Honey and lime also have health benefits. Honey can soothe sore throats and provide energy. Lime juice is rich in antioxidants and helps with digestion. These additions make your salad a smart choice for any meal. For the full recipe, check out the complete guide to making the perfect Honey Lime Fruit Salad. {{image_2}} You can switch up the fruits in your honey lime fruit salad. Using seasonal fruits can add fresh flavors. Think of juicy peaches in summer or crisp apples in fall. Each fruit brings its own taste and texture. For a tropical twist, try adding mango or kiwi. Mango adds sweetness, while kiwi gives a tangy kick. Both fruits pair well with honey and lime. You can mix and match based on what you love. While the honey lime dressing is tasty, you can get creative. A yogurt-based dressing can make it creamy and tangy. Simply mix plain yogurt with lime juice and honey. This option packs in protein and makes the salad more filling. If you want to change the sweetness, try maple syrup or agave. Both can replace honey and work well in the dressing. You can also add a pinch of salt for balance. If you follow a vegan diet, use maple syrup instead of honey. You can also replace yogurt with a dairy-free option. This way, everyone can enjoy the salad without worry. For low-sugar diets, opt for fresh fruit alone. Skip the honey or use a sugar-free sweetener. The natural sweetness of the fruit shines through. Make sure to check that all ingredients are gluten-free. Most fruits are naturally gluten-free, making this salad safe for those with gluten sensitivities. To keep your Honey Lime Fruit Salad fresh, store it in the fridge. Use an airtight container. This helps keep the flavors vibrant and prevents any unwanted odors. Make sure to eat it within a few days for the best taste. You can enjoy your salad for about 3 to 5 days when stored properly. Look for signs of spoilage like mushy fruit or off smells. If anything looks or smells bad, it’s best to throw it away. Making this fruit salad ahead of time is easy. You can prepare it a day in advance. Just keep the dressing separate until you're ready to serve. For quick snacks, try pre-portioning servings in small containers. This way, you have a healthy treat ready to go! You can find the full recipe above to guide you through the process. Can I use canned fruit for the recipe? Yes, you can use canned fruit. Just drain the syrup first. Canned fruit may be softer, but it will work well. Fresh fruit usually tastes better, but canned can save time. How long can I keep the salad in the fridge? You can keep the salad in the fridge for about 2 days. After that, the fruit may get mushy. Always cover it tightly to keep it fresh. What can I use instead of honey for a vegan option? For a vegan option, use maple syrup or agave nectar. Both will add sweetness and work well with lime. Is the lime juice fresh or bottled? Fresh lime juice is best for flavor. It gives a bright taste that bottled juice cannot match. If you use bottled juice, check for added sugars or preservatives. Can I use frozen fruits? Yes, you can use frozen fruits. Just let them thaw first and drain excess liquid. Frozen fruit may change the texture of your salad slightly. Best accompaniments with fruit salad Serve the fruit salad with yogurt or granola for added texture. It also pairs nicely with grilled meats or fish. This makes it a great side dish for summer meals. How to serve for gatherings or parties For gatherings, serve the fruit salad in a large bowl. You can also make individual cups for easy serving. Add mint leaves on top for a lovely touch. This fruit salad recipe combines fresh, colorful ingredients for a tasty treat. You learned how to mix fruits and make a delicious dressing. Remember to use ripe fruit for more sweetness. Feel free to adjust flavors and try new combinations. You can even make this ahead of time for easy snacks. With these tips and variations, you can impress anyone with your salad. Enjoy making this fresh dish!
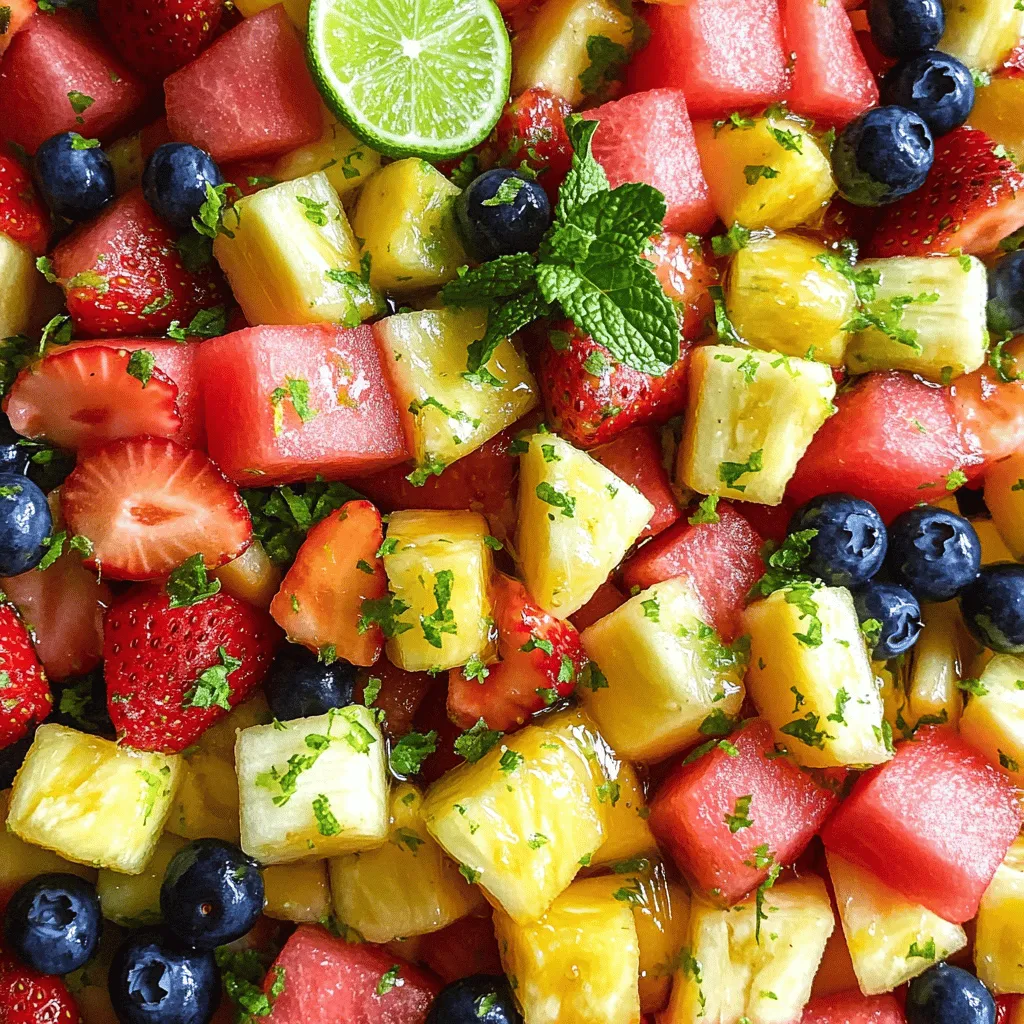
Honey Lime Fruit Salad Fresh and Flavorful Delight
Looking for a refreshing treat that bursts with flavor? Look no further than my Honey Lime Fruit Salad! This vibrant mix of sweet fruits combines
To make Mediterranean Orzo Pasta Salad, gather these fresh ingredients: - 1 cup orzo pasta - 1 cup cherry tomatoes, halved - 1 cucumber, diced - 1/2 red onion, finely chopped - 1/2 cup Kalamata olives, pitted and sliced - 1/2 cup feta cheese, crumbled - 1/4 cup fresh parsley, chopped - 1 teaspoon dried oregano - 4 tablespoons olive oil - 2 tablespoons lemon juice - Salt and pepper to taste These ingredients come together to create a colorful and tasty dish. You can swap some ingredients based on your taste or what you have. - Use whole wheat or gluten-free orzo for different pasta. - Try grape tomatoes if cherry tomatoes aren't available. - Swap red onion with green onion for a milder flavor. - Use different olives, like green olives, if you prefer. - If you don't like feta, try goat cheese or skip it entirely. These substitutions still keep the salad vibrant and fresh. Fresh ingredients add a burst of flavor and texture. They make the salad bright and lively. For example, fresh parsley and tomatoes bring color and taste. Dried ingredients, like oregano, provide depth. They blend well with the fresh items. Use them to boost flavor without needing extra preparation. Using a mix of both fresh and dried ingredients ensures a well-rounded taste. This balance makes your Mediterranean Orzo Pasta Salad both tasty and satisfying. First, you need to cook the orzo pasta. Start by boiling salted water in a large pot. Once the water boils, add 1 cup of orzo pasta. Cook it according to the package instructions until it is al dente. This usually takes about 8-10 minutes. After that, drain the pasta and rinse it under cold water. This stops the cooking and helps keep the orzo firm. Next, it’s time to prepare the vegetables. Grab 1 cup of cherry tomatoes and cut them in half. Dice 1 cucumber into small pieces. Finely chop 1/2 of a red onion. For added flavor, slice 1/2 cup of Kalamata olives. Lastly, chop 1/4 cup of fresh parsley. These fresh ingredients make the salad vibrant and tasty. Now, let’s mix everything together. In a large mixing bowl, combine the cooked orzo, cherry tomatoes, cucumber, red onion, olives, feta cheese, and parsley. In a small bowl, whisk together 4 tablespoons of olive oil, 2 tablespoons of lemon juice, 1 teaspoon of dried oregano, and a pinch of salt and pepper. Pour this dressing over the salad and toss gently. Make sure everything is evenly coated. Let the salad sit for 15-20 minutes. This helps the flavors blend. For the complete recipe, check out [Full Recipe]. To cook orzo just right, start with a big pot. Fill it with water and add salt. Bring the water to a boil, then add the orzo. Cook until it is al dente, which means it is firm but not hard. This usually takes about 8 to 10 minutes. Once done, drain it and rinse under cold water. This will stop the cooking and keep it from getting mushy. For a tasty salad, you want to get the seasoning just right. I love adding lemon juice for a fresh zing. A touch of salt and pepper enhances all the flavors. If you like things spicy, add some crushed red pepper flakes. You can also play with herbs. Fresh basil or mint can change the taste and make it exciting. Try different combinations to find what you like best. Making this salad ahead of time helps the flavors blend. After mixing, cover it and chill in the fridge. Let it sit for at least 30 minutes, but overnight is even better. The longer it sits, the more the ingredients soak up the dressing. This makes each bite delicious. Just remember to give it a quick toss before serving to mix everything back together. For the full recipe, check out the details above. {{image_2}} You can boost your Mediterranean Orzo Pasta Salad by adding proteins. Grilled chicken works great. It adds a nice flavor and makes it filling. You can also use chickpeas for a plant-based option. Chickpeas are tasty and add a nice texture. Just mix them in right before serving. This way, you keep the dish light and fresh. If you want to make this salad vegan, skip the feta cheese. Instead, try using avocado for creaminess. You can also add toasted nuts or seeds for crunch. Look for vegan dressings if you prefer. These small changes keep the dish vibrant while meeting diet needs. You can switch up the veggies based on what’s fresh. In summer, try adding bell peppers or zucchini. In fall, roasted butternut squash adds a warm touch. This salad is flexible and allows you to explore different tastes. Use what you love, and enjoy the process! To store your Mediterranean Orzo Pasta Salad, choose airtight containers. Glass or plastic options work well. Glass containers keep food fresh and are easy to clean. If you use plastic, pick BPA-free ones. Make sure the lid fits snugly to avoid spills. This pasta salad lasts about 3 to 5 days in the fridge. Keep it in an airtight container for the best results. You may notice the veggies get softer as time goes on. However, the taste remains fresh and zesty for several days. You can enjoy this salad cold or at room temperature. If you prefer warm pasta, gently heat it in a pan. Add a splash of olive oil and some lemon juice to revive the flavors. For serving, top with extra feta cheese and parsley for a bright finish. This dish pairs well with grilled meats or as a light lunch on its own. For the complete recipe, check out the Full Recipe. Yes, you can use other pasta shapes. Penne, fusilli, or farfalle work well. Just cook them according to package directions. Keep in mind the texture changes slightly. Orzo gives this salad a nice, unique feel. If you prefer a gluten-free option, choose a gluten-free pasta. Traditional orzo is made from wheat, so it is not gluten-free. However, many brands now offer gluten-free orzo made from rice or corn. Always check the label for gluten-free options. This way, you can enjoy the dish without worry. This salad pairs well with grilled chicken, fish, or roasted vegetables. You can also serve it as a light lunch or picnic dish. For a full meal, add some crusty bread or a fresh green salad. You can find the full recipe for Mediterranean Orzo Pasta Salad linked here. Enjoy! In this post, we explored the key ingredients for Mediterranean Orzo Pasta Salad. We covered how to prepare them, including substitutions and fresh versus dried options. I shared step-by-step instructions for cooking orzo and mixing the salad. Tips helped ensure you cook orzo perfectly and store it correctly. Remember, you can customize this dish with proteins, seasonal veggies, or dressings. The result is a vibrant, healthy salad perfect for any meal. Enjoy making your own version!
Mediterranean Orzo Pasta Salad Vibrant and Fresh Dish
Looking for a fresh and vibrant dish to brighten your table? Try Mediterranean Orzo Pasta Salad! With its colorful veggies and tasty flavors, this salad
For a tasty summer fruit salad, you need fresh, ripe fruits. Here’s what I use: - 1 cup strawberries, hulled and sliced - 1 cup blueberries - 1 ripe pineapple, diced - 2 ripe peaches, diced These fruits bring great flavor and color to the dish. Strawberries add sweetness, while blueberries give a burst of juice. Pineapple offers a tropical twist, and peaches add a soft texture. To enhance the fruit salad, I add some extra ingredients: - 1 cup cucumber, peeled and diced - ¼ cup fresh mint leaves, chopped - 2 tablespoons honey - 2 tablespoons lime juice - A pinch of sea salt The cucumber brings crunch and freshness. Mint leaves add a bright flavor. Honey and lime juice create a sweet-tart dressing. A pinch of salt boosts all the flavors. For a stunning finish, consider these garnishes: - Extra mint leaves - Lime slices These garnishes make your salad look fancy and add a touch of zest. Serve it in a glass bowl to show off the vibrant colors. For the full recipe, check out Sunny Delight Summer Fruit Salad. First, wash all your fruits well. This step keeps your salad fresh and safe. Hull the strawberries and slice them into small pieces. For blueberries, just rinse them under cold water. Next, take a ripe pineapple. Cut off the skin and core, then dice the fruit. Now, grab two ripe peaches. Dice them into bite-sized pieces. Finally, peel and dice the cucumber. This adds a nice crunch to your salad. In a large mixing bowl, combine the strawberries, blueberries, pineapple, peaches, and cucumber. Make sure to mix them gently to avoid squishing the fruit. Now, let’s make the dressing. In a separate small bowl, whisk together the honey and lime juice until smooth. Drizzle this mixture over the fruit and cucumber. Gently fold everything together until all the pieces are well coated. Sprinkle the chopped mint leaves on top for a burst of flavor. If you like, add a pinch of sea salt to enhance the taste. To serve your salad, use a large glass bowl. This helps show off the bright colors of the fruit. For a special touch, garnish with extra mint leaves and lime slices on the side. Let the salad sit for about 10 minutes before serving. This allows the flavors to meld together. Enjoy your refreshing summer fruit salad! For the full recipe, check the details above. When making a summer fruit salad, picking ripe fruits is key. Look for bright colors and pleasant smells. For strawberries, choose berries that are firm and shiny. Blueberries should be deep blue and plump. Pineapples should feel heavy and have a sweet scent. Peaches should give slightly when you press them. Avoid fruits with blemishes or soft spots. Ripe fruits add sweetness and flavor to your salad. Dressings can boost the taste of your fruit salad. A simple honey-lime dressing works great! Mix honey and lime juice together. The honey adds sweetness, and lime gives a fresh kick. Drizzle this over your fruit mix and toss gently. You can also try yogurt or a sprinkle of cinnamon for different flavors. A pinch of sea salt can heighten the taste of the fruits. Presentation is important for any dish. To show off the colors in your summer fruit salad, use a large glass bowl. This lets the vibrant colors shine through. Add extra mint leaves on top for a pop of green. Slices of lime next to the salad can add a nice touch. You can also serve individual portions in small cups. This makes it easy for guests to grab and enjoy. For the full recipe, check out the Sunny Delight Summer Fruit Salad. {{image_2}} For a taste of the tropics, try this fun twist. Use fruits like mango, kiwi, and papaya. These fruits add sweetness and a nice texture. You can mix in some shredded coconut for a tropical feel. Just chop the fruits into bite-sized pieces. Toss them all together for a bright, sunny dish. This variation is perfect for summer BBQs or beach days. If you love berries, this version is for you. Combine strawberries, raspberries, blackberries, and blueberries. Each berry brings its own flavor and color. You can add a splash of orange juice for extra zest. This medley works well as a light dessert or a snack. It’s fresh and keeps you cool on hot days. Want to impress your guests? Go gourmet with your fruit salad. Use unique fruits like dragon fruit or star fruit. Add a splash of balsamic glaze for a special touch. You might also consider mixing in some nuts for crunch. Almonds or pistachios add protein and flavor. Present it in a fancy bowl to wow everyone at your table. For more ideas, check out the Full Recipe to get started! To keep your summer fruit salad fresh, follow these tips: - Store it in a tight container. - Use glass or plastic with a lid. - Keep it in the fridge. - Add mint only before serving to prevent wilting. These steps help retain the bright colors and great taste of your salad. Your fruit salad lasts about 2 to 3 days in the fridge. Make sure to check for any signs of spoilage. If the fruit looks dull or mushy, it’s best to toss it out. The sooner you eat it, the better the flavor! If you have leftovers, don’t waste them! Here are some fun ways to reuse your salad: - Blend it into a smoothie for breakfast. - Mix it into yogurt for a tasty snack. - Use it as a topping for pancakes or waffles. - Add it to a green salad for extra flavor. These ideas help you enjoy every bite of your delicious Sunny Delight Summer Fruit Salad! For a great summer fruit salad, I recommend using fresh, juicy fruits. Some of the best choices are: - Strawberries - Blueberries - Pineapple - Peaches - Watermelon - Cantaloupe These fruits add vibrant colors and sweet flavors. They also mix well together. You can use any fruit you like, but these are my favorites. Yes, you can make fruit salad ahead of time. However, I suggest you do it wisely. To keep it fresh, store it in the fridge for no more than 24 hours. If you must prepare it earlier, wait to add the dressing until just before serving. This will help the fruit stay firm and not mushy. Making a fruit salad dressing is easy! A simple mix of honey and lime juice works well. Here’s how: 1. In a small bowl, whisk together 2 tablespoons of honey and 2 tablespoons of lime juice. 2. Taste it. If you want more sweetness, add a bit more honey. This dressing adds a nice flavor without being too heavy. You can also try adding fresh herbs like mint for a fun twist. For the full recipe, check out Sunny Delight Summer Fruit Salad! In this post, we explored how to create a refreshing fruit salad. We covered key ingredients, step-by-step instructions, and valuable tips. You learned about different fruit options and how to make your salad pop with garnish. Use our storage tips to keep your salad fresh. With this guide, you now have the tools to impress anyone with your fruit salad. Enjoy the bright flavors and healthy choices. Happy mixing!
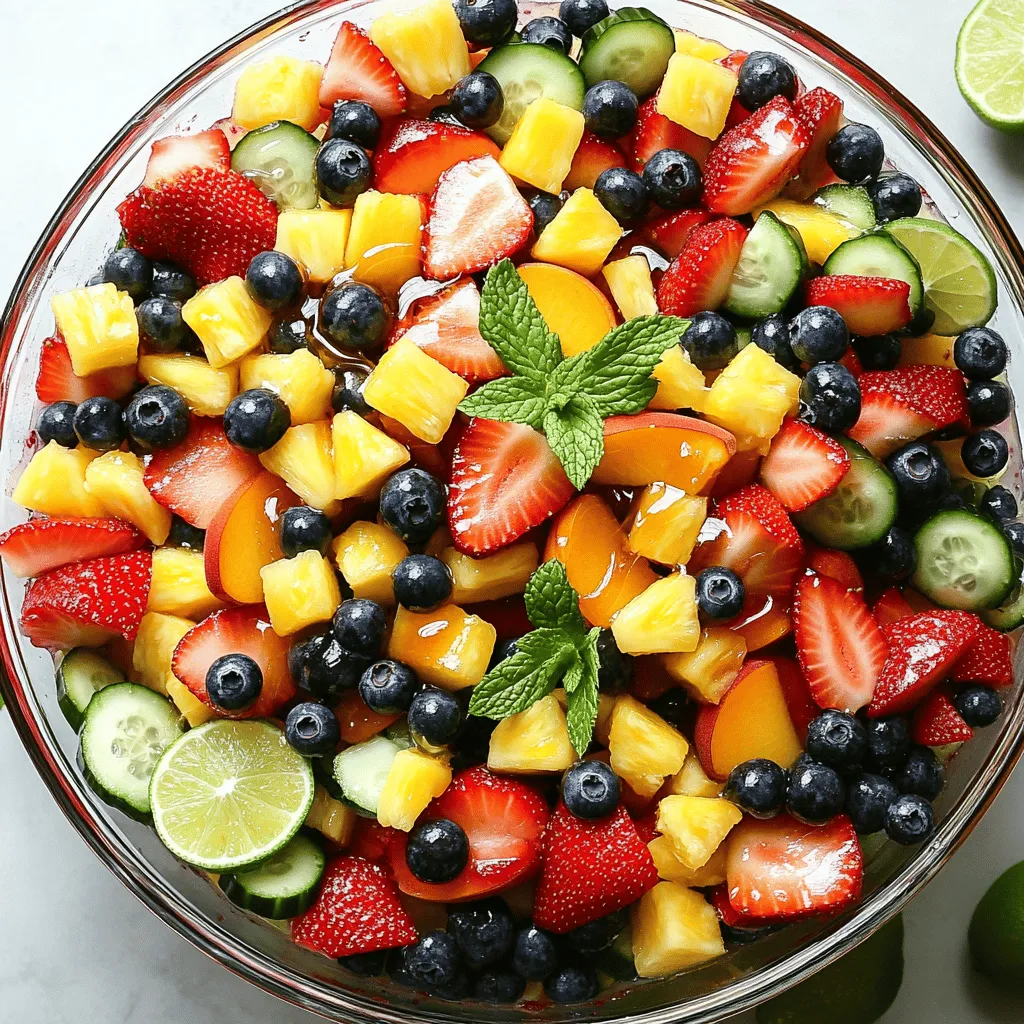
Refreshing Summer Fruit Salad Simple and Tasty
Looking for a tasty way to cool off this summer? This Refreshing Summer Fruit Salad is your perfect solution! It’s simple to make and bursting
To make Easy Mexican Coleslaw, you need the following fresh ingredients: - 4 cups green cabbage, shredded - 1 cup red cabbage, shredded - 1 cup carrots, grated - 1 cup fresh corn, cooked (or canned, drained) - 1/2 cup red onion, finely chopped - 1/2 cup cilantro, chopped - 1 jalapeño, finely diced (seeds removed for less heat) - 1/2 cup mayonnaise - 2 tablespoons lime juice - 1 tablespoon agave nectar (or honey) - Salt and pepper to taste Using fresh produce is key for flavor. The crunch from the cabbage and sweetness from the corn make this dish bright and lively. Fresh herbs like cilantro add depth, while lime juice gives a zesty kick. You can customize your coleslaw with these optional ingredients: - Avocado for creaminess - Black beans for protein - Radishes for extra crunch - Other peppers for more heat For dietary needs, swap mayonnaise with a vegan option or use yogurt. You can also replace agave nectar with maple syrup or skip sweeteners altogether. These changes help fit various diets while keeping it tasty. To prepare this coleslaw, you’ll need: - A large mixing bowl - A cutting board and knife - A grater for carrots - A whisk for the dressing - Measuring cups and spoons These tools make the prep easy and quick. You’ll enjoy assembling this colorful dish that adds flair to any meal. To make your coleslaw great, start with fresh, crisp vegetables. Use a sharp knife or a food processor to shred the green cabbage and red cabbage. You want thin strips. For the carrots, use a box grater or a food processor to get fine pieces. This helps mix their sweet flavor into the slaw. Combine all the shredded and grated veggies in a large bowl. Add the cooked corn, finely chopped red onion, chopped cilantro, and diced jalapeño. Mix them well. This ensures every bite has a burst of flavor. Next, let’s make the dressing. In a small bowl, whisk together the mayonnaise, lime juice, agave nectar, salt, and pepper. Make sure the mixture is smooth and creamy. The lime juice adds a tangy taste, while the agave nectar brings a hint of sweetness. Aim for a good balance between these flavors. You want enough dressing to coat the vegetables well. If it’s too thick, add a bit more lime juice. If it’s too runny, add more mayonnaise. Now it’s time to combine everything. Pour the dressing over the veggie mix. Gently toss them together until all the vegetables are well coated. Cover the bowl with plastic wrap or a lid. Refrigerate the coleslaw for at least 30 minutes. This chilling time allows the flavors to meld and deepen. Chilling also helps the veggies stay crisp. Before serving, give it a good stir and taste. Adjust the seasoning with extra lime juice, salt, or pepper if needed. Enjoy your fresh, zesty Mexican coleslaw! For the full recipe, check out the [Full Recipe]. To make your coleslaw fast and easy, use pre-shredded veggies. You can find these in most stores. They save time and effort. When you chop vegetables, keep them in cold water. This helps them stay crisp. Drain and dry before mixing to avoid sogginess. You can serve coleslaw with many meals. It goes well with tacos, burgers, or grilled chicken. It adds a fresh crunch to your plate. Try it with spicy dishes for a cooling effect. This coleslaw pairs nicely with barbecue or even as a topping for nachos. To boost the flavor, add spices or herbs. A pinch of cumin gives a warm taste. Fresh lime zest adds a bright kick. For extra crunch, toss in some nuts or seeds. Try sunflower seeds or chopped almonds for a fun texture. You will love the added layers of flavor! For the complete recipe, check the Full Recipe section. {{image_2}} You can switch up the dressing for your coleslaw. Try a tangy vinaigrette by mixing olive oil, vinegar, and mustard. It gives a bright flavor that pairs well with tacos. For a creamy twist, use yogurt instead of mayonnaise. This option adds a nice tang while keeping it light. Each dressing changes the taste and feel of your coleslaw. For a vegan coleslaw, swap out the mayo for plant-based options. Use cashew cream or avocado for creaminess. These options keep the texture rich and tasty. You can also add nutritional yeast for a cheesy flavor. This way, everyone can enjoy a delicious side dish, no matter their diet. You can add local flavors to your coleslaw. In the Southwest, add black beans and corn for a hearty twist. Or, try mango for a sweet touch that contrasts the crunch. If you want a spicy kick, mix in chipotle peppers or chili powder. Each region offers unique spins that make this dish fun and exciting. To keep your coleslaw fresh, use an airtight container. Glass or plastic containers work well. Make sure the lid seals tightly. This helps prevent air from spoiling your coleslaw. Store it in the fridge right away. Avoid leaving it out at room temperature. This will keep it crisp and tasty. Coleslaw can last about 3 to 5 days in the fridge. After that, it may lose its crunch. You can also freeze coleslaw. However, the texture changes when thawed. To freeze, place coleslaw in a freezer-safe bag. Remove as much air as possible. When ready to eat, thaw it in the fridge overnight. Use it within a week for the best taste. If your coleslaw loses its crunch, try adding fresh veggies. Some chopped bell peppers or carrots work great. You can also mix in a bit of extra dressing. This adds flavor and moisture. If you have leftover coleslaw, try using it in tacos or burritos. It adds a nice crunch to these dishes. You can even stir it into soups or stews for extra texture. This coleslaw is called "Mexican" due to its vibrant flavors and ingredients. You use fresh produce like green and red cabbage, carrots, and corn. The addition of lime juice and cilantro adds brightness. The jalapeño gives it a kick. These elements blend to create a unique taste that goes well with many dishes. Yes, you can make this coleslaw ahead of time. Preparing it a few hours before serving helps the flavors come together. The dressing will soak into the vegetables, making them tastier. Just store it in the fridge until you're ready to serve. Absolutely! If you love heat, add more jalapeños. You can also leave the seeds in for extra spice. Another option is to add a pinch of cayenne pepper or hot sauce. Adjust these to suit your taste. Start with a little, then add more if you want. Agave nectar is not a must. If you don't have it, honey works well too. You can also skip the sweetener if you prefer a less sweet taste. Just taste the dressing and adjust as needed. You can add a bit more lime juice for balance. This blog post covered how to make a delicious coleslaw with fresh ingredients. We explored essential components, optional add-ins, and necessary tools. You learned step-by-step how to prepare vegetables and make the dressing. We shared tips for keeping it fresh and flavorful, plus variations to try. Coleslaw is versatile and can adapt to your taste. Whether you want a spicy twist or a vegan option, the possibilities are endless. Enjoy experimenting and sharing this dish with family and friends!
Easy Mexican Coleslaw Tasty Side for Every Meal
Are you ready to spice up your meals with a vibrant twist? Our Easy Mexican Coleslaw is the perfect side dish that adds fresh flavors
- 8 oz rotini pasta - 1 cup cherry tomatoes, halved - 1 cucumber, diced - 1 bell pepper (red or yellow), diced - 1 cup baby spinach, roughly chopped - 1/2 cup black olives, sliced - 1/2 cup mozzarella balls, halved - 1/4 cup red onion, finely chopped - 1/4 cup parsley, chopped - 1/4 cup olive oil - 2 tablespoons red wine vinegar (or apple cider vinegar for a twist) - 1 teaspoon Italian seasoning - Salt and pepper to taste Each ingredient in this grinder pasta salad plays a key role. The rotini pasta serves as the base, with its spirals holding the dressing and flavors. Cherry tomatoes add juicy sweetness, while cucumbers bring a refreshing crunch. The bell pepper brightens the dish with its color and taste. Baby spinach enhances the salad’s health factor. Black olives provide a savory bite. Mozzarella balls add creaminess, and red onion brings a bit of sharpness. Fresh parsley rounds it out with a pop of color and freshness. For the dressing, olive oil makes it rich. Red wine vinegar adds tang, and Italian seasoning infuses it with herbs. Salt and pepper balance all the flavors. You can find the complete recipe for this salad in the Full Recipe section. To make the perfect grinder pasta salad, start by cooking rotini pasta. Boil water in a large pot. Add a pinch of salt. Then, cook the pasta for about 8-10 minutes or until al dente. Al dente means it should be firm but not hard. Drain the pasta in a colander. Rinse it under cold water. This stops the cooking process and helps cool the pasta. Next, it’s time to mix the pasta with fresh veggies. In a large bowl, add the cooled rotini. Toss in the halved cherry tomatoes, diced cucumber, and bell pepper. Add the chopped baby spinach, black olives, mozzarella balls, finely chopped red onion, and parsley. The key here is to balance the ingredients. Each veggie adds its own flavor and crunch. Now, let’s whip up the dressing. In a separate bowl, add olive oil, red wine vinegar, Italian seasoning, salt, and pepper. Whisk them together until they blend well. This dressing brings all the flavors together. You can adjust the vinegar based on your taste. Want a tangy kick? Add a bit more vinegar! Pour the dressing over the pasta and veggies. Now comes the fun part: tossing! Use two forks to gently mix everything. Make sure every piece gets some dressing. Once tossed, cover the bowl and chill it in the fridge. Let it sit for at least 30 minutes. This chill time helps the flavors meld together. Trust me, it makes a big difference! For the full recipe, check out the listed ingredients and instructions. Enjoy your flavorful grinder pasta salad! Grinding makes your ingredients more tender. It breaks them down, which helps flavors mix better. When you grind veggies, they release more juices. This adds a fresh taste to your salad. Use a food processor for quick grinding. Just pulse the veggies a few times. You get a nice, chunky texture that pairs well with pasta. For the best grinder pasta salad, choose crisp veggies. Cherry tomatoes bring sweetness. Cucumbers add crunch. Bell peppers add color and flavor. I love using seasonal veggies. They taste better and are often cheaper. In summer, add fresh basil or zucchini. In fall, try roasted butternut squash. Always pick what looks fresh at the market. Garnishing your salad can make it pop. Top with extra parsley or a sprinkle of cheese. You can also add some nuts for crunch. For meal pairings, serve this salad with grilled chicken or fish. It’s light but filling. You could even pack it for a picnic. Just make sure to keep it cool until you eat. Try the Full Recipe for a great meal! {{image_2}} You can easily add protein to your grinder pasta salad. Grilled chicken is a great choice. It adds a smoky flavor and fills you up. If you prefer plant-based options, try adding grilled tofu. It soaks up flavors well and is rich in protein. For a meatier touch, consider prosciutto or salami. These cured meats give a salty kick that balances the salad's freshness. The dressing can change the salad's whole vibe. You can try different dressings to switch things up. A creamy ranch or zesty lemon vinaigrette can add new layers of flavor. You can also mix in herbs like basil or dill for extra taste. Feel free to experiment until you find the perfect combo. Customizing your salad lets you create a flavor profile that suits your taste. If you need gluten-free options, use gluten-free pasta. Many brands offer great alternatives that taste just as good. For those following a vegan diet, swap the mozzarella for avocado or vegan cheese. You can also replace the honey in dressings with maple syrup. These simple swaps keep the salad delicious while meeting dietary needs. To keep your leftover pasta salad fresh, place it in an airtight container. This helps lock in the flavors and keeps it safe from other odors in your fridge. You can also use a glass jar with a tight lid. Make sure the salad is cool before sealing it to avoid steam buildup. When stored properly, your grinder pasta salad lasts about 3 to 5 days in the fridge. If you see any mold or if it smells off, it’s time to toss it. Pay close attention to the ingredients that spoil first, like the fresh vegetables. For best results, serve your pasta salad cold. If you prefer it warm, gently heat it in a pan on low. Stir often to avoid burning. Remember, the salad tastes great cold, so feel free to enjoy it right from the fridge! Yes, you can! If you want to switch things up, try using: - Penne - Fusilli - Farfalle - Gluten-free pasta These options work well in a grinder pasta salad. Each pasta shape holds sauce and ingredients differently, adding fun to your dish. Making this salad in advance is easy. Here are some tips: - Cook the pasta and cool it completely. - Cut the veggies and store them separately. - Mix the dressing and refrigerate it. Combine everything the night before. This helps the flavors blend nicely. To turn your salad into a full meal, consider adding: - Grilled chicken or shrimp for protein - Chickpeas or black beans for a veggie boost - Feta cheese or avocado for creaminess Serve it with crusty bread or a side of fruit for balance. Freezing pasta salad is not ideal. Here’s why: - The texture of pasta changes when frozen. - Fresh veggies lose crunch and become soggy. If you must freeze, leave out the dressing and any fresh ingredients. Thaw it in the fridge and add fresh elements when ready to serve. For the best results, use a food processor to grind ingredients. Here are some tips: - Chop ingredients into smaller pieces before grinding. - Pulse in short bursts to control the texture. - Avoid over-processing; you want some chunks for texture. This method releases flavors while keeping a nice bite in your salad. Check out the Full Recipe for more details! You learned about crafting a tasty and colorful pasta salad. We covered key ingredients, easy steps, and clever tips. You can swap ingredients to suit your taste or dietary needs. This salad is perfect for any meal or gathering. Remember, fresh flavors and textures make it shine. Enjoy your culinary creation and share your results! It’s not just food; it’s a fun experience. Dive in and create your perfect version now!
Grinder Pasta Salad Fresh and Flavorful Delight
Are you ready to spice up your summer picnics? This Grinder Pasta Salad is a fresh and flavorful delight that will impress your guests and
To make a tasty Mexican macaroni salad, you need some key ingredients: - 2 cups elbow macaroni - 1 cup cherry tomatoes, halved - 1 cup black beans, rinsed and drained - 1/2 cup corn, canned or frozen (thawed) - 1/2 red onion, finely chopped - 1 avocado, diced - 1/2 cup cilantro, chopped - 1 jalapeño, finely chopped (optional for heat) - 1/4 cup lime juice - 1/4 cup olive oil - 1 teaspoon cumin - Salt and pepper to taste - Cotija cheese for topping (optional) These ingredients create a mix of flavors and colors. The creamy avocado and crunchy vegetables make every bite fun. You can play with the recipe by adding these optional ingredients: - Bell peppers for sweetness - Fresh corn for extra crunch - Chopped green onions for a mild onion taste - Radishes for a peppery flavor - A splash of hot sauce for more heat These additions can change the taste and texture. Feel free to experiment! If you have dietary needs, there are easy swaps: - Use gluten-free pasta if you need it. - Replace black beans with chickpeas for a different protein. - Swap out lime juice for lemon juice if you prefer. - Use olive oil or avocado oil for a lighter dressing. These substitutions help you stick to your diet while still enjoying the salad. Remember, cooking is all about finding what works best for you! For the complete recipe, check out the Full Recipe. Start with a large pot of salted water. Bring it to a boil. Once boiling, add 2 cups of elbow macaroni. Cook according to the package instructions until the pasta is al dente. This usually takes about 8-10 minutes. Drain the macaroni in a colander and rinse it under cold water. This stops the cooking and cools it down quickly. While the macaroni cooks, chop your fresh ingredients. Slice 1 cup of cherry tomatoes in half. Rinse and drain 1 cup of black beans. If you use frozen corn, thaw 1/2 cup. Finely chop 1/2 red onion. Dice 1 avocado into small pieces. Chop 1/2 cup of cilantro. If you like heat, finely chop a jalapeño. Be careful with the seeds! In a large mixing bowl, combine all the cooked macaroni with your fresh ingredients. Add the tomatoes, beans, corn, onion, avocado, cilantro, and jalapeño. Next, make the dressing. In a small bowl, whisk together 1/4 cup lime juice, 1/4 cup olive oil, 1 teaspoon cumin, and salt and pepper to taste. Pour the dressing over the salad. Toss gently to mix everything well. You can serve it right away, topped with Cotija cheese, or chill it for 30 minutes for extra flavor. This recipe is truly a crowd-pleaser! For the full recipe, check out the details above. To add more flavor to your Mexican macaroni salad, try these tips. First, use fresh lime juice instead of bottled. Fresh juice brightens the taste. Next, add a pinch of smoked paprika for a nice kick. You can also toss in some diced red bell pepper for extra crunch and color. If you want more spice, consider adding more jalapeño. You can also include a dash of hot sauce for a zesty touch. Lastly, let the salad sit for a bit after mixing. This allows the flavors to blend and deepen. Texture is key in a great salad. Make sure not to overcook the elbow macaroni. Cook it just until al dente. This keeps it firm and prevents mushiness. Rinse the pasta with cold water after cooking. This halts the cooking and cools it down. For the veggies, chop them into small, even pieces. This helps them mix well with the pasta. The avocado should be just ripe. Too soft and it becomes mushy. A little crunch from the corn and beans balances the softness of the avocado. When serving your salad, presentation matters. Use a large bowl to show off the colorful ingredients. Garnish the top with crumbled Cotija cheese. This adds a creamy texture and salty flavor. You can also sprinkle extra cilantro on top for color. Serve it cold for the best taste. It’s great for picnics or barbecues. Pair it with grilled meats or as a side dish. For a fun twist, serve it in avocado halves. This makes for a beautiful and tasty dish. For the full recipe, check below! {{image_2}} You can easily make this salad more veggie-packed. Add bell peppers for crunch or zucchini for a fresh taste. Fresh corn off the cob is a great choice too. You can swap black beans with chickpeas or kidney beans. These options boost flavor and nutrition while keeping it vegetarian. Want some extra protein? Grilled chicken or shrimp fits in well. You can also use diced tofu for a plant-based option. If you love seafood, try adding canned tuna or salmon. These additions turn your salad into a filling meal. If you like heat, add more jalapeños or some diced serrano peppers. Sliced radishes can also add a nice kick. To make it zesty, sprinkle in some chili powder or hot sauce. These spicy twists will give your salad a fun twist and keep it lively. For a complete guide, check the Full Recipe. To keep your Mexican macaroni salad fresh, store it in an airtight container. If you make extra, let it cool down first. Then, place it in the fridge. This salad tastes great cold, so it’s perfect for leftovers. If you want to warm it up, do it gently. Use the microwave and heat in short bursts. Stir in between to make sure it heats evenly. You don't want mushy pasta! Add a splash of lime juice for a fresh taste after reheating. The salad stays good for about three days in the fridge. After that, check for any off smells or changes in texture. If it looks or smells funny, it’s best to toss it out. Enjoy it while it’s fresh for the best flavors! Mexican macaroni salad is a vibrant twist on classic pasta salad. It combines elbow macaroni with fresh veggies and beans. The flavors come from lime juice, cumin, and cilantro. You get a mix of creamy avocado, sweet corn, and juicy tomatoes in every bite. People love it for its colorful look and bold taste. This salad is perfect for barbecues, picnics, or family dinners. Yes, you can prepare Mexican macaroni salad ahead of time. Making it a few hours before serving helps the flavors blend well. Just store it in the fridge until you are ready to eat. If you want, add avocado just before serving to keep it fresh. This makes it easy for busy days or gatherings. You can easily customize this recipe to fit your taste. Add your favorite veggies like bell peppers or cucumbers for crunch. Want more protein? Toss in cooked chicken or shrimp. For spice lovers, add more jalapeño or a dash of hot sauce. You can even change the dressing by adding yogurt for creaminess. Check out the Full Recipe for more ideas and mix it up! In this post, we covered how to make Mexican macaroni salad, including key ingredients and steps. You learned how to enhance flavors and adjust for dietary needs. I shared tips for the best texture and serving ideas. Remember, you can customize this dish in many ways to fit your taste. Experiment with different ingredients and find your perfect mix. Enjoy making this fun and tasty dish!
Mexican Macaroni Salad Flavorful and Easy Recipe
Are you ready to spice up your salad game? I’ve got the perfect dish for you: Mexican Macaroni Salad! This recipe blends rich flavors and
- 2 large cucumbers, thinly sliced - 1 large red onion, thinly sliced - 4 ripe tomatoes, diced - 1/4 cup apple cider vinegar - 2 tablespoons olive oil - 1 tablespoon honey or maple syrup - 1 teaspoon salt - 1/2 teaspoon black pepper - 1 teaspoon dried oregano - Fresh parsley, chopped (for garnish) This recipe serves 4 to 6 people. You can double the amounts if you want more. The balance of flavors works well with these measurements. You can add fresh herbs like dill or basil for more taste. A pinch of red pepper flakes adds a nice kick. Try adding feta cheese for a creamy contrast. To start, we need to slice the cucumbers and onions. Use a sharp knife for clean cuts. Cut each cucumber into thin rounds. Aim for about 1/8 inch thick. This gives a nice crunch. Next, take the red onion. Slice it thinly, just like the cucumber. Thin slices help blend the flavors well. Now, let’s dice the tomatoes. Cut each tomato into quarters. Then, remove the seeds for a better texture. After that, chop the tomato pieces into small cubes. This will make them mix well with the other veggies. For the marinade, grab a bowl. Combine the apple cider vinegar, olive oil, and honey or maple syrup. Use two tablespoons of oil to get a nice flavor. Add one teaspoon of salt and half a teaspoon of black pepper. Don’t forget the dried oregano; it adds a nice touch. Whisk these ingredients together. This step is key! A good whisk ensures everything mixes well. It helps the oil and vinegar blend into a smooth dressing. Now it’s time to marinate the vegetables. In a big bowl, add the sliced cucumbers and onions. Toss them gently. Next, add the diced tomatoes. Pour the marinade over the veggies. Toss everything together again. Make sure the dressing coats all the vegetables. Cover the bowl with plastic wrap. You can also move the salad to a sealed container. Refrigerate it for at least 30 minutes. This allows the flavors to meld beautifully. Remember, the longer you marinate, the better the taste! Just before serving, give it a gentle toss again. Taste it and adjust salt or pepper if needed. For a touch of color, sprinkle some fresh parsley on top. This is where the magic happens! You can find the full recipe in the previous section. To get the best taste, let the cucumbers, onions, and tomatoes sit. When you mix them with the marinade, they soak up all the good flavors. I suggest letting them chill for at least 30 minutes in the fridge. This time helps the taste blend well. If you want to adjust the seasoning, taste the mix before serving. Add a pinch of salt or a dash of pepper if it needs more oomph. Presentation matters! Use a clear glass bowl to show off the bright colors. You can also layer the salad on fresh lettuce leaves for a nice touch. This adds texture and makes it look fancy. Pair this salad with grilled chicken or fish for a great meal. It also goes well with rice or quinoa for a filling side. Feel free to make this salad your own. You can add protein like chickpeas or grilled shrimp for a heartier dish. Want to switch up the flavors? Try adding feta cheese or olives for a salty kick. If you prefer a sweeter taste, toss in some diced bell peppers or even a splash of lemon juice. The options are endless! For the full recipe, check out the details above. {{image_2}} You can change the veggies in this dish easily. Try adding bell peppers for a sweet crunch. Carrots bring a nice color and extra sweetness. Radishes add a spicy kick. For a seasonal twist, use fresh corn in summer or roasted squash in fall. Each of these choices gives a new taste and texture. While the apple cider vinaigrette is tasty, you can explore other dressings. A classic balsamic vinaigrette or a zesty lemon dressing works well too. For a twist, try a tahini dressing for creaminess. You can also mix in herbs like cilantro or dill for a cultural touch. These flavors can take your dish to new heights. This recipe can fit many diets. It is vegan, as it uses no animal products. If you need gluten-free options, just check the vinegar label. For those looking to lower sugar, swap honey for a sugar-free sweetener. You can even skip it if you like your veggies plain! These small changes make the dish work for everyone. For the full recipe, check out the section above. To keep your marinated cucumbers, onions, and tomatoes fresh, follow these tips: - Always use airtight containers to store leftovers. - Glass containers work best, as they do not retain odors. - If you use plastic, ensure it is BPA-free. This dish can stay fresh in your fridge for about 3 to 5 days. Look for these signs of spoilage: - A change in color, especially in tomatoes. - A mushy texture in the cucumbers or onions. - An off smell that seems sour or unpleasant. You do not need to heat this salad. It tastes best cold. If you prefer to serve it at room temperature, just let it sit out for a few minutes. Here are some serving ideas: - Use a nice bowl to showcase the colors. - Toss gently before serving to mix the flavors again. - Garnish with fresh parsley just before serving for a pop of color. For more details, check out the Full Recipe. To get the best flavor, marinate the salad for at least 30 minutes. This time lets the veggies soak up the dressing. If you have more time, try marinating for up to 2 hours. The longer they sit, the better the taste! Yes, you can prepare this dish ahead of time! Make the salad up to a day before serving. Store it in an airtight container in the fridge to keep it fresh. Just remember to toss it again before you serve. This helps mix the flavors back together. This salad pairs well with grilled chicken, fish, or a savory sandwich. You can also serve it with warm pita bread. It adds a nice touch and balances the meal. Consider adding some crispy chips for extra crunch, too. Yes! You can easily customize this recipe. Add fresh herbs like basil or dill for more flavor. You can also swap the honey for agave syrup if you want a vegan option. Feel free to mix in avocado or bell peppers for added texture and taste. This post guided you through making a fresh salad with cucumbers, tomatoes, and onions. You learned key ingredients, preparation steps, and tips for flavor enhancement. Customization options let you adapt the salad to suit your taste. Remember, allowing flavors to meld is key for a great dish. Enjoy the process, and feel free to experiment! Your unique touch can make this salad even better. Happy cooking!
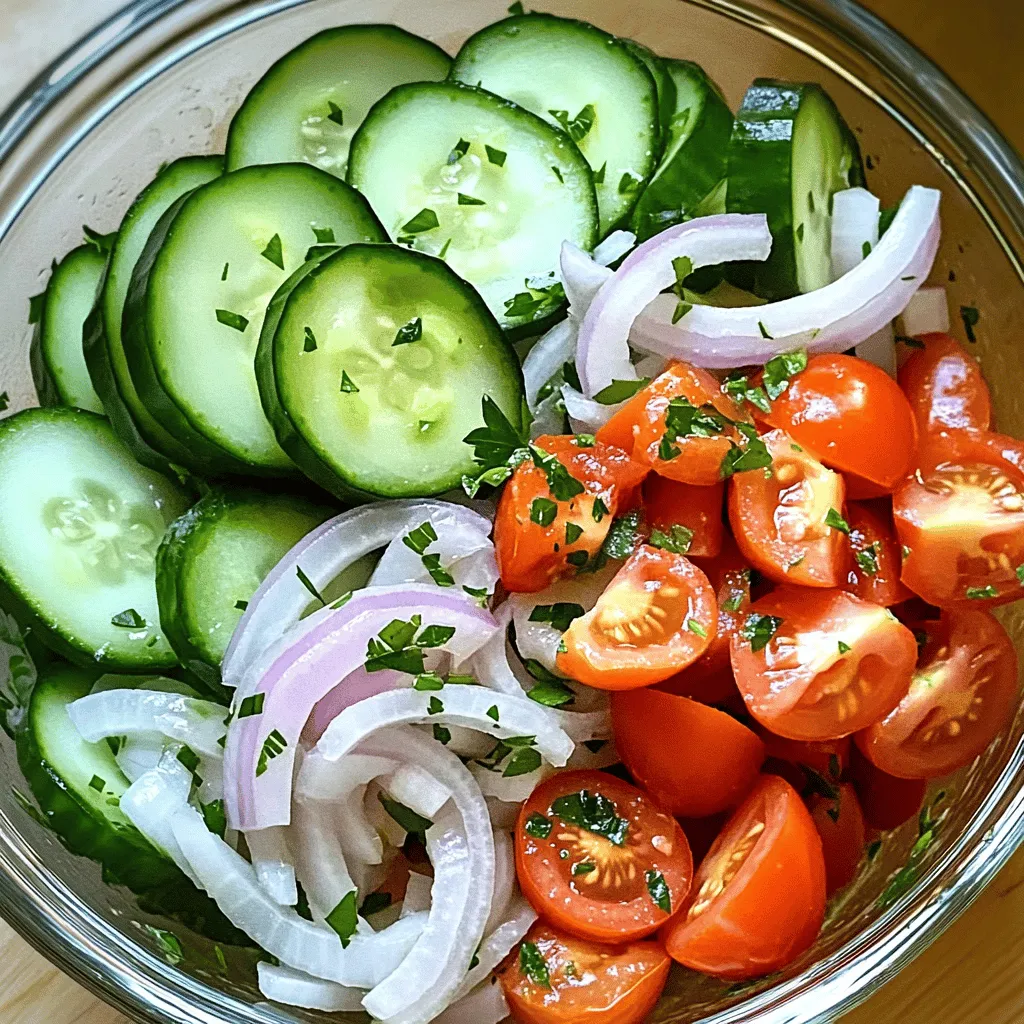
Marinated Cucumbers, Onions, and Tomatoes Delight
Are you ready to add a burst of flavor to your meals? Marinated cucumbers, onions, and tomatoes are fresh, tasty, and easy to make. With
Here’s what you need for a great Easy Italian Antipasto Pasta Salad. This list has everything to make your dish burst with flavor. - 8 ounces rotini or fusilli pasta - 1 cup cherry tomatoes, halved - 1 cup mozzarella balls (bocconcini) - 1 cup salami, sliced into strips - 1/2 cup black olives, pitted and sliced - 1/2 cup roasted red peppers, chopped - 1/4 cup red onion, finely chopped - 1/4 cup fresh basil, chopped - 1/4 cup olive oil - 2 tablespoons balsamic vinegar - 1 teaspoon Italian seasoning - Salt and pepper to taste You can swap ingredients if you like. For example, use penne instead of rotini. You can also try different cheeses like feta or provolone. If you want a lighter option, use turkey or chicken instead of salami. You can even add more veggies, like cucumbers or artichokes. This recipe is flexible to fit your taste. Enjoy making this salad with your favorite ingredients! For the full recipe, check out the Easy Italian Antipasto Pasta Salad. Start by cooking the pasta. Use rotini or fusilli, as they hold sauce well. Cook until al dente. This means the pasta should be firm but not hard. If you overcook it, the pasta will get mushy. Once done, drain the pasta. Rinse it under cold water. This cooling process stops cooking and keeps the pasta fresh. In a large bowl, combine the cooled pasta with the antipasto elements. Add cherry tomatoes, mozzarella balls, salami, black olives, roasted red peppers, red onion, and fresh basil. Mix gently. Avoid smashing the ingredients. You want each flavor to shine. Toss until everything is evenly distributed. For the dressing, you need olive oil, balsamic vinegar, Italian seasoning, salt, and pepper. Whisk them together in a small bowl until smooth. The dressing should balance tang and richness. Taste it. If needed, adjust the salt and vinegar. Pour the dressing over the pasta and vegetable mixture. Mix it all well. Let the pasta salad sit in the fridge for at least 30 minutes. This allows the flavors to blend perfectly. You can find the full recipe above for all the details! You can change your pasta salad to fit your taste. Here are some ideas: - Additional ingredients: Add artichoke hearts, pepperoncini, or roasted zucchini. You can also try different cheeses like feta or goat cheese. - Dietary modifications: For a vegan version, skip the cheese and salami. Use chickpeas or tofu for protein. If you need gluten-free, choose gluten-free pasta. This salad fits many occasions. Here are some ideas for serving: - Best occasions: Serve it at picnics, barbecues, or family gatherings. It’s great for potlucks or as a side dish for dinner. - Pairing ideas: Pair it with grilled chicken, garlic bread, or a light soup. It also works well with a fresh green salad. Marinating your salad brings out the best flavors. Here’s how to do it: - Marinating time: Let your salad sit for at least 30 minutes. This helps the ingredients blend well. For even more flavor, you can marinate for a few hours. - Adjusting acidity and seasoning: Taste your salad before serving. If it needs more zing, add extra balsamic vinegar or a squeeze of lemon. Season with salt and pepper to balance the flavors. {{image_2}} You can change up the ingredients to give a Mediterranean flair. Use artichoke hearts, feta cheese, and sun-dried tomatoes. These flavors bring a bright taste to your salad. You can also add capers for a salty punch. Swap out the salami for prosciutto, which adds a nice texture. This twist makes the dish feel fresh and vibrant, perfect for summer. Adding more vegetables can make your pasta salad even better. You can toss in bell peppers, cucumbers, or zucchini. These veggies add crunch and color. Try adding spinach or arugula for a healthy touch. More vegetables can balance out the rich flavors, making each bite exciting. Plus, they make the salad look beautiful! Want to make your salad heartier? Add grilled chicken or chickpeas for protein. Grilled chicken adds a smoky flavor, while chickpeas offer a nice, nutty taste. Both options make your salad filling and satisfying. You can also use shrimp if you prefer seafood. Protein-packed salads are great for lunch or dinner. They keep you full and energized! For the complete recipe, check out the Full Recipe section. To keep your Easy Italian Antipasto Pasta Salad fresh, store it in the fridge. Use an airtight container to prevent any odors from mixing. Glass containers work well because they don’t stain. You can also use plastic containers, but ensure they close tightly. Always let the dish cool before sealing it. This helps avoid condensation, which can make the salad soggy. When stored properly, your pasta salad lasts about 3 to 5 days in the refrigerator. Check for signs of spoilage, like a sour smell or mold. If you see any changes in color or texture, it's best to toss it. Always trust your senses; if it looks or smells off, don't eat it. Yes, you can freeze the pasta salad, but it may change the texture. To freeze, place it in a freezer-safe container. Leave some space at the top, as it will expand. When you want to eat it, thaw it in the fridge overnight. For best results, enjoy it fresh. The flavors may not be as bright after freezing. You can find the full recipe for more details on how to prepare it. To make an Italian antipasto pasta salad, start by cooking 8 ounces of rotini or fusilli pasta. Cook it until it is al dente, then drain and rinse it under cold water. This cools the pasta down and stops the cooking. Next, gather your ingredients. You will need cherry tomatoes, mozzarella balls, salami, black olives, roasted red peppers, red onion, and fresh basil. In a large bowl, mix the cooled pasta with these ingredients. For the dressing, whisk together olive oil, balsamic vinegar, Italian seasoning, salt, and pepper in a small bowl. Pour this dressing over the pasta salad and gently toss everything. Let the salad sit in the fridge for at least 30 minutes. This helps the flavors blend. You can find the full recipe for detailed steps. For extra flavor, you can add a few items to your salad. Consider adding: - Artichoke hearts for a tangy bite. - Capers for a salty kick. - Fresh herbs like parsley or oregano for freshness. - Pepperoncini for some heat. - Grilled vegetables for a smoky flavor. These additions can really enhance the taste and make your salad unique. Yes, you can eat antipasto pasta salad the next day. Store it in an airtight container in the fridge. It stays fresh for about 3 days. The flavors may even taste better as they meld overnight. Just give it a good stir before serving. If it seems dry, add a splash of olive oil or vinegar to refresh it. Enjoy your delicious pasta salad! In this post, we explored how to make a delicious antipasto pasta salad. I gave you a clear list of ingredients and even some swaps. We discussed cooking pasta perfectly and mixing it right. Tips helped customize your salad for any diet or occasion. I also shared ways to store and enhance flavor. Remember, this salad is flexible and fun. Enjoy creating your own version!
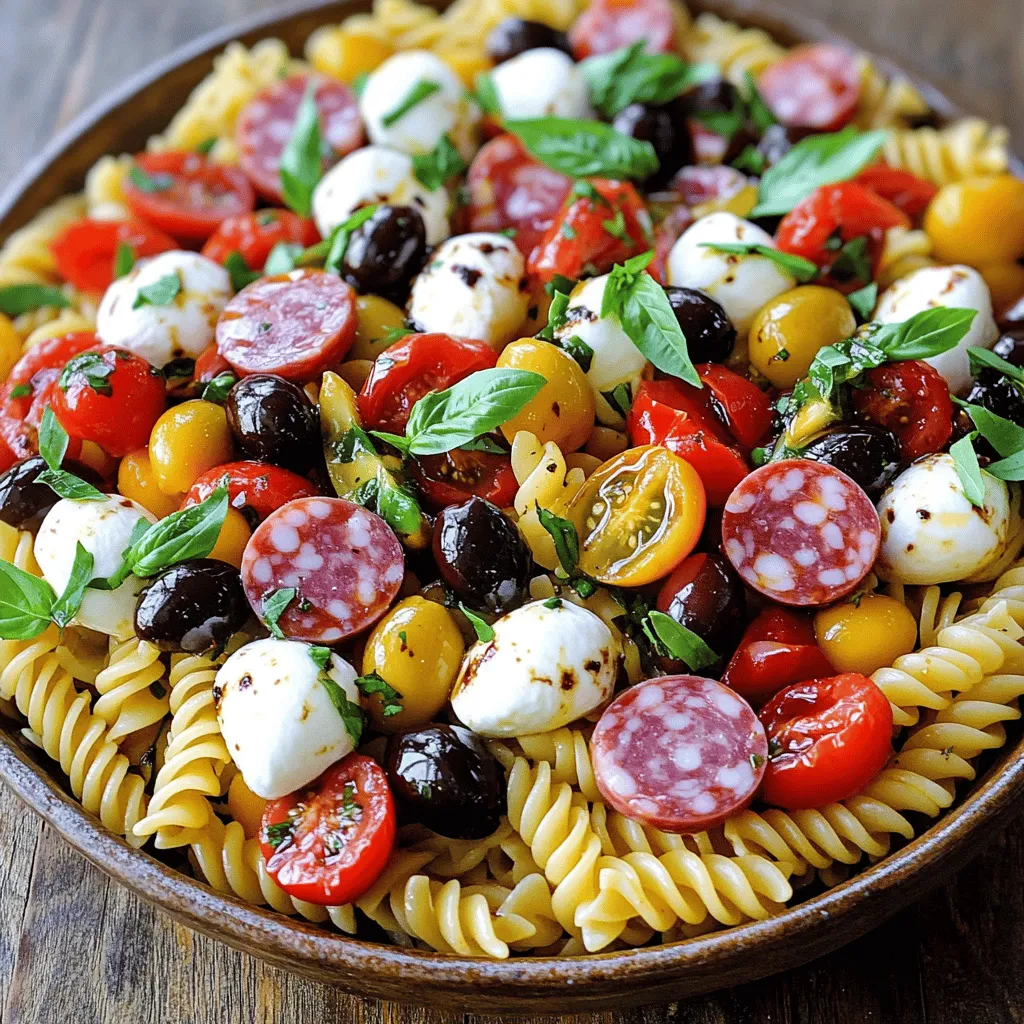
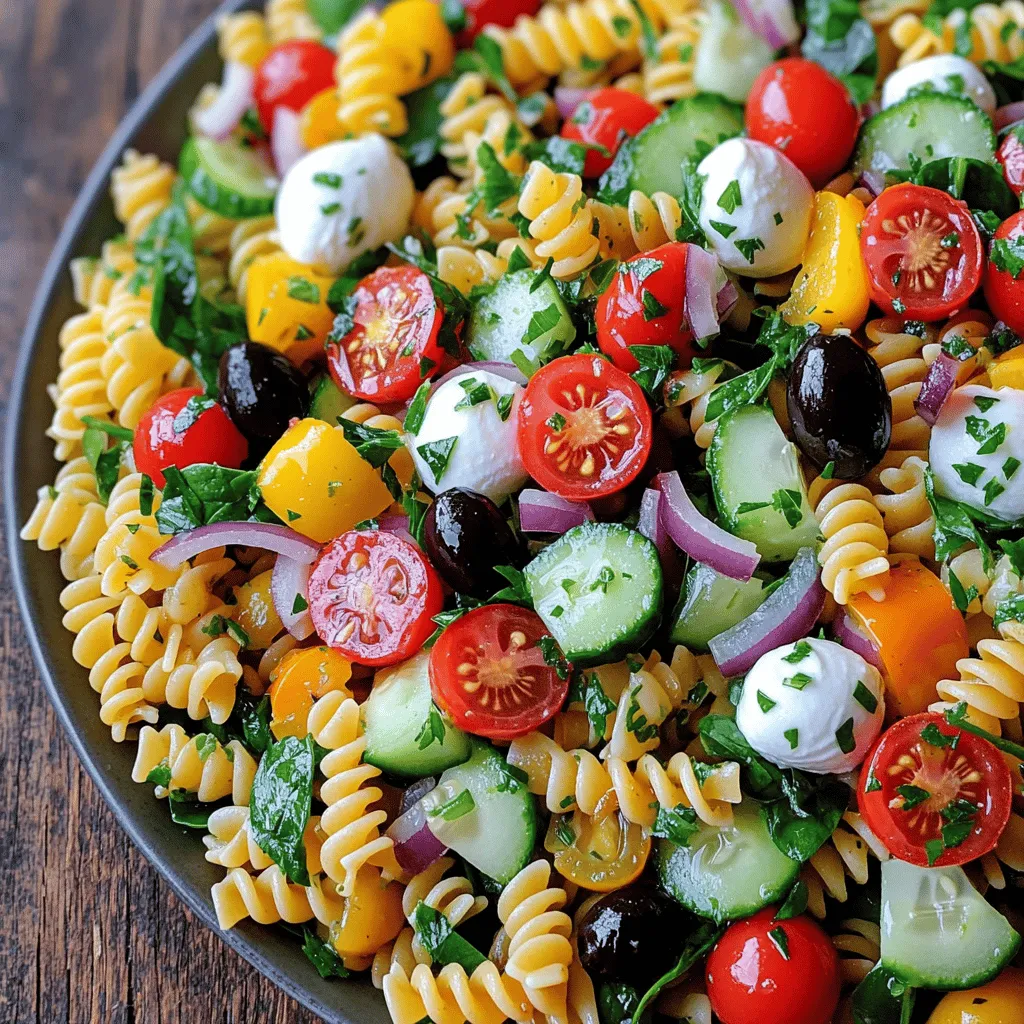
Easy Italian Antipasto Pasta Salad Quick and Tasty Recipe
Looking for a quick and tasty dish to impress your friends? My Easy Italian Antipasto Pasta Salad is the answer! This colorful salad packs bold