Dinner

To make this tasty soup, you need some key ingredients. Here’s the list: - 2 cups canned cannellini beans, rinsed and drained - 1 medium onion, chopped - 2 cloves garlic, minced - 2 medium carrots, diced - 2 celery stalks, diced - 4 cups vegetable broth - 2 cups diced tomatoes (canned or fresh) - 1 teaspoon dried thyme - 1 teaspoon dried rosemary - 2 cups kale or spinach, chopped - 2 tablespoons olive oil - Salt and pepper to taste - Fresh basil for garnish These items give the soup a nice balance of flavors and textures. The beans add creaminess. The veggies bring crunch and color. The herbs offer depth and aroma. You can add some optional ingredients to make the soup even better. Here are a few ideas: - 1-2 bay leaves for extra flavor - A splash of lemon juice for brightness - A pinch of red pepper flakes for heat - Parmesan cheese for a rich taste These additions can spice up the soup. They let you customize your bowl to fit your taste. Fresh herbs can really brighten up your soup. Here are some great options: - Fresh parsley for a pop of color - Fresh thyme leaves for a stronger herb flavor - A drizzle of olive oil for richness - Croutons for added crunch These garnishes add flair and freshness to your dish. They make your soup look and taste amazing. For the full recipe, be sure to check the complete guide. First, gather all your ingredients. You need two cups of canned cannellini beans, one medium onion, two cloves of garlic, two medium carrots, and two celery stalks. Measure out four cups of vegetable broth and two cups of diced tomatoes. Don't forget your dried thyme, dried rosemary, and two cups of kale or spinach. Lastly, grab olive oil, salt, and pepper. Next, chop the onion, carrots, and celery. Mince the garlic. Rinse and drain the beans. This prep makes cooking easier. In a large pot, heat the olive oil over medium heat. Add the chopped onion and sauté for about five minutes. You want the onion to be soft and clear. Next, stir in the garlic, carrots, and celery. Cook for another five to seven minutes. Stir often to keep them from burning. Now, add the diced tomatoes, vegetable broth, thyme, and rosemary to the pot. Bring it to a boil. Then, reduce the heat and let it simmer for about 15 minutes. This helps the flavors blend well. After 15 minutes, stir in the rinsed cannellini beans and chopped kale or spinach. Let the soup simmer for another ten minutes. This step adds nutrition and color. Finally, season with salt and pepper to taste. To serve, ladle the soup into bowls. Add fresh basil leaves on top for garnish. This adds a pop of color and fresh flavor. Serve the soup hot. Pair it with crusty bread or a simple salad for a complete meal. Enjoy each comforting spoonful of your homemade Tuscan White Bean Soup. You can find the Full Recipe to guide you through each step. When making Tuscan white bean soup, avoid overcooking the vegetables. They should stay tender, not mushy. Another mistake is skipping the seasoning. Salt and pepper can make a big difference. Don't forget to taste as you go. This helps you adjust flavors. To boost flavor, add a splash of lemon juice. It brightens the soup and adds freshness. You can also try adding a pinch of red pepper flakes for warmth. Fresh herbs like basil or parsley can enhance the taste too. Stir them in right before serving for the best effect. Use a large pot or Dutch oven for even cooking. A good cutting board and sharp knife will help you chop quickly. A wooden spoon is great for stirring. If you have an immersion blender, it can smooth out the soup if you want a creamier texture. For the full recipe, check out the details above. {{image_2}} You can easily make this soup meat-free. Use vegetable broth and skip any meat. The cannellini beans give you protein. You can add more veggies for texture and flavor. Try adding zucchini or bell peppers. These options keep the soup hearty and healthy. This soup is naturally gluten-free. Make sure your vegetable broth is gluten-free. Always check the labels. You can enjoy this dish without worrying about gluten. Enjoy it as is for a safe and tasty meal. Feel free to swap ingredients based on what you have. If you don’t have kale, use spinach or Swiss chard. You can use any white bean if you can’t find cannellini beans. Add herbs like oregano or parsley for a new twist. You can also use fresh tomatoes if canned ones are not available. For a spicier kick, add red pepper flakes. These small changes can give your soup a whole new flavor. For the full recipe, check out the section above. I love making extra Tuscan white bean soup. To store it, let the soup cool. Use an airtight container for best results. Place the soup in the fridge. It will stay fresh for up to 5 days. Make sure you label the container with the date. When you are ready to enjoy your soup again, take it out of the fridge. Pour the soup into a pot. Heat over medium heat until it is warm. Stir it often to keep it from sticking. You can also use a microwave. Just heat it in a microwave-safe bowl. Stir every minute until it is hot. If you want to keep the soup longer, freezing is a great option. First, let the soup cool completely. Then, pour it into freezer-safe containers. Leave some space at the top as the soup will expand. Seal the containers well and label them. You can freeze the soup for up to 3 months. When you are ready to eat it, thaw it in the fridge overnight. Reheat it as mentioned above. This way, you can enjoy this tasty dish anytime! For the complete recipe, check out the Full Recipe. Tuscan White Bean Soup is a warm, hearty dish. It comes from the Tuscany region of Italy. This soup features cannellini beans, veggies, and herbs. The broth is rich and full of flavor. You can enjoy it as a main dish or a side. Yes, you can switch beans if you like. White beans are best for this recipe. Navy or great northern beans work well too. You can even try black beans for a twist. Just make sure to rinse and drain them before use. You can keep Tuscan White Bean Soup in the fridge for about five days. Store it in an airtight container. Make sure it cools down first. This way, the soup will stay fresh and tasty. You can serve this soup with crusty bread. A simple green salad pairs well too. You might even enjoy it with a sprinkle of grated cheese on top. Fresh basil makes a great garnish, adding color and flavor. For the full recipe, check out the section above. Tuscan White Bean Soup is simple yet tasty. We covered its main and optional ingredients, key cooking steps, and how to serve. Remember to avoid common mistakes to get the best flavor. You can make variations to fit your needs, like vegan or gluten-free. Store leftovers properly and follow reheating tips to enjoy later. With this guide, you can make a delicious soup that warms your heart. Enjoy your cooking journey!
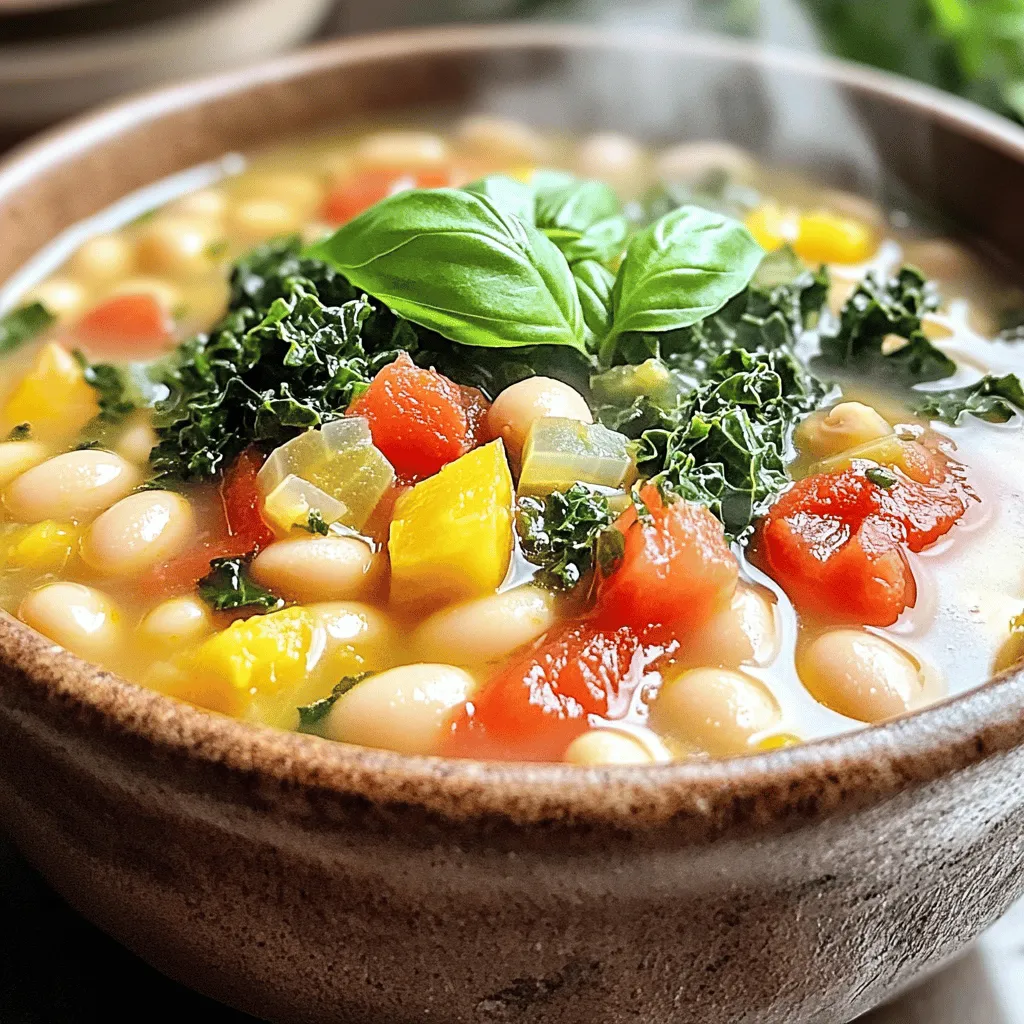
Tuscan White Bean Soup Delicious and Nutritious Meal
If you’re craving a warm and hearty meal, Tuscan White Bean Soup is a must-try. This soup is packed with flavor and goodness, making it
- 1 pound large shrimp, peeled and deveined - 8 ounces linguine or spaghetti - 4 tablespoons unsalted butter - 4 tablespoons olive oil - 4 cloves garlic, minced - 1 teaspoon red pepper flakes (adjust to taste) - Zest and juice of 1 lemon - 1/4 cup chopped fresh parsley - Salt and pepper to taste - Optional: Lemon wedges for garnish When picking shrimp, fresh is best if you can find it. Fresh shrimp should look pink and shiny. It should smell like the ocean, not fishy. If you buy frozen shrimp, check the package. Look for shrimp that is firm and not icy. You can use either type for this dish, but fresh gives the best taste. You need a few key tools for this recipe. A large skillet works great for cooking shrimp. You’ll also need a pot for boiling pasta. Make sure to have measuring cups and spoons on hand. A strainer helps drain the pasta after cooking. With these tools, you’ll be all set to make shrimp scampi. For the full recipe, check the detailed instructions above! To cook the pasta, start by boiling water in a large pot. Add a good amount of salt to the water. This helps flavor the pasta. Once the water boils, add your linguine or spaghetti. Cook it for about 8-10 minutes until it is al dente. Al dente means the pasta is firm but not hard. Remember to reserve 1/2 cup of that pasta water before draining it. You will need it later! In a large skillet, heat the butter and olive oil over medium heat. Once the butter melts, add the minced garlic and red pepper flakes. Be careful! You do not want to burn the garlic. Cook it for about 1-2 minutes until it smells great. Next, add the shrimp to the skillet. Season it with salt and pepper. Cook the shrimp for about 2-3 minutes on each side. They are done when they turn pink and opaque. Now it's time to combine everything! Lower the heat and add the lemon zest and juice. Pour in that reserved pasta water you saved. Stir well to mix it all together. Toss in the cooked pasta and chopped parsley. This will coat the pasta and shrimp in a yummy lemony sauce. For serving, use a large bowl or plate. Garnish with extra lemon wedges and a sprinkle of parsley. This makes the dish look bright and inviting. Enjoy your savory shrimp scampi! For the full recipe, check the above section. Garlic gives shrimp scampi its bold taste. Timing is key when cooking garlic. You want to add it after the butter and oil melt but before you add the shrimp. This way, it cooks just right. Cooking garlic for 1-2 minutes makes it fragrant. You must watch closely to avoid burning it. If garlic burns, it can turn bitter. Keep the heat at medium and stir often. Lemon adds brightness to shrimp scampi. Balancing acidity is important. If you like it tangy, add more lemon juice. Start with half the juice and taste. You can always add more. Red pepper flakes can spice things up. Start with a teaspoon and adjust to your liking. If you want heat, add more. If not, hold back. The perfect shrimp texture is juicy and tender. To achieve this, cook shrimp until they turn pink and opaque. This usually takes about 2-3 minutes per side. Do not overcook the shrimp, or they will become rubbery. Keep a close eye on them while they cook. This helps you serve a dish that is pleasing to the eye and the palate. For the full recipe, check the section above! {{image_2}} You can serve shrimp scampi with different types of pasta. I recommend using: - Linguine - Spaghetti - Zucchini noodles Linguine and spaghetti are classic choices. They hold the sauce well. Zucchini noodles are great for a low-carb option. They add a fun twist to the dish. If you want to skip wine, you can still make a tasty sauce. Here are some substitutes: - Chicken broth - Vegetable stock Both options give depth to the sauce. Chicken broth adds a savory note. Vegetable stock keeps it light and fresh. Just replace the wine with an equal amount of either broth. You can boost your shrimp scampi by adding veggies. Some great choices are: - Spinach - Cherry tomatoes - Asparagus Adding spinach is easy. Toss it in just before you finish cooking the shrimp. Cherry tomatoes add sweetness. You can add them at the same time as the shrimp. Asparagus needs a bit more time. Add it a few minutes before the shrimp. This way, everything cooks perfectly. To keep shrimp scampi fresh, refrigerate it right away. Place it in an airtight container. This helps keep the flavors strong and the shrimp tender. I recommend using glass containers. They seal well and do not stain like plastic. Your leftovers can last up to three days in the fridge. When reheating shrimp scampi, do it slowly. Use a skillet over low heat. Add a splash of water or broth to keep it moist. Stir often for even heating. Avoid using a microwave; it can make the shrimp rubbery. This method keeps the dish flavorful and tasty. Freezing shrimp scampi is simple. First, let it cool completely. Then, place it in a freezer-safe bag. Remove as much air as possible before sealing. This helps prevent freezer burn. To thaw, move it to the fridge overnight. Reheat gently to enjoy the same great taste. Cooking shrimp is quick. For large shrimp, it takes about 2-3 minutes per side. They turn pink and opaque when done. Smaller shrimp need less time, around 1-2 minutes per side. Always check to avoid overcooking. Overcooked shrimp become rubbery and tough. You want tender, juicy shrimp for the best flavor. Yes, you can prep Shrimp Scampi in advance. Cook the pasta and shrimp separately. Store the shrimp and pasta in the fridge. When you’re ready to eat, heat them together with the sauce. This keeps your dish fresh and tasty. Avoid cooking shrimp too early, as they can lose their nice texture. Shrimp Scampi pairs well with many sides. Here are some popular choices: - Garlic bread for dipping in the sauce - A fresh green salad with lemon vinaigrette - Roasted or steamed vegetables for color and nutrition - Rice or risotto for a hearty meal These sides balance the flavors and make your meal complete. Shrimp Scampi has roots in Italy. The word "scampi" refers to small crustaceans. In the U.S., it often means shrimp cooked in garlic and butter. This dish shows Italian-American cooking’s creativity and flavor. It's a favorite for many due to its rich taste and simple preparation. Absolutely, frozen shrimp are great for this dish. They are often flash-frozen to keep freshness. Thaw them in the fridge overnight or run them under cold water. Avoid using hot water as it can cook the shrimp. Cook frozen shrimp directly from the bag, just add a minute to your cook time. This way, you still get that delicious shrimp flavor. Enjoy the full recipe for more details on making this dish! In this post, I shared how to make easy and delicious shrimp scampi. You learned about the essential ingredients, cooking steps, and tips for perfect flavor and texture. I also explored how to adjust the dish to suit your taste. Remember, using fresh shrimp and right cooking techniques makes a big difference. Enjoy your cooking adventure, and don’t hesitate to experiment with new flavors and ingredients. Happy cooking!
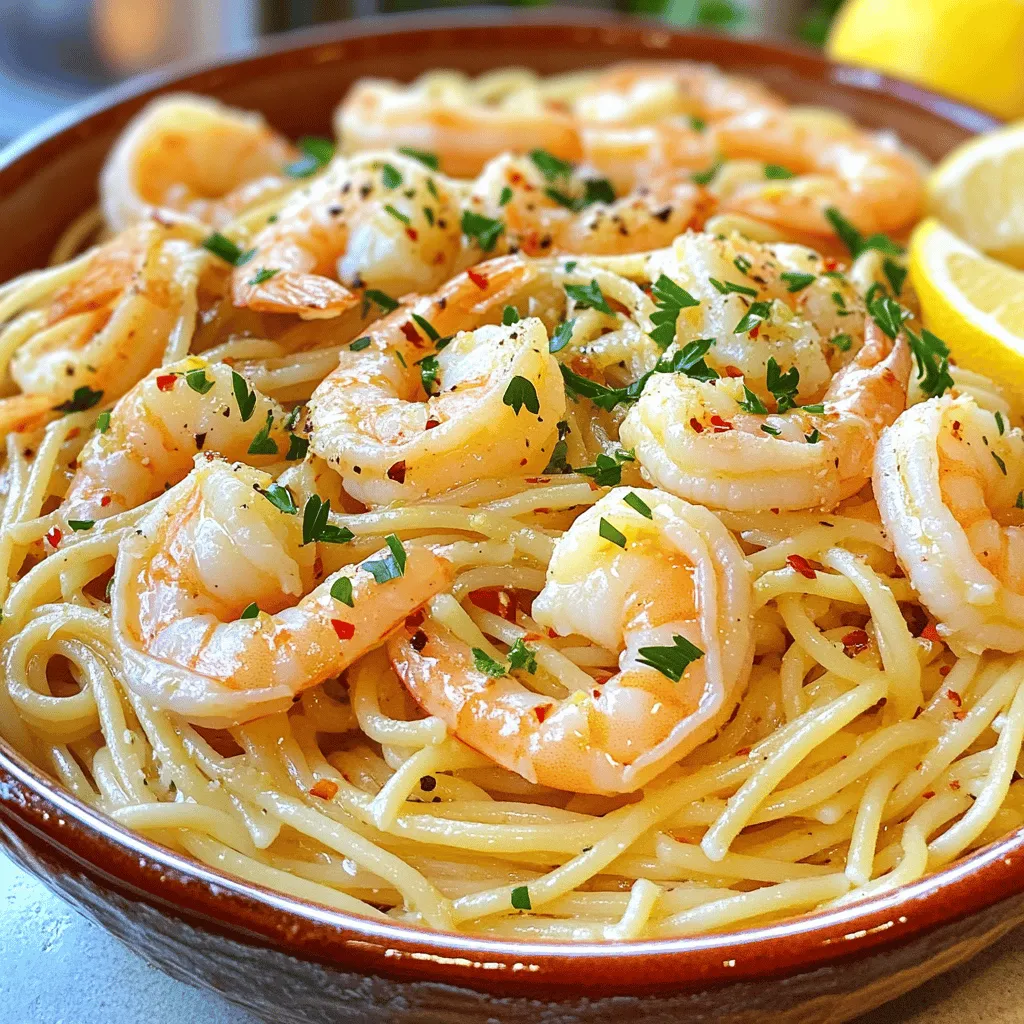
Savory Shrimp Scampi Simple and Tasty Recipe
If you love seafood, you’ll enjoy this simple Shrimp Scampi recipe. This dish packs bold flavors in every bite. You’ll learn how to pick the
To make creamy pesto chicken with roasted tomatoes, you need the following ingredients: - 2 chicken breasts - 1/2 cup basil pesto - 1 cup heavy cream - 1 cup cherry tomatoes, halved - 2 tablespoons olive oil - 1 teaspoon garlic powder - 1 teaspoon onion powder - Salt and pepper to taste - Fresh basil leaves for garnish - Grated Parmesan cheese for serving Each ingredient plays a key role in creating a delicious dish. Chicken breasts serve as a juicy, tender base. The basil pesto adds a burst of fresh flavor. Heavy cream gives the dish its creamy texture. Cherry tomatoes bring a sweet tang and a pop of color. Olive oil helps in roasting the tomatoes and cooking the chicken. Garlic and onion powders enhance the overall taste, while salt and pepper round out the flavors. Finally, garnishes like fresh basil and Parmesan cheese elevate your meal, making it visually appealing and tasty. For the full recipe, check out the detailed instructions to guide you through the cooking process! 1. Preheat your oven to 400°F (200°C). This helps the tomatoes roast well. 2. In a baking dish, toss the halved cherry tomatoes with olive oil, garlic powder, onion powder, salt, and pepper. Spread them out evenly. This mix gives the tomatoes great flavor. 1. Roast the cherry tomatoes in the oven for 20-25 minutes. Look for them to get blistered and soft. The heat brings out their sweetness. 2. While the tomatoes roast, season the chicken breasts with salt and pepper on both sides. This step is key for flavor. 3. In a large skillet over medium heat, add a little olive oil. Once it’s hot, add the seasoned chicken breasts. Cook for about 6-7 minutes on each side until they are golden brown. Check that the internal temperature reaches 165°F (75°C). 4. Remove the chicken from the skillet and set it aside. In the same skillet, lower the heat and add the heavy cream. Stir to deglaze the pan, scraping up flavorful bits. 5. Add the basil pesto to the cream and mix it well. Simmer for a couple of minutes until the sauce is warm. This step creates a creamy sauce full of flavor. 1. Return the chicken to the skillet, spooning the creamy pesto sauce over it. Let it simmer for an additional 2-3 minutes. This helps the chicken absorb the sauce. 2. Once the tomatoes are roasted, remove them from the oven and stir them into the creamy pesto chicken. This adds freshness and color. 3. Serve the creamy pesto chicken hot. Garnish with fresh basil and sprinkle grated Parmesan cheese on top. For the best look, drizzle sauce around the edges of the plate. For the full recipe, check out the details above. Enjoy your cooking! To make creamy pesto chicken, cook the chicken until it reaches 165°F (75°C). This step is key to ensuring it is safe to eat. Use a meat thermometer for accuracy. For the sauce, use heavy cream to get that rich, creamy texture. Stir the cream slowly to mix well with the pesto. Simmer it for a few minutes to deepen the flavors. This way, the sauce remains smooth and full of taste. If you want to skip heavy cream, try using coconut cream or cashew cream. These options still give a rich taste without dairy. To make it dairy-free, use nutritional yeast for a cheesy flavor without cheese. You can also add almond milk or oat milk mixed with a little cornstarch to thicken the sauce. Both ideas work well and keep the dish creamy. For the full recipe, be sure to check the details in the previous sections. {{image_2}} You can change the taste of your creamy pesto chicken with fun flavor additions. Try using different types of pesto. Sun-dried tomato pesto gives a sweet and tangy twist. Arugula pesto adds a peppery kick that brightens the dish. Each pesto has its own unique flavor that can surprise your taste buds. Adding vegetables can also enhance this dish. Spinach is a great option. It wilts nicely into the creamy sauce and adds nutrients. Mushrooms bring a rich, earthy flavor. Just sauté them in the skillet before adding the cream. This step will make the sauce even tastier. If you want to mix things up, use shrimp or tofu instead of chicken. Shrimp cooks quickly and adds a seafood flair. Just toss them in the skillet until they turn pink. Tofu is a great choice for a plant-based meal. Press it first to remove excess water, then cube it. Sauté it until golden brown before adding the sauce. Both options provide delicious flavors that fit well with the creamy pesto sauce. For the full recipe, check out the Creamy Pesto Chicken with Roasted Tomatoes. Enjoy exploring these tasty variations! To keep your creamy pesto chicken fresh, store it in an airtight container. Make sure to include the roasted tomatoes with the chicken. Place the dish in the fridge within two hours of cooking. This helps prevent bacteria growth. You can safely store the leftovers for three to four days. Always label your container with the date. This way, you know how long it has been stored. When you're ready to enjoy the leftovers, you want to reheat them well. The best method is to use the stovetop. Place the chicken and sauce in a skillet over low heat. Stir gently until it warms up. This keeps the chicken moist and the sauce creamy. You can also use the microwave, but be careful. Heat in short bursts to avoid overcooking. Cover the dish to keep moisture in. Enjoy your meal again without losing texture! How long can I store the creamy pesto chicken? You can store creamy pesto chicken in the fridge for up to three days. Make sure to keep it in a sealed container. This way, it stays fresh and safe to eat. Can I freeze this recipe? Yes, you can freeze creamy pesto chicken. Place it in an airtight container or freezer bag. It will stay good for about three months. Just thaw it in the fridge before reheating. What can I serve with creamy pesto chicken? Creamy pesto chicken pairs well with many sides. Here are some tasty options: - Pasta - Rice - Quinoa - Steamed vegetables - Salad These sides add flavor and balance to the meal. For the full recipe, check out the detailed instructions above and enjoy cooking! To sum up, you learned how to make creamy pesto chicken with simple steps. We covered the key ingredients, like chicken, pesto, and tomatoes. I shared tips to achieve perfect texture and flavor. You can also find ideas for variations and substitutions. This dish is easy to store and reheat, ensuring you enjoy it later. With these insights, you can create a creamy pesto chicken that impresses any guest. Enjoy cooking and exploring your culinary creativity in the kitchen!
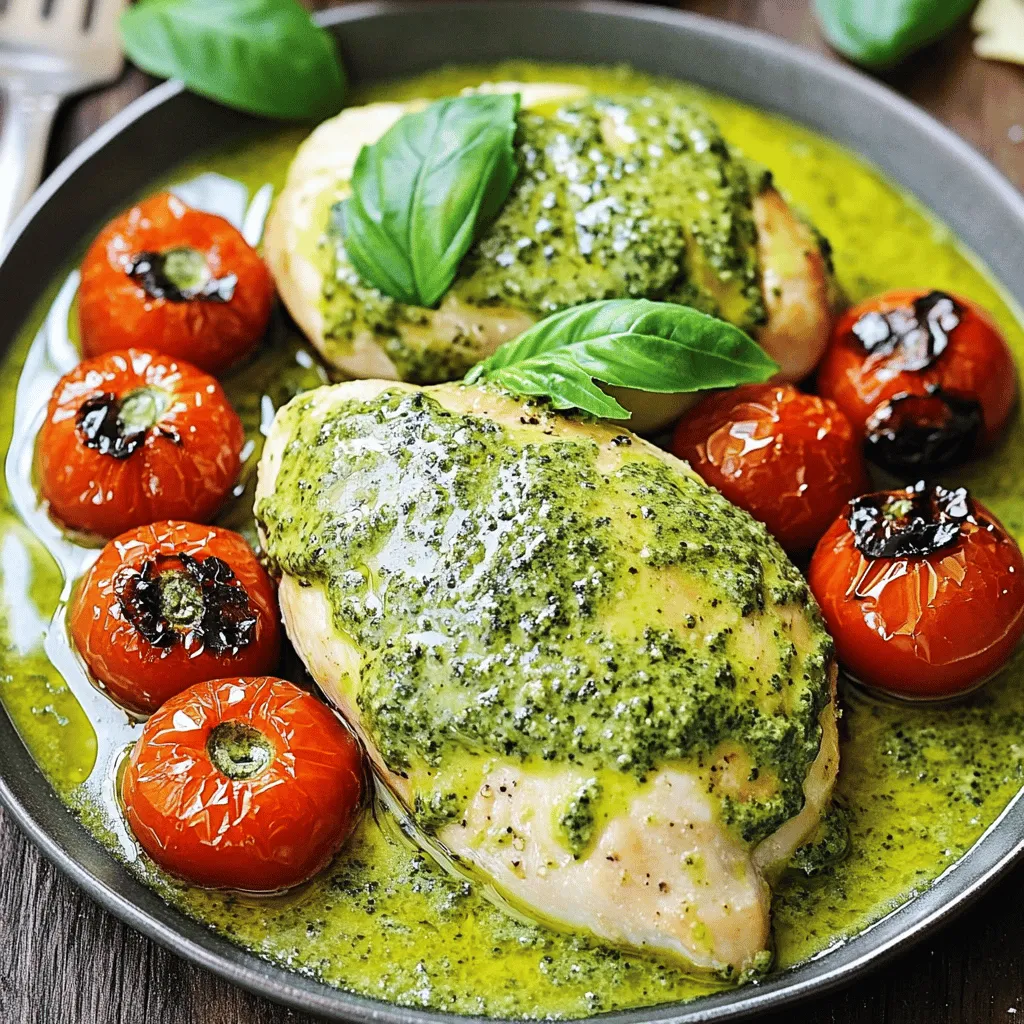
Creamy Pesto Chicken with Roasted Tomatoes Delight
Are you ready to elevate your dinner game? My Creamy Pesto Chicken with Roasted Tomatoes is simple yet amazing. This dish brings together tender chicken,
- 4 chicken breast fillets - 1 cup shredded coconut - 1 cup buttermilk (or yogurt) The main ingredients make this dish shine. Chicken breast fillets form the base. They soak up the marinade well. Shredded coconut adds crunch and flavor. The buttermilk or yogurt helps tenderize the chicken. - 1 cup all-purpose flour - 1/2 teaspoon garlic powder - 1/2 teaspoon onion powder - Salt and pepper to taste For the dry ingredients, all-purpose flour creates a crispy coating. Garlic powder and onion powder add depth to the taste. A pinch of salt and pepper enhances all the flavors. - 1 cup apricot preserves - 1 tablespoon fresh ginger, grated - 1 tablespoon lime juice - 1 tablespoon soy sauce (or coconut aminos for a gluten-free option) For the apricot sauce, apricot preserves bring sweetness. Fresh ginger adds a zesty kick. Lime juice balances the flavor profile. Soy sauce rounds it out with umami. This sauce elevates the coconut chicken to new heights. You can find the Full Recipe to guide you through the steps. Enjoy the blend of flavors! To start, gather your buttermilk, garlic powder, onion powder, salt, and pepper. In a bowl, mix these ingredients well. Add the chicken breast fillets to the bowl. Make sure each piece is coated fully. Cover the bowl and place it in the fridge. For the best flavor, marinate the chicken for at least 30 minutes. If you have time, let it sit for up to 2 hours. This enhances the taste and keeps the chicken juicy. Next, we need to prepare the coating. Grab a shallow dish and combine the all-purpose flour and shredded coconut. Stir them together until they blend well. Season this mixture with a pinch of salt and pepper to add flavor. This coating will give your chicken a crunchy texture and a lovely coconut taste. Now it's time to cook the chicken. Remove each fillet from the marinade. Allow the extra buttermilk to drip off. Dredge the chicken in the coconut-flour mixture. Press gently so it sticks well. Heat vegetable oil in a large skillet over medium heat. Once the oil is hot, add the coated chicken fillets. Cook for 4-5 minutes on each side. You want them golden brown and cooked through. The internal temperature should reach 165°F (75°C). After cooking, place the chicken on a paper towel-lined plate. This helps soak up any extra oil. For the complete recipe, check the Full Recipe section. To get that crispy texture, make sure to coat the chicken well. Use a mix of shredded coconut and flour. This gives the chicken its crunch. You can also try adding spices like paprika or cumin to the coating. This adds extra flavor and warmth. For marinating, you can use yogurt instead of buttermilk. Yogurt gives a tangy taste. You can also add a splash of lime juice to the marinade for a fresh kick. Marinate for at least 30 minutes. The longer you marinate, the deeper the flavor. To get the best sauce, use quality apricot preserves. Heat them gently with the grated ginger, lime juice, and soy sauce. Stir often to avoid sticking. If the sauce is too thick, add a bit of water. This will help reach the right consistency. For garnishes, fresh cilantro adds a bright touch. Lime wedges also add a nice pop of color. You can sprinkle some sesame seeds for a crunchy finish. When frying, a deep skillet works best. It holds more oil and heat. Keep the oil at medium heat. This prevents the chicken from burning while cooking through. To avoid oil splatter, use a splatter guard. It keeps the mess down. You can also place the chicken in the pan gently to minimize splashes. For the full recipe, check out the details above. Enjoy your cooking! {{image_2}} You can easily make this dish gluten-free. Instead of all-purpose flour, use gluten-free flour. It works well for coating the chicken. For a lighter sauce, swap regular soy sauce with coconut aminos. This change cuts some calories while keeping great flavor. Want to kick up the taste? Add spices like paprika or cayenne to the coating. Fresh herbs like cilantro or basil can add a nice touch. You can also make a unique apricot sauce. Try mixing in orange juice or a dash of chili for a zesty twist. Pair your coconut chicken with rice or a fresh salad. These sides balance the rich flavors. For a fun presentation, slice the chicken and fan it out on the plate. Drizzle the apricot sauce on top and sprinkle with fresh herbs for a pop of color. For the full details on making this dish, check out the [Full Recipe]. To keep your coconut chicken fresh, use airtight containers. Glass containers work well, but plastic ones are fine too. Store leftovers in the fridge. They stay good for about 3 to 4 days. If you want to keep them longer, consider freezing. When reheating, use an oven or skillet. This helps maintain the crispy texture. Avoid the microwave, as it can make the chicken soggy. If frozen, let the chicken thaw overnight in the fridge. Reheat in a 350°F oven until warmed through, about 15 minutes. You can prep parts of this dish in advance. Marinate the chicken and store it in the fridge. Mix the flour and coconut ahead of time too. Always ensure food is cooled before storing. When meal prepping, keep everything clean to avoid contamination. You can marinate the chicken for at least 30 minutes. This time allows the flavors to sink in. For a deeper flavor, try marinating for up to 2 hours. This extra time helps the chicken stay juicy and tasty. Yes, you can! Cook the chicken and make the apricot sauce ahead. Store them in separate containers in the fridge. When you’re ready to eat, reheat the chicken in a pan. Warm the apricot sauce on the stove. This method keeps everything fresh and delicious. This dish pairs well with several sides. Try fluffy rice or a crisp salad for a light touch. You can also serve it with steamed veggies for a healthy option. For drinks, a fruity iced tea or a light white wine works great. Check the [Full Recipe] for more details on the main dish! This blog post covered a delightful recipe for Coconut Chicken with Apricot Sauce. We explored key ingredients like chicken, coconut, and a flavorful apricot sauce. I shared step-by-step instructions, tips for perfecting texture, and creative variations. You now have the tools to make this dish shine. Enjoy experimenting with flavors and serving ideas. Your culinary skills can impress anyone. Happy cooking!
Coconut Chicken with Apricot Sauce Tasty Delight
Get ready to enjoy a tasty delight with my Coconut Chicken with Apricot Sauce recipe! This dish brings together juicy chicken, crunchy coconut, and a