Dinner

To make the best crispy buttermilk chicken, you need some key ingredients: - 4 chicken thighs (bone-in, skin-on) - 2 cups buttermilk - 2 teaspoons garlic powder - 1 teaspoon onion powder - 1 teaspoon paprika - 1 teaspoon cayenne pepper (adjust for spice) - Salt and pepper to taste - 1 ½ cups all-purpose flour - 1 teaspoon baking powder - Oil for frying (vegetable or canola) These ingredients work together to create juicy chicken with a crispy crust. I suggest using brands that you trust for quality. For buttermilk, try Lifeway or Daisy. They offer a rich flavor. For flour, King Arthur Baking Company is a great choice. It provides the perfect texture for frying. You can add your own twist to this dish. Consider these optional ingredients: - Fresh herbs like thyme or rosemary for added flavor. - A splash of hot sauce for a spicy kick. - Parmesan cheese mixed into the flour for a cheesy crust. These choices can elevate your buttermilk chicken and make it uniquely yours. If you want the full recipe, check out the link. To start, gather a large bowl. Mix the buttermilk, garlic powder, onion powder, paprika, cayenne pepper, salt, and pepper. Place the chicken thighs in the bowl. Make sure they are fully covered in the buttermilk. Cover the bowl and place it in the fridge. Let the chicken marinate for at least four hours. For the best flavor, let it sit overnight. While the chicken marinates, prepare your dry mix. In a new bowl, combine the all-purpose flour, baking powder, and a pinch of salt and pepper. Stir until well mixed. This will be the crunchy coating that gives the chicken its crispy texture. For frying, use a large skillet or deep fryer. Pour in enough oil to cover the bottom by about an inch. Heat the oil over medium-high heat. Use a thermometer to check the temperature. Aim for 350°F (175°C) for optimal frying. Too low, and the chicken will soak up oil. Too high, and it will burn. Once the chicken has marinated, take it out of the buttermilk. Let the excess drip off. Dredge each piece in the flour mixture. Press lightly to ensure a thick coating. This step is important for that crispy finish. Shake off any extra flour before placing the chicken on a plate. Carefully add the coated chicken thighs to the hot oil, skin side down. Fry them in batches if needed. Overcrowding will lower the oil temperature. Cook for about 7-8 minutes on each side. You want them golden brown and cooked through. The internal temperature should reach 165°F (75°C). After frying, transfer the chicken to a wire rack or a plate lined with paper towels. This helps drain any excess oil. Let the chicken rest for about 5 minutes. This resting time keeps the chicken juicy. Now, you are ready to enjoy your crispy buttermilk chicken! Check out the Full Recipe for all the details. To ensure your chicken stays juicy, start with good marination. Marinate the chicken in buttermilk for at least four hours. This helps the meat absorb moisture. For more flavor, let it marinate overnight. The acids in buttermilk break down proteins, making the chicken tender. For crispy skin, the coating is key. Use a mix of flour and baking powder. The baking powder adds air, making the crust light and crunchy. When you coat the chicken, press the flour mixture onto the chicken. This helps it stick better. Fry at the right temperature, around 350°F. If the oil is too hot, the skin will burn. Avoid these common mistakes to get the best results. First, don’t skip the marination step. It’s important for flavor and moisture. Second, don’t overcrowd the pan while frying. This lowers the oil temperature and makes the chicken soggy. Lastly, let the fried chicken rest after cooking. This helps keep it juicy. For more detailed steps, check the full recipe. {{image_2}} You can add heat with a spicy buttermilk chicken twist. Just increase the cayenne pepper in the marinade. You can also add hot sauce to the buttermilk. This mix gives the chicken a spicy kick that many love. For extra flavor, try adding chili powder or crushed red pepper flakes. This twist is great for those who crave bold flavors. If you want a healthier choice, try a baked version. After marinating the chicken, coat it with the flour mix as usual. Instead of frying, place the chicken on a baking sheet. Spray the chicken lightly with cooking spray or brush with oil. Bake at 425°F (220°C) for about 25 to 30 minutes. This method gives you crispy skin without all the oil. For a true Southern flavor, adjust your seasonings. Add more paprika, garlic powder, and onion powder for depth. You might want to include thyme, oregano, or even a hint of sugar for sweetness. These small changes can make a big difference. You can also try using buttermilk with a touch of pickle juice for a tangy twist. This will enhance the flavor and tenderness of your chicken. For more detailed instructions, check the full recipe. To keep your crispy buttermilk chicken fresh, place leftovers in an airtight container. Make sure to let the chicken cool down first. Store it in the fridge for up to three days. If you want to keep it longer, consider freezing it. When reheating, use the oven for the best results. Preheat your oven to 375°F (190°C). Place the chicken on a baking sheet. Heat for about 15-20 minutes or until hot. This method helps keep the skin crispy. Avoid the microwave, as it can make the chicken soggy. If you want to freeze your crispy buttermilk chicken, wrap each piece tightly in plastic wrap. Then, put them in a freezer-safe bag. This helps prevent freezer burn. When you're ready to enjoy it, thaw the chicken in the fridge overnight. Reheat it using the oven to restore that crispy texture. You can use plain yogurt or milk with vinegar. Just mix 1 cup of milk with 1 tablespoon of vinegar. Let it sit for a few minutes. This creates a similar tangy flavor. You can also use sour cream, but thin it out with a little water. I recommend marinating the chicken for at least 4 hours. For the best flavor, go for overnight. This time lets the chicken soak up all the spices and the buttermilk. The longer it sits, the more tender it will be. Yes, you can use chicken breasts. They will cook faster than thighs. Make sure to adjust cooking time to avoid overcooking. Breasts tend to dry out if cooked too long. Vegetable or canola oil works best for frying. They have high smoke points. This means they can handle the heat without burning. Peanut oil is another great option if you like a nutty flavor. Use a meat thermometer. The chicken should reach an internal temperature of 165°F (75°C). This ensures it is safe to eat. If you don’t have a thermometer, cut into the thickest part. The juices should run clear, not pink. Absolutely! Use gluten-free flour instead of all-purpose flour. There are many great options available. Just make sure to check the labels to avoid any cross-contamination. This way, everyone can enjoy crispy buttermilk chicken. For the full recipe, check out the complete guide. I’ve shared the key ingredients and steps for making crispy buttermilk chicken. You learned how to marinate and fry the chicken for the best results. I also covered tips for flavor variations and proper storage. Remember, cooking is about experimenting and having fun. Don't hesitate to try new flavors. Enjoy your crispy chicken, and make it your own!
The Best Crispy Buttermilk Chicken Recipe You’ll Love
Are you ready to up your dinner game? Today, I’m sharing my favorite crispy buttermilk chicken recipe. This dish delivers juicy chicken with a crunchy
To make Easy Spicy Chicken & Peanut Butter Ramen, gather these simple items: - 2 packs of instant ramen noodles (discard seasoning) - 1 pound boneless, skinless chicken thighs - 2 cloves garlic, minced - 1 tablespoon grated ginger - 1 red chili pepper, chopped - 3 tablespoons creamy peanut butter - 3 tablespoons soy sauce - 2 tablespoons chicken broth or water - 1 tablespoon sesame oil - 1 cup broccoli florets - 1 carrot, julienned - 2 green onions, sliced - Chopped cilantro for garnish (optional) These ingredients create a rich and spicy dish. The chicken thighs offer juicy flavor, while the peanut butter adds creaminess. The garlic and ginger bring warmth and depth. You can adjust the red chili pepper for heat. Fresh vegetables like broccoli and carrots add crunch and nutrition. Each bite combines all these flavors for a delightful meal. For more detailed preparation, check out the Full Recipe. 1. Cooking the ramen noodles: Start by boiling a pot of water. Once it boils, add the instant ramen noodles. Cook them as per the package instructions, which usually takes about 3-4 minutes. Drain the noodles and set them aside. 2. Sautéing the chicken and aromatics: In a large skillet or wok, heat one tablespoon of vegetable oil over medium-high heat. Add one pound of bite-sized chicken thighs. Cook the chicken for about 5-7 minutes until it’s brown and cooked through. Add two cloves of minced garlic, one tablespoon of freshly grated ginger, and one finely chopped red chili pepper. Stir these in for 1-2 minutes until they release their fragrant aroma. 3. Creating the peanut sauce: Lower the heat to medium. Add three tablespoons of creamy peanut butter, three tablespoons of soy sauce, two tablespoons of chicken broth (or water), and one tablespoon of sesame oil to your skillet. Mix these together until you have a smooth sauce that coats the chicken well. 1. Adding vegetables and noodles: Toss in one cup of broccoli florets and one julienned carrot into the skillet. Stir everything together and let it cook for about 3-4 minutes. The veggies should be tender but still crisp. Now, fold in the cooked ramen noodles and mix well with the chicken and spicy peanut sauce. 2. Final cooking steps and mixing: Heat everything through for 2-3 minutes. This allows the noodles to soak up all the tasty flavors from the sauce. 1. Presentation tips and garnishes: Serve your ramen in deep bowls. For a pop of color and heat, add extra chopped chili on top. A sprinkle of chopped cilantro can enhance the dish’s look and flavor. 2. Serving temperature options: Enjoy your Easy Spicy Chicken & Peanut Butter Ramen hot. If you prefer a cooler dish, let it sit for a few minutes before serving. Choosing the right skillet or wok makes a big difference. I prefer a non-stick skillet for easy cooking and cleaning. A well-seasoned cast iron wok also works great. Both options heat evenly and help prevent sticking. For the perfect sauce consistency, mix the peanut butter with soy sauce and broth. Heat helps to blend the flavors well. If the sauce is too thick, add a bit more broth or water. This keeps it smooth and creamy. Adjusting spice levels is simple. If you love heat, add more chili peppers. For a milder dish, use less. You can also use chili paste if you want an extra kick. If you run out of an ingredient, don't worry! You can swap the peanut butter for almond butter. This gives a nice twist to the flavor. Soy sauce can be replaced with tamari for a gluten-free option. Save time on busy nights by prepping your ingredients in advance. Chop the veggies and marinate the chicken the night before. Store them in the fridge to keep them fresh. You can cook the ramen noodles ahead of time, but it's best to do this close to serving. This way, they stay firm and do not get mushy. Follow the Full Recipe for more detailed steps to prepare this dish easily. {{image_2}} You can switch the chicken for tofu if you want a vegetarian option. Tofu soaks up the flavors well. Firm tofu works best for this recipe. If you prefer meat, you can use chicken breast or shrimp instead. Chicken breast is leaner, while shrimp adds a nice touch. Seasonal vegetables make this dish fresh and colorful. You can add bell peppers, snap peas, or bok choy for extra crunch. Feel free to use your favorites. Carrots and broccoli are great, but don’t hesitate to mix it up. For gluten-free options, use gluten-free ramen noodles. Rice noodles are a tasty alternative too. If you need nut-free options, swap peanut butter for sunflower seed butter. This keeps the creamy texture without the nuts. To keep your Easy Spicy Chicken & Peanut Butter Ramen fresh, place it in a container. Use an airtight container to prevent moisture loss. Store it in the fridge for up to three days. This helps maintain the chicken's flavor and noodle texture. You can reheat leftovers in the microwave or on the stovetop. For the microwave, place the ramen in a bowl and cover it loosely. Heat in short bursts until warm. For stovetop, add a splash of water to a pan. Heat over low, stirring gently to warm through. To keep noodles from getting mushy, avoid overcooking. Stir often and add a little water if needed. If you want to store your ramen longer, freezing is a great option. Let the dish cool completely before freezing. Use freezer-safe bags or containers to save space. When ready to eat, thaw it overnight in the fridge. Reheat it gently on the stove or in the microwave, adding a splash of water to restore moisture. For the full recipe, check the Easy Spicy Chicken & Peanut Butter Ramen section. How to make ramen noodles taste better? Add a splash of soy sauce or sesame oil. You can also mix in some garlic or ginger. These ingredients give the noodles a rich flavor. Another tip is to add fresh herbs like cilantro or green onions for a fresh touch. Can I make spicy chicken & peanut butter ramen ahead of time? Yes, you can prepare it in advance. Cook the chicken and sauce, then store them in the fridge. Just cook the noodles fresh when you are ready to eat. This keeps the noodles from getting mushy. What can I substitute for peanut butter? If you have a nut allergy, use sunflower seed butter. Tahini is another great option. Both will give you a creamy texture with a different flavor. Can I use any type of peanut butter? Yes, you can use smooth or crunchy peanut butter. Just keep in mind that crunchy peanut butter will add texture. Always choose a brand with minimal added sugars for the best flavor. How do I adjust the spiciness level? To make the dish milder, use less chili pepper. You can also remove the seeds from the pepper. If you like it spicier, add more chili or a dash of hot sauce when serving. Calories per serving This dish has about 400 calories per serving. This is a great meal packed with flavor without too many calories. Health benefits of the ingredients Chicken provides protein for muscle growth. Broccoli is rich in vitamins and fiber. Peanut butter adds healthy fats and can help keep you full longer. In this article, we explored how to make a tasty chicken and peanut butter ramen dish. We covered key ingredients, cooking steps, and serving tips. You learned about helpful techniques, ingredient swaps, and ways to store leftovers. Feel confident in creating this meal on busy nights or for a special gathering. Whether you stick to the basics or try variations, this recipe promises satisfaction. Enjoy your cooking journey and the delicious meals ahead!
Easy Spicy Chicken & Peanut Butter Ramen Delight
Looking for a quick and tasty meal? You’ll love my Easy Spicy Chicken & Peanut Butter Ramen Delight! This dish combines tender chicken, fresh veggies,
To make Cream Cheese Chicken Enchiladas, you need the right ingredients. Here’s a complete list: - 2 cups cooked chicken, shredded - 1 package (8 oz) cream cheese, softened - 1 cup shredded Monterey Jack cheese - 1 cup salsa (choose your heat level) - 8 small flour tortillas - 1/2 cup green onions, chopped - 1 teaspoon garlic powder - 1 teaspoon cumin - Salt and pepper to taste - Fresh cilantro, for garnish You can customize this recipe with optional ingredients. Try adding black beans or corn for extra texture. You can also swap Monterey Jack cheese for cheddar cheese if you prefer a sharper taste. If you want a bit more spice, consider adding diced jalapeños or a dash of hot sauce to the chicken mixture. These ingredients come together to create a dish that is creamy, cheesy, and full of flavor. For the complete recipe, check out the Full Recipe section. Prepping the chicken and cream cheese mixture First, gather your ingredients: cooked chicken, cream cheese, Monterey Jack cheese, salsa, green onions, garlic powder, cumin, salt, and pepper. In a bowl, mix the shredded chicken with the softened cream cheese. Add half a cup of Monterey Jack cheese, half a cup of salsa, garlic powder, cumin, salt, and pepper. Stir well until it’s smooth and creamy. Assembling the enchiladas Now, take a 9x13 inch baking dish and spread a thin layer of salsa on the bottom. Grab a tortilla and spoon about a quarter cup of your chicken mixture into the center. Roll the tortilla tightly and place it seam-side down in the dish. Repeat this with the rest of the tortillas and chicken filling. Once they are all lined up in the dish, pour the rest of the salsa on top. Then sprinkle the remaining Monterey Jack cheese and chopped green onions over the enchiladas. Baking and finishing touches Preheat your oven to 350°F (175°C). Cover your baking dish with aluminum foil and bake for 20 minutes. After that, remove the foil and bake for another 10 minutes. Look for bubbly and golden cheese. Once they are done, take the dish out and let it cool for a few minutes. Top with fresh cilantro right before serving. Enjoy your creamy delight! For the complete recipe, check the Full Recipe. To avoid soggy tortillas, use fresh flour tortillas. They hold up better. Warm them slightly in a pan before filling. This makes them more flexible and less likely to tear. For melty cheese, mix your Monterey Jack cheese with a bit of the salsa. This helps it melt evenly. Sprinkle the cheese on top halfway through baking for a nice, bubbly finish. Pair these enchiladas with a fresh salad or some rice. Black beans also make a great side. They add protein and flavor. For garnishes, use chopped fresh cilantro and sliced green onions. A dollop of sour cream adds creaminess. Avocado or guacamole also brings a nice touch. Enjoy your meal with your favorite toppings! {{image_2}} You can change the protein in these enchiladas. If you want beef, use ground beef instead of chicken. Cook it until brown, then mix it with the cream cheese and spices. Turkey is another good choice. It gives a lighter taste but still keeps it rich. For a vegetarian option, try black beans or lentils. They add protein and fiber. Just cook them the same way as the chicken. You can also blend in some veggies, like spinach or bell peppers, for extra nutrition. Each option keeps the dish tasty and fun. Do you want more heat in your enchiladas? Add diced jalapeños to the chicken mixture. You can also choose a spicier salsa. If you prefer a milder taste, use mild salsa instead. To tone down the heat, add a bit of sour cream on top when serving. This cools the spice and balances the flavors. Remember, you can always taste and adjust as you cook. This way, you make the dish just right for your family. To keep your Cream Cheese Chicken Enchiladas fresh, use proper storage. First, let the enchiladas cool completely. Once cool, cover them tightly with plastic wrap or foil. You can store them in the fridge for up to three days. If you want to keep them longer, freeze them. Place the wrapped enchiladas in an airtight container or freezer bag. They can last up to three months in the freezer. When ready to eat, remember to label the date. This way, you know how long they have been stored. Reheating enchiladas can be tricky. You want warm, gooey cheese without drying them out. To reheat, first, take them out of the fridge or freezer. If frozen, let them thaw overnight in the fridge. Preheat your oven to 350°F (175°C). Place the enchiladas in a baking dish. If they seem dry, add a splash of salsa or broth on top. Cover the dish with foil to keep moisture in. Bake for about 20 minutes if they were in the fridge. If frozen, heat for about 30-35 minutes. Check that they are hot all the way through before serving. Enjoy your delicious meal again! Can I use store-bought rotisserie chicken? Yes, you can use store-bought rotisserie chicken. It saves time and adds great flavor. Just shred the chicken before mixing it with the other ingredients. This makes your prep quick and easy. What can I substitute for cream cheese? If you want a substitute for cream cheese, try Greek yogurt or sour cream. Both give a nice tang and creamy texture. You can also use a dairy-free cream cheese if you prefer a vegan option. Just adjust the amount based on your taste. How can I make this dish ahead of time? You can prepare the enchiladas ahead of time. Assemble them and place them in the baking dish. Cover the dish with foil and store it in the fridge for up to 24 hours. When you’re ready, just bake them as directed. This makes dinner stress-free. Full Recipe and additional resources for cooking For the full recipe and more cooking tips, check out the Creamy Delight Chicken Enchiladas. This will guide you through each step to create a delicious family meal. In this post, I covered how to make tasty cream cheese chicken enchiladas. I shared the complete list of ingredients, step-by-step cooking instructions, and tips for best results. You learned how to customize the dish with different proteins and spice levels. I also provided smart storage methods and reheating tips. Experiment with your own flavors and enjoy every bite. Happy cooking!
Cream Cheese Chicken Enchiladas Simple Family Meal
Looking for an easy family meal that packs a punch? Try my Cream Cheese Chicken Enchiladas! These cheesy, flavorful delights are simple to make and
- 1 pound frozen meatballs (beef or turkey) - 2 cups uncooked penne pasta - 2 cups marinara sauce - 1 cup water - 1 cup shredded mozzarella cheese - 1/2 cup grated Parmesan cheese - 1 teaspoon Italian seasoning - Salt and pepper to taste - Fresh basil for garnish Gathering these ingredients is easy. You can find frozen meatballs in your local grocery store. Choose beef or turkey based on your taste. I often use penne pasta because it holds sauce well. Marinara sauce adds a rich flavor and keeps the dish moist. The water helps cook the pasta evenly. For cheese, I love using mozzarella for its meltiness and Parmesan for a salty kick. Italian seasoning brings all the flavors together. Don't forget to add salt and pepper to enhance the taste. If you want a fresh touch, add basil as a garnish. This dish is not only simple but also quick. You can have a hearty meal ready in just over 50 minutes. For the full recipe, check out the Easy Dump And Bake Meatball Casserole 🥘. - Preheat the oven to 375°F (190°C). - In a large bowl, combine frozen meatballs, uncooked penne pasta, marinara sauce, and water. Stir until all the ingredients mix well. This step helps to coat the pasta and meatballs in sauce. - Pour the mixture into a greased 9x13 inch baking dish. Spread it evenly across the dish. - Cover the dish tightly with foil to keep the moisture in. Bake for 30 minutes. - After 30 minutes, take off the foil and stir the casserole. Add the shredded mozzarella and Parmesan cheese on top. - Place the dish back in the oven without the foil. Bake for another 15 to 20 minutes, until the cheese is melting and bubbly. - Once baked, remove the dish from the oven. Let it cool for 5 minutes. - This cooling time helps the dish set a bit, making it easier to serve. Garnish with fresh basil if you like. Enjoy your meal! Use store-bought marinara sauce for a quick start. This saves time and effort. Prepping your ingredients ahead makes cooking faster. Chop your cheese and measure pasta before you begin. You can customize your dish with spices or veggies. Try adding red pepper flakes for heat or bell peppers for sweetness. Experiment with cheese types too. Cheddar or provolone add a nice twist. Garnish your casserole before serving for a fresh look. A sprinkle of fresh basil or parsley brightens the dish. This small step makes your meal feel special. Enjoy the lovely colors and flavors! {{image_2}} You can switch up the pasta in this casserole for fun! Use shapes like rotini or rigatoni. They add a nice twist. If you need gluten-free options, try rice or quinoa pasta. Both work well and taste great. Want to change the meatballs? You can use turkey meatballs instead of beef. They are leaner and still tasty. If you prefer a plant-based meal, choose vegetarian meatballs. Spice things up with spicy meatballs or Italian-style ones for extra flavor. Don't feel stuck with marinara sauce! Use Alfredo sauce for a creamy option. Pesto adds a fresh taste that is hard to beat. You can also mix sauces for a unique flavor. Try different flavors to see what you like best! For the full recipe, check out the Easy Dump And Bake Meatball Casserole. To store leftovers in the fridge, place them in an airtight container. This keeps the casserole fresh and tasty. The shelf life in the refrigerator is about three to four days. Be sure to check for any signs of spoilage before eating. For freezing leftovers, let the casserole cool before putting it in a freezer-safe container. Make sure to label it with the date. It can last for up to three months in the freezer. To reheat frozen casserole, thaw it in the fridge overnight. Then, bake it in the oven at 350°F (175°C) until hot and bubbly. To divide portions for easy meal prep, cut the casserole into squares. Use small containers to store each portion. This makes it simple to grab a meal on busy days. You can also create balanced meals by adding a side salad or some steamed veggies. This dish is quick and easy. It takes just 10 minutes to prep. The total cooking time is about 45 minutes. So, you will have a hot meal in about 55 minutes. Yes, you can use fresh meatballs. Just make sure they are cooked. You can reduce the cooking time by about 10 minutes. This makes it easier if you have fresh ones ready. You can switch up the cheese. Try using provolone or cheddar for a twist. You can even mix in some feta for a sharp flavor. Experiment to find your favorite! Absolutely! Kids love the meatballs and cheesy goodness. The flavors are simple and tasty. You can even let them help make it. It’s a fun family meal for everyone. Yes, adding veggies is a great idea! Try bell peppers, spinach, or zucchini. Just chop them small and mix them in with the meatballs. It adds color and nutrition to the dish. For the full recipe, check the earlier section! This blog post detailed a simple and tasty Dump and Bake Meatball Casserole. You learned about key ingredients, step-by-step baking instructions, and helpful tips. We explored variations, storage methods, and answered common questions. This dish is easy to make and fun to customize. With a few simple twists, you can make it your own. Whether you choose different pasta, sauces, or cheeses, the options are endless. Enjoy cooking and delighting in every bite!
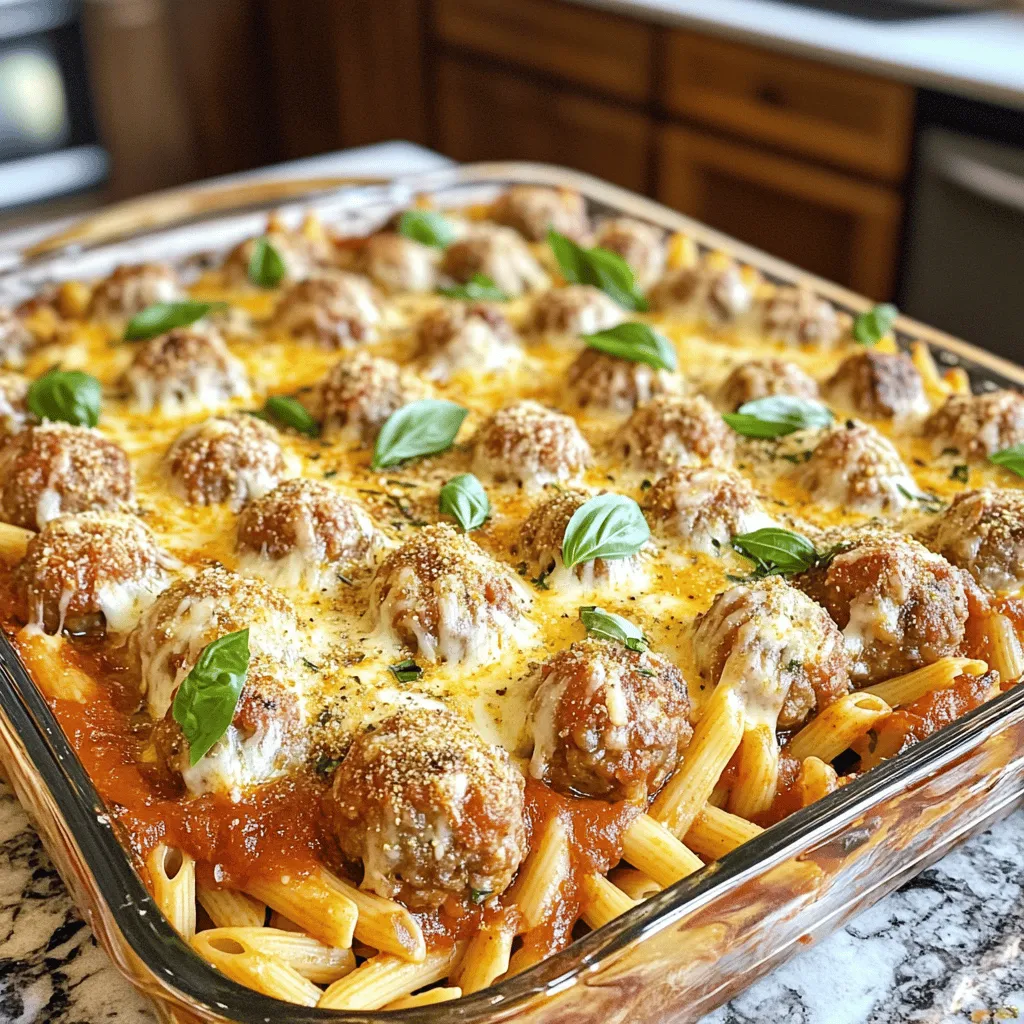
Dump And Bake Meatball Casserole Simple and Quick Meal
Looking for a quick and easy dinner? You’re in the right place! This Dump And Bake Meatball Casserole is simple to make and packed with
To make this tasty twice-baked potato casserole, you will need: - 4 large russet potatoes - 1 cup sour cream - ½ cup milk - 1 ½ cups shredded cheddar cheese - ½ cup cream cheese, softened - ¼ cup green onions, chopped - 1 teaspoon garlic powder - ½ teaspoon onion powder - Salt and pepper to taste - ½ cup crispy breadcrumbs (optional) - 2 tablespoons olive oil For the best flavor, choose fresh, high-quality ingredients. Use large russet potatoes. They are fluffy and great for baking. Look for a creamy sour cream and rich cream cheese. These add smoothness to the dish. Select sharp cheddar cheese for a bold taste. Fresh green onions will provide a nice crunch and a pop of color. If you have dietary needs, don't worry! Here are some easy swaps: - Vegan: Use dairy-free sour cream and cream cheese. Choose a vegan cheese for flavor. - Gluten-Free: Leave out the breadcrumbs or use gluten-free ones. - Low-Fat: Select low-fat sour cream and cream cheese to cut calories. These changes will still make a delicious casserole. For the full recipe, check out the details. To make Easy Twice Baked Potato Casserole, gather your ingredients first. You need russet potatoes, sour cream, milk, and cheese. This dish is simple and fun to make. Here’s a quick look at the steps you'll take. 1. Preheat your oven to 400°F (200°C). 2. Wash and poke the potatoes. 3. Bake the potatoes for 45-60 minutes. 4. Mix the creamy filling in a bowl. 5. Scoop out the baked potatoes. 6. Combine everything. 7. Bake again and enjoy! 1. Preheat the oven to 400°F (200°C). This helps the potatoes cook evenly. 2. Wash the russet potatoes well. Use a fork to poke holes in each potato. This allows steam to escape while baking. 3. Place the potatoes on a baking sheet. Bake them for 45-60 minutes. They should be tender when you poke them with a knife. 4. Let the potatoes cool for 10 minutes after baking. This makes them easier to handle. 5. In a large bowl, mix the sour cream, milk, cream cheese, garlic powder, onion powder, salt, and pepper. Stir until it’s smooth. 6. Cut the baked potatoes in half lengthwise. Carefully scoop out the insides, leaving a bit of potato in the skin. 7. Add the scooped potato to your creamy mix. Also, include 1 cup of shredded cheddar cheese and green onions. Mix until everything is combined. 8. Transfer the mix back into the potato skins or spread it in a greased 9x13 inch baking dish. 9. If you want, sprinkle crispy breadcrumbs on top for a bit of crunch. Drizzle with olive oil for extra flavor. 10. Bake it again in the oven for 20-25 minutes. Look for a golden, bubbly top. 11. Remove from the oven and let it sit for a few minutes. Garnish with more green onions and cheddar cheese. To get the best results, keep an eye on the baking time. If your potatoes are larger, they may need more time. Always check with a fork. If it goes in easily, they are ready. If you want a crispier top, you can bake a bit longer. Just be careful not to burn it. The perfect twice-baked potato casserole has a creamy inside and a golden top. For the best flavor, use fresh ingredients. High-quality cheese and fresh herbs make a big difference. Enjoy making this dish; it’s a favorite! For the full recipe, check out [Full Recipe]. When making twice-baked potato casserole, some mistakes can ruin your dish. One common error is not baking the potatoes long enough. If you underbake them, they will not scoop out easily. Always ensure they are fork-tender. Another mistake is overmixing the potato filling. This can make the texture gummy. Mix just until everything is combined for the best result. Lastly, don't forget to season your filling. A little salt and pepper can elevate the flavors. To get that creamy texture, use good-quality ingredients. Sour cream and cream cheese are key players. Make sure both are at room temperature before mixing. Adding milk also helps keep the filling smooth. If you want it extra creamy, try adding a bit more cream cheese or sour cream. Another tip is to use a potato masher instead of a mixer. This keeps some texture while making it creamy. Serving your casserole right is important for the best taste. Let it cool for a few minutes after baking. This helps it set and makes serving easier. When serving, you can use a spatula or a large spoon. Place it on plates and top with extra cheese or green onions for a pop of color. This makes it look as good as it tastes. If you want to add some crunch, sprinkle crispy breadcrumbs on top just before serving. For the complete guide, check the Full Recipe for more tips and details. {{image_2}} You can make this dish lighter with a few swaps. Use Greek yogurt instead of sour cream. This adds protein and cuts calories. Instead of cream cheese, use a low-fat cream cheese. You can also cut down on cheese or use reduced-fat cheese. This will still taste great! Mix in some fun flavors! Add cooked bacon bits for a smoky touch. You can also stir in broccoli or spinach for a veggie boost. Try swapping cheddar cheese for pepper jack for a spicy kick. Or add herbs like chives or thyme for a fresh taste. To make this recipe gluten-free, ensure your breadcrumbs are gluten-free. For a vegan option, swap all dairy products for plant-based versions. Use almond milk and cashew cream. Nutritional yeast can add a cheesy flavor without dairy. You still get that creamy delight without the animal products! For detailed instructions, check out the [Full Recipe]. After enjoying your Easy Twice Baked Potato Casserole, store leftovers in an airtight container. This keeps the dish fresh and tasty for later. Make sure to let it cool down first. You should keep it in the fridge. Properly stored, it lasts about three to five days. You can freeze this casserole for longer storage. First, let it cool completely. Then, wrap it tightly with plastic wrap and foil. This helps prevent freezer burn. You can freeze it for up to three months. To reheat, thaw it in the fridge overnight. Then bake it at 350°F (175°C) until hot, usually about 25-30 minutes. You can cover it with foil to avoid browning too much. Most ingredients in this casserole have a good shelf life. Potatoes can last several weeks in a cool, dark place. Sour cream and cream cheese stay fresh for about two weeks when opened. Cheddar cheese lasts about four to six weeks in the fridge. Always check for signs of spoilage before using. Following these storage tips will keep your casserole delicious for longer! For the complete cooking process, you can check the Full Recipe. Baking twice-baked potato casserole takes about 20 to 25 minutes. First, you need to bake the potatoes for 45 to 60 minutes. After mixing the filling, you bake it again. The second bake helps the top get golden and bubbly. Yes, you can prepare this dish ahead of time. You can make the casserole and store it in the fridge for up to 24 hours. Just cover it well with plastic wrap or foil. This way, you save time when you are ready to bake it. To reheat twice-baked potato casserole, preheat your oven to 350°F (175°C). Cover the dish with foil to keep it moist. Bake for about 20 to 30 minutes, or until heated through. You can also use the microwave for a quicker option, but the oven gives better texture. For the best results, let it sit for a few minutes before serving. For the full recipe, check out the Cheesy Twice-Baked Potato Casserole. This blog post covered key topics for making a delicious twice-baked potato casserole. We looked at essential ingredients and quality recommendations. You learned step-by-step cooking instructions and tips to avoid common mistakes. We also examined variations and storage methods. Remember, with simple swaps and techniques, you can create your own tasty dish. Enjoy experimenting and sharing your version of this classic recipe!
Easy Twice Baked Potato Casserole Creamy Delight
If you crave creamy, dreamy comfort food, then you’ll love this Easy Twice Baked Potato Casserole. Imagine fluffy potatoes packed with rich flavors, all baked
- 1 pound ground beef or turkey - 1 cup fresh spinach, chopped - 1 cup shredded mozzarella cheese - 1/2 cup grated Parmesan cheese - 1/4 cup breadcrumbs - 1 large egg - 1 teaspoon garlic powder - 1 teaspoon onion powder - Salt and pepper to taste - 4 medium potatoes, thinly sliced - 2 cups marinara sauce - 1 teaspoon Italian seasoning - Olive oil for drizzling For this cheesy spinach meatball and potato bake, you can choose between ground beef or turkey. Both options work well and offer great flavor. The fresh spinach adds a pop of color and boosts nutrition. You can use any cheese you love, but mozzarella and Parmesan give the best taste and texture. Don’t forget the seasonings! Garlic powder and onion powder bring out the meatball's flavor. Salt and pepper are essential for a well-seasoned dish. The potatoes serve as a hearty base, so slice them thin for even cooking. Marinara sauce ties everything together, adding a rich layer of flavor. Italian seasoning brings warmth and depth. Finally, drizzle olive oil to keep it moist as it bakes. If you want to see how to put this all together, check the Full Recipe. 1. Preheating the oven: Start by preheating your oven to 375°F (190°C). This step is key for even cooking. 2. Mixing the meatball ingredients: In a large mixing bowl, combine 1 pound of ground beef or turkey, 1 cup of chopped fresh spinach, 1 cup of shredded mozzarella cheese, 1/2 cup of grated Parmesan cheese, 1/4 cup of breadcrumbs, 1 large egg, 1 teaspoon of garlic powder, 1 teaspoon of onion powder, and salt and pepper to taste. Mix until everything blends well. 3. Forming meatballs: Shape the mixture into small, round meatballs, about 1 inch in diameter. This size helps them cook evenly and makes them easy to eat. 1. Arranging potatoes and meatballs: In a large baking dish, layer half of the sliced potatoes on the bottom. Drizzle with olive oil and sprinkle with a pinch of salt and Italian seasoning. Next, place the meatballs evenly over the potato layer. 2. Adding marinara sauce and final layers: Pour 2 cups of marinara sauce over the meatballs. Then, add the remaining potato slices on top, arranging them neatly. Drizzle with more olive oil and season with salt and Italian seasoning. 3. Baking duration and key tips for success: Cover the dish with aluminum foil and bake for 30 minutes. After that, remove the foil and sprinkle more cheese on top. Bake uncovered for another 15-20 minutes. Your bake is done when the potatoes are soft and the cheese is golden brown. Let it cool for a few minutes before serving. For the full recipe, see the provided details above. Enjoy your delicious cheesy spinach meatball and potato bake! - Ensuring meatballs hold together: To keep meatballs from falling apart, mix the ground meat well with the other ingredients. Make sure the breadcrumbs absorb moisture from the egg. This helps bind everything together. - Perfecting potato doneness: For perfectly cooked potatoes, slice them thinly. Thin slices cook faster and become tender. Layer them evenly in the dish so they all cook at the same time. - Serving ideas and garnishes: Serve the bake straight from the dish. A sprinkle of fresh basil or parsley adds color and flavor. You can also drizzle a little olive oil on top before serving for shine. - Pairing options for sides and drinks: This dish pairs well with a simple side salad. A light vinaigrette complements the rich flavors. For drinks, a crisp white wine or sparkling water works nicely. For more details, check out the Full Recipe. {{image_2}} You can switch up the protein in this dish. If you want a lighter option, use ground chicken or turkey. For a plant-based meal, try using lentils or chickpeas. Both choices will still give you great flavor and texture in your bake. Cheese is another area to play around. Mozzarella adds a nice stretch, but you can use cheddar for a sharper taste. Feta cheese can also add a tangy kick. Experiment with different cheeses to find your favorite mix. To boost nutrition, add more veggies. Chopped bell peppers, zucchini, or mushrooms work well. You can mix these in with the meatballs or layer them between the potatoes. This will not only enhance flavor but also add color and nutrients. If you have dietary needs, you can modify the recipe easily. For a gluten-free option, swap breadcrumbs with gluten-free ones or use ground oats. This makes the dish more inclusive for everyone at your table. For the full recipe, check out the main article. To keep your cheesy spinach meatball and potato bake fresh, store leftovers in an airtight container. This helps prevent moisture loss and keeps flavors intact. Enjoy this dish within 3 to 4 days for the best taste. If you meal prep, consider dividing the bake into individual portions. This makes it easy to grab and reheat later. When it's time to enjoy leftovers, the best way to reheat is in the oven. Preheat your oven to 350°F (175°C). Place the portion in an oven-safe dish, cover it with foil, and heat for about 20 minutes. This method helps maintain the texture of the potatoes and keeps the meatballs juicy. If you want to freeze it, let the bake cool completely. Then, wrap it tightly in plastic wrap and foil. It can last up to three months in the freezer. When you're ready to eat, thaw it overnight in the fridge before reheating. For the full recipe, check out the original cooking instructions. What can I substitute for breadcrumbs? You can use crushed crackers or rolled oats. These options work well and add texture. If you want a gluten-free option, try almond flour or ground cornflakes. Can I make this dish ahead of time? Yes, you can prepare the meatballs and layer the dish a day before. Just cover it and store it in the fridge. When ready, bake it as instructed. How do I know when it's done cooking? Check if the potatoes are tender with a fork. The meatballs should be cooked through, and the cheese should be golden and bubbly. Can I use frozen spinach instead of fresh? Yes, frozen spinach works great. Just thaw and drain it well before mixing it into the meatballs. This helps prevent excess moisture. How to make it gluten-free? Use gluten-free breadcrumbs or oats. Check your marinara sauce for gluten-free labeling. This ensures you keep the dish safe for those with gluten allergies. Suggested toppings for extra flavor Try adding fresh herbs like basil or parsley. A sprinkle of red pepper flakes adds heat. You can also drizzle with balsamic glaze for a sweet touch. This blog post covered the essential ingredients and steps to make a delicious meatball dish. We explored different meats, cheeses, and how to prep and layer everything. With tips for cooking and serving, you can impress anyone at your table. Remember, you can swap ingredients to suit your taste and storage tips help keep leftovers fresh. Enjoy making this meal, and let your creativity shine in the kitchen!
Cheesy Spinach Meatball And Potato Bake Savory Treat
Are you ready to whip up a delicious dinner that kids and adults love? My Cheesy Spinach Meatball and Potato Bake is a fun, savory
- 4 medium-sized russet potatoes - 4 tablespoons olive oil - 3 cloves garlic, minced - 1 teaspoon fresh rosemary, finely chopped - 1 teaspoon fresh thyme, finely chopped - 1 teaspoon sea salt - ½ teaspoon black pepper - ¼ cup grated parmesan cheese - Fresh parsley for garnish When I make Hasselback potatoes, I focus on fresh, simple ingredients. The russet potatoes are the star of the show. They have a fluffy inside and a crispy skin when cooked right. I choose medium-sized ones for even cooking. Olive oil adds richness. I use minced garlic for a strong flavor boost. Fresh herbs like rosemary and thyme create a fragrant aroma. Sea salt and black pepper enhance all the tastes. For a cheesy touch, I sprinkle grated parmesan on top before baking. It melts and forms a crispy layer. Fresh parsley adds color and a fresh taste when serving. If you're ready to dive into the full recipe, it guides you step-by-step through the process. Each ingredient plays a role in achieving that perfect crispy and flavorful bite. - Preheat your oven to 425°F (220°C). - Rinse and dry the russet potatoes. Start by washing the potatoes under cold water. This step removes any dirt. Once clean, dry them with a towel. Dry potatoes will crisp better during baking. - How to slice potatoes Hasselback style - Tips for even slicing without cutting through To slice the potatoes, place each one on a cutting board. Use a sharp knife. Cut thin slices, about ¼ inch apart, but stop ¼ inch from the bottom. This keeps the potato in one piece. You can use two chopsticks on either side of the potato. They will help guide your knife and prevent cutting all the way through. - Making the herb-infused oil mixture - Applying the oil mixture to the potatoes - Baking time and temperature details In a bowl, mix the olive oil, minced garlic, rosemary, thyme, sea salt, and black pepper. This blend will infuse the potatoes with flavor. Use a brush to spread the mixture over the potatoes. Make sure to get some oil between the slices. Sprinkle grated parmesan cheese on top. It will melt into the cuts and add a delicious touch. Place the potatoes on a lined baking sheet. Bake them for 45-50 minutes. Look for a golden-brown color and a crispy outside. The inside should be soft and tender. Enjoy the amazing flavors of your Hasselback potatoes! For the complete recipe, check the [Full Recipe]. To get that perfect crispy exterior, you need a few key factors. Start with russet potatoes; they have the right starch to get crispy. Slice them evenly, about ¼ inch apart, but don’t cut all the way through. This keeps them together. Spacing between the slices is crucial. It allows heat to circulate and crisp up each layer. Brush your potatoes well with oil. I recommend using olive oil for its rich flavor. Don’t be shy! Make sure some oil gets between the slices too. This helps the insides cook nicely while the outside gets crispy. For added flavor, think about your seasonings. Fresh herbs like rosemary and thyme elevate the taste. You can also use garlic for a punch. Simply mince it and mix it in with the oil. Cheese is another great option. Grated parmesan adds a lovely salty bite. Sprinkle it over the potatoes before baking. You can even add some spicy paprika for a kick. Be creative with your flavor choices! When serving your Hasselback potatoes, the way you arrange them matters. Place them on a nice platter to show off their beauty. Drizzle a bit of olive oil on top for a shiny finish. Then, sprinkle fresh parsley for a pop of color. For an extra touch, serve with a dollop of sour cream or yogurt. It adds creaminess and balances the crispy texture. These small details make the dish even more inviting. Enjoy your crispy and flavorful Hasselback potatoes! For the full recipe, check out the detailed instructions above. {{image_2}} If you're looking for vegan and gluten-free Hasselback potatoes, it's simple! You can swap olive oil for avocado oil. This oil has a nice flavor and is also healthy. For cheese lovers, try nutritional yeast instead of parmesan. It gives a cheesy taste without dairy. You can also add some vegan butter to make them rich and tasty. You can play with flavors to make your Hasselback potatoes unique. For a spicy kick, add paprika or chili powder to the oil mix. Smoky flavors come from smoked paprika or cumin. Fresh herbs like dill or basil can also change the taste. Mix up your herbs and spices to create a new dish every time! Hasselback potatoes pair well with many dishes. Grilled chicken is a great protein choice. The crispy potatoes complement juicy chicken perfectly. You can also serve them with a fresh salad. A green salad with cherry tomatoes and a light vinaigrette works well. Roasted veggies on the side add color and nutrition too. For the full recipe, check out the section above! To keep your Hasselback potatoes fresh, allow them to cool first. Then, place them in an airtight container. This helps keep moisture in and prevents drying out. You can store them in the fridge for up to three days. Use a glass or plastic container with a tight lid for best results. When reheating, I recommend using the oven. Set it to 350°F (175°C) for even heating. Place the potatoes on a baking sheet. Reheat them for about 15-20 minutes. This method helps keep the skin crispy and the inside soft. To avoid sogginess, do not cover them. Just let them crisp back up in the oven. You can freeze Hasselback potatoes, but they may lose some texture. To freeze, let them cool completely. Wrap each potato in plastic wrap, then place them in a freezer bag. Squeeze out as much air as possible. When ready to eat, thaw them in the fridge overnight. Reheat in the oven for the best taste. To cut Hasselback potatoes safely, use a sharp knife and a cutting board. Place a wooden spoon or chopsticks on each side of the potato. This prevents you from cutting all the way through. Slice the potato every ¼ inch. Stop when the knife hits the spoon or chopsticks. This method keeps the potato intact while giving it those lovely, even slices. Yes, you can use different potatoes! While russet potatoes are the best choice for their texture, you can also try Yukon Golds or red potatoes. Each type gives a unique flavor and texture. Yukon Golds are creamy, while red potatoes are waxy. Experiment with these varieties to find your favorite. Hasselback potatoes pair well with many sauces. Here are some popular choices: - Sour cream with chives - Garlic aioli - Spicy ketchup - Ranch dressing - Homemade herb dip For a homemade option, mix Greek yogurt with lemon juice, garlic, and fresh herbs. This adds a nice zing to your crispy potatoes! Hasselback potatoes are simple yet rewarding. We covered the main ingredients and step-by-step instructions. Tips for crispiness and flavor enhancements help you succeed. You can explore variations and even serve vegan options. Don’t forget storage and reheating tips for leftovers. Enjoy these delicious potatoes with your favorite proteins or salads. Now, it’s time for you to try this yummy recipe!
Hasselback Potatoes Crispy and Flavorful Delight
If you’ve never tried Hasselback potatoes, you’re in for a treat. These crispy, flavorful delights are easy to make and will impress everyone at your
- 4 slices of sourdough bread - 2 tablespoons unsalted butter, softened - 1 cup sharp cheddar cheese, grated - 1/2 cup mozzarella cheese, grated - 1 tablespoon fresh basil, chopped (optional) - 1/2 teaspoon garlic powder - Salt and pepper to taste - 1/4 cup sun-dried tomatoes, chopped (optional) When making a grilled cheese sandwich, choose fresh ingredients. The bread forms the base, so I love using sourdough. Its crust gives a nice crunch. Butter adds rich flavor and helps achieve a golden color. Cheese is the star here. I recommend sharp cheddar for its tangy taste. Mixing it with mozzarella creates a gooey texture. You can add fresh basil for an herby kick. It brightens up the flavors. Garlic powder enhances taste without being overpowering. Sun-dried tomatoes add sweetness and depth. They’re optional but worth it! You can also play with salt and pepper to suit your taste. - Alternative bread options: white, whole wheat, or gluten-free - Cheese variations: fontina, gouda, or pepper jack - Optional add-ins: avocado, ham, or spinach If you want a different flavor, try other breads. White or whole wheat works well too. For gluten-free diets, look for suitable gluten-free bread. Cheese can vary too. Fontina or gouda brings a unique taste. Pepper jack adds heat. These choices help customize your sandwich. Don’t forget about add-ins! Avocado gives creaminess. Ham adds protein. Spinach boosts nutrition and color. Mix and match to create your perfect grilled cheese! For the full recipe, check out the detailed steps in the Cheesy Delight Grilled Sandwich section. 1. Preheat your skillet over medium heat. This step is key for even cooking. 2. Take your butter and spread a thin layer on one side of each slice of bread. This butter will create a nice crispy crust when grilled. 1. Place two slices of bread in the skillet, butter side down. 2. Evenly sprinkle the sharp cheddar and mozzarella cheese on top of the bread. 3. If you like, add optional ingredients like basil, garlic powder, sun-dried tomatoes, salt, and pepper. 4. Top with the remaining two slices of bread, this time butter side up. 1. Grill the sandwich for about 4-5 minutes. You want a golden brown crust. 2. Carefully flip the sandwich using a spatula. Cook the other side for another 4-5 minutes. This helps the cheese melt inside. 3. Once both sides are golden brown and crispy, remove the sandwich from the skillet. Let it cool for a minute before slicing. For the full recipe, be sure to check the earlier section! Enjoy your cheesy delight! Using medium heat is key for a perfect grilled cheese. If the heat is too high, the bread burns before the cheese melts. Medium heat lets the bread turn golden brown while the cheese gets gooey. This balance makes a tasty sandwich. To prevent burning while ensuring melty cheese, watch the sandwich closely. Start with one side down in the skillet. Flip it only when the bottom is golden. This way, you melt the cheese without overcooking the bread. Grilled cheese pairs well with soups and salads. A warm bowl of tomato soup is a classic match. The rich flavors blend nicely. You can also serve it with a fresh salad for a light meal. To make your serving look gourmet, cut the sandwiches diagonally. Place them on a fancy plate with a small bowl of marinara sauce for dipping. Adding fresh basil leaves as a garnish adds a pop of color. One common mistake is overloading the sandwich with fillings. While extra ingredients sound great, they can make the sandwich soggy. Stick to a few key flavors for the best texture. Another mistake is skipping the buttering step. Butter adds a rich flavor and helps the bread crisp up. Always spread a thin layer of softened butter on the outside of the bread slices. This small step makes a big difference in taste. For the full recipe, check out the Cheesy Delight Grilled Sandwich. Enjoy the comfort of this classic dish! {{image_2}} Mixing different cheeses can change your grilled cheese game. I love using sharp cheddar and mozzarella for a gooey texture. The cheddar brings a nice tang, while mozzarella adds stretch. You can also try gouda or fontina for a rich flavor. Pepper jack adds heat, which is fun for spice lovers. Try blending cheeses based on your mood. Here are some ideas: - Sharp Cheddar: Classic choice with a strong flavor. - Mozzarella: Great for that melt-in-your-mouth feel. - Gouda: Adds a sweet, nutty taste. - Fontina: Creamy and rich, perfect for indulgence. - Pepper Jack: Spicy twist for adventurous eaters. These combos can elevate your sandwich to something special. Adding fillings can make your grilled cheese even better. You can go sweet or savory. For sweet, fig jam or apple slices work wonders. They bring a nice contrast to the cheese. For savory, think bacon or roasted peppers. They add depth and flavor. You can also use fresh herbs for a seasonal twist. Basil, parsley, or thyme can brighten your sandwich. Here are some ideas: - Sweet Fillings: - Fig jam - Apple slices - Savory Fillings: - Crispy bacon - Roasted red peppers - Seasonal Variations: - Fresh herbs like basil or cilantro These fillings can turn a simple grilled cheese into a gourmet delight. You can make grilled cheese for everyone! For vegan or lactose-free options, use plant-based cheese. Brands like Daiya or Violife offer great choices. They melt well and taste good too. If you need gluten-free bread, look for brands that suit your needs. There are many types available. Here’s what you can use: - Vegan Cheese: Daiya, Violife, or homemade nut cheese. - Lactose-Free Cheese: Look for brands at your local store. - Gluten-Free Bread: Many options are available, like rice or almond flour bread. These adaptations help everyone enjoy this classic dish. To store leftover grilled cheese sandwiches, wrap them in foil or place them in an airtight container. This helps keep them fresh. You can also use parchment paper before wrapping to prevent sogginess. When you're ready to eat, reheat them in a skillet over medium heat. This way, the bread gets crispy again. Flip them once to warm the inside and crisp the outside. To freeze assembled sandwiches, first let them cool completely. Then wrap each sandwich in plastic wrap and place them in a freezer bag. Remove as much air as you can before sealing. To thaw, place the sandwich in the fridge overnight. For reheating, use a skillet or toaster oven for a nice crispy texture. Avoid using the microwave, as it can make the bread soggy. Grilled cheese sandwiches are best eaten fresh but can last in the fridge for up to three days. To keep them fresh, store them well. Look for signs of spoilage, like a sour smell or mold. If the bread feels stale or hard, it’s time to toss it. Always trust your senses when checking food freshness. The best cheese for grilled cheese is one that melts well. You want a cheese that gets gooey and stretchy. Here are some great options: - Cheddar: Sharp or mild, it adds great flavor. - Mozzarella: Super melty and pairs well with cheddar. - Fontina: Creamy and smooth, it melts like a dream. - Gouda: Smoky and rich, it gives a unique taste. Many chefs recommend using a mix of cheeses. This creates layers of flavor and texture in your sandwich. Combining different cheeses can make your grilled cheese even more special. Yes, you can make grilled cheese in a toaster! It’s easy and fun. Here’s how: 1. Butter the outside of your bread slices. 2. Place the cheese between the slices of bread. 3. Put the sandwich in a toaster bag or on a toaster rack. 4. Toast until golden brown. Safety tips: Watch the sandwich while it toasts. Make sure it doesn’t touch the heating element. This keeps your kitchen safe and your sandwich tasty. Making your grilled cheese healthier is simple! Here are some ideas: - Use whole grain bread: This adds fiber and nutrients. - Choose low-fat cheese: It can cut calories without losing flavor. - Add vegetables: Spinach, tomatoes, or avocados boost nutrition. You can swap out some butter for healthier fats like olive oil. This keeps the sandwich tasty while making it better for you. For a full recipe, check out the Cheesy Delight Grilled Sandwich. This blog post covers how to make the best grilled cheese sandwich. We explored key ingredients, tasty substitutions, and step-by-step instructions. I shared tips to prevent common mistakes and suggested flavor variations. Remember, a delicious grilled cheese comes from choosing good cheese and buttering your bread. Don't shy away from experimenting with fillings or cheeses. With simple adjustments, your grilled cheese can be even more delightful. Enjoy creating your perfect sandwich!
Grilled Cheese Sandwich Irresistible Comfort Food Treat
If comfort food had a poster child, the grilled cheese sandwich would be it. Crunchy on the outside and melty on the inside, there’s nothing
- 1 lb large shrimp, peeled and deveined - 1 cup bread crumbs - 1/2 cup cream cheese, softened - 1/4 cup grated Parmesan cheese - 1/4 cup chopped fresh parsley These ingredients create a rich and tasty base for our casserole. The shrimp provides that lovely seafood flavor, while the cream cheese and Parmesan add a creamy, cheesy texture. Bread crumbs help bind everything together and give a nice crunch. - 2 cloves garlic, minced - 1 teaspoon lemon juice - 1/2 teaspoon paprika - 1/2 teaspoon black pepper - 1/4 teaspoon salt - 1/2 cup shredded mozzarella cheese for topping - 2 tablespoons olive oil These seasonings are key to bringing the dish to life. Garlic gives it a wonderful aroma, and lemon juice brightens the flavors. Paprika and black pepper add a hint of spice, while mozzarella on top makes it deliciously cheesy. - Casserole dish - Mixing bowls - Baking sheet Having the right equipment makes cooking easier. A casserole dish holds everything together. Mixing bowls are great for combining your ingredients. Lastly, a baking sheet helps catch any drips while baking. For the full recipe, check out the details above. Happy cooking! - Preheat the oven to 375°F (190°C). - In a large mixing bowl, combine the bread crumbs, cream cheese, Parmesan cheese, parsley, minced garlic, lemon juice, paprika, black pepper, and salt. Mix until everything is well combined. This step is key. You want to blend the flavors well. The cream cheese adds a nice creaminess and the spices give it a boost. - Add the peeled and deveined shrimp to the bowl with the stuffing mixture. Gently fold the shrimp into the mixture until they are evenly coated. - Grease a medium-sized casserole dish with olive oil. Pour the shrimp and stuffing mixture into the dish, spreading it out evenly. It’s important to coat the shrimp well. This ensures every bite is packed with flavor. You can use a spatula to help mix gently. - Sprinkle shredded mozzarella cheese evenly over the top of the casserole. - Bake in the preheated oven for 25-30 minutes or until the shrimp are cooked through and the top is golden brown and bubbly. The cheese gets melty and bubbly, creating a nice crust. This step makes the dish look inviting and delicious. You can check for doneness by looking for a golden top. Now, you're ready to enjoy a comforting meal that’s both savory and simple. For the full recipe, check out the details above. - Use fresh shrimp for better flavor. Fresh shrimp taste sweeter and juicier. - Adjust seasonings to taste. Everyone has different preferences, so feel free to tweak. - Garnish with fresh parsley. It adds color and freshness to the dish. - Serve with lemon wedges. The bright acidity complements the rich flavors. - Consider adding different types of seafood. Crab or scallops can add variety and depth. - Explore various cheese options for topping. Try goat cheese or cheddar for a unique twist. {{image_2}} For a lighter twist on baked stuffed shrimp casserole, consider these ideas: - Substituting low-fat cream cheese: This change reduces calories without losing flavor. - Incorporating vegetables like spinach or bell peppers: Adding veggies boosts nutrients and adds color. To elevate the taste, try these flavorful options: - Experimenting with different spices: Add cayenne for heat or oregano for an herbaceous touch. - Adding chopped sun-dried tomatoes: This adds a sweet and tangy flavor that pairs well with shrimp. If you have special dietary needs, these adjustments work well: - Gluten-free bread crumbs option: Use ground almonds or gluten-free bread to keep it safe for gluten-sensitive eaters. - Vegan alternatives for cream cheese and shrimp: Try cashew cream for a vegan option and replace shrimp with marinated tofu or chickpeas. Feel free to get creative! Each variation can make your dish unique. For the full recipe, check out the details above. To store leftovers in the fridge, let the casserole cool first. Cover it tightly with plastic wrap or aluminum foil. You can also place it in an airtight container. This helps keep the flavors fresh. I suggest using a shallow container to cool it down faster. To freeze the casserole, first, let it cool completely. Then, wrap it tightly in plastic wrap and aluminum foil. You can also use a freezer-safe container. When you want to enjoy it later, thaw it in the fridge overnight. Reheat it in the oven at 350°F (175°C) until hot. In the fridge, the casserole lasts about 3 to 4 days. If frozen, it can stay good for up to 3 months. Always check for signs of spoilage before eating. Proper storage keeps your baked stuffed shrimp casserole tasty and safe! You can tell shrimp are cooked when they turn pink and opaque. The shrimp should curl into a C shape. If they look gray or translucent, they need more time. Cooked shrimp should feel firm to the touch. Overcooked shrimp become tough and rubbery, so keep an eye on them. Perfectly cooked shrimp are juicy and tender, making them a delight to eat. Yes, you can prepare this dish in advance. You can mix the stuffing and shrimp the night before. Store it in the fridge until you're ready to bake. This saves time on busy days. If you want to freeze it, assemble the casserole, cover it well, and freeze. Just remember to thaw it in the fridge before baking. This makes serving easy and fun! A few great side dishes go well with this casserole. You can serve a fresh salad with lemon vinaigrette. Steamed green beans or asparagus add a nice crunch. Garlic bread is also a tasty choice, perfect for soaking up the sauce. For a heartier meal, consider a light pasta with olive oil and herbs. These sides balance the rich flavors of the casserole. Yes, you can use frozen shrimp for this dish. Just make sure to thaw them properly first. Place the shrimp in the fridge overnight or run them under cold water for 10-15 minutes. Once thawed, peel and devein them as needed. Frozen shrimp can work well, but fresh shrimp usually taste better. If you use frozen shrimp, ensure they are well-drained before mixing with the stuffing. In this article, we explored how to make a delicious baked stuffed shrimp casserole. We discussed key ingredients, step-by-step instructions, and helpful tips for success. I shared ways to enhance flavor and even healthier alternatives. This dish is easy to prepare and perfect for any gathering. Remember, fresh shrimp and a few spices can elevate your meal. You can store leftovers or even freeze the casserole for later. Enjoy your cooking adventure and impress your family and friends with this tasty dish!
Baked Stuffed Shrimp Casserole Savory and Simple Meal
Dive into a delicious meal with my Baked Stuffed Shrimp Casserole. This dish combines juicy shrimp with creamy filling and rich flavors, making it a
- 2 pounds boneless, skinless chicken breasts - 1 packet ranch seasoning mix - 8 ounces cream cheese, softened - 1 cup pepper jack cheese, shredded - 1 cup cooked, shredded chicken (for texture) - 1/2 cup green onions, chopped - 1/2 cup crispy fried onions (for garnish) - Salt and pepper to taste For this Easy Pepper Jack Crack Chicken, the main ingredients are simple yet flavorful. The chicken breasts form the base of the dish. The ranch seasoning mix adds a punch of flavor that compliments the creamy cheese. Softened cream cheese gives the dish a rich texture. The pepper jack cheese brings a nice kick, making each bite exciting. You can add optional ingredients to enhance the dish. Shredded chicken adds texture, while chopped green onions offer a fresh taste. Crispy fried onions add crunch and a savory twist. Don't forget to season to your liking with salt and pepper. You can find the full details in the Full Recipe. - Add chicken breasts to the slow cooker. - Sprinkle ranch seasoning mix evenly over the chicken. I love starting with fresh chicken breasts. They give the best flavor to the dish. The ranch seasoning adds a nice kick, making it even more tasty. - Layer cream cheese on top of the chicken. - Add cooked, shredded chicken if you’re using it. - Cover and cook on low for 6-8 hours or high for 4-5 hours. The cream cheese makes the sauce creamy and rich. If you add shredded chicken, it gives more texture. Cooking it slowly helps the chicken absorb all the flavors. - Shred the chicken and stir to combine. - Mix in shredded pepper jack cheese until well melted. - Adjust seasoning with salt and pepper to taste. Once the chicken is cooked, shredding it is easy. Mixing in pepper jack cheese gives that nice spicy kick. Don’t forget to taste and add salt and pepper as needed. This recipe is so simple, yet so full of flavor. You can find the Full Recipe for exact measurements and tips. - Choose fresh chicken breasts for best flavor. Fresh chicken makes a big difference in taste. - Use a meat thermometer for accurate cooking. This tool ensures your chicken is safe to eat. - Best served warm with soft flour tortillas or as sliders. These options add a nice touch to your meal. - Accompany with side dishes like coleslaw or a fresh salad. They balance the rich flavors of the chicken. - Add jalapeños for extra spice. This gives your dish a fun kick. - Include more vegetables for added nutrition. Think bell peppers or spinach to boost healthiness. For the full recipe, check out the Cheesy Pepper Jack Crack Chicken. {{image_2}} You can switch up the cheese in this dish. Try using cheddar or Monterey Jack cheese instead of pepper jack. These cheeses melt well and add a nice flavor. You can also mix different cheeses for a unique taste. A blend of sharp cheddar and creamy mozzarella works great too. Want a lighter option? Substitute low-fat cream cheese for the regular kind. It keeps the creaminess without the extra fat. You can also add more veggies to the mix. Chopped bell peppers, spinach, or even zucchini can boost nutrition and flavor. To add a twist, try adding BBQ sauce for a smoky flavor. This gives the dish a rich taste that everyone will love. You can also include herbs or spices like garlic powder or paprika. These small changes can make a big difference in flavor. To store your leftover Easy Pepper Jack Crack Chicken, let it cool to room temperature first. Then, place it in an airtight container. This helps keep the flavors fresh. I recommend using glass or plastic containers that seal well. Make sure to label and date your container for easy tracking. If you want to save some for later, freezing is a great option. Transfer the cooled chicken to a freezer-safe container or a heavy-duty freezer bag. Squeeze out any extra air to prevent freezer burn. When you’re ready to eat, thaw it in the fridge overnight. To reheat, warm it on the stove over low heat or in the microwave until hot throughout. In the fridge, your Easy Pepper Jack Crack Chicken will stay good for about 3 to 4 days. Check for any changes in smell or texture. If it smells off or has a strange color, it’s best to throw it away. Always trust your senses when it comes to food safety! To spice up your Easy Pepper Jack Crack Chicken, you can add jalapeños. Chopped fresh jalapeños give a nice kick. For a smoky taste, try using chipotle peppers. You can also mix in some hot sauce. Just add it to the slow cooker before cooking. Adjust the amount based on your heat preference. Start small, then taste and add more if needed. Yes, you can make Easy Pepper Jack Crack Chicken in the oven! Preheat your oven to 375°F. In a baking dish, combine the chicken, ranch seasoning, and cream cheese. Cover with foil and bake for about 30 to 40 minutes. When the chicken is tender, shred it right in the dish. Then stir in the pepper jack cheese until melted. This method gives a nice, baked flavor. This dish pairs well with many sides. Soft flour tortillas are a great choice for wrapping up the chicken. You can also serve it with crunchy coleslaw for contrast. A fresh salad adds a nice touch too. For a heartier side, try rice or mashed potatoes. These help soak up the creamy sauce. Yes, Easy Pepper Jack Crack Chicken is perfect for meal prep. You can make a big batch and store leftovers in the fridge. Use airtight containers to keep it fresh. It stays tasty for about four days. You can also freeze portions for later meals. Just thaw in the fridge before reheating. This makes weeknight dinners super easy! For the full recipe, check out the earlier section. This blog post provided a simple recipe for Easy Pepper Jack Crack Chicken. We outlined the main ingredients, step-by-step instructions, and helpful tips. You can customize this dish with cheese options and healthy substitutions. Store leftovers properly and enjoy them later. Remember, cooking should be fun and easy. Try out different flavors or serve it with your favorite sides. Now, you can impress your family and friends with this tasty dish!
Easy Pepper Jack Crack Chicken Flavorful Dinner Idea
If you’re looking for a quick dinner idea that packs a punch, you’ve found it! Easy Pepper Jack Crack Chicken combines tender chicken, zesty ranch,