Dinner

When you make creamy spinach turkey meatballs, you need a few key ingredients. Each brings flavor and texture to the dish. Here’s what you will need: - Ground Turkey - Fresh Spinach - Breadcrumbs - Parmesan Cheese - Egg - Garlic - Dried Oregano - Olive Oil - Heavy Cream - Nutmeg - Cream Cheese - Salt and Pepper These ingredients create a rich, savory taste. The ground turkey is lean and healthy, while the fresh spinach adds a nice pop of color and nutrients. Breadcrumbs help bind the meatballs, giving them a perfect texture. Parmesan cheese adds a salty, nutty flavor. The egg acts as a binder too, keeping everything together. Garlic and dried oregano bring in aromatic notes, making every bite tasty. For the sauce, heavy cream and cream cheese create that luscious, creamy texture. A hint of nutmeg adds warmth and depth. You can also add a few garnishes to make your dish even better. Consider using: - Additional Parmesan Cheese - Fresh Spinach These optional garnishes enhance the presentation and add extra flavor. The creamy spinach turkey meatballs are great for dinner or a cozy meal. For the complete recipe, check out the [Full Recipe]. - Preheat the Oven First, set your oven to 400°F (200°C). This heat gives the meatballs a nice, golden finish. - Prepare the Meatball Mixture In a large bowl, mix 1 pound of ground turkey with 1 cup of finely chopped spinach, 1/2 cup breadcrumbs, and 1/4 cup grated Parmesan cheese. Add 1 large egg, 3 minced garlic cloves, and 1 teaspoon dried oregano. Season with salt and pepper. Blend everything until it is well combined. - Shape the Meatballs Now, shape the mixture into balls about 1.5 inches wide. Place them neatly on a baking sheet lined with parchment paper. - Bake the Meatballs Put the baking sheet in the oven. Bake for 20-25 minutes until the meatballs turn golden brown and are fully cooked. - Prepare the Creamy Sauce While the meatballs bake, grab a skillet and heat 1 tablespoon of olive oil over medium heat. Pour in 1 cup of heavy cream. Let it warm up gently. Stir in 1/2 teaspoon of nutmeg and 1/2 cup of softened cream cheese until smooth. - Combine Meatballs with Sauce Once the meatballs are ready, transfer them into the skillet with the creamy sauce. Toss the meatballs gently to coat them evenly. Enjoy your creamy spinach turkey meatballs warm! For the complete recipe, refer to the Full Recipe. Proper Cream Cheese Incorporation To make your sauce creamy, mix the cream cheese well. Start by softening it at room temperature. This step helps it blend easily. If you skip this, you may end up with lumps. Use a whisk to help combine it with the heavy cream. Stir until smooth and creamy. Temperature Control Warm your heavy cream gently. If the cream is too hot, it can curdle when you add cream cheese. Heat it over medium heat and stir often. You want it warm but not boiling. This careful heating helps keep the sauce smooth. Ensuring Even Cooking To cook meatballs evenly, keep them the same size. Aim for about 1.5 inches in diameter. This size helps them bake at the same rate. Place them on a lined baking sheet with space between each meatball. This way, they get nice and brown all around. Avoiding Dry Meatballs To keep your meatballs moist, do not over-bake them. Check for doneness at 20 minutes. If they are golden brown and firm to the touch, they are ready. You can also add a little more cream or cheese to the mixture for extra moisture. This trick helps keep them juicy and tasty. For the full recipe, check out the complete guide. {{image_2}} You can switch up the meat in this recipe. Using ground chicken or beef works well. Ground chicken keeps it light, while beef adds a heartier flavor. Just make sure to adjust cooking times as needed. For cheese, you can try alternatives like feta or mozzarella. Feta gives a tangy kick. Mozzarella melts beautifully for a rich texture. Both options will create a tasty twist on the classic creamy sauce. These meatballs shine when served with pasta. Toss them with your favorite noodles and creamy sauce. This combo adds comfort and bold flavors to your meal. For side dishes, consider a fresh salad or roasted veggies. A simple green salad adds crunch and brightness. Roasted veggies bring out sweetness and pairs well with the creamy meatballs. You can even mix and match these sides to suit your taste. Explore the [Full Recipe] for a delightful cooking experience and more ideas! - Storing Leftovers: Place leftover creamy spinach turkey meatballs in an airtight container. They stay fresh for up to three days in the fridge. Make sure to cool them down before sealing the container. This helps keep the meatballs moist and tasty. - Best Practices for Freshness: To keep the flavors strong, add the creamy sauce only when serving. If you mix in the sauce before storing, the meatballs may lose some texture. You can also store the sauce separately for a better taste later. - Freezing Meatballs: To freeze the meatballs, let them cool completely first. Then, place them on a baking sheet in a single layer. Freeze them for about an hour. Once frozen, transfer the meatballs to a freezer bag. They last up to three months. - Reheating Tips: To reheat, you can bake them at 350°F (175°C) until hot, about 15-20 minutes. If you prefer, you can also thaw them in the fridge overnight. After thawing, warm them in a skillet with some sauce for the best flavor. For the full recipe, check out the details on making these delicious meatballs! How long do meatballs last in the fridge? Meatballs can last about three to four days in the fridge. Store them in an airtight container to keep them fresh. If you want to keep them longer, consider freezing them. Can I make these meatballs gluten-free? Yes! To make these meatballs gluten-free, use gluten-free breadcrumbs. Many stores sell these, or you can make your own by grinding gluten-free bread. What can I serve with creamy spinach turkey meatballs? These meatballs pair well with many sides. You can serve them over pasta, rice, or even a bed of greens. Add a simple salad or steamed veggies for more color and nutrients. How do I know when the meatballs are done? You can check if the meatballs are done by using a meat thermometer. They should reach an internal temperature of 165°F (74°C). Another way is to cut one open. It should be no longer pink inside. Can I prepare the meatball mixture ahead of time? Absolutely! You can mix the meatball ingredients a day in advance. Just cover the bowl with plastic wrap and keep it in the fridge. This makes for quick cooking when you're ready to bake. This blog covered how to make creamy spinach turkey meatballs. We highlighted key ingredients like ground turkey, cheese, and garlic. You learned preparation steps and cooking tips to achieve a perfect, creamy texture. Don't forget to try variations like ground chicken or different cheeses. Store leftovers properly for later or freeze them for another day. With these tips, making meatballs can be easy and fun. Enjoying this dish will surely make meal time better!
Creamy Spinach Turkey Meatballs Savory and Satisfying
If you’re craving a dish that’s flavorful and healthy, you’re in the right place! These Creamy Spinach Turkey Meatballs blend lean protein with fresh spinach
When making Cowboy Stew, it is key to gather fresh and simple ingredients. This stew is hearty and full of flavor, perfect for sharing with family. Here’s what you need: - 1 lb (450g) ground beef - 1 cup onion, diced - 2 cloves garlic, minced - 2 cups diced potatoes - 1 can (15 oz) diced tomatoes - 1 can (15 oz) black beans, drained and rinsed - 1 cup corn (frozen or fresh) - 2 cups beef broth - 1 tablespoon chili powder - 1 teaspoon cumin - Salt and pepper to taste - 1 tablespoon olive oil - Fresh cilantro, chopped (for garnish) These ingredients blend well to create a warm, filling stew. The ground beef adds richness, while the beans and corn give it a nice texture. The spices, like chili powder and cumin, bring warmth and depth to the dish. You can find this full recipe for Cowboy Stew in other sections of this guide. Remember, using fresh ingredients makes a big difference in taste. Enjoy cooking! 1. Start by heating the olive oil in a large pot over medium heat. 2. Add the diced onions and sauté them until they turn soft, about 5 minutes. 3. Next, toss in the minced garlic and cook for one more minute. This brings out a great aroma. 4. Now, add the ground beef to the pot. Break it apart as it cooks. Brown it for about 6-8 minutes. Drain any extra fat. 1. Time to add the heart of the stew! Toss in the diced potatoes, canned tomatoes with their juice, black beans, and corn. 2. Pour in the beef broth. This will give your stew a rich flavor. 3. Add the chili powder, cumin, salt, and pepper. Stir everything well to mix the flavors. Make sure the potatoes are covered by the liquid. 1. Bring the mixture to a boil over high heat. This is when the magic starts! 2. Once it boils, lower the heat to a simmer. Cover the pot and let it cook for about 30-35 minutes. 3. Check the potatoes for tenderness. Stir occasionally to keep them from sticking. 4. Taste the stew. Adjust the seasoning if needed. Enjoy the warmth of a meal made with love. For detailed cooking guidance, check the Full Recipe. To make your Cowboy Stew shine, start with the spices. You can adjust them to fit your taste. If you want more heat, add extra chili powder or toss in some cayenne pepper. For a smoky flavor, consider smoked paprika. Simmering time is also key. Letting your stew simmer for at least 30 minutes allows flavors to blend. The longer it cooks, the more the taste develops. Just be sure to stir it every so often to avoid sticking. Using a Dutch oven gives you the best results. Its thick walls retain heat well. This helps to cook the stew evenly. If you use a regular pot, keep an eye on the heat to avoid burning. Stirring is important, too. As your stew simmers, stir it gently. This keeps the ingredients from sticking to the bottom. It also helps mix the flavors throughout. Pair your Cowboy Stew with simple sides. Cornbread is a classic choice. It adds a sweet touch and soaks up the stew nicely. A fresh green salad is also great. It brings a crisp contrast to the warm stew. For garnishing, fresh cilantro works wonders. Sprinkle some on top right before serving. You can also add a dollop of sour cream for creaminess. If you love cheese, shredded cheddar adds a nice finish. For the full recipe, check the earlier section. {{image_2}} You can easily switch out the ground beef for turkey or a plant-based option. Ground turkey gives a lighter taste while still keeping it hearty. If you want a meat-free dish, try using lentils or beans instead. They add protein and fiber. You can also add different vegetables to your stew. Bell peppers and carrots bring in great color and taste. You can even toss in zucchini or green beans for added texture. Feel free to experiment with what you have on hand. To spice things up, consider adding jalapeños. They provide a nice kick that warms you up. You can adjust the amount based on your spice level preference. If you want a richer flavor, use homemade broth. It adds depth that store-bought broth may lack. Cowboy Stew tastes great in a bread bowl. The bread soaks up the juices and adds a nice crunch. You can also top your stew with cheese for creaminess or sour cream for tang. Fresh cilantro as a garnish adds a burst of color and flavor. These small changes can make your Cowboy Stew unique. Enjoy the process of creating your version with these simple swaps and enhancements! After you enjoy your Cowboy Stew, store any leftovers properly. Place the stew in an airtight container. It can last in the fridge for about 3 to 4 days. Make sure it cools down before sealing. This helps keep it fresh and tasty. If you have more than you can eat, freezing is a great option. You can freeze your Cowboy Stew for up to 3 months. Use freezer-safe containers or bags. Leave some space for expansion when it freezes. Label the containers with the date for easy tracking. When it’s time to enjoy your leftovers, reheating correctly is key. The best method is to use the stove. Pour the stew into a pot and heat it over medium heat. Stir often to prevent sticking. You can also use a microwave. Place the stew in a microwave-safe bowl and cover it. Heat it for 2-3 minutes, stirring halfway. This keeps the flavor intact. Cowboy Stew is perfect for meal prep. You can make it in advance and serve it later. Cook a big batch on a Sunday. Divide it into portions for the week. Just warm it up when you’re ready to eat. This saves time and makes weeknight dinners easy. Plus, you’ll always have a hearty meal ready to go! For the full recipe, check out the Cowboy Stew section above. Cowboy Stew is a hearty dish that brings comfort and warmth. It has roots in the American West, where cowboys needed filling meals. This stew is simple and uses ingredients that are easy to find. People often share it during family gatherings, making it a symbol of togetherness. The mix of ground beef, beans, and vegetables makes it not just filling but also tasty. You can find many versions across the U.S., reflecting local flavors and traditions. Yes, you can easily adapt Cowboy Stew for a slow cooker. Start by browning the ground beef and sautéing the onions and garlic on the stovetop. After that, add all the ingredients to your slow cooker. Here are some tips for slow cooking: - Use the low setting for 6-8 hours or the high setting for 3-4 hours. - If you like a thicker stew, remove the lid for the last hour of cooking to let some liquid evaporate. - Stir occasionally, if possible, to help flavors blend. Making Cowboy Stew vegetarian is simple and fun. You can swap the ground beef for several meat substitutes. Here are some options: - Use lentils or black beans for protein. - Crumbled tempeh or tofu also works well. - For broth, swap beef broth with vegetable broth for a lighter taste. - Add more vegetables like bell peppers or mushrooms for extra flavor. Cowboy Stew pairs well with many sides. Here are some popular choices: - Cornbread is a classic and adds a sweet touch. - A simple green salad can balance the meal. - You might also enjoy rice or mashed potatoes on the side. - For a fun twist, serve the stew in a bread bowl. This hearty meal is perfect for gatherings and is sure to please everyone. For the full recipe, check the earlier section! Cowboy Stew is a hearty dish packed with flavor and nutrition. We covered the ingredients, from ground beef to fresh cilantro. I shared step-by-step instructions for crafting this tasty stew, plus tips to enhance its flavor. You can also experiment with ingredient swaps and cooking techniques. Remember to store leftovers properly to enjoy later. With these insights, you can create a warm meal that satisfies your taste buds and fills your belly. Enjoy making it your own!
Cowboy Stew Hearty Meal for Gathering Family Together
If you’re seeking a warm, hearty dish to bring your family together, look no further than Cowboy Stew! Packed with rich flavors and wholesome ingredients,
- 1 medium butternut squash, peeled and cubed - 1 tablespoon olive oil - 1 small onion, finely chopped - 2 garlic cloves, minced - 1 teaspoon fresh sage, chopped (or ½ teaspoon dried) - ½ teaspoon ground nutmeg - 1 cup vegetable broth - ½ cup heavy cream (or coconut cream for a vegan option) - Salt and pepper to taste - ¼ cup grated Parmesan cheese (optional, or nutritional yeast for vegan) - Fresh parsley, for garnish - Cooked pasta of your choice (about 12 oz) These ingredients create a rich and tasty sauce. The butternut squash gives a sweet and nutty flavor. Olive oil adds richness, while onion and garlic bring depth. Feel free to play with the flavors. You can add: - Red pepper flakes for heat - Thyme or rosemary for earthy notes - Lemon juice for brightness - Spinach for extra greens Using these optional ingredients can make your sauce unique. When it comes to pasta, choose what you love. Some great choices are: - Spaghetti for a classic feel - Penne for easy mixing - Fettuccine for a hearty bite - Gluten-free pasta for a lighter option Pairing the sauce with the right pasta makes each bite enjoyable. For the full recipe, check out Butternut Bliss Pasta Sauce. First, preheat your oven to 400°F (200°C). Take your medium butternut squash, peel it, and cube it into small pieces. This helps it cook evenly. Spread the cubed squash on a baking sheet. Drizzle it with olive oil and sprinkle with salt and pepper. Toss it to coat the cubes well. Roast the squash in the oven for about 25 to 30 minutes. It should be tender and slightly caramelized when done. While the squash roasts, let’s prepare the aromatics. Heat a tablespoon of olive oil in a large skillet over medium heat. Add in your finely chopped onion. Sauté it until it turns translucent, which takes about 5 minutes. Next, add the minced garlic, chopped fresh sage, and ground nutmeg. Cook everything for about one minute until it smells amazing. This step builds a great base for your sauce. Once your butternut squash is ready, add it to the skillet with the onion and garlic. Pour in one cup of vegetable broth and bring this mixture to a simmer. Now, we need to blend it. You can use an immersion blender or transfer everything to a regular blender. If using a blender, be very careful of the hot steam. Blend until the sauce is nice and smooth. Return the blended sauce to the skillet and stir in half a cup of heavy cream (or coconut cream for a vegan touch). If you like, add grated Parmesan cheese for extra flavor. Cook this on low heat for about 5 minutes to let all the flavors meld together. Taste and add salt and pepper as needed. Finally, toss your cooked pasta in the sauce until it’s well coated. If the sauce is too thick, add a little more vegetable broth to get it just right. For the full recipe, check the complete guide above. To boost the flavor of your butternut squash sauce, think about adding herbs. Fresh sage is a great start. You can also try thyme or rosemary for a nice twist. A pinch of cinnamon adds warmth, too. For a kick, red pepper flakes work well. Remember, taste as you go. This helps you find the perfect balance. When picking pasta, think about shape and texture. I love using whole wheat or gluten-free pasta for added nutrition. Shapes like penne or rigatoni hold the sauce well. If you want a delicate touch, try angel hair or fettuccine. Just make sure to cook the pasta al dente. This gives it a nice bite and helps it hold up in the sauce. If your sauce seems too thick, don’t worry. You can simply add more vegetable broth. Start with a little and mix well, then check the texture. If you want creaminess, use heavy cream or coconut cream. This gives a rich feel without overpowering the squash. For a lighter sauce, try using just vegetable broth and a splash of lemon juice. This keeps it fresh and bright. For the complete recipe, check out the Butternut Bliss Pasta Sauce. {{image_2}} If you want a vegan option, use coconut cream instead of heavy cream. This gives the sauce a rich taste without any dairy. You can also swap out Parmesan cheese for nutritional yeast. Nutritional yeast adds a cheesy flavor, making it perfect for vegan diets. For those who need gluten-free meals, choose gluten-free pasta. Many brands offer great options made from rice, quinoa, or lentils. The butternut squash sauce pairs well with any gluten-free pasta. Just make sure to check the label for gluten-free certification. To boost the protein in the sauce, you can add cooked lentils or chickpeas. Both options mix well and add a hearty texture. You can also stir in shredded chicken or cooked sausage for meat lovers. This way, you create a filling meal that’s still packed with flavor. For the full recipe, check out Butternut Bliss Pasta Sauce. Store your leftover butternut squash pasta sauce in an airtight container. Make sure it cools before sealing. This helps keep it fresh. In the fridge, it lasts for about 3 to 5 days. Always check for any off smells or changes in color before using it again. You can freeze the sauce for longer storage. Pour it into freezer-safe bags or containers. Leave some space at the top, as the sauce will expand. Label each bag with the date. It can stay in the freezer for up to 3 months. When you’re ready to use it, just thaw in the fridge overnight. To reheat, warm the sauce on the stove over low heat. Stir it often to heat it evenly. If it’s too thick, add a splash of vegetable broth. You can also microwave it in a safe dish. Heat in short bursts, stirring in between. This keeps the flavor fresh and delicious. Check out the Full Recipe for more tips! To make your butternut squash pasta sauce creamy, add heavy cream or coconut cream. This will give it a rich texture. You can also use a bit of grated Parmesan cheese for added creaminess. Blend the sauce until smooth before adding the cream. This helps mix everything well. If you want a lighter sauce, use vegetable broth instead of cream. Yes, you can use frozen butternut squash. Make sure to thaw it first and drain any excess water. Frozen squash is often pre-cooked, which can save you time. Adjust your cooking time, as frozen squash may need less time to cook down. This butternut squash pasta sauce pairs well with various pasta types. I recommend using: - Fettuccine - Penne - Rigatoni - Farfalle These shapes hold the sauce well. You can also try it with whole wheat or gluten-free pasta for a healthy twist. Don’t forget to toss your pasta in the sauce for a delicious meal. For the full recipe, check the link above. Butternut squash pasta sauce is easy and fun to make. We explored main ingredients and ways to customize your dish. I shared step-by-step instructions to prepare and blend the sauce. You learned tips to enhance flavor and select the right pasta. We also discussed variations, storage methods, and answers to common questions. This sauce is friendly for all diets. Experiment with flavors, and enjoy your meals!
Butternut Squash Pasta Sauce Simple and Flavorful Meal
If you’re looking for a tasty and easy meal, try butternut squash pasta sauce. This creamy, flavorful sauce will impress anyone at your table. Using
- 1 lb Brussels sprouts, trimmed and halved - 3 tablespoons olive oil - 2 tablespoons balsamic vinegar - 1 tablespoon maple syrup - 1 teaspoon garlic powder - Salt and pepper to taste - ¼ cup chopped walnuts - 2 tablespoons grated Parmesan cheese (optional) - Fresh parsley, chopped for garnish To get the best flavor, fresh Brussels sprouts are key. Look for bright green sprouts with no yellow leaves. They should feel firm and heavy in your hand. For the olive oil, use extra virgin for a rich taste. The balsamic vinegar adds a nice tang, so pick a good quality one. Maple syrup brings a sweet touch, but you can adjust it to your taste. Garlic powder gives a warm flavor. If you like a crunch, add walnuts. Lastly, Parmesan cheese adds richness, but it’s optional. If you don’t have Brussels sprouts, try cauliflower or broccoli instead. Instead of olive oil, you can use avocado oil. If you want to skip the balsamic vinegar, lemon juice works well too. Honey can replace maple syrup if you prefer a different sweetener. You can also use onion powder instead of garlic powder if you want another flavor. For the nuts, any chopped nut will work, like pecans or almonds. To make perfect roasted Brussels sprouts, follow these steps closely. First, preheat your oven to 400°F (200°C). This temperature gives the sprouts a nice, crispy finish. Next, line a large baking sheet with parchment paper. This keeps the sprouts from sticking and makes cleanup easy. Now, grab your mixing bowl. Combine the halved Brussels sprouts, olive oil, balsamic vinegar, maple syrup, garlic powder, salt, and pepper. Toss everything together until the sprouts are fully coated. This mix adds flavor and helps with caramelization. Spread the sprouts in a single layer on the baking sheet. Place them cut side down. This step is key for getting that beautiful golden brown color. Roast them in the oven for 20 minutes. After this, stir the sprouts and add the chopped walnuts to the pan. Walnuts add crunch and flavor. Roast for another 10-15 minutes. You want them golden brown and crispy. When they are done, take them out of the oven. If you like, sprinkle grated Parmesan cheese on top. Toss everything to mix it well. Finally, garnish with fresh parsley before serving. Start by trimming the Brussels sprouts. Cut off the stem end and remove any yellow leaves. Then, halve each sprout from top to bottom. This helps them cook evenly. Make sure to wash the sprouts well under cold water. Dry them thoroughly with a clean towel. Moisture can cause steaming instead of roasting. For the best texture, space the Brussels sprouts out on the baking sheet. Crowding them makes them steam, not roast. This can lead to soggy sprouts. Also, remember to flip the sprouts halfway through cooking. This helps them brown evenly. If you want extra crispiness, leave them in a bit longer. Just watch closely to prevent burning. By following these steps, you’ll achieve perfectly roasted Brussels sprouts every time. For the full recipe, check below. When picking Brussels sprouts, look for bright green color. The sprouts should feel firm. Avoid any that are yellow or have brown spots. Smaller sprouts tend to be sweeter and more tender. You can often find fresh Brussels sprouts on the stalk. If you do, choose ones with tightly packed leaves. Your oven type can change cook times. If you use a conventional oven, stick to the recipe's time. For convection ovens, reduce the time by about 5 minutes. Convection ovens cook food faster and more evenly. Always check the sprouts at the lowest time to avoid burning. Roasted Brussels sprouts shine on any plate. Serve them as a side with meats or grains. They pair well with chicken, pork, or quinoa. Add some lemon juice for brightness. Top with toasted nuts for crunch. A sprinkle of cheese gives a nice finish, too. For a twist, mix them into a salad. They add flavor and texture to any meal. For a complete experience, don’t forget to try the full recipe! {{image_2}} You can change the taste of your Brussels sprouts easily. Try adding herbs like thyme or rosemary. They bring a nice earthy taste. You might also enjoy red pepper flakes for some heat. A sprinkle of smoked paprika adds a deep flavor. Don't be afraid to mix and match your favorite spices! Making this dish vegan is simple. Just skip the Parmesan cheese or use a vegan version. You can also replace maple syrup with agave syrup for a different sweetness. Olive oil is great, but try avocado oil for a richer taste. These swaps keep the dish tasty without any dairy. Adding other veggies makes this dish even better. Carrots, sweet potatoes, or parsnips roast well with Brussels sprouts. Just cut them to match the size of the sprouts. This way, they cook evenly. You can also toss in red onions for a sweet touch. This adds color and flavor to your meal. For the full recipe, check out the Crunchy Caramelized Brussels Sprouts. Enjoy your cooking! Once you enjoy your roasted Brussels sprouts, store any leftovers in an airtight container. This keeps them fresh. Place the container in the fridge. They can stay good for about 3 to 5 days. If you use a glass container, it is easier to see your food. To reheat your Brussels sprouts, use the oven. This helps maintain their crunch. Preheat the oven to 350°F (175°C). Spread the sprouts on a baking sheet. Heat them for about 10 to 15 minutes. You can also use a skillet. Just warm them over medium heat for a few minutes. This way, they will taste almost as good as when you first made them. You can freeze roasted Brussels sprouts for later use. Start by letting them cool completely. Then, place them in a freezer-safe bag. Remove as much air as possible to prevent freezer burn. They can last for about 2 to 3 months in the freezer. When you are ready to use them, thaw in the fridge overnight. Reheat in the oven or skillet for best results. Enjoy your delicious Brussels sprouts anytime! The best temperature for roasting Brussels sprouts is 400°F (200°C). This heat gives them a nice crisp while cooking through. At this temperature, they caramelize well and develop a rich flavor. I always use this setting when I want perfect sprouts. To get Brussels sprouts to brown, spread them cut side down on the baking sheet. This helps them make good contact with the hot surface. Tossing them in oil also aids browning. The oil helps them crisp up and develop that golden color. Don't overcrowd the pan; give each sprout space to breathe. Yes, you can make this recipe ahead of time. You can prep the Brussels sprouts and toss them in oil and seasonings. Store them in the fridge for up to 24 hours. When ready to roast, simply spread them out on the baking sheet and cook. They will still taste great! For the full recipe, check out the Crunchy Caramelized Brussels Sprouts section. You learned about the key ingredients and tips for cooking Brussels sprouts perfectly. I shared step-by-step instructions and helpful tricks for choosing fresh sprouts. We also explored tasty variations and proper storage methods. In short, these methods can elevate your dish. With these insights, you can enjoy delicious, roasted Brussels sprouts anytime. Now, it’s your turn to get cooking and impress everyone at your table!
Perfect Roasted Brussels Sprouts Simple and Delicious Recipe
Do you want to elevate your vegetable game? Perfectly roasted Brussels sprouts are your answer! In this simple and delicious recipe, I’ll show you how
- 4 large bell peppers (any color) - 1 cup quinoa, rinsed - 2 cups vegetable broth - 1 can (15 oz) black beans, drained and rinsed - 1 cup corn, frozen or canned - 1 small red onion, diced - 2 cloves garlic, minced - 1 cup diced tomatoes (canned or fresh) - 1 teaspoon cumin - 1 teaspoon smoked paprika - 1 teaspoon chili powder - Salt and pepper to taste - Fresh cilantro, chopped - Lime wedges for serving When you gather these ingredients, you set the stage for a tasty meal. Start with the bell peppers. They add color and nutrition. Choose red, green, yellow, or orange. Each has a unique taste. Next, you need quinoa. Rinse it well to remove any bitter taste. This grain is filling and packed with protein. Combine it with vegetable broth for flavor. Black beans are a must. They provide fiber and protein. Make sure to rinse them well to cut back on sodium. Corn adds sweetness and texture. You can use frozen or canned corn. Both work great. Onions and garlic bring depth to your dish. Dice the onion small so it mixes well. Mince the garlic for a strong flavor boost. Tomatoes add juiciness and freshness. Use canned or fresh, based on what you have. For seasonings, cumin, smoked paprika, and chili powder create warmth and flavor. Adjust salt and pepper to your taste. Finally, fresh cilantro and lime wedges brighten the dish. They add a refreshing finish. This recipe is not just easy; it's also healthy and satisfying. Check out the Full Recipe for detailed cooking steps! - Combine rinsed quinoa and vegetable broth in a saucepan. - Boil, then reduce heat and simmer for 15 minutes. Cooking quinoa is simple. Start by rinsing it well. This removes any bitterness. Then, mix it with vegetable broth. Boil the mixture on high heat. Once it boils, lower the heat and cover the pot. Let it simmer for about 15 minutes. After the time is up, remove the pot and fluff the quinoa with a fork. - Slice tops off and remove seeds from the bell peppers. - Place hollowed peppers upright in the slow cooker. Next, grab your bell peppers. You can use any color you like. Cut off the tops and remove the seeds. Make sure to hollow them out nicely. This creates a space for the stuffing. Stand the peppers up in your slow cooker. - Mix cooked quinoa with black beans, corn, and seasonings. - Stuff each bell pepper and add vegetable broth to the slow cooker. In a big bowl, combine your cooked quinoa with black beans, corn, and seasonings. Toss in diced red onion, minced garlic, diced tomatoes, salt, and pepper. Stir until it’s all mixed well. Now, take a spoon and fill each bell pepper with this tasty mixture. Press it down lightly to fit. Pour a bit of vegetable broth into the slow cooker. This helps steam the peppers. - Cover and cook on low for 6-8 hours or high for 3-4 hours. Now it’s time to cook! Cover the slow cooker with its lid. Set it to low for 6-8 hours or high for 3-4 hours. You want the peppers to become tender. Once done, carefully remove them. You can garnish with fresh cilantro and serve with lime wedges. Enjoy your meal! Prepping your ingredients saves time. I suggest cooking quinoa and chopping veggies the night before. This way, you can simply toss everything in the slow cooker in the morning. It makes your meal prep easy and stress-free. Want to mix things up? Add different spices like oregano or thyme. You can also switch up the beans. Try kidney beans or pinto beans for a new taste. This adds fun and keeps your meals fresh. Serve your stuffed peppers with a light salad. A fresh green salad adds crunch and balance. You can also add a dollop of yogurt on top. The creaminess of yogurt pairs well with the peppers. It enhances the dish and makes it even more satisfying. {{image_2}} You can mix things up with different stuffing options. Instead of quinoa, try brown rice or lentils. Both options add a nice texture and flavor. You can also add in vegetables like zucchini or spinach. This boosts nutrition and makes the dish even more colorful. If you like a little kick, consider spice level adjustments. You can add jalapeños or hot sauce for heat. Start with a small amount and taste as you go. This way, you control the spice to suit your taste. You can make this dish fit any diet. For a vegetarian version, stick with the quinoa and beans. If you want something heartier, add ground turkey or beef. This makes the meal filling and packed with protein. For the full recipe, check out Slow-Cooker Quinoa & Black Bean Stuffed Peppers. To store leftover stuffed peppers, place them in an airtight container. Make sure the peppers cool down to room temperature first. Once cool, seal the container and refrigerate. They will stay fresh for about three to four days. If you want to enjoy them later, I recommend labeling the container with the date. Freezing stuffed peppers is a great way to save meals for later. First, let the peppers cool completely. Wrap each pepper in plastic wrap or aluminum foil. Then, place them in a freezer-safe bag or container. You can freeze them for up to three months. When you are ready to eat, let them thaw overnight in the fridge before reheating. To reheat your stuffed peppers, you can use either the oven or the microwave. For the oven, preheat it to 350°F (175°C). Place the peppers in a baking dish and cover with foil. Heat for about 20 minutes or until warm. If using a microwave, place a pepper on a microwave-safe plate. Heat for 2-3 minutes, checking halfway. Enjoy your meal with ease! You can store cooked stuffed peppers in the fridge for about 3 to 5 days. Keep them in an airtight container to stay fresh. If you want to keep them longer, freezing is a great option. Stuffed peppers can last in the freezer for 2 to 3 months. When ready to eat, just thaw in the fridge overnight before reheating. Yes, you can make these stuffed peppers ahead of time. Prepare the filling and stuff the peppers a day before. Store them in the fridge until you are ready to cook. You can cook them right from the fridge too. Just adjust the cooking time slightly if they are cold. If you want to swap quinoa, there are great options. You can use brown rice, farro, or barley as alternatives. For a protein boost, try lentils or chickpeas. These choices still give you a tasty and filling dish while changing the flavor and texture. Absolutely! These stuffed peppers are perfect for meal prep. They store well in the fridge and taste great reheated. Making a batch at once saves time during busy weeknights. You can easily grab a pepper for lunch or dinner. They are nutritious, filling, and packed with flavor, making them an ideal meal prep option. Check out the Full Recipe for step-by-step guidance! Slow-cooker quinoa and black bean stuffed peppers make a tasty and healthy meal. You learned the best ingredients, step-by-step preparation, and cooking methods. The variety of options lets you customize flavors and ingredients to suit your taste. These peppers are great for meal prep, ensuring easy dinners all week. Store the leftovers or freeze them for future meals. Enjoy the ease of making this dish and its rich flavors. Your next meal can be both simple and satisfying!
Slow-Cooker Flat Belly Foods for Easy Meal Prep
Are you ready to simplify your meal prep and boost your health? Slow-cooker flat belly foods can help you enjoy tasty meals while keeping belly
This dish is easy and quick to make. You will love the mix of flavors. It is perfect for a busy weeknight or a cozy dinner. The full recipe is simple and fun to prepare. - 4 chicken thighs, skin-on and bone-in - 1 cup baby potatoes, halved - 1 cup cherry tomatoes - 1 bell pepper, sliced (any color) - 4 cloves garlic, minced - 1 tablespoon fresh rosemary, chopped - 1 tablespoon fresh thyme, chopped - 2 tablespoons olive oil - Juice of 1 lemon - Zest of 1 lemon - Salt and pepper to taste These ingredients make a tasty and filling meal. The chicken thighs give rich flavor. The veggies add color and health. Fresh herbs like rosemary and thyme boost the taste. - 1 cup green beans - 1 onion, sliced - 1 teaspoon paprika - 1 teaspoon chili powder Feel free to mix in any of these options. Green beans add crunch. Onions bring sweetness. Spices can heat things up. Use what you have on hand and enjoy! First, gather your chicken thighs. Use skin-on and bone-in pieces for the best flavor. Rinse them under cold water, then pat them dry with paper towels. This step helps the skin get crispy. Place the thighs in a large bowl for marinating later. Next, make the marinade. In a separate bowl, mix olive oil, lemon juice, and lemon zest. Add minced garlic, chopped rosemary, thyme, salt, and pepper. Stir well to combine. Pour this marinade over the chicken thighs. Make sure each piece is covered. If you can, let it sit for 15 minutes. This adds great taste. Now, take a large oven-safe skillet. Start with halved baby potatoes. Spread them evenly across the bottom. Then add the cherry tomatoes and sliced bell pepper. Drizzle some olive oil over the veggies. Season them with salt and pepper. This helps bring out their flavors. Place the marinated chicken on top of the veggies in the skillet. Be sure to arrange them nicely. Then, transfer the skillet to your preheated oven. Bake for 30 to 35 minutes. The chicken should be golden and cooked through. Check that it reaches an internal temperature of 165°F. Once cooked, let it rest for a few minutes before serving. Enjoy your one-pan meal! Marinating is key to great taste. Use fresh herbs like rosemary and thyme for a burst of flavor. If you have time, let the chicken sit in the marinade for 15 minutes. This helps the meat soak up the good stuff. For even more flavor, try marinating overnight in the fridge. Just remember to cover it well. To cook chicken perfectly, aim for an internal temperature of 165°F (75°C). You can check this with a meat thermometer. When baking, place the chicken skin-side up. This allows the skin to get crispy. If you want extra crisp, broil for a few minutes after baking. Keep an eye on it so it doesn’t burn. Cleaning up can feel like a chore, but it doesn't have to be hard. Use the same skillet for cooking and serving. This cuts down on dishes. Let the skillet soak in warm, soapy water right after use. This helps food residue come off easier. For tough spots, use a gentle scrubber. Enjoy your meal without the stress of cleaning! {{image_2}} You can mix and match your veggies for this dish. Instead of baby potatoes, try sweet potatoes or carrots. They add a nice sweetness. If you want more greens, add broccoli or green beans. Zucchini works great too. Just cut them to the same size as the other veggies for even cooking. Get creative with your marinades! Instead of lemon, try balsamic vinegar or soy sauce. Garlic and herb blends add a tasty twist. You can also use yogurt for a creamy marinade. Just remember to keep the marinade balanced with some acid and fat. Spice it up with different herbs and spices. Instead of rosemary and thyme, use oregano and basil for a new flavor. You can also add a pinch of red pepper flakes for some heat. Try smoked paprika for a hint of smokiness. These small changes can make a big difference! After making your one-pan chicken dinner, you may have some tasty leftovers. To store them, let the dish cool down for about 30 minutes. Then, place the chicken and veggies in an airtight container. This keeps flavors fresh and prevents spills. You can store the leftovers in the fridge for up to three days. When you are ready to enjoy your leftovers, reheating is easy. You can use the microwave or the oven. For the microwave, place the chicken and veggies on a plate. Heat for about 2 to 3 minutes, checking to ensure it warms evenly. If you prefer the oven, preheat it to 350°F (175°C). Put the dish in for about 15 minutes. This method keeps the chicken crispy and delicious. If you want to save some for later, freezing is a great option. To freeze, make sure the chicken is cool. Then, wrap it tightly in plastic wrap or foil. Place it in a freezer-safe bag or container. This keeps it fresh for up to three months. When you're ready to eat, thaw it in the fridge overnight. Reheat as mentioned above, and enjoy! For the full recipe, check back to our earlier sections. You can serve this dish with many sides. Rice or quinoa pairs well. A fresh salad adds a nice crunch. You might also enjoy some crusty bread to soak up the juices. Feel free to mix and match! Yes, you can use boneless chicken. It cooks faster than bone-in chicken. Just check the cooking time, as it may reduce. Boneless chicken thighs or breasts work great in this recipe. The best way is to check the internal temperature. Use a meat thermometer. Chicken should reach 165°F (75°C) for safe eating. If you don’t have one, cut into the thickest part. The meat should be white, not pink. This dish lasts about 3 to 4 days in the fridge. Store it in an airtight container. Make sure to let it cool before sealing. Always check for any off smells before eating leftovers. You now have a full guide to making a tasty one-pan chicken dinner. The recipe covers all essential and optional ingredients. I included clear steps for prepping, marinating, and cooking the chicken. You learned tips for perfect flavor and cooking. Variations let you mix in your favorite veggies and spices. Finally, I covered storage and reheating, ensuring your dish tastes great later. Enjoy your cooking and share this easy recipe with friends!
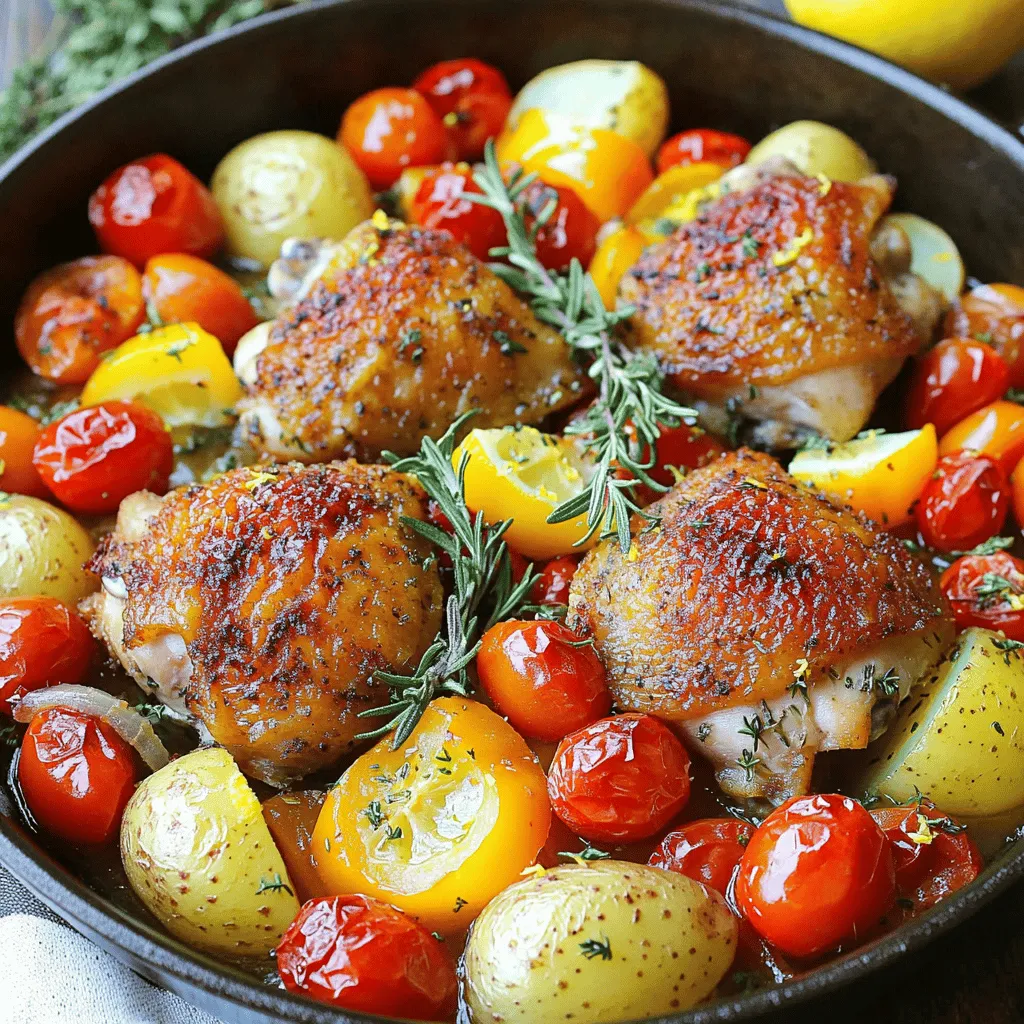
One-Pan Chicken Dinner Quick and Tasty Recipe
Looking for a quick and tasty meal? I’ve got the perfect solution: a One-Pan Chicken Dinner! This simple recipe saves time without sacrificing flavor. You
- 1 lb boneless, skinless chicken breasts - 2 cups broccoli florets (fresh or frozen) - 1 cup uncooked brown rice - 4 cups chicken broth - 1 cup shredded cheddar cheese - 1/2 cup cream cheese, softened - 1 teaspoon garlic powder - 1 teaspoon onion powder - Salt and pepper to taste - 2 tablespoons olive oil (optional) To make this dish shine, you need fresh and simple ingredients. Boneless chicken breasts serve as the main protein. They cook well in the crockpot and stay juicy. Broccoli adds color and nutrition, while brown rice gives a hearty base. For flavor, chicken broth is key. It keeps everything moist and tasty. Cream cheese and cheddar cheese bring the creamy goodness. Garlic and onion powders add depth, and salt and pepper tie it all together. If you want to add extra flavor, a bit of olive oil can work wonders too. You can find the full recipe [here](#). Gather your ingredients, and let’s get cooking! Start by deciding if you want to sear the chicken. Searing adds great taste. In a skillet, heat olive oil over medium heat. Cook the chicken for 3 to 4 minutes on each side until it is lightly brown. If you are short on time, you can skip this step. Next, place the chicken in the bottom of the crockpot. Add the uncooked brown rice evenly over the chicken. Then, layer the broccoli florets on top of the rice. This order helps all the flavors mix well. Now it’s time to make the broth. In a bowl, combine 4 cups of chicken broth with 1 teaspoon of garlic powder and 1 teaspoon of onion powder. Add salt and pepper to taste. Stir the mixture well to blend the flavors. Pour this broth mix over the chicken, rice, and broccoli in the crockpot. This will soak into the rice as it cooks. Set your crockpot to cook on low for 4 to 6 hours or on high for 2 to 3 hours. The chicken should be cooked through, and the rice will be tender. When done, take the chicken out and shred it with two forks. Return the shredded chicken to the pot. Stir in the cream cheese and 1 cup of shredded cheddar cheese. Mix it all until it becomes creamy and well combined. Taste and adjust the seasoning with salt and pepper as needed. Enjoy your delicious cheesy chicken broccoli rice! For the complete recipe, check out the Full Recipe section. Searing the chicken adds rich flavor. It creates a nice crust that locks in juices. If you’re in a hurry, you can skip this step. The dish will still taste great without it. After cooking, always taste the dish. You might want to add more salt or pepper. Adjusting the seasoning makes a big difference. This cheesy chicken broccoli rice pairs well with simple sides. A fresh salad is a great choice. You can also serve it with crusty bread for dipping. For presentation, use a colorful bowl. A sprinkle of cheese and fresh parsley adds flair. A lovely plate makes the meal feel even more special. {{image_2}} You can easily change this dish by swapping out some ingredients. - Using different cheeses: Try mozzarella for a milder taste, or pepper jack for some heat. Each cheese gives a new twist to the dish. - Substituting brown rice with white rice or quinoa: White rice cooks faster than brown rice. Quinoa adds a nutty flavor and boosts protein. Both options work well in this recipe. Want to add more nutrition and flavor? Toss in some extra veggies! - Bell peppers: These add sweetness and crunch. Chop them up and mix them in with the broccoli. - Carrots: Slice them thin and add them for a pop of color and earthiness. They also soften nicely in the crockpot. These swaps and extras can make your meal unique every time you make it. For more detailed instructions, check out the Full Recipe. To keep your Crockpot Cheesy Chicken Broccoli Rice fresh, follow these steps: - Cool Down: Let the dish cool to room temperature first. - Use Airtight Containers: Store leftovers in airtight containers. This keeps moisture in and air out. - Refrigerate: Place the containers in the fridge. Enjoy leftovers within 3 to 4 days. - Freezing: You can freeze leftovers too. Use freezer-safe containers or bags. They last for up to 3 months. When it’s time to enjoy your leftovers, here’s how to reheat them: - Microwave: Place a serving in a microwave-safe bowl. Cover with a lid or microwave-safe wrap. Heat on medium power for 2-3 minutes, stirring halfway through. - Stovetop: Heat in a skillet over medium heat. Add a splash of water or broth to help it warm up nicely. Stir until heated through. These methods keep the dish creamy and cheesy, just like when you first made it. For more tips, check out the Full Recipe! Yes, you can use frozen chicken. Just add about an hour to the cooking time. If you use frozen chicken, it will cook well in the crockpot. Make sure to check if it is fully cooked before serving. Always aim for an internal temperature of 165°F. This way, you can enjoy a safe and tasty meal. To make this dish low-carb, swap the brown rice for cauliflower rice. Cauliflower rice is a great substitute. It has fewer carbs and still adds texture. You can also cut back on the cream cheese for a lighter option. This change keeps the dish creamy while lowering the carbs. If you want to substitute cream cheese, try sour cream or Greek yogurt. Both give a creamy texture. You can also use ricotta cheese for a different flavor. These options keep the dish delicious and rich. Make sure to use the same amount to keep the balance right. This blog post covers a hearty and tasty Crockpot Cheesy Chicken Broccoli Rice dish. We explored the main and additional ingredients that make it shine. You learned how to prepare, cook, and serve it perfectly. Plus, we shared tips to enhance flavor and texture. Remember, you can customize this dish to fit your taste with different cheeses or veggies. I hope you feel inspired to try this simple recipe. Enjoy your cooking journey and savor every bite.
Crockpot Cheesy Chicken Broccoli Rice Simple Delight
Welcome to your new favorite dish: Crockpot Cheesy Chicken Broccoli Rice! This simple delight combines tender chicken, rich cheese, and healthy broccoli in one easy
Cooking great meals starts with fresh, quality ingredients. Here’s what you need for the Savory Garlic Cauliflower and Mushroom Skillet: - 1 medium cauliflower, cut into florets - 8 oz (225g) mushrooms, sliced (cremini or button) - 4 cloves garlic, minced - 2 tablespoons olive oil - 1 tablespoon unsalted butter - 1 teaspoon dried thyme - 1/2 teaspoon smoked paprika - Salt and pepper to taste - 2 tablespoons fresh parsley, chopped - Zest of 1 lemon Each ingredient plays a key role. The cauliflower brings a nice crunch. Mushrooms add a savory depth. Garlic gives a punch of flavor, while thyme and paprika bring warmth. Olive oil and butter create a rich base. Lemon zest adds brightness and freshness. Finally, parsley finishes the dish with color and taste. When you gather these ingredients, focus on freshness. It makes a big difference in flavor. For the best results, choose vibrant cauliflower and firm mushrooms. This dish shines with simple, high-quality components. For the full recipe, follow the detailed instructions for cooking. Enjoy crafting this tasty meal! - Rinse and cut the cauliflower into florets. - Clean and slice the mushrooms evenly. First, wash the cauliflower well under cold water. This step removes dirt and keeps it fresh. After rinsing, chop it into small florets. Aim for uniform pieces so they cook evenly. Next, grab your mushrooms. Choose cremini or button mushrooms for the best flavor. Wipe them with a damp cloth to clean. Then, slice them evenly. Even slices help them cook at the same rate. - Heat the skillet with oil and butter. - Sauté cauliflower and mushrooms in succession. Heat a large skillet over medium heat. Add two tablespoons of olive oil and one tablespoon of unsalted butter. Wait for the butter to melt and bubble. This mix gives a rich flavor to the dish. Once the skillet is hot, add the cauliflower florets. Sauté them for about 5 to 7 minutes. Stir occasionally to avoid sticking. You want them to get a nice golden color. After the cauliflower softens, it’s time for the mushrooms. Add them to the skillet and cook for another 5 minutes. They will release moisture and become tender. - Incorporate garlic and seasonings. - Finish with lemon zest and fresh parsley. Now, it’s time to add the magic. Toss in four cloves of minced garlic, one teaspoon of dried thyme, and half a teaspoon of smoked paprika. Season with salt and pepper to taste. Sauté for 2 to 3 minutes. Make sure not to burn the garlic; it can turn bitter. Once the garlic is fragrant, remove the skillet from heat. Add the zest of one lemon and two tablespoons of chopped fresh parsley. This adds brightness and freshness to the dish. For the full recipe, check out the complete details. Enjoy your savory garlic cauliflower and mushroom skillet! To achieve the perfect sauté, use a large skillet. Heat the olive oil and butter well before adding the vegetables. This helps them cook evenly. Stir the cauliflower frequently so it browns nicely. Cook it for about 5 to 7 minutes until it gets tender. Do not burn the garlic. Add it after the cauliflower and mushrooms have cooked a bit. Garlic cooks fast and can turn bitter if overcooked. Sauté it for just 2 to 3 minutes until you smell its great aroma. You can add spices to boost the taste. Try adding a pinch of red pepper flakes for heat. A dash of cumin can give it a warm flavor. Experiment until you find your favorite mix. Using fresh herbs enhances the dish's flavor. Chopped basil or thyme can brighten the taste. Fresh parsley adds color and freshness. Always add herbs near the end of cooking for the best flavor. This dish pairs well with rice or quinoa. A side salad can add a nice crunch. You can also serve it with crusty bread to soak up the flavors. For plating, use a large, shallow dish. This helps show off the colorful veggies. Sprinkle extra parsley on top for a great look. Zest some lemon over the top for a bright finish. Try the Full Recipe for a delightful cooking experience! {{image_2}} You can easily switch up the mushrooms in this dish. Try using shiitake, portobello, or oyster mushrooms. Each type adds its own flavor and texture. For a fun twist, mix different mushrooms together. You can also add seasonal veggies. Think about bell peppers in summer or kale in winter. These changes keep the dish fresh and exciting. To make this recipe vegan, swap the butter for more olive oil. This keeps it rich and tasty without any animal products. You can also make it gluten-free by ensuring your mushrooms and seasonings are certified gluten-free. This way, everyone can enjoy this delicious meal without worry. Herbs and spices can take this skillet to new heights. Try adding basil, rosemary, or even a pinch of red pepper flakes for heat. If you want to add protein, consider chicken, shrimp, or tofu. Simply cook them in the skillet before the vegetables. This adds a hearty element and makes the dish even more filling. For the Full Recipe, check out the detailed steps to make your own Savory Garlic Cauliflower and Mushroom Skillet. To keep your savory garlic cauliflower and mushroom skillet fresh, store leftovers right away. Place the dish in an airtight container. This helps to keep moisture in and air out. Refrigerate within two hours of cooking. Proper cooling is key to safety. Use a shallow container to cool quicker. This method helps maintain the flavor and texture. When you are ready to enjoy your leftovers, you can reheat them in two ways. The skillet method works best for even heating. Heat a splash of olive oil in the skillet. Add the cauliflower and mushrooms. Stir them often until warm. This keeps them from drying out. If you are short on time, use the microwave. Place the dish in a microwave-safe bowl. Heat it in short bursts, stirring in between. This will help heat evenly. Keep an eye on the time to avoid overcooking. Freezing your garlic cauliflower and mushroom skillet is easy. First, let the dish cool completely. Spoon the mixture into a freezer-safe container. Leave some space at the top for expansion. Seal tightly to prevent freezer burn. This dish can last in the freezer for up to three months. When you want to eat it, thaw in the fridge overnight. This method keeps the texture better. Reheat as mentioned before for best results. Enjoy this tasty dish even later! For the complete recipe, check out the Full Recipe section. Cooking cauliflower in the skillet takes about 10 to 12 minutes. First, sauté the florets for 5 to 7 minutes until they start to brown. Next, add the mushrooms and cook for another 5 minutes until tender. Yes, you can use frozen cauliflower. However, it’s best to thaw it first. Squeeze out any excess water before adding it to the skillet. This helps keep the dish from becoming too watery. You can use any cooking oil you like. Some good options are avocado oil or canola oil. Both provide a nice flavor and work well with the ingredients in this dish. To prepare this dish ahead of time, cook it as directed. Let it cool completely and store it in an airtight container. You can refrigerate it for up to three days. Just reheat it in the skillet before serving. For the full recipe, click here. This blog post covered a tasty cauliflower and mushroom dish. We discussed ingredients, cooking steps, and flavor tips. You learned how to customize the recipe for your tastes. I shared storage advice and answered key questions for your kitchen needs. Experimenting with this dish can spark your creativity. Enjoy the process and make it yours! Cooking is fun, and good food brings joy to every meal.
Savory Garlic Cauliflower and Mushroom Skillet Delight
Are you ready to elevate your veggie game? This Savory Garlic Cauliflower and Mushroom Skillet Delight is a simple yet flavorful dish that will make
- 1 lb beef sirloin (cut into bite-sized cubes) - 1 lb baby potatoes (halved or quartered) - 4 tablespoons unsalted butter - 4 cloves garlic (minced) - 2 tablespoons fresh rosemary (or 1 tablespoon dried) - 1 teaspoon smoked paprika - Salt and pepper to taste - Fresh parsley for garnish Gather these ingredients to create a tasty dish. The beef sirloin gives a rich flavor. Baby potatoes add a nice texture. Butter brings everything together with creaminess. The garlic is key for that punch of flavor. Fresh rosemary makes the dish smell amazing. Smoked paprika adds depth and warmth. Don’t forget salt and pepper; they enhance every bite. Finally, fresh parsley is perfect for brightening up your plate. For the full recipe, you can check the section above. Now, let’s get cooking! Set the temperature to 400°F (200°C). This gets the oven ready for roasting. Toss the baby potatoes with butter, smoked paprika, salt, and pepper. Make sure every potato is coated well for great flavor. Place the potatoes in the oven for about 20 minutes. They should be golden and tender. Toss them halfway through for even cooking. While the potatoes roast, season the beef cubes with salt and pepper. This step adds a nice flavor to the beef. Melt the remaining butter in a skillet over medium-high heat. Add minced garlic and sauté it for about 30 seconds until it smells amazing. Raise the heat to high and add the seasoned beef cubes. Sear the beef in the skillet until it's browned on all sides. This takes about 3 to 4 minutes. Once the potatoes are done, mix them with the beef and fresh rosemary. Toss everything gently to combine. Lastly, finish the dish with fresh chopped parsley before serving. This adds a nice touch and makes the dish look appealing. For the full recipe, check [Full Recipe]. Use sirloin for optimal tenderness. Sirloin offers a nice balance of flavor and softness. It cooks well and stays juicy, making it perfect for this dish. Look for bright red meat with good marbling. This marbling adds flavor to your beef bites. Make sure to cut the beef into bite-sized cubes. This ensures even cooking and easy eating. Ensure even cooking by tossing potatoes halfway through roasting. Start by coating the baby potatoes with butter, salt, and spices. This adds flavor and crispiness. Spread them out on a baking sheet. When you toss them after ten minutes, it helps them cook uniformly. This small step makes a big difference in taste and texture. Experiment with different herbs or spices to make this dish your own. Rosemary gives a wonderful aroma, but you can try thyme or basil too. If you want some heat, add red pepper flakes. You can also swap out garlic for shallots for a different taste. Don't hesitate to play with flavors—cooking should be fun and personal! {{image_2}} You can boost the flavor by adding vegetables. Bell peppers and onions work well. Slice them thin and toss them with the beef. They will roast nicely and add great taste. If you like heat, try chili flakes. Add them while cooking the beef. Start with a pinch and adjust to your taste. This will give your dish a nice kick. You can switch herbs for new flavors. Use thyme or basil in place of rosemary. Each herb brings its own unique taste. Experiment to find your favorite! Store leftovers in an airtight container for up to 3 days. This keeps the beef bites and potatoes fresh. If you plan to eat them later, cool them first before sealing. This way, the taste remains great. You can easily reheat your meal. Use a microwave for quick warming. Alternatively, sauté the beef and potatoes on the stove. Heat them until warm. This method helps retain their flavor and texture. Want to save some for later? Freeze the beef bites and potatoes before cooking. Place them in a freezer-safe bag. When you're ready, thaw them overnight in the fridge. Then, cook as per the full recipe. This way, you can enjoy this dish anytime! Yes, other beef cuts like ribeye can be used. Each cut brings a unique flavor and texture. For a tender bite, choose cuts with good marbling. Pair with a salad or fresh bread. A crisp green salad adds freshness. Fresh bread soaks up the tasty garlic butter sauce. Total time is approximately 30 minutes. You will spend about 10 minutes prepping and 20 minutes cooking. This quick meal is perfect for busy nights. Yes, it can be made ahead and stored. Just refrigerate it in an airtight container. Reheat it when you're ready to enjoy it again. For the full recipe, be sure to check out the detailed steps. This recipe for Garlic Butter Beef Bites and Baby Potatoes is simple and tasty. You start by roasting the potatoes, then sautéing the beef with garlic and herbs. Remember, you can mix in other veggies or spices to change the flavors. Store any leftovers well for more meals later. This dish is perfect for any night and takes about 30 minutes to make. Enjoy your cooking adventure!
Garlic Butter Beef Bites & Potatoes Savory Delight
Get ready to savor a mouthwatering dish that’s easy and fun to make! In just 30 minutes, you can whip up Garlic Butter Beef Bites
- 1 lb ground beef - 1/2 lb ground turkey - 1/2 cup breadcrumbs - 1/4 cup grated Parmesan cheese - 1 large egg - 2 tablespoons Worcestershire sauce - 1 teaspoon garlic powder - 1 teaspoon onion powder - Salt and pepper to taste For the meatballs, I love using a mix of ground beef and turkey. This blend gives great flavor and keeps the meatballs juicy. Breadcrumbs and Parmesan cheese help bind the mixture while adding a nice taste. The Worcestershire sauce gives a savory kick. I also add garlic and onion powder for extra flavor. Don't forget salt and pepper to season! - 1 cup beef broth - 1 cup sliced mushrooms - 1 medium onion, sliced - 2 tablespoons ketchup - 1 tablespoon Dijon mustard - 2 tablespoons cornstarch - 2 tablespoons water (for thickening) For the sauce, beef broth is key. It adds depth to the flavor. I like to include sliced mushrooms and onions for texture and taste. Ketchup and Dijon mustard give a sweet and tangy flavor to the sauce. To finish, I use cornstarch and water to thicken the sauce. This ensures the sauce coats the meatballs perfectly. For the full recipe, you can find all the steps to create this tasty dish! To start, I mix the meatball ingredients. In a large bowl, combine: - 1 lb ground beef - 1/2 lb ground turkey - 1/2 cup breadcrumbs - 1/4 cup grated Parmesan cheese - 1 large egg - 2 tablespoons Worcestershire sauce - 1 teaspoon garlic powder - 1 teaspoon onion powder - Salt and pepper to taste I blend these together until they form a uniform mixture. This step is crucial for flavor and texture. Next, I shape the mixture into meatballs about 1 inch in diameter. I find that rolling them gently helps keep them firm. Once shaped, I set them aside on a plate. Now, it's time to layer the ingredients in the slow cooker. First, I add sliced onions and mushrooms to the bottom. Then, I pour in 1 cup of beef broth, 2 tablespoons ketchup, and 1 tablespoon Dijon mustard. I stir this mixture gently to combine the flavors. Next, I carefully place the meatballs on top of the sauce. I avoid stirring at this point; I let the meatballs rest on the sauce to keep their shape. I cover the slow cooker and choose the cooking time. For a low setting, I cook for 6 to 7 hours. If I'm in a hurry, I can set it to high for 3 to 4 hours. Either way, the meatballs become tender and flavorful. As the cooking time ends, I prepare to thicken the sauce. I mix 2 tablespoons of cornstarch with 2 tablespoons of water in a small bowl until smooth. This mix forms a slurry that will help achieve the right thickness. After that, I stir the cornstarch slurry into the slow cooker. I let the slow cooker run for another 15 minutes. This final step transforms the sauce into a rich, creamy delight. Now, the Salisbury steak meatballs are ready to serve! To get the best texture for your meatballs, mix ground beef and turkey. This blend gives a juicy bite while keeping them light. Use equal parts of each meat. This helps create a rich flavor. When mixing, use your hands. It’s quick and effective. Don’t over-mix, or the meatballs can become tough. Aim for a gentle mix until just combined. Adding breadcrumbs helps with texture too. They soak up juices and keep the meatballs moist. To avoid meatball breakage, layer carefully. Place them on top of the sauce. Don’t stir after adding them. This keeps the meatballs intact. Checking for doneness is easy. Use a meat thermometer. Meatballs should reach 165°F. If you don’t have one, cut a meatball in half. It should no longer be pink inside. For sides, serve these meatballs over creamy mashed potatoes or rice. They soak up the savory sauce well. Noodles are another great option. For a fun twist, add fresh parsley on top. It adds color and flavor. You can also try a sprinkle of grated cheese. This adds richness and pairs well with the meatballs. For the full recipe, check the details above. {{image_2}} You can switch meats in this recipe. Ground beef and turkey work great together, but you can use just beef, turkey, or even chicken. Each option provides a unique flavor. If you want a spicy kick, add red pepper flakes or cayenne pepper. Adding vegetables to the meatballs also boosts nutrition. You can mix in finely chopped carrots or spinach. These options add color and taste. You can even toss in some bell peppers for sweetness. If you need a quicker meal, you can make this dish on the stovetop. Brown the meatballs in a skillet first, then add the sauce. Cover and simmer for about 30 minutes. You can also bake the meatballs in the oven. Preheat your oven to 375°F. Place the meatballs on a baking sheet and cook for 20-25 minutes. Then, combine them with the sauce in a pan and let them simmer for flavor. You can make this dish healthier by using leaner meats. Ground chicken or turkey has less fat. Whole grain breadcrumbs also add fiber and nutrients. Look for options that are high in whole grains. For gluten-free options, use gluten-free breadcrumbs. They work well in this recipe and keep the texture nice. You can also use oats as a substitute for breadcrumbs. Just grind them up a bit for a finer texture. For the full recipe, check the detailed instructions above. Enjoy your cooking! After enjoying your slow cooker Salisbury steak meatballs, you may have some leftovers. Here are my best tips for storing them: - Refrigeration: Cool the meatballs and sauce to room temperature before storing. This helps prevent condensation and keeps them fresh. - Containers: Use airtight containers for storage. Glass or BPA-free plastic containers work well. Label them with the date to keep track. If you want to keep your meatballs for later, freezing is a great option. Follow these steps: - Freezing Separately: First, cool the meatballs and sauce. Place the meatballs in one container and the sauce in another. This keeps the texture nice. - Thawing: When ready to eat, thaw in the fridge overnight. For quick thawing, use the microwave on low power. - Reheating Tips: Reheat meatballs in the microwave or on the stove. For the sauce, heat gently on low until warm. Stir to combine both before serving. These storage tips will help you enjoy your delicious meal even after the first round. For the complete recipe, refer to the [Full Recipe]. Yes, you can use frozen meatballs. They save time and work well with the sauce. Just add them to the slow cooker straight from the freezer. Cook on low for 6-7 hours or high for 3-4 hours. The sauce will flavor the meatballs as they cook. This is a great shortcut for busy days. To make this dish dairy-free, skip the Parmesan cheese. You can use nutritional yeast for a cheesy flavor. For the sauce, look for dairy-free broth or use coconut milk instead. These swaps keep the dish tasty without dairy. It’s simple to adjust the recipe for your needs. Salisbury steak meatballs pair well with many sides. Popular options include: - Mashed potatoes - Rice - Egg noodles - Steamed vegetables These sides soak up the rich sauce. You can also add a side salad for a fresh touch. Enjoy these meatballs with your favorite sides for a complete meal. Making Salisbury steak meatballs is simple with the right ingredients and steps. We covered essential components like ground beef, breadcrumbs, and a tasty sauce. You learned how to mix meatballs, layer ingredients in a slow cooker, and thicken the sauce for the best flavor. In the end, you can adapt the recipe with swaps and variations to fit your taste. Remember these tips for perfect meatballs: check for doneness and serve them well. Enjoy your cooking journey!
Slow Cooker Salisbury Steak Meatballs Savory Dish
If you’re looking for a hearty, comforting dish, try Slow Cooker Salisbury Steak Meatballs. This recipe combines tender meatballs made from ground beef and turkey