Dinner
![- 2 lbs beef chuck, cut into 1-inch pieces - 1 large onion, diced - 3 cloves garlic, minced - 4 medium carrots, sliced - 4 medium potatoes, diced - 1 cup frozen peas - 1 tablespoon olive oil - 2 cups beef broth - 1 tablespoon tomato paste - 1 teaspoon dried thyme - 1 teaspoon dried rosemary - Salt and pepper to taste - 2 bay leaves - Prep Time: 15 minutes - Total Time: 1 hour - Servings: 6 Gathering the right ingredients makes cooking easier. Start with fresh beef chuck. This meat gives the stew a rich flavor. Cut it into 1-inch pieces for even cooking. Next, chop one large onion and mince three cloves of garlic. These add a sweet and savory base to the dish. For a hearty bite, slice four medium carrots and dice four medium potatoes. These veggies help fill you up and provide great texture. Finish it off with one cup of frozen peas. They add a pop of color and sweetness at the end. Next, don't forget your pantry staples. Use one tablespoon of olive oil to sauté the beef and aromatics. Two cups of beef broth form the stew's base. One tablespoon of tomato paste adds depth. Season with one teaspoon of dried thyme and one teaspoon of dried rosemary. Add salt and pepper to taste. Lastly, toss in two bay leaves for extra flavor. This recipe serves six, making it perfect for family meals. You can whip it up in just an hour, with only 15 minutes of prep. For the full recipe, click here [Full Recipe]. - Set the Instant Pot to Sauté mode and heat olive oil. - Sear beef chuck pieces until browned, then set aside. First, you want to make sure your Instant Pot is ready. Set it to Sauté mode, then add the olive oil. Let it heat up for a moment. When the oil shimmers, it’s time to add the beef. Add your beef chuck pieces in batches. Sear them until they are a nice brown color. This step adds flavor to your stew. Once browned, take the beef out and set it aside on a plate. - Sauté diced onion until translucent. - Add minced garlic and cook for 1 additional minute. Next, keep the pot on Sauté mode. Toss in the diced onion. Cook it until it turns translucent. This takes about three to four minutes. Then, add the minced garlic. Stir it in and let it cook for one more minute. The smell will be wonderful at this point! - Stir in tomato paste, return beef to the pot. - Add remaining vegetables, broth, and spices. - Close lid and set to Manual for cooking. Now it's time to bring everything together! Stir in the tomato paste and mix well. Then, return the browned beef to the pot. Add in the sliced carrots, diced potatoes, beef broth, thyme, rosemary, and season with salt and pepper. Give everything a good stir to combine. Place the bay leaves on top without stirring them in. This helps add flavor. Close the Instant Pot lid and set it to Manual for 35 minutes. Make sure the valve is set to Sealing. For the full flavor experience, follow the [Full Recipe]. To make your stew taste amazing, start with quality beef chuck. This cut has the right fat and flavor. It breaks down well during cooking, giving your dish richness. Before serving, always taste and adjust seasoning. A pinch more salt or pepper can elevate the flavors. You have two methods to release pressure: natural and quick. Natural release lets the pot cool down on its own. This can take about 10-20 minutes. It keeps the stew moist. Quick release is faster. Just turn the valve to venting. Be careful! Use a kitchen towel to protect your hand from steam. To open the Instant Pot safely, ensure the pressure is fully released. Wait for the pin to drop. Then, turn the lid to open it away from you. This helps avoid steam burns. For a deeper flavor, add a splash of red wine. It really boosts the taste! You can also stir in fresh herbs like parsley or thyme right before serving. They add freshness and a pop of color. These simple steps make your stew shine. For the full recipe, check the details above. {{image_2}} You can change the meat! Try chicken or pork instead of beef. Each option brings a unique taste. For veggies, swap in whatever is fresh. Use sweet potatoes, green beans, or even mushrooms. This stew is flexible! Want to make it gluten-free? Just check your beef broth. Some brands add gluten. If you prefer a vegan version, use plant-based meat alternatives. You can still enjoy that hearty flavor without the meat. If you don't have an Instant Pot, don't worry! You can use a slow cooker instead. Just follow the same steps but cook on low for about 6-8 hours. You can also make it on the stovetop. Start by browning the beef in a pot, then add the rest of the ingredients. Let it simmer for about 1.5 to 2 hours until everything is tender. This stew is made for comfort, no matter how you cook it! To store leftover Instant Pot beef stew, first cool it to room temperature. Then, place it in an airtight container. This keeps the stew fresh for up to three days in the fridge. Glass containers work best, as they do not stain and are easy to clean. If you want to keep the stew longer, consider freezing it. To freeze beef stew, follow these steps: - Allow the stew to cool completely. - Portion it into freezer-safe bags or containers. - Remove as much air as possible to prevent freezer burn. - Label the containers with the date. For thawing, place the stew in the fridge overnight. This keeps the texture and flavor intact. You can also thaw it in the microwave on low power if you need it faster. When reheating, you have two main options: the stove or the microwave. If using the stove, heat the stew in a pot over medium heat. Stir often until it’s hot. If using the microwave, use a microwave-safe bowl. Heat in short bursts, stirring in between, until hot. To maintain flavor and texture, avoid boiling the stew. Gently warming it keeps the meat tender and the veggies from getting mushy. Enjoy your hearty comfort in a bowl! For more details, check the Full Recipe. Yes, you can make this stew ahead of time. It tastes better the next day! To store, let it cool down first. Then, put it in an airtight container. You can keep it in the fridge for up to three days. If you want to store it longer, freeze it. It keeps well for about three months in the freezer. Just make sure to label it with the date. To thicken your stew, you have a few options. You can mash some of the potatoes in the pot. This adds creaminess without extra steps. Another option is to mix a bit of cornstarch with cold water. Stir this mixture into the stew and cook for a few minutes. This method works fast and gives a nice thickness. Many sides complement this stew well. You can serve it with crusty bread for dipping. A fresh green salad also adds a nice crunch. If you want something warm, try mashed potatoes or rice. These sides soak up the flavorful broth. They enhance your meal and make it more filling. You now know how to make a delicious Instant Pot beef stew. This stew uses fresh and pantry ingredients to create great flavor. You can easily customize it with different meats or veggies. Remember to store your leftovers properly for later enjoyment. With these tips and tricks, you can impress anyone who tries your dish. Enjoy each bite of your hearty meal, and feel free to explore new variations. Cooking can be fun and rewarding, so dive in and make it your own!](https://toastedrecipes.com/wp-content/uploads/2025/05/99c4b6e4-567d-46ab-9e53-5f33d48339e0.webp)
Instant Pot Beef Stew Hearty Comfort in a Bowl
There’s nothing quite like a warm bowl of beef stew on a chilly day. In my latest post, “Instant Pot Beef Stew: Hearty Comfort in

Creamy Garlic Tuscan Chicken Delightful Dinner Option
If you’re looking for a simple yet delightful dinner option, my Creamy Garlic Tuscan Chicken is your answer! This dish blends juicy chicken with rich

Philly Cheesesteak Cheesy Bread Flavorful Delight
Are you ready to take your taste buds on a cheesy adventure? This Philly Cheesesteak Cheesy Bread recipe combines all the savory flavors you crave.
 for precise measurements and more tips! Cooking quinoa perfectly is easy. First, rinse it under cold water. This removes the bitter coating. Next, add one cup of quinoa to two cups of water. Bring it to a boil, then cover and let it simmer for about 15 minutes. Once the quinoa is fluffy, remove it from heat and let it sit for five minutes. To trim asparagus, hold the stalk and bend it. The asparagus will snap at the right point. Cut the stalks into 2-inch pieces. This helps them cook evenly in the casserole. In a large bowl, combine the cooked quinoa, cream of mushroom soup, sour cream, garlic powder, onion powder, salt, and pepper. Mix well until all ingredients are smooth. This mixture will coat the asparagus nicely. Add the cut asparagus to the bowl. Stir gently to coat each piece with the creamy mixture. Make sure every piece of asparagus is covered. This step ensures great flavor in every bite. First, preheat your oven to 350°F (175°C). Grease a 9x13 inch casserole dish with olive oil. This prevents sticking and helps with browning. Pour the asparagus mixture into the prepared dish. Spread it evenly. Sprinkle shredded cheddar cheese on top for that cheesy goodness. In a small bowl, mix breadcrumbs with grated Parmesan cheese and a drizzle of olive oil. This creates a crunchy topping. Evenly distribute this mixture over the cheese layer. Bake in the preheated oven for 30-35 minutes. Look for a golden brown top with bubbling edges. When it’s done, let it cool for a few minutes. Garnish with fresh parsley before serving. For the complete recipe, check the Full Recipe section. To avoid overcooked asparagus, cook it just until tender. This usually takes about 3-4 minutes in boiling water. If you cook it too long, it will become mushy in the casserole. After boiling, quickly cool the asparagus in ice water. This method keeps the bright green color and crisp texture. For the right casserole consistency, mix your ingredients well. The cream of mushroom and sour cream should blend smoothly with the quinoa. If it feels too thick, add a splash of vegetable broth. This will help create a creamy, rich texture. I recommend using homemade cream of mushroom soup for a fresher taste. Store-bought options can be high in sodium. If you make your own, you can control the flavors and ingredients. You can also add garlic or onion to enhance the flavor further. Consider adding herbs like thyme or dill for extra flavor. A sprinkle of red pepper flakes can add a bit of heat. Experiment with these additions to find your favorite flavor combination. To complement the casserole, serve it with a light salad. A fresh green salad with lemon vinaigrette balances the richness of the dish. You could also pair it with roasted potatoes or crusty bread. To present the dish attractively, use a colorful plate. Garnish with chopped parsley for a fresh look. You can also sprinkle extra cheese on top before serving for added appeal. For the full recipe, click here. {{image_2}} You can make this casserole to fit different diets. For a gluten-free option, swap the breadcrumbs for gluten-free breadcrumbs. You can also use brown rice instead of quinoa. This keeps the dish hearty and safe for gluten-free eaters. For a vegan version, replace the dairy. Use plant-based cream of mushroom soup and non-dairy sour cream. Substitute the cheese with a vegan cheese blend or nutritional yeast for a cheesy flavor. These changes still make the dish creamy and tasty. Feel free to mix in other veggies. Broccoli, spinach, or bell peppers all work well. You can also add cooked lentils or chickpeas for extra protein. This makes the casserole more filling and colorful. For a low-fat alternative, use reduced-fat cheese and sour cream. You can also choose Greek yogurt instead of sour cream. This keeps the dish creamy while cutting down on fat. Incorporating seasonal veggies can add freshness. In spring, use fresh peas or green beans. In summer, try zucchini or cherry tomatoes. These additions can brighten the flavor and color of your casserole. For holiday-inspired versions, think of adding herbs like thyme or rosemary. You can also sprinkle crushed nuts on top for a crunchy finish. This not only enhances taste but also makes the dish festive. For the full recipe, check the earlier section detailing all the steps and ingredients. To keep your Cheesy Asparagus Casserole fresh, use a good container. Glass or plastic containers with tight lids work best. Make sure the casserole cools down before sealing it. This helps prevent moisture build-up. Store it in the fridge for up to four days. When it’s time to enjoy leftovers, you have two choices: the microwave or oven. If you use the microwave, heat in short bursts. This helps keep the texture nice. Stir it often to heat evenly. If you prefer the oven, set it to 350°F (175°C). Cover the casserole with foil to avoid drying out. Bake for about 20 minutes until hot. You can freeze the casserole too! If you want to freeze it before baking, assemble it in your dish but don’t bake it. Cover tightly with foil or plastic wrap. To freeze after baking, let it cool first, then wrap. For best results, thaw it in the fridge overnight before reheating. This helps keep the flavor and texture perfect. Cheesy Asparagus Casserole can last about 3 to 5 days in the fridge. Store it in an airtight container. This helps keep it fresh and tasty. Before eating, check for any signs of spoilage. Yes, you can make this casserole ahead of time. Prepare it up to the baking step and cover it well. Keep it in the fridge for up to 24 hours. When ready to bake, just add a few extra minutes to the baking time. If you don’t have cream of mushroom soup, you can use cream of chicken soup. You can also make a simple homemade version. Just blend cooked mushrooms, cream, and some broth. This gives a rich flavor and works well in the dish. This casserole can be a healthy choice. Asparagus is low in calories and high in vitamins. The quinoa adds protein and fiber. However, it does contain cheese and cream, so enjoy it in moderation. You can also make it lighter by using low-fat dairy options. For the full recipe, check out my detailed guide! Cheesy asparagus casserole is easy and tasty. You start with fresh asparagus and quinoa, mixing in delicious cheeses. Add spices to boost flavor and then bake it to perfection. You can change ingredients and make it your own. Remember to store any leftovers well. Enjoy it warm or cold. This dish is great for any meal. Exploring variations makes it fun and nutritious too. Keep it in mind for your next family meal or gathering. Your taste buds will thank you!](https://toastedrecipes.com/wp-content/uploads/2025/05/5729ddf8-3cbd-43d6-a5d1-dd701129da62.webp)
Cheesy Asparagus Casserole Tasty and Simple Recipe
Looking for a delicious way to enjoy fresh asparagus? This Cheesy Asparagus Casserole is your answer! It’s easy to make and packed with flavor. You’ll
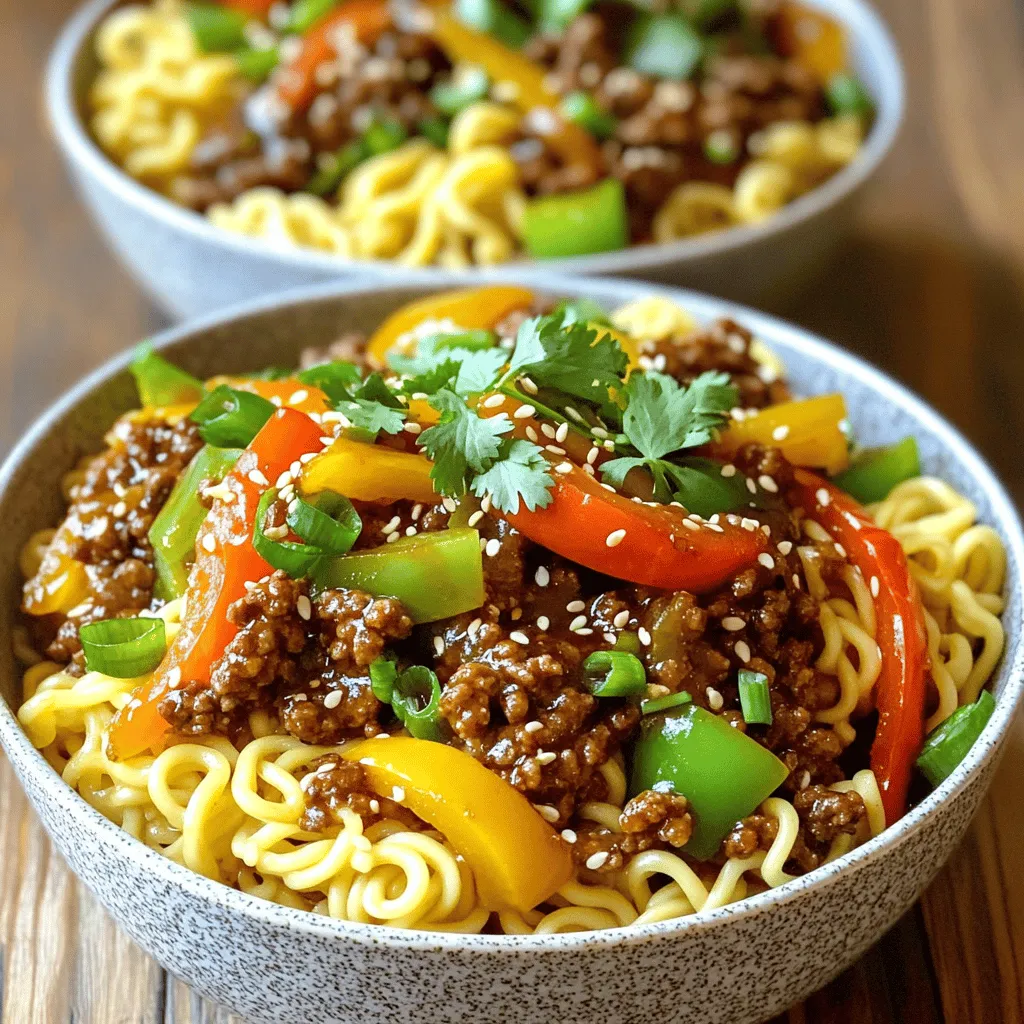
Stunning Mongolian Ground Beef Noodles Delicious Recipe
Are you ready to savor a delicious dish that will impress your family? This Stunning Mongolian Ground Beef Noodles recipe is easy to make and
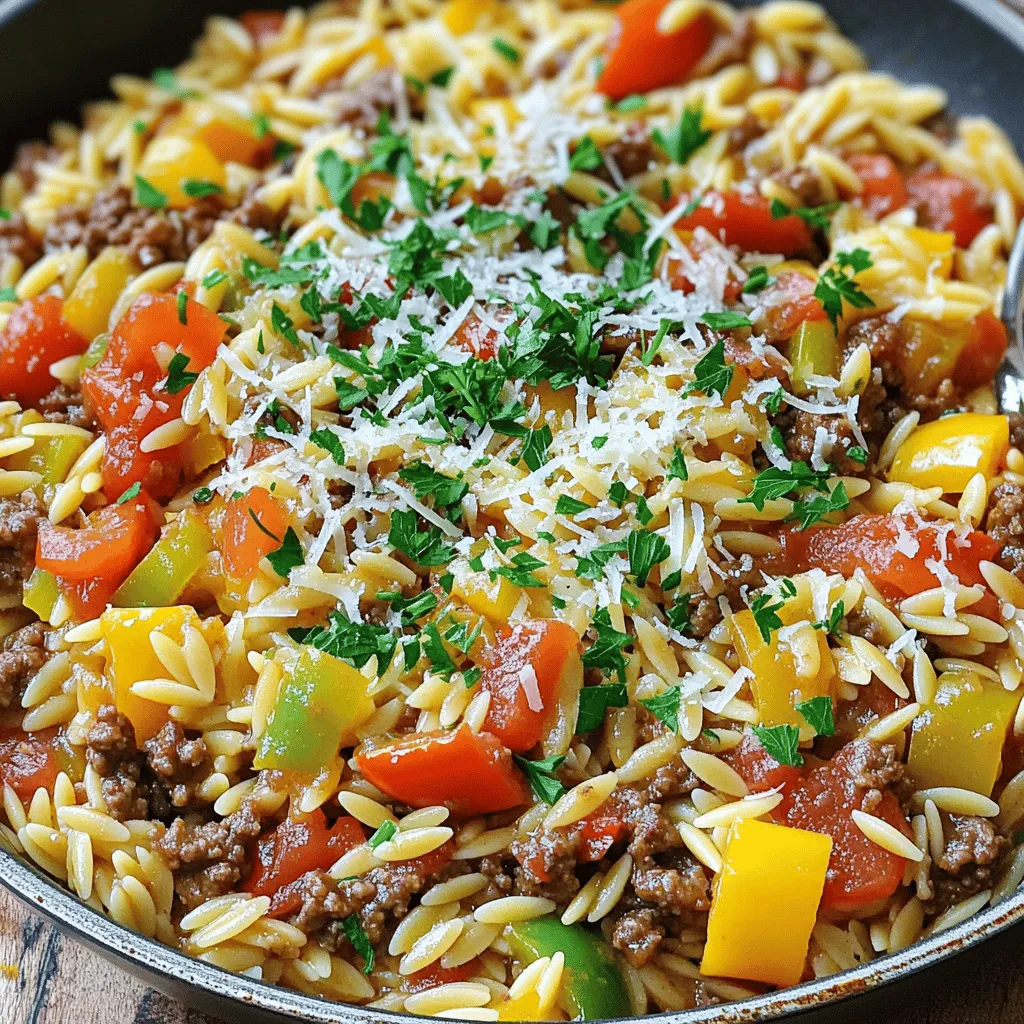
Ground Beef Orzo Satisfying and Simple Recipe
Looking for a meal that’s quick, tasty, and satisfying? Ground Beef Orzo is the perfect solution! This simple recipe combines hearty ground beef with tender
![- 1 lb large shrimp, peeled and deveined - 2 tablespoons olive oil - 1 teaspoon paprika - 1 teaspoon cumin - 1/2 teaspoon garlic powder - Salt and pepper to taste - 8 small corn tortillas - 1 cup red cabbage, finely shredded - 1 avocado, sliced - 1/2 cup mango salsa (store-bought or homemade) - Fresh cilantro, for garnish - Lime wedges, for serving To make these easy shrimp tacos, you need fresh ingredients. Start with large shrimp that are peeled and deveined. This saves time and makes cooking easier. The olive oil helps the spices stick to the shrimp. Paprika adds a sweet flavor, while cumin gives a warm note. For seasonings, garlic powder adds depth. Don’t forget salt and pepper to taste. Adjust these as you like! Next, think about toppings. Small corn tortillas are perfect for holding all the goodies. Red cabbage gives a nice crunch and color. Sliced avocado adds creaminess, and mango salsa brings sweetness and tang. Finally, use fresh cilantro for a burst of flavor. Serve lime wedges on the side for a zesty finish. This combination of ingredients makes for a quick and tasty meal. For more detailed cooking steps, check out the Full Recipe. - In a medium bowl, combine the shrimp with 2 tablespoons of olive oil. - Add 1 teaspoon of paprika, 1 teaspoon of cumin, 1/2 teaspoon of garlic powder, salt, and pepper to taste. - Toss until the shrimp are evenly coated in the spices. This step brings out the flavors. - Heat a large skillet over medium-high heat. - Once hot, add the seasoned shrimp in a single layer. - Cook for 2-3 minutes on one side. They will turn pink and opaque. - Flip the shrimp and cook for another 1-2 minutes until fully cooked. - Remove from heat. The shrimp should be juicy and tender. - While the shrimp cooks, warm 8 small corn tortillas in a separate dry skillet. - Heat them for about 30 seconds on each side until they are pliable. - This step makes it easier to fold the tortillas without tearing them. - Place a few shrimp in the center of each tortilla. - Top with 1 cup of shredded red cabbage, slices of avocado, and a spoonful of mango salsa. - Garnish with fresh cilantro. Serve with lime wedges on the side. - Enjoy the vibrant flavors and colors of your tacos, a true feast for the senses! For the complete recipe, check out the Full Recipe section. To cook shrimp just right, aim for a high heat. A large skillet over medium-high heat works well. Cook the shrimp for 2-3 minutes on one side. They should turn pink and opaque. Then, flip them and cook for 1-2 minutes more. The shrimp are done when they curl into a C shape. For extra flavor, try adding cayenne pepper or chili powder. These spices will give your shrimp a nice kick. Marinating the shrimp is also key. Let them sit in the olive oil and spices for at least 15 minutes. This step helps the flavors soak in. When serving, arrange the tacos neatly on a platter. Stack the tortillas for a fun look. Top each taco with red cabbage for crunch, avocado for creaminess, and mango salsa for sweetness. Fresh cilantro adds a pop of color. Serve with lime wedges for a bright finish. For the full recipe, check the main section above. {{image_2}} You can easily swap shrimp for chicken or fish. Chicken works well with the same spices. Just make sure to cook it fully. For fish, choose a firm type like mahi-mahi or tilapia. Cook it gently so it doesn't fall apart. If you want a vegetarian option, try using grilled vegetables or tofu. These options soak up flavors nicely. They also add great texture and taste to your tacos. For a spicy shrimp taco, add some chili powder or cayenne pepper. This gives your tacos a nice kick. You can also mix in diced jalapeños for added heat. Another fun idea is to add a tropical twist with pineapple salsa. The sweetness of pineapple pairs well with shrimp. It adds a refreshing taste that brightens your meal. You can change up your toppings. Try adding cheese or sour cream for a creamier texture. Both options add richness to the tacos. Seasonal veggies are great too. Use fresh corn in summer or roasted peppers in fall. They give your tacos a fresh burst of color and flavor. To keep your shrimp tacos fresh, store them in an airtight container. Place the tacos in the fridge right after eating. This helps maintain their taste and texture. If you have leftover shrimp, it’s best to store them separately. This way, they won’t make the tortillas soggy. For the shrimp: - Let cooked shrimp cool. - Place them in a sealed container. - Use them within 2-3 days for best flavor. When you want to enjoy your shrimp tacos again, reheating is key. You can use a microwave or a skillet. Microwave: - Place tacos on a microwave-safe plate. - Heat for about 30-45 seconds. - Check if they are warm enough. Skillet: - Heat a skillet on low. - Add tacos and cover. - Warm for about 1-2 minutes on each side. The skillet method keeps the tortillas crispy. So, it’s my favorite way to reheat. If you want to save shrimp for later, freezing is a great option. Here’s how: - Place raw shrimp in a freezer bag. - Remove as much air as possible and seal tightly. - Label the bag with the date and use within 3 months. If you want to freeze assembled tacos: - Wrap each taco in plastic wrap. - Store in a freezer-safe container. - Thaw in the fridge overnight before reheating. This helps preserve flavor and freshness. Enjoy your easy shrimp tacos anytime! Remember to check the [Full Recipe] for more tips. You can make easy shrimp tacos in about 20 minutes. This includes 10 minutes for prep and 10 minutes for cooking. The shrimp cooks fast, so keep an eye on it. Yes, you can use frozen shrimp! Just make sure to thaw it first. To thaw, you can place the shrimp in cold water for about 15-20 minutes. After thawing, pat the shrimp dry before seasoning. This helps the spices stick better. If you don’t have corn tortillas, you can use flour tortillas. Other options include lettuce wraps or even pita bread. Each gives a different taste and texture, so feel free to explore! To make shrimp tacos gluten-free, use corn tortillas. They are naturally gluten-free. Also, check the labels on your ingredients like salsa and spices to ensure they are gluten-free. You can also use lettuce wraps as a fun alternative. For the full recipe, check the recipe section above! These easy shrimp tacos are packed with flavor and fun. You learned how to prepare shrimp, cook it perfectly, and assemble tasty tacos with vibrant toppings. Remember to try different proteins and flavor options for variety. Keep leftovers fresh and know how to reheat them right. Explore alternatives for tortillas and make the dish gluten-free. Enjoy these shrimp tacos at home or share with friends for a delightful meal!](https://toastedrecipes.com/wp-content/uploads/2025/05/f02f1163-5f07-406e-a799-be052925f97b.webp)
Easy Shrimp Tacos Quick and Flavorful Meal Idea
Looking for a quick and tasty meal? These Easy Shrimp Tacos bring vibrant flavors to your table in just a few minutes! With juicy shrimp,
. In this post, we explored how to make delicious Korean BBQ meatballs. We covered key ingredients, from ground beef and pork to flavor enhancers like gochujang. I shared step-by-step instructions for preparing, baking, and making a spicy mayo dip. Remember to mix well and choose the right meat for best results. Try variations based on your taste, and store leftovers properly. Enjoy these meatballs with your favorite sides for a tasty meal!](https://toastedrecipes.com/wp-content/uploads/2025/05/598aba45-0438-44ce-8981-7d7e0f9aefc4.webp)
Korean BBQ Meatballs with Spicy Mayo Dip Delight
Are you ready to spice up your dinner with a twist? Korean BBQ Meatballs with a creamy Spicy Mayo Dip will do just that! Bursting
![To make this tasty dish, you need just three main items: - 1 lb chicken thighs, cut into bite-sized pieces - 1 cup orange marmalade - 2 tablespoons soy sauce These ingredients work together to create a sweet and tangy flavor. The chicken thighs are juicy and cook quickly, making them perfect for this dish. The orange marmalade adds a bright sweetness, while the soy sauce gives depth and saltiness. You can make your orange chicken even better with a few simple garnishes: - Sliced green onions - Toasted sesame seeds These garnishes add crunch and color. They also enhance the dish's flavor. For the best look, sprinkle them on just before serving. For the full recipe, check out the detailed instructions in the Simple 3 Ingredient Orange Chicken section. This dish is easy to make and sure to impress! First, I start by making the sauce. In a mixing bowl, I combine 1 cup of orange marmalade with 2 tablespoons of soy sauce. I stir well until the mixture is smooth and evenly mixed. This sauce will give the chicken a sweet and tangy flavor. Next, I prepare the chicken. I cut 1 pound of chicken thighs into bite-sized pieces. This size helps the chicken cook evenly and absorb the sauce better. Now, I heat a large skillet over medium-high heat. Once hot, I add the chicken pieces to the pan. I cook them for about 6-8 minutes. I want them to get a nice golden-brown color. This browning adds flavor and makes the dish look appealing. After the chicken is browned, I pour the orange sauce over it. I stir the chicken to coat every piece evenly. I reduce the heat to medium and let it cook for 3-5 more minutes. This step helps the sauce thicken and stick to the chicken, making it extra tasty. Once the chicken is done, I remove it from heat and let it sit for a minute. This helps the sauce stick better to the chicken pieces. For plating, I like to serve the orange chicken over a bed of steamed rice or fluffy quinoa. I often garnish it with sliced green onions or toasted sesame seeds. These add flavor and make the dish look beautiful. For the full recipe, check the details above. Enjoy your cooking! - How to avoid overcooking chicken: To keep chicken juicy, use chicken thighs. Cook on medium-high heat. Check for doneness after about 6-8 minutes. The chicken should be golden brown and firm. If you cut a piece, the juice should run clear, not pink. - Tips for thickening the sauce: If your sauce is too thin, simmer it longer. This reduces the liquid. You can also add a cornstarch slurry. Mix one tablespoon of cornstarch with two tablespoons of water. Stir it into the sauce and cook for a few minutes. This will give it a nice, thick texture. - Best side dishes to pair with orange chicken: Serve your orange chicken with steamed rice. Fluffy quinoa is another great choice. You can also add stir-fried vegetables for color and crunch. Broccoli or bell peppers work well. - How to make the dish visually appealing: Presentation matters! Serve your chicken over a bed of rice. Garnish with sliced green onions or toasted sesame seeds. A sprinkle of these toppings adds color and texture. It makes your dish pop and look gourmet. For added flair, use a nice plate to serve. {{image_2}} You can change up the protein in this dish. Instead of chicken thighs, try chicken breast. You can also use shrimp or tofu for a fun twist. Both options cook quickly and absorb flavor well. For fruit preserves, orange marmalade is a classic choice. But you can use apricot or peach preserves as well. These swaps give the dish a new taste. Experiment with what you like best. Adding spices can elevate your meal. A pinch of garlic powder or ginger gives it a nice kick. You can also try adding red pepper flakes for some heat. Fresh herbs like cilantro or basil can brighten the dish. Incorporating vegetables can add nutrition and color. Bell peppers, broccoli, or snap peas work great. Toss them in the skillet with the chicken. They cook fast and blend well with the orange sauce. Using these tips can make your meal even better. For the full recipe, check out the [Full Recipe]. To store your leftover orange chicken, place it in an airtight container. Make sure the dish is cooled down to room temperature before sealing. This helps keep the chicken fresh. You can store it in the fridge for up to three days. After that, the flavor and texture may change. When you’re ready to enjoy the leftovers, heat them gently. The best method is using a skillet over medium heat. Add a splash of water or extra soy sauce to keep it moist. This way, the chicken won’t dry out. You can also reheat it in the microwave, but cover it to avoid splatters. If you want to save some for later, freezing is a great option. Just place the cooled chicken in a freezer-safe bag. Be sure to remove as much air as possible before sealing. It can last in the freezer for up to three months. When you’re ready to eat, thaw it overnight in the fridge before reheating. Check out the Full Recipe for more details on making this tasty meal! How do I make the sauce thicker? To thicken the sauce, cook it longer. As you simmer, it will reduce and become thicker. You can also add a cornstarch slurry. Mix one tablespoon of cornstarch with two tablespoons of cold water. Stir it into the sauce while it simmers until it thickens. Can I use other types of chicken cuts? Yes, you can use chicken breast or drumsticks. Just adjust the cooking time. Thighs are juicy, but other cuts work too. Ensure all pieces are cooked through and reach a safe temperature of 165°F. What if I don’t have soy sauce? If you lack soy sauce, try using teriyaki sauce or coconut aminos. Both give a similar salty flavor. You can also use a mix of water and salt as a last resort, but it won’t taste the same. How can I spice up the 3 Ingredient Orange Chicken? To add spice, mix in red pepper flakes or sriracha. You can also add ginger or garlic to the sauce for extra flavor. Experiment with these to find your perfect taste. Can I double the recipe for a larger group? Absolutely! Just double all the ingredients. Use a bigger skillet or cook in batches. Ensure the chicken cooks through to keep everyone safe. What’s the best way to ensure my chicken stays juicy? Cook the chicken over medium heat and avoid overcooking it. Chicken thighs stay moist, but check for doneness. Let it rest before serving to keep in the juices. This recipe for orange chicken offers an easy way to enjoy great taste. You learned about the main ingredients, simple cooking steps, and tips for the best results. Experiment with variations to fit your taste. Store any leftovers correctly to keep them fresh. With these pointers, you'll have a delicious meal that impresses everyone. Enjoy every bite of your creation!](https://toastedrecipes.com/wp-content/uploads/2025/05/fdd76d89-23f9-4a78-ad90-9e809dc5fb1d.webp)
Flavorful 3 Ingredient Orange Chicken Recipe Made Easy
Are you ready to whip up a delicious meal with just three simple ingredients? This Flavorful 3 Ingredient Orange Chicken Recipe is easy and quick,

Creamy Smothered Chicken and Rice Comforting Dish
Looking for a dish that warms your heart and fills your belly? Creamy Smothered Chicken and Rice is your answer! In this cozy meal, tender