Dinner
![- 1 pound ground beef - 1 pound Italian sausage, casings removed - 1 cup pepperoni slices - 1 cup diced ham The meat is the star of this casserole. Ground beef and Italian sausage bring rich flavors. I love using pepperoni and diced ham for added taste and texture. You can easily customize the meats based on what you like. Try turkey sausage for a lighter option or mix in some bacon for extra crunch. - 1 medium onion, chopped - 2 cloves garlic, minced - 2 teaspoons Italian seasoning - 1 teaspoon red pepper flakes (optional) Onions and garlic make this dish aromatic and savory. I always choose fresh ingredients for the best flavor. Italian seasoning adds that classic pizza taste. If you like heat, add red pepper flakes for a spicy kick. Adjust these to your taste to create your perfect blend. - 1 can (14 oz) pizza sauce - 1 can (14 oz) diced tomatoes, drained - 2 cups shredded mozzarella cheese - 1 cup shredded cheddar cheese Pizza sauce and diced tomatoes form the base of this casserole's flavor. I like to use both to give it depth. The mozzarella cheese creates a gooey, melty topping. Cheddar cheese adds a sharpness that balances the dish. Feel free to mix in your favorite cheeses for a unique twist. - 4 cups cooked pasta (penne or rotini) - Salt and pepper to taste - Fresh basil for garnish (optional) Pasta is the backbone of this casserole. I prefer penne or rotini because they hold the sauce well. Add salt and pepper to enhance the flavors. Fresh basil on top not only looks great but adds a burst of freshness. You can skip it if you want, but it’s a nice touch. For the full recipe, check out the detailed instructions to create this comforting dish! - Preheat the oven: Start by setting your oven to 375°F (190°C). This helps the casserole cook evenly. - Cook ground beef and Italian sausage: In a large skillet, add 1 pound of ground beef and 1 pound of Italian sausage. Cook over medium heat until it turns brown, about 5-7 minutes. Use a spatula to break the meat into smaller pieces. - Drain fat and add onions and garlic: After cooking, drain the excess fat. Then, stir in 1 chopped onion and 2 minced garlic cloves. Cook these for another 3-4 minutes until the onions are soft and clear. - Mix in remaining meat and sauce ingredients: To the skillet, add 1 cup of pepperoni slices, 1 cup of diced ham, 1 can of pizza sauce, 1 can of diced tomatoes, 2 teaspoons of Italian seasoning, and 1 teaspoon of red pepper flakes if you want some heat. Season with salt and pepper to taste. Let this simmer for about 5 minutes to blend the flavors. - Combine with cooked pasta: In a large bowl, take 4 cups of cooked pasta (penne or rotini work best) and mix it with the meat mixture. Stir gently to coat the pasta well. - Layering in the baking dish: Grease a 9x13 inch baking dish. Place half of the pasta and meat mixture in the dish. Sprinkle half of the 2 cups of shredded mozzarella and 1 cup of shredded cheddar cheese over it. Then, add the rest of the pasta and meat mixture on top, followed by the remaining cheese. - Cover and bake: Cover the baking dish with aluminum foil and bake for 20 minutes. This helps keep the moisture in. - Remove foil and continue baking: After 20 minutes, take off the foil. Bake for another 10-15 minutes until the cheese is melted and bubbly. - Cool before serving: Once baked, let the casserole cool for a few minutes. This makes it easier to serve. Enjoy your hearty Meat Lovers Pizza Casserole! For the full recipe, check out the detailed instructions above. - Browning meat properly: Start by heating your skillet over medium heat. Add the ground beef and Italian sausage. Cook them until they turn brown. This step adds a rich flavor to your casserole. Make sure to break the meat into small pieces with your spatula. - Enhancing sauce with spices: To boost the sauce, add Italian seasoning and red pepper flakes. The Italian seasoning brings warmth, while the red pepper flakes add a kick. Don't forget to season with salt and pepper. Taste as you go to find the right balance. - Tips for cheesy goodness: Use a mix of mozzarella and cheddar cheese. This combo creates a great texture and flavor. Layer half the cheese in the middle of the casserole. Then, add the rest on top for an extra cheesy finish. - Garnishing with fresh basil: Fresh basil adds a pop of color and fresh taste. Just sprinkle some leaves on top before serving. It makes the dish look appealing and adds a nice flavor. - Pairing with side dishes: A simple side salad pairs well with this casserole. The freshness of the salad contrasts nicely with the rich flavors. You could also serve it with garlic bread for a complete meal. - Serving in stylish dishware: Use a bright, colorful dish to serve your casserole. A nice baking dish can make the meal feel special. Consider using a deep dish to highlight the layers of meat, cheese, and pasta. For more detailed steps on making this delicious casserole, check out the [Full Recipe]. {{image_2}} You can switch out the meats in this casserole. Using turkey or chicken sausage makes it lighter. It still tastes great and keeps that savory flavor. You can also mix in different meats. Try bacon or ground turkey for new flavors. If you want a vegetarian option, use plant-based sausage or mushrooms. They add a nice texture and taste without meat. If you need a gluten-free option, choose gluten-free pasta. Many brands offer tasty choices that work well in this dish. Zucchini noodles are another fun option. They cut carbs but still soak up all that sauce. You can also play with different pasta shapes. Shells, fusilli, or even farfalle can add a unique twist to your casserole. You can make this casserole even better with extra toppings. Add more vegetables like bell peppers, olives, or spinach. They not only boost nutrition but also add color. For cheese, try different blends. A mix of mozzarella and provolone can bring a new flavor. If you like spice, add more red pepper flakes or use hot sausage. Adjusting the heat level lets you create a dish to fit your taste. After enjoying your Meat Lovers Pizza Casserole, let it cool down for about 30 minutes. This step helps keep the texture just right. Once cooled, cover it tightly. You can use plastic wrap or aluminum foil for this. For better storage, place it in a container with a lid. Glass or plastic containers work well and help keep the flavors fresh. When it's time to reheat, you have two main choices: the oven or the microwave. The oven works best for keeping that nice, cheesy crust. Preheat your oven to 350°F (175°C). Place the casserole in an oven-safe dish, cover it with foil, and heat for about 20 minutes. If you're in a hurry, the microwave works too. Just heat it in short bursts, stirring in between to avoid uneven heating. This helps keep the texture from getting too mushy. To freeze your casserole, make sure it is completely cool first. Then, cut it into serving sizes. Wrap each piece in plastic wrap tightly. After wrapping, place them in a freezer bag or container. This method keeps the air out and prevents freezer burn. You can store it in the freezer for up to three months. When you're ready to enjoy, thaw it in the fridge overnight before reheating. Meat Lovers Pizza Casserole lasts about 3 to 4 days in the fridge. Keep it in an airtight container. This helps keep it fresh and tasty. If you want to eat it later, make sure it cools down before putting it away. Yes, you can make this casserole ahead of time. Just prepare it, cover it, and place it in the fridge. You can bake it the next day. This makes it a great choice for busy days or gatherings. You can use turkey or chicken instead of ground beef. They work well and still taste great. If you want a meatless option, try lentils or mushrooms. These options can add flavor without meat. To make a vegan version, use plant-based meat substitutes. You can also add extra veggies like bell peppers and spinach. Replace cheese with vegan cheese or simply skip it. Use a vegan pizza sauce for a complete dish. Yes, you can use other cheeses. Provolone, gouda, or even feta can add different flavors. Mix and match to find your favorite combination. Just remember that the melting quality of the cheese matters for the best texture. This Meat Lovers Pizza Casserole combines hearty meats, tasty veggies, and rich cheese. I provided each step to make crafting your dish easy. Remember, you can tweak ingredients to match your taste. Try different meats or pasta shapes for new flavors. Store any leftovers well, and reheat them for quick meals. This dish is fun to share, whether for family dinner or a get-together. Enjoy your delicious casserole and savor each bite!](https://toastedrecipes.com/wp-content/uploads/2025/05/b3e7e86a-0279-46c0-be01-c7560a357d98.webp)
Savory Meat Lovers Pizza Casserole Easy Comfort Meal
If you love hearty meals packed with flavor, then this Savory Meat Lovers Pizza Casserole is for you! It combines all your favorite pizza toppings
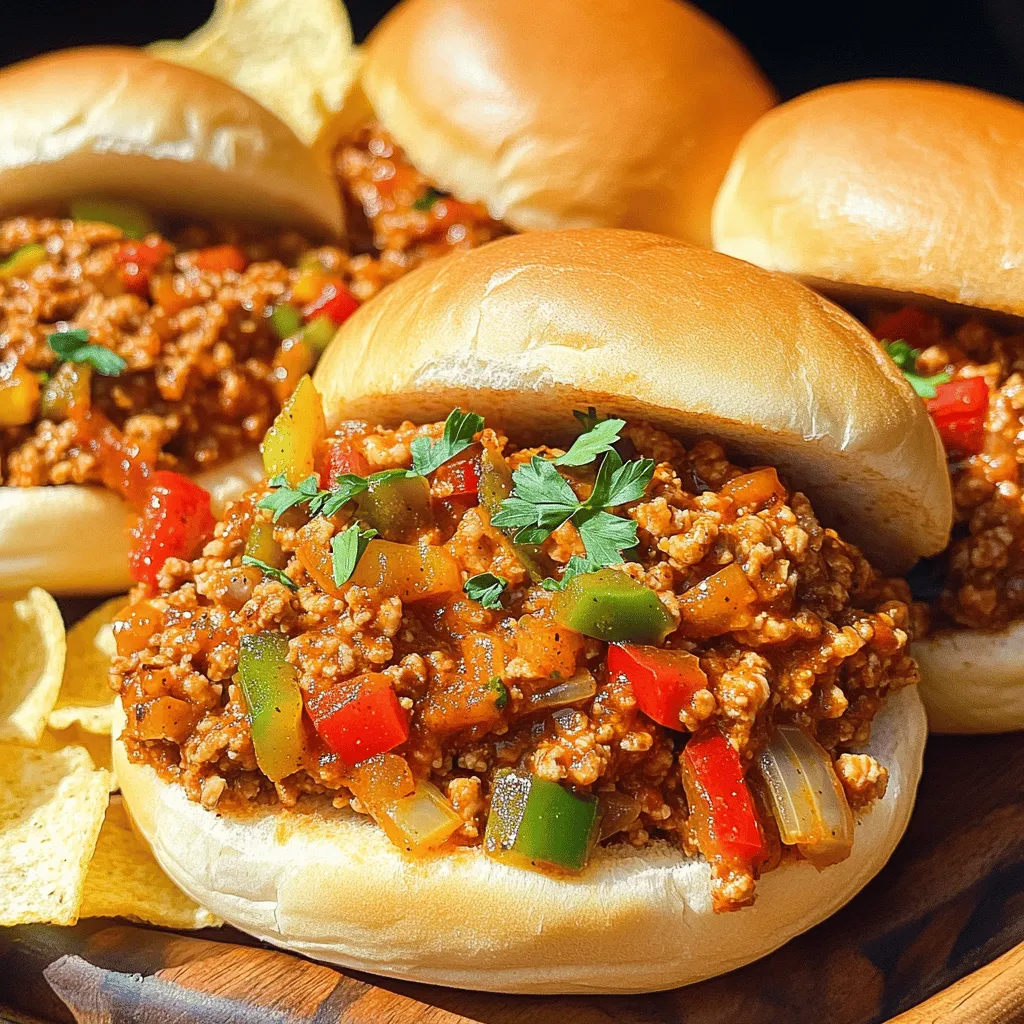
Cajun Chicken Sloppy Joes Flavorful and Easy Recipe
If you’re craving a meal that’s both spicy and satisfying, Cajun Chicken Sloppy Joes are a must-try. This dish packs bold flavors into a quick
. {{image_2}} You can easily switch the shrimp in this dish. Chicken and tofu work well too. If you choose chicken, cut it into bite-sized pieces. Cook it until it's golden brown and fully cooked. This takes about 6-8 minutes. For tofu, use firm or extra-firm. Cut it into cubes and sauté until crispy. This adds a nice texture to the dish. Both options absorb the honey garlic sauce beautifully. If you need a gluten-free option, swap soy sauce with tamari. Tamari has a similar taste but is made without wheat. This makes it safe for those with gluten sensitivities. You won’t lose any flavor in the sauce. It still adds that savory kick, enhancing the shrimp or chicken perfectly. Want to add some heat? Red pepper flakes and Sriracha are great choices. Sprinkle red pepper flakes into the sauce for mild heat. If you love spice, add a teaspoon of Sriracha while cooking. Adjust to your taste. This gives the dish a nice kick while keeping the sweet and savory balance. How Long Will It Last? You can store the honey garlic shrimp and rice bowl in the fridge for up to three days. This allows you to enjoy leftovers without losing freshness. Best Practices for Storing Leftovers To keep your dish tasty, place it in an airtight container. Be sure to let it cool to room temperature before sealing. This helps avoid condensation, which can make the food soggy. Techniques for Reheating without Loss of Flavor When reheating, I recommend using a skillet over medium heat. Add a splash of water or broth to prevent it from drying out. Stir gently for even heating. You can also use the microwave if you cover it with a damp paper towel to trap moisture. Can It Be Frozen? Yes, you can freeze the honey garlic shrimp and rice bowl. It’s a great way to save time for future meals. However, note that the texture of the shrimp may change slightly after freezing. How to Properly Freeze the Dish To freeze, place the cooled dish in a freezer-safe container. Make sure to label it with the date. You can store it for up to three months. When ready to eat, thaw it overnight in the fridge before reheating. For the full recipe, refer to the section above. Enjoy your delicious meals! Yes, you can use frozen shrimp. Just make sure to thaw them first. Place them in cold water for about 15 minutes. This helps them cook evenly. Cook the shrimp as you would fresh ones. They will be just as tasty! You can make this dish healthier by using less honey. Try reducing it to 1 tablespoon. Use low-sodium soy sauce to cut down on salt. Add more veggies, like carrots or snap peas. You can also serve it with brown rice instead of white rice. This adds fiber and nutrients. Many side dishes go well with honey garlic shrimp. Here are some great options: - Steamed green beans - Grilled asparagus - Mixed salad with a light dressing - Fried rice with vegetables These sides will make your meal complete! Enjoy the mix of flavors and colors. For more ideas, check out the Full Recipe. This blog post covered how to make delicious Honey Garlic Shrimp. We explored key ingredients like shrimp, honey, soy sauce, and colorful veggies. You learned step-by-step how to prepare, cook, and serve this dish. I shared tips to help you avoid overcooking and make it your own. Whether you want to switch proteins or go gluten-free, you have options. Enjoy experimenting with flavors! With these ideas, you can create a meal that’s tasty and satisfying.](https://toastedrecipes.com/wp-content/uploads/2025/05/57a1b6e5-dfd0-4a45-b5de-d7845c1b87c1.webp)
20 Minute Honey Garlic Shrimp & Rice Bowl Delight
Craving a quick and delicious meal? This 20-Minute Honey Garlic Shrimp & Rice Bowl is your answer! In just under half an hour, you’ll enjoy
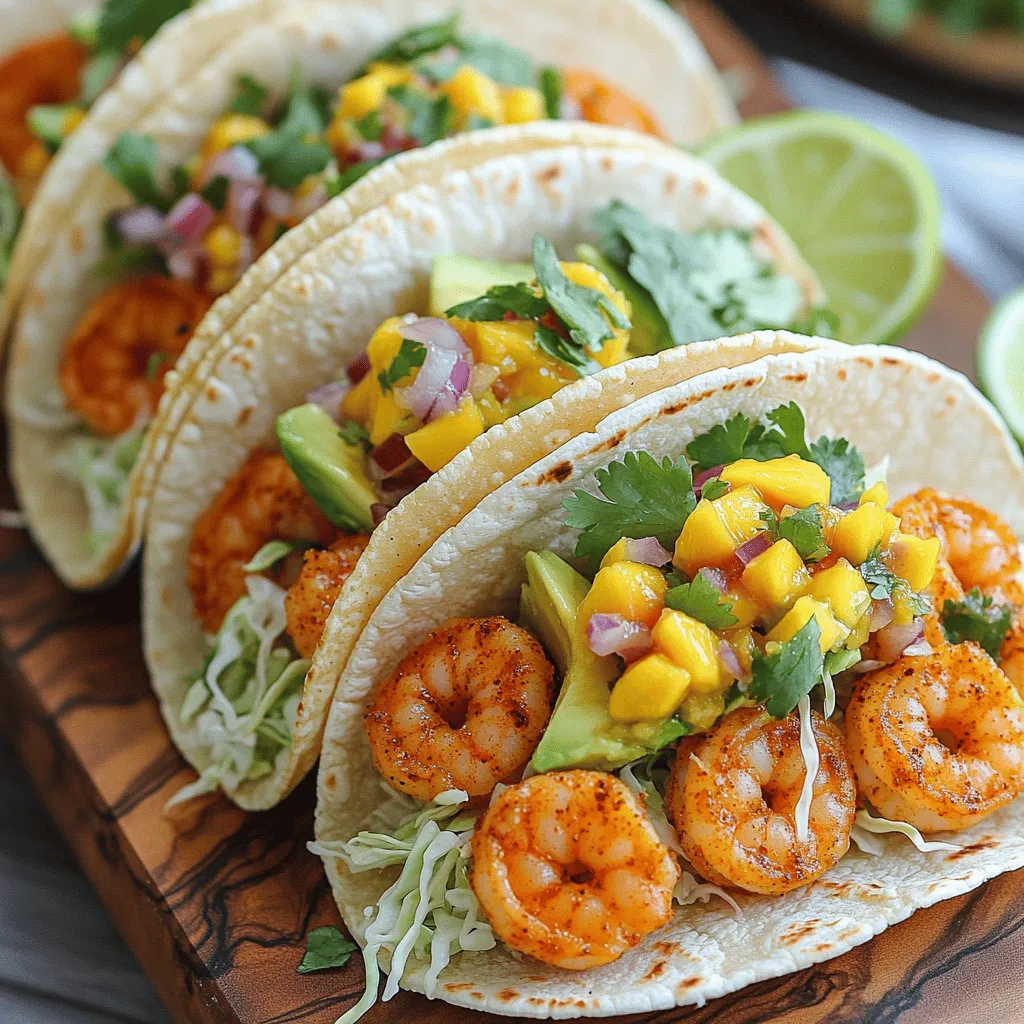
Spicy Shrimp Tacos with Mango Salsa Quick Delight
Craving something fresh and flavorful? Try my Spicy Shrimp Tacos with Mango Salsa! This quick delight combines zesty shrimp, sweet mango salsa, and crunchy toppings
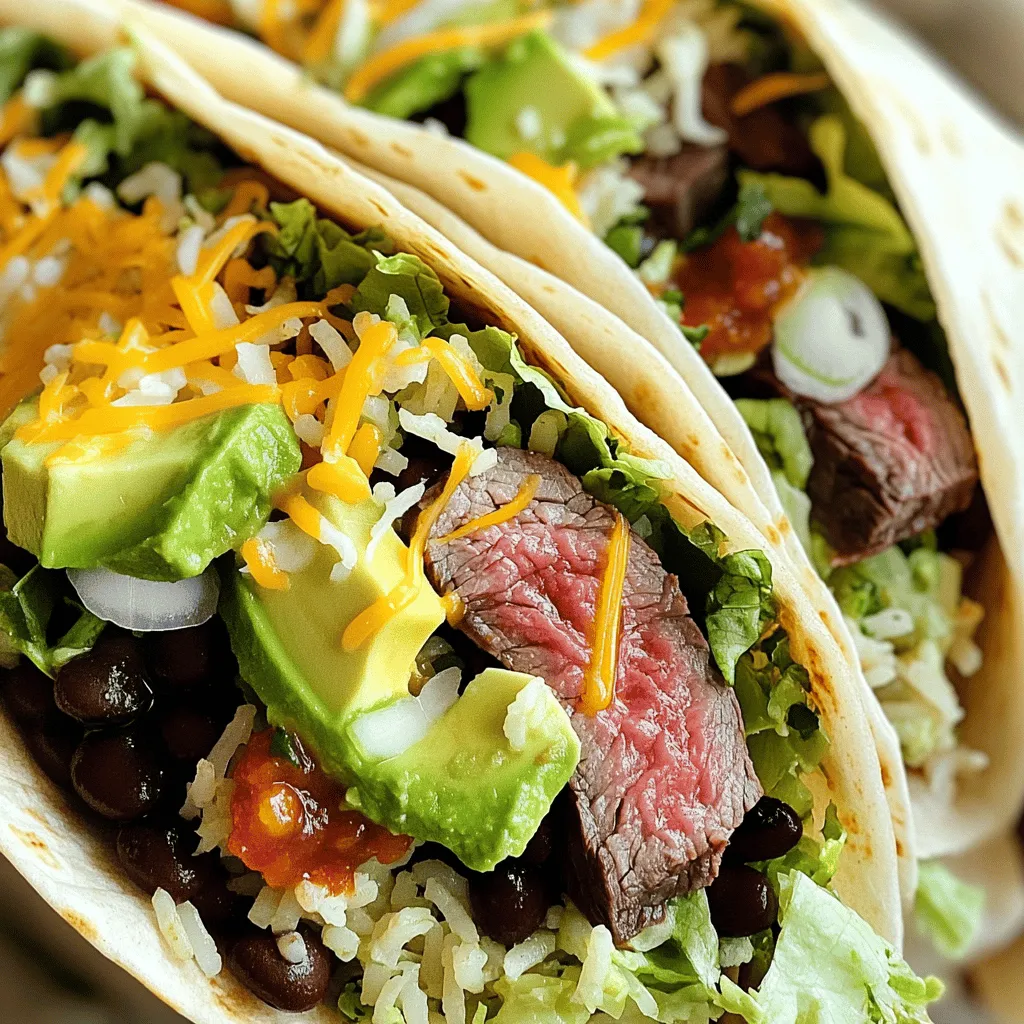
Juicy Steak Burritos Packed with Flavorful Goodness
Are you ready to savor a taste explosion? My Juicy Steak Burritos are not just meals; they’re flavor-packed experiences! In this guide, I’ll walk you
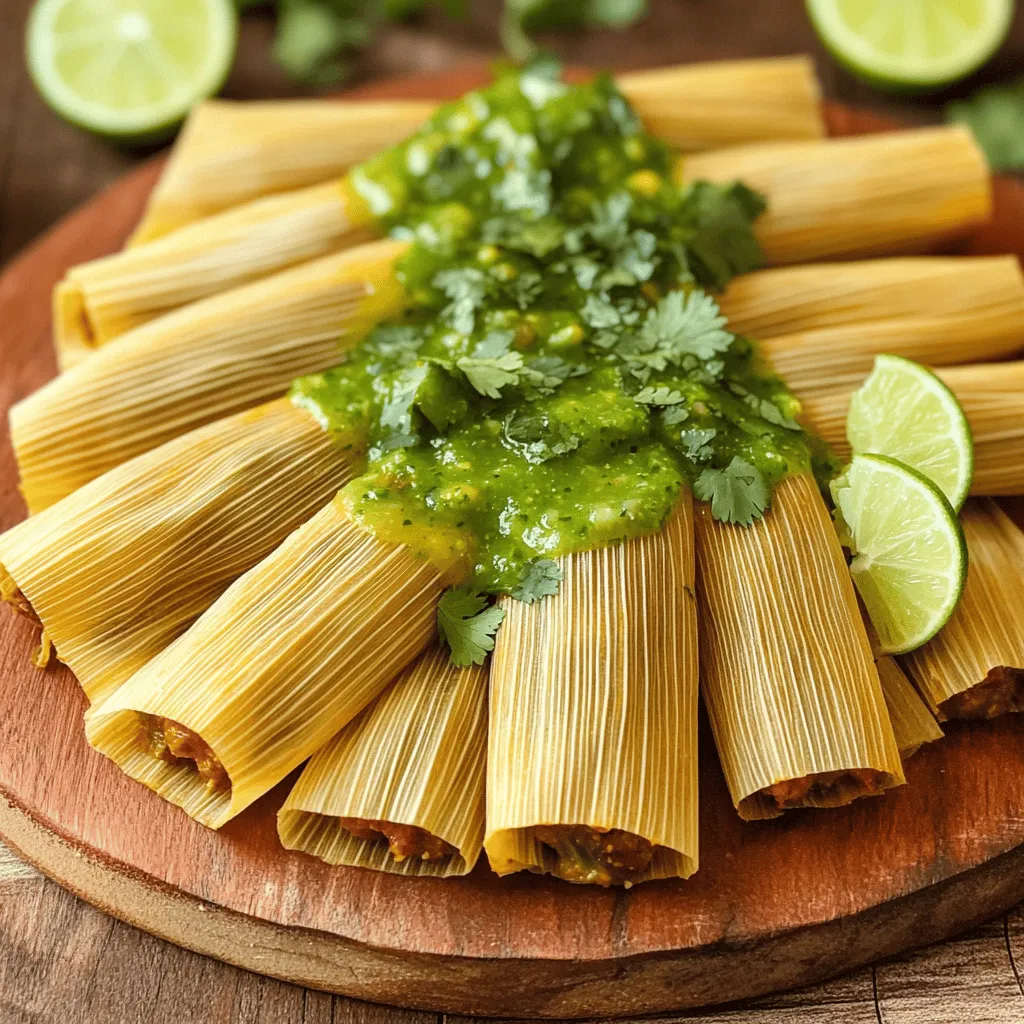
Homemade Mexican Tamales Easy Family-Style Recipe
Are you ready to bring the taste of Mexico into your kitchen? In this easy family-style recipe for homemade Mexican tamales, I will guide you
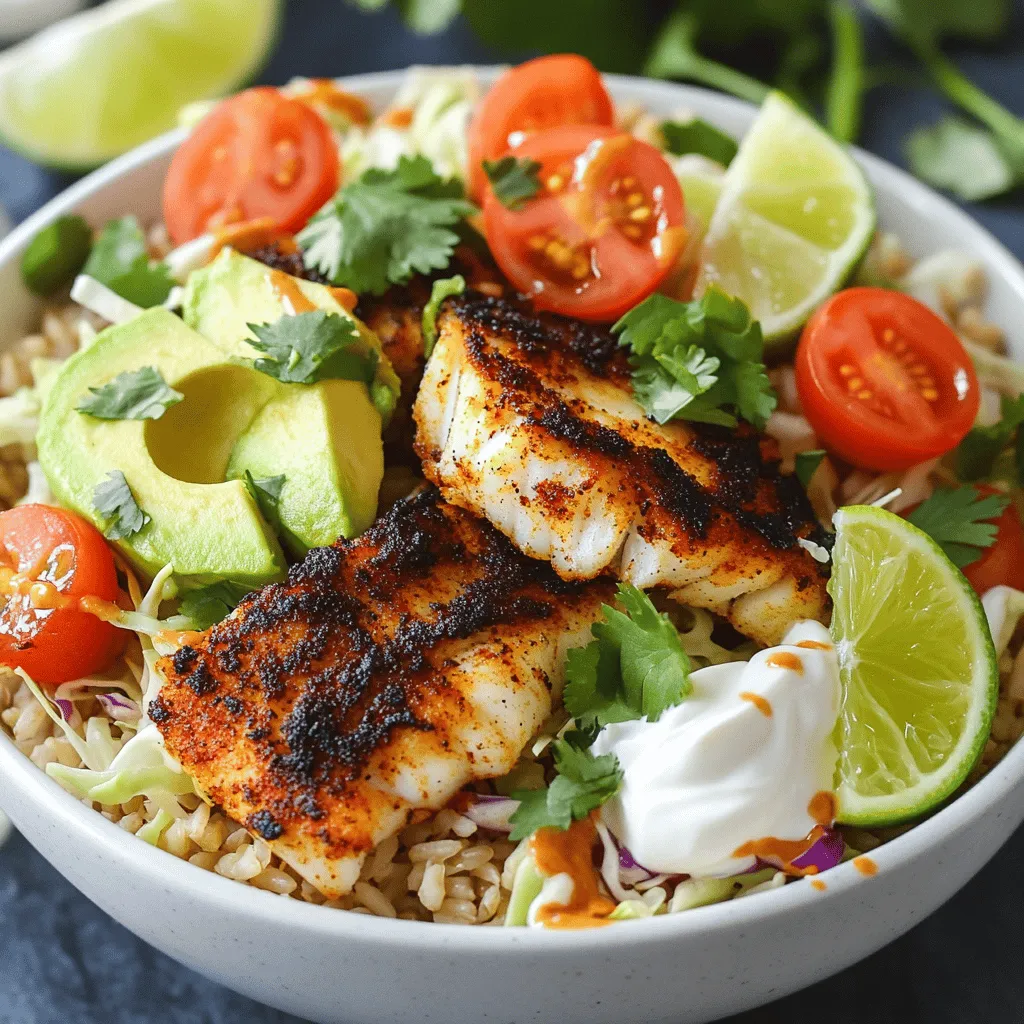
Blackened Fish Taco Bowls Flavorful and Easy Recipe
Looking for a fun and tasty meal? My Blackened Fish Taco Bowls are just what you need! This easy recipe brings bold flavors to your

Spicy Shrimp and Avocado Rice Bowl Delightful Meal
Are you ready to spice up your dinner routine? The Spicy Shrimp and Avocado Rice Bowl is a delicious dish that combines tender shrimp with
. Can I use chicken breast instead of thighs? Yes, you can use chicken breast. However, thighs stay juicier. Breasts may dry out more easily. Adjust cooking time to ensure they reach 165°F. What is the best BBQ sauce for this recipe? Choose a sauce that you enjoy. A sweet and smoky sauce works best. You can even mix two sauces for a unique flavor. How do I ensure my chicken is juicy? Cook the chicken on medium heat. This helps keep it tender. Also, let it rest after cooking. Resting allows the juices to redistribute. Can I make these tacos ahead of time? Yes, you can prep the chicken and sauce in advance. Store them in the fridge. Assemble the tacos just before serving for the best taste. What sides go well with Garlic Butter Honey BBQ Chicken Tacos? Serve with rice, beans, or a fresh salad. These sides balance the flavors. You could also offer chips and salsa for crunch. Can I serve these tacos in a salad form? Absolutely! Start with a bed of greens. Add the chicken and toppings on top. Drizzle with lime juice for a fresh twist. In this blog post, we explored a tasty recipe for Garlic Butter Honey BBQ Chicken Tacos. We covered essential ingredients, cooking steps, and ways to customize your tacos. Remember, you can swap ingredients or adjust the spice level to suit your taste. With simple tips and clever variations, these tacos can fit anyone's diet. Enjoy making these easy and delicious tacos with your family!](https://toastedrecipes.com/wp-content/uploads/2025/05/5759d692-38b3-4adc-847d-4242cb1d05ad.webp)
Garlic Butter Honey BBQ Chicken Tacos Flavor Booster
Craving a burst of flavor? Look no further! My Garlic Butter Honey BBQ Chicken Tacos blend sweet, smoky, and savory elements, creating a dish that’s
![- 1 cup white or brown rice: Use white rice for a softer texture or brown rice for more fiber. - 1 pound ground beef or turkey: Choose turkey for a leaner option or use plant-based crumbles for vegetarian. - 1 tablespoon taco seasoning: You can make your own or use a store-bought mix. - 1 can (15 oz) black beans, drained and rinsed: Beans add protein and fiber. Swap with pinto beans if you prefer. - 1 cup corn kernels (fresh or frozen): Fresh corn gives a sweet crunch, while frozen is convenient and quick. - 1 cup cherry tomatoes, halved: They add sweetness and color. Replace with regular tomatoes if needed. - 1 avocado, diced: For creaminess, use guacamole if you don’t have fresh avocados. - 1 cup shredded cheddar cheese: Cheddar is classic, but you can use any cheese you like. - 1 cup lettuce, chopped: Romaine or iceberg works well. Use spinach for a twist. - 1 cup Doritos, crushed (any flavor): For crunch, try tortilla chips if you want a healthier option. - ½ cup sour cream or Greek yogurt: Both add creaminess; Greek yogurt is a great lower-fat choice. - ¼ cup salsa: Choose your favorite salsa. Fresh salsa adds a nice touch. - 2 tablespoons olive oil: Use any oil you prefer for cooking. - Salt and pepper to taste: Essential for enhancing all flavors in the dish. These ingredients blend together to create a tasty and colorful meal. The key flavors come from the taco seasoning and the crunch from the Doritos. Feel free to mix and match based on your preferences and what you have at home. You can find the full recipe to guide you through making this dish. To cook the rice, start by measuring 1 cup of white or brown rice. Rinse the rice under cold water. This helps remove excess starch. In a medium saucepan, add the rinsed rice and 2 cups of water. Bring it to a boil over high heat. Once boiling, lower the heat and cover the pot. Let it simmer for about 15 minutes for white rice or 40 minutes for brown rice. After cooking, turn off the heat and let it sit for 5 minutes. This resting time helps the rice become fluffy. Fluff the rice with a fork before serving. For the meat, use either 1 pound of ground beef or turkey. Heat 2 tablespoons of olive oil in a skillet over medium heat. Add the meat and break it apart with a spoon. Cook it evenly until it is browned, about 6-8 minutes. Drain any excess fat from the skillet. Then, stir in 1 tablespoon of taco seasoning. Add ¼ cup of water to the meat. Let it simmer for 3-4 minutes until the sauce thickens. This makes the meat more flavorful and moist. Now it’s time to assemble your taco rice bowl! Start with a base of cooked rice in each bowl. Layer the seasoned meat over the rice. Next, add a mixture of 1 can of black beans, 1 cup of corn, halved cherry tomatoes, and diced avocado. This mix adds color and nutrition. Top it with shredded lettuce and 1 cup of cheddar cheese. For extra fun, add a dollop of sour cream or Greek yogurt and a spoonful of salsa. Just before serving, sprinkle crushed Doritos on top for crunch. Serving in vibrant bowls makes it visually appealing. Arrange the toppings in sections for a colorful display. Try this [Full Recipe] to enjoy a tasty taco rice bowl with Doritos! To boost the taste of your Taco Rice Bowl, think about spices and toppings. I recommend using cumin, paprika, and chili powder for extra depth. If you love heat, add jalapeños or a splash of hot sauce. For a milder dish, skip the heat and focus on fresh herbs like cilantro or parsley. A squeeze of lime juice adds brightness and freshness. Prepping your ingredients in advance can save you time. Cook the rice a day before and store it in the fridge. You can also brown the meat ahead of time and keep it in the fridge. If you have leftover proteins or veggies, feel free to use them. Shredded chicken or roasted veggies work great in this bowl. For sides, I recommend crispy tortilla chips or a simple green salad. You can also serve this bowl with a side of guacamole for a creamy touch. If you're planning a party, make mini bowls for guests. Everyone can build their own Taco Rice Bowl for a fun and interactive meal. For meal prep, store each component separately to keep everything fresh. For the full recipe, check out the details above! {{image_2}} You can easily make this dish vegetarian. Just swap out the meat for plant-based proteins. Options like lentils or black bean burgers work great. They add texture and flavor. Add your favorite toppings for a vegetarian twist. Try diced bell peppers, jalapeños, or roasted corn. Fresh cilantro or avocado can bring extra taste. For a gluten-free version, use corn tortillas or rice as your base. These options fit right in with the bowl's flavors. You’ll still get that satisfying crunch! Choose gluten-free taco seasoning for the best taste. Many brands offer this option. Just check the labels to be sure. Get creative and mix in different spices or sauces. Try adding cumin or coriander for a warm flavor. Chipotle sauce can give it a smoky kick. For toppings, think beyond the usual. Add kimchi for a Korean twist or salsa verde for a zesty finish. These small changes can make your Taco Rice Bowl a global dish. For the full recipe, check out the Taco Rice Bowl with Doritos. To keep your Taco Rice Bowl with Doritos fresh, store it in an airtight container. This keeps out air and moisture. Refrigerate your leftovers right after serving. You can safely keep them in the fridge for up to three days. If you want to store it longer, consider freezing. When you reheat your bowl, use the microwave for quick results. Place it in a microwave-safe dish. Cover it with a damp paper towel to keep it moist. Heat for one to two minutes, stirring halfway. You can also use a skillet on low heat. This method helps keep the rice and meat from drying out. Always check that it’s heated to at least 165°F for safety. You can freeze your Taco Rice Bowl before or after cooking. If you freeze it before cooking, assemble the ingredients in a container. This way, you can cook it fresh later. If you freeze it after cooking, let it cool completely first. Use meal prep containers that are safe for freezing. Make sure to label them with the date. This keeps your meals organized and fresh for up to three months. Making a Taco Rice Bowl with Doritos takes about 30 minutes. You need around 15 minutes for prep and another 15 minutes for cooking. This quick time makes it perfect for busy days. Absolutely! You can add heat in a few ways. Use spicy taco seasoning or add diced jalapeños. Hot sauce is another great way to bring the heat. Just drizzle some on top or mix it in the meat. Adjust the spice to your taste and enjoy! If you want a crunch without Doritos, try tortilla chips or crushed corn chips. You can even use pita chips for a different flavor. Just make sure they are crunchy to keep the fun texture. Yes, this recipe is very kid-friendly! Kids usually love the mix of flavors and textures. You can let them pick their toppings, which makes it more fun. Consider using less spicy seasoning and adding cheese and sour cream to appeal to picky eaters. Garnishes can make your dish pop! Use fresh cilantro or chopped green onions for color. Lime wedges add a bright touch and zing. You can also drizzle some extra salsa or sour cream on top for added flavor. Make it look as tasty as it is! This article provided a clear guide to creating a tasty Taco Rice Bowl. We covered essential ingredients, detailed cooking steps, and tips for enhancing flavors. You can easily adapt the dish to fit your diet, whether vegetarian or gluten-free. I shared storage techniques to keep your leftovers fresh. Finally, I answered common questions to make your cooking experience smooth. Now, you have the tools to impress your family and friends with a delicious meal. Enjoy experimenting with your Taco Rice Bowl!](https://toastedrecipes.com/wp-content/uploads/2025/05/8763d560-193f-4749-917a-4be428cabb99.webp)
Taco Rice Bowl with Doritos Easy Flavorful Meal
Are you looking for a fun and tasty meal that’s easy to make? The Taco Rice Bowl with Doritos brings together bold flavors and crunch