Dinner
![- 12 ounces fresh cheese tortellini - 1 cup Italian sausage, crumbled - 1 cup pepperoni slices, halved - 1 cup cooked ground beef - 1 cup mozzarella cheese, shredded To make a hearty Meat Lovers Pizza Tortellini, you need some main ingredients. First, cheese tortellini forms the base of the dish. It offers a chewy texture that pairs well with meat. Next, include crumbled Italian sausage and cooked ground beef for rich flavors. Pepperoni adds a classic pizza taste, while mozzarella cheese gives that gooey finish. - 1/2 cup marinara sauce - 1/2 cup pizza sauce - 1 teaspoon dried Italian herbs (oregano, basil, thyme) - Salt and pepper to taste For the sauce, marinara and pizza sauce blend perfectly. They give the dish a bold, savory flavor. Adding dried Italian herbs enhances the taste. Don't forget to season with salt and pepper to balance the flavors. These ingredients bring the dish together and make it mouthwatering. - Fresh basil for garnish - 1 tablespoon olive oil You can make this dish even better with optional ingredients. Fresh basil adds a pop of color and fresh taste. Drizzling olive oil over the top gives a nice shine and flavor. These little touches can elevate your Meat Lovers Pizza Tortellini to the next level. For the full recipe, check out the details provided. First, bring a large pot of salted water to a boil. Add 12 ounces of fresh cheese tortellini to the water. Cook them until they are al dente, which usually takes about 3 to 5 minutes. Stir occasionally to prevent sticking. Once cooked, drain the tortellini in a colander. Set them aside for later use. Next, grab a large skillet and heat 1 tablespoon of olive oil over medium heat. Once the oil is hot, add 1 cup of crumbled Italian sausage. Cook it until it turns brown and crispy. Then, add 1 cup of cooked ground beef to the skillet. Stir it well and cook for an extra 2 to 3 minutes. This helps combine the flavors. Now, it’s time for the pepperoni. Add 1 cup of halved pepperoni slices to the skillet. Cook for about 2 minutes, letting the pepperoni crisp up. This step adds a nice crunch to the dish. Reduce the heat to low and pour in 1/2 cup of marinara sauce and 1/2 cup of pizza sauce. Stir everything together until well mixed. Season with 1 teaspoon of dried Italian herbs, salt, and pepper to taste. Now, gently fold the cooked tortellini into the meat and sauce mixture. Make sure every tortellini is coated with sauce. Finally, sprinkle 1 cup of shredded mozzarella cheese over the entire mixture. Cover the skillet and let it sit on low heat for about 5 minutes. This allows the cheese to melt perfectly. Once the cheese is melted, stir the mixture gently. Your hearty meat lovers pizza tortellini is ready to serve hot. For a nice touch, you can add fresh basil leaves on top. Enjoy your meal! Check the [Full Recipe] for more details. To cook tortellini perfectly, timing is key. Boil the tortellini for about 2-3 minutes less than the package states. This helps achieve that nice al dente texture. You want them firm but tender. Salting the water is also important. Use a generous amount of salt, like the sea. It flavors the pasta as it cooks. Fresh herbs can really boost the taste of your dish. Try adding fresh basil or parsley. They add brightness that pairs well with meat. Balance is crucial when seasoning your sauce. Taste as you go. If it feels too salty, add a splash of water or more sauce. A touch of sugar can help tame the acidity in tomato-based sauces. When it comes to melting cheese, the skillet works great. It allows for even melting and browning. Just keep the heat low so the cheese melts without burning. If you prefer, you can also use the oven. Spread the mixture in a baking dish, cover with cheese, and bake until bubbly. Be cautious not to overcook the meat. Sausage and beef should be browned but not dried out. Check the meat often, and remove it from heat as soon as it's cooked through. This keeps your dish tasty and juicy. For the full recipe, check out the complete guide. {{image_2}} You can easily switch up the meats in this dish. If you prefer a lighter option, you can substitute turkey or chicken sausage for the Italian sausage. This change reduces fat while keeping the flavor. Ground turkey works great too. For those who want a meat-free meal, consider using plant-based proteins. You can find many tasty options at your grocery store. These alternatives still pack a punch in flavor and texture. Cheese is key to this recipe. Instead of just mozzarella, try using a blend of cheeses. A mix of cheddar and provolone adds depth to each bite. If you're lactose intolerant, don't worry! Look for dairy-free cheese options. Many brands offer great substitutes that melt well and taste delicious. Vegetables add color and nutrition to your dish. Bell peppers and mushrooms work well in this recipe. They bring a nice crunch and flavor. You can also sneak in spinach or kale for extra vitamins. These leafy greens blend well, and you won’t even taste them! Adding vegetables makes your meal more balanced and satisfying. To keep your Meat Lovers Pizza Tortellini fresh, store it in the fridge. Place leftovers in airtight containers. This prevents air from making your dish soggy. Always let the tortellini cool before sealing. This helps avoid condensation inside the container. When reheating, use a skillet for the best texture. Heat it over low to medium heat. Stir occasionally to warm evenly. Avoid using the microwave, as it can make the pasta soggy. If you must use the microwave, cover the dish with a damp paper towel. This helps retain moisture without making it too wet. You can freeze Meat Lovers Pizza Tortellini for future meals. Just let it cool completely before freezing. Use freezer-safe containers or bags to prevent freezer burn. When ready to eat, thaw it in the fridge overnight. Reheat it in a skillet or oven until hot. This keeps the flavors and texture intact. Yes, you can make this dish in advance. To prep, cook the tortellini and meat mixture as usual. After combining them, let the dish cool. Then, store it in an airtight container. You can keep it in the fridge for up to three days. When ready to eat, just reheat it on low heat. You can add many ingredients to change the flavor. Here are some ideas: - Swap the Italian sausage for turkey or chicken sausage. - Add veggies like bell peppers, mushrooms, or spinach. - Mix in different cheeses, like cheddar or provolone. - Use a spicy pizza sauce for extra heat. These options can create a new twist on this classic dish. This dish lasts about three to four days in the fridge. Store it in an airtight container to keep it fresh. Always check for any signs of spoilage before eating. If it looks or smells off, it’s best to throw it away. In this blog post, I shared how to make a delicious Meat Lovers Pizza Tortellini. We covered key ingredients like cheese tortellini, Italian sausage, and their flavorful sauces. I also shared cooking steps, tips for perfect texture, and variations to suit different diets. By following these steps, you can create a tasty meal that's easy to enjoy and customize. With the right ingredients and techniques, your dinner will impress everyone. Enjoy experimenting with this dish and make it your own!](https://toastedrecipes.com/wp-content/uploads/2025/06/5e32b6f7-bee6-4919-b5a1-10227b40c276.webp)
Hearty Meat Lovers Pizza Tortellini Recipe Made Easy
Are you ready to dive into a dish that combines all your favorite pizza flavors with tender cheese tortellini? My Hearty Meat Lovers Pizza Tortellini
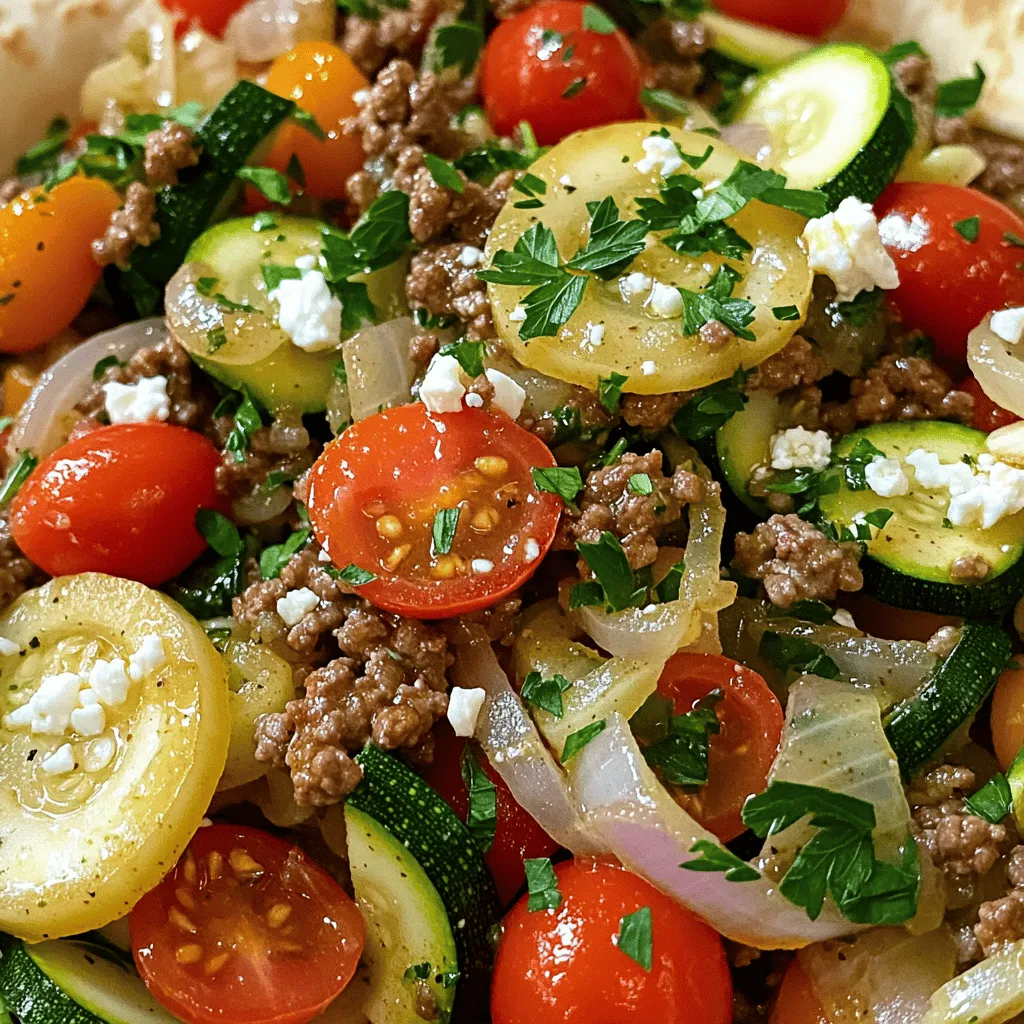
Mediterranean Ground Beef Stir Fry Flavorful and Easy
Welcome to a flavorful adventure with my Mediterranean Ground Beef Stir Fry! This dish is your new go-to for busy nights. Packed with taste and
![- 1 lb chicken breast, cut into bite-sized pieces - 4 tablespoons unsalted butter - 4 cloves garlic, minced - 1 teaspoon dried thyme - 1 teaspoon paprika - Salt and pepper to taste - 8 oz pasta (fettuccine or your choice) - 1 cup heavy cream - 1 cup grated Parmesan cheese - 1/2 cup chicken broth - Fresh parsley, chopped (for garnish) The chicken breast is the star of this dish. It cooks quickly and stays juicy. I love using garlic and butter together for their rich flavor. They make the chicken irresistible. Choose any pasta you like, but fettuccine works best for holding the creamy sauce. - Fresh herbs - Vegetable options You can add fresh herbs like basil or thyme for extra flavor. They bring a nice freshness. You might also want to toss in veggies like spinach or broccoli. They add color and nutrition to the meal. - Importance of precise measurements Using the right amounts of ingredients is key. Too much garlic can overpower the dish, while too little can leave it bland. Measure carefully for the best results. This way, you’ll enjoy the perfect balance of flavors. Always remember, cooking is both an art and a science. For the complete recipe, check out the Full Recipe. To prepare pasta perfectly, start with a large pot of salted water. Bring it to a boil before adding the pasta. Cook according to the package instructions until it is al dente. This means it should be firm but not hard. Drain the pasta and set it aside. Remember to save some pasta water. This water helps adjust your sauce later. To avoid mushy pasta, follow these tips: - Always use plenty of water. - Stir the pasta during cooking to prevent sticking. - Check for doneness a minute before the time on the package. For tender chicken, use a large skillet over medium-high heat. Melt 2 tablespoons of butter in the skillet. Add the chicken pieces that you cut earlier. Season with salt, pepper, thyme, and paprika. Cook the chicken until it turns golden brown and is cooked through. This usually takes about 5-7 minutes. Then, remove the chicken from the skillet and set it aside. To ensure even seasoning, make sure to: - Spread the spices evenly over the chicken. - Avoid overcrowding the pan. This helps the chicken brown better. First, let’s create the garlic butter sauce. In the same skillet, add the remaining 2 tablespoons of butter. Then, add the minced garlic and sauté it for about 1 minute. Watch closely so the garlic does not burn. Next, we create the creamy parmesan sauce. Pour the chicken broth into the skillet, scraping up any browned bits from the bottom. After a minute, stir in the heavy cream. Let it simmer for 2-3 minutes until it thickens a bit. When it comes to the cheese, gradually whisk in the grated Parmesan cheese. Keep stirring until it melts and blends smoothly. If it becomes too thick, add some reserved pasta water to reach your desired consistency. Combine everything by adding the cooked chicken back into the skillet. Toss in the drained pasta as well. Mix until the chicken and pasta are well coated in the creamy sauce. For the complete process, refer to the Full Recipe. To enhance the flavor of your garlic butter chicken bites, consider adding fresh herbs like basil or oregano. These herbs bring a bright and fresh taste. You can also try adding a pinch of red pepper flakes for some heat. Balancing flavors is key. If your dish tastes too rich, add a splash of lemon juice or vinegar. This will cut through the creaminess and brighten the dish. Cooking time is crucial for a great meal. While the pasta cooks, sauté your chicken. This way, you save time and keep everything warm. Aim to cook the chicken for just 5-7 minutes. It should be golden brown and no longer pink inside. Keep an eye on the garlic while making the sauce. Cook it just until fragrant, about one minute. Burnt garlic can ruin the flavor. Timing is everything for perfect doneness. For sides, a simple green salad pairs well with this dish. You can also serve garlic bread to soak up the creamy sauce. For garnish, sprinkle fresh parsley on top right before serving. When it comes to drinks, a glass of white wine like Chardonnay works well. If you prefer non-alcoholic, a sparkling water with lemon is refreshing. For the full recipe, check out the [Full Recipe]. {{image_2}} You can switch the chicken for shrimp or tofu. Shrimp cooks fast, about 3-5 minutes. Tofu needs a bit longer, around 7-10 minutes. Just ensure it gets nice and crispy. Adjust your cooking times based on what you choose. Both options give you great flavors! Feel free to use gluten-free or whole grain pasta. Both options work well and add unique textures. Gluten-free pasta can cook faster, so watch it closely. Whole grain pasta has a nutty taste that complements the dish nicely. Adjust your boiling time based on the type of pasta you pick. If you're looking for dairy-free options, try coconut milk or cashew cream instead of heavy cream. These alternatives keep the sauce creamy and rich. You can also mix in different cheeses for fun flavors. Try cheddar, gouda, or even a spicy pepper jack for a kick. Each cheese brings something special to the dish! For the full recipe, check out the complete guide on Garlic Butter Chicken Bites with Savory Creamy Parmesan Pasta. To store leftovers, place the garlic butter chicken bites and creamy pasta in an airtight container. Keep it in the fridge right after it cools down. This helps prevent bacteria growth. It can stay fresh for 3 to 4 days. Always check for any off smells or changes in texture before eating. You can freeze the leftovers if you want to keep them longer. First, cool the dish completely. Then, place it in a freezer-safe container. Be sure to label it with the date. It will last for up to 3 months in the freezer. When you are ready to eat, thaw it in the fridge overnight. This keeps the texture nice when you reheat it. For reheating, you can use the microwave or stovetop. In the microwave, heat it in short bursts. Stir it every minute to avoid hot spots. On the stovetop, add a splash of chicken broth or cream. Heat it over low heat while stirring. This helps keep the creaminess intact. Enjoy your meal just as delicious as when it was fresh! What to do if the sauce is too thick? If your sauce is too thick, don't worry. Just add a splash of the reserved pasta water. This water helps loosen the sauce without losing flavor. Stir it in slowly until you reach your desired consistency. How to fix overcooked chicken? If your chicken is overcooked, you can try to salvage it. Slice the chicken into smaller pieces. Then, add it back to the creamy sauce. This will help moisten the chicken. The sauce will add flavor and make it more enjoyable. Can I prepare this dish ahead of time? Yes, you can prepare parts of this dish ahead of time. Cook the chicken and pasta earlier in the day. Store them separately in the fridge. When ready to eat, just heat everything up and combine with the sauce. What’s the best way to ensure the chicken stays juicy? To keep your chicken juicy, use a meat thermometer. Cook it to 165°F. Avoid cooking it too long, as this makes it dry. Also, let the chicken rest for a few minutes before cutting. This keeps the juices inside. Is this recipe suitable for meal prep? Absolutely! This recipe works well for meal prep. You can divide the chicken and pasta into containers. It stores well in the fridge for up to three days. Just add a bit of water when reheating to keep it creamy. What are the nutritional aspects of the dish? This dish provides protein from the chicken and carbs from the pasta. The heavy cream and cheese add richness and flavor but also calories. For a lighter option, consider using less cream or substituting with yogurt. Check the Full Recipe for more details on serving sizes and calories. This blog post covered all you need to make a delicious chicken pasta dish. We talked about key ingredients like chicken breast and garlic butter. I shared cooking tips and steps to make it all come together. You can swap proteins or adjust sauces to fit your taste. With these guidelines, you can create meals that impress. Enjoy experimenting in your kitchen! Delicious meals await you.](https://toastedrecipes.com/wp-content/uploads/2025/06/784dbba3-8a54-4679-bfc3-a7a37df92d81.webp)
Garlic Butter Chicken Bites with Creamy Pasta Delight
If you crave a cozy, flavorful meal, then you’ve found it! My Garlic Butter Chicken Bites paired with Savory Creamy Parmesan Pasta will delight your
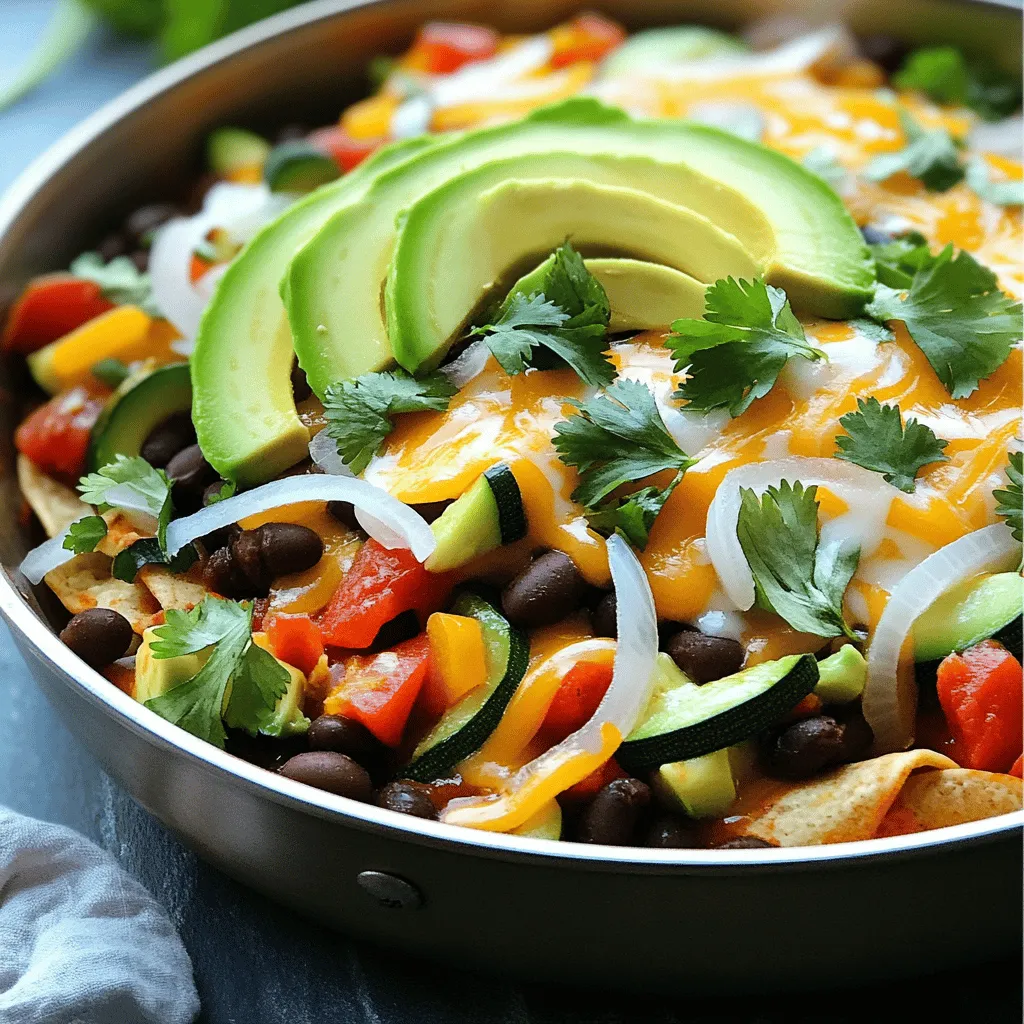
Healthy Enchilada Skillet Quick and Easy Recipe
Looking for a quick and healthy dinner? This Healthy Enchilada Skillet recipe is here to save the day! Packed with veggies, beans, and wholesome grains,
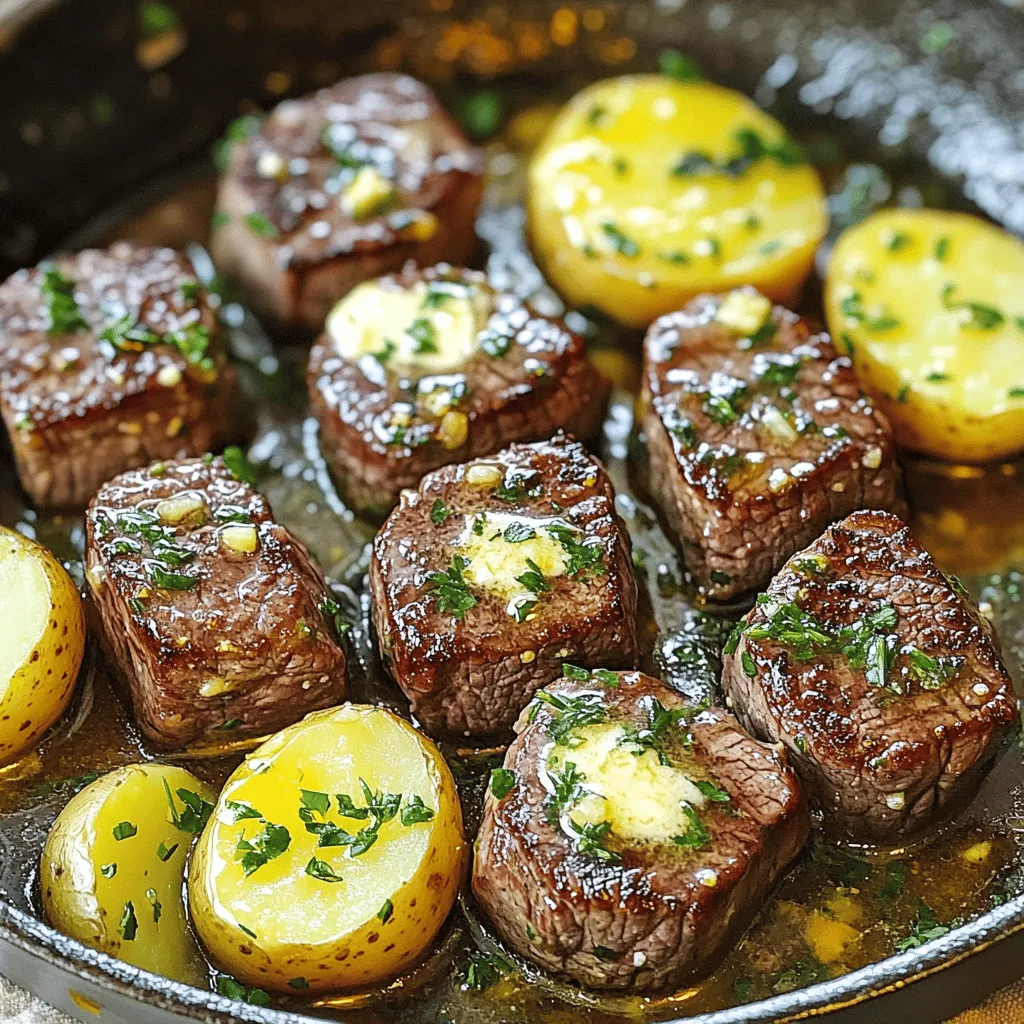
Garlic Butter Steak Bites and Potatoes Tasty Delight
Want a quick and tasty dinner that will impress everyone? Try my Garlic Butter Steak Bites and Potatoes—it’s full of flavor and easy to make!
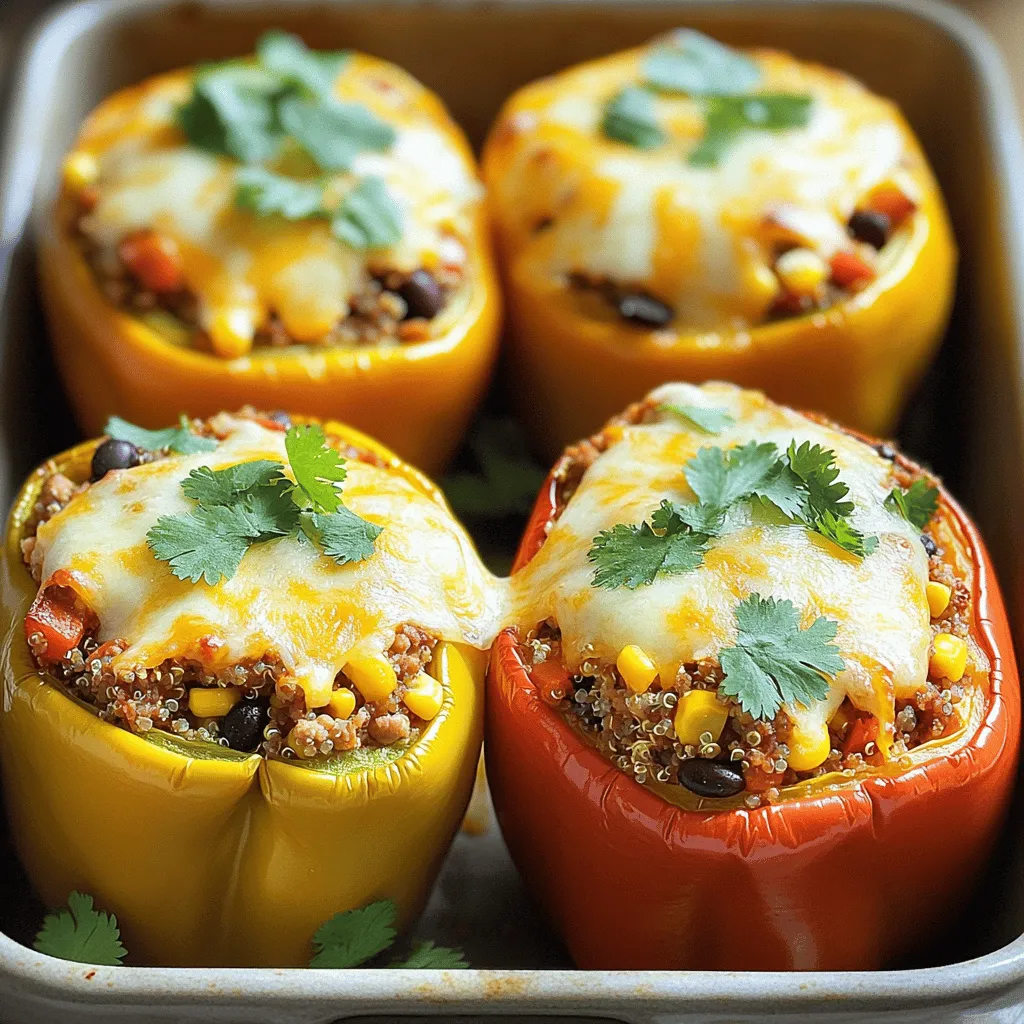
Classic Stuffed Peppers Delight Flavorful Family Meal
Looking for a tasty, family-friendly meal? Look no further than classic stuffed peppers! Bursting with flavor, these colorful bell peppers come filled with a hearty
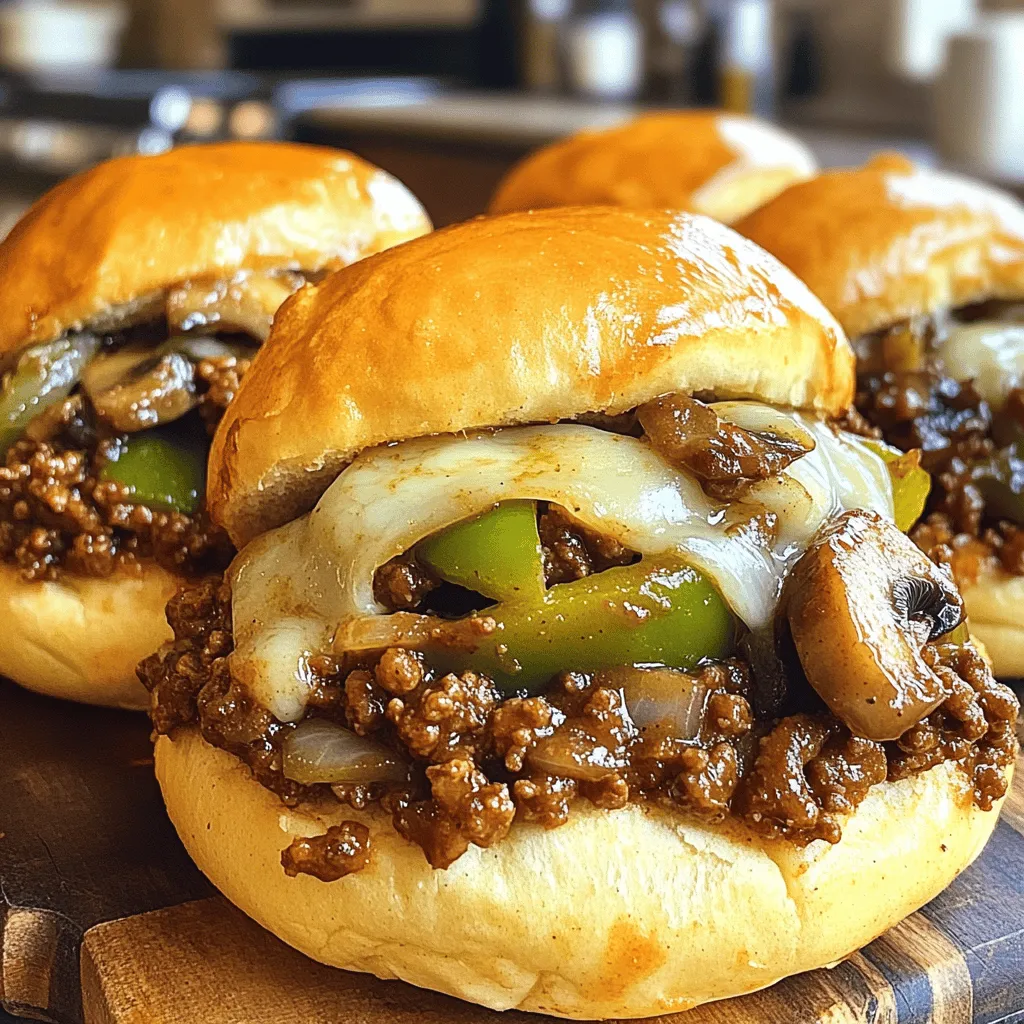
Philly Cheesesteak Sloppy Joes Flavorful and Easy Meal
If you crave a tasty twist on a classic, Philly Cheesesteak Sloppy Joes are for you! This meal blends the rich, savory flavors of Philly
![- Ground beef or ground turkey - Aromatics: garlic and ginger - Sauces and pastes: soy sauce, brown sugar, sesame oil, gochujang For this dish, you want flavorful meat. I often use ground beef, but ground turkey works well too. Both choices give you a tasty base. The key aromatics, garlic and ginger, add a fragrant punch to your meal. Next, we have the sauces. Soy sauce brings saltiness, while brown sugar adds a hint of sweetness. Sesame oil offers a nutty depth, and gochujang gives a spicy kick. Together, they create a rich sauce that coats the meat perfectly. - Green onions - Shredded carrots - Cucumber and radishes for garnish Fresh ingredients add color and crunch. I like to use green onions for their mild flavor. Shredded carrots not only look great but also add some sweetness. For garnish, cucumber and radishes give a refreshing bite that balances the rich beef. - White rice - Brown rice Rice is the perfect base for your Korean Ground Beef Bowl. White rice is soft and fluffy, while brown rice offers a chewier texture and more nutrients. Choose the one you prefer or have on hand. Either option works well with the savory beef and fresh toppings. You can find the full recipe to make this delicious meal easily. - First, heat a large skillet over medium heat. - Add 1 lb of ground beef. Cook until it starts to brown. - Break it apart with a spatula for about 5-7 minutes. - Then, add 3 cloves of minced garlic and 1 tablespoon of grated ginger. - Cook for 2 more minutes until fragrant. - Now, stir in 3 tablespoons of soy sauce. - Add 2 tablespoons of brown sugar, 1 tablespoon of sesame oil, and 1 tablespoon of gochujang. - Mix well until the beef is fully coated. - Simmer for another 3-4 minutes to enhance the flavors. - Remove from heat and add half of the chopped green onions. - Stir in 2 teaspoons of sesame seeds. - Serve by scooping cooked rice into bowls. - Top with the Korean ground beef mixture. - Add shredded carrots and cucumber slices on the side. - Garnish with the rest of the green onions and sliced radishes. This Korean Ground Beef Bowl is a tasty and colorful meal. Don't forget to check out the Full Recipe for any additional tips! Choosing the right ground meat is key. I love using ground beef for its rich flavor, but ground turkey works too. It’s leaner and still tasty. Look for meat with some fat for better taste. For cooking, start by preheating your skillet. Use medium heat to brown the beef. Break it apart with a spatula. This helps it cook evenly. The meat should be brown and crumbly in about 5 to 7 minutes. To boost flavor, add extra spices. Try garlic powder or onion powder for more depth. You can also mix in some sesame seeds for crunch. Gochujang is a star ingredient. If you like heat, add more. Start with a little, then taste. Adjust until you find the right spice level for you. Make your bowl look great! Start with a scoop of rice. Then, add the beef on top. Arrange the veggies on the side. This adds color and texture. Garnishing is fun! Use the reserved green onions and sliced radishes. They add freshness and make your bowl pop. A beautiful meal is always more enjoyable to eat. For the full recipe, check out the Korean Ground Beef Bowl. {{image_2}} You can make this meal gluten-free easily. Just swap regular soy sauce for tamari. Tamari is a gluten-free soy sauce alternative that keeps the flavor intact. This small change allows everyone to enjoy the dish. If you want a vegetarian option, try using tofu or tempeh. Both can absorb flavors well. Crumble firm tofu or cube tempeh and cook it just like the ground beef. You will get a tasty meal that fits different diets. Feel free to play with the vegetables in this dish. You can add bell peppers, snap peas, or broccoli. These veggies add color and crunch. They also boost the meal's nutrients. Using different sauces can change the flavor too. Instead of gochujang, try sriracha for more heat. You can also use hoisin sauce for a sweet twist. Mixing sauces gives you a new taste each time you cook. Pair your Korean Ground Beef Bowl with Korean side dishes for a complete meal. Kimchi or pickled vegetables add a nice tangy kick. You can also serve it with a simple salad for freshness. For meal prep or leftovers, pack the beef mixture and rice separately. This keeps everything fresh. You can easily reheat the beef and rice together when you're ready to eat. This method saves time and tastes great! For the complete recipe, check out the [Full Recipe]. To store leftovers, first let the dish cool down. Place the Korean ground beef in an airtight container. You can also store the rice separately. This helps keep the texture fresh. Make sure to use the leftovers within 3 to 4 days. When you are ready to eat, give it a good sniff. If it smells off, it's best to toss it. Freezing is a great option for meal prep. You can freeze the ground beef mixture in portions. Use freezer-safe containers or bags. Label them with the date. You can keep them for up to 3 months. Just remember to cool it completely before freezing. This will help avoid ice crystals that can ruin the texture. When reheating, aim for even heat. The microwave works, but it can make the beef tough. Instead, try using a skillet. Heat the beef over low heat, stirring often. If it seems dry, add a splash of water or soy sauce. This keeps the flavors strong and the texture nice. You can use the microwave for the rice, but cover it to keep it from drying out. To add spice, use more gochujang. You can also mix in a splash of chili oil. For heat, add sliced fresh chilies into the beef mixture. Another option is to sprinkle crushed red pepper flakes on top before serving. Adjusting spice levels is easy. Taste as you go. This helps you find the right heat for your dish. Yes, you can use ground turkey or chicken instead of beef. For a plant-based option, try crumbled tofu or tempeh. Both are great substitutes that soak up flavors well. If you prefer, use pork for a richer taste. Each protein gives a unique twist to the dish. Serve your bowl with simple sides. Steamed broccoli or bok choy adds color and nutrients. Pickled vegetables give a nice crunch. For drinks, try iced green tea or a light beer. These drinks balance the meal's flavors. You can also add a side of kimchi for a traditional touch. To wrap up, making a Korean Ground Beef Bowl is simple and rewarding. You start with ground beef or turkey and tasty aromatics. Adding sweet and savory sauces brings rich flavor. Fresh veggies like green onions and carrots add zing. You also have options for rice, making it flexible for everyone. Remember, feel free to swap ingredients or adjust spice levels to suit your taste. Enjoy this dish, and share your creations with friends and family. It’s a fun meal that makes any day better.](https://toastedrecipes.com/wp-content/uploads/2025/06/920681a3-de49-4dd9-a3b0-a48719cf7bbb.webp)
Korean Ground Beef Bowl Flavorful and Simple Meal
Looking for a quick and tasty meal? You’ll love my Korean Ground Beef Bowl! This dish is packed with bold flavors and comes together in
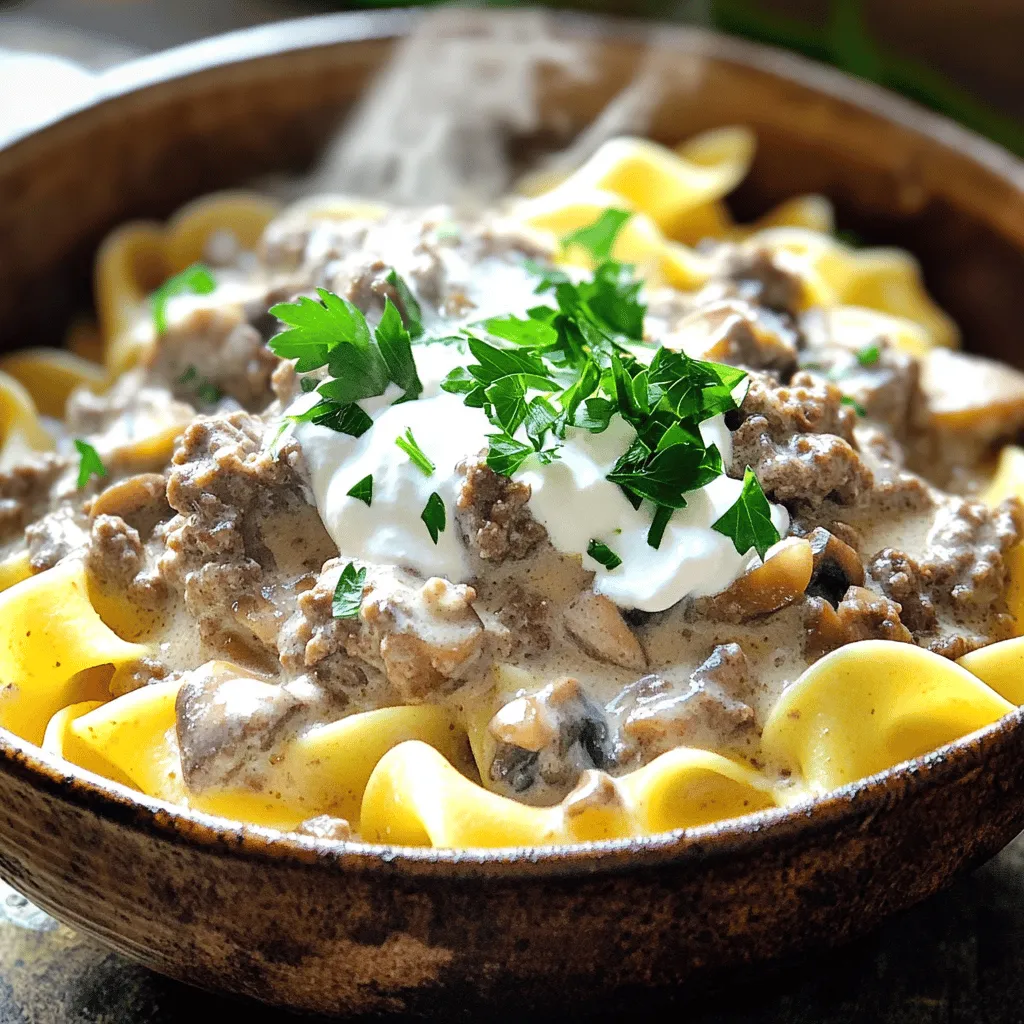
Ground Beef Stroganoff Simple and Tasty Recipe
If you’re craving a warm, hearty meal, Ground Beef Stroganoff is a classic choice. This simple and tasty recipe combines savory beef, fragrant onion, and

Taco Bell Beefy Melt Burrito Simple Recipe Guide
Are you craving the delicious Taco Bell Beefy Melt Burrito? You can make it at home! This simple recipe guide walks you through everything you