Dinner

Here is what you need to make Mexican Street Corn Soup: - 4 ears of fresh corn, husked - 1 tablespoon olive oil - 1 medium onion, chopped - 2 cloves of garlic, minced - 1 bell pepper (red or yellow), diced - 4 cups vegetable broth - 1 cup heavy cream or coconut milk - 1 teaspoon chili powder - 1 teaspoon cumin - Salt and pepper to taste - 1/2 cup cotija cheese, crumbled (or feta as a substitute) - 1/4 cup fresh cilantro, chopped - 1 lime, juiced - Optional toppings: diced avocado, additional cilantro, or hot sauce If you don't have all the ingredients, you can easily swap some out. Here are a few ideas: - Fresh corn can be replaced with frozen corn. Just thaw it first. - Olive oil can be switched for any vegetable oil you have on hand. - Heavy cream works well, but you can use coconut milk for a lighter option. - Cotija cheese adds a nice flavor, but feta cheese is a great alternative. - If you want a dairy-free version, skip the cream and cheese altogether. Toppings can make your soup extra special. Here are some fun additions: - Diced avocado adds creaminess. - More fresh cilantro brightens the dish. - A dash of hot sauce gives it a spicy kick. - You can also sprinkle more cotija cheese or add tortilla strips for crunch. These ingredients and options help create a delicious and fun Mexican Street Corn Soup. Check the Full Recipe for full instructions and enjoy! To start, you want to cut the kernels off the corn cobs. Use a sharp knife to slice down the sides of each cob. Be careful, as this can be tricky. Aim to get all the kernels without missing any. Once done, set the kernels aside. This fresh corn adds a sweet, crisp flavor to your soup. Next, heat a large pot over medium heat. Add one tablespoon of olive oil. Once the oil is hot, toss in the chopped onion and diced bell pepper. Cook these for about five minutes, stirring often. You want them to soften and become fragrant. After this, add two minced garlic cloves, one teaspoon of chili powder, and one teaspoon of cumin. Stir for a minute until you can smell the spices. This step builds a strong base for your soup. Now, it’s time to combine everything. Add the corn kernels and four cups of vegetable broth to the pot. Bring this mix to a boil, then reduce the heat. Let it simmer for 10 to 15 minutes. This allows the flavors to meld beautifully. Once done, use an immersion blender to blend the soup to your desired texture. If you like it chunky, blend only half. Then, stir in one cup of heavy cream or coconut milk. Let it simmer for another five minutes. Season with salt and pepper to taste. Finally, remove the pot from heat and add the juice of one lime and half a cup of crumbled cotija cheese. Mix it well, and your soup is ready! For the complete recipe, check out the Full Recipe section. To boost flavor, add a pinch of smoked paprika. This adds a nice depth. Try roasting the corn before adding it. This brings out its sweet taste. A squeeze of lime brightens the soup. Don’t skip the fresh cilantro; it adds a fresh kick. Always use fresh corn for the best taste. When cutting kernels, hold the cob upright. Cut down the sides with a sharp knife. This keeps the kernels intact. Make sure to sauté the corn and veggies until soft. This helps meld the flavors together. Serve the soup in rustic bowls for a cozy feel. Sprinkle cotija cheese on top for a creamy touch. Add a lime wedge on the side for a pop of color. Garnish with fresh cilantro for a vibrant look. For extra flair, consider adding diced avocado or a drizzle of hot sauce. For the full recipe, check the earlier section. {{image_2}} To make a vegan version of Mexican street corn soup, swap out the heavy cream. Use coconut milk for a creamy texture. This change keeps the soup rich and delicious. You can also replace cotija cheese with a vegan cheese or simply skip it. The flavors will still shine through with the fresh corn, spices, and lime juice. This option is perfect for plant-based eaters. If you love heat, try adding jalapeños or serrano peppers. Sauté them along with the onion and bell pepper. You can also increase the chili powder for more spice. Adding a splash of hot sauce before serving gives the soup an extra kick. The heat balances well with the sweetness of the corn. It creates a warm and vibrant dish that excites the taste buds. To make the soup heartier, consider adding black beans or cooked quinoa. Both options add protein and fiber. You can stir them in after blending the soup. Another choice is to add diced potatoes for extra bulk. If you want a touch of smokiness, toss in some smoked paprika. Each of these add-ins makes the soup more filling and satisfying. For the complete recipe and detailed steps, check out the Full Recipe. After enjoying your delicious Mexican Street Corn Soup, let it cool down. Pour the soup into an airtight container. Make sure to seal it well. Store it in the fridge. It will stay fresh for about 3 to 4 days. If you want to keep it longer, freezing is the best option. To freeze your soup, use freezer-safe containers or bags. Divide the soup into portions. Leave some space at the top of the container. This space allows the soup to expand when it freezes. It’s best to freeze it within 2 hours of cooking. You can keep it frozen for up to 3 months. Just label the container with the date so you know when you made it! When you’re ready to eat your soup, take it out of the fridge or freezer. If frozen, place it in the fridge overnight to thaw. You can reheat it on the stove over medium heat. Stir it often so it heats evenly. If it's too thick, add a little water or broth to thin it out. You can also use the microwave for quick reheating. Just cover the bowl and heat in short bursts, stirring in between. Enjoy your warm soup like it was just made! Mexican Street Corn Soup is a creamy and flavorful dish inspired by elote, a popular Mexican street food. It combines sweet corn, spices, and creamy elements for a rich taste. You will find fresh corn, onion, garlic, and spices like chili powder and cumin in the mix. This soup is warm, comforting, and perfect for any occasion. Yes, you can use frozen corn! It’s a great option if fresh corn is not available. Frozen corn is picked at its peak ripeness, so it still has great flavor. Simply measure out the same amount as fresh corn for this recipe. Cook it in the same way and enjoy the same great taste. Making this recipe gluten-free is simple. All the ingredients in the Mexican Street Corn Soup are gluten-free. Just ensure your vegetable broth is gluten-free. Many brands offer gluten-free broth. With this minor check, you can enjoy a delicious bowl without worry. For the full recipe, you can refer to the details above. This blog post gave you a clear path to making Mexican Street Corn Soup. We covered the key ingredients, helpful substitutions, and tasty toppings. You learned how to prepare and cook the soup, plus tips to boost its flavor. We also explored vegan and spicy variations. Finally, we shared useful storage and reheating tips. Remember, making soup is about having fun and experimenting. Enjoy your cooking journey!
Mexican Street Corn Soup Flavorful and Easy Recipe
Are you ready to savor the rich, smoky taste of Mexican street corn in a warm soup? This Mexican Street Corn Soup is flavorful, easy
- Cooked chicken - Flour tortillas - Black beans - Corn - Red bell pepper - Avocado - Shredded lettuce - Fresh cilantro - Greek yogurt - Lime juice - Chili powder - Salt and pepper The main ingredients make these wraps hearty and full of flavor. I love using cooked chicken because it saves time. You can use any leftover chicken you have. Flour tortillas are my choice, but corn tortillas work too. Black beans add protein and fiber. Corn gives a nice crunch. The red bell pepper brings color and sweetness. Slicing an avocado adds creaminess. Fresh shredded lettuce gives a crisp bite. I always sprinkle fresh cilantro for that bright taste. Greek yogurt serves as a healthy sauce that adds tang. Lime juice brightens everything up and adds zest. Chili powder gives it a warm kick. Don’t forget to season with salt and pepper! - Additional vegetables - Different types of cheese - Various sauces You can make these wraps even better with optional add-ins. Add more veggies like spinach or tomatoes for extra nutrients. Different types of cheese can enhance the taste. Try cheddar or feta for a twist. You can also drizzle your favorite sauce, like hot sauce or ranch, for added flavor. - Salsas and dips - Garnishes like lime wedges Serve your wraps with salsas and dips for a complete meal. I love a fresh tomato salsa or guacamole on the side. They add another layer of flavor. Garnishes like lime wedges not only look good but also let you add more zest when you bite into the wrap. Try these serving ideas to impress your family or friends! For the full recipe, check out the section above. Enjoy making your hearty chicken tortilla wraps! In a large bowl, combine the ingredients. Add the shredded chicken, black beans, corn, and diced red bell pepper. Pour in the lime juice and sprinkle chili powder, salt, and pepper. Mix everything well. Seasoning makes the flavors pop. You want every bite to taste great! To warm your tortillas, heat a dry skillet over medium heat. Place one tortilla in the pan for about 30 seconds, then flip it. This helps make the tortilla soft and easy to wrap. You can use a non-stick pan or a cast-iron skillet. Either works well for this step. Lay your warm tortilla flat on a plate. Spoon the chicken mixture into the center, then add avocado slices and a handful of shredded lettuce. Make sure to balance the filling! Too much filling can make it hard to wrap. You want a good mix of flavors and textures. To wrap it up, fold the sides of the tortilla inward. Then roll it up from the bottom. This keeps the filling inside. For a nice touch, drizzle Greek yogurt over the filling and top with fresh cilantro. Slice the wraps in half and serve them on a platter. Presentation matters! Serve the wraps with salsa or guacamole and garnish with lime wedges. This adds color and freshness to your meal. Enjoy your zesty chicken tortilla wraps! For the full recipe, check out the earlier section. To keep your ingredients fresh, store them separately. Use airtight containers. This prevents wilting and sogginess. Wraps taste best when you use fresh fixings. To avoid sogginess, don't add wet ingredients directly. Instead, use spreads like Greek yogurt. Place veggies and proteins on top. This keeps your wrap intact and tasty. For meal prep, cook chicken and chop veggies in advance. You can store them in the fridge for easy use. This cuts down your prep time on busy days. Quick substitutions for the chicken include canned tuna or beans. You can also use leftover meats. This makes it easy to whip up a meal in no time. Involve kids in preparation by letting them choose toppings. They can also help mix ingredients. This makes cooking fun and engaging for them. To adapt flavors for younger plates, use milder spices. Skip the chili powder or use just a pinch. You can also add cheese or swap in their favorite veggies. {{image_2}} You can easily swap chicken for plant-based proteins like tofu or tempeh. This change keeps the wraps tasty and satisfying. You can also add more vegetables to boost flavor and nutrition. Think about using zucchini, carrots, or bell peppers. Fresh herbs like basil or dill can add a nice touch too. If you love heat, add jalapeños or spicy sauces to your wraps. You can choose how spicy you want it. For a mild kick, use just a few slices of jalapeño. For more heat, try a spicy sauce or hot pepper flakes. Always taste as you go to find your perfect level of spice. Explore different cultural twists on your wraps. You can use sauces and toppings from various cuisines. Try adding tzatziki for a Greek touch or sriracha for a Thai kick. You could even use curry sauce for an Indian vibe. The possibilities are as broad as your taste buds! For more ideas, check the Full Recipe and get inspired to create your unique wraps. To keep your chicken tortilla wraps fresh, refrigerate them within two hours of making. Place them in an airtight container. This helps keep moisture in and prevents them from getting dry. Use containers that stack easily in your fridge. Glass or BPA-free plastic containers work best. If you want to save wraps for later, freezing is a great option. Wrap each tortilla tightly in plastic wrap. Then, place them in a freezer-safe bag. This keeps them safe from freezer burn. When you’re ready to eat, thaw the wraps in the fridge overnight. For quick heating, microwave them for about one minute or until warm. Understanding how long your ingredients last helps you stay safe and delicious. Cooked chicken lasts about three to four days in the fridge. Fresh veggies should be used within a week for the best taste. Always check for best before dates on canned goods. Using fresh ingredients will ensure your wraps are always tasty. Yes, you can make Chicken Tortilla Wraps ahead of time. To do this, prepare the filling and store it in the fridge. Keep your tortillas separate until you’re ready to eat. This way, the tortillas stay fresh and don’t get soggy. When you are ready, warm the tortillas in a skillet. Then, assemble the wraps just before serving. This keeps everything tasty and crisp. If you want alternatives to flour tortillas, there are great options. Try corn tortillas for a gluten-free choice. Whole wheat tortillas add more fiber. You can also use lettuce leaves for a low-carb wrap. For a fun twist, try using pita bread or even crepes. Each option gives a unique taste and texture to your wraps. To make your wraps healthier, focus on fresh ingredients. Use whole wheat tortillas instead of regular ones. Add more veggies like spinach or cucumbers for crunch. Swap regular yogurt for low-fat Greek yogurt. You can also reduce cheese or use lower-fat versions. By making these small changes, you can enjoy a tasty wrap that’s also good for you. To store Tortilla Wraps, wrap them tightly in plastic wrap or foil. This helps keep them fresh. Place the wraps in an airtight container in the fridge. They last about 2 to 3 days. If you want to keep them longer, freeze the wraps. Just be sure to separate each wrap with parchment paper. This makes it easy to thaw them later. You can make delicious chicken tortilla wraps with simple ingredients. Start with cooked chicken, fresh veggies, and tasty toppings. Don’t forget to season well for flavor. Use warm tortillas for the perfect texture. Try different variations, like vegetarian or spicy options. Get creative with storage and meal prep. The wraps can be fun for kids too, letting them join in. Enjoy experimenting to find what you like best!
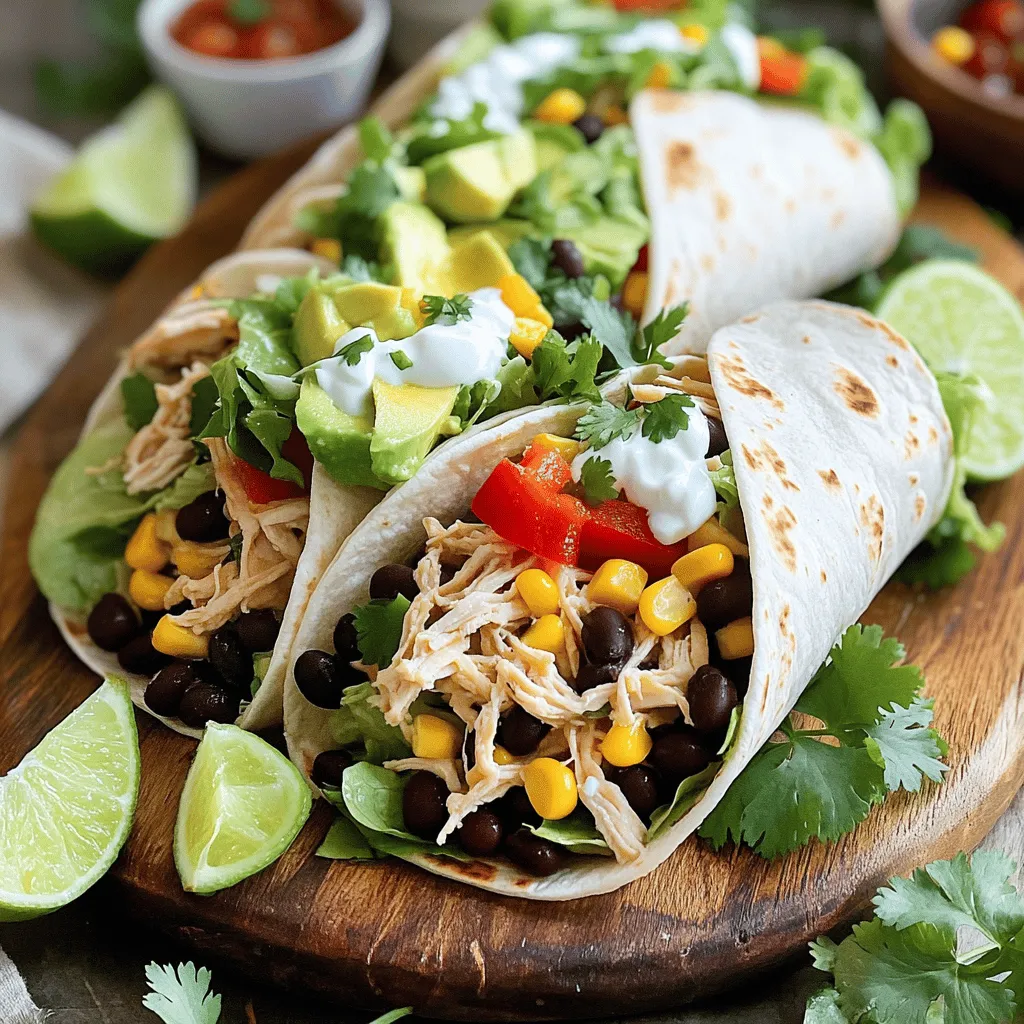
Hearty Chicken Tortilla Wraps Quick and Tasty Meal
Craving a quick and tasty meal? These hearty chicken tortilla wraps pack flavor and nutrition in every bite. With simple ingredients like cooked chicken, black
Cooking tasty Cheesy Bean and Rice Burritos starts with simple ingredients. Here’s what you need: - 1 cup cooked rice (white or brown) - 1 can (15 oz) black beans, rinsed and drained - 1 cup shredded cheddar cheese (or a cheese blend) - 1/2 cup corn kernels (canned or frozen) - 1 small red onion, diced - 2 cloves garlic, minced - 1 teaspoon ground cumin - 1 teaspoon chili powder - Salt and pepper to taste - 4 large flour tortillas - 1/4 cup fresh cilantro, chopped (optional) - 1 avocado, sliced (for serving) - Salsa or hot sauce (for serving) These ingredients come together to create a warm, cheesy, and flavorful dish. The black beans give protein, while the rice adds heartiness. The spices bring great taste, and cheese ties it all together. You can easily adjust these ingredients to fit your taste. If you want a kick, try adding jalapeños or a sprinkle of cayenne. You can find the Full Recipe for step-by-step guidance on how to use these ingredients effectively. 1. Sautéing the aromatics (onion and garlic) Begin by heating a bit of olive oil in a large skillet over medium heat. Add the diced red onion and minced garlic. Cook them for about 3-4 minutes. You want them fragrant and soft. This step builds a great base for flavor. 2. Combining rice and beans Next, stir in the cooked rice, rinsed black beans, and corn. Add ground cumin, chili powder, and salt and pepper. Mix everything well. Cook this mixture for another 5 minutes. This allows the flavors to blend nicely. 3. Folding in cheese and cilantro Remove the skillet from the heat. Fold in half of the shredded cheese and cilantro, if you like. Make sure everything is mixed evenly. The cheese will start to melt from the heat. 1. Laying out tortillas Grab your flour tortillas and lay them flat on a clean surface. This is where the fun begins! 2. Filling and rolling burritos Spoon a generous amount of the bean and rice mixture onto the center of each tortilla. Sprinkle the rest of the cheese on top. Fold in the sides of the tortilla first, then roll it up tightly from the bottom. Tuck it in as you go to keep all the goodness inside. 1. Preheating the skillet Preheat a non-stick skillet or griddle over medium heat. This step is key for getting that perfect crisp. 2. Cooking until crispy Place the burritos seam-side down in the skillet. Cook them for about 2-3 minutes on each side. You want them golden brown and crispy, with the cheese melted inside. After cooking, let them cool for a minute before slicing in half. For the full recipe, make sure to check the detailed instructions. Enjoy your delicious burritos! For a unique twist, try different beans. Pinto or kidney beans work great too. You can even use lentils for a fun change. Each bean adds its own flavor and texture. When it comes to cheese, you have options. Monterey Jack or pepper jack adds a nice kick. For a lighter choice, use a low-fat cheese blend. This keeps your burrito tasty without the extra calories. To get crispy tortillas, heat your skillet well. A non-stick pan works best. Cook the burritos seam-side down first. This seals them and keeps the filling inside. If you have leftover filling, store it in an airtight container. It stays fresh for up to three days. You can use it in salads or as a dip. Just heat it up for a quick meal. Make your burrito meal complete with sides. Serve with a fresh salad or tortilla chips. You can also pair it with a bowl of soup for a cozy touch. For garnishing, sprinkle extra cilantro on top. A slice of avocado adds creaminess. Try drizzling lime juice over the burrito for a zesty kick. These simple touches make a big difference. {{image_2}} You can easily add more veggies to your cheesy bean and rice burritos. Consider bell peppers, zucchini, or spinach. These vegetables boost flavor and nutrition. If you want to keep it vegan, try vegan cheese. Many brands offer great options that melt well. This way, everyone can enjoy a tasty, cheesy burrito. For a heartier meal, add ground meat or tofu. Ground beef or turkey works great. If you prefer plant-based, use crumbled tofu. Both options give you extra protein. You can also try chorizo for a spicy kick. It adds rich flavor and makes each bite exciting. Changing spices can transform your burritos. Try adding smoked paprika, oregano, or taco seasoning for a twist. You can also use different sauces, like enchilada sauce or salsa verde. Each choice brings a new taste. Don’t forget about the influence of different cuisines! A Tex-Mex flair is fun, but you can also explore flavors from other cultures. This creativity keeps your meals fresh and interesting. To store leftovers properly, let the burritos cool first. Wrap each burrito in plastic wrap or foil. Place them in an airtight container. This keeps them fresh and tasty. They stay good in the fridge for about 3 to 4 days. To freeze burritos, wrap each one tightly in foil or plastic wrap. Place them in a freezer-safe bag. They last up to 3 months in the freezer. When you want to eat them, take one out and thaw it in the fridge overnight. To reheat, unwrap the burrito and place it on a plate. Microwave for 1 to 2 minutes, or until hot. You can also bake them at 350°F (175°C) for 15-20 minutes. This makes the tortilla crispy again. Preparing in advance helps save time on busy days. You can make a big batch of the filling and store it in the fridge. Portion it out for easy meals. This way, you can fill and wrap the burritos when you need them. You can also assemble the burritos and then freeze them. This means you have a quick meal ready to go. Just remember to label them with the date. Enjoy your Cheesy Bean and Rice Burritos anytime! For the full recipe, check out the section above. You can easily make burritos without tortillas. Lettuce wraps are a great choice. Use large leaves from romaine or butter lettuce. They are fresh and crunchy. You can also use rice paper wraps. They are thin and great for holding fillings. If you want something more filling, try using thin flatbreads or pita pockets. Each option gives a fun twist to your burrito! Yes, you can make these burritos ahead of time. Prepare the filling as shown in the Full Recipe. Once cooled, store it in an airtight container in the fridge. You can assemble the burritos later. If you want, you can wrap them in foil. This keeps them fresh for about three days. To reheat, just warm them in a skillet or microwave. They make quick meals for busy days! You can add many fun ingredients! Here are some tasty options: - Sliced jalapeños for heat - Diced bell peppers for crunch - Chopped spinach or kale for greens - Sour cream or Greek yogurt for creaminess - Fresh tomatoes or guacamole for extra flavor - Different types of cheese like pepper jack or feta Mix and match to create your perfect burrito! This blog post covered how to make delicious burritos with easy steps. We looked at the ingredients, including rice, beans, and cheese. I shared tips for making them crispy and fun ways to customize your burritos. You can also store or freeze leftovers for future meals. Making burritos is simple and rewarding. With a few tweaks, you can create many tasty dishes. Enjoy your cooking adventures and share your favorite versions with friends!
Cheesy Bean and Rice Burritos Delicious and Easy Meal
Are you ready to whip up a delicious meal that’s quick and easy? Try my Cheesy Bean and Rice Burritos! With just a few simple
When making a calzone, you need a few key ingredients. These will give you that tasty, cheesy delight that everyone loves. Here’s what you need: - 1 batch of pizza dough (store-bought or homemade) - 1 cup ricotta cheese - 1 cup shredded mozzarella cheese - 1/2 cup grated Parmesan cheese - 1/2 cup diced bell peppers (any color) - 1/2 cup chopped spinach (fresh or frozen) - 1/4 cup sliced black olives - 1 teaspoon dried oregano - 1 teaspoon garlic powder - 1/2 teaspoon red pepper flakes (optional for heat) - 1 egg, beaten (for egg wash) - Marinara sauce for dipping I recommend using equal parts ricotta and mozzarella. This mix gives a creamy and stretchy texture. The Parmesan adds a nice salty kick. For veggies, feel free to mix in your favorites. Bell peppers and spinach work well, but you can try others. You can customize your calzone easily. Want meat? Try pepperoni or sausage. Love mushrooms? Toss them in! You can also swap cheeses. Goat cheese or cheddar can change the flavor. Be creative with what you have at home. Preheating the Oven Start by preheating your oven to 425°F (220°C). This ensures your calzone bakes evenly and crisps up nicely. Preparing the Baking Sheet Next, line a baking sheet with parchment paper. This helps prevent sticking and makes cleanup easy. Rolling Out the Pizza Dough On a floured surface, roll out the pizza dough. Aim for a large circle, about 12 inches wide. Make it thin, but not too thin, or it may break. Filling the Dough In a mixing bowl, combine the cheeses and veggies. Use ricotta, mozzarella, Parmesan, bell peppers, spinach, and olives. Add oregano, garlic powder, and red pepper flakes for extra flavor. Mix well until everything is combined. Spoon this mixture onto one half of the dough circle. Leave a small border along the edge for sealing. Sealing the Calzone Carefully fold the other half of the dough over the filling. Press the edges firmly to seal. You can use a fork to crimp the edges. This adds a nice touch and keeps the filling inside. Baking Instructions (Time and Temperature) Place the calzone on the baking sheet. Brush the top with beaten egg for a golden finish. Cut a few small slits on top for steam to escape. Bake for 15-20 minutes until golden brown and bubbly. Let it cool for a few minutes before slicing. Serve it warm with marinara sauce for dipping. Enjoy your cheesy veggie explosion calzone! For the full recipe, check out the detailed instructions above. To make a great calzone, keep a few tips in mind. - Preventing Dough from Sticking: Use enough flour on your work surface. This helps the dough roll out easily. If it sticks, gently lift it and add more flour underneath. You want a smooth surface for rolling. - Tips for Even Baking: Make sure your oven is fully preheated. This step is key for even baking. Place your calzone in the center of the oven. This allows hot air to circulate around it. If you bake too close to the sides, it may cook unevenly. Calzones are fun because you can fill them with many options. - Adding Different Fillings: You can swap in any veggies or meats you like. Try mushrooms, zucchini, or pepperoni. Be creative with flavors! Just remember not to overfill. This keeps them easy to seal and bake. - Vegetarian vs. Meat Options: For a veggie calzone, use ricotta, spinach, and bell peppers. For meat lovers, add sausage or ham. You can mix and match to suit everyone’s taste. {{image_2}} You can make your calzone even more fun with different flavors. Here are two tasty options: - Italian Meat Calzone: Add cooked sausage, pepperoni, or ham to your filling. Mix these meats with ricotta and mozzarella cheese. This gives a hearty taste and a protein boost. - Mediterranean Veggie Calzone: For a lighter choice, use ingredients like feta cheese, zucchini, and sun-dried tomatoes. Add fresh herbs like basil and oregano. This calzone bursts with fresh flavors. Dipping sauces can make your calzone even better. Here are some great options: - Alternative Sauces for Serving: Try ranch dressing, pesto, or garlic butter as dips. Each sauce adds a new twist to your calzone experience. - Homemade Marinara Recipe: You can also make your own sauce. Here’s a quick way: - Ingredients: - 1 can of crushed tomatoes - 1 teaspoon dried oregano - 1 teaspoon garlic powder - Salt and pepper to taste - Instructions: 1. In a pot, combine crushed tomatoes, oregano, and garlic powder. 2. Heat over medium heat for about 10 minutes. 3. Season with salt and pepper. This sauce pairs perfectly with your cheesy veggie explosion calzone. Enjoy the dip! - Storing Leftover Calzones After you enjoy your calzones, let them cool. Place them in an airtight container. You can keep them in the fridge for up to three days. If you want to save space, wrap each calzone in plastic wrap before putting them in the container. This keeps them fresh and tasty. - Best Practices for Reheating When you are ready to eat your leftover calzones, you can reheat them easily. Preheat your oven to 350°F (175°C). Place the calzones on a baking sheet. Heat them for about 10-15 minutes. This helps keep the crust crispy. You can also use a microwave, but the crust may get soft. If you use a microwave, heat in short bursts to avoid overcooking. - How to Freeze Cooked Calzones If you want to save your calzones for later, freezing is a good option. Let the calzones cool completely. Wrap each one in plastic wrap and then in aluminum foil. This double wrap prevents freezer burn. Label them with the date. You can freeze them for up to three months. - Thawing and Cooking Frozen Calzones To enjoy your frozen calzones, take them out of the freezer. Let them thaw in the fridge overnight. If you’re in a hurry, you can thaw them in the microwave using the defrost setting. Once thawed, preheat your oven to 350°F (175°C) and bake for about 15 minutes. Check to make sure they are heated through. You can follow the same steps for cooking directly from frozen but add 10-15 extra minutes to the baking time. For a full recipe of cheesy goodness, check out the [Full Recipe]. How do I know when my calzone is done? You can tell when your calzone is done by its color. It should be golden brown. You can also look for bubbles in the dough. The cheese inside should be melted and hot. To be sure, you can use a food thermometer. The inside should reach 165°F (74°C) for safety. Can I use store-bought pizza dough? Yes, you can use store-bought pizza dough. It saves time and works great. Many people enjoy the taste and texture of store-bought dough. Just make sure to follow the package instructions for rolling and baking. What vegetables work best for calzone filling? Many vegetables suit calzones well. My favorites include bell peppers, spinach, and mushrooms. You can also add onions, zucchini, or even artichokes. Just remember to chop them small. This helps them cook evenly and fit well inside the calzone. What to serve with calzones? Calzones pair well with marinara sauce for dipping. You can also serve a fresh salad on the side. A simple green salad or Caesar salad works great. Garlic bread or cheesy breadsticks can make a tasty addition too. Can calzones be made ahead of time? Yes, you can make calzones ahead of time. Prepare them, then store them in the fridge for up to 24 hours. You can also freeze them for later. Just bake them straight from the freezer, adding a few extra minutes to the cooking time. Enjoy this easy calzone recipe as a simple and delicious meal option. Check out the Full Recipe for more details! Making calzones is fun and tasty. We covered important aspects, like ingredients, baking steps, and tips. Remember, you can customize your calzone with fillings you love. Store leftovers in the fridge or freeze them for later. With the right techniques, you'll enjoy perfect calzones every time. Try different sauces to enhance the flavor. Now, get creative in your kitchen and enjoy your delicious calzones!
Easy Calzone Recipe Simple and Delicious Meal Option
Looking for a simple meal that delights everyone? This easy calzone recipe is your answer! I’ll guide you through tasty ingredients, quick steps, and fun
To make creamy vegan tomato white bean stew, gather these ingredients: - 1 tablespoon olive oil - 1 medium onion, diced - 3 cloves garlic, minced - 2 medium carrots, diced - 1 red bell pepper, diced - 1 can (14 oz) crushed tomatoes - 1 can (15 oz) white beans (cannellini or great northern), drained and rinsed - 2 cups vegetable broth - 1 cup coconut milk (canned for creaminess) - 1 teaspoon dried basil - 1 teaspoon dried oregano - Salt and pepper to taste - Fresh basil leaves for garnish This stew is not just tasty; it’s also good for you. One serving has: - Calories: 250 - Protein: 10g - Carbohydrates: 35g - Dietary Fiber: 8g - Fat: 10g - Sodium: 300mg This dish provides a solid mix of nutrients. The beans add protein and fiber. The veggies bring vitamins and minerals. Coconut milk gives it a rich taste without dairy. You can easily swap ingredients to fit your needs: - Use avocado oil instead of olive oil for a different flavor. - If you don’t have white beans, try black beans or chickpeas. - Use low-sodium vegetable broth for a healthier option. - Omit the coconut milk for a lighter stew. - For gluten-free, ensure your broth is gluten-free. These changes ensure everyone can enjoy this stew. Whether you’re vegan, gluten-free, or just looking for a tasty meal, you can adjust this recipe. You can find the full recipe for creamy vegan tomato white bean stew to guide you through. To make this creamy vegan tomato white bean stew, follow these steps: 1. Heat 1 tablespoon of olive oil in a large pot over medium heat. 2. Add 1 medium diced onion and sauté for 3 to 4 minutes. Wait until it is translucent. 3. Next, stir in 3 minced garlic cloves, 2 diced carrots, and 1 diced red bell pepper. Cook for another 5 to 7 minutes. The veggies should start to soften. 4. Pour in 1 can of crushed tomatoes and 1 can of drained white beans. Add 2 cups of vegetable broth, 1 teaspoon of dried basil, and 1 teaspoon of dried oregano. 5. Mix everything well and bring it to a gentle simmer. Let it cook for 15 minutes. Stir occasionally. 6. After 15 minutes, lower the heat. Stir in 1 cup of coconut milk. Allow it to heat for 5 to 10 minutes. 7. Season with salt and pepper to taste, adjusting as needed. 8. Give the stew a gentle stir and remove it from heat. To get the right texture in your stew, consider these tips: - Make sure to sauté the onion until it is soft. This adds depth to the flavor. - Avoid overcooking the vegetables. They should be tender but not mushy. - Stir in the coconut milk gently to keep the creamy texture. - If you want a thicker stew, mash some of the white beans while cooking. For a quick meal, plan ahead: - Chop all vegetables before starting. This saves time. - Set a timer for each cooking step to stay on track. - While the stew simmers, clean up the kitchen. This keeps your space tidy. - Enjoy this meal in just 35 minutes with prep and cooking combined! For the full recipe and more details, you can refer to the Full Recipe section. To boost the creaminess of your stew, use full-fat coconut milk. This gives a rich flavor. You can also blend a portion of the stew. This method adds a smooth texture. Just scoop out a cup of the stew and blend it until creamy. Stir it back into the pot. Add fresh herbs for a pop of flavor. Try thyme or even a bay leaf. You can also squeeze in some lemon juice for brightness. If you like heat, add a pinch of red pepper flakes. These spices awaken the flavors and make the stew more exciting. One common mistake is cooking the garlic too long. It can burn and taste bitter. Always add garlic after the onions are soft. Another mistake is not seasoning enough. Taste as you go! Adjust salt and pepper to suit your taste. Lastly, don’t skip the coconut milk; it really adds creaminess. For the full recipe, check out the Full Recipe section. {{image_2}} You can easily swap ingredients in this stew. If you don’t have white beans, use chickpeas instead. They add a nice texture and flavor. For a bright twist, try adding zucchini or spinach. These veggies cook quickly and blend well. If you want a different base, swap coconut milk with almond milk. This keeps the stew creamy but light. Herbs and spices can change the whole flavor of the dish. Add a pinch of red pepper flakes for heat. If you love a smoky flavor, include some smoked paprika. Fresh herbs like thyme or parsley also work great. You can even toss in a bay leaf while it simmers. It adds depth to the stew. Experiment and find your favorite mix! Serving this stew can be fun and creative. I love to serve it in deep bowls. Garnish with fresh basil leaves for a pop of color. Crusty bread pairs perfectly and soaks up the stew. Try it with a side salad for a light meal. You can even serve it over rice or quinoa for a heartier option. Each method offers a unique dining experience. For more ideas, check out the Full Recipe. To keep your creamy vegan tomato white bean stew fresh, store it in an airtight container. Make sure the stew cools down before sealing it. This helps prevent moisture build-up. The stew lasts up to five days in the fridge. Always label your container with the date. This way, you know when to use it. Freezing is a great option if you want to save some stew for later. First, let the stew cool completely. Then, pour it into freezer-safe containers. Leave some space at the top for expansion. You can freeze it for up to three months. When you’re ready to eat, thaw it in the fridge overnight before reheating. Reheating is simple! You can use the stove or microwave. If using the stove, pour the stew into a pot. Heat on low and stir often until warm. If you use a microwave, place the stew in a microwave-safe bowl. Heat in short intervals, stirring in between. This ensures even heating and keeps it creamy. Enjoy your delicious meal again! Yes, you can make this stew ahead of time. It tastes even better after sitting for a day. Store it in an airtight container in the fridge. The flavors meld together, making each bite rich and tasty. You can also freeze it for later. Just let it cool, then pour it into freezer-safe bags. When you’re ready, thaw it overnight in the fridge. Reheat on the stove or in the microwave. This stew pairs well with many sides. I recommend crusty bread for dipping. You can also serve it with a fresh salad. A simple green salad with a light vinaigrette works great. If you want more carbs, try it with rice or quinoa. These options add balance and make it a full meal. Absolutely! While white beans are great, feel free to swap them out. You can use black beans, kidney beans, or even chickpeas. Each type changes the flavor a bit, but they all work well. Just make sure to drain and rinse canned beans before adding them to the stew. This keeps the dish fresh and tasty. For the full recipe, check out the detailed steps above! This article covered the key points for making a tasty stew. We explored the right ingredients, nutritional facts, and good substitutions. You learned step-by-step cooking instructions and tips for the best texture. We shared ideas for flavor and common mistakes to avoid. Storage info and reheating guidelines were also important. Always feel free to try new ingredient swaps or serving ideas to make the stew your own. Enjoy making this stew your special way!
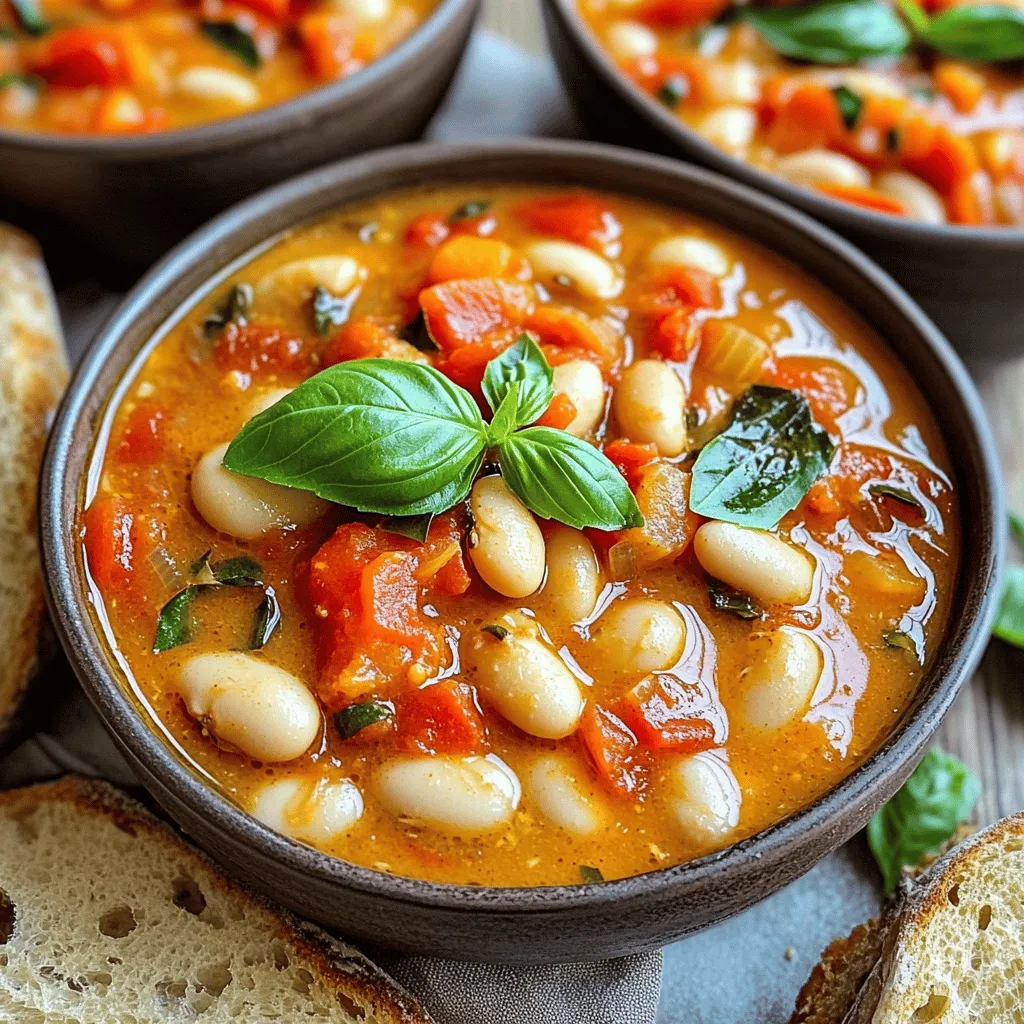
Creamy Vegan Tomato White Bean Stew Recipe Delight
Are you ready to warm up with a delicious bowl of Creamy Vegan Tomato White Bean Stew? This hearty dish combines creamy beans and rich
To make the California Turkey Club Wrap, gather some simple ingredients. This recipe is quick and easy. You can make it in just 10 minutes. It serves four people, making it perfect for a family meal or a quick lunch. - Whole Wheat Tortillas: These tortillas give you fiber and keep you fuller longer. - Turkey Breast: This lean meat is high in protein and very low in fat. - Cheddar Cheese: It adds a creamy taste and calcium for strong bones. - Avocado: This fruit is rich in healthy fats and adds a nice creaminess. - Tomato: Fresh tomatoes provide vitamins and add a juicy flavor. - Romaine Lettuce: This leaf gives a nice crunch and is packed with nutrients. - Mayonnaise: It adds moisture and flavor, making the wrap tasty. - Dijon Mustard: This adds a tangy kick that brightens the wrap. - Lemon Juice: This freshens the taste and balances the flavors. - Salt and Pepper: These simple spices enhance all the flavors. - Jalapeños (optional): They add heat and excitement if you like spicy food. You can customize your wrap by adding some fun extras. Here are a few ideas: - Sliced cucumbers: They add crunch and freshness. - Red onion: This gives a nice bite and flavor. - Spinach: This leafy green can replace romaine for a different taste. - Pesto: Spread some on the tortilla for a herby twist. - Sliced bell peppers: They add color and sweetness. With these ingredients and ideas, you can create your own perfect California Turkey Club Wrap. Enjoy the mix of flavors and textures! To make the spread, you need just a few simple ingredients. Grab a small bowl. Add the mayonnaise, Dijon mustard, lemon juice, salt, and pepper. Mix these items well. This spread adds a creamy and tangy flavor to the wrap. Set it aside for later. Start with a whole wheat tortilla. Lay it flat on a clean surface. Take a spoon and spread about 1 tablespoon of the mayo-Dijon mix evenly across the tortilla. Next, place 2 ounces of sliced turkey breast right in the center. On top of the turkey, add one slice of cheddar cheese. Then, layer a few slices of avocado and tomato. Next, grab a romaine leaf and place it over the veggies. If you like a little heat, add some sliced jalapeños. Now it’s time to wrap it up! Fold the sides of the tortilla inward. Then roll the tortilla tightly from the bottom to the top. Repeat this with the other tortillas and ingredients. When rolling the wrap, make sure to keep it tight. This helps the filling stay inside. After rolling, you can slice each wrap in half diagonally. This way, they look great on a platter. For a nice touch, arrange the wraps with the cut sides facing up. You can also garnish with extra avocado and tomato wedges around the edges. Enjoy your California Turkey Club Wrap! To make your California Turkey Club Wrap tasty, start with fresh ingredients. Use ripe avocados for creaminess and great flavor. Look for bright red tomatoes that are firm but slightly soft. For turkey, choose freshly sliced deli meat. Whole wheat tortillas should be soft and pliable. Check the expiration dates on all items. Fresh ingredients boost the taste and health of your meal. If you have leftover wraps, wrap them tightly in plastic wrap or foil. This helps keep them fresh. You can also place them in an airtight container. Store them in the fridge for up to two days. If you want to save them longer, consider freezing them. Just remember to thaw them in the fridge before eating. For a crispy wrap, try toasting it in a pan. Heat a skillet over medium heat. Add a small amount of oil or butter to the pan. Place the wrap in the pan and cook for about two minutes on each side. This will give your wrap a nice golden brown color and a satisfying crunch. You can also use a panini press for similar results. Enjoy the crispiness with each bite! {{image_2}} You can switch up the turkey in the California Turkey Club Wrap. Try chicken, ham, or even roast beef. These meats give a different taste but keep the wrap fun. You can also use deli meats like salami or pastrami for a tasty twist. Each meat adds its own flavor and texture. If you like spicy food, add some chorizo for a kick. If you want a meat-free wrap, go for a vegetarian option. Replace turkey with grilled vegetables like zucchini, peppers, or mushrooms. You can also use hummus or a bean spread for protein. For a vegan wrap, skip the cheese and use avocado for creaminess. You can add spinach or kale for extra nutrients. These swaps keep the wrap fresh and delicious. The sauce can make or break your wrap. Consider using pesto, chipotle mayo, or ranch dressing. Each sauce offers a unique flavor experience. You can also try avocado spread instead of mayo for a creamy texture. If you want heat, add some spicy aioli or Sriracha. Experiment with different spreads to find your favorite. Each variation can change the whole vibe of your California Turkey Club Wrap. To keep your California Turkey Club Wrap fresh, store it in the fridge. Place the wrap in an airtight container or wrap it tightly in plastic wrap. This helps prevent it from drying out. Enjoy the wraps within three days for the best taste. If you notice any changes in color or smell, it’s best to toss them. You can freeze California Turkey Club Wraps for later use. Wrap each one in plastic wrap, then place them in a freezer bag. This keeps them fresh and tasty. When you're ready to eat, remove them from the bag. Let them thaw in the fridge overnight. You can also microwave them for a quick meal. To reheat your wraps, use a microwave or a skillet. If using a microwave, place the wrap on a plate. Heat for 30 seconds, then check if it's warm enough. If it needs more time, heat in 15-second bursts. For a crispy finish, use a skillet. Warm the wrap on medium heat for about 2-3 minutes on each side. This makes it hot and tasty without losing its crunch. Yes, you can make these wraps ahead of time. Prepare the wraps and store them in the fridge. Wrap them tightly in plastic wrap or foil. This keeps them fresh. You can make them up to a day in advance. Just remember to add the avocado right before serving to keep it green. Many sides go great with these wraps. Here are some tasty options: - Baked sweet potato fries - A fresh green salad - Crunchy veggie sticks with dip - Fruit salad for a sweet touch These sides add color and flavor to your meal. To make gluten-free wraps, use gluten-free tortillas. Many stores sell these. Check the label to be sure they are safe. You can also add extra veggies or proteins inside the wrap. This gives you more flavor and keeps your meal fun. Enjoy your meal without worry! In this article, we explored the California Turkey Club Wrap, covering its key ingredients, preparation, and storage tips. You learned how to assemble the wrap and discovered cooking techniques to enhance crispiness. Variations cater to different tastes, whether you prefer meat, vegetarian options, or unique sauces. Remember, organizing your wraps ahead saves time. With proper care, leftovers can last. Enjoy experimenting with flavors and ingredients to find your favorite version. Creating these wraps is simple and fun. Explore, and make each bite a new experience!
California Turkey Club Wrap Tasty and Quick Meal
Looking for a quick and tasty meal? The California Turkey Club Wrap is your answer! It combines fresh turkey, crisp veggies, and a flavorful spread,
For this delicious cheeseburger soup, you need: - 1 pound ground beef - 1 medium onion, diced - 2 cloves garlic, minced - 3 medium potatoes, diced - 4 cups beef broth - 2 cups shredded cheddar cheese - 1 cup milk - 1 tablespoon Worcestershire sauce - 1 teaspoon mustard - 1 teaspoon paprika - Salt and pepper to taste - 2 tablespoons olive oil - Chopped green onions for garnish These ingredients blend to create a warm, hearty soup. The ground beef gives it that classic cheeseburger taste. The potatoes add bulk and texture. Cheddar cheese provides creamy goodness. You can add different flavors to make the soup your own. Some options include: - Cooked bacon for a smoky kick - Jalapeños for heat - Frozen corn for sweetness - Diced tomatoes for freshness - A splash of hot sauce for spice Using these optional ingredients lets you tailor the soup to your taste. Feel free to get creative! If you need to adjust amounts, here are some simple conversions: - 1 cup = 8 ounces - 1 tablespoon = 3 teaspoons For substitutes, you can use ground turkey instead of beef. Use vegetable broth for a lighter flavor. If you want a dairy-free version, try almond milk and non-dairy cheese. These swaps help keep the soup just as tasty! For the complete recipe, check out the Full Recipe section. Start by gathering your ingredients. You need: - 1 pound ground beef - 1 medium onion, diced - 2 cloves garlic, minced - 3 medium potatoes, diced - 4 cups beef broth - 2 cups shredded cheddar cheese - 1 cup milk - 1 tablespoon Worcestershire sauce - 1 teaspoon mustard - 1 teaspoon paprika - Salt and pepper to taste - 2 tablespoons olive oil - Chopped green onions for garnish Chop your onion, mince the garlic, and dice the potatoes. This step makes cooking easier. In a large pot, heat the olive oil on medium heat. Add the diced onion first. Cook until soft, about 5 minutes. Then, add the minced garlic and cook for one more minute. This makes the base of your soup flavorful. Now, increase the heat to medium-high. Add the ground beef and break it apart with a spoon. Cook until it turns brown, about 5-7 minutes. If there's excess grease, drain it off. Next, stir in the diced potatoes, beef broth, Worcestershire sauce, mustard, paprika, salt, and pepper. Bring this mixture to a boil. Once it's boiling, reduce the heat to a simmer. Cover the pot and let it cook for about 15-20 minutes. This makes the potatoes tender. Once the potatoes are soft, stir in the milk and shredded cheddar cheese. Mix until the cheese melts and the soup becomes creamy. Taste it and adjust the seasoning if you need to. Remove the pot from the heat and let it cool for a few minutes. Ladle the soup into bowls. For a nice touch, garnish with chopped green onions and an extra sprinkle of cheese on top. Serve with warm, crusty bread for a cozy meal. For a complete guide, don't forget to check the Full Recipe. To make your cheeseburger soup shine, use fresh ingredients. Fresh potatoes and onions add great taste. Brown the beef well for rich flavor. Don't rush the cooking; let the onions soften first. Stir the garlic in just before you add the beef. This keeps the garlic strong and tasty. Use good quality beef broth for depth. Try adding a splash of hot sauce for a kick. One mistake is not draining the fat from the beef. Too much fat can make the soup greasy. Another mistake is overcooking the potatoes. Keep an eye on them; they should be tender, not mushy. Don’t skip on seasoning. Taste and adjust as you go. Lastly, avoid boiling the soup after adding cheese. It can separate and ruin the texture. Need a lighter version? Use lean ground turkey instead of beef. If you want a dairy-free option, use coconut milk and dairy-free cheese. To make it gluten-free, ensure your broth and Worcestershire sauce are gluten-free. For a veggie boost, add spinach or carrots. These tweaks keep the taste while meeting your needs. Check the Full Recipe for more details. {{image_2}} You can make a tasty vegetarian version of cheeseburger soup. Swap out the ground beef for a mix of beans or lentils. Use vegetable broth instead of beef broth. This keeps the soup hearty and filling. Add diced mushrooms for a meaty texture. Want to change things up? You can add fun ingredients! Crispy bacon gives a nice crunch. Diced jalapeños add heat and spice. For a smoky taste, try adding smoked paprika. You can even throw in some corn for sweetness. These additions make the soup more exciting. You have two great choices: creamy or broth-based. For a creamy soup, use more milk and cheese. This makes it rich and smooth. For a lighter option, stick with the broth. This version is great if you want something less heavy. Both styles taste amazing, so pick what you like! To store leftover cheeseburger soup, let it cool to room temperature. Then, place it in an airtight container. Make sure to seal it well to keep out air. Store it in the fridge for up to three days. This keeps the soup fresh and tasty for later meals. You can freeze cheeseburger soup for future meals. First, let the soup cool completely. Then, pour it into freezer-safe bags or containers. Remove as much air as possible before sealing. Label the bags with the date. This soup can last in the freezer for up to three months. When you are ready to eat it, thaw it in the fridge overnight. When reheating, use a pot on the stove over low heat. Stir the soup often to avoid sticking. If it looks too thick, add a splash of milk or broth. This helps restore its creamy texture. You can also microwave it in a bowl, but cover it to prevent splattering. Heat in short bursts, stirring in between, until warm. Enjoy the comforting flavors again! Cheeseburger soup is a warm and tasty dish. It combines the flavors of a cheeseburger in a creamy soup. You get ground beef, cheese, and veggies all in one bowl. People love it because it’s hearty and easy to make. You can enjoy it with bread or crackers for a full meal. Yes, you can make cheeseburger soup ahead of time. Just prepare the soup as usual and let it cool. Then, store it in the fridge for up to three days. When you’re ready to eat, simply reheat it on the stove. The flavors will blend even more, making it taste great! Making cheeseburger soup in a slow cooker is simple. Start by browning the beef in a pan first. Then, add it to the slow cooker with all the other ingredients. Set it on low for about 6 hours or high for 3 hours. Stir in the cheese and milk before serving. It’s easy and perfect for busy days! You can serve many tasty sides with cheeseburger soup. Some great options are: - Warm crusty bread - Grilled cheese sandwiches - Salad with fresh greens - Crackers for dipping These sides pair well and make your meal even more enjoyable. For the full recipe, check out the [Full Recipe]. Cheeseburger soup is a tasty dish you can customize. We covered key ingredients, cooking steps, and storage tips. Don't forget the optional ingredients that can spice it up! Use the tips to avoid common mistakes and adjust the recipe to fit your diet. You can make it vegetarian or add unique flavors. With these guidelines, you can enjoy this comforting soup anytime. Your kitchen is ready for a delicious meal!
Cheeseburger Soup Comforting and Flavorful Recipe
Imagine a warm bowl of Cheeseburger Soup, brimming with flavor and comfort. This creamy dish blends all the best parts of a cheeseburger into a
- 1 medium butternut squash, peeled and cubed - 1 medium onion, chopped - 2 cloves garlic, minced - 2 tablespoons olive oil - 1 teaspoon ground cumin - 1/2 teaspoon ground nutmeg - 4 cups vegetable broth - 1 can (400 ml) coconut milk - Salt and pepper to taste Butternut squash is the star of this soup. It offers a sweet, nutty flavor. The onion and garlic add depth and warmth. Spices like cumin and nutmeg bring a cozy feel. The vegetable broth provides a rich base, while coconut milk gives it that creamy texture. - Fresh cilantro or parsley - Nuts or seeds - Crème fraîche or yogurt Garnishes can elevate your soup. Fresh herbs like cilantro or parsley add color and freshness. Nuts or seeds give a nice crunch. A dollop of crème fraîche or yogurt adds creaminess. These options let you customize the soup to your taste. For the full recipe, check out the Cozy Butternut Bliss Soup. 1. Sautéing onions and garlic: Start by heating two tablespoons of olive oil in a large pot over medium heat. Add the chopped onion and cook for about five minutes. You want the onion to turn soft and clear. Then, add two minced garlic cloves, along with one teaspoon of ground cumin and half a teaspoon of ground nutmeg. Cook for another minute to bring out the flavors. 2. Cooking the squash: Now, it's time for the star of the dish: the butternut squash. Peel and cube one medium squash. Add the squash cubes to the pot and stir to mix them with the oil and spices. Pour in four cups of vegetable broth and bring the mixture to a boil. Once it boils, reduce the heat and let it simmer for about 20 to 25 minutes. The squash should be soft enough to blend. 3. Blending the soup: After the squash is tender, remove the pot from heat. Use an immersion blender to blend the soup until it is smooth. If you don’t have an immersion blender, let the soup cool a bit. Then, blend in batches in a regular blender. Once blended, stir in one can of coconut milk. Season with salt and pepper to taste. Heat it through before serving. - How to serve hot: Ladle the soup into bowls while it is still hot. - Best pairings with bread or salad: This soup pairs well with crusty bread or a fresh salad. The bread soaks up the soup's rich flavors, while the salad adds a crisp contrast. - Ideal bowl presentation: For a beautiful presentation, garnish each bowl with fresh cilantro or parsley. It adds color and freshness to the dish. You can find the Full Recipe for Cozy Butternut Bliss Soup at the beginning of this article. To make your butternut squash soup pop, use spices like cumin and nutmeg. They add warmth and depth. Fresh herbs like cilantro or parsley can brighten the flavors. Sauté the spices with onions and garlic before adding the squash. This step helps release their oils and boosts flavor. You want to balance the natural sweetness of the squash. Add salt and a splash of lemon juice to enhance the taste. A pinch of cayenne pepper can add a nice kick if you like heat. For a creamy, smooth soup, blend well. An immersion blender works great for this. If you use a regular blender, let the soup cool a bit first. Always blend in small batches to avoid spills. To avoid lumps, make sure to cook the squash until it's very tender. This way, it blends easily into a silky soup. If you want a chunkier texture, reserve some cooked squash before blending. Follow these tips and enjoy a rich and creamy butternut squash soup. For the detailed steps, check out the Full Recipe. {{image_2}} You can easily change this soup to fit your diet. For a vegan option, just skip the coconut milk and use almond milk instead. You can also make it gluten-free by checking your broth. If you want to try different types of squash, feel free! Acorn squash or pumpkin work well too. They add unique flavors and textures. Using almond milk instead of coconut milk gives a lighter taste. It still keeps the soup creamy. Don't be afraid to mix and match these options to suit your needs! Adding fruits can change the taste of your soup. Apples or pears add natural sweetness. They blend well with the squash. You can also play with spices. Try ginger or cinnamon for a warm flavor. For a kick, add a dash of cayenne pepper. These spices can change the whole vibe of the soup. If you prefer a different base, use chicken broth instead of vegetable broth. It adds depth to the flavor. Each variation opens up new taste adventures! For the full recipe, check out Cozy Butternut Bliss Soup. To keep your butternut squash soup fresh, use airtight containers. Glass or BPA-free plastic containers are great options. Ensure the soup has cooled before sealing. You can store it in the fridge for up to five days. If you want to keep it longer, consider freezing. The soup can last for three months in the freezer. When you're ready to enjoy your soup again, use gentle heat. The best way to reheat is on the stove over low heat. Stir often to avoid sticking. If you prefer the microwave, use a microwave-safe bowl. Heat in short bursts, stirring in between. To keep the flavor and texture intact, add a splash of vegetable broth or coconut milk while reheating. This helps restore its creamy consistency. Feel free to check out the Full Recipe for tips on preparing a fresh batch! How long does butternut squash soup last in the fridge? Butternut squash soup lasts about 3 to 5 days in the fridge. Store it in a sealed container for best results. Always check for any off smells before consuming. Can I freeze butternut squash soup? Yes, you can freeze butternut squash soup. It freezes well for up to 3 months. Make sure to cool it completely before placing it in an airtight container. What is the nutritional value of butternut squash soup? Butternut squash soup is low in calories and high in vitamins. One cup has around 100 calories, packed with Vitamin A, C, and fiber. This makes it a healthy choice for meals. Can I use fresh butternut squash instead of frozen? Absolutely! Fresh butternut squash gives the best flavor. Just peel and cube it, then follow the same cooking steps in the recipe. How can I make this soup spicier? To spice it up, add a pinch of cayenne pepper or some chopped jalapeños. You can also use spicy curry powder for a different twist. What’s the best way to thicken butternut squash soup? The best way to thicken the soup is by blending it well. For extra thickness, you can add more squash or a potato. What can I substitute for coconut milk? If you need a substitute, use almond milk or heavy cream. Both add creaminess but change the flavor slightly. Is there a substitute for vegetable broth? You can use chicken broth or even water with added seasonings. This will still give you a nice base for the soup. Can I replace olive oil with another oil? Yes, you can use avocado oil or canola oil. Each will still provide a nice flavor for your soup. For the full recipe, check out Cozy Butternut Bliss Soup. In this blog post, we explored making butternut squash soup. We covered main ingredients, step-by-step instructions, and key tips for flavor and texture. I shared variations for diet needs and flavor twists, plus storage and reheating advice. Whether you enjoy it plain or with toppings, this soup is satisfying. Remember to experiment and make it your own. You can create a bowl of warmth and comfort with just a few simple steps. Enjoy your cooking adventure!
Butternut Squash Soup Rich and Creamy Delight
Are you ready to dive into a bowl of comfort? Butternut squash soup is a crowd-pleaser with its rich, creamy taste. This cozy dish is
To make Creamy Chicken Tortilla Soup, gather the following ingredients: - 2 cups cooked chicken, shredded - 1 tablespoon olive oil - 1 onion, diced - 2 cloves garlic, minced - 1 bell pepper, diced - 1 can (14.5 oz) diced tomatoes, with juices - 4 cups chicken broth - 1 cup corn kernels - 1 can (4 oz) green chilies, diced - 1 teaspoon cumin - 1 teaspoon chili powder - ½ teaspoon smoked paprika - 1 cup heavy cream - Salt and pepper to taste - Tortilla strips, for garnish - Fresh cilantro, for garnish - Lime wedges, for serving These ingredients create a rich, warm flavor. The chicken adds protein and heartiness. The spices, like cumin and chili powder, give it a nice kick. The cream makes the soup smooth and creamy. Each bite is comforting, filling, and delicious. For the full recipe, you will want to combine these ingredients in the right steps to enjoy this tasty dish. - Heat 1 tablespoon of olive oil in a large pot over medium heat. - Add 1 diced onion and 1 diced bell pepper. Sauté them for 3 to 4 minutes until they soften. - Stir in 2 cloves of minced garlic, 1 can of diced tomatoes with juices, and 4 cups of chicken broth. - Add 1 cup of corn kernels, 1 can of diced green chilies, 1 teaspoon cumin, 1 teaspoon chili powder, and ½ teaspoon smoked paprika. Bring this mixture to a simmer. - Once simmering, introduce 2 cups of shredded chicken. Season with salt and pepper to taste. Let it cook for 10 minutes to meld the flavors. - Reduce the heat to low and stir in 1 cup of heavy cream until warmed through. - Taste and adjust seasoning as needed before serving. For a delightful finish, ladle the soup into bowls. Top with crispy tortilla strips, fresh cilantro, and serve with lime wedges for squeezing. You can find the Full Recipe for more details. To enhance your creamy chicken tortilla soup, I suggest adjusting the seasonings. If you like more depth, add a pinch of oregano or a dash of cayenne. These small changes can make a big difference. If you want to spice things up, include more chili powder or fresh jalapeños. You can also use spicy diced tomatoes for extra heat. Garnishing your soup makes it more appealing. Use crispy tortilla strips for crunch. Fresh cilantro adds a vibrant touch, and lime wedges bring a nice tang. Serve your soup with a side of cornbread or a simple green salad. These sides complement the soup's rich flavors. Simmering is key to developing flavor. It allows the ingredients to meld and gives a rich taste. When you shred the chicken, use two forks for a quick and easy method. This helps to create even pieces that mix well in the soup. For the best texture, shred the chicken while it's still warm. Be sure to check out the Full Recipe for a detailed guide on making this delightful dish! {{image_2}} You can swap heavy cream for several alternatives. Use coconut milk for a dairy-free option. Sour cream adds a tangy flavor. Greek yogurt also works well but mix it in slowly to avoid curdling. For chicken, rotisserie chicken saves time and adds flavor. You can also use turkey or even canned chicken. If you prefer a lighter option, shredded poached chicken is great too. To give your soup a Southwest flair, add black beans or avocado. Fresh lime juice brightens the taste. You can also include fresh corn for a sweet crunch. If you want low-carb or keto-friendly options, skip the corn and use cauliflower rice instead. This keeps the soup hearty without the carbs. You can also add zucchini for extra veggies and flavor. For a vegan version, replace the chicken with chickpeas or jackfruit. Both options provide great texture. Use cashew cream or coconut cream instead of heavy cream. This will keep your soup rich and delicious without dairy. To store leftovers, let the soup cool first. Use an airtight container to keep it fresh. This soup lasts up to three days in the fridge. It’s best to enjoy it within this time for the best taste. When reheating, use a pot on medium heat. Stir often to prevent burning. You can also use the microwave. Heat in short bursts, stirring between each. If you want to freeze the soup, cool it completely first. Pour it into freezer-safe bags or containers. It can last up to three months in the freezer. After storing, the soup might need a little boost. Add a splash of cream to revive its richness. You can also stir in fresh cilantro or lime juice for extra flavor. Before serving, taste and adjust the seasoning as needed. This way, you keep the soup tasty and fresh! Creamy Chicken Tortilla Soup has many tasty ingredients. You need shredded chicken, diced tomatoes, and chicken broth. The soup also includes corn, green chilies, and spices like cumin and chili powder. Heavy cream makes it rich and smooth. You’ll top it with crispy tortilla strips, cilantro, and lime for extra flavor. Yes, you can easily make this soup ahead. First, cook the soup as normal. Let it cool, then store it in the fridge. It will stay fresh for about three days. When you are ready to eat, just reheat it on the stove. Add the heavy cream before serving for the best taste. To thicken your soup, there are a few options. You can simmer it longer to reduce the liquid. Another way is to add a bit of cornstarch mixed with water. Stir this into the soup and heat until thickened. You can also use more heavy cream for a creamier texture. Yes, this soup is very customizable! You can change the protein by using turkey or beans. For a spicier kick, add jalapeños or hot sauce. If you want a lighter version, swap the heavy cream for coconut milk. Feel free to add veggies like zucchini or spinach for more nutrition. This blog post guides you through making creamy chicken tortilla soup. You start with fresh ingredients and step-by-step instructions. We explored tips and tricks to enhance flavor and serving ideas. I shared variations for different diets and how to store leftovers properly. In summary, you now have the tools to create a delicious, creamy soup any day. Enjoy experimenting with flavors and making it your own!
Creamy Chicken Tortilla Soup Flavorful and Easy Recipe
Are you ready to enjoy a warm bowl of comfort? My Creamy Chicken Tortilla Soup is the perfect blend of flavors that will delight your
- Wild Rice: This grain gives the soup a nutty taste. It adds texture and heartiness. I love using it because it stays firm and absorbs flavors well. - Seasonal Vegetables: Fresh vegetables like carrots, celery, and butternut squash bring color and nutrition. These veggies add sweetness and depth to the soup. Kale is another must-have. It adds a nice green touch and boosts the health factor. - Broth and Coconut Milk: The base is vegetable broth, which adds a savory flavor. Coconut milk gives the soup a rich and creamy texture. This combination makes each spoonful feel cozy and warm. - Fresh Parsley: Chopped parsley adds a pop of color. It also gives a fresh taste on top of the creamy soup. - Additional Spices: You can add a pinch of red pepper flakes for heat. A sprinkle of paprika can also enhance the flavor profile. These extras make the soup your own. Try this Full Recipe for a delicious bowl of comfort! Rinsing and Soaking Wild Rice Start by rinsing the wild rice in cold water. This helps remove any dust or debris. After rinsing, soak the rice in water for 30 minutes. This step softens it and makes cooking easier. Chopping Vegetables Next, chop your vegetables. Dice one medium onion, two carrots, and two celery stalks. Peel and dice one medium butternut squash. Mince two garlic cloves. Keep your knife skills sharp for even cuts. Even pieces cook better and look nice in the soup. Sautéing Aromatics and Vegetables In a large pot, heat one tablespoon of olive oil over medium heat. Add the diced onion and sauté for about three to four minutes. You want it to get soft and translucent. Add the minced garlic, diced carrots, and celery. Sauté for five more minutes until they start to soften. Then stir in the diced butternut squash, dried thyme, and sage. Cook for an additional two minutes until fragrant. Simmering the Soup Pour in six cups of vegetable broth. Add the rinsed wild rice and bring the mixture to a boil. Once boiling, reduce the heat to low and cover the pot. Let it simmer for 40 to 45 minutes. The wild rice should be tender and open up. Adding Coconut Milk Once the wild rice is cooked, stir in one can of coconut milk. This adds creaminess and a touch of sweetness. Then, add one cup of chopped kale. Let the soup simmer for another ten minutes. This wilts the kale and blends the flavors nicely. Seasoning the Soup Finally, season with salt and pepper to taste. Adjust the seasoning to your liking. Serve the soup hot and garnish with fresh parsley. For the full recipe, check out the Cozy Autumn Wild Rice Soup section. To get the right texture, adjust the cooking time. Wild rice needs about 40-45 minutes to cook. Check it at 40 minutes to see if it’s soft. If you want a thicker soup, let it simmer longer. Using fresh herbs makes a big difference. Fresh thyme and sage add bright flavor. Dried herbs work too, but they may not have the same punch. If using dried herbs, add them early in cooking. Fresh herbs should go in near the end. A splash of lemon juice can brighten the taste. It adds a nice zing to the soup. Just a teaspoon will do. Add it right before serving for the best flavor. You can also try adding spices like cumin or paprika. They give warmth and depth. Start with a pinch and taste as you go. Adjust until it feels right for you. This soup pairs well with crusty bread. A slice of sourdough or a warm baguette will elevate your meal. You can also serve it with a simple green salad for extra crunch. For a nice presentation, ladle the soup into bowls and sprinkle fresh parsley on top. A drizzle of olive oil can also add a touch of elegance. Don’t forget to enjoy it with your favorite company! For the full recipe, check out Cozy Autumn Wild Rice Soup. {{image_2}} Cooking with Chicken or Turkey You can easily add chicken or turkey to this soup. Just cook the meat in the pot after sautéing the onion. Use about 1 to 2 cups of diced cooked chicken or turkey. This makes the soup heartier and boosts protein. It also adds a nice savory flavor. Vegetarian Protein Options For a vegetarian option, try using beans or lentils. Chickpeas work great, too. They not only add protein but also make the soup more filling. Add about a cup of your chosen beans during the last 10 minutes of cooking. This keeps them tender without overcooking. Substituting Other Vegetables Feel free to swap in any vegetables you like. Sweet potatoes, peas, or green beans can work well. Just remember to adjust cooking times based on the veggies you choose. For example, sweet potatoes may need a bit longer to cook than butternut squash. Gluten-Free Options This cozy soup is naturally gluten-free, but always check your broth. Some broths may contain gluten. You can also use a gluten-free grain like quinoa instead of wild rice for a different texture and flavor. Spice Level Adjustments Want a bit of heat? Add red pepper flakes or diced jalapeños. Start with a small amount and taste as you go. This way, you can control how spicy the soup gets. Adding Creaminess You can make the soup creamier by adding more coconut milk. If you prefer a non-dairy option, try cashew cream. Blend soaked cashews with water until smooth. Mix it in toward the end of cooking for a rich texture. For the complete details on making this cozy dish, check out the Full Recipe. - Refrigeration Tips After enjoying the soup, let it cool down first. Pour it into a container with a lid. Store it in the fridge. It can last for about 4 to 5 days. Always check for any signs of spoilage before eating. - Freezing for Later To freeze, use freezer-safe containers. Make sure to leave some space at the top for expansion. The soup can stay good in the freezer for up to three months. Label the container with the date to track freshness. - Best Methods to Reheat For reheating, the stove is the best method. Pour the soup into a pot and heat over medium heat. Stir often to avoid sticking. You can also use the microwave. Just place it in a microwave-safe bowl. Heat in short intervals, stirring in between. - Avoiding Overcooking When reheating, be careful not to overcook it. This can make the wild rice mushy. Heat until it’s warm throughout. Taste a spoonful to check the temperature. Adjust seasoning if needed after reheating. For the full recipe, check out the Cozy Autumn Wild Rice Soup recipe. You can use several options if you lack wild rice. - Other Rice Types: Brown rice or long-grain rice works well. They cook more quickly than wild rice, so adjust your cooking time. Use about 1 cup for the soup. - Quinoa or Barley Options: Quinoa is a great choice. It adds a nutty flavor and cooks fast. Barley also fits well, adding a chewy texture that enhances the soup. This soup keeps well in the fridge. - Storage Duration: You can store it for about 4 to 5 days. - Signs of Spoilage: Look for off smells or changes in color. If the soup looks or smells strange, it’s best to toss it. Yes, making this soup ahead is a smart idea. - Best Practices for Preparing in Advance: Cook the soup and let it cool. Store it in an airtight container. Refrigerate it for up to 5 days. You can also freeze it for up to 3 months. When ready to eat, thaw in the fridge overnight. Reheat it slowly on the stove for the best taste. Check out the Full Recipe for more details on the process. This blog post shared how to make a cozy autumn wild rice soup. You learned about key ingredients, from wild rice to seasonal vegetables. I provided step-by-step instructions for making the soup and tips for getting the texture just right. We explored variations you can try, like adding protein or different spices. In closing, enjoy personalizing this soup to fit your taste. It’s a warm dish that brings comfort during autumn days. Happy cooking!
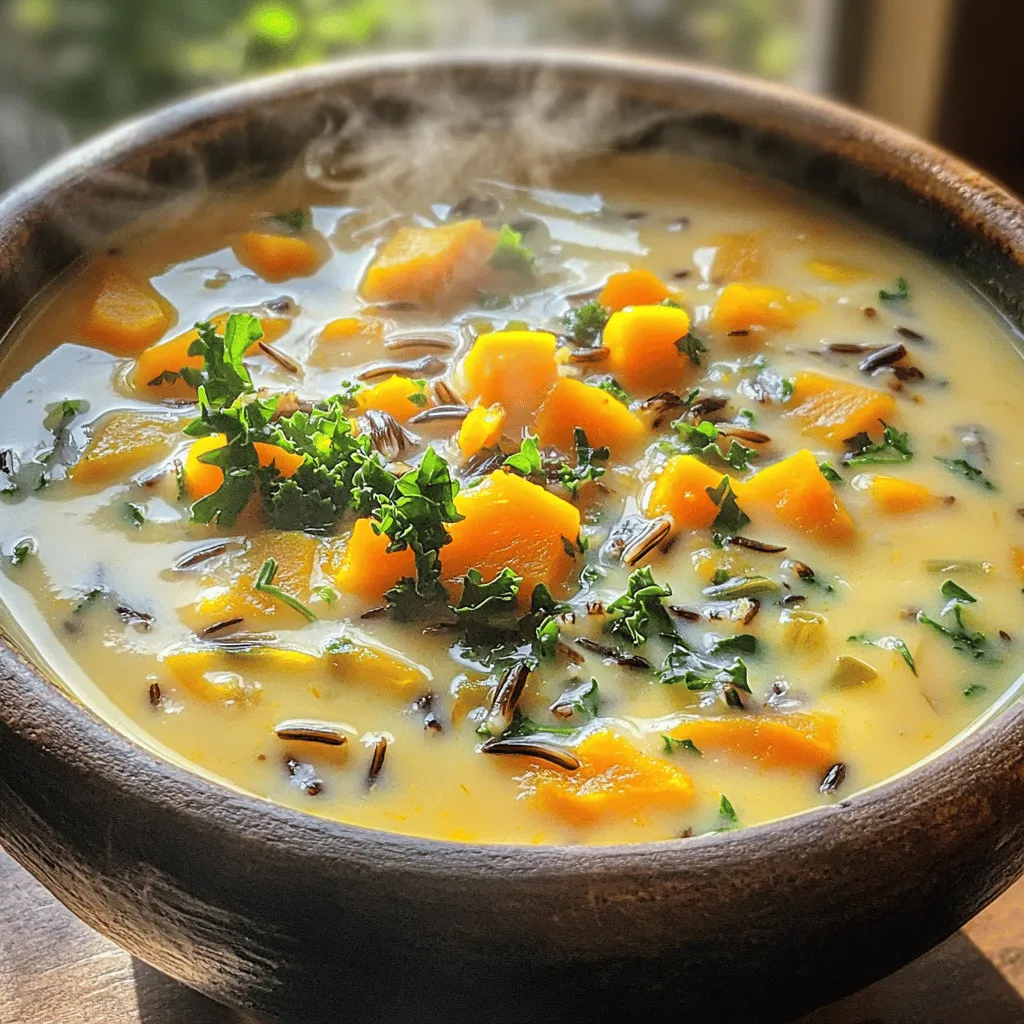
Cozy Autumn Wild Rice Soup Heartwarming Flavor Packed
As the leaves turn and the air chills, there’s nothing better than a warm bowl of Cozy Autumn Wild Rice Soup. This soup bursts with