Dinner
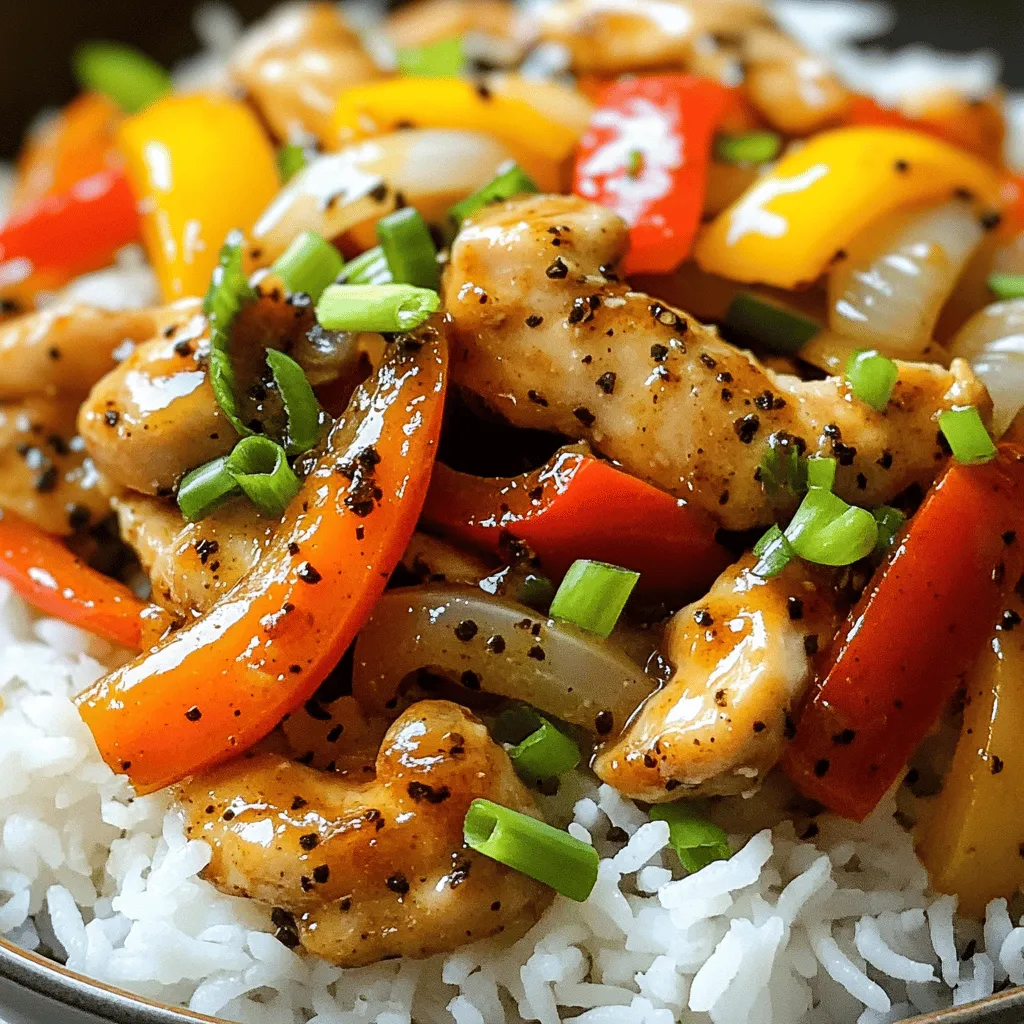
Savory Black Pepper Chicken Quick and Easy Recipe
Are you ready to spice up your dinner with a simple, tasty dish? Black Pepper Chicken combines bold flavors and juicy chicken in a quick
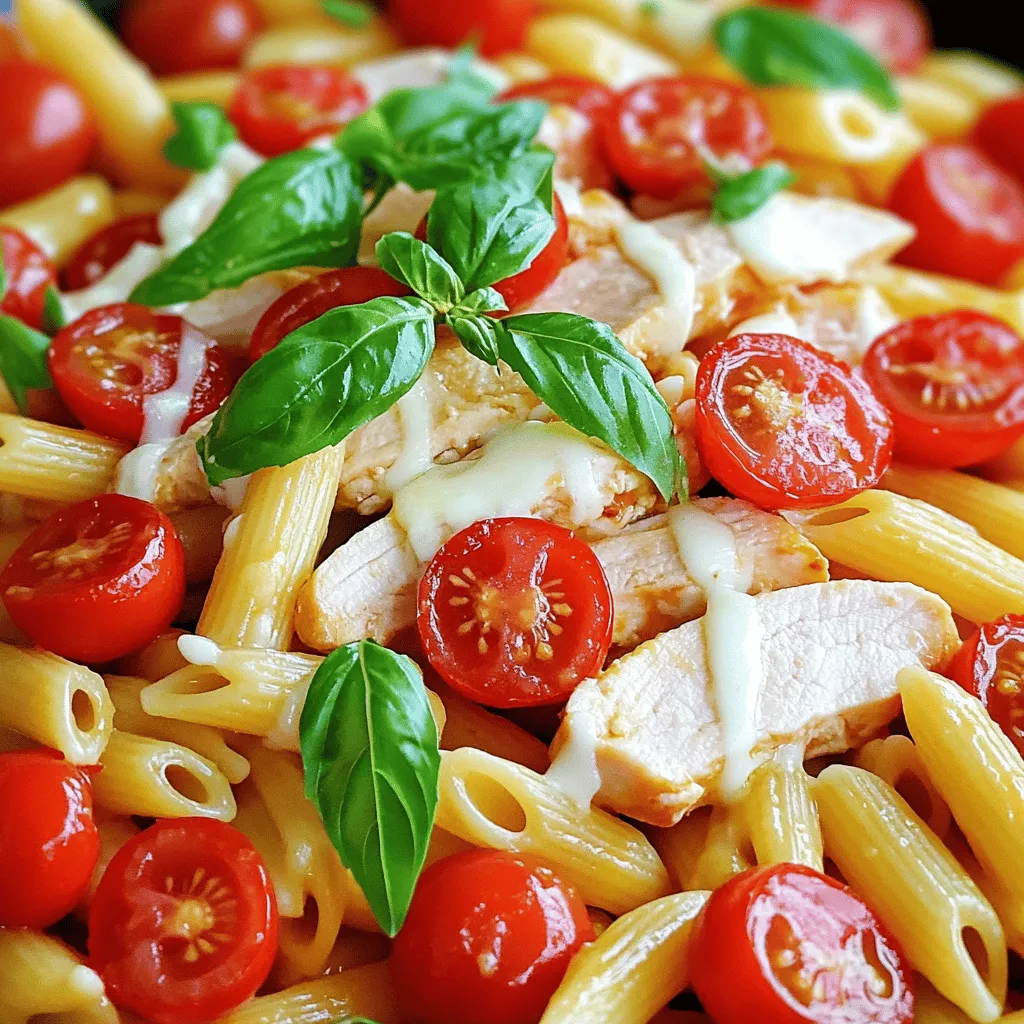
Bruschetta Chicken Pasta Flavorful and Easy Meal Guide
Craving a vibrant and delicious meal? Bruschetta Chicken Pasta is your answer! This dish combines juicy chicken, fresh tomatoes, and pasta in a way that’s

Best Fish Tacos Flavorful Recipe to Enjoy Tonight
If you’re craving a delicious dinner, look no further! In this article, I’ll share my go-to recipe for best fish tacos that are both quick
![To make Lemon Butter Baked Tilapia, you need the following ingredients: - 4 tilapia fillets - 1/4 cup unsalted butter, melted - 2 tablespoons lemon juice - 1 tablespoon lemon zest - 3 cloves garlic, minced - 1 teaspoon dried thyme - 1 teaspoon dried parsley - Salt and pepper to taste - Lemon slices, for garnish - Fresh parsley, chopped, for garnish If you want to try different fish, you can use cod, haddock, or even salmon. Each fish has its own flavor, but they work well with lemon and butter. For this recipe, you will need a few common kitchen tools: - A baking dish: I recommend using a glass or ceramic dish for even cooking. - Mixing bowl: This is where you will combine your lemon butter sauce. - Measuring cups and spoons: Accurate measurements make a big difference. - Knife and cutting board: You’ll need these for chopping garlic and parsley. - Parchment paper: It helps with easy cleanup and prevents sticking. With these ingredients and tools, you're all set to create a tasty dish that is simple yet impressive. For more detailed steps on how to prepare this dish, check out the Full Recipe. First, preheat your oven to 400°F (200°C). This step is key for even cooking. Next, prepare your baking dish by lining it with parchment paper. This makes cleanup easy later. Now, let’s mix the lemon butter sauce. In a bowl, combine: - 1/4 cup unsalted butter, melted - 2 tablespoons lemon juice - 1 tablespoon lemon zest - 3 cloves garlic, minced - 1 teaspoon dried thyme - 1 teaspoon dried parsley - Salt and pepper to taste Stir well until all ingredients blend nicely. This sauce adds great flavor! Place your tilapia fillets in the prepared baking dish. Arrange them in a single layer. This helps them cook evenly. Now, pour the lemon butter mixture over the fish. Make sure each fillet gets well coated. Bake the tilapia in your preheated oven for 15-20 minutes. To check if it’s done, use a fork. The fish should flake easily and look opaque. Once cooked, remove it from the oven. Let it rest for a minute. For a lovely finish, garnish with fresh lemon slices and chopped parsley. This adds color and brightness to your dish. For more details, check the Full Recipe. To get the best flavor, use fresh ingredients. Fresh lemon juice and zest make a big difference. When you mix the butter, lemon juice, and spices, blend them well. This helps each fillet soak up the flavor. Avoid cooking the fish too long. Overcooked tilapia can become dry. Check for doneness by using a fork. The fish should flake easily. If you see it turn opaque, it’s ready to eat. Be careful with salt. Start with a small amount, then taste. You can always add more later. Too much salt can ruin the dish. Pair your tilapia with bright sides. Steamed broccoli or asparagus adds color. A fresh salad with mixed greens works well too. You can even serve it with rice or quinoa for a hearty meal. For a beautiful plate, use a white dish. Place the tilapia in the center and drizzle the lemon butter sauce on top. Add lemon slices and chopped parsley for a fresh look. This makes your meal appealing and vibrant. Explore the [Full Recipe] for more tips on making Lemon Butter Baked Tilapia! {{image_2}} You can make this dish lighter while keeping it tasty. Instead of using regular butter, try a low-fat option. You can use margarine or a plant-based butter. Both options work well and cut down on fat. Adding different herbs and spices also helps. Try dill or basil for a fresh twist. Both herbs add great flavor without extra calories. You can even toss in some spinach for added nutrients. It cooks down well and blends nicely with the fish. Want to kick up the heat? Add some chili flakes to your lemon butter mix. This will give your tilapia a nice spicy kick. Just a pinch goes a long way! If you want to change the citrus flavor, try lime or orange juice instead of lemon. Lime gives a zesty twist, while orange adds sweetness. Both options keep the dish bright and fresh. Remember to adjust the zest based on your choice for best flavor. Feel free to explore these variations to make your Lemon Butter Baked Tilapia even more exciting. For the full recipe, check out the details above! To keep your leftover tilapia fresh, place it in an airtight container. Make sure to cover it well with a lid or plastic wrap. This helps prevent any unwanted odors from seeping in. You can store the tilapia in the fridge for up to three days. After that, the fish may lose its taste and texture. When you are ready to enjoy your leftover tilapia, reheat it gently. The best way is to use an oven or a skillet. If using the oven, preheat it to 350°F (175°C). Place the fish on a baking sheet and cover it loosely with foil. Bake for about 10 minutes. This keeps the fish moist. If you prefer the skillet, heat a bit of oil on medium heat. Place the fillets in the skillet and cook for about 3-4 minutes on each side. For serving, add a touch of fresh lemon juice and some chopped parsley on top. This will brighten the flavor and make it look fresh again. Enjoy your meal! For the full recipe, check the earlier section. You can use other mild fish if you don’t have tilapia. Here are some great options: - Cod - Haddock - Sole - Flounder These fish will soak up the lemon butter flavor well. They also cook similarly, so you can follow the same baking time. Yes, you can prep this dish ahead of time. Here are some tips: - Marinate the tilapia in the lemon butter mix for up to an hour. - Place the marinated fish in the fridge if you make it early. - Bake the tilapia right before serving for the best taste. This way, you keep it fresh and tasty! For a balanced meal, try these side dishes: - Steamed broccoli - Roasted asparagus - Quinoa or rice - A fresh salad These sides add color and nutrition to your plate. Enjoy your meal with the full recipe for Lemon Butter Baked Tilapia! This blog post covered how to make Lemon Butter Baked Tilapia. We listed the key ingredients, tools, and step-by-step instructions. You learned cooking tips and ways to enhance flavors with variations. We also discussed how to store leftovers and answered common questions. In conclusion, this dish is easy and fun to prepare. With simple ingredients and tools, you can make a tasty meal. Enjoy experimenting with flavors and serving ideas. Happy cooking!](https://toastedrecipes.com/wp-content/uploads/2025/06/1b17701d-a588-443b-a192-76ca96e3532f.webp)
Lemon Butter Baked Tilapia Simple and Tasty Dish
Are you searching for a quick and delicious dinner idea? Look no further! Lemon Butter Baked Tilapia is both simple to make and packed with
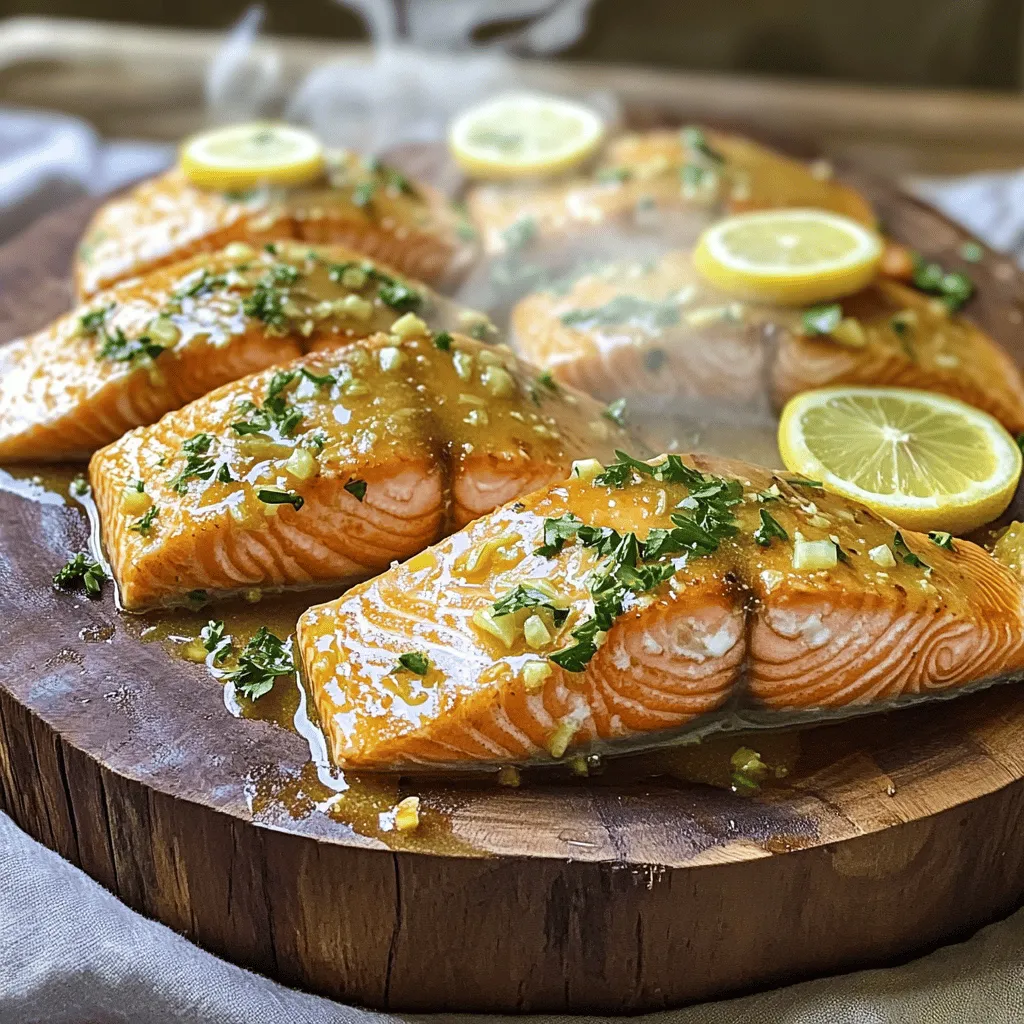
Marry Me Salmon Irresistible Recipe for Dinner
If you’re looking to impress at dinner tonight, try my Marry Me Salmon recipe! This dish is packed with flavor and takes just a few
![- Jumbo pasta shells - Ricotta cheese - Shredded mozzarella cheese - Grated Parmesan cheese - Egg - Marinara sauce - Fresh basil - Garlic powder - Salt and pepper - Olive oil The ingredients make this dish special. You need jumbo pasta shells. They hold the filling well. Ricotta cheese adds creaminess. I also use shredded mozzarella for that gooey texture. Grated Parmesan gives a nice salty kick. The egg helps bind everything. Marinara sauce adds flavor and moisture. Fresh basil brings a bright taste. Garlic powder enhances the overall depth. Don’t forget salt and pepper for seasoning. A drizzle of olive oil adds richness. - Alternatives for ricotta cheese: You can use cottage cheese or cream cheese. Both give a similar texture. - Dairy-free options for cheese: Look for vegan ricotta or nut-based cheese. They work well if you avoid dairy. - Gluten-free shell options: You can find gluten-free pasta shells made from rice or corn. These are great for gluten-free diets. These substitutions help everyone enjoy this dish. Whether you have allergies or dietary needs, you can still savor these stuffed shells. 1. Preheat the oven and prepare the baking dish Start by preheating your oven to 375°F (190°C). While it heats up, lightly grease a baking dish with olive oil. This helps prevent sticking and adds flavor. 2. Cook the pasta shells: boiling instructions In a large pot, bring salted water to a boil. Add 20 jumbo pasta shells and cook them until al dente, about 8-10 minutes. Drain the shells and let them cool slightly. This step is crucial to avoid overcooking them. 1. Combining the filling ingredients In a mixing bowl, combine 2 cups of ricotta cheese, 1 cup of shredded mozzarella, and ½ cup of grated Parmesan cheese. Add 1 egg, 2 tablespoons of chopped fresh basil, 1 teaspoon of garlic powder, salt, and pepper to taste. Mix everything until smooth and well-combined. 2. Stuffing the pasta shells method Take each cooked shell and stuff it with about 2 tablespoons of the ricotta mixture. Make sure you fill them generously. This will ensure every bite is creamy and flavorful. 1. Layering the marinara sauce Spread 1 cup of marinara sauce on the bottom of your greased baking dish. This will keep the shells moist as they bake. 2. Covering and baking the dish Arrange the stuffed shells in the dish, seam side up. Top them with the remaining marinara sauce. Then, sprinkle the rest of the mozzarella and Parmesan cheese over the sauce. Cover the dish with aluminum foil and bake for 25 minutes. After that, remove the foil and bake for an additional 10-15 minutes, until the cheese is bubbly and golden brown. These simple steps lead to a delightful dish that’s sure to please everyone. For the full recipe, check out the earlier section. To make great ricotta stuffed shells, cook the pasta to al dente. This means it should be firm but not hard. If you overcook the shells, they may break when you stuff them. Always check the package for cooking time, usually around 8-10 minutes. When stuffing, avoid overstuffing each shell. Filling them too much can cause them to burst during baking. Aim for about two tablespoons of filling per shell. This amount keeps the filling inside while allowing the cheese to melt perfectly. Pair your stuffed shells with a fresh green salad. A crisp Caesar or mixed greens salad works well. The lightness of the salad balances the richness of the cheese. Garlic bread is another great option. The crunchy bread complements the soft shells. For drinks, a light red wine like Chianti enhances the meal. If you prefer white wine, try a Pinot Grigio. Both wines bring out the flavors in the sauce and cheese. Adding spices and herbs can boost flavor. Try mixing in red pepper flakes for a bit of heat. Fresh basil and parsley also add a nice touch. These herbs brighten the dish and make it smell great. Using homemade marinara sauce can elevate the dish even more. It often tastes fresher than store-bought. However, if you're short on time, a good quality store-bought sauce works just fine. Look for one with no added sugars for the best taste. For more tips and the full recipe, check out the [Full Recipe]. {{image_2}} You can switch up the filling for your ricotta stuffed shells. One tasty option is a spinach and ricotta mix. Just add fresh spinach to the ricotta cheese and blend it well. This adds a nice green color and boosts nutrition. Another fun choice is to use meat or vegetarian alternatives. For meat lovers, ground beef or sausage works great. For a vegetarian option, try mushrooms or zucchini. These fillings add unique flavors and textures. The sauce can also change the whole dish. A creamy Alfredo sauce is a rich option. Just swap out the marinara for Alfredo. This gives a smooth and cheesy taste that many love. If you want something fresh, try pesto sauce. It adds a unique flavor twist. Just spread it over the shells instead of marinara. This can give your meal a bright and herby taste. For those following a vegan diet, you can make a vegan ricotta stuffing. Use blended tofu, nutritional yeast, and lemon juice. This mix mimics the taste of ricotta. If you want low-carb options, use zucchini or eggplant slices instead of pasta shells. You can layer them with the ricotta filling. This keeps the dish delicious while lowering carbs. Explore these variations to make your stuffed shells unique. Check out the Full Recipe for more details and tips! To keep your ricotta stuffed shells fresh, place them in an airtight container. Store them in the fridge. They last about three to four days. If you want to keep them longer, freezing is a great option. Just make sure to cool the shells first before freezing. This helps maintain their shape and flavor. When it's time to enjoy your leftovers, you have two good options: the microwave or the oven. - Microwave: Place a shell on a microwave-safe plate. Cover it with a damp paper towel. Heat for 1 to 2 minutes. Check if it's warm enough. If not, heat in 30-second bursts. - Oven: Preheat your oven to 350°F (175°C). Place the shells in a baking dish. Add a little marinara sauce on top to keep them moist. Cover with foil and bake for about 15-20 minutes. This method keeps the flavors intact. Freezing stuffed shells is easy. First, let them cool completely. Then, arrange them in a single layer on a baking sheet. Freeze them for about 1 hour. Once frozen, transfer them to a freezer bag. This prevents them from sticking together. To cook from frozen, no need to thaw. Just preheat your oven to 375°F (190°C). Place the frozen shells in a baking dish with some sauce. Cover it with foil and bake for about 40-45 minutes. Check they are heated all the way through. Enjoy your delicious, easy dinner anytime! For the full recipe, visit the link. Bake ricotta stuffed shells for 25 minutes at 375°F (190°C) with foil on. After that, remove the foil and bake for another 10-15 minutes. This extra time makes the cheese bubbly and golden. If you use a convection oven, check them a bit sooner, as they cook faster. Always keep an eye on those delicious shells to avoid overcooking! Yes, you can prep these shells ahead. Make the filling and stuff the shells the day before. Store them in the fridge covered with foil. This saves you time on busy nights. Just remember to let them sit out for 30 minutes before baking. This helps them cook evenly. Marinara is a classic choice for stuffed shells. Its rich flavor pairs well with the creamy ricotta. You can also try Alfredo sauce for a creamy twist. Pesto adds a fresh taste, too. Each sauce brings a unique flavor to the dish. Experiment to see what you like best! Look for a bubbly, golden top as a sign your shells are done. You can also check by inserting a knife in the middle. If it comes out hot, your shells are ready to eat. The cheese should be melted and the pasta soft but firm. Enjoy the aroma as they bake; it’s a good sign! We’ve covered how to make delicious stuffed pasta shells, including all the key ingredients. You learned ingredient substitutions, step-by-step prep instructions, and tips for perfect results. Variations and storage info also provide you with flexibility for future meals. In summary, stuffed shells are both simple and satisfying. With the right ingredients and steps, you can enjoy this classic dish any night of the week.](https://toastedrecipes.com/wp-content/uploads/2025/06/3875955c-1bbf-468c-b0b5-197fcc69ade3.webp)
The Best Ricotta Stuffed Shells Easy Dinner Recipe
If you’re craving a comforting dinner that’s easy to make and full of flavor, look no further! I’m excited to share my recipe for the
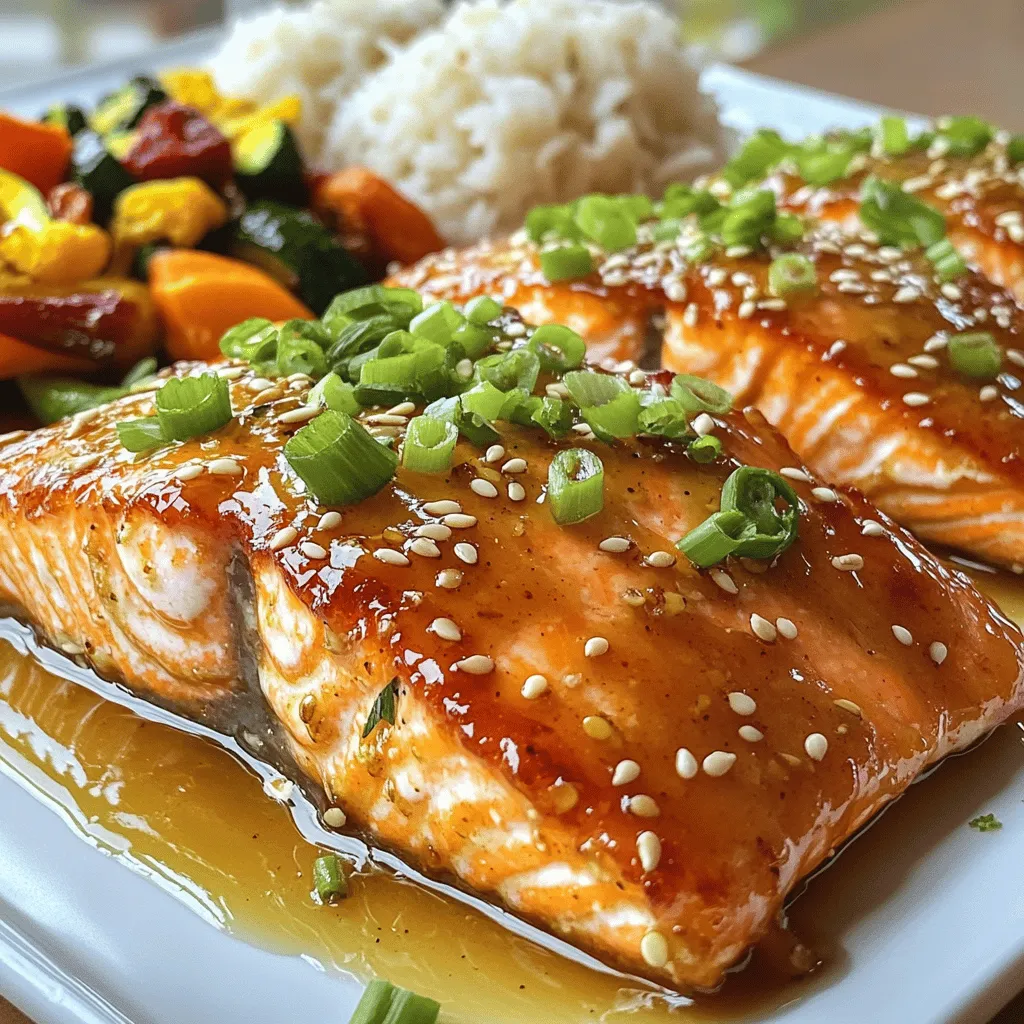
Perfectly Crispy Honey Garlic Salmon Recipe Delight
Get ready to impress your taste buds with my Perfectly Crispy Honey Garlic Salmon recipe! This dish combines sweet honey, savory garlic, and tender salmon
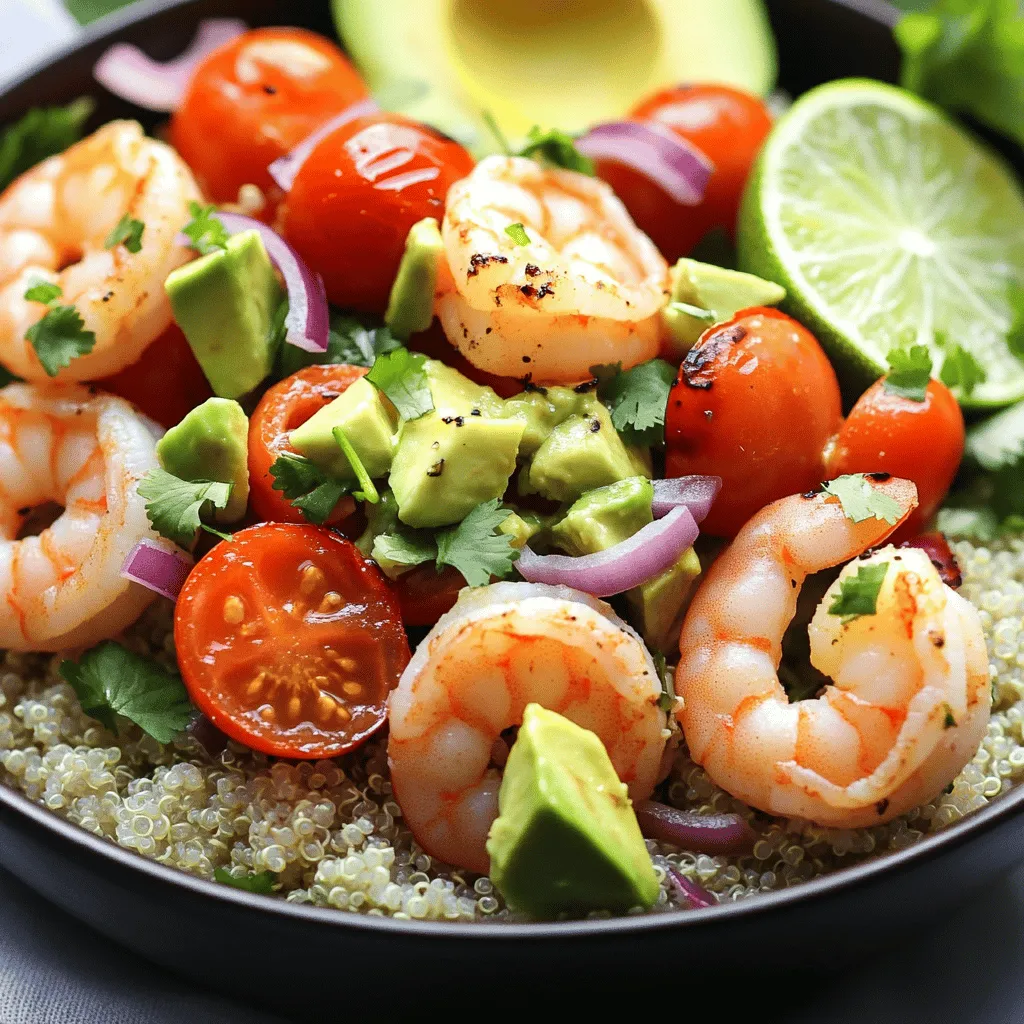
Grilled Shrimp Bowl with Avocado Salsa Delight
Looking to spice up your meals? This Grilled Shrimp Bowl with Avocado Salsa is perfect for you! It’s vibrant, tasty, and packed with healthy ingredients.
![- 4 large whole wheat tortillas - 8 ounces sliced turkey breast - 4 slices of cheddar cheese - 1 large avocado, sliced - 1 large tomato, sliced - 4 leaves of romaine lettuce You need whole wheat tortillas for a healthy base. Turkey breast adds protein and flavor. Cheddar cheese melts well and gives richness. Fresh avocado adds creaminess, while tomatoes and romaine lettuce add crunch. - 1/4 cup mayonnaise - 1 tablespoon Dijon mustard - Salt and pepper Mix mayonnaise with Dijon mustard for a tasty spread. This blend ties all flavors together. Don’t forget to season with salt and pepper. It enhances the taste of the wrap. - Fresh cilantro Cilantro adds a fresh kick and bright color. It’s not needed, but it makes your wraps look nice. This small touch can impress your friends and family. For the complete recipe, check out the Full Recipe link. To start, mix mayonnaise and Dijon mustard in a small bowl. Use a spoon to blend them well. This sauce adds flavor and creaminess to your wraps. Next, lay one tortilla flat on a clean surface. Spread a thin layer of your sauce over the tortilla. Make sure to cover the whole tortilla. Then, layer the turkey slices evenly across the tortilla. Leave about an inch from the edges. Add a slice of cheddar cheese on top of the turkey. Next, place a leaf of romaine lettuce, followed by slices of avocado and tomato. Season with salt and pepper for extra taste. Now, it's time to roll the wraps. Start from one edge and gently roll the tortilla tightly over the filling. Tuck in the ends as you go. This keeps everything inside. Once you finish rolling, slice each wrap in half diagonally. This way, you can see all the colorful ingredients inside. For a nice touch, you can garnish with fresh cilantro. Enjoy making this simple and delicious meal! For the full recipe, check [Full Recipe]. To keep your fillings snug, use a light hand when you roll. Start at one edge and fold tightly. Tuck in the ends as you roll. This method keeps everything inside. It prevents spills and helps you enjoy each bite. If you find the tortilla is tearing, warm it slightly. A soft tortilla rolls better. Serve your wraps on a wooden platter. This adds a rustic touch to your meal. Slice each wrap in half to show off the colorful layers. Pair them with a side of chips or a light salad. You can also add a small bowl of extra sauce for dipping. This makes the meal feel special and fun. Yes, you can prep these wraps in advance! Assemble the wraps and wrap them tightly in plastic. Store them in the fridge for up to two days. This makes lunch easy and quick. Just remember to keep the sauce separate if you want fresh taste. When ready to eat, slice and enjoy. For the full recipe, refer to the above instructions. {{image_2}} You can switch the turkey for chicken or ham. Both meats bring great taste. If you want a vegetarian option, try using grilled veggies or a plant-based protein. These changes let you enjoy different flavors while keeping the wrap fun. Adding more veggies makes the wrap even better. Try sliced cucumbers, bell peppers, or spinach. You can also use different cheese types. Feta or pepper jack cheese can add a nice twist. Get creative with what you have at home! Want to spice things up? Add hot sauce or a spicy mayo. Fresh herbs like basil or cilantro can also boost the flavor. These small changes make each bite exciting. Try out different combinations to find your favorite taste! To store leftover wraps, wrap them tightly in plastic wrap or foil. Place them in an airtight container. This keeps them fresh and prevents spills. You can store them in the fridge for up to three days. If you notice any sogginess, it’s best to eat them sooner. To freeze wraps for later, first, wrap each one in plastic wrap. Then, place them in a freezer-safe bag or container. This helps keep them from getting freezer burn. You can freeze the wraps for up to a month. When you’re ready to eat, just take one out and thaw it overnight in the fridge. Reheating wraps can be tricky. To keep the texture nice, use an oven or a skillet. If using an oven, preheat it to 350°F (175°C). Place the wrap on a baking sheet for about 10 minutes. For a skillet, heat it over medium heat. Cook for about 3-4 minutes on each side. This method warms the wrap without making it soggy. Enjoy your California Turkey Club Wraps with the same fresh taste! To make these wraps vegan, you can swap turkey for plant-based proteins. Use tempeh, tofu, or jackfruit as good options. For cheese, choose vegan cheese or skip it altogether. Instead of mayonnaise, try a blend of avocado and lemon juice. This keeps the wraps creamy and fresh. Load up on veggies, like bell peppers or cucumbers. You can also add sprouts for extra crunch. Yes, you can use different types of tortillas. Whole wheat tortillas are healthy and tasty. You may also try spinach or tomato tortillas for color. Corn tortillas offer a gluten-free option. Just keep in mind that each type will change the flavor slightly. Experiment to find your favorite! These wraps go great with many sides. Try serving with a light salad or fresh fruit. Chips add a nice crunch, too. You could serve them with carrot sticks or cucumber slices for a healthy choice. A side of pickles or olives can also give an extra zing. Enjoy your meal with any of these fun options! In this post, we covered how to make delicious California turkey club wraps. You learned about the key ingredients, like turkey, cheese, and fresh veggies. I shared step-by-step instructions for making the sauce, assembling the wraps, and rolling them up tight. We discussed tips for serving and packing them too. Finally, I offered variations and ways to store these wraps. Now you can enjoy a tasty, healthy meal any time. Try different flavors and have fun with your wraps!](https://toastedrecipes.com/wp-content/uploads/2025/06/e144c3f6-7cb0-456f-97dc-a2f608e88654.webp)
California Turkey Club Wraps Simple and Delicious Meal
Looking for a quick and tasty meal? California Turkey Club Wraps are the answer! They’re easy to make and loaded with fresh flavors. You can
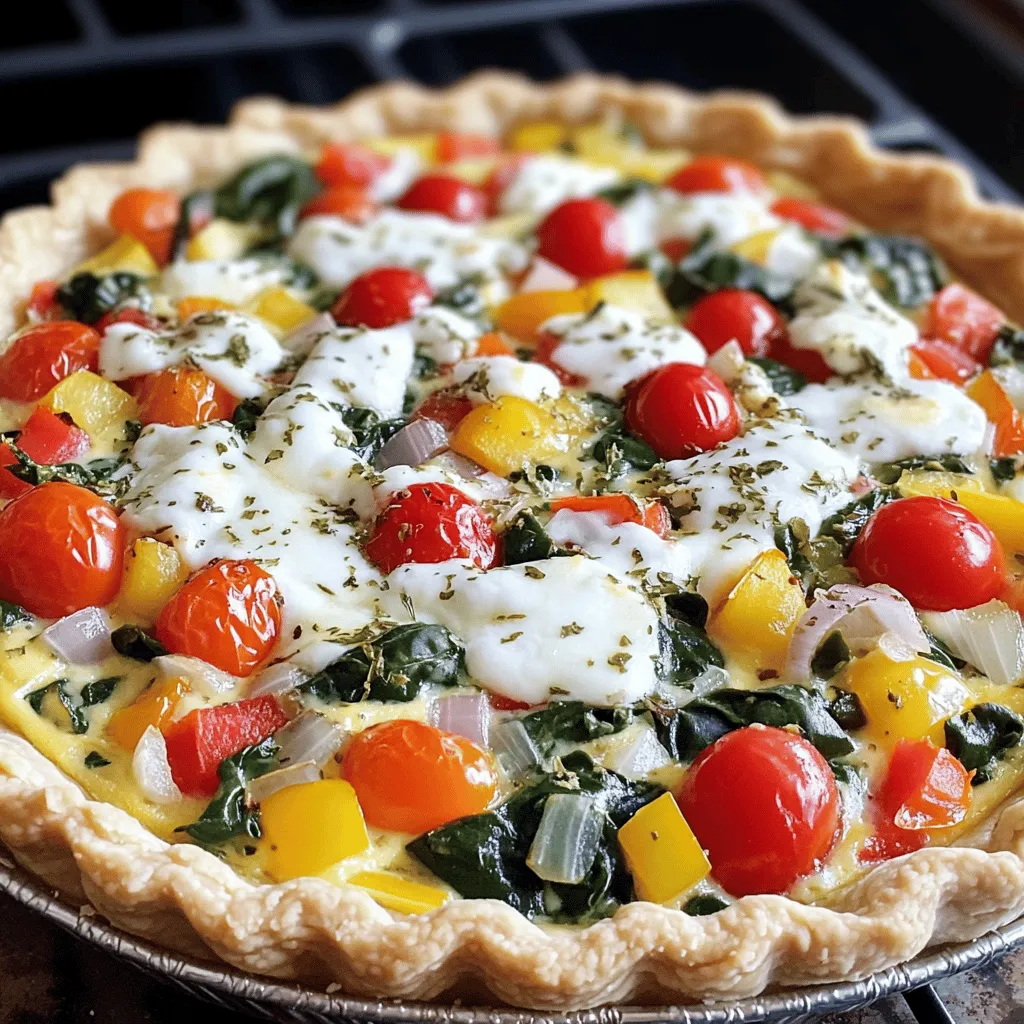
Crustless Cottage Cheese Quiche Easy and Tasty Dish
Looking for a quick and tasty dish? This Crustless Cottage Cheese Quiche is your answer! Packed with protein and flavor, it’s easy to make and