Dinner
![To make a great Crock Pot Chicken Alfredo, you need these key items: - 2 boneless, skinless chicken breasts - 4 cups fettuccine pasta - 4 cups chicken broth - 1 cup heavy cream - 1 cup grated Parmesan cheese - 3 cloves garlic, minced - 1 teaspoon Italian seasoning - 1 teaspoon salt - 1/2 teaspoon black pepper - 2 tablespoons chopped fresh parsley (for garnish) These ingredients create a rich and creamy dish. The chicken and broth provide a nice base. The heavy cream and Parmesan bring the creaminess. You can add more flavor to your dish with these extras: - 1/2 cup sun-dried tomatoes - 1 cup fresh spinach - 1/2 teaspoon red pepper flakes - 1 teaspoon lemon juice These additions can elevate your dish. Sun-dried tomatoes add sweetness. Spinach adds nutrition, and red pepper flakes give a spicy kick. If you lack an ingredient, here are some swaps you can use: - Use vegetable broth instead of chicken broth for a vegetarian version. - Swap heavy cream for half-and-half if you want a lighter sauce. - Use grated Romano cheese instead of Parmesan for a different taste. These substitutions keep your dish tasty without missing out. Always feel free to customize based on what you have at home. For the full recipe, check the instructions carefully to ensure you don’t miss any steps. Start with two boneless, skinless chicken breasts. Place them at the bottom of your slow cooker. Next, sprinkle minced garlic over the chicken. Add Italian seasoning, salt, and black pepper. This mix gives the chicken great flavor. Pour four cups of chicken broth over the chicken. Make sure it's well covered to soak up all the goodness. Cover your slow cooker tightly. Set it to low and let it cook for four to six hours. This slow cooking makes the chicken tender. It will easily shred with a fork when done. If you are in a hurry, check it after four hours. About 30 minutes before serving, add four cups of fettuccine pasta into the slow cooker. If the cooker is too full, cook the pasta separately. Once the chicken is cooked, shred it using two forks. Stir in one cup of heavy cream and one cup of grated Parmesan cheese. Mix well to create a creamy sauce. Let it cook for an extra 15 to 20 minutes on low. This will heat everything through and make it nice and creamy. To get that rich, creamy texture in your Crock Pot Chicken Alfredo, use heavy cream. It adds depth and smoothness. Make sure to stir in the cream and Parmesan at the end. This helps the cheese melt evenly. Let it cook for an extra 15 to 20 minutes on low. This step makes everything blend perfectly. If you’re in a hurry, prep your chicken the night before. Season it and place it in the slow cooker. Just add the broth in the morning. You can also cook the pasta separately if your slow cooker is full. Cooking the pasta on the stove saves time and keeps it from getting mushy. For tender chicken, cook on low for 4 to 6 hours. If you set it on high, aim for about 2 to 3 hours. When adding pasta, do it 30 minutes before serving. This ensures the pasta is cooked but not overdone. Following these times will help you get a tasty meal every time. For the full recipe, check the detailed instructions provided earlier. {{image_2}} You can add many vegetables to your Chicken Alfredo. Broccoli, spinach, or bell peppers work well. These add color and nutrients. To add them, chop the veggies into small pieces. Stir them in the slow cooker about 30 minutes before the dish is done. They will cook and soak up all the flavors. This makes your meal healthy and tasty. If you want to switch things up, try different proteins. Shrimp, turkey, or tofu can be great swaps. Just make sure to adjust the cooking time. For shrimp, add them in the last 10 minutes to avoid overcooking. For turkey or tofu, cut them into small pieces and follow the same steps as chicken. Each protein brings its own unique taste to the dish. Fettuccine is the classic choice for Alfredo. However, you can use other pasta types. Penne or rotini also work well. They hold the sauce nicely. You can even try gluten-free pasta if you prefer. Just cook the pasta according to the package, then add it to the slow cooker. This makes for a fun twist on the traditional recipe. For the full recipe, check back to the beginning! I love to save leftovers from my Crock Pot Chicken Alfredo. To keep it fresh, let it cool to room temperature. Then, transfer it to an airtight container. Make sure to store it in the fridge. It will stay good for about 3 to 4 days. If you want to keep it longer, consider freezing it. Reheating this dish is easy. You can use the microwave or stove. If using the microwave, place it in a safe bowl. Cover it with a lid to keep moisture in. Heat it in short bursts, stirring in between. If you prefer the stove, warm it over low heat. Stir often to avoid burning. Freezing is a great way to keep leftovers. First, let the chicken Alfredo cool completely. Then, place it in a freezer-safe container. You can also use freezer bags. Make sure to squeeze out as much air as you can. It can stay in the freezer for up to 3 months. When you’re ready to eat, thaw it in the fridge overnight before reheating. For full details, check out the Full Recipe. Yes, you can use frozen chicken. Just add about 30 minutes to the cooking time. The slow cooker will safely cook the frozen chicken. Make sure the chicken reaches 165°F for safety. To make this dish healthier, consider these tips: - Use low-fat cream or milk instead of heavy cream. - Add more vegetables, like spinach or broccoli, for extra nutrients. - Swap regular pasta for whole wheat or veggie-based pasta. - Cut back on cheese or use a lower-fat version. Crock Pot Chicken Alfredo pairs well with: - Steamed vegetables, like broccoli or green beans. - A fresh garden salad with light dressing. - Garlic bread for a tasty complement. - Roasted asparagus for a colorful side. Explore the [Full Recipe] for more details on making this creamy dish! This blog post covers everything you need for a tasty Crock Pot Chicken Alfredo. You learned about essential and optional ingredients, plus swaps for your pantry. The step-by-step instructions showed you how to prepare, cook, and finish the sauce. We shared tips for a creamy dish and time-saving tricks. You explored variations with veggies and proteins, along with storage tips for leftovers. Now, you’re ready to create a delicious meal. Enjoy experimenting and making this dish your own!](https://toastedrecipes.com/wp-content/uploads/2025/06/a3ab8028-a561-474f-86d6-4553a3d4fc86.webp)
Crock Pot Chicken Alfredo Creamy and Flavorful Dish
If you love creamy pasta dishes, then you must try this Crock Pot Chicken Alfredo. It’s rich, flavorful, and super easy to make. Just toss

Ultimate Southern Fried Chicken Crispy and Flavorful
Craving the crunch and flavor of classic Southern fried chicken? You’re in the right spot! Join me as we dive into the ultimate recipe that
![Fresh ingredients bring life to your okra stew. Here’s what you’ll need: - 1 pound fresh okra, sliced - 1 medium onion, chopped - 3 cloves garlic, minced - 1 bell pepper (red or green), chopped - 2 medium tomatoes, diced - 1 can (15 oz) diced tomatoes with green chilies Next, let's talk about the spices and seasonings that add flavor: - 1 teaspoon ground cumin - 1 teaspoon smoked paprika - ½ teaspoon cayenne pepper (adjust for spice preference) - Salt and pepper to taste Now for the liquids and fats, which help create the stew’s rich texture: - 1 cup vegetable broth - 1 tablespoon olive oil - Fresh cilantro for garnish Using fresh ingredients makes a big difference in taste. Each item adds its own flavor, making the dish exciting. For the full recipe, check out Okra Delight Stew. - Prepare all ingredients before starting to cook. - Heat the olive oil in a large pot over medium heat. - Add the chopped onion and sauté until translucent. - Stir in minced garlic and bell pepper, cooking until softened. - Introduce the sliced okra and cook until golden. - Incorporate tomatoes, spices, and vegetable broth. - Simmer, cover, and cook for 20-25 minutes. - Adjust seasoning and consistency before serving. For this okra stew, start by getting everything ready. This helps you cook smoothly. Heat olive oil in a large pot. Use medium heat so it warms up well. Once the oil is hot, toss in the chopped onion. Stir it until it turns translucent. This step brings out the onion's flavor. Next, add minced garlic and chopped bell pepper. Cook these until they are soft and mix well. Now, it's time to add the star of the dish—the sliced okra. Cook it until it turns a nice golden color. This gives the stew depth and a great taste. Now we finalize the stew. Pour in diced fresh tomatoes, canned tomatoes, and the spices. Include ground cumin and smoked paprika for warmth. Add cayenne pepper if you like it spicy. Finally, pour in the vegetable broth. Bring the mixture to a simmer, then cover the pot. Let it cook for about 20-25 minutes. This allows the flavors to meld beautifully. After cooking, taste it. Adjust the seasoning and consistency to your liking. You can check the full recipe for more details, but this method will ensure your okra stew is a treat at any meal. - Experiment with different spices for added depth. - Try a splash of lemon juice for brightness. To make your okra stew pop, mix in spices like coriander or turmeric. These can add fun twists to the flavor. A hint of lemon juice can wake up the dish. This small step makes the stew taste fresh and vibrant. - Use fresh okra for the best texture. - Stir occasionally to avoid sticking and burning. Fresh okra is key for a great stew. Look for firm, bright green pods. They should be free of blemishes. When cooking, stir the stew now and then. This helps keep the okra tender and prevents it from sticking to the pot. - Garnish with fresh cilantro for a pop of color. - Serve with crusty bread or over rice for a complete meal. To make your dish eye-catching, sprinkle fresh cilantro on top. It adds a nice color and flavor. Pair the stew with crusty bread for dipping or serve it over rice for a filling meal. Each bite will be a delight! For the full recipe, check [Full Recipe]. {{image_2}} To make a vegan version of Okra Stew, you can simply replace the vegetable broth with water. This keeps the dish light and fresh. Just skip any added meats. You can still enjoy all the great flavors! If you want to add protein, consider cooked shrimp or chicken. Both options add rich flavors and make the stew heartier. Just add them in during the last few minutes of cooking. This way, they heat through without overcooking. Explore exciting regional twists by changing up spices or vegetables. For instance, you can try adding curry powder for an Indian flair. Or, toss in some diced zucchini for a Southern twist. The choice is yours! Each variation brings a new taste to this classic stew. For the full recipe, check out the details above. Store your okra stew in an airtight container in the fridge. It stays good for up to 3 days. This helps keep the flavors fresh. When you're ready to eat, just take it out and reheat. You can freeze portions of the stew for later use. Make sure to use a freezer-safe container. When you want to enjoy it again, thaw it in the fridge overnight. This keeps the stew tasty and safe. For the best results, reheat your okra stew on the stove. Pour it into a pot and warm it over low heat. If it seems thick, add a splash of broth. This will help bring back its creamy texture. Enjoy the warm flavors once more! Okra stew is a hearty dish filled with flavor. It blends fresh okra, tomatoes, and spices. This dish has roots in African, Middle Eastern, and Southern U.S. cuisines. Each region adds its own twist. The combination of ingredients creates a rich taste. You can enjoy it as a main dish or side. Yes, you can prepare okra stew in advance. Cook the stew as directed and let it cool. Store it in an airtight container in the fridge. It stays fresh for about three days. When ready to eat, reheat on the stove. Add a splash of broth if it seems thick. If you don’t have an ingredient, here are some ideas: - Instead of fresh okra, use frozen okra. - Swap canned tomatoes for fresh tomatoes if needed. - Bell peppers can be replaced with zucchini or carrots. - Use your favorite broth if vegetable broth is not available. To cut down on the sliminess, try these tips: - Wash and dry okra before slicing. - Sauté the sliced okra until lightly browned. - Avoid cooking okra too long; short cooking times help. - Add acidic ingredients like tomatoes or lemon juice. Yes, okra stew is gluten-free. All the ingredients in the recipe are safe for a gluten-free diet. Just be sure to check labels on canned goods. Enjoy this dish without worrying about gluten! For the full recipe, check out Okra Delight Stew. Okra stew is a flavorful dish that highlights fresh ingredients, spices, and cooking techniques. From the vibrant colors of fresh okra and tomatoes to the savory spices like cumin and paprika, this dish is both hearty and satisfying. Experiment with variations to suit your taste, whether vegan or protein-packed. Store leftovers easily for later meals. With simple steps, you can enjoy a nutritious bowl of okra stew anytime. Get started in your kitchen and make this tasty dish your own!](https://toastedrecipes.com/wp-content/uploads/2025/06/8739eb76-fb2a-4049-a8f9-5d1fce515a32.webp)
Okra Stew Flavorful Dish for Any Meal
Are you ready to dive into a dish that combines flavor, nutrition, and comfort? Okra stew is a delicious and hearty meal that suits any
![To make the best baked mac and cheese, gather these simple items: - 8 oz elbow macaroni - 2 tablespoons unsalted butter - 2 tablespoons all-purpose flour - 2 cups milk (whole or 2%) - 1 teaspoon Dijon mustard - 1/2 teaspoon garlic powder - 1/2 teaspoon onion powder - 1/4 teaspoon cayenne pepper (optional) - 2 cups shredded sharp cheddar cheese - 1 cup shredded mozzarella cheese - Salt and pepper to taste - 1/2 cup breadcrumbs (for topping) - 2 tablespoons olive oil - Fresh parsley for garnish (optional) Using quality ingredients makes a big difference. Here are some tips: - Cheese: Use sharp cheddar for a bold flavor. Mixing in mozzarella adds creaminess. - Milk: Whole milk will give a rich taste. If you want lower fat, use 2%. - Pasta: Cook the macaroni until just al dente. It will cook more in the oven. - Butter and Flour: Make a roux for a smooth cheese sauce. Cook it just until bubbly. You can swap some ingredients based on your taste or needs: - Pasta: Any short pasta works well, such as shells or cavatappi. - Cheese: Try gouda or fontina for a different flavor. - Breadcrumbs: Use crushed crackers or panko for crunch. - Milk: For a dairy-free option, use almond or oat milk. - Spices: Add spices like paprika or nutmeg for extra warmth. Feel free to explore the Full Recipe for detailed steps and tips! To start, gather all your ingredients. You will need: - 8 oz elbow macaroni - 2 tablespoons unsalted butter - 2 tablespoons all-purpose flour - 2 cups milk (whole or 2%) - 1 teaspoon Dijon mustard - 1/2 teaspoon garlic powder - 1/2 teaspoon onion powder - 1/4 teaspoon cayenne pepper (optional) - 2 cups shredded sharp cheddar cheese - 1 cup shredded mozzarella cheese - Salt and pepper to taste - 1/2 cup breadcrumbs (for topping) - 2 tablespoons olive oil - Fresh parsley for garnish (optional) Next, preheat your oven to 350°F (175°C). This ensures even cooking for the mac and cheese. Boil water in a pot and cook the elbow macaroni according to the package instructions until it's al dente. Then, drain the macaroni and set it aside. In a large saucepan, melt the butter over medium heat. Once melted, add the flour. Whisk it for about a minute until it forms a paste. This step helps get rid of the raw flour taste. Gradually add the milk while whisking to avoid lumps. Keep stirring until the sauce thickens and bubbles, which takes about 5-7 minutes. Once the sauce is thick, take it off the heat. Stir in the Dijon mustard, garlic powder, onion powder, and cayenne pepper if you like a little heat. Season it with salt and pepper. Now, add 1 1/2 cups of shredded cheddar cheese and all of the mozzarella cheese. Stir until it melts and becomes smooth. Fold in the cooked macaroni with the cheese sauce. Make sure everything is well combined. Transfer this mix into a greased 9x13-inch baking dish. Now for the topping! In a small bowl, mix the breadcrumbs with olive oil until the crumbs are coated. Sprinkle this mixture evenly over the mac and cheese. To make it even cheesier, add the remaining 1/2 cup of shredded cheddar cheese on top of the breadcrumbs. Bake in the preheated oven for 25-30 minutes. You want the top to be golden brown and bubbly. Once done, take it out and let it sit for 5 minutes before serving. If you like, garnish with fresh parsley for a nice touch. This makes the dish pop and look inviting. Feel free to check out the Full Recipe for any details you might need! To get the creamiest mac and cheese, start with a good cheese blend. I recommend using sharp cheddar and mozzarella for the best melt. When making the cheese sauce, cook it slowly over medium heat. This helps the cheese melt evenly. Always whisk the sauce well to avoid lumps. Adding a bit of Dijon mustard enhances the flavor and creaminess. Lastly, avoid overcooking the pasta; it should be al dente before mixing with the sauce. This prevents it from getting mushy in the oven. One common mistake is using low-fat milk. Whole milk or 2% milk gives the best texture. Another issue is not seasoning enough. Salt and pepper are key for flavor. Make sure to taste the cheese sauce before adding the pasta. Also, don’t skip the breadcrumbs on top. They add a nice crunch that balances the creamy dish. Lastly, avoid cooking the mac and cheese too long in the oven; you want it bubbly and golden, not dry. To boost the flavor of your baked mac and cheese, use fresh spices. Garlic powder and onion powder add depth. If you want a little heat, cayenne pepper works great. For a gourmet touch, consider adding cooked bacon or sautéed vegetables. You can also stir in some grated Parmesan cheese for a salty kick. Lastly, let the dish rest for a few minutes after baking. This helps the flavors meld and makes serving easier. For the full recipe, check out the Ultimate Creamy Baked Mac and Cheese. {{image_2}} You can easily boost the flavor of baked mac and cheese. Try adding cooked bacon, ham, or sausage. These meats add a nice savory touch. Veggies also work well; think broccoli, spinach, or even tomatoes. You can mix in some sautéed onions or peppers for a sweet crunch. This makes the dish more colorful and fun. Adding a splash of hot sauce or a sprinkle of smoked paprika can also enhance the taste. Feel free to get creative! While cheddar and mozzarella are classic, don't stop there. You can mix different cheeses for a unique taste. Gouda gives a creamy and smoky flavor. Fontina melts beautifully and adds richness. Try pepper jack for a spicy kick. You can even use blue cheese for a bold twist. Each cheese has its own character, so explore until you find your favorite blend. This keeps your baked mac and cheese exciting every time. If you want a healthier version, swap out the elbow macaroni for whole wheat or chickpea pasta. This adds fiber and protein. Use low-fat milk and cheese to cut calories. You can also add cauliflower or zucchini to the cheese sauce. This makes it creamy while sneaking in extra veggies. For a gluten-free option, use gluten-free pasta and flour. These changes keep the dish tasty while making it a bit better for you. Check the [Full Recipe] for detailed instructions on making the perfect baked mac and cheese! After enjoying your baked mac and cheese, store any leftovers in an airtight container. Let it cool down to room temperature first. You can keep it in the fridge for up to three days. This will help maintain its taste and texture. Make sure to cover it well to prevent drying out. When you're ready to enjoy your leftovers, reheating is simple. Preheat your oven to 350°F (175°C). Place the mac and cheese in a baking dish and add a splash of milk. This keeps it creamy. Cover with foil to avoid burning the top. Bake for about 15-20 minutes or until heated through. You can also use a microwave. Heat in short bursts, stirring in between. This helps it heat evenly. Freezing baked mac and cheese is a great way to enjoy it later. First, let it cool completely. Then, place it in a freezer-safe container or wrap it tightly in plastic wrap and foil. It can last up to three months in the freezer. When you're ready to eat, thaw it overnight in the fridge. Reheat it in the oven for the best results. This way, you’ll have a delicious meal ready when you need it! For the full recipe, check out the Ultimate Creamy Baked Mac and Cheese. This Baked Mac and Cheese stands out because of its rich and creamy cheese sauce. I use sharp cheddar and mozzarella for the best flavor. The blend creates a perfect gooey texture. I also add a hint of Dijon mustard and spices for depth. The golden breadcrumb topping gives it a nice crunch. Each bite feels like a warm hug on a plate. These small details make it truly the best. Yes, you can swap elbow macaroni for other pasta shapes. Penne, shells, or fusilli work well too. Just choose a pasta that holds the cheese sauce well. Make sure to cook it al dente to avoid mushiness in the oven. Each shape brings a unique twist to the dish. This dish takes about 25 to 30 minutes to bake. You want the top to turn golden brown and bubbly. Preheating your oven to 350°F (175°C) helps achieve that perfect texture. The wait is worth it when you see that cheesy goodness! Absolutely! You can prepare this dish a day ahead. Just follow the recipe and assemble it in the baking dish. Cover it with plastic wrap and store it in the fridge. When you’re ready to bake, remove the wrap and bake as directed. It’s a great time-saver for busy days or gatherings. Yes, you can make a vegan version! Use plant-based pasta and dairy-free cheeses. Almond milk or oat milk works well to replace regular milk. Nutritional yeast can add a cheesy flavor too. Make sure to check the labels for vegan-friendly ingredients. This way, everyone can enjoy a comforting bowl of mac and cheese. For the full recipe, check out the Ultimate Creamy Baked Mac and Cheese. In this post, we covered key ingredients, cooking steps, and helpful tips for the best baked mac and cheese. We also explored yummy variations, smart storage ideas, and answered common questions. Remember, great mac and cheese has the right blend of flavors and textures. Use these tips to craft a dish everyone will love. With practice, you’ll create your perfect version. Enjoy making this comfort food classic!](https://toastedrecipes.com/wp-content/uploads/2025/06/924175aa-d854-4bd3-88e5-ef49f63c79c5.webp)
The BEST Baked Mac and Cheese Flavorful Comfort Dish
Are you ready to dig into a bowl of the BEST Baked Mac and Cheese? This dish is the ultimate comfort food, perfect for any
. Gather these items, and you’ll be on your way to a delicious dinner! Start by boiling a large pot of salted water. Once it bubbles, add 12 ounces of fettuccine or spaghetti. Cook it according to the package instructions until it is al dente. This usually takes about 8 to 10 minutes. Drain the pasta in a colander, but save a little pasta water for later. Set the pasta aside. In a large skillet over medium heat, melt 2 tablespoons of unsalted butter. Once the butter is melted, add 2 boneless, skinless chicken breasts, cut into bite-sized pieces. Season the chicken with salt and pepper. Cook it for about 5 to 7 minutes. The chicken should be golden brown and fully cooked. Remove it from the skillet and set it aside. In the same skillet, add the remaining 2 tablespoons of butter. Once melted, add 6 minced garlic cloves and 1 teaspoon of red pepper flakes if you want some heat. Sauté this mixture for 1 to 2 minutes. You want the garlic to be fragrant and golden but not burnt. Now, pour in 1 cup of chicken broth and bring it to a simmer. Lower the heat and stir in 1 cup of heavy cream. Let this mixture simmer for a few minutes, allowing it to thicken slightly. Then, add the cooked chicken back into the skillet, followed by the drained pasta. Stir well to combine everything. If the sauce feels too thick, add a splash of the reserved pasta water to loosen it. Finally, stir in 1 cup of grated Parmesan cheese until it melts and makes the dish creamy. Taste the sauce and add more salt and pepper if needed. For a fresh finish, sprinkle chopped parsley on top before serving. Enjoy your delicious garlic butter chicken pasta! For the full recipe, check out the original instructions. To make the best garlic butter sauce, use fresh garlic. Fresh garlic has a strong flavor that dried garlic lacks. You should also sauté the garlic just until it turns golden. Cooking it too long can make it bitter. If you want a kick, add red pepper flakes. They bring heat without overpowering the dish. Always taste your sauce before serving. Adjust the salt and pepper to your liking. One big mistake is overcooking the pasta. Aim for al dente, which means firm but not hard. Another error is not saving pasta water. This starchy water helps the sauce stick to the pasta. When sautéing chicken, don’t overcrowd the pan. This causes steaming instead of browning. Lastly, avoid skipping the cheese. Parmesan adds creaminess and flavor. If you're out of chicken, try shrimp or tofu for a different taste. You can swap heavy cream for half-and-half for a lighter sauce. Don’t have Parmesan? Use Pecorino Romano or nutritional yeast for a vegan option. Fresh parsley can be replaced with basil or spinach to add color and flavor. Always match the substitutes to the dish to keep it delicious. For more details, check the Full Recipe. {{image_2}} You can boost your Garlic Butter Chicken Pasta by adding veggies. Try spinach, broccoli, or bell peppers. These add color and nutrition. Simply sauté them in the same pan as the chicken. Add them before the garlic for extra flavor. This makes your meal heartier and more vibrant. If you like heat, spice it up! Add more red pepper flakes to the garlic butter sauce. You can also use a dash of hot sauce. This brings a kick that pairs well with the creamy pasta. Adjust the spice to your taste. It’s an easy way to change the whole dish! Want a lighter meal? Swap heavy cream for half and half. It still gives a creamy taste but cuts the fat. You can also use less butter. This keeps the dish tasty but lowers the calories. You still get a satisfying meal without feeling too heavy. Check out the Full Recipe to see how these changes work! After enjoying your garlic butter chicken pasta, store any leftovers in an airtight container. Make sure to let it cool before sealing. This helps keep the pasta fresh. You can store it in the fridge for up to three days. When stored properly, the flavors remain rich and delicious. To reheat your pasta, use the microwave or a skillet. If using the microwave, place it in a bowl and cover it with a damp paper towel. Heat in short bursts, stirring in between to ensure even warming. If using a skillet, add a splash of chicken broth or water to prevent sticking. Heat over medium heat, stirring until warm. You can freeze garlic butter chicken pasta, but it is best to do so without the cheese. Place the cooled pasta in a freezer-safe container. It can last up to three months in the freezer. When ready to eat, thaw it overnight in the fridge. Reheat it on the stove, adding cheese during the last few minutes for that creamy finish. Enjoy your meal again with great taste! For the full recipe, check the details above. To make your Garlic Butter Chicken Pasta creamy, add more heavy cream. You can also mix in some cream cheese. Start with a little and stir well. This will give your dish a rich, smooth texture. Remember to adjust the seasoning if you add more cream. Yes, you can prepare this dish in advance. Cook the pasta and chicken, then store them separately. When you are ready to eat, heat the chicken and sauce together. Add the pasta at the last minute. This keeps everything fresh and tasty. You can serve Garlic Butter Chicken Pasta with several side dishes. A simple green salad works well. Garlic bread is another great choice. You might also try steamed broccoli or roasted vegetables. These sides add color and flavor to your meal. To make this recipe vegetarian, swap the chicken for mushrooms or tofu. Use vegetable broth instead of chicken broth. You can also add a mix of vegetables like bell peppers or spinach. This keeps the dish full of flavor while being meat-free. For the full recipe, check the earlier section. In this article, we explored the key ingredients for Garlic Butter Chicken Pasta. We walked through simple steps, from cooking the pasta to finishing touches. I shared tips to perfect the sauce and avoid common mistakes. You can also try different variations, add veggies, or make lighter options. Lastly, we discussed how to store leftovers and reheat them properly. Remember, cooking should be fun and creative. Use this recipe as a base and make it your own. Enjoy your delicious dish!](https://toastedrecipes.com/wp-content/uploads/2025/06/81308886-a7de-4c4d-9bd4-b8cf4ecfc067.webp)
Garlic Butter Chicken Pasta Delicious Dinner Option
If you’re searching for a quick and tasty dinner option, look no further! Garlic Butter Chicken Pasta is a flavorful dish that combines tender chicken,

Spicy Cajun Honey Butter Chicken Flavorful Dish
Are you ready to spice up your dinner routine? This Spicy Cajun Honey Butter Chicken is a mouthwatering dish that combines sweet and heat. You’ll
![- 1 lb sirloin steak, cut into 1-inch cubes - 4 cloves garlic, minced - 2 tablespoons olive oil The main ingredients create the rich taste in garlic steak bites. Sirloin steak is tender and juicy. Cutting it into cubes helps it cook quickly. Fresh garlic gives a strong flavor that pairs well with steak. Olive oil adds moisture and helps the spices stick. - 1 tablespoon fresh rosemary, chopped - 1 teaspoon smoked paprika - Salt and black pepper to taste - Fresh parsley, chopped (for garnish) Seasoning enhances the flavor of the steak. Fresh rosemary brings a lovely, earthy note. Smoked paprika adds a hint of smokiness. Salt and black pepper balance the dish. Garnishing with parsley makes it look fresh and bright. - 1 tablespoon butter Butter adds richness and depth to the dish. When you toss the cooked steak bites in butter, it creates a lovely sauce. This sauce coats each bite and brings all the flavors together. For the full experience, check out the full recipe to create your own garlic steak bites. Start by gathering your ingredients. In a large bowl, combine the sirloin steak, minced garlic, olive oil, chopped rosemary, smoked paprika, salt, and pepper. Mix everything well. This step is key. Marinating your steak for at least 30 minutes helps the flavors blend. If you have time, letting it sit longer enhances the taste even more. Next, heat a large skillet over medium-high heat. Once it's hot, add the marinated steak bites. Make sure not to crowd the pan; this allows for even cooking. Cook for about 2-3 minutes per side. For medium-rare, aim for an internal temperature of 135°F. Remember, you can adjust the time to reach your preferred doneness. After cooking, lower the heat to medium-low. Add a tablespoon of butter to the skillet. Let it melt and mix with the juices from the steak. This creates a rich, tasty sauce. Toss the steak bites in this garlic butter sauce for about a minute. This step adds an extra layer of flavor that you won’t want to miss. Once done, garnish with fresh parsley before serving. Enjoy! For the complete step-by-step, check out the Full Recipe. For the best flavor, marinate your steak bites. Start by mixing the steak with minced garlic, olive oil, rosemary, smoked paprika, salt, and pepper. This blend gives your meat a rich taste. I recommend marinating for at least 30 minutes. If you have time, let it sit for 2 hours in the fridge. The longer you marinate, the more flavor it absorbs. You can cook garlic steak bites in different ways. A skillet works great, but grilling or air-frying adds unique flavors. When using a skillet, heat it on medium-high for the best sear. Avoid overcrowding the pan; this keeps the bites juicy. Cook each side for 2-3 minutes for perfect doneness. Use a meat thermometer to check. Aim for 135°F for medium-rare. Garnishing makes your dish look appealing. After cooking, sprinkle fresh parsley on top. It adds color and freshness. Serve these bites with sides like mashed potatoes or a fresh salad. You can also pair them with a garlic sauce or chimichurri for extra flavor. This creates a well-rounded meal that impresses everyone at the table. For the full recipe, check out the detailed steps above. {{image_2}} For garlic steak bites, the best cuts of steak are sirloin, ribeye, or tenderloin. These cuts offer great flavor and tenderness. If you want to try different meats, you can use chicken or pork. Both will soak up the garlic flavor well, giving you a tasty twist. You can add spices or herbs to change the taste. Try adding cayenne pepper for heat, or thyme for a fresh note. Mixing in vegetables can also enhance the dish. Bell peppers or mushrooms work great. They add color and flavor while cooking with the steak bites. Garlic steak bites make a perfect appetizer or main dish. Serve them on skewers for fun finger food. You can pair them with sauces like chimichurri or a creamy garlic dip. For sides, think about mashed potatoes or grilled veggies. These will balance the rich flavors of the steak bites. For the full recipe, check the [Full Recipe]. To keep your garlic steak bites tasty, refrigerate them right away. Place them in an airtight container. This keeps the flavor fresh and prevents drying. Try to use them within 3 days for the best taste. If you still have some left, make sure the lid is on tight to block air. When you want to enjoy your garlic steak bites again, the right reheating method matters. The microwave is quick, but it can dry out the meat. Set it to medium power and heat in short bursts. Check every 30 seconds to keep it juicy. Using a skillet is my favorite way to reheat. Add a bit of oil or butter to the pan on low heat. This method warms the bites evenly and keeps them flavorful. Sear them for just a couple of minutes until heated through. You can freeze cooked garlic steak bites! Just let them cool first. Place them in a freezer-safe bag or container. Remove as much air as you can to avoid freezer burn. They last up to 3 months in the freezer. To thaw, move them to the fridge overnight. If you’re in a hurry, you can use the microwave’s defrost feature. After thawing, reheat them in the skillet for the best results. This method keeps that rich flavor intact. Enjoy your tasty bites later with the same great taste! You should marinate the steak for at least 30 minutes. This allows the flavors to soak in. If you want even more flavor, marinate for up to 2 hours in the fridge. The longer it sits, the richer the taste. Yes, you can use other cuts like ribeye or flank steak. These cuts also work well and add great flavor. If you prefer chicken or pork, those options are fine too. Just adjust cooking times for different meats. Garlic steak bites pair well with many sides. Consider serving them with mashed potatoes or roasted veggies. A fresh salad is also a great choice. You can even serve them on skewers for fun appetizers. For the full recipe, check here! This blog post covered how to make delicious garlic steak bites. We discussed the key ingredients, from sirloin to fresh herbs. Marinating really brings out the flavor, so don’t skip it! You learned various cooking methods, tips for serving, and how to store leftovers. Try different cuts or spices to make this dish your own. Enjoy cooking, and make these bites a part of your meal rotation! They’re quick, tasty, and sure to impress. Happy cooking!](https://toastedrecipes.com/wp-content/uploads/2025/06/f875a3fd-7f15-44b4-9e97-03716fa97a98.webp)
The Best Garlic Steak Bites Rich Flavor in Every Bite
Want to bring bold flavor to your dinner table? Discover The Best Garlic Steak Bites Rich Flavor in Every Bite. You’ll learn how to create

Sweet & Spicy Korean Fried Chicken Delightful Meal
Are you ready to spice up your dinner? Sweet & Spicy Korean Fried Chicken brings bold flavors to your table. This dish combines a crispy

Crispy Hot Honey Feta Chicken Flavorful Delight
Are you ready to taste the extraordinary? Crispy Hot Honey Feta Chicken is a dish that bursts with flavor and texture. This simple recipe combines
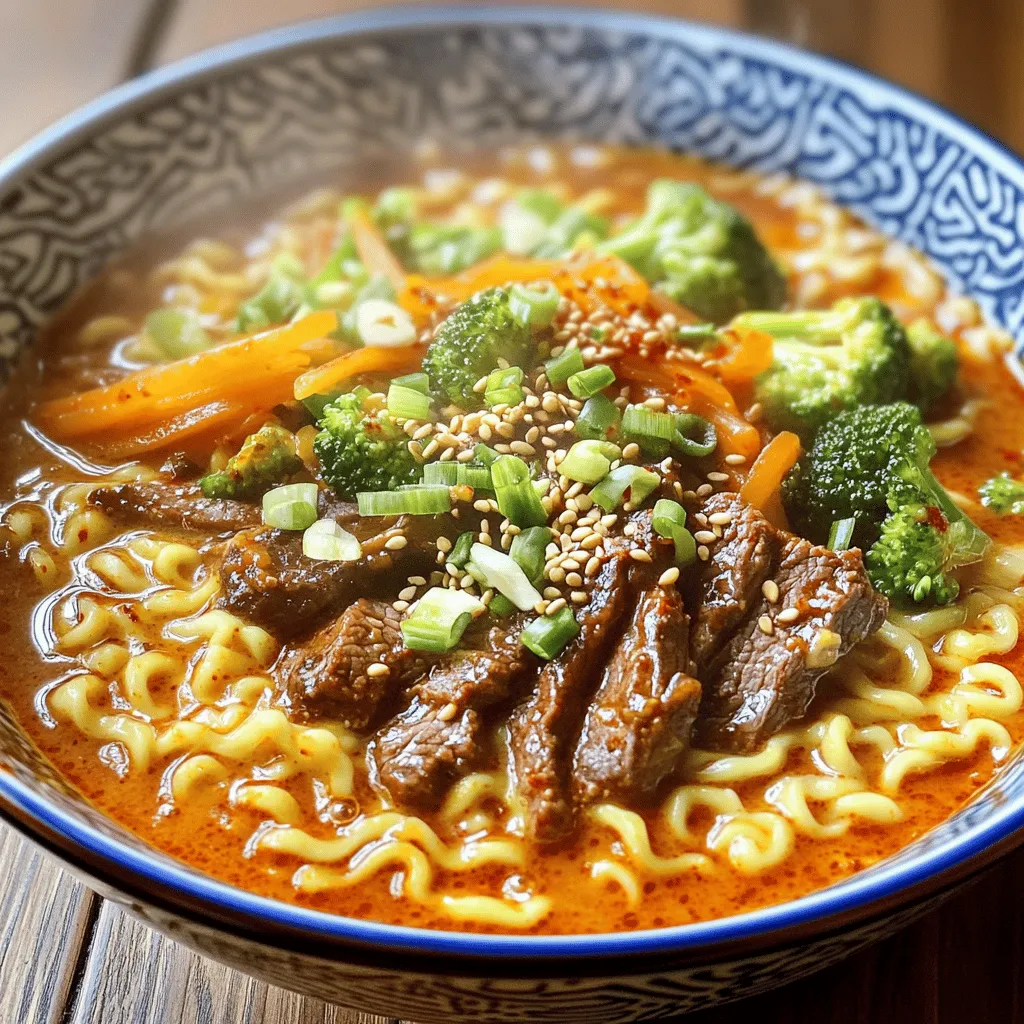
Spicy Korean Ramen with Grilled Beef & Creamy Sauce Delight
Are you ready to spice up your dinner? In this blog, I’ll show you how to make Spicy Korean Ramen with Grilled Beef & Creamy