Desserts
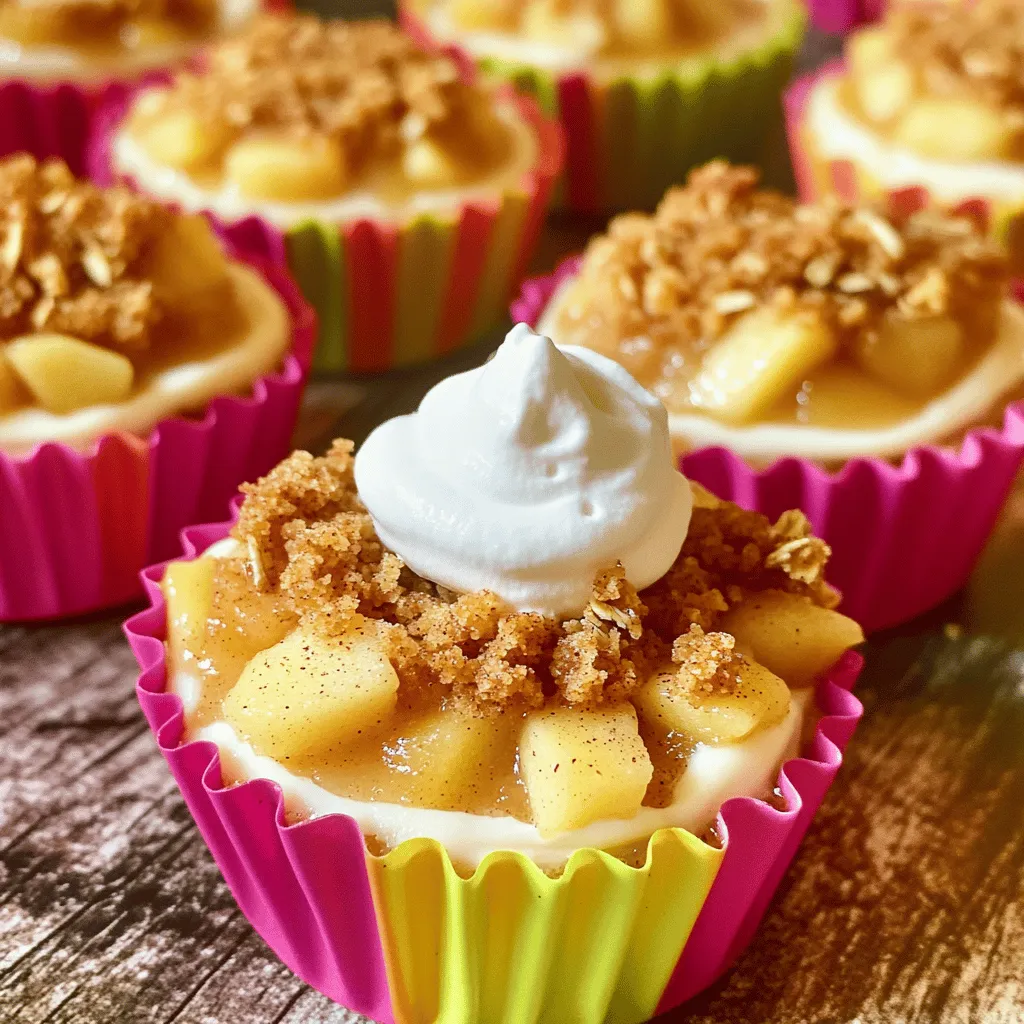
Apple Crisp Mini Cheesecakes Tasty and Simple Treat
Looking for a dessert that’s both tasty and easy? Try my Apple Crisp Mini Cheesecakes! These bite-sized treats combine creamy cheesecake with a crunchy apple
![When you want to make pumpkin chocolate chip cupcakes, you need to gather a few key ingredients. Each item plays a role in creating that perfect blend of flavor and texture. Here’s what you will need: - 1 cup pumpkin puree - 1 cup granulated sugar - 1/2 cup brown sugar - 1/2 cup vegetable oil - 2 large eggs - 1 teaspoon vanilla extract - 1 1/2 cups all-purpose flour - 1 teaspoon baking soda - 1/2 teaspoon baking powder - 1/2 teaspoon salt - 1 teaspoon ground cinnamon - 1/2 teaspoon ground nutmeg - 1/4 teaspoon ground ginger - 1 cup semi-sweet chocolate chips - Optional: Cream cheese frosting for topping Each ingredient brings something special to the cupcakes. The pumpkin puree adds moisture and a lovely flavor. The sugars help balance the spice and sweetness. The eggs give structure, while the flour creates a tender crumb. The spices add warmth and depth, and the chocolate chips bring in sweetness and a rich texture. For a little extra fun, I suggest adding cream cheese frosting on top. It makes each bite even more delightful. If you want the full details on how to prepare these tasty treats, check out the Full Recipe. - Preheat your oven to 350°F (175°C) and line a cupcake pan with cupcake liners. - In a large mixing bowl, combine the pumpkin puree, granulated sugar, brown sugar, and vegetable oil. Mix until smooth. - In another bowl, whisk together the all-purpose flour, baking soda, baking powder, salt, cinnamon, nutmeg, and ginger. - Gradually add the dry ingredients to the wet mixture. Stir until just combined. - Fold in the chocolate chips gently. This keeps them from sinking. - Divide the batter evenly among the cupcake liners, filling each about two-thirds full. - Bake in the preheated oven for 18-20 minutes. Check doneness with a toothpick. If it comes out clean, they are done. - Once baked, remove the cupcakes from the oven. Let them cool in the pan for 5 minutes. Then transfer them to a wire rack to cool completely. For a special treat, top with cream cheese frosting after they cool. This recipe is a true delight! You can find the complete recipe in the [Full Recipe]. - Avoiding overmixing the batter: Mix until you see no dry flour. Overmixing makes cupcakes tough. Keep it light and gentle. - Checking doneness with a toothpick: Insert a toothpick in the center. If it comes out clean, they are done. If it has batter, bake longer. - Ideas for topping with cream cheese frosting: Cream cheese frosting adds a rich taste. Spread it on top or pipe it for flair. - Presentation tips for a festive look: Dust with cinnamon for elegance. Add a candy pumpkin for fun. This makes your cupcakes pop! - Importance of measuring ingredients accurately: Use measuring cups and spoons. Too much or too little can ruin the cupcakes. Precision is key for great results. - Baking time adjustments for different ovens: Ovens can vary in heat. Check your cupcakes a few minutes early. Adjust baking time for perfect cupcakes every time. For the full recipe, check out the details above! {{image_2}} You can make these cupcakes even better with different flavors. Try adding extra spices like allspice or cloves. These will bring warmth and depth to your cupcakes. If you love chocolate, switch to dark chocolate chips for a richer taste. Dark chocolate pairs nicely with the pumpkin flavor, giving a bold twist. Need a gluten-free option? Use a 1-to-1 gluten-free flour blend in place of all-purpose flour. This will keep the texture smooth and delicious. If you want a vegan twist, replace the eggs with flax eggs. Mix 1 tablespoon of ground flaxseed with 2.5 tablespoons of water for each egg. For dairy, use almond milk or coconut milk. Both work well in this recipe. Want to change the size? You can bake mini cupcakes instead. Just fill the liners halfway and reduce the baking time to 12-15 minutes. If you prefer a cake, pour the batter into a cake pan. Bake for about 30-35 minutes, or until a toothpick comes out clean. Adjust the frosting amount based on your serving style. For the full recipe and more tips, check out the [Full Recipe]. To keep your pumpkin chocolate chip cupcakes fresh, store them in an airtight container. This method helps prevent them from drying out. You can also use plastic wrap if you don’t have a container. They will stay good at room temperature for up to three days. If you want to keep them fresh for longer, put them in the fridge. They can last about a week in the fridge. If you want to save some cupcakes for later, freezing is a great option. First, let the cupcakes cool completely. Then, wrap each cupcake tightly in plastic wrap. After that, place them in a freezer-safe bag. They can last up to three months in the freezer. When you’re ready to eat them, take out the cupcakes and let them thaw at room temperature for a few hours. This keeps them moist and tasty. If you want a warm cupcake, reheating is easy. Preheat your oven to 350°F (175°C). Place the cupcake on a baking sheet and heat for about 5-10 minutes. You can also use the microwave. Heat on low for about 10-15 seconds. Just be careful not to overheat them, as they can get dry. Enjoy them warm for a delightful treat. For the full recipe, don’t forget to check the earlier sections! To keep your cupcakes fresh, use an airtight container. Place them at room temperature if you will eat them in a few days. If you want to store them longer, put them in the fridge. They stay good for up to a week this way. If you need to store them for a long time, freeze them. Wrap each cupcake tightly in plastic wrap before freezing. They can last for about three months in the freezer. Yes, you can use fresh pumpkin! Just roast a pumpkin and scoop out the flesh. Make sure to puree it until smooth. This gives your cupcakes an amazing flavor. Fresh pumpkin can be a bit wetter than canned, so use less liquid in the recipe. One cup of fresh pumpkin works well in place of canned. To make these cupcakes richer, try adding more chocolate chips. You could also mix in some chopped nuts for a nice crunch. Another option is to add a splash of coffee to the batter. This enhances the chocolate flavor. For extra creaminess, top them with cream cheese frosting. You could even swirl in some caramel for a sweet surprise. There are many great toppings for these cupcakes! Cream cheese frosting is a classic choice. You could also use whipped cream for a light touch. For a twist, try a chocolate ganache drizzle. Sprinkling nuts or mini chocolate chips on top adds fun texture. You can even add cinnamon sugar for extra flavor. Each topping can change the cupcake experience! You now have a complete guide to making delicious pumpkin chocolate chip cupcakes. We covered all the essential ingredients, step-by-step instructions, and helpful tips. You learned how to avoid common mistakes and even explore tasty variations. Remember, the key to great cupcakes is in the details. Whether you top them with cream cheese frosting or save them for later, these cupcakes are worth the effort. Enjoy baking these treats and sharing them with friends and family!](https://toastedrecipes.com/wp-content/uploads/2025/07/3e8a6150-12a3-4cef-8090-2a0d20566656.webp)
Pumpkin Chocolate Chip Cupcakes Irresistible Delight
Get ready for a sweet treat that combines the warmth of pumpkin with delightful chocolate! In this guide, I’ll show you how to make Pumpkin
![Here’s what you need to make pumpkin scones: - 2 cups all-purpose flour - 1/2 cup brown sugar, packed - 1 tablespoon baking powder - 1/2 teaspoon baking soda - 1 teaspoon ground cinnamon - 1/2 teaspoon ground nutmeg - 1/4 teaspoon ground ginger - 1/4 teaspoon salt - 1/2 cup unsalted butter, cold and cubed - 1/2 cup canned pumpkin puree - 1/4 cup heavy cream - 1 large egg - 1/2 teaspoon vanilla extract These ingredients create a rich, flavorful base for your scones. The pumpkin puree gives moisture and a lovely color. The spices add warmth and depth. You can customize your scones with these fun options: - 1/4 cup chopped nuts (such as walnuts or pecans) for added crunch - Chocolate chips for a sweet twist - Dried cranberries for tartness Feel free to mix and match! Each add-in brings its own joy to the scone. You can also experiment with different spices or zest of an orange for a fresh touch. If you have dietary needs, here are some swaps you can try: - Use gluten-free flour for a gluten-free option. - Substitute coconut oil for butter for a dairy-free choice. - Replace heavy cream with almond milk for a lighter option. These substitutes won’t change the flavor too much. You can still enjoy pumpkin scones no matter your diet. Check the [Full Recipe] for more details on how to make these tasty treats! Start by preheating your oven to 425°F (220°C). Line a baking sheet with parchment paper. In a large bowl, mix together the dry ingredients. Combine 2 cups of all-purpose flour, 1/2 cup of brown sugar, 1 tablespoon of baking powder, 1/2 teaspoon of baking soda, 1 teaspoon of ground cinnamon, 1/2 teaspoon of ground nutmeg, 1/4 teaspoon of ground ginger, and 1/4 teaspoon of salt. Whisk until everything blends well. Next, add 1/2 cup of cold, cubed unsalted butter to the bowl. Use your fingers or a pastry cutter to mix the butter into the flour mixture. Do this until it looks like coarse crumbs. In another bowl, stir together 1/2 cup of canned pumpkin puree, 1/4 cup of heavy cream, 1 large egg, and 1/2 teaspoon of vanilla extract. Mix until smooth and creamy. Pour the wet ingredients into the dry mixture. Gently mix until just combined. Be careful not to overmix. If you want, you can fold in 1/4 cup of chopped nuts for a nice crunch. Lightly flour a clean surface. Turn out the dough and pat it into a circle about 1 inch thick. Cut it into wedges or use a biscuit cutter. Place the shaped scones on the prepared baking sheet, making sure to space them evenly. Bake them for 15 to 20 minutes. They should turn golden brown. To check if they’re done, insert a toothpick. It should come out clean. While your scones bake, prepare the glaze. In a bowl, mix 1 cup of powdered sugar with 1 to 2 tablespoons of milk. Keep mixing until the glaze is smooth and drizzles easily. After the scones have cooled for a few minutes, drizzle the glaze on top. To make your scones pop, sprinkle a little cinnamon or some pumpkin seeds on top. You can find the Full Recipe for this delightful treat to guide you through every step! To get soft and fluffy pumpkin scones, mix gently. Overworking the dough makes them tough. The key is to stop mixing once combined. When you fold in the wet ingredients, do it lightly. Use cold butter to create that flaky texture. I like to cut the butter into small cubes. This helps it blend well with the flour. One mistake is not measuring ingredients accurately. Use dry measuring cups for flour and sugar. Also, make sure your baking powder is fresh. Old baking powder can lead to flat scones. Another common error is skipping the chilling step. If you chill the dough for 15 minutes, it helps with the rise. Lastly, avoid opening the oven door too soon. This can cause the scones to sink. Serve pumpkin scones warm for the best taste. They go well with a hot cup of tea or coffee. You can also add a dollop of whipped cream on top. For a fun twist, try adding a sprinkle of cinnamon sugar. If you want to make it special, serve with apple butter. This adds a nice sweet and spicy touch. For the full recipe, check out the steps above. {{image_2}} To make vegan pumpkin scones, you can swap a few ingredients. Use plant-based butter instead of regular butter. Replace the egg with a flax egg made from one tablespoon of ground flaxseed and three tablespoons of water. Mix the flaxseed and water and let it sit for five minutes to thicken. Use almond or coconut milk instead of heavy cream. This way, you keep the scones moist and tasty. For gluten-free pumpkin scones, use a gluten-free flour blend. Many blends work well, but make sure it has xanthan gum for structure. You can also try almond flour for a nutty flavor. Keep the other ingredients the same to maintain flavor. This makes a great scone that everyone can enjoy. You can customize your pumpkin scones with fun add-ins. Consider adding chocolate chips for a sweet touch. Dried cranberries or raisins bring a fruity flavor. For a nutty crunch, fold in chopped walnuts or pecans. You can also add spices like cardamom for a unique twist. These variations let you create your perfect pumpkin scone. Check out the Full Recipe for more ideas! To keep your baked pumpkin scones fresh, place them in an airtight container. This helps to lock in moisture. Store them at room temperature for up to three days. For longer freshness, consider refrigerating them. The cold air will help prevent mold and keep them tasty. When you're ready to enjoy your scones again, reheating is easy. Preheat your oven to 350°F (175°C). Place the scones on a baking sheet and cover them with foil. Heat them for about 10 minutes. This warms them through while keeping them soft. You can also microwave a scone for about 15 seconds, but it may not stay as fluffy. Freezing scones is a great way to save some for later. First, let the scones cool completely. Next, wrap each scone tightly in plastic wrap. Place them in a freezer bag or container. They can stay in the freezer for up to three months. When you're ready to eat, just thaw them in the fridge overnight. Reheat them in the oven for the best taste. For more delicious details, check out the Full Recipe. To make pumpkin scones from scratch, gather your ingredients. You need flour, brown sugar, baking powder, baking soda, spices, salt, butter, pumpkin puree, cream, egg, and vanilla. Mix the dry ingredients in one bowl. In another bowl, mix the wet ingredients. Then, combine both mixtures gently. Shape the dough, cut it into wedges, and bake until golden. For the full recipe, check out the detailed instructions. Yes, you can use fresh pumpkin. Start by roasting or steaming the pumpkin until soft. Then, blend it until smooth. Make sure to drain excess water. Fresh pumpkin can add a vibrant taste to your scones. However, canned pumpkin is often more convenient and consistent in texture. You can find pumpkin scones at many local bakeries or coffee shops. Some grocery stores also sell them, especially in the fall. If you want a fresh batch, try making them at home. It’s a fun and rewarding process! Pumpkin scones are simple to make and versatile. We covered main ingredients, optional add-ins, and substitutes for diets. The step-by-step guide helps you prepare the dough, bake the scones, and glaze them for a perfect finish. I shared tips to avoid mistakes and enhance your scone texture. You can even explore variations for vegan or gluten-free options. Lastly, I provided storage tips to keep your scones fresh. Enjoy baking and sharing your delicious pumpkin scones with friends and family!](https://toastedrecipes.com/wp-content/uploads/2025/07/499ac5d8-8e38-42e2-8532-b3dc434e0d06.webp)
Pumpkin Scones Delightful and Easy Recipe Guide
Are you ready to enjoy pumpkin scones that are both easy and delicious? In this guide, I’ll walk you through a simple recipe that captures
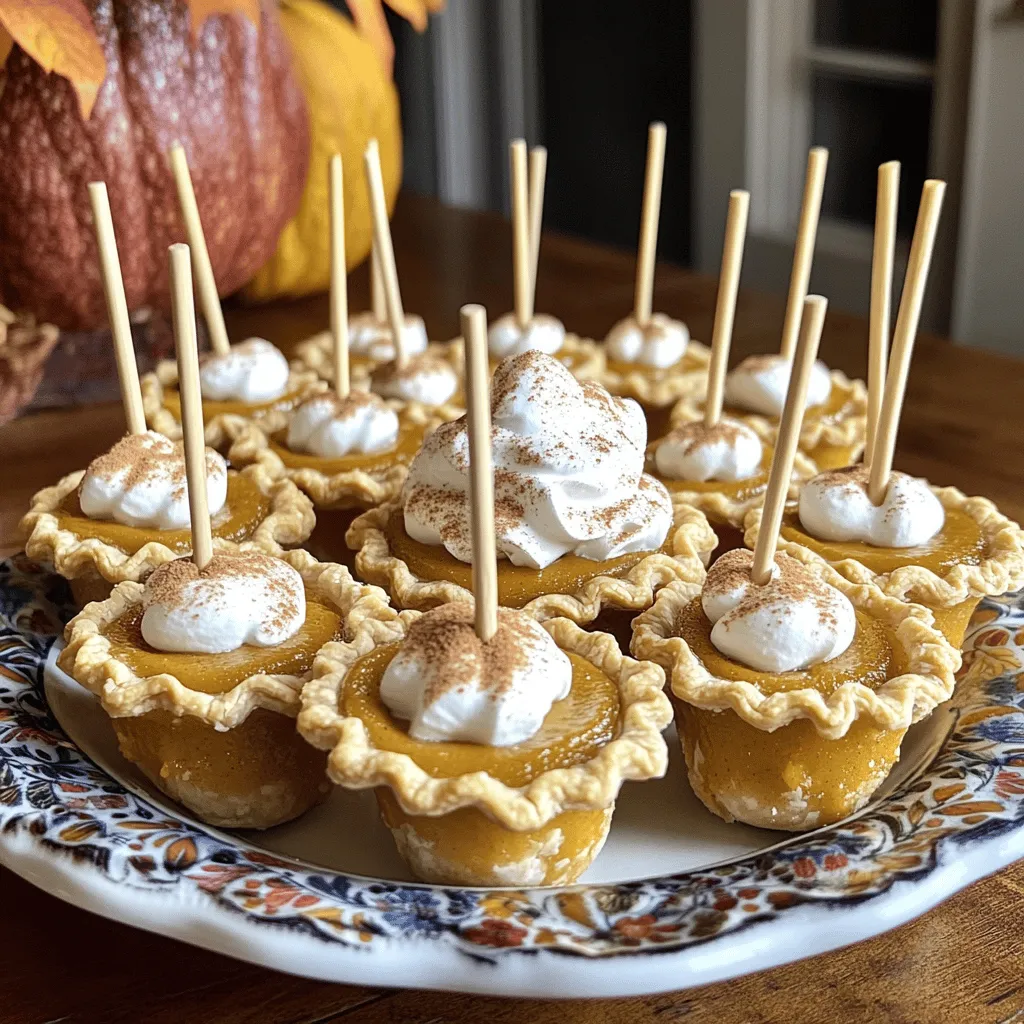
Mini Pumpkin Pie Pops Easy Festive Treats
Are you ready to spice up your fall dessert game? These Mini Pumpkin Pie Pops are the perfect mix of fun, festivity, and flavor. With
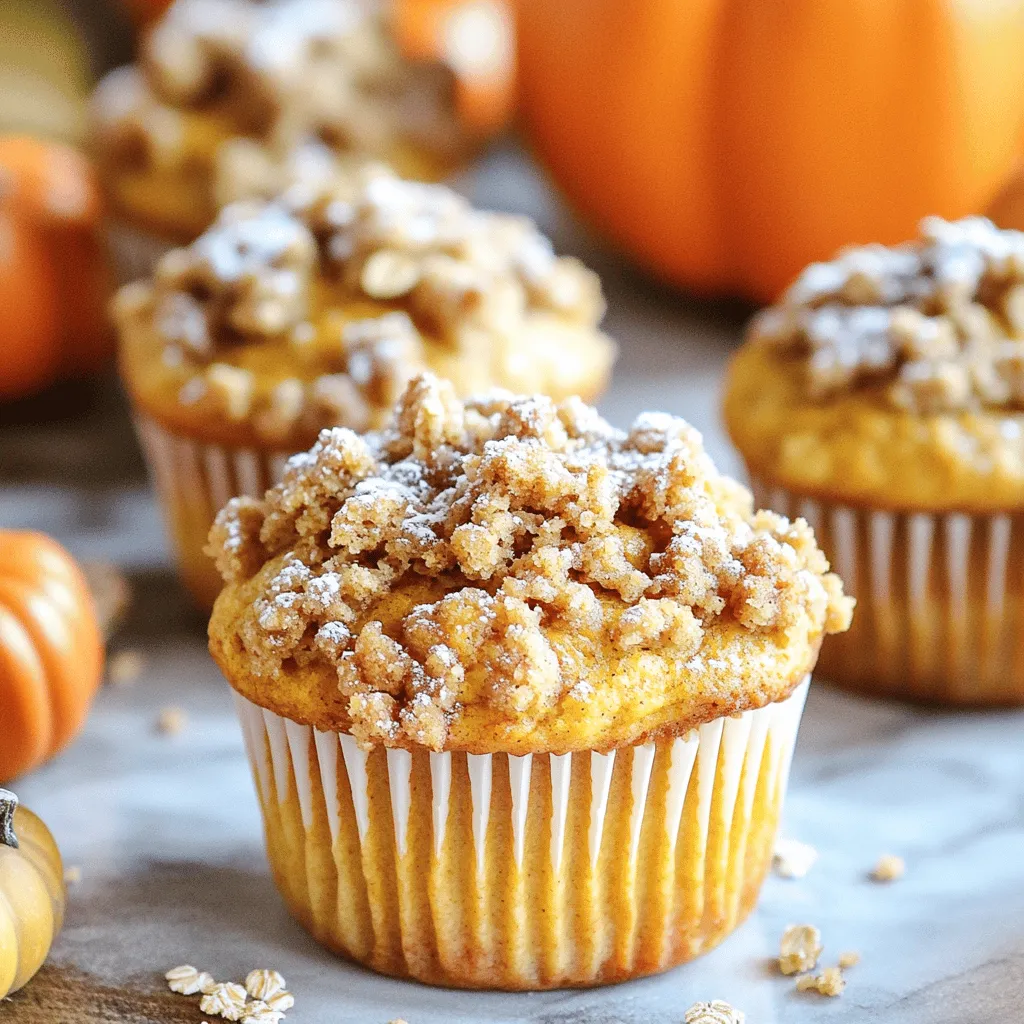
Pumpkin Streusel Muffins Perfectly Moist and Flavorful
If you’re craving a warm, spiced treat, these Pumpkin Streusel Muffins are for you! Moist and flavorful, they’ll brighten up any morning. I’ll share my
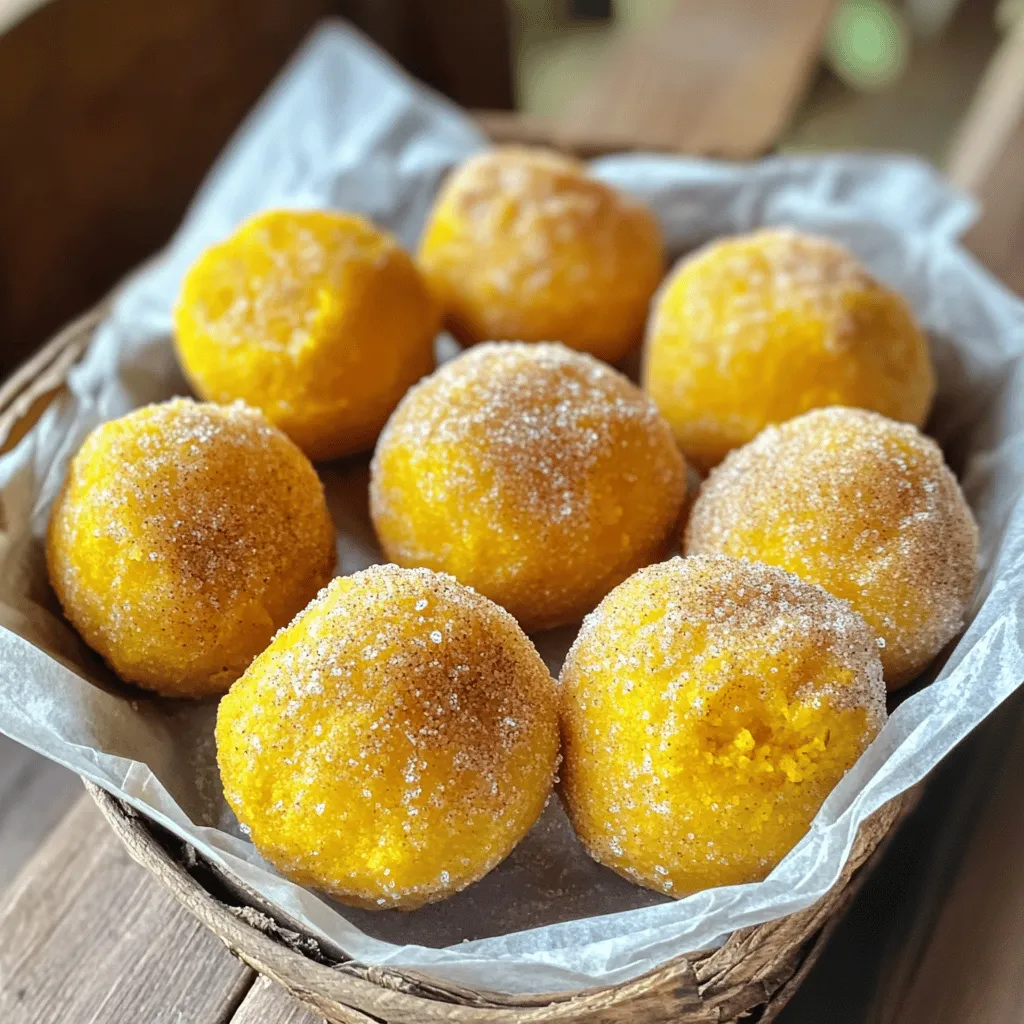
Healthy Pumpkin Donut Holes Tasty Fall Treat Recipe
Fall is here, and what better way to celebrate than with Healthy Pumpkin Donut Holes? These delicious bites combine the warmth of pumpkin spice with
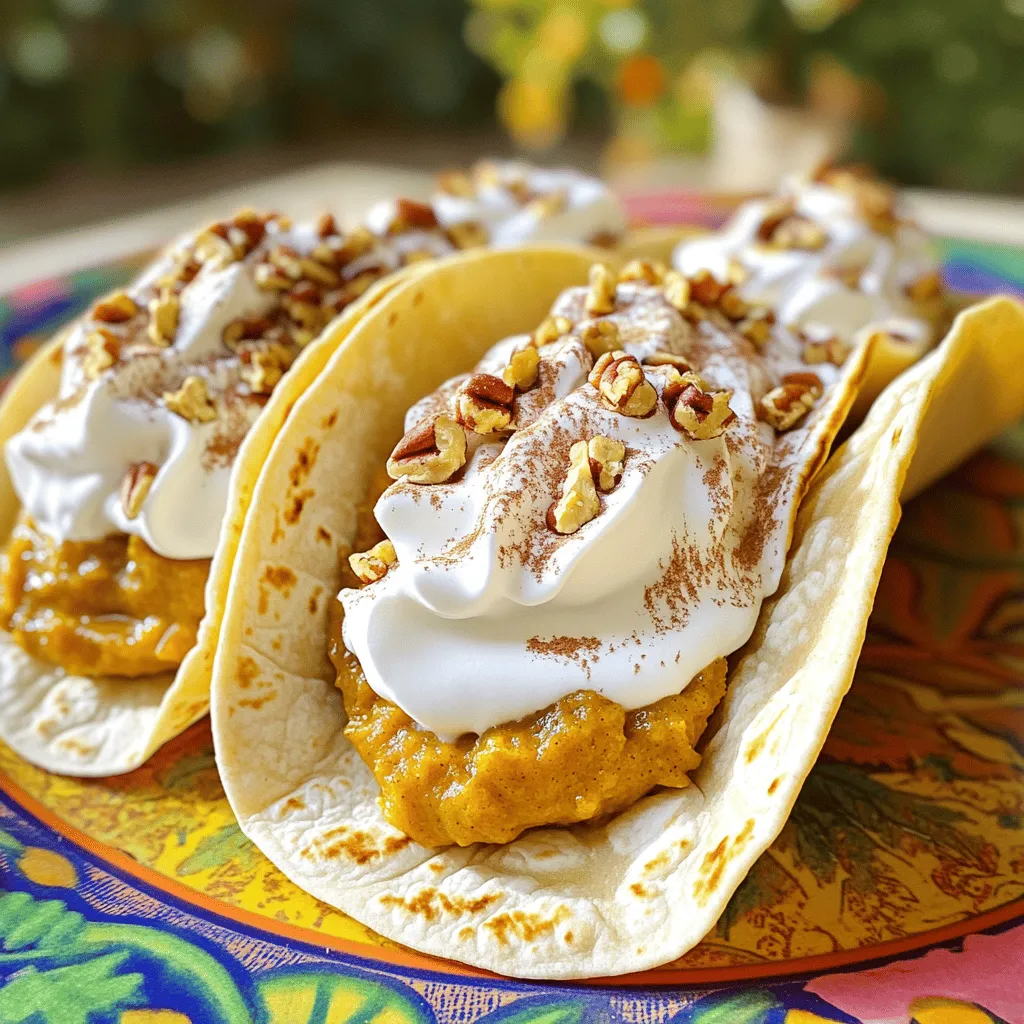
Pumpkin Pie Tacos Delightful Fall Flavor Treat
Get ready to fall in love with a new treat: Pumpkin Pie Tacos! These fun and tasty tacos mix sweet pumpkin filling with soft tortillas
![- 1 ¾ cups all-purpose flour - 1 teaspoon baking powder - 1 teaspoon baking soda - 1 teaspoon ground cinnamon - ½ teaspoon ground nutmeg - ½ teaspoon ground ginger - ¼ teaspoon salt - 1 cup granulated sugar - ½ cup brown sugar, packed - ½ cup vegetable oil - 2 large eggs - 1 cup canned pumpkin puree - 1 teaspoon vanilla extract - ½ cup buttermilk - 8 oz cream cheese, softened - ½ cup unsalted butter, softened - 2 cups powdered sugar - 1 teaspoon vanilla extract - 1 teaspoon ground cinnamon In this recipe, I use a mix of dry and wet ingredients for the pumpkin cupcakes. The dry ingredients give the cupcakes structure. The flour, baking powder, and baking soda help them rise. The spices, like cinnamon, nutmeg, and ginger, bring warmth and flavor. The salt enhances the sweetness. The wet ingredients are key for moisture and flavor. I use two types of sugar for depth. The vegetable oil keeps the cupcakes soft. The eggs bind the mix together. Canned pumpkin puree adds richness and that classic pumpkin taste. The buttermilk keeps the cupcakes tender. For the frosting, cream cheese and butter create a smooth base. The powdered sugar sweetens it up. The vanilla extract adds flavor, while ground cinnamon ties the frosting back to the cupcakes. This whole mix makes every bite a treat. You can find the Full Recipe for all the steps to make these delicious pumpkin cupcakes! - Preheat Oven: Start by preheating your oven to 350°F (175°C). This helps the cupcakes bake evenly. Line a 12-cup muffin tin with cupcake liners for easy cleanup. - Mix Dry Ingredients: In a medium bowl, combine the all-purpose flour, baking powder, baking soda, ground cinnamon, ground nutmeg, ground ginger, and salt. Whisk these together until they mix well. - Cream Sugars and Oil: In a large mixing bowl, beat the granulated sugar, brown sugar, and vegetable oil. Mix until the mixture is smooth and creamy. This step adds sweetness and moisture to your cupcakes. - Add Eggs and Pumpkin: Now, add two large eggs to the sugar mixture, one at a time. Beat well after each egg. Next, mix in one cup of canned pumpkin puree along with one teaspoon of vanilla extract. Keep mixing until the batter is smooth. - Combine Ingredients: Gradually add the dry mixture to the wet mixture. Use a spatula to fold them together gently. Alternate adding the half cup of buttermilk until just combined. Do not overmix; this keeps the cupcakes light. - Fill Cupcake Liners: Divide the batter evenly among the cupcake liners. Fill each liner about two-thirds full. This allows room for the cupcakes to rise. - Bake Cupcakes: Place the muffin tin in the preheated oven. Bake for 18 to 20 minutes. Check for doneness by inserting a toothpick in the center. It should come out clean. - Cool in Pan: Once baked, let the cupcakes cool in the pan for about five minutes. This helps them set before moving them. - Transfer to Wire Rack: Carefully move the cupcakes to a wire rack to cool completely. This prevents them from becoming soggy. - Beat Cream Cheese and Butter: In a medium bowl, beat eight ounces of softened cream cheese and half a cup of softened unsalted butter. Mix until smooth and creamy. - Add Powdered Sugar and Flavorings: Gradually add two cups of powdered sugar, mixing until combined. Then, add one teaspoon of vanilla extract and one teaspoon of ground cinnamon. Beat until fluffy and smooth. - Frost Cupcakes: Once the cupcakes are completely cool, generously frost each one with the cinnamon cream cheese frosting. Use a piping bag or a spatula for a nice finish. Now you're ready to enjoy your delicious Pumpkin Magic Cupcakes! For the full recipe details, check the [Full Recipe]. How to avoid overmixing: To keep your cupcakes light, mix just until combined. Overmixing leads to dense cupcakes. Use a spatula to gently fold in dry ingredients. This helps keep air in the batter. Checking for doneness: Insert a toothpick into the center of a cupcake. If it comes out clean, they are done. If it has batter on it, bake for a few more minutes. Keep an eye on them after 18 minutes. Ensuring even baking: Place the cupcake tin in the center of the oven. This helps them bake evenly. Rotate the tin halfway through baking if your oven has hot spots. Achieving the perfect consistency: Start with soft cream cheese and butter. Beat them until smooth. Gradually add powdered sugar until the frosting is thick, yet spreadable. If it’s too thick, add a splash of milk. Tips for using a piping bag: Fill the piping bag halfway to avoid overflow. Twist the top and squeeze gently. Practice on a plate before frosting the cupcakes. This builds your skills and confidence. Decorating suggestions: Use a star tip for a fun design. Swirl the frosting on top for a beautiful look. Add a sprinkle of cinnamon or a cute candy pumpkin for charm. Adding spices or extracts: For a flavor boost, add a pinch of cloves or allspice to the batter. A dash of vanilla extract can deepen the taste. Adjust to your liking. Using different frosting options: Try maple cream or chocolate ganache for a twist. Each brings a unique taste to your cupcakes. Play with flavors to find your favorite. Incorporating mix-ins: Add chocolate chips or chopped nuts for extra texture. Dried fruit, like raisins, can also add sweetness. Just fold them in gently with the batter. {{image_2}} To make gluten-free pumpkin cupcakes, swap all-purpose flour for a gluten-free blend. Look for blends that include xanthan gum to help with texture. You may need to adjust the baking time slightly. Start checking for doneness a few minutes early. For a dairy-free frosting, use vegan cream cheese and dairy-free butter. They blend well and taste great. You can also use coconut milk or almond milk instead of buttermilk in the batter. This keeps the cupcakes moist and flavorful. Mix in chocolate chips for a sweet surprise in every bite. Chopped nuts or raisins add crunch and chewiness. You can also try adding other fruit purees, like applesauce or mashed bananas, to boost flavor and moisture. For the full recipe, check out the details above. Enjoy creating your unique twist on these pumpkin cupcakes! To keep your pumpkin cupcakes fresh, place them in an airtight container. This method locks in moisture and flavor. At room temperature, these cupcakes stay good for about three days. If your kitchen is warm, try moving them to a cool spot. You can freeze these cupcakes for later. To do this, let them cool completely first. Wrap each cupcake in plastic wrap, then place them in a freezer bag. For the frosting, store it in a separate airtight container. Your cupcakes can stay frozen for up to three months. When it’s time to eat, take them out and thaw them overnight in the fridge. This helps keep their texture nice. If you like your cupcakes warm, you can reheat them easily. Place a cupcake on a microwave-safe plate. Heat it in the microwave for about 10-15 seconds. This warms it without melting the frosting. To keep the frosting from losing its quality, avoid direct heat. Enjoy your treats warm and fresh! You can find the full recipe for these delightful cupcakes and more tips in the linked section. Can I make this recipe ahead of time? Yes, you can. Bake the cupcakes and let them cool. Store them in an airtight container. You can keep them at room temperature for up to three days. How do I know when the cupcakes are done baking? Stick a toothpick into the center of a cupcake. If it comes out clean or with a few crumbs, they are done. If it comes out wet, bake them a bit longer. What should I do if my cupcakes sink in the middle? This can happen if the batter is overmixed or the oven is not hot enough. Make sure to mix just until combined. Also, check your oven temperature with a thermometer. How can I fix runny frosting? If your frosting is too runny, add more powdered sugar. Mix it in slowly until it reaches your desired thickness. Can the frosting be made in advance? Yes, you can make the frosting ahead of time. Store it in the fridge for up to one week. Just let it sit at room temperature before using it. What can I use instead of buttermilk? You can make a quick substitute. Mix one cup of milk with one tablespoon of vinegar or lemon juice. Let it sit for a few minutes before using. Can I use fresh pumpkins instead of canned? Yes, fresh pumpkins can work. Cook and puree them until smooth. Just make sure to measure the same amount as canned pumpkin for the best results. In this post, we covered how to make delicious pumpkin cupcakes from scratch. We looked at the key dry and wet ingredients, then followed step-by-step instructions for baking and frosting. You now have tips for baking success, flavor variations, and storage info. Remember, baking is all about having fun and being creative. Use this guide to impress your friends and family with tasty treats. Enjoy your baking journey!](https://toastedrecipes.com/wp-content/uploads/2025/07/8f4247f9-51fb-4df3-81cd-892907a3637d.webp)
Pumpkin Cupcakes with Cinnamon Cream Cheese Frosting
Get ready for a fall favorite! These Pumpkin Cupcakes with Cinnamon Cream Cheese Frosting are the perfect blend of sweet and spice. Whether you’re hosting
![To create these tasty pumpkin protein balls, you need simple ingredients. Here is what to gather: - 1 cup canned pumpkin puree - 1/2 cup rolled oats - 1/2 cup almond butter (or any nut butter of choice) - 1/4 cup honey or maple syrup - 1/4 cup vanilla protein powder - 1 teaspoon cinnamon - 1/2 teaspoon nutmeg - 1/4 teaspoon salt These ingredients blend well to create a smooth, flavorful mix. The pumpkin puree gives moisture and taste. The oats add fiber and texture. The nut butter adds healthy fats and protein, while the honey or maple syrup sweetens the mix. You can customize your pumpkin protein balls with optional add-ins. Consider adding: - 1/4 cup chopped nuts (e.g., walnuts or pecans) - 1/4 cup mini chocolate chips Chopped nuts give a nice crunch. Mini chocolate chips add a sweet touch that many love. Feel free to mix and match based on your taste. Each ingredient in the pumpkin protein balls offers great nutrition. Here’s a quick look: - Canned pumpkin puree: Low in calories, high in fiber, and packed with vitamins. - Rolled oats: Great source of whole grains and fiber. - Almond butter: Contains healthy fats and protein. - Honey or maple syrup: Natural sweeteners that provide energy. - Vanilla protein powder: Boosts protein content for muscle repair. - Cinnamon and nutmeg: Add flavor and have anti-inflammatory properties. - Salt: Enhances taste. This mix makes a balanced snack. You get protein, healthy fats, and fiber, all in one delicious bite. For the complete recipe, check out the [Full Recipe]. To start, gather your ingredients. You will need: - 1 cup canned pumpkin puree - 1/2 cup rolled oats - 1/2 cup almond butter (or any nut butter of choice) - 1/4 cup honey or maple syrup - 1/4 cup vanilla protein powder - 1 teaspoon cinnamon - 1/2 teaspoon nutmeg - 1/4 teaspoon salt - 1/4 cup chopped nuts (e.g., walnuts or pecans) - 1/4 cup mini chocolate chips (optional) In a large bowl, mix the canned pumpkin puree, almond butter, and honey or maple syrup. Stir until it's smooth. Next, add the rolled oats, protein powder, cinnamon, nutmeg, and salt. Mix everything well to combine all the flavors. Then, fold in the chopped nuts and chocolate chips if you want some sweetness. Once your mixture is ready, it’s time to shape it into balls. Use your hands to scoop small portions of the mixture. Roll them into bite-sized balls, about 1 inch wide. This step is fun and lets you feel the texture of your snack. Place the rolled protein balls on a baking sheet lined with parchment paper. After rolling all the balls, you need to chill them. Refrigerate the protein balls for at least 30 minutes. This helps them firm up, making them easier to eat. Once chilled, store the pumpkin protein balls in an airtight container in the fridge. They stay fresh for up to a week. You can find the full recipe above if you need to refer back to it. Enjoy your delicious and healthy snack! When making pumpkin protein balls, start with a large bowl. First, mix the canned pumpkin puree, almond butter, and honey. Stir until smooth. This step is key to a good blend. After that, add the dry ingredients. Mix these gently to avoid clumps. Use a spatula to fold in the nuts and chocolate chips. This keeps the texture light and airy. To get the right texture, your mixture should be moist but not sticky. If it's too wet, add more oats or protein powder. If it's too dry, a splash of milk or more nut butter can help. The balls should hold their shape but not fall apart. Practice rolling them gently with your hands. Aim for bite-sized pieces, about one inch in diameter. Serving your pumpkin protein balls can be fun! Use a colorful platter to make them pop. Sprinkle extra chopped nuts or chocolate chips around them for a festive touch. Small paper cups are perfect for portioning. They make it easy to grab a snack. For a holiday twist, add some fall-themed decorations. These small details make your dish memorable. {{image_2}} You can make pumpkin protein balls even more fun by adding flavors. If you love chocolate, mix in mini chocolate chips or cocoa powder. For a nutty taste, use peanut butter instead of almond butter. You can also try almond extract for a sweet twist. Each change gives a new taste to enjoy! Dietary needs are important. If you are gluten-free, use certified gluten-free oats. For nut allergies, try sunflower seed butter. Maple syrup is a great swap for honey if you want a vegan option. Always check labels for any hidden allergens. These swaps let everyone enjoy the snack! Seasonal ingredients can add a fresh touch. In fall, mix in dried cranberries for a tart flavor. During summer, shredded coconut can give a tropical vibe. You can also fold in pumpkin seeds for a crunchy texture. These additions keep the snack exciting and full of seasonal flavor. Try these variations to make your pumpkin protein balls unique and tasty! For the full recipe, please refer to the recipe section above. To keep your pumpkin protein balls fresh, place them in an airtight container. This helps hold in moisture and flavor. Store them in the fridge. They stay tasty and safe to eat this way. If you want them to last longer, consider freezing them. When you store pumpkin protein balls in the fridge, they can last up to a week. If you freeze them, they can stay good for about three months. To freeze, place the balls on a tray, freeze them for a few hours, then transfer them to a container or freezer bag. This method prevents them from sticking together. If you have leftover pumpkin protein balls, use them in different ways. Crumble them over yogurt or oatmeal for a tasty breakfast. You can also add them to smoothies for a protein boost. They make great toppings for desserts too! With a little creativity, you can enjoy them in new, fun ways. To make vegan Pumpkin Protein Balls, swap the honey for maple syrup. Use a plant-based protein powder. Choose any nut butter that fits your diet. The rest of the ingredients can stay the same. This way, you keep all the flavor and nutrients. Vegan protein balls still taste great! Pumpkin is low in calories and high in fiber. It helps with digestion and can keep you full. Pumpkin is also rich in vitamins A and C. These vitamins boost your immune system. Plus, pumpkin has antioxidants that fight free radicals. Eating pumpkin helps support eye health, too. Yes, you can use any nut butter you like! Almond butter, peanut butter, and cashew butter work great. Each nut butter adds its unique flavor. Just make sure your choice is smooth and creamy. This helps the mixture blend well. You can even try seed butters if you want a nut-free option. In this blog post, we explored how to make pumpkin protein balls. You learned about key ingredients, various add-ins, and their nutritional benefits. We outlined clear steps for preparation, rolling, and chilling your treats. I shared tips for mixing, texture, and serving. We also discussed flavor variations and how to store your protein balls for the long term. By following these steps, you can create tasty and healthy snacks. Enjoy your pumpkin protein balls as a nutritious treat any time!](https://toastedrecipes.com/wp-content/uploads/2025/07/f094d629-e4ae-4778-ad14-4d0da9f85026.webp)
Pumpkin Protein Balls Simple and Nutritious Snack
Looking for a delicious and healthy snack? You’ve come to the right place! Pumpkin Protein Balls are simple to make and packed with nutrients. In
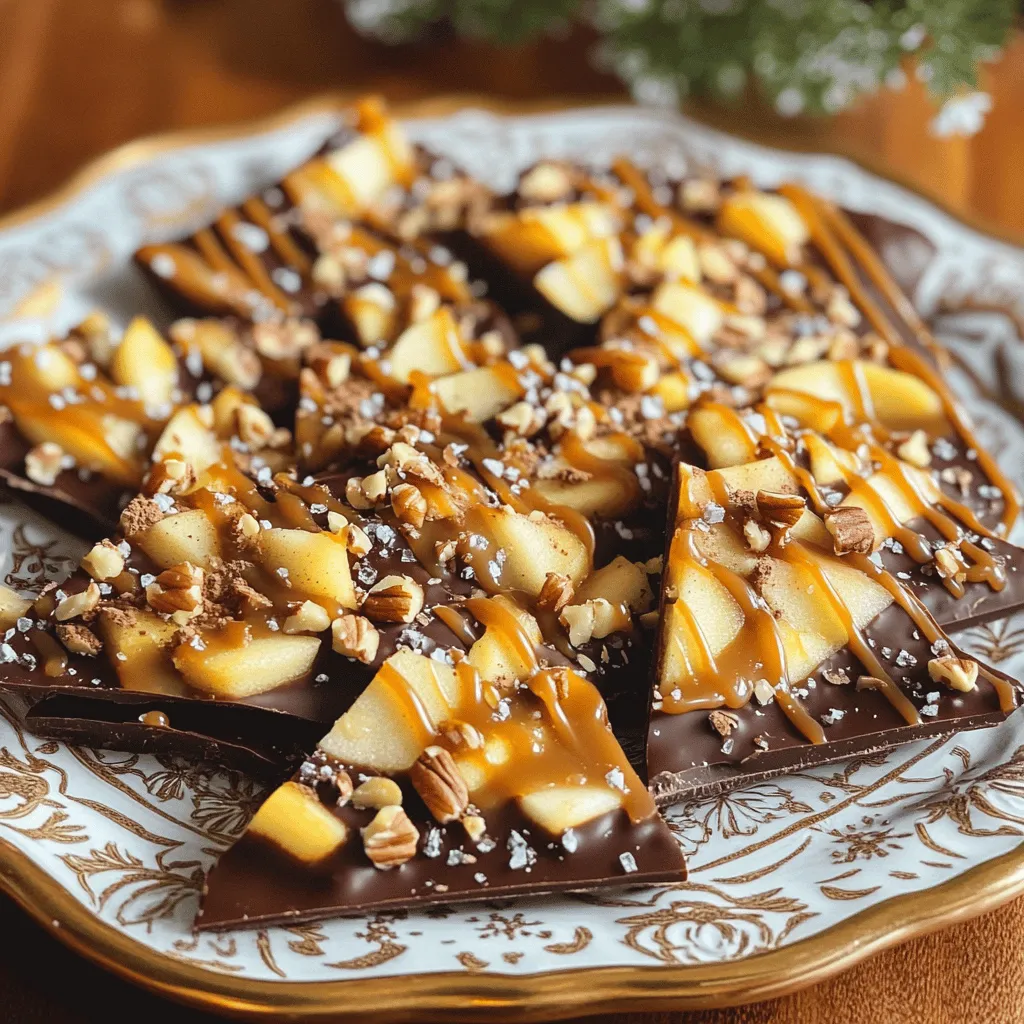
Caramel Apple Bark Irresistible Holiday Treat Recipe
If you’re looking for a festive treat this holiday season, you’ve found it! Caramel Apple Bark is a simple, delicious snack that combines sweet caramel,