Desserts

To make pumpkin s'mores bars, gather these ingredients: - 1 ½ cups graham cracker crumbs - ½ cup unsweetened cocoa powder - ½ cup unsalted butter, melted - 1 cup granulated sugar - 1 cup pumpkin puree - 2 large eggs - 1 teaspoon vanilla extract - 1 teaspoon ground cinnamon - ½ teaspoon ground nutmeg - ¼ teaspoon salt - 1 cup mini marshmallows - ½ cup chocolate chips (milk or dark) You can swap some ingredients for others if needed: - Use almond flour instead of graham cracker crumbs for a gluten-free option. - Replace unsweetened cocoa powder with carob powder for a different flavor. - Coconut oil can replace unsalted butter for a dairy-free treat. - Maple syrup can work instead of granulated sugar to add a unique taste. Choosing the right ingredients makes a big difference. Here are some tips: - Use fresh pumpkin puree for the best flavor. Avoid canned pumpkin with added sugars. - Select high-quality cocoa powder for rich chocolate flavor. Look for brands with no additives. - Choose unsalted butter for better control over the salt level in your recipe. - Pick mini marshmallows made with natural ingredients. They will melt beautifully and taste great. Using high-quality ingredients ensures your pumpkin s'mores bars are tasty and fun. For the full recipe, check the complete guide! To make your pumpkin s'mores bars, start by preheating your oven to 350°F (175°C). Grease a 9x13 inch baking pan or line it with parchment paper. This helps with easy removal later. Next, mix 1 ½ cups of graham cracker crumbs, ½ cup of cocoa powder, and ½ cup of melted butter in a medium bowl. Stir until it looks like wet sand. Firmly press this mix into the bottom of your pan. In a large bowl, whisk together 1 cup of granulated sugar, 1 cup of pumpkin puree, 2 large eggs, 1 teaspoon of vanilla extract, 1 teaspoon of ground cinnamon, ½ teaspoon of ground nutmeg, and ¼ teaspoon of salt. Mix until it’s smooth and well combined. Pour this pumpkin mixture over your crust. Spread it evenly with a spatula. Bake your bars in the oven for 25-30 minutes. The edges should be set, and a toothpick should come out mostly clean when you check the center. After baking, remove the pan and sprinkle 1 cup of mini marshmallows and ½ cup of chocolate chips on top. Return the pan to the oven, but set it to broil for 1-2 minutes. Keep a close eye on it. You want the marshmallows to get golden and puffy but not burnt. Once done, let the bars cool in the pan for about 30 minutes. Then, transfer them to the fridge for another hour to set. Finally, cut them into squares and enjoy your delicious pumpkin s'mores bars! The key times in this recipe are the baking time of 25-30 minutes and the broiling time of 1-2 minutes. Keep an eye on the bars while broiling. Ovens can vary, and you don’t want to burn the marshmallows. Use a toothpick to check if the bars are done. Insert it in the center; if it comes out mostly clean, they are ready. Preparing the baking pan is an important step. You can grease the pan with a little butter or non-stick spray. This will help the bars come out easily. If you line the pan with parchment paper, leave some overhang. This makes it easy to lift the bars out after cooling. To get the perfect texture in your Pumpkin S'mores Bars, focus on your crust. Mix graham cracker crumbs, cocoa powder, and melted butter until it feels like wet sand. Press this mix firmly into your pan. This helps form a strong base that won’t crumble when you cut the bars. For the pumpkin layer, blend the ingredients well. A smooth mixture is key. This ensures even baking and a creamy texture. When mixing your ingredients, use a large bowl. Start with the sugar and pumpkin puree. Whisk these together until they are smooth. Then, add the eggs and vanilla. Make sure to mix well after each addition. This helps blend the flavors. For the spices, sprinkle them in while mixing. This allows the cinnamon and nutmeg to spread evenly. Lastly, fold in the mini marshmallows and chocolate chips gently. You want them to stay whole for that gooey effect. One common mistake is overbaking the bars. Check them around 25 minutes. If the edges are set but the center is slightly wobbly, they’re done. Another mistake is not greasing the pan. This can make it hard to remove the bars later. Also, avoid adding too many marshmallows. They can overpower the pumpkin flavor. Stick to the amount in the recipe for balance. For the best results, follow the Full Recipe closely. {{image_2}} You can change the flavor of your Pumpkin S'mores Bars easily. Try adding a pinch of sea salt or even a splash of maple syrup. These changes can add depth to the sweet pumpkin taste. For a fun twist, add peanut butter chips or white chocolate. These flavors give your bars a new life. If you need gluten-free bars, use gluten-free graham crackers. They work just as well in the crust. For a dairy-free version, swap the butter with coconut oil. You can also use dairy-free chocolate chips and marshmallows. This way, everyone can enjoy these tasty treats. You can make these bars even more special by adding spices or nuts. Try some ground ginger or cloves for extra warmth. Chopped pecans or walnuts can add a nice crunch, too. Sprinkle them on top or mix them into the batter. Seasonal changes keep your bars fresh and exciting, perfect for fall gatherings. For the full recipe, you can refer back to the beginning of the article. To keep your pumpkin s'mores bars fresh, store them in an airtight container. You can place parchment paper between layers to prevent sticking. Make sure they are completely cool before sealing. This helps lock in moisture and flavor. These bars last about 4 to 5 days in the fridge. If you want to keep them longer, freeze them. Cut the bars into squares and wrap each piece tightly in plastic wrap. Place the wrapped bars in a freezer-safe bag. They can stay fresh for up to three months. When you’re ready to eat, let them thaw in the fridge overnight. To enjoy your pumpkin s'mores bars warmed, use the microwave. Heat for 10 to 15 seconds. This softens the marshmallows and makes the chocolate creamy. You can also reheat them in the oven. Set your oven to 350°F (175°C) and warm the bars for about 5 minutes. This method gives you a nice, warm treat. Enjoy every bite of your delicious pumpkin s'mores bars! For the complete recipe, check out the Full Recipe. Yes, you can make Pumpkin S'mores Bars ahead of time. I often prepare them a day before a gathering. After baking, let the bars cool. Then, chill them in the fridge. This helps the flavors blend well. Just remember to cover them tightly to keep them fresh. If you can't find pumpkin puree, use sweet potato puree. It gives a similar taste. You can also use butternut squash puree. Both options work well in this recipe. Make sure they are smooth and well-mixed to match the texture of pumpkin. To check if your bars are done, look for set edges. The center should be mostly clean when you poke it with a toothpick. If it comes out with a bit of pumpkin on it, that’s okay. The bars will set more as they cool. For the best results, follow the baking time in the Full Recipe. We covered the key steps to make tasty Pumpkin S'mores Bars. Start with the right ingredients, choose quality ones, and follow the steps carefully. Remember to mix well and avoid common mistakes. You can try fun variations and easy ways to store leftovers too. Cooking can be simple and rewarding. Enjoy these bars at any time of year!
Pumpkin S’mores Bars Irresistible Fall Treat
Get ready for the taste of fall with my Pumpkin S’mores Bars! This treat combines pumpkin, chocolate, and marshmallows for a cozy dessert. You won’t
To make these tasty apple pie cheesecake bars, you'll need: - 1 cup graham cracker crumbs - 1/2 cup unsalted butter, melted - 1/4 cup sugar - 2 (8 oz) packages cream cheese, softened - 1 cup sugar - 2 large eggs - 1 teaspoon vanilla extract - 2 cups apples, peeled and diced (preferably Granny Smith) - 1 teaspoon cinnamon - 1/4 teaspoon nutmeg - 1 tablespoon lemon juice - 1/4 cup brown sugar These ingredients blend together to create a rich and creamy dessert with a crunchy crust. You can add fun twists to your bars with these options: - Chopped nuts like walnuts or pecans for added crunch - A splash of caramel sauce swirled in for extra sweetness - A sprinkle of sea salt on top to enhance flavors - Different spices like ginger or allspice for a unique taste Feel free to experiment based on your taste! Each bar offers a balance of flavors and nutrients. Here’s a quick look: - Calories: 220 - Total Fat: 12g - Saturated Fat: 7g - Cholesterol: 70mg - Sodium: 150mg - Total Carbohydrates: 25g - Dietary Fiber: 1g - Sugars: 15g - Protein: 3g This information helps you enjoy your dessert while keeping track of your diet. For the full recipe, check the complete guide to make your own delicious apple pie cheesecake bars! Start by preheating your oven to 350°F (175°C). Take an 8x8 inch baking dish and line it with parchment paper. Leave some paper hanging over the edges to help lift the bars out later. In a medium bowl, mix together 1 cup of graham cracker crumbs, 1/2 cup of melted unsalted butter, and 1/4 cup of sugar. Stir until everything blends well. Press this mix firmly into the bottom of your baking dish. This forms a nice, sturdy crust. In a large bowl, beat 2 packages (8 oz each) of softened cream cheese with 1 cup of sugar. Mix until smooth and creamy. Add 2 large eggs one at a time, mixing well after each. Finally, stir in 1 teaspoon of vanilla extract to add flavor. Now, toss 2 cups of peeled and diced apples with 1 teaspoon of cinnamon, 1/4 teaspoon of nutmeg, 1 tablespoon of lemon juice, and 1/4 cup of brown sugar in a separate bowl. Make sure the apples get fully coated. Pour half of the cheesecake mixture over the cooled crust. Spread the spiced apples on top. Then, pour the rest of the cheesecake mixture over the apples. Bake the layered bars for 35-40 minutes. The center should be set but still have a slight jiggle. Once done, take them out and let them cool at room temperature. Refrigerate for at least 4 hours, or overnight if you can wait. When ready, lift the bars out using the parchment paper. Cut into squares and enjoy your delicious creation! For the full recipe, check the details above! Making apple pie cheesecake bars can be simple, but mistakes happen. Here are some common ones to watch for: - Not cooling the crust: If you skip cooling the crust, the cheesecake may not set well. - Overmixing the cream cheese: Mixing too much can add air and cause cracks. - Using unpeeled apples: Always peel your apples for a smoother texture. - Skipping the chilling time: This step is key for the best flavor and texture. To get the best results, follow these baking tips: - Preheat your oven fully: This ensures even baking from the start. - Use a water bath: Place your baking dish in a larger pan with water. This helps the cheesecake cook evenly. - Check for jiggle: The center should jiggle slightly when you take it out. It will firm up as it cools. - Avoid opening the oven door: This can cause temperature drops and lead to uneven baking. How you serve your bars can make a big difference. Here are some fun ideas: - Dust with powdered sugar: This adds a nice touch and looks pretty. - Garnish with apple slices: A fresh apple slice on top gives a lovely look. - Drizzle caramel sauce: This adds sweetness and richness to each bite. - Serve with whipped cream: A dollop of whipped cream makes it feel extra special. For the complete recipe, check out the Full Recipe link to get all the details! {{image_2}} You can switch up the flavor of these bars easily. Try using pumpkin for a fall twist. Simply add 1 cup of pumpkin puree to the cheesecake mix. This gives it a warm, spiced taste. For a caramel apple flavor, mix in some caramel sauce with the apples. It adds a sweet and rich layer to the bars. You can also drizzle more caramel on top before serving for extra sweetness. Making these bars gluten-free is simple. Replace graham cracker crumbs with gluten-free crumbs. Almond flour or gluten-free cookies work well. Use gluten-free oats for a different crust. Check the labels on sugar and other ingredients to ensure they are gluten-free. This way, everyone can enjoy the treat without worry. If you want to make these bars vegan, I have some easy swaps. Use vegan cream cheese instead of regular cream cheese. Replace the eggs with flax eggs; mix 1 tablespoon of ground flaxseed with 3 tablespoons of water, then let it sit. For the butter, use coconut oil or a vegan butter substitute. These swaps keep the taste rich and creamy while being plant-based. Enjoy your delicious vegan apple pie cheesecake bars! You can keep your apple pie cheesecake bars in an airtight container. Make sure to let them cool completely before covering. Store them in the fridge for up to five days. This helps keep the bars fresh and tasty. If you need to stack them, place parchment paper between layers. This prevents sticking and keeps the texture nice. If you want to save some for later, freezing is a great option. First, cut the bars into squares. Wrap each square tightly in plastic wrap. Then, place them in a freezer-safe bag or container. They can stay frozen for up to three months. When you’re ready to eat, just thaw them in the fridge overnight. To enjoy your bars warm, reheat them gently. Place a square in the microwave for about 10-15 seconds. Check to make sure it’s warm, not hot. This keeps the cheesecake creamy and the crust from getting too soft. Enjoy them fresh, just like when you first made them. For a special touch, add a drizzle of caramel sauce before serving! Yes, you can use different types of apples. Granny Smith apples work best due to their tartness. However, you can try Honeycrisp or Fuji apples for a sweeter touch. Each type will change the taste a bit. Mix and match apples for fun flavors. You can keep these bars in the fridge for up to five days. Make sure they are covered tightly. If you want to keep them longer, consider freezing them. They can last in the freezer for about three months. Absolutely! These bars are perfect for making ahead. You can bake them a day or two in advance. Just store them in the fridge until you are ready to serve. Chilling them will help the flavors blend. If your cheesecake doesn't set, it may need more time in the oven. Check if the center is jiggly but not liquid. If it is too soft, return it to the oven for five to ten more minutes. Cooling it in the fridge overnight can also help firm it up. This post covered all you need for apple pie cheesecake bars. We looked at key ingredients and how to mix them well. I shared step-by-step tips for a smooth bake and tasty results. You learned about fun variations and how to store leftovers. Try these bars for a sweet treat. With simple steps, you can impress your friends and family. Enjoy making and sharing this dessert!
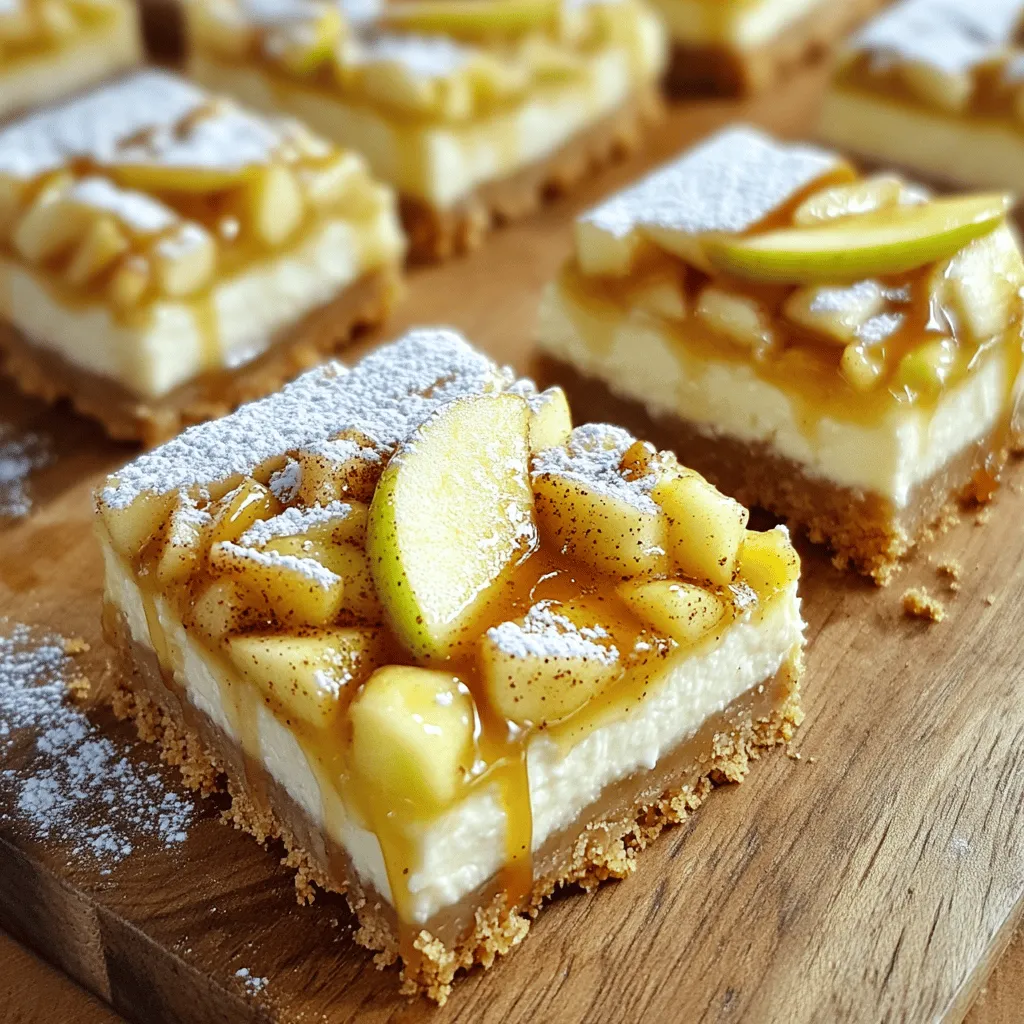
Apple Pie Cheesecake Bars Tasty and Easy Treat
Looking for a simple yet tasty treat? You’ve found it with these Apple Pie Cheesecake Bars! Combining creamy cheesecake with sweet, spiced apple filling, these
- 1 ½ cups all-purpose flour - 1 teaspoon baking powder - 1 teaspoon baking soda - ½ teaspoon salt - 1 teaspoon ground cinnamon - ½ teaspoon ground nutmeg - ½ teaspoon ground ginger - ½ cup unsalted butter, softened - 1 cup granulated sugar - 2 large eggs - 1 cup canned pumpkin puree - ½ cup buttermilk - 1 teaspoon vanilla extract - 1 cup cream cheese frosting (store-bought or homemade) - Optional: crushed pecans for topping I love using fresh, quality ingredients. They make a big difference in flavor and texture. For the dry mix, I start with all-purpose flour. It gives a nice structure to the cupcake. Baking powder and baking soda help the cupcakes rise. Salt enhances the sweet and spicy notes. I use ground cinnamon, nutmeg, and ginger for that warm fall flavor. For wet ingredients, softened unsalted butter is key. It mixes well with sugar for a lovely creamy base. The canned pumpkin puree adds moisture and a rich taste. Buttermilk makes the cupcakes tender and fluffy. I always add a splash of vanilla extract for a fragrant touch. Finally, the cream cheese frosting is a must. It adds a tangy sweetness that pairs perfectly with the pumpkin. Optional crushed pecans give a lovely crunch and extra flavor. Follow the [Full Recipe] for a detailed guide on how to make these cupcakes. First, preheat your oven to 350°F (175°C). This helps your cupcakes bake evenly. Next, line a standard muffin tin with cupcake liners. This makes clean-up easy and keeps cupcakes from sticking. In a medium bowl, whisk together the dry ingredients: - 1 ½ cups all-purpose flour - 1 teaspoon baking powder - 1 teaspoon baking soda - ½ teaspoon salt - 1 teaspoon ground cinnamon - ½ teaspoon ground nutmeg - ½ teaspoon ground ginger Set this aside for later. In a large mixing bowl, cream the softened butter and sugar together. Use a hand mixer for about 2-3 minutes. This step makes the mixture light and fluffy. Then, add the eggs one at a time, mixing well after each addition. This ensures a smooth batter. Next, stir in the pumpkin puree, buttermilk, and vanilla extract. Mix until everything combines well. It should look rich and creamy. Now, gradually add your dry ingredients to the wet mixture. Mix gently until just combined. Be careful not to overmix, as this can make cupcakes tough. Divide the batter evenly among the cupcake liners, filling each about two-thirds full. Bake in the preheated oven for 18-20 minutes. To check if they’re done, insert a toothpick in the center. If it comes out clean, they’re ready. Remove the cupcakes from the oven and let them cool in the pan for 5 minutes. Then, transfer them to a wire rack to cool completely. Once cool, frost with cream cheese frosting and sprinkle with crushed pecans if you like. These steps will make your Pumpkin Dream Cupcakes truly irresistible. For a complete guide, refer to the Full Recipe. To make perfect Pumpkin Dream Cupcakes, avoid overmixing. When you combine wet and dry ingredients, stir just until you see no flour. This keeps the cupcakes soft. The best temperature for butter is room temperature. Softened butter blends well with sugar, creating a fluffy mix. To soften butter quickly, cut it into small pieces. You can also microwave it for a few seconds, but watch closely. To frost evenly, use a knife or a spatula. Start in the center and spread out. This method gives a smooth finish. You can also use a piping bag for fun designs. For creative garnishes, consider crushed pecans or a sprinkle of cinnamon. You can also add a drizzle of caramel sauce for extra sweetness. Get creative with toppings that match your taste. For the best pairing, serve these cupcakes with warm cider or a spiced latte. The warm flavors enhance the pumpkin taste. For gatherings, arrange cupcakes on a pretty platter. A sprinkle of cinnamon or melted white chocolate on top adds a nice touch. This makes them look fancy and inviting. For the full recipe, check out the complete details earlier. {{image_2}} To make Pumpkin Dream Cupcakes even better, try adding chocolate chips. They add a sweet twist to the warm spices. Use about ½ cup of semi-sweet chips. Fold them in gently at the end, just before baking. You can also play with the spices. Add more cinnamon or even a pinch of allspice. This gives your cupcakes a unique flavor. If you need gluten-free options, swap the all-purpose flour for a gluten-free blend. Make sure the blend works for baking. For a dairy-free version, use a dairy-free butter and almond milk instead of buttermilk. You can also find dairy-free cream cheese for frosting. These changes make the recipe friendly for more diets. Cream cheese frosting is classic, but you can try other frostings too. A vanilla buttercream adds a sweet touch. For a twist, use maple frosting. Simply add maple syrup to your buttercream. Another idea is using whipped cream, which keeps it light and airy. You can even blend in flavors like pumpkin spice or chocolate for more variety. You can store your Pumpkin Dream Cupcakes on the counter or in the fridge. If you choose the counter, keep them in a container with a lid. This keeps them fresh for about three days. If you prefer the fridge, use an airtight container. This option can make the cupcakes last up to a week. To freeze your cupcakes, first wrap them tightly in plastic wrap. Then, place them in a freezer bag or airtight container. This method helps prevent freezer burn. When you want to enjoy them, take them out and let them thaw in the fridge overnight. You can also let them sit at room temperature for a few hours. The ideal storage time in the freezer is up to three months. To check freshness, look for any signs of mold or an off smell. If the cupcakes seem dry or crumbly, they may not taste good. I recommend eating them within a week for the best flavor. However, if frozen, enjoy them within three months for the best taste and texture. For the full recipe, refer back to the earlier section. To keep your cupcakes moist, use the right amount of oil or butter. Adding pumpkin puree helps, too. Mix the batter gently. Overmixing can make them dry. Always bake them until just done. Use a toothpick to check for doneness. If it comes out clean, they're ready! Yes, you can use fresh pumpkin. First, cook it until soft. Then, mash it well. Drain any excess water. This way, it mimics the canned version. It may take more time, but the flavor is worth it. Store leftover cupcakes in an airtight container. Keep them at room temperature for up to three days. If you need to store them longer, refrigerate them. Just make sure they are covered. Frosting can harden in the fridge. Absolutely! To freeze, let them cool completely. Wrap each cupcake in plastic wrap. Place them in a freezer bag. They will stay fresh for up to three months. Thaw them in the fridge before serving. Cream cheese frosting pairs great with pumpkin flavors. Its tangy taste balances the sweetness. You can use store-bought or homemade. Other options include whipped cream or maple frosting. Frost them with a piping bag for a nice touch. You can also sprinkle crushed pecans on top. A drizzle of caramel or melted chocolate adds charm. Use seasonal decorations like small pumpkins for a fun look. Yes, adding nuts or chocolate chips can enhance flavor. Fold them into the batter before baking. Just be mindful not to add too many. This keeps the cupcakes light and fluffy. You can make a quick substitute. Mix one cup of milk with one tablespoon of vinegar or lemon juice. Let it sit for five minutes. This gives you a buttermilk alternative with similar acidity. This recipe yields 12 cupcakes. If you want more, you can double the ingredients. Just make sure to adjust baking time if necessary. Serve them on a nice platter. You can garnish with a sprinkle of cinnamon. A drizzle of melted chocolate also adds flair. Pair them with coffee or tea for a cozy treat. This blog post shared a simple guide to making delicious cupcakes. We covered key ingredients, including spices and toppings. The step-by-step instructions help you mix and bake with ease. Tips and tricks ensure perfect results every time. You can explore flavor variations and storage methods. Remember, creativity matters! Enjoy sharing these treats with friends and family. Trust that these cupcakes will impress and satisfy everyone. Keep baking and have fun experimenting!
Pumpkin Dream Cupcakes Irresistible Fall Delight
Get ready to indulge in the cozy flavors of fall with my Pumpkin Dream Cupcakes! These treats are soft, spiced, and topped with creamy frosting.
- 2 cups all-purpose flour - 1 ½ teaspoons baking powder - 1 teaspoon baking soda - 1 teaspoon ground cinnamon - ½ teaspoon ground nutmeg - ½ teaspoon ground ginger - ½ teaspoon salt - 1 cup granulated sugar - ½ cup brown sugar, packed - 1 cup vegetable oil - 4 large eggs - 1 cup canned pumpkin puree - 1 teaspoon vanilla extract - 8 oz cream cheese, softened - ½ cup unsalted butter, softened - 2 cups powdered sugar - ½ cup caramel sauce - A pinch of sea salt Gathering the right ingredients is key to making this pumpkin cake shine. You start with the dry ingredients. The blend of flour, baking powder, baking soda, and spices creates a warm, inviting aroma. The sugar adds sweetness, while the pumpkin puree gives moisture and flavor. Next, we have wet ingredients. The combination of granulated sugar and brown sugar makes the cake moist and rich. The vegetable oil keeps it soft, and eggs add structure. Canned pumpkin puree provides the beloved pumpkin flavor. Don't forget the vanilla extract for that extra touch. Finally, we prepare the frosting. Cream cheese and butter combine for a creamy base. Add powdered sugar to sweeten the mix, and caramel sauce brings in that delightful sweetness. The pinch of sea salt balances the flavors. You can find the full recipe to see how these ingredients come together perfectly! - Preheat the oven to 350°F (175°C). - Grease and flour two 9-inch round cake pans. Getting the oven ready is the first step. This ensures your cake rises and bakes evenly. Greasing and flouring the pans helps prevent sticking. Use a bit of butter or oil to grease, and flour works great for dusting. - Combine dry ingredients in a bowl. - Mix sugars and oil in a separate bowl. In a medium bowl, mix the dry ingredients. This includes the flour, baking powder, baking soda, spices, and salt. Whisk them well to break up lumps. In another large bowl, combine the granulated sugar, brown sugar, and vegetable oil. Use an electric mixer to blend them until smooth. This gives your cake a nice, sweet flavor. - Add eggs and pumpkin, combine well. - Gradually mix in dry ingredients, then bake for 25-30 minutes. Now, add the eggs one at a time to the sugar mixture. Mix well after each addition. Then add in the pumpkin puree and vanilla extract. This adds moisture and flavor. Gradually add the dry ingredients to this mixture. Use a spatula to fold it gently. This helps keep your cake fluffy. Pour the batter into the prepared pans and smooth the tops. Bake them for 25-30 minutes. To check if they are done, insert a toothpick in the center. If it comes out clean, your cakes are ready! Let them cool in the pans for about 10 minutes before moving them to wire racks. This helps them cool completely and makes it easier to frost. For the complete recipe, be sure to check out the Full Recipe section. To make a fluffy pumpkin cake, avoid over-mixing. When you combine the wet and dry ingredients, be gentle. Just mix until you see no dry flour. Also, using room temperature ingredients is key. If your eggs and pumpkin puree are warm, they blend better, making your cake rise well. For a smooth frosting, use softened cream cheese and butter. This helps the frosting blend nicely. If your frosting is too soft, chill it for a short time. This makes it easier to spread on the cake without dripping. Serve your cake slices on white plates. The bright color of the cake stands out against white. Drizzle caramel sauce over each slice for an added touch. You can also garnish with fresh mint leaves. They add a nice pop of color and freshness. For extra flair, sprinkle some crushed nuts or cinnamon on top. These small touches make your cake look and taste fantastic. For the complete recipe, check out the Full Recipe. {{image_2}} You can make your pumpkin cake even tastier! To do this, add more cinnamon or nutmeg. Just a teaspoon more can boost the flavor. If you enjoy deeper spices, incorporate some ground cloves. This spice adds warmth and richness that pairs well with pumpkin. Want to make a healthier version of this cake? Substitute brown sugar with coconut sugar. This swap gives you a lower glycemic index and a hint of caramel flavor. You can also use Greek yogurt instead of cream cheese for the frosting. This change adds protein and cuts some fat while keeping it creamy. Add-ins can make your cake special! You might include chopped nuts, like walnuts or pecans, right in the batter. They add crunch and flavor. You can also toss in chocolate chips for a sweet twist. For a fun finish, top your cake with grated chocolate or toffee bits. These will give your cake extra texture and make it even more delightful. For the complete recipe, check out the Full Recipe. You can keep leftover pumpkin cake in an airtight container. It will stay fresh at room temperature for up to 2 days. If you want to keep it longer, refrigerate it. The cake will last in the fridge for up to a week. Just make sure to seal it well to keep the moisture in. If you have more cake than you can eat, freezing is a great option. Wrap each layer of the cake in plastic wrap. This will help keep it fresh. You can freeze them for up to 3 months. When you’re ready to enjoy the cake again, thaw the layers in the fridge. Let them warm up before frosting and serving for the best taste. If you want a warm slice of cake, reheating is easy. You can microwave individual slices for a few seconds. This warms the cake without drying it out. If you prefer, you can also warm it briefly in the oven. Just pop it in at a low heat. This will help refresh the cake's texture, making it taste freshly baked again. For the full recipe, check out the Pumpkin Spice Delight Cake. Yes, but ensure it is well-pureed and drained of excess moisture. Fresh pumpkin can bring a vibrant flavor to your cake. Start with a small pumpkin, roast it, and scoop out the soft flesh. Blend it until smooth. This step helps achieve the right texture in your cake. Add more powdered sugar gradually until the desired consistency is reached. Start with half a cup and mix it in well. If it’s still too thin, keep adding until you get that fluffy, thick texture. This icing should hold its shape well on the cake. Store-bought works well, but homemade caramel can enhance flavor. If you have time, try making your own. It’s simple and offers a deeper taste. Just melt sugar, add cream, and stir until smooth. Homemade caramel adds a special touch to your frosting. Substitute flour with a gluten-free blend for a gluten-free version. Many blends work well, but make sure to check for a mix that contains xanthan gum. This will help with the texture and keep your cake moist and delicious. This blog post covers a tasty cake recipe from start to finish. We discussed the dry and wet ingredients needed, and how to mix and bake the cake perfectly. I shared tips to keep your cake fluffy and how to create smooth frosting. You can make fun variations to suit your taste and enjoy easy storage tips for leftovers. Try this recipe for a delightful dessert. Simple steps make tasty results. Happy baking!
Pumpkin Cake with Caramel Cream Cheese Frosting Delight
Craving a sweet treat that captures fall in every bite? This Pumpkin Cake with Caramel Cream Cheese Frosting is your answer! With warm spices and
To make these delightful apple cider cookies, gather these key ingredients: - 2 cups all-purpose flour - 1 teaspoon baking soda - 1 teaspoon ground cinnamon - 1/2 teaspoon ground nutmeg - 1/4 teaspoon ground ginger - 1/2 teaspoon salt - 1/2 cup unsalted butter, softened - 1 cup packed brown sugar - 1/2 cup granulated sugar - 1 large egg - 1 teaspoon vanilla extract - 1/2 cup apple cider - 1/2 cup chopped walnuts or pecans (optional) - 1/2 cup dried cranberries or raisins (optional) Each ingredient plays a role in the flavor and texture of the cookies. The flour gives structure, while the butter adds richness. Spices like cinnamon and nutmeg bring warmth, perfect for autumn. Apple cider adds moisture and a sweet apple taste. You can customize your cookies with nuts or dried fruit for extra crunch and flavor. For the full recipe, check the earlier section. This combination will create cookies that are soft, chewy, and bursting with autumn flavors. - Preheat your oven to 350°F (175°C). Line a baking sheet with parchment paper. - In a medium bowl, mix together 2 cups of flour, 1 teaspoon of baking soda, 1 teaspoon of cinnamon, 1/2 teaspoon of nutmeg, 1/4 teaspoon of ginger, and 1/2 teaspoon of salt. Set this mixture aside. - In a large bowl, cream together 1/2 cup of softened butter, 1 cup of packed brown sugar, and 1/2 cup of granulated sugar. Beat this until it is fluffy, for about 2-3 minutes. - Add 1 large egg and 1 teaspoon of vanilla extract to the butter mixture. Mix until everything blends well. - Pour in 1/2 cup of apple cider and stir until the mixture is smooth. - Gradually mix the dry mixture into the wet mixture. Stir until just combined. - If you want, fold in 1/2 cup of chopped nuts and 1/2 cup of dried cranberries or raisins. - Scoop tablespoon-sized portions of dough onto the prepared baking sheet. Space them about 2 inches apart. - Bake in the preheated oven for 10-12 minutes. Look for lightly golden edges. - After baking, let the cookies cool on the sheet for 5 minutes. Then, move them to a wire rack to cool completely. For the full recipe, refer to the recipe section above. Enjoy your delicious apple cider cookies! - To achieve the perfect texture, mix the dough just enough. Over-mixing can make your cookies tough. - Use room temperature butter. Cold butter will not mix well, affecting the cookie's rise. - Add a pinch of cloves or allspice for extra warmth. A splash of maple extract gives a nice twist! - Nuts like walnuts or pecans add great crunch. Dried cranberries or raisins bring a sweet chewiness. - Arrange the cookies on a fun plate. Sprinkle some cinnamon on top for a cozy look. - Pair them with a warm glass of apple cider. This makes for a delightful treat during autumn. For more details, check out the Full Recipe. {{image_2}} You can change up the flavor of your apple cider cookies easily. One fun way is to make pumpkin spice cookies. Just add a tablespoon of pumpkin spice to the dough. This gives your cookies a warm, fall flavor. You can also use pumpkin puree instead of some butter. This swap makes the cookies softer and adds moisture. Another tasty twist is making salted caramel apple cider cookies. To do this, mix in some caramel bits into the dough. After baking, sprinkle a little sea salt on top. The sweet and salty mix is a real treat! If you need gluten-free options, you can use a gluten-free flour blend instead of all-purpose flour. Make sure it has a good binding agent, like xanthan gum, for the best texture. For vegan adaptations, swap the egg for a flax egg. To make a flax egg, mix one tablespoon of ground flaxseed with three tablespoons of water. Let it sit for a few minutes until it thickens. Use vegan butter instead of regular butter, and choose a plant-based milk for the apple cider. These changes keep the cookies tasty and friendly for everyone. For short-term storage, let the cookies cool completely. Then, place them in an airtight container. This keeps them soft and tasty. You can store them at room temperature for up to one week. For extra freshness, add a slice of bread. It helps keep the cookies moist. If you want to freeze cookies, you can do that too. First, let them cool down. Then, wrap each cookie in plastic wrap. Place the wrapped cookies in a freezer-safe bag. They will stay good for about three months. When you're ready to eat, just thaw them at room temperature. These apple cider cookies stay fresh for about one week at room temperature. You can also store them in the fridge. They can last a bit longer there, up to two weeks. Look out for signs of spoilage. If the cookies become hard or dry, they may not taste as good. Also, check for any unusual smells. If they smell off, it’s best to throw them away. Enjoy your delicious treats while they are still fresh! The best way to make Apple Cider Cookies is to follow the full recipe closely. Start by mixing dry ingredients in a bowl. Then, cream the butter and sugars until light and fluffy. Add in the egg and vanilla before mixing in the apple cider. Finally, combine the wet and dry mixtures, scoop, and bake. This method gives you the best texture and flavor. No, you cannot substitute apple cider vinegar for apple cider. Apple cider has a sweet flavor that helps create a soft cookie. Vinegar is much more tart and will alter the taste and texture. Stick with real apple cider for the best results in your cookies. You can tell the cookies are done when the edges turn light golden brown. The center may still look soft but will firm up as they cool. Remove them from the oven and let them rest for a few minutes on the baking sheet. Yes, you can make the dough ahead of time. Wrap the dough tightly in plastic wrap and store it in the fridge for up to three days. You can also freeze it for up to three months. When you’re ready, thaw the dough and bake as usual. You can serve Apple Cider Cookies with a glass of warm apple cider. They also pair well with tea or coffee. For a fun twist, try serving them with whipped cream or vanilla ice cream. In this post, we covered everything you need for delicious apple cider cookies. You learned about the ingredients, step-by-step instructions, and helpful tips for baking. We also shared variations and storage options to try. Baking cookies can be fun and rewarding. With these easy steps, you can impress friends and family. Remember, small changes can make a big difference. So, don’t hesitate to experiment. Enjoy your baking journey!
Apple Cider Cookies Scrumptious Autumn Treat Recipe
Fall is here, and what better way to celebrate than with warm, fragrant Apple Cider Cookies? In this blog post, I’ll guide you through a
To make easy frozen yogurt bites, you need just a few simple ingredients. Each item adds flavor and texture, making your snack fun and delicious. - 2 cups plain Greek yogurt - 1 tablespoon honey or maple syrup - 1/2 teaspoon vanilla extract - 1 cup mixed berries - 1/2 banana, sliced - 1/4 cup chopped nuts - A pinch of sea salt Using plain Greek yogurt gives these bites a creamy base. I love adding honey or maple syrup for sweetness. Vanilla extract adds a nice touch, too. The mixed berries bring color and flavor, while banana adds natural sweetness. Chopped nuts give a crunchy texture. A pinch of sea salt enhances all the flavors, making each bite pop. This list of ingredients makes it easy to customize your bites. You can swap fruits or nuts based on your taste. Try using your favorite berries or a different nut. The possibilities are endless! For the full recipe, check the section above. To start, you need to mix the yogurt, honey, vanilla, and salt. Use a medium bowl for this. Stir until the mixture is smooth and creamy. This simple step sets the base for your tasty bites. Next, line your muffin tin or silicone molds. If you use silicone molds, you can skip this step. Lining helps with easy removal later. Now, take a spoon and put a dollop of the yogurt mixture into each cup. Fill them about halfway. This gives you space for the fun stuff! Add your favorite fruits like mixed berries and banana slices. Press them gently into the yogurt. This makes sure they stay in place. Finally, sprinkle some chopped nuts on top. They add a great crunch and flavor. Once your cups are filled, cover the fruits and nuts with more yogurt mixture. This seals everything in and makes a lovely bite. Now, it's time to freeze. Place the muffin tin or molds in the freezer. Let them freeze for at least 2-3 hours until solid. When they are ready, remove the bites from the molds. If they stick, run warm water over the outside to help release them easily. Enjoy these refreshing treats! For the full recipe, check out the detailed instructions above. To make your frozen yogurt bites truly shine, adjust the sweetness. You can use honey for a nice touch. If you prefer a vegan option, maple syrup works great too. Both options add flavor and balance the tartness of yogurt. Using full-fat Greek yogurt is key for creaminess. It gives your bites a rich texture that feels great in your mouth. Low-fat yogurt can be watery and less satisfying. Stick with the full-fat version for a delightful treat. Serving your yogurt bites well makes them even more fun. Try using a colorful platter; it catches the eye. Arrange the bites in a circle or a fun shape to make them pop. Garnishing adds a special touch. Fresh mint leaves brighten the plate and add color. You can also sprinkle a few berries on top for extra flair. It makes the bites look fancy and inviting. {{image_2}} You can mix up your frozen yogurt bites in fun ways. One easy option is to use different fruits. Try mango, peach, or kiwi for a tropical twist. Each fruit brings its own taste and color. You can also use flavored yogurts. A strawberry or blueberry yogurt adds a rich flavor. This simple change makes your bites even tastier. Toppings can make your yogurt bites more exciting. Adding mixed seeds or granola gives a nice crunch. You can use sunflower seeds, pumpkin seeds, or your favorite granola blend. These toppings add texture and a boost of nutrition. Another option is to sprinkle on chocolate chips or coconut flakes. Both choices add sweetness and fun. You can play around with different toppings to find what you love best. The key is to make each bite as unique as you want! To store your frozen yogurt bites, place them in a sealed container. This keeps them fresh and prevents freezer burn. I recommend using a container that is airtight. You can also use resealable freezer bags. Just make sure to squeeze out the air before sealing. When you thaw the yogurt bites, they might lose some texture. To help keep them firm, let them sit at room temperature for just a few minutes. This will help maintain their shape. If you prefer a softer treat, you can let them thaw longer. Just know that they might get a bit messy. For the best results, use glass or high-quality plastic containers. They help keep the yogurt bites fresh. Look for containers with a tight-sealing lid. This prevents air from getting in and keeps the flavors strong. Silicone molds are also great for easy storage. You can pop the bites out without any hassle. They are flexible and make removal a breeze. Plus, you can stack them easily in your freezer. For long-term storage, always label your containers with the date. This way, you will know when to enjoy them by. You can easily swap out fruits and nuts to fit your taste. Use any fruit you love. Try mango, kiwi, or peaches. For nuts, almonds, walnuts, or even seeds work well. You can mix and match to create new flavors each time. This way, you can enjoy a different snack every day! Yes, you can use non-dairy yogurt! Look for almond, coconut, or soy yogurt. These options are great for vegan or lactose-free diets. Just ensure they have a similar texture to Greek yogurt for best results. This keeps your yogurt bites creamy and tasty. These yogurt bites last up to a month in the freezer. To keep them fresh, store them in a sealed container. Make sure to label the container with the date you made them. This way, you'll know when to enjoy them! Yes, you can make these yogurt bites ahead of time! Prepare them a few days or even a week before you need them. Just freeze them and take them out when you’re ready to eat. They make a perfect snack or dessert for any occasion. For the full recipe, check it out here! You learned how to make tasty yogurt bites with simple steps. You can mix Greek yogurt, fruits, and nuts for a healthy snack. Remember to freeze them for a few hours to enjoy later. Experiment with different flavors and toppings to find what you love. These yogurt bites are easy to customize, store, and serve. So grab your ingredients and start creating delicious treats!
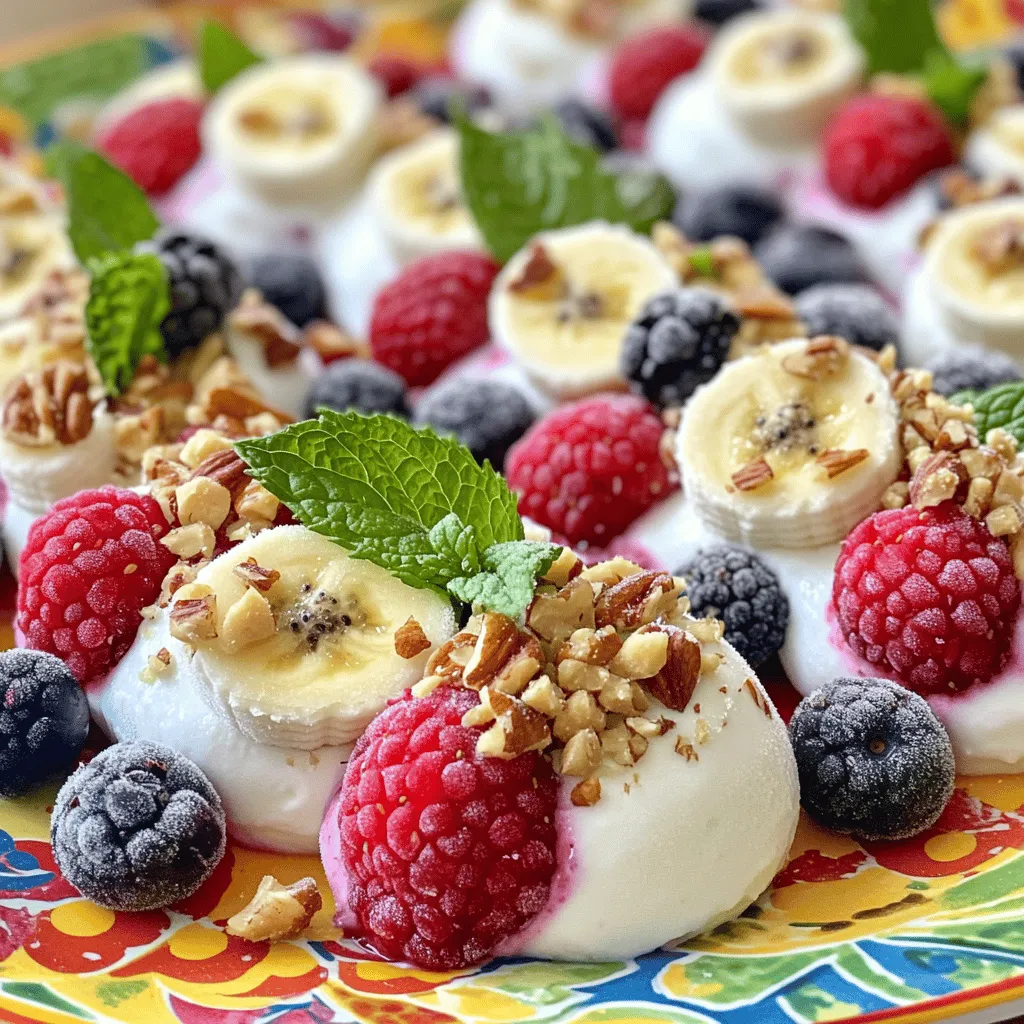
Easy Frozen Yogurt Bites Simple and Tasty Snack
Are you looking for a fun and healthy snack? These Easy Frozen Yogurt Bites are the perfect treat! With just a few simple ingredients, you
- 1 cup all-purpose flour - 1/2 cup old-fashioned oats - 1/2 teaspoon baking powder - 1/2 teaspoon baking soda - 1/4 teaspoon salt - 1/2 cup unsalted butter, softened - 1 cup brown sugar, packed - 1/4 cup granulated sugar - 2 large eggs - 1/2 cup pure pumpkin puree - 1/4 cup pure maple syrup - 1 teaspoon vanilla extract - 1 teaspoon ground cinnamon - 1/4 teaspoon ground nutmeg - 1/4 teaspoon ground ginger - 1/2 cup chopped pecans (optional) - 1/4 cup powdered sugar for dusting (optional) These ingredients create a rich, sweet, and spiced flavor that fills the kitchen with warmth. The brown sugar adds depth, while pumpkin offers moisture. You can add pecans for a crunchy texture. If you want to skip the pecans, that’s fine too! - Mixing bowls - Whisk - Spatula - Baking pan (9x9-inch) - Parchment paper (optional) Gathering these tools makes the process smooth. A whisk helps blend the ingredients well. The spatula ensures you scrape down the sides of the bowl. Using a baking pan lined with parchment paper makes cleanup easy. For the full recipe, check out the instructions that follow. Enjoy baking these delicious bars! 1. Preheat your oven to 350°F (175°C) to ensure even baking. 2. Grease a 9x9-inch baking pan or line it with parchment paper for easy removal. 3. In a mixing bowl, whisk together the following dry ingredients: - 1 cup all-purpose flour - 1/2 cup old-fashioned oats - 1/2 teaspoon baking powder - 1/2 teaspoon baking soda - 1/4 teaspoon salt - 1 teaspoon ground cinnamon - 1/4 teaspoon ground nutmeg - 1/4 teaspoon ground ginger 1. In another large bowl, cream together: - 1/2 cup unsalted butter, softened - 1 cup brown sugar, packed - 1/4 cup granulated sugar Beat these until the mixture is light and fluffy. 2. Now add: - 2 large eggs - 1/2 cup pure pumpkin puree - 1/4 cup pure maple syrup - 1 teaspoon vanilla extract Mix until everything combines smoothly. 1. Gradually fold the dry ingredients into the wet mixture. Do this gently to avoid overmixing. It’s okay if the batter is a bit lumpy. 2. If you want to add a crunch, fold in: - 1/2 cup chopped pecans (optional) 3. Pour the batter into your prepared pan. Spread it evenly with a spatula. 4. Bake in your preheated oven for about 25-30 minutes. The edges should be golden, and a toothpick inserted in the center should come out clean. 5. Once baked, let the bars cool in the pan for about 10 minutes. Then transfer them to a wire rack to cool completely. 6. For a sweet touch, dust with powdered sugar if you like, then cut into squares or rectangles. These bars are not just tasty; they are also a great way to enjoy fall flavors in a simple treat. For the complete instructions, check the Full Recipe! To make your Brown Sugar Maple Pumpkin Butter Bars just right, focus on mixing. Start with the wet ingredients. Beat the butter and sugars well. This adds air, making the bars light and fluffy. Then add in the eggs and pumpkin puree. Mix until smooth. When you combine the dry and wet mixes, do it gently. Use a spatula to fold them together. Stop mixing as soon as you see no dry flour. This keeps the bars moist. Overmixing can make them tough. A few lumps are okay. Want to jazz up your bars? Add more spices! Try a pinch of allspice or cloves. They add warmth and depth to the flavor. You can also use different extracts. Almond extract or maple flavor can give a special twist. If you want to change the sweetness, consider using honey or agave. These options blend well with pumpkin. You can also swap some brown sugar for coconut sugar. It adds a slightly different taste but is still delicious! Presentation is key to make these bars shine. Serve them on a wooden platter. Dust them with powdered sugar for a nice touch. You can also add a sprinkle of cinnamon on top. For drinks, pair these bars with warm apple cider or a latte. The flavors complement each other well. If you love whipped toppings, try a dollop of whipped cream or cinnamon whipped cream. It adds a nice creamy balance to the sweet bars. For more details, check the Full Recipe. {{image_2}} You can mix things up with your Brown Sugar Maple Pumpkin Butter Bars. Adding chocolate chips gives a sweet twist. I love using semi-sweet chips, but you can choose dark or white chocolate too. Chopped nuts, like walnuts or almonds, add crunch and flavor. If you want a fruity touch, try using apple or pear puree instead of pumpkin. This change brightens the taste and adds a new layer of fun. Want to make these bars vegan? Swap the butter for coconut oil or vegan butter. Instead of eggs, use flaxseed meal or applesauce for binding. This keeps the texture soft and moist. For gluten-free bars, use gluten-free all-purpose flour. It works well and keeps the bars tasty. You can also try almond or oat flour for a different flavor and texture. Make your bars special for the season. Add spices like allspice or cloves for extra warmth. You can also mix in some dried cranberries for a festive flair. For the holidays, drizzle melted chocolate on top or try a cream cheese frosting. These little details bring joy to your treats and make them shine at any event. Once your Brown Sugar Maple Pumpkin Butter Bars come out of the oven, let them cool. Allow the bars to rest in the pan for about 10 minutes. Then, move them to a wire rack to cool completely. This helps keep the texture nice and fluffy. For storage, choose an airtight container. Glass containers work well, as do plastic ones. Line them with parchment paper for easy removal. These bars stay fresh for about 3 days at room temperature. If you want to keep them longer, refrigeration is best. In the fridge, they last up to a week. For even longer storage, freeze the bars. Wrap them tightly in plastic wrap and then place them in a freezer bag. They can last up to three months in the freezer. To reheat, use the oven. Preheat it to 350°F (175°C). Place the bars on a baking sheet for about 10 minutes. This keeps them soft and warm. You can also use a microwave. Heat for 15-20 seconds, but watch closely. Serve with a drizzle of maple syrup for extra flavor. Enjoy your tasty treat! Yes, you can use canned pumpkin puree. Canned pumpkin is easy and saves time. It has a smooth texture and rich flavor, just like fresh. Always check the label for 100% pumpkin. This ensures it has no added sugar or spices. Fresh pumpkin can taste great too, but it takes longer to prepare. If you need a substitute for brown sugar, try white sugar mixed with molasses. This mixture gives a similar flavor. You can also use coconut sugar or maple sugar. Each option changes the taste slightly, but they all work well in this recipe. To check if the bars are done, use a toothpick. Insert it in the center; it should come out clean. Look for golden edges and a slight spring back when you touch the top. If it’s still wet, bake a few more minutes and test again. Regular oats can be used, but they will change the texture. Old-fashioned oats add a nice chewiness to the bars. If you use regular oats, the bars might be softer. Stick with old-fashioned oats for the best result. Yes, you can make these bars ahead of time. Bake them a day or two before serving. Store them in an airtight container once cool. They taste great even after a few days. If you want, you can also freeze them for longer storage. Just let them thaw before serving for the best taste. For the full recipe, check the earlier section. These Brown Sugar Maple Pumpkin Butter Bars are simple and delicious. We covered the key ingredients, tools, and steps for making them. Remember the tips for texture and flavor to make your bars stand out. You can explore variations or store them for later enjoyment. You’ll impress your friends and family with these tasty treats. Baking is fun, especially with a recipe that works well for everyone. Get your ingredients ready and enjoy the process of baking these perfect bars!
Brown Sugar Maple Pumpkin Butter Bars Delightful Treat
Craving a sweet, cozy treat? These Brown Sugar Maple Pumpkin Butter Bars are just what you need! With their rich flavors and easy prep, these
For this pumpkin spice monkey bread, you will need the following ingredients: - 2 cans of refrigerated biscuit dough - 1 cup pumpkin puree - 1/2 cup brown sugar - 1/2 cup granulated sugar - 2 teaspoons pumpkin pie spice - 1 teaspoon cinnamon - 1/2 cup unsalted butter, melted - 1/2 cup chopped pecans (optional) - 1/4 cup powdered sugar (for drizzle) - 2 tablespoons milk (for drizzle) These ingredients work together to create a warm, gooey treat perfect for fall. The combination of pumpkin puree and spices gives this bread its signature flavor. The biscuit dough makes it easy to prepare, allowing you to enjoy the process without stress. The optional pecans add a nice crunch. If you love nuts, toss them in! The drizzle of powdered sugar and milk adds a sweet touch that makes this bread even better. You can find the full recipe to make this delicious treat [here](Full Recipe). Enjoy every bite! - Preheat your oven to 350°F (175°C) and grease a bundt pan with non-stick spray or butter. - In a large bowl, mix 1 cup of pumpkin puree, 1/2 cup of brown sugar, 1/2 cup of granulated sugar, 2 teaspoons of pumpkin pie spice, and 1 teaspoon of cinnamon. Stir until smooth. - Open the cans of biscuit dough and cut each biscuit into quarters. Dip each piece in the pumpkin mixture to coat well. - Take the coated biscuit pieces and layer them in the prepared bundt pan. If you like, sprinkle 1/2 cup of chopped pecans between the layers. - Pour the remaining pumpkin mixture over the biscuit layers in the pan for added flavor. - Drizzle 1/2 cup of melted butter evenly over everything to enhance the richness. - Bake the monkey bread for 30-35 minutes. Check for doneness by inserting a toothpick in the center; it should come out clean. - Once baked, let the monkey bread cool in the pan for about 10 minutes. This will help it set. - Carefully invert the bundt pan onto a serving plate to release the monkey bread. Enjoy with a drizzle made from 1/4 cup powdered sugar and 2 tablespoons of milk for a sweet touch. For the complete guide, check the Full Recipe. To get that perfect golden color, watch your oven closely. Bake at 350°F (175°C) for 30-35 minutes. The top should be brown and firm. If it browns too fast, cover it with foil for the last few minutes. For even cooking, spread your biscuit pieces evenly in the bundt pan. Avoid stacking them too high. This helps the heat circulate well. Make sure to use a toothpick to check if it’s done. It should come out clean when inserted. For a fun presentation, serve the monkey bread warm on a nice platter. You can sprinkle extra cinnamon on top or add a few pecans for a nice touch. Consider placing a small bowl of warm caramel sauce nearby for dipping. Best drinks to pair with your pumpkin spice monkey bread include hot apple cider or a cozy cup of coffee. The flavors blend well and make for a warm fall experience. To make your monkey bread even more inviting, try garnishing it with a sprinkle of powdered sugar. You can also drizzle extra icing over the top for added sweetness. For gatherings, consider pulling apart the bread pieces and serving them in small cups. This makes it easy for guests to grab and enjoy. You can even set up a fun topping bar with whipped cream, chocolate chips, or even marshmallows. Try this [Full Recipe] to create your pumpkin spice monkey bread. Enjoy every bite of this fall treat! {{image_2}} You can change up the flavor of your pumpkin spice monkey bread easily. Adding spices like nutmeg or ginger brings warmth. Just mix them into the pumpkin mixture. If you want a sweet twist, try adding chocolate chips or caramel bits. This will take your monkey bread to a whole new level of yum! If you need gluten-free options, look for gluten-free biscuit dough. Many brands offer great choices. You can also make this recipe vegan. Substitute the butter with coconut oil or vegan butter. Use almond or oat milk instead of regular milk. These swaps keep your monkey bread tasty and friendly for different diets. Fall is the best time to play with flavors. You can switch pumpkin for apple cider or maple syrup to change the taste. For a holiday touch, add dried cranberries or walnuts for crunch. These seasonal twists keep your pumpkin spice monkey bread fresh and fun! For the complete recipe, check out the [Full Recipe]. After you enjoy your pumpkin spice monkey bread, store any leftovers properly. Let it cool completely before wrapping it. Use plastic wrap or foil to cover it tightly. This helps keep it fresh and moist. In the fridge, your monkey bread lasts about 3 to 4 days. You can still enjoy it warm or at room temperature for a quick snack. If you want to keep your monkey bread longer, freezing is a great option. First, let it cool completely. Then, wrap it in plastic wrap and place it in a freezer bag. Squeeze out the air to avoid freezer burn. When stored correctly, it can last for up to 3 months. To reheat, simply thaw it in the fridge overnight. Then, warm it in the oven at 350°F (175°C) for about 15-20 minutes. This brings back its delicious taste and soft texture. Enjoy your pumpkin spice monkey bread anytime! For the complete recipe, check out the Full Recipe. Can I make pumpkin spice monkey bread ahead of time? Yes, you can. Prepare the monkey bread and store it in the fridge. Just bake it the next day. This saves time and keeps it fresh for serving. What’s the best way to reheat leftover monkey bread? To reheat, warm it in the oven at 350°F for about 10 minutes. This helps keep it soft and tasty. You can also microwave it for 15 to 20 seconds. Can I use a different type of bread for this recipe? You can try different types of bread. Use pull-apart bread or sweet rolls for a unique taste. Just make sure they can soak up the pumpkin mix well. Why did my monkey bread turn out dense? A dense texture often comes from overmixing the dough. Try to mix just until combined. Also, make sure your oven is at the right temperature for even baking. How can I make my monkey bread more flavorful? Add more spices, like nutmeg or ginger, for a rich flavor. You can also mix in chocolate chips or caramel for a sweet twist. How many servings does this recipe yield? This recipe makes about 8 to 10 servings. Perfect for sharing with family or friends. How to adjust the recipe for a larger group? To serve more people, double the ingredients. Use a larger bundt pan and increase the baking time. Check for doneness with a toothpick. This blog post covered making pumpkin spice monkey bread. We explored the key ingredients and the steps to prepare it perfectly. I shared tips for serving and baking to make your bread shine. You can even try fun variations and storage tips. This treat is perfect for gatherings or a cozy night in. Enjoy making it your own!
Pumpkin Spice Monkey Bread Irresistible Fall Treat
Fall is here, and that means it’s time for warm, cozy treats! Today, I’m excited to share my Pumpkin Spice Monkey Bread recipe. This delightful
- 1 cup canned pumpkin puree - 1/2 cup unsalted butter, softened - 1 cup granulated sugar - 1/2 cup brown sugar, packed The star of these cookies is the canned pumpkin puree. It gives the cookies their moist texture and rich flavor. Ensure you pick a brand that uses 100% pumpkin for the best taste. Next, I use unsalted butter. It adds creaminess and enhances the cookie's flavor. Both granulated and brown sugars help create a nice balance of sweetness. Brown sugar gives a slight chewiness, while granulated sugar keeps the cookies light and fluffy. - 8 oz cream cheese, softened - 1/2 cup unsalted butter, softened - 2 cups powdered sugar - 1 teaspoon vanilla extract The cream cheese frosting is a game changer. Softened cream cheese mixes with butter to create a smooth base. Powdered sugar sweetens it, while vanilla adds a hint of warmth. This frosting perfectly complements the pumpkin flavor. - 1 teaspoon ground cinnamon - 1/2 teaspoon ground nutmeg - 1/4 teaspoon ground ginger I love adding spices to elevate the flavor. Ground cinnamon is a must; it pairs well with pumpkin. Nutmeg adds depth, and a touch of ginger gives a warm kick. These spices create a cozy, fall-inspired taste. You can adjust them based on your taste. If you want more warmth, add a bit more cinnamon or nutmeg. For the full recipe, check out the details above. - Preheat your oven to 350°F (175°C). - Line a baking sheet with parchment paper. Next, we mix the cookie batter. Start by beating the softened butter, granulated sugar, and brown sugar together until they are creamy. This step ensures your cookies will be soft. Then, add the canned pumpkin puree, egg, and vanilla extract. Mix until everything is well combined. In a separate bowl, whisk together the all-purpose flour, baking soda, baking powder, cinnamon, nutmeg, salt, and ground ginger. Once you have your dry ingredients ready, gradually add them to the wet mixture. Stir gently until just combined. It's very important not to overmix, or the cookies may become tough. Now, it's time to bake! Use a cookie scoop or a tablespoon to drop your dough onto the prepared baking sheet. Make sure to space them about 2 inches apart. This space gives them room to spread. Bake the cookies for 12-15 minutes. You want the edges to be set while the centers remain soft. Keep an eye on them to avoid overbaking. Once done, take them out and let them cool on the baking sheet for about 5 minutes. After that, transfer them to a wire rack to cool completely. This cooling step helps them stay soft and chewy. For the full recipe, refer to the instructions above. To make the softest pumpkin cookies, avoid overworking the dough. When mixing the wet and dry ingredients, stir just until you see no dry flour. This keeps the cookies light and fluffy. To check if your cookies are done, look for set edges but soft centers. If the edges are golden brown, it’s time to take them out. Let them cool on the sheet for a bit to keep moisture in. For the best cream cheese frosting, aim for a smooth and spreadable texture. Start with softened cream cheese and butter. Beat them together until fluffy. Then, add powdered sugar slowly to reach your desired thickness. You can change the flavor of the frosting by adding a bit of lemon juice or orange zest. These add a nice twist and brighten the taste. For a lovely visual appeal, use a spatula to spread the frosting on each cookie. Create swirls or peaks for a nice touch. You might also sprinkle cinnamon or nuts on top for extra flair. When serving, arrange the cookies on a colorful platter. This makes them look more inviting and impresses your guests. For a fun touch, add seasonal decorations like small pumpkins or fall leaves. {{image_2}} If you want to make these soft pumpkin cookies gluten-free, you can easily swap the flour. Use a gluten-free flour blend in place of all-purpose flour. I suggest using blends that include rice flour and tapioca starch. They help keep the cookies soft and chewy, just like the original recipe. You can add some fun twists to the flavor of your cookies. For example, chocolate chips or chopped nuts add a delightful crunch. You can also change the spices. Instead of just cinnamon, try adding cardamom or allspice for a different taste. This way, you can create a unique batch each time! Feel free to explore seasonal ingredients! Instead of pumpkin puree, you can use sweet potato puree for a rich flavor. You can also switch up the extracts. Almond or maple extract adds a new layer of taste. These swaps keep your cookies fresh and exciting for every season. For the full recipe, check the section above. Store your soft pumpkin cookies at room temperature. Place them in an airtight container. This keeps them soft and fresh. You can also layer parchment paper between the cookies. This prevents sticking. They will stay fresh for about 3 to 5 days. For long-term storage, freeze the cookies and frosting separately. First, wrap each cookie in plastic wrap. Then, put them in a freezer-safe bag. For the frosting, store it in an airtight container. It can stay in the freezer for up to 3 months. When you want to enjoy them, thaw the cookies at room temperature. For the frosting, leave it out for about 30 minutes. Then, re-whip it to restore its creamy texture. These cookies can last about 5 days at room temperature. If frozen, they can last up to 3 months. Watch for signs of spoilage. If they smell off or have a hard texture, it's best to toss them. Always check before serving to ensure freshness. Yes, you can use fresh pumpkin! To prepare fresh pumpkin, start by choosing a small sugar pumpkin. Cut it in half and scoop out the seeds. Place the halves cut-side down on a baking sheet. Roast at 400°F (200°C) for about 45 minutes or until soft. Once cool, scoop out the flesh and blend it until smooth. Fresh pumpkin adds a lovely flavor, but make sure to drain excess moisture for the best results. To enhance flavor, try adding a pinch of salt. This small addition can bring out the sweetness of the sugar. You can also mix in spices like extra cinnamon or nutmeg. Another great idea is to add a splash of maple syrup or a hint of orange zest. These flavors pair well with pumpkin and make your cookies pop! For a smooth and even frosting finish, let your cookies cool completely. Use a butter knife or spatula to spread the cream cheese frosting. Start from the center and work your way outwards. For a fun twist, you can also use a piping bag for a fancier look. Just make sure the frosting is soft enough to spread easily. Look for a slight golden edge on your cookies. The centers should still appear soft and puffy. If you gently touch the top, it should spring back without leaving a dent. If it feels too soft, give them a few more minutes. Remember, they will firm up as they cool, so don’t overbake! In this post, we explored key ingredients for soft pumpkin cookies and their creamy frosting. We shared step-by-step baking instructions and helpful tips to perfect your cookies. Variations and storage tips offered ways to customize and keep them fresh. Baking can be fun, and these cookies are a delightful treat. Enjoy making and sharing them with family and friends. Happy baking!
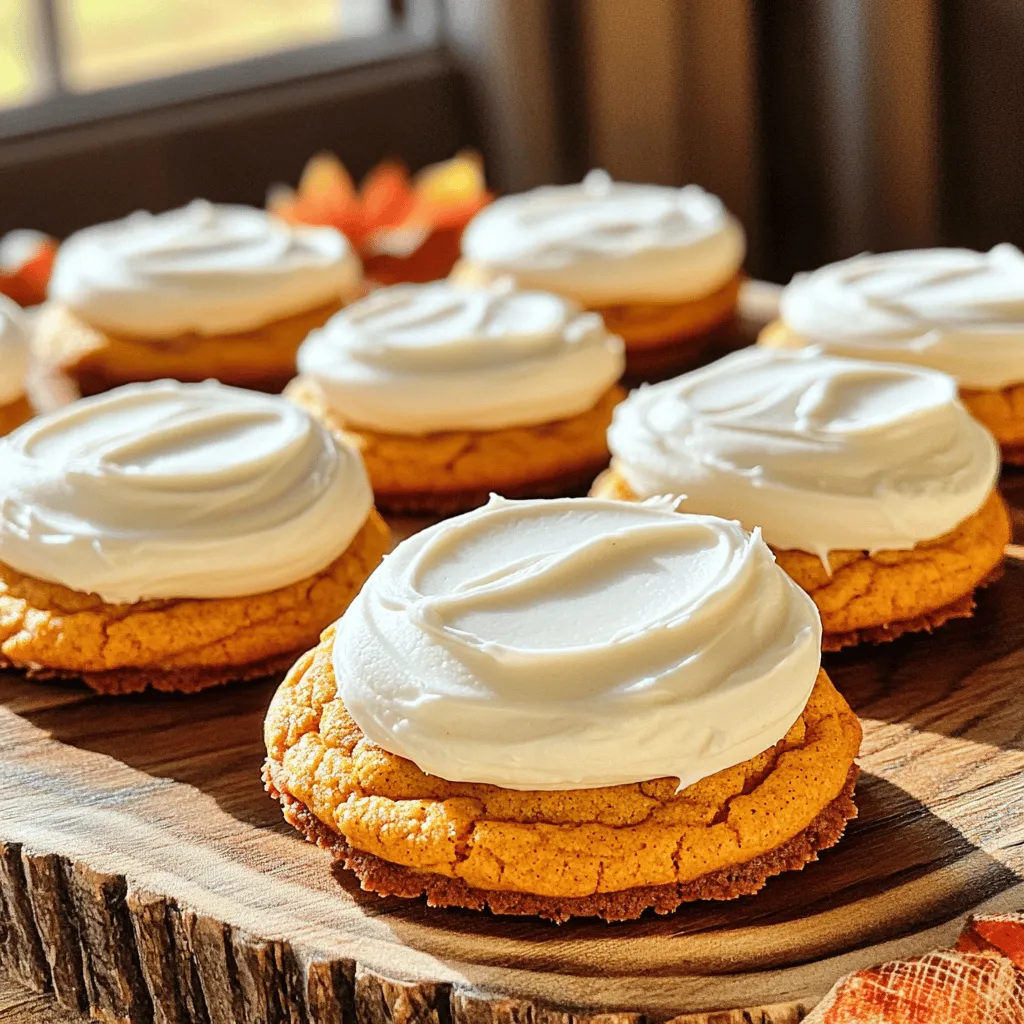
Soft Pumpkin Cookies with Cream Cheese Frosting Delight
If you love the cozy taste of fall, you’re in for a treat! My Soft Pumpkin Cookies with Cream Cheese Frosting are perfect for any
To make delicious caramel apple dessert cups, you need some key ingredients. Here is what you will need: - 2 large apples (Granny Smith or Honeycrisp), peeled, cored, and diced - 1 cup caramel sauce (store-bought or homemade) - 1/2 teaspoon cinnamon - 1/4 teaspoon nutmeg - 1 tablespoon lemon juice - 1 cup whipped cream or whipped topping - 1/2 cup granola (for crunch) - 1/4 cup chopped pecans or walnuts (optional) - Fresh mint leaves for garnish For the apples, both Granny Smith and Honeycrisp work great. Granny Smith apples are tart and crisp, while Honeycrisp are sweet and juicy. Choose whichever you prefer! For the caramel sauce, you can go for store-bought for ease. If you want to impress, try making your own. Homemade caramel can add a special touch. It’s simple, just sugar, butter, and cream! You can add fun extras for flavor. Chopped nuts like pecans or walnuts give great crunch. They also add a nutty flavor that pairs well with apples. If you want something lighter, swap whipped cream for yogurt. This list gives you a solid base for your dessert cups. Now you're ready to create a tasty treat! For the full recipe, don’t forget to check the details shared above. To make the caramel apple dessert cups, you first need to prepare the apples. Start by peeling the apples. I like to use Granny Smith or Honeycrisp apples for their crispness. After peeling, use a corer to remove the core. Then, dice the apples into small pieces. Aim for uniform sizes to ensure even cooking. Next, mix the spices with the apples. In a medium bowl, combine the diced apples with 1 tablespoon of lemon juice, 1/2 teaspoon of cinnamon, and 1/4 teaspoon of nutmeg. The lemon juice helps prevent browning and adds a fresh flavor. Toss everything together until the apples are well coated. This spiced apple mix is key to a tasty dessert. Now comes the fun part: layering the dessert cups! Start by placing a generous layer of the spiced apples at the bottom of each cup. This layer should be thick enough to provide a flavorful base. Next, drizzle about 2 tablespoons of caramel sauce over the apples. Make sure every cup gets its share of sweetness. After the caramel, add a layer of whipped cream on top. You can spoon it on or use a piping bag for a nice design. Now, sprinkle a layer of granola over the whipped cream. This adds a crunchy texture that contrasts well with the soft apples. Be sure to distribute the granola evenly across all cups. Finally, drizzle a bit more caramel sauce on top of the granola. For the final touches, garnish each dessert cup with fresh mint leaves. This adds a pop of color and a hint of freshness to the dessert. If you want, you can also sprinkle some chopped pecans or walnuts on top. This adds extra flavor and a lovely crunch. To achieve a visually appealing presentation, make sure the layers are visible through the cup. This way, your guests will see the beautiful colors and textures. The caramel apple dessert cups are now ready to enjoy! For the full recipe, check out the instructions above. Caramel apple dessert cups are perfect for many occasions. Serve them at birthday parties, family gatherings, or even cozy movie nights. They add a sweet touch to any event. Pair these cups with hot cider or a creamy vanilla milkshake. They work well with many drinks. You can make these dessert cups your own. Try using different nuts like almonds or peanuts for a new flavor. If you prefer yogurt, use it instead of whipped cream for a lighter option. Adjust the sweetness by adding more or less caramel sauce. You can also add spices, like more cinnamon or a pinch of ginger, to change the taste to your liking. Enjoy making this dessert unique! {{image_2}} You can change up the fruit in your caramel apple dessert cups. Try pears, for a sweet twist. Berries add a burst of color and flavor too. Use peaches for a summer treat. Each fruit pairs well with caramel and spices. You can also switch up the toppings. Try chocolate sauce for a rich flavor. A drizzle of peanut butter adds a nutty touch. You could use yogurt instead of whipped cream for a lighter option. Add sprinkles for a fun look. If you need gluten-free options, choose gluten-free granola. You can also skip the granola and use nuts. Sunflower seeds work well, too. They add crunch without gluten. For vegan options, use coconut cream instead of whipped cream. Look for vegan caramel sauce to keep it dairy-free. These swaps keep your dessert tasty and friendly for all diets. To keep your caramel apple dessert cups fresh, store them in the fridge. Use an airtight container to prevent air from getting in. This helps maintain the flavors and textures. You can enjoy leftover dessert cups for up to three days. However, the granola may lose its crunch after a day. If you want it to stay crispy, store it separately. You can freeze the individual parts of this dessert. If you have leftover apples, caramel, or whipped cream, freeze them in small containers. This keeps them fresh for about three months. When you want to use them, thaw the apples and caramel in the fridge overnight. For the whipped cream, let it sit at room temperature for about 30 minutes. Avoid refreezing after thawing to keep the best texture. To make homemade caramel sauce, you need just sugar, butter, and cream. Start by heating sugar in a pan until it melts. Stir it until it turns golden brown. Remove it from heat and add butter. Once melted, slowly mix in cream. Let it cool before using it in your dessert cups. Yes, you can use other apples. I like Granny Smith for its tartness. Honeycrisp apples add a sweet crunch. Feel free to try Fuji or Gala apples, too. Each type gives a unique taste to your dessert cups. Absolutely! Kids love the sweet and crunchy layers. They can help make these cups, too. Just watch out for the caramel sauce. It can get hot. Overall, these dessert cups are a fun treat for kids. To keep apples from browning, use lemon juice. It works wonders! Tossing the diced apples in lemon juice right after cutting slows down browning. This keeps your dessert looking fresh and tasty. You can prepare them ahead of time! Just assemble the layers without topping them with whipped cream and granola. Cover and store them in the fridge. Add the whipped cream and granola just before serving for the best texture. You now have a clear guide to making delicious caramel apple dessert cups. You learned about essential ingredients, preparation steps, and elegant serving tips. I shared ways to customize and make these treats fit your taste. Proper storage tips and variations help keep your dessert exciting. Enjoy exploring this sweet treat, and share it with others. You can impress friends and family at any event with these easy instructions. Get creative and have fun in the kitchen!
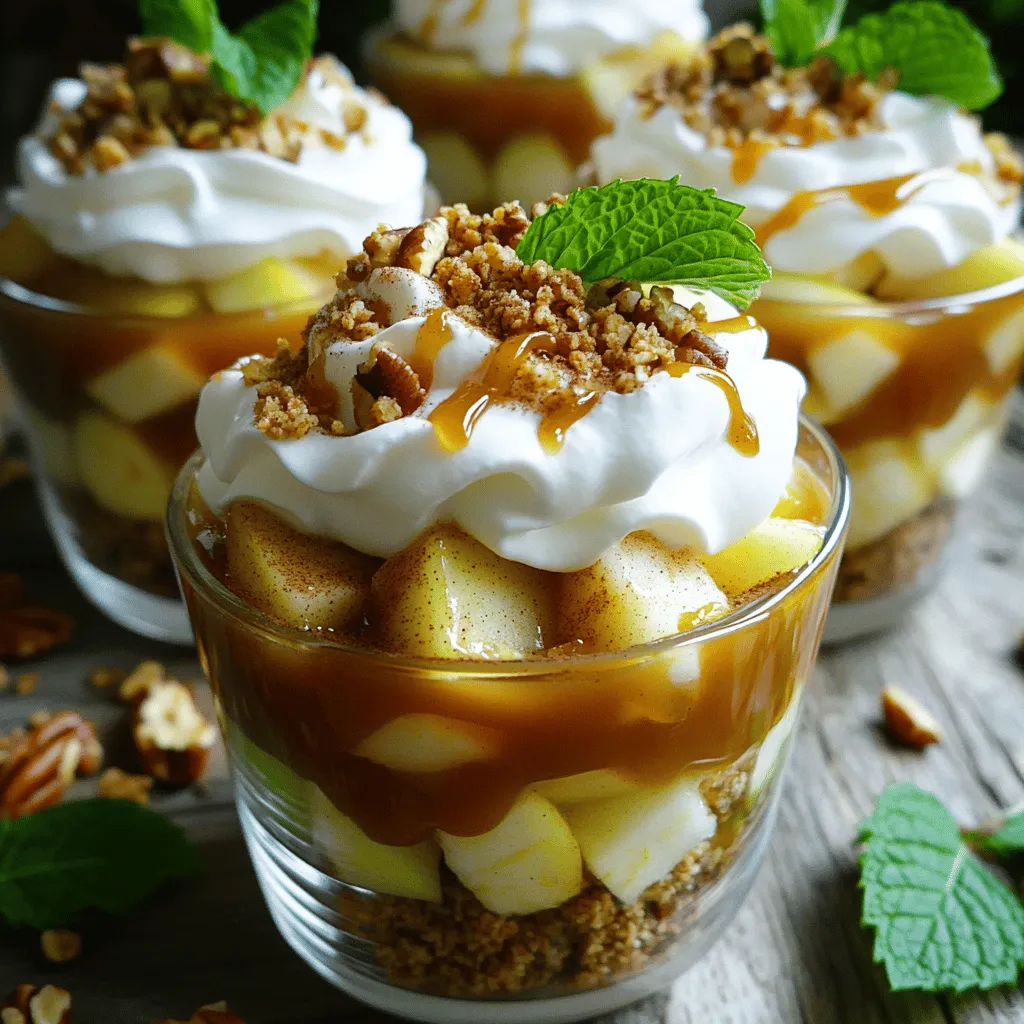
Caramel Apple Dessert Cups Tasty and Fun Treat
Looking for a fun and tasty treat? Caramel Apple Dessert Cups are the perfect solution! These cups combine sweet apples, rich caramel, and whipped cream