Desserts
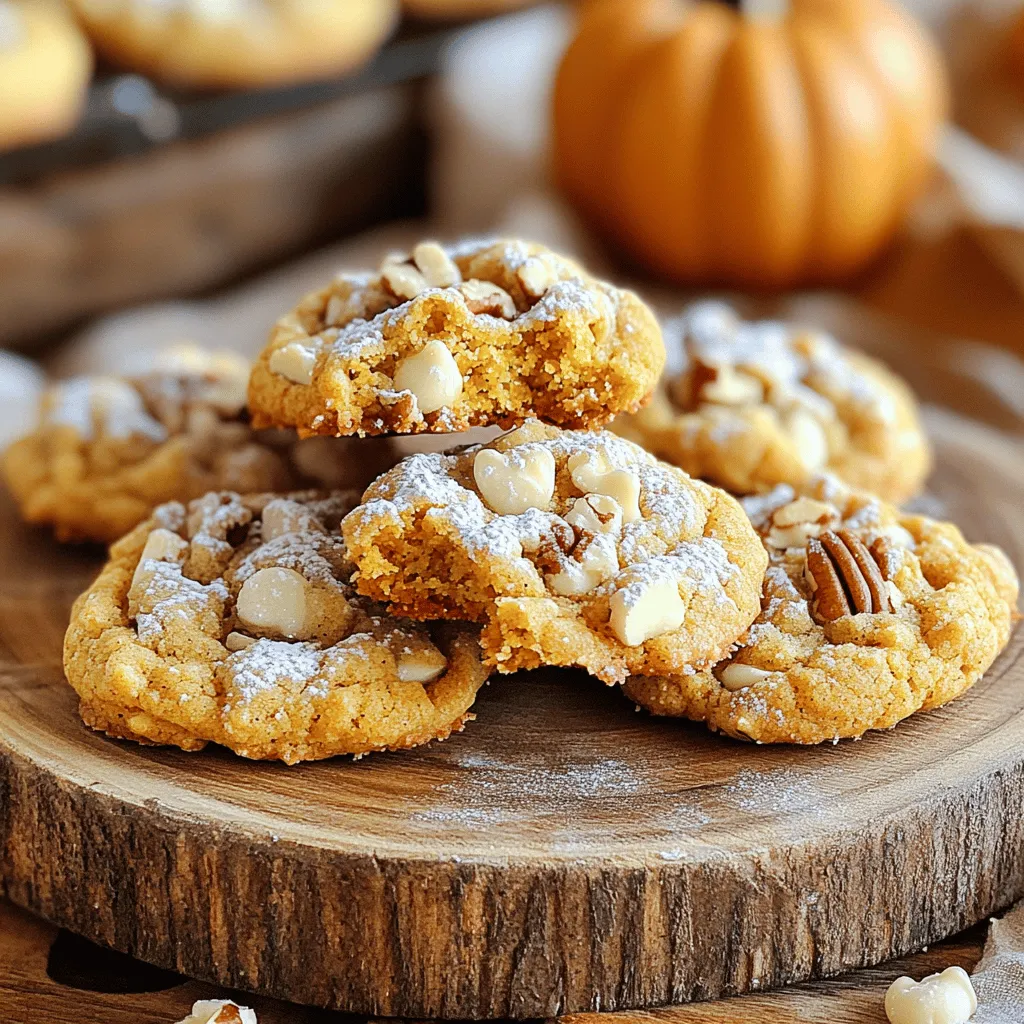
Crumbl Pumpkin Pie Cookies Tasty Fall Delight
Get ready to bake a fall favorite with my Crumbl Pumpkin Pie Cookies! This tasty treat captures the warm flavors of pumpkin spice, perfect for
![To make caramel apple bark, you need a few simple items. Here are the ingredients: - 2 cups of milk chocolate chips - 1 cup of white chocolate chips - 1 large apple, diced (preferably Granny Smith for tartness) - 1/2 cup of caramel sauce (store-bought or homemade) - 1/4 cup of chopped pecans or walnuts (optional) - Sea salt for sprinkling These ingredients work together to create a sweet and crunchy treat. The milk chocolate gives a rich base. The white chocolate adds a creamy touch. Diced apples bring a fresh crunch, while caramel adds a smooth sweetness. Nuts add a nice crunch, too. The sea salt balances all the flavors. When combined, they make a delightful fall treat that everyone will enjoy! You can find the full recipe above to get started. Making caramel apple bark is easy and fun. Follow these steps to create a tasty fall treat. You will need milk chocolate and white chocolate. You will also need apples and caramel sauce. - Melt the chocolate in 30-second intervals: Start with milk chocolate chips. Place them in a microwave-safe bowl. Heat for 30 seconds. Stir well and check. Repeat until smooth. This method helps prevent burning. - Prepare the baking sheet with parchment paper: Take a baking sheet and line it with parchment paper. This paper makes it easy to lift the bark later. Make sure it covers the bottom and sides. - Spread milk chocolate in an even layer: Pour the melted milk chocolate onto the lined sheet. Use a spatula to spread it into a rectangle. Aim for about 1/4 inch thick. - Chill to set chocolate: Place the baking sheet in the fridge. Chill for about 15 minutes. This helps the chocolate set properly. - Add caramel, apples, and white chocolate: Drizzle caramel sauce over the chilled chocolate. Then, sprinkle diced apples on top. If you like, add chopped pecans or walnuts. Next, melt the white chocolate using the same method. Drizzle it over the apples and caramel. Use a spatula to swirl it gently. After that, sprinkle a little sea salt on top. Return the bark to the fridge for 30 more minutes. This final chill helps it set completely. Now, you can break the bark into pieces. Enjoy your delicious caramel apple bark! For the complete recipe, check [Full Recipe]. Use high-quality chocolate for better melting. Good chocolate melts smoothly and tastes great. I suggest using brands you trust. This will give your bark a rich flavor and smooth finish. Avoid cheap chocolate; it may clump or burn easily. Experiment with different nuts or fruits. You can swap pecans for almonds or walnuts. Dried cranberries or cherries add a nice touch too. If you want a spicy kick, try adding a sprinkle of cinnamon. Each change makes the bark unique and fun. Presentation tips for special occasions are key. Arrange your caramel apple bark on a pretty plate. Garnish with thin apple slices or extra nuts for color. You can also wrap pieces in cellophane bags tied with a ribbon. This makes a lovely gift for friends or family. Remember, we eat with our eyes first! {{image_2}} You can swap milk chocolate for dark chocolate. Dark chocolate gives a rich flavor. It also offers a nice contrast to the sweet caramel. If you want a bolder taste, dark chocolate is a great choice. It pairs well with the tartness of the apple. For a fall twist, add pumpkin spice to the mix. This spice gives the bark a cozy flavor. You can mix in a teaspoon of pumpkin spice with the caramel. It adds warmth and a hint of sweetness. This variation makes your treat even more festive for autumn. You can easily make this recipe vegan or gluten-free. For a vegan option, choose dairy-free chocolate and caramel. Many brands offer these substitutes now. If you want it gluten-free, ensure your chocolate and caramel are certified gluten-free. These adjustments let everyone enjoy this tasty treat! To keep your caramel apple bark fresh, store it in an airtight container. Make sure to layer pieces with parchment paper to prevent sticking. Place the container in a cool, dry place, away from heat or direct sunlight. Avoid refrigerating the bark, as this can cause it to lose its crispness. Caramel apple bark stays fresh for about one to two weeks when stored properly. After that, it may lose flavor and texture. If you notice any signs of moisture or changes in smell, it's best to toss it. You can freeze caramel apple bark for up to three months. To freeze, wrap each piece tightly in plastic wrap, then place them in a freezer-safe bag. When you're ready to enjoy, thaw the bark in the fridge overnight. This helps maintain its texture and taste. Making caramel apple bark takes about one hour. You need 15 minutes to prep. Then, you let it chill for 45 minutes. Yes, you can make this recipe ahead of time. It stays fresh in the fridge for about a week. Just keep it in an airtight container. The best way to cut the chocolate bark is to let it set fully. Use a sharp knife to break it into pieces. You can also use your hands for a rustic look. You'll know the chocolate is fully melted when it looks smooth and shiny. Stir it well to check for any lumps. If you see lumps, heat it in short bursts again. This caramel apple bark is fun to make and enjoy. We covered the key ingredients, preparation steps, and useful tips to enhance your bark. You can also customize flavors to fit your taste. Remember to store it properly for maximum freshness. Get creative with variations for seasonal fun. Making this treat is easy, and sharing it will bring smiles. I hope you feel inspired to try this simple recipe and share it with others!](https://toastedrecipes.com/wp-content/uploads/2025/07/da94311c-8165-4979-aeb8-6306e8092d17.webp)
Caramel Apple Bark Delightful Fall Treat Recipe
Fall is here, and it’s time for a treat that’s both tasty and fun to make! I’m excited to share my Caramel Apple Bark recipe
![To make these apple cider cinnamon rolls, you will need the following: - 2 cups apple cider - 2 tablespoons unsalted butter, melted - 1/4 cup granulated sugar - 1 packet (2 1/4 teaspoons) active dry yeast - 4 cups all-purpose flour, plus more for dusting - 1/2 teaspoon salt - 1 teaspoon ground cinnamon - 1/2 teaspoon nutmeg - 1/2 cup brown sugar, packed - 1/2 cup chopped apples (Granny Smith or Honeycrisp work well) - 1/4 cup raisins (optional) - 1 cup powdered sugar (for glaze) - 2-3 tablespoons milk (for glaze) You can also play with these optional ingredients to change up the flavor: - Chopped nuts like walnuts or pecans - Cream cheese for a richer glaze - Dried cranberries for a tangy twist - Different spices like ginger or cardamom Using high-quality ingredients will boost your rolls' flavor and texture. Here are some tips: - Choose fresh apple cider for that bright, fruity taste. - Use unsalted butter for better control over salt levels. - Look for active dry yeast that is fresh and stored properly. - Choose unbleached all-purpose flour for a better rise. These tips help ensure your rolls are sweet, soft, and a delight to eat. For the full recipe and detailed steps, check out the [Full Recipe]. To start, you need to reduce the apple cider. Pour 2 cups of apple cider into a small pan. Heat it on medium until it boils. Then, lower the heat and let it simmer for 10-15 minutes until it reduces to 1 cup. This step brings out the apple flavor. Once done, let it cool down a bit. In a large bowl, mix the warm apple cider, melted butter, and granulated sugar. The cider should be around 110°F when you add the yeast. Sprinkle the yeast on top and let it sit for about 5 minutes. You want it to foam up, which shows the yeast is alive. In another bowl, combine 4 cups of flour, salt, cinnamon, and nutmeg. Gradually add this dry mix to the yeast mixture. Stir until a dough forms. Knead the dough on a floured surface for about 5-7 minutes. It should feel smooth and elastic. After that, place it in a greased bowl and cover it with a towel. Let it rise in a warm spot for about 1 hour. It should double in size. After the dough has risen, punch it down gently. Roll it out into a rectangle of about 12x18 inches on a floured surface. This creates a nice canvas for the filling. Spread 1/2 cup of brown sugar evenly over the dough. Then, sprinkle the chopped apples and optional raisins on top. Now, roll the dough tightly from the long side to form a log. Make sure it’s snug but not too tight. Once rolled, cut the log into 12 equal slices. Place these slices in a greased baking dish. Cover them again and let them rise for another 30-45 minutes. This second rise is key for fluffy rolls. Preheat your oven to 350°F (175°C). Once the rolls have risen, bake them for 25-30 minutes. Look for a golden-brown color. This means they are ready. While they bake, prepare the glaze. Mix 1 cup of powdered sugar with 2-3 tablespoons of milk until smooth. As soon as the rolls come out of the oven, drizzle the glaze over them. This makes them sweet and shiny. Let them cool slightly before serving. Enjoy your sweet and soft apple cider cinnamon rolls! For the detailed recipe, check the Full Recipe. Baking can be tricky, but I have some simple tips for you. If your dough does not rise, check the yeast. It may be old or not activated. Make sure the liquid is warm, not hot. If the rolls are too dry, add a bit more butter next time. For overly sticky dough, dust your hands and surface with extra flour. Getting the dough right is key. You want it soft but not sticky. If it feels too wet, add flour a tablespoon at a time. Knead the dough for a good 5-7 minutes to develop gluten. This gives the rolls their soft texture. After rising, it should double in size. Make sure to punch it down gently, so you keep some air in. These rolls shine when served warm. I like to drizzle the glaze right after baking. It melts into the rolls, making them even more delightful. You can serve them with fresh apple slices on the side. A sprinkle of cinnamon adds a nice touch. If you want to get fancy, try adding a scoop of vanilla ice cream on top! {{image_2}} You can change the flavor by using different apples. Granny Smith apples give a tart taste. Honeycrisp apples offer a sweet crunch. Fuji apples are also great for a sweeter roll. Each type brings its own twist. Try a mix of apples for added depth. You can adjust the spice level to suit your taste. If you like more warmth, add extra cinnamon or nutmeg. A pinch of cloves can add a nice kick. For a milder flavor, reduce the spices. Always start small and taste as you go. This way, you can find your perfect balance. To make gluten-free cinnamon rolls, use a gluten-free flour blend. Look for a blend that includes xanthan gum. This helps the dough hold together. Follow the same steps in the recipe, but be aware that the texture may change. The rolls might be a bit denser but still tasty. Enjoy experimenting with this option! To keep your apple cider cinnamon rolls fresh, store them in an airtight container. This keeps the rolls soft and moist. You can also wrap them in plastic wrap and then place them in a container. They stay good at room temperature for up to two days. If you want to keep them longer, the fridge is a great option. Just remember, they may lose some softness in the fridge. When you want to enjoy your rolls again, reheating is key. Preheat your oven to 350°F (175°C). Place the rolls on a baking sheet. Cover them with foil to keep them from drying out. Heat for about 10 to 15 minutes. You can also use the microwave. Heat individual rolls for 15 to 20 seconds. Just be careful not to overheat, or they can get tough. Freezing is a smart way to save your apple cider cinnamon rolls for later. First, let the rolls cool completely. Then, wrap each roll in plastic wrap. Next, place them in a freezer bag or container. They can last for up to three months in the freezer. To enjoy, thaw them in the fridge overnight. Then, reheat as mentioned above. This way, you can have a sweet treat whenever you want! The best apples for cinnamon rolls are Granny Smith and Honeycrisp. These apples add a nice balance of sweetness and tartness. Granny Smith gives a crisp bite, while Honeycrisp adds a juicy sweetness. Both hold their shape during baking, which keeps the rolls from getting too mushy. Yes, you can make the dough ahead of time. Prepare the dough and let it rise as directed. After it rises, punch it down. Wrap it tightly in plastic wrap and store it in the fridge. It can stay there for up to 24 hours. When ready, let it sit at room temperature for about 30 minutes before rolling it out. You can tell the rolls are done by their color and texture. They should be golden brown on top. Lightly tap the rolls; they should sound hollow. If you have a kitchen thermometer, the internal temperature should be around 190°F. This ensures they are cooked through and soft. You’ve learned about making delicious apple cider cinnamon rolls. We covered key ingredients, baking steps, and helpful tips. You can now tweak your recipe with different apples or make it gluten-free. Proper storage keeps them fresh for a long time. With the right techniques, your rolls will impress everyone. Enjoy making these tasty treats and sharing them with friends and family. Happy baking!](https://toastedrecipes.com/wp-content/uploads/2025/07/75d1cf33-b39f-45c4-a7cf-87c6b24950e9.webp)
Apple Cider Cinnamon Rolls Sweet and Soft Delight
Imagine sinking your teeth into a warm, soft roll bursting with the sweet flavors of apple cider and cinnamon. In this post, I’ll guide you
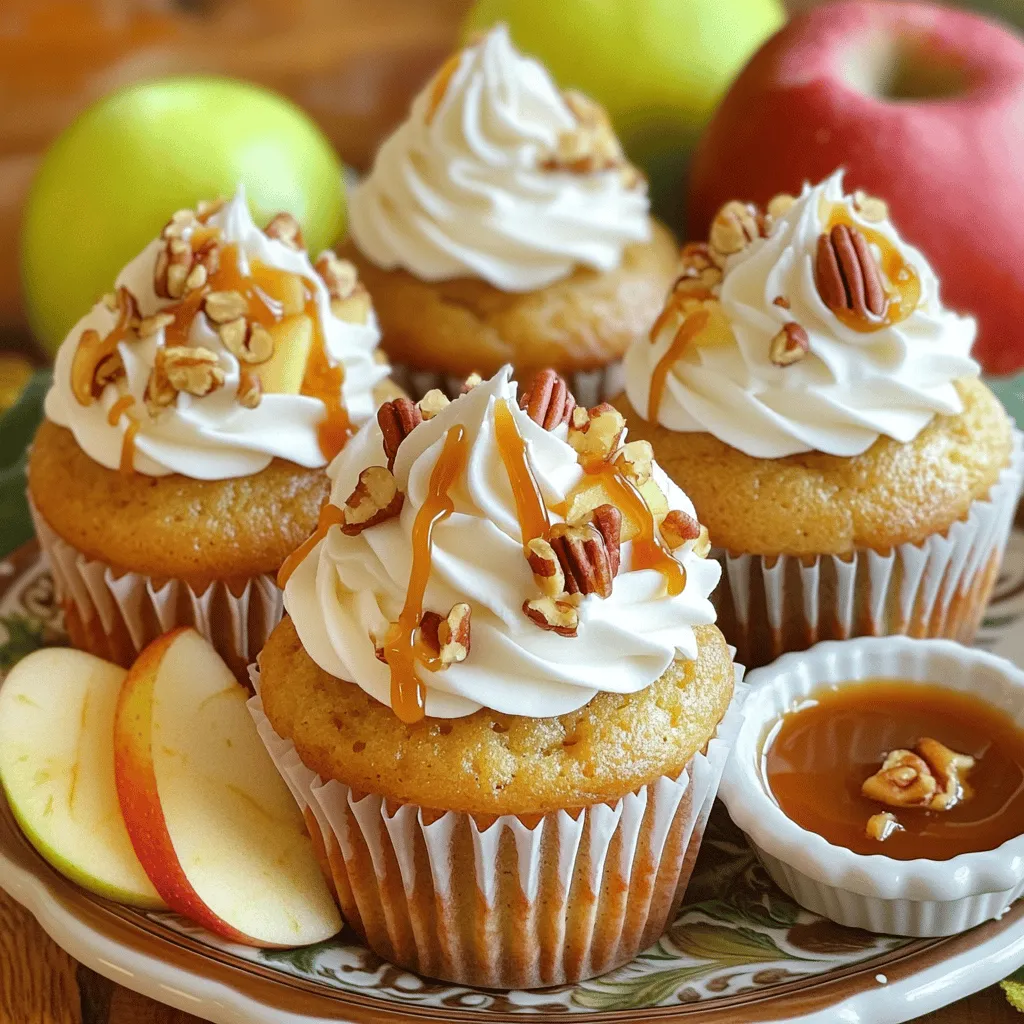
Caramel Apple Cupcakes Delightful and Simple Recipe
Are you ready to impress your friends with a delightful treat? Caramel apple cupcakes are simple to make and taste amazing! In this post, I
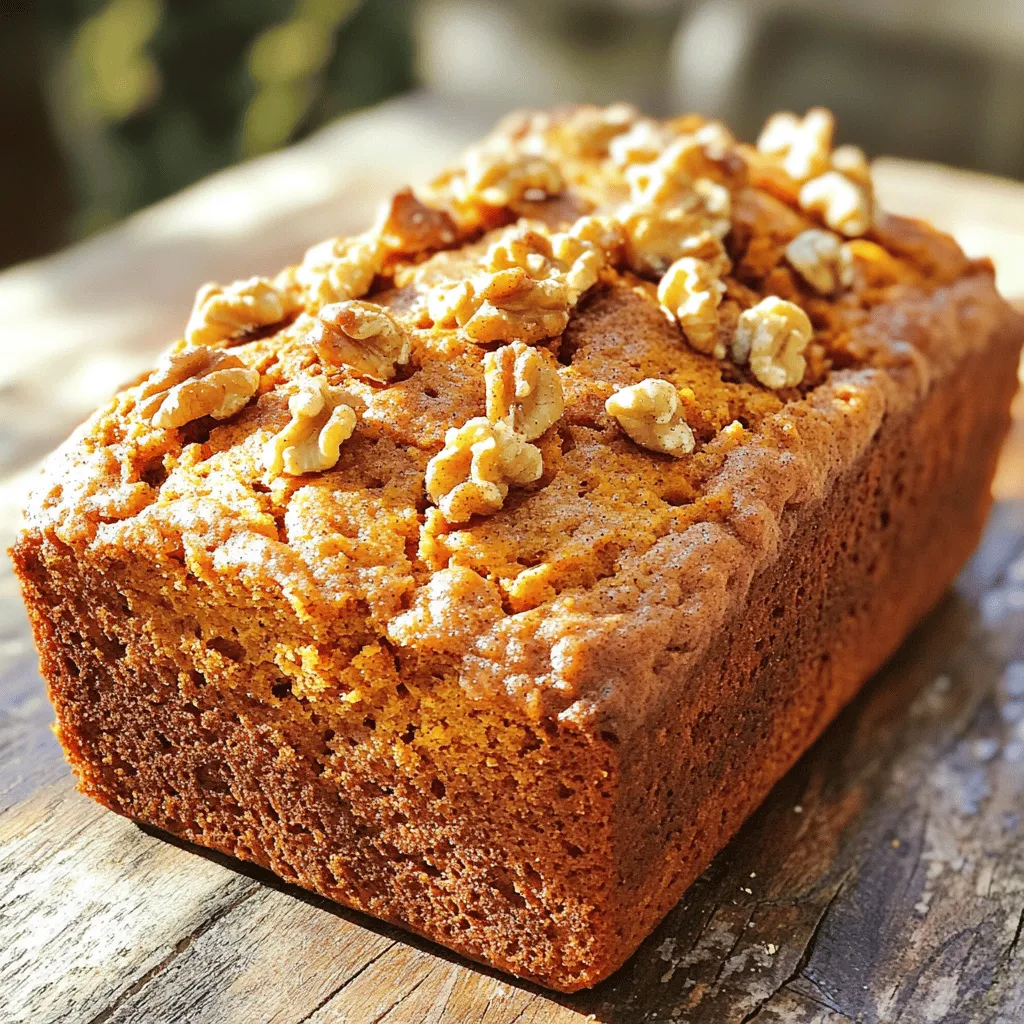
Cinnamon and Spice Sweet Potato Bread Delightful Recipe
Get ready to delight your taste buds with my Cinnamon and Spice Sweet Potato Bread! This warm, moist bread is loaded with flavor and perfect
. First, preheat your oven to 350°F (175°C). This step is key! A hot oven helps the cake rise well. Next, grease a 9-inch round cake pan with butter. You can also use parchment paper if you prefer. This makes it easy to remove the cake later. Now, let’s prepare the apples. Take 3 medium-sized apples, peel, core, and slice them thinly. In a bowl, toss the apple slices with 1 teaspoon of cinnamon and 1 tablespoon of lemon juice. Let them sit. This will enhance their flavor and keep them from browning. For the batter, start by creaming together 1/2 cup of softened butter and 1 cup of granulated sugar. Mix until it looks light and fluffy. Then, add 2 large eggs, one at a time. Mix well after each addition. In another bowl, whisk together 1 cup of all-purpose flour, 1 teaspoon of baking powder, 1/2 teaspoon of baking soda, and 1/4 teaspoon of salt. Gradually add this dry mix to the butter mixture. Alternate it with 1/2 cup of milk. Finally, stir in 1 teaspoon of vanilla extract. To assemble, pour half of the batter into the prepared cake pan. Spread it evenly. Then, layer the marinated apple slices on top of the batter. Pour the remaining batter gently over the apples. Spread it out carefully to cover them. Now, place the cake in the preheated oven. Bake for 45-50 minutes. Check for doneness by inserting a toothpick in the center. If it comes out clean, the cake is ready. Once baked, remove the cake from the oven. Let it cool in the pan for about 10 minutes, then transfer it to a wire rack. This cooling step helps the cake set nicely. Enjoy the full recipe with all the details needed to make this delicious Swedish apple cake! To get the best texture for your cake, use room temperature ingredients. Cold butter and eggs can make your cake dense. Let your butter and eggs sit out for about 30 minutes before mixing. This simple step makes a big difference. Mix your batter just until combined. Overmixing can also lead to a dense cake. Remember, lumps are okay! They will bake out. You can add nuts or raisins for extra flavor and crunch. Chopped walnuts or pecans work great. If you enjoy a fruity bite, toss in some raisins as well. To make the cinnamon flavor pop, use fresh ground cinnamon. This can elevate the taste. You can also mix in a pinch of nutmeg for warmth. Dust your cake with powdered sugar for a lovely finish. This adds a touch of sweetness and a beautiful look. Use a fine sieve to sprinkle it evenly. For a fresh touch, use slices of apples as a garnish. Place them on top or around the cake. This will make your Swedish apple cake look even more inviting. {{image_2}} To make this cake gluten-free, you can use alternative flours. Here are some great options: - Almond flour - Coconut flour - Oat flour - Rice flour Using these flours can change the texture. Almond flour gives a moist, nutty flavor. Coconut flour absorbs more liquid, so adjust your liquids when using it. Oat flour offers a mild taste and works well in most recipes. Rice flour is light and gives a nice crumb. If you want a vegan version, you can replace the eggs and butter. Here are my favorite substitutes: - Use 1/4 cup unsweetened applesauce for each egg. - Swap butter with 1/4 cup coconut oil or vegan butter. These swaps keep the cake moist and tasty. The applesauce adds a hint of sweetness and keeps the cake light. Coconut oil gives a slight coconut flavor, making it unique. Adding spices can elevate the flavor of your Swedish apple cake. Consider these: - Cardamom - Nutmeg Cardamom adds a warm, sweet flavor and pairs well with apples. Just a pinch can make a big difference. Nutmeg brings a cozy, spicy touch. You can use these spices alongside cinnamon for a richer taste. Try adding these spices to your apple mix or directly to the batter. To keep your Swedish apple cake fresh, store it in the fridge. Use an airtight container or wrap the cake tightly in plastic wrap. This helps keep the cake moist and tasty. You can freeze slices of the cake if you want to save some for later. Wrap each slice in plastic wrap and place them in a freezer bag. Remove as much air as possible before sealing. When you want to eat a slice, take it out and let it thaw in the fridge overnight. For a warm treat, you can reheat it in the microwave for about 15-20 seconds. Your Swedish apple cake will stay fresh for about 3-4 days in the fridge. If frozen, it can last for 2-3 months. Just remember, the sooner you eat it, the better it will taste! Baking a Swedish apple cake takes about 45 to 50 minutes. This time allows the cake to rise and turn golden brown. Always check the cake a few minutes early to avoid overbaking. Yes, you can use different types of apples. Each type adds its own flavor. Tart apples like Granny Smith give a nice contrast to the sweet cake. Sweet apples, like Fuji or Honeycrisp, will make the cake sweeter. Experiment and find your favorite! If you don’t have vanilla extract, you have options. You can use almond extract for a nutty flavor. Another option is to add a bit of cinnamon for warmth and spice. Both will keep your cake tasting great! Yes, you can make this cake ahead of time. It stays fresh for a few days. Just store it in an airtight container at room temperature. You can also freeze it for a longer shelf life. To check if the cake is done, insert a toothpick into the center. If it comes out clean or with just a few crumbs, the cake is done. If it has wet batter on it, bake for a few more minutes. In this blog post, we shared the key ingredients for a delicious Swedish apple cake. You learned how to prepare the batter, layer your apples, and bake to perfection. Tips for texture, flavor, and presentation help your cake shine. We also discussed variations, storage methods, and answered common questions. Now, you have everything you need to create a sweet treat. Enjoy the baking process and share your tasty results!](https://toastedrecipes.com/wp-content/uploads/2025/07/a460ee6f-5aaf-4774-8071-c7c3b273e08f.webp)
Baking a Delicious Swedish Apple Cake Today
Are you ready to create a warm, tasty treat that will impress your friends and family? Today, I’m sharing my go-to recipe for a delicious
![To make these tasty cookies, gather the following ingredients: - 1 cup pumpkin puree - 1/2 cup unsalted butter, softened - 1 cup brown sugar - 1/2 cup granulated sugar - 1 large egg - 1 teaspoon vanilla extract - 2 cups all-purpose flour - 1 teaspoon baking soda - 1 teaspoon cream of tartar - 1/2 teaspoon cinnamon - 1/2 teaspoon nutmeg - 1/4 teaspoon salt - 1/4 cup granulated sugar (for rolling) - 1 tablespoon cinnamon (for rolling) These ingredients blend nicely to give your cookies that soft texture and rich flavor. The pumpkin puree adds moisture, while the sugars create a lovely sweetness. You can tweak the recipe for fun. Consider adding: - Chocolate chips - Chopped nuts like walnuts or pecans - Dried cranberries or raisins - A pinch of ginger for extra spice Adding these items can change the taste and texture of your cookies. Get creative and find what you like best! To make these cookies, you will need: - A mixing bowl - A whisk - A cookie scoop or spoon - A baking sheet - Parchment paper - An oven Having the right tools makes cookie-making easier. The parchment paper helps with easy cleanup and keeps cookies from sticking. For the best results, use a cookie scoop to keep the size even. For the complete recipe, check out the [Full Recipe]. First, gather all your ingredients. You will need pumpkin puree, butter, sugars, egg, and vanilla. Get your flour and spices ready too. Start by preheating your oven to 350°F (175°C). Line a baking sheet with parchment paper. This will help the cookies not stick. In a large bowl, cream the softened butter, brown sugar, and 1/2 cup of granulated sugar. Mix until it feels light and fluffy. Next, add the pumpkin puree, egg, and vanilla extract. Stir until everything is well mixed. In another bowl, whisk together all-purpose flour, baking soda, cream of tartar, cinnamon, nutmeg, and salt. Slowly add this dry mix to your wet ingredients. Stir until just combined. Be careful not to overmix. Now, in a small bowl, mix the remaining 1/4 cup of granulated sugar with 1 tablespoon of cinnamon. Take a cookie scoop or a spoon and portion out the dough. Roll each piece in the cinnamon-sugar mixture until it is fully coated. Place the dough balls on your baking sheet, leaving about 2 inches between each. Bake them in your preheated oven for 10-12 minutes. The edges should be lightly golden, while the centers will look soft. Once baked, take the cookies out of the oven. Let them cool on the baking sheet for about 5 minutes. After that, transfer them to a wire rack to cool completely. To store your cookies, keep them in an airtight container. They will stay fresh for up to a week. If you want to keep them longer, consider freezing them. Follow the full recipe for more details. Enjoy your delicious pumpkin snickerdoodle cookies! To get soft and chewy cookies, mix the dough just right. Overmixing can make them tough. Use room temperature butter and pumpkin puree for the best blend. This helps the cookies rise nicely. You want a dough that is soft but not sticky. If it feels too wet, add a bit more flour. Always use dry measuring cups for flour and sugar. Spoon the flour into the cup and level it off with a knife. Do not scoop directly from the bag; this packs the flour down. For brown sugar, pack it tightly into the cup. Accurate measuring helps your cookies turn out great every time. One big mistake is not preheating the oven. Always set it to 350°F (175°C) before baking. Another mistake is placing cookies too close together. Leave space for them to spread. Lastly, don't skip the cooling step. Letting them cool on a wire rack keeps them from getting soggy. Follow these tips, and you’ll enjoy perfect Pumpkin Snickerdoodle Cookies every time! For the full recipe, check out the complete instructions above. {{image_2}} You can make these cookies gluten-free easily. Just swap the all-purpose flour for a gluten-free blend. Many blends work well, but look for one that includes xanthan gum. This will help the cookies hold their shape. Follow the same recipe, and you’ll get tasty cookies without the gluten. To make vegan pumpkin snickerdoodle cookies, replace the egg with a flax egg. Mix one tablespoon of ground flaxseed with three tablespoons of water. Let it sit until it thickens. Use dairy-free butter instead of regular butter. This keeps the cookies soft and yummy without animal products. You can add fun flavors to your cookies. Try mixing in chopped nuts, like walnuts or pecans, for crunch. Or add chocolate chips for a sweet twist. You can swap cinnamon for pumpkin pie spice if you like a stronger flavor. These small changes can make your cookies unique and exciting. For the complete recipe, check out the Full Recipe section. To keep your Pumpkin Snickerdoodle Cookies fresh, use an airtight container. Place parchment paper between layers to avoid sticking. Store at room temperature for up to five days. If you want them to last longer, consider refrigerating them. Cold air slows down spoilage. Freezing is a great way to keep cookies fresh for weeks. First, let your cookies cool completely. Then, place them in a single layer on a baking sheet. Freeze for about an hour until firm. Once frozen, transfer them to a freezer-safe bag. They can last up to three months in the freezer. When you're ready to enjoy your cookies, reheat them for a few seconds in the microwave. Use a paper towel over them to keep moisture in. This makes them warm and soft again. You can also pop them in the oven at 350°F (175°C) for a few minutes. Enjoy your cookies warm and fresh! For the full recipe, check the earlier section. You can skip cream of tartar in your recipe. Use a mix of baking powder and baking soda instead. For each teaspoon of cream of tartar, use 1.5 teaspoons of baking powder. It helps to keep the cookies soft and fluffy. Just make sure to adjust the baking soda in your recipe. This change will keep the cookies light without altering the flavor much. Yes, you can use fresh pumpkin. First, cook the pumpkin until soft. You can roast or boil it. After cooking, scoop out the flesh and blend it until smooth. Make sure to drain any excess water. Fresh pumpkin gives a nice taste, but it might be wetter than canned puree. Adjust the flour in your recipe if needed to keep the cookie dough thick. Pumpkin Snickerdoodle Cookies stay fresh for about five days at room temperature. Store them in an airtight container to keep them soft. If you want to keep them longer, freeze them. They can last for up to three months in the freezer. Just thaw them at room temp before enjoying. For the best flavor, eat them within a week. Don't forget to check out the Full Recipe for more details! You learned how to make Pumpkin Snickerdoodle Cookies from start to finish. We covered the main ingredients, tools, and step-by-step instructions. I also shared tips for perfect texture and ways to store your cookies. Whether you prefer gluten-free or vegan options, there’s something for everyone. Remember, fresh cookies are best enjoyed right after baking. Now, it’s time to bake and enjoy these tasty treats!](https://toastedrecipes.com/wp-content/uploads/2025/07/b8e95afd-4f09-4117-b0ff-d011420970fc.webp)
Delicious Pumpkin Snickerdoodle Cookies Easy to Make
Get ready to enjoy a warm, cozy treat! These Delicious Pumpkin Snickerdoodle Cookies are easy to make and perfect for fall. Packed with pumpkin spice
![To make these delightful bars, gather these key items: - 1 cup pumpkin puree (canned or fresh) - 1 cup brown sugar, packed - 1/2 cup granulated sugar - 1/2 cup vegetable oil - 3 large eggs - 1 teaspoon vanilla extract - 1 1/2 cups all-purpose flour - 1 teaspoon baking soda - 1 teaspoon baking powder - 1 teaspoon ground cinnamon - 1/2 teaspoon ground nutmeg - 1/2 teaspoon salt - 1 cup chocolate chips (semi-sweet or dark) These ingredients create a moist and sweet batter that blends well together. You can make your bars unique by adding some optional ingredients: - 1/2 cup chopped walnuts - 1/2 cup dried cranberries - A dash of sea salt for topping These extras can enhance the texture and flavor of your bars. Having the right tools makes baking easier and more fun. Here are the tools you need: - 9x13 inch baking pan - Mixing bowls (large and medium) - Whisk or electric mixer - Spatula - Measuring cups and spoons - Parchment paper (optional for easy removal) These tools help you mix, bake, and serve your pumpkin chocolate chip bars with ease. For the full recipe, check [Full Recipe]. Start by preheating your oven to 350°F (175°C). This step is key for even baking. Next, grease and flour a 9x13 inch baking pan or line it with parchment paper. This makes it easy to remove the bars later. In a large bowl, mix together 1 cup of pumpkin puree, 1 cup of brown sugar, and 1/2 cup of granulated sugar. Add in 1/2 cup of vegetable oil, 3 large eggs, and 1 teaspoon of vanilla extract. Stir until the mixture is smooth and well-combined. In another bowl, whisk together 1 1/2 cups of all-purpose flour, 1 teaspoon of baking soda, 1 teaspoon of baking powder, 1 teaspoon of ground cinnamon, 1/2 teaspoon of ground nutmeg, and 1/2 teaspoon of salt. This blend gives the bars their warm flavor. Gradually add the dry mix to the wet mix. Stir gently until just combined. Avoid overmixing to keep the bars light and fluffy. Finally, fold in 1 cup of chocolate chips and 1/2 cup of chopped walnuts if you want some crunch. Now, pour the batter into your prepared pan. Use a spatula to spread it evenly. Place the pan in the preheated oven. Bake for 25 to 30 minutes. Check for doneness by inserting a toothpick in the center. If it comes out clean or with a few crumbs, your bars are ready. After baking, let the bars cool in the pan for 10 to 15 minutes. This helps them set. Then, transfer them to a wire rack to cool completely. This step is important for the best texture. Once cooled, cut the bars into squares. For a fun touch, dust them with powdered sugar. You can also drizzle some melted chocolate on top. A sprinkle of chopped walnuts adds elegance and flavor. Enjoy this delightful treat! For the full recipe, refer to the detailed cooking steps above. To keep your bars moist, use fresh pumpkin puree. It adds rich flavor and moisture. If using canned, check for quality. Avoid overmixing the batter. This makes the bars dense, not fluffy. Bake them just until a toothpick comes out clean. Overbaking dries them out. One common mistake is not measuring ingredients correctly. Use dry measuring cups for flour and sugars. Always pack brown sugar tightly. Another mistake is skipping the greasing step. Even with parchment paper, a little grease helps. Lastly, don’t skip the cooling time. Cutting too soon can make the bars fall apart. Use high-quality chocolate chips for a deeper taste. I recommend semi-sweet or dark chocolate. Adding spices, like cinnamon and nutmeg, enhances the pumpkin flavor. If you like nuts, choose walnuts or pecans for a great crunch. Finally, try a pinch of sea salt on top. It balances the sweetness beautifully. For a detailed recipe, check out the Full Recipe. {{image_2}} You can easily make these bars gluten-free. Just swap all-purpose flour with a gluten-free blend. Look for blends that include xanthan gum for the best texture. You can also use almond flour for a nutty flavor. Make sure all other ingredients are gluten-free, too. This way, everyone can enjoy these tasty treats without worry. To make these bars vegan, replace eggs with flax eggs. Mix one tablespoon of ground flaxseed with three tablespoons of water. Let it sit for five minutes to thicken. You can also swap vegetable oil with melted coconut oil or applesauce. Use vegan chocolate chips to keep it dairy-free. Your vegan friends will love this dessert! You can change the flavors to match the seasons. In fall, add extra spices like ginger or cloves for warmth. In winter, mix in some peppermint extract or crushed candy canes. For spring and summer, try adding lemon or orange zest for a fresh taste. These little changes keep the recipe exciting all year long! For the full recipe, check out Pumpkin Chocolate Chip Delight! To keep your Pumpkin Chocolate Chip Bars fresh, store them in an airtight container. This helps avoid moisture loss and keeps them soft. If you have leftovers, let the bars cool completely before sealing them up. You can also layer parchment paper between the bars to prevent sticking. For optimal taste, keep them at room temperature. If your home is warm, consider refrigerating them. When stored properly, these bars can last up to five days at room temperature. In the fridge, they can last up to a week. If you want to save them for longer, freeze them. Wrapped tightly in plastic wrap or foil, they can last for up to three months. Just remember to label the package with the date. If your bars become a bit firm after chilling, don’t worry! To soften them, simply microwave a piece for about 10-15 seconds. This will warm them up and restore some of their softness. You can also let them sit at room temperature for about 30 minutes before enjoying. They taste great warm, especially with a scoop of ice cream on top! Yes, you can use fresh pumpkin. Start by peeling, chopping, and roasting the pumpkin until soft. After cooling, blend it until smooth. This method gives a fresh taste. However, canned pumpkin is more convenient. It’s already cooked and ready to use. Both options work well in this recipe. If you don’t have chocolate chips, try using chopped chocolate bars. You can also use butterscotch chips or white chocolate chips. Nuts, like pecans or walnuts, can add texture and flavor. For a fruity twist, consider dried cranberries or raisins. Each option creates a new taste. To check if the bars are done, insert a toothpick into the center. If it comes out clean or with a few moist crumbs, the bars are ready. Keep an eye on the time, usually 25-30 minutes. If the edges look golden and pulled away from the pan, they are likely done. Enjoy the warm, sweet aroma while they bake! To wrap up this guide on Pumpkin Chocolate Chip Bars, we explored key ingredients, tools, and step-by-step baking instructions. I shared tips for moist bars and how to avoid common mistakes. We also covered variations for gluten-free and vegan options, along with smart storage practices to keep your bars fresh. Baking is fun and rewarding. With this knowledge, you can make delicious bars that suit your taste. Enjoy experimenting and sharing with others!](https://toastedrecipes.com/wp-content/uploads/2025/07/13eb4ed2-b491-4cd5-84fa-00bcbc359c31.webp)
Pumpkin Chocolate Chip Bars Delightful Easy Treat
Are you ready for a delicious treat that brings fall flavors year-round? My Pumpkin Chocolate Chip Bars are a simple, tasty dessert that everyone will
![To make Southern fried apples, you will need the following ingredients: - 4 medium-sized Granny Smith apples, peeled, cored, and sliced - 1 teaspoon lemon juice - 1/2 cup brown sugar - 1 teaspoon ground cinnamon - 1/4 teaspoon ground nutmeg - 2 tablespoons unsalted butter - 1 tablespoon vegetable oil - Pinch of salt You can enhance your dish with these optional ingredients: - Chopped pecans for garnish - Vanilla ice cream for serving When making fried apples, I always choose Granny Smith apples. They are tart and firm, which helps them hold their shape while cooking. Look for apples that are bright green and free of bruises. You can also try Honeycrisp or Fuji apples for a sweeter flavor. Just remember, the right apple makes all the difference in taste and texture. Start by peeling and coring the apples. Use four medium-sized Granny Smith apples for the best taste. Next, slice them into thin wedges. Place the apple slices in a large bowl. Add a teaspoon of lemon juice. This will keep the apples from turning brown and adds a nice zing. Toss the apples gently so they are well-coated with the juice. Now, let’s cook the apples! In a separate bowl, mix half a cup of brown sugar, one teaspoon of ground cinnamon, one-fourth teaspoon of ground nutmeg, and a pinch of salt. Stir these together until they blend well. Heat a large skillet over medium heat. Add two tablespoons of unsalted butter and one tablespoon of vegetable oil. Wait for the butter to melt and bubble. Carefully add the sliced apples to the skillet, spreading them out evenly. Sprinkle the brown sugar mixture over the apples. Gently stir to coat all the apple slices. Cook for about 10 to 12 minutes. Stir occasionally, so the apples don’t stick. They should become tender and caramelized, but not mushy. Once they are cooked, take the skillet off the heat and let the apples cool for a few minutes. Serve the warm apples right from the skillet. For a special touch, sprinkle chopped pecans on top. You can also add a scoop of vanilla ice cream for a creamy contrast. This recipe is comfort food at its best. Enjoy every bite of your Southern fried apples! For the full recipe, click [Full Recipe]. To get the best caramelized apples, follow these steps. Use Granny Smith apples, as they are tart and hold their shape. First, toss the sliced apples with lemon juice. This helps keep them fresh and bright. When cooking, use a mix of butter and vegetable oil. This mix prevents burning and adds flavor. Cook the apples on medium heat. Stir gently to avoid breaking them. Watch closely as they cook. You want them tender, not mushy. The key is to let the sugar mix melt and bubble around the apples. This forms a nice caramel layer. If you cook them too long, they will lose their shape. Here are some common mistakes to watch out for. First, do not skip the lemon juice. It brightens the flavor and keeps the apples from browning. Also, avoid using too much heat. High heat can burn the sugar and ruin the dish. Another mistake is not stirring enough. Stirring helps coat the apples evenly. If you don't stir, some apples may burn while others stay raw. Lastly, don't rush the cooking time. Give the apples enough time to soften and caramelize beautifully. Spices can really elevate your southern fried apples. Cinnamon is a must-have, but don’t stop there. Adding nutmeg gives a warm, earthy flavor that rounds out the dish. You can even try a pinch of ginger for a little kick. If you want to get creative, think about adding vanilla extract. Just a splash can make a big difference. You can also toss in some chopped pecans for crunch. Top it all off with vanilla ice cream for a treat that feels special. For the full recipe, check the details above. {{image_2}} You can make Southern fried apples even better by adding more ingredients. For a crunchy twist, toss in some chopped pecans. They add a nice texture and flavor. If you love vanilla, drizzle some over the apples while they cook. It makes them taste even sweeter. You could also add a splash of maple syrup for extra sweetness. Each of these options adds a unique touch to the dish. Southern fried apples can differ across regions. In some parts, folks add a splash of bourbon for a rich flavor. This gives the dish a nice kick. Others might use different apples, like Honeycrisp or Fuji, for a sweeter taste. Some might even throw in a pinch of cayenne pepper for heat. These regional twists show how versatile this dish can be. Southern fried apples pair well with many foods. They go great with breakfast dishes like pancakes or waffles. You can also serve them as a side with pork chops. The sweetness of the apples balances the savory meat. For dessert, try them with a scoop of vanilla ice cream. This mix makes for a delightful treat. You can find the full recipe and enjoy this comfort food treat in many ways! Let your fried apples cool to room temperature. This stops steam from making them soggy. Place them in an airtight container. Store them in the fridge for up to three days. If you want to keep them longer, freezing is a great option. To reheat, gently warm the apples on the stove over low heat. Stir them often to heat evenly. You can also use a microwave. Heat them in 30-second bursts, stirring in between. Add a bit of butter for extra flavor and moisture. To freeze, place the cooled apples in a freezer-safe bag. Remove as much air as you can. They will keep in the freezer for up to three months. When ready to use, thaw them in the fridge overnight. Reheat them on the stove or in the microwave for a tasty treat. For the full recipe, check the listed instructions above. Southern Fried Apples shine as a dessert. They pair well with vanilla ice cream. The warm apples contrast nicely with the cold ice cream. You can also serve them with pancakes or waffles. They add a sweet touch to breakfast. Some love them with biscuits or cornbread. They bring a taste of the South to any meal. Yes, you can use other apples. Granny Smith apples work best for their tartness. However, you can try Fuji or Honeycrisp apples. These apples add a nice sweetness. Just remember, the texture may change a bit. Softer apples might turn mushy when cooked. Stick with firm apples for the best results. Southern Fried Apples can last up to five days in the fridge. To store them, let them cool down first. Place them in an airtight container. This keeps them fresh and tasty. When reheating, use low heat to warm them up. They can taste just as good the next day! You can also find the Full Recipe for more detailed instructions. In this article, you learned how to make Southern fried apples, including needed ingredients and cooking steps. I shared tips for achieving the best caramelization and how to enhance flavor with spices. You also discovered variations that add new twists and how to store leftovers. Southern fried apples are tasty and fun to make. Enjoy your dish and share it with friends!](https://toastedrecipes.com/wp-content/uploads/2025/07/e77e214e-188a-4028-9be7-9fc144b19a50.webp)
Southern Fried Apples Irresistible Comfort Food Treat
If you’re craving a warm, sweet treat that brings a taste of the South, you’ve come to the right place! Southern Fried Apples are the
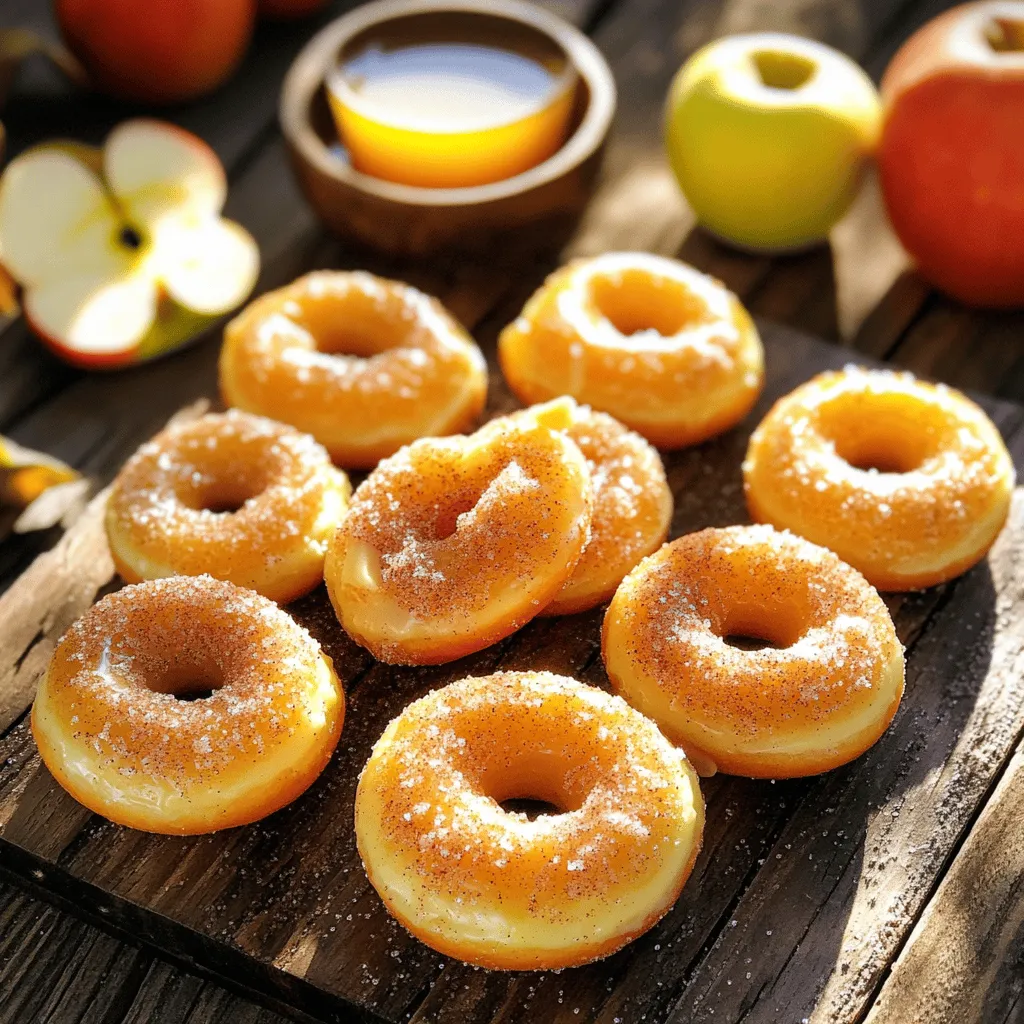
Baked Apple Cider Donuts Irresistible Fall Treat
Fall is here, and that means it’s time for warm, cozy treats! You can’t go wrong with Baked Apple Cider Donuts. These donuts are soft,