Desserts

- 9 cups rice chex cereal - 1 cup cherry-flavored candy melts - 1 cup cream cheese-flavored candy melts - 1/2 cup unsalted butter The main ingredients are simple and easy to find. Rice chex cereal serves as the base. The cherry-flavored candy melts add a sweet cherry taste. Cream cheese-flavored candy melts give it that classic cheesecake flavor. Unsalted butter helps to create a smooth blend. - 1 teaspoon vanilla extract - 1/2 cup powdered sugar - 1/2 cup crushed graham crackers - 1/2 cup dried cherries, chopped - 1 cup mini chocolate chips (for garnishing) To make it even better, we add some extra flavors. Vanilla extract brings warmth to the mix. Powdered sugar adds sweetness and a nice finish. Crushed graham crackers give a crunch, just like a cheesecake crust. Chopped dried cherries enhance the cherry taste. Finally, mini chocolate chips are for garnishing, adding a fun touch. You can find the full recipe to make this treat perfect! Start by measuring out 9 cups of rice chex cereal. Place it in a large mixing bowl. This cereal gives our puppy chow its crunch. Next, grab a microwave-safe bowl. Combine 1 cup of cherry-flavored candy melts and 1/2 cup of unsalted butter into the bowl. Microwave the candy melts and butter. Do this in 30-second intervals. After each interval, take it out and stir. Stirring is key! It helps create a smooth and creamy mixture. Once melted, add 1 teaspoon of vanilla extract for a flavor boost. Next, pour the melted cherry mixture over the rice chex cereal. Gently fold it together. Be careful not to crush the cereal. You want each piece to get coated evenly. After that, melt 1 cup of cream cheese-flavored candy melts using the same method. Drizzle this over the coated cereal. Fold again to ensure everything is covered. Now, grab a gallon-sized resealable bag. In it, mix 1/2 cup of powdered sugar, 1/2 cup of crushed graham crackers, and 1/2 cup of chopped dried cherries. Transfer the coated puppy chow into the bag. Seal it tightly and shake it well. This helps coat every piece. Spread the mixture onto a large baking sheet. Let it cool for about 10 minutes. Once cool, you can sprinkle 1 cup of mini chocolate chips on top for some extra fun. To melt candy melts, use a microwave-safe bowl. Start with 30-second intervals. After each interval, stir the mixture. This helps it melt evenly and prevents burning. If you don’t have a microwave, use a double boiler. Just place a heat-safe bowl over simmering water. Stir until melted and smooth. Coating your cereal is key to the right texture. Make sure each piece gets a good layer of candy. After coating, let it cool on a baking sheet for about 10 minutes. This allows the candy to set. To avoid clumping, mix gently. If you notice clumps forming, use your hands to break them apart. For a fun display, serve your puppy chow in a decorative bowl. You can line the bowl with parchment paper for a nice touch. To make it easy to share, pack the treat into individual snack bags. Tie each bag with a bright ribbon. This makes it a perfect gift or party treat. {{image_2}} You can switch up the flavors in Cherry Cheesecake Puppy Chow easily. Try using different fruit-flavored candy melts. You might enjoy strawberry, blueberry, or even orange. Each option will give you a new taste experience. Mix-ins can also add fun. Consider adding nuts like chopped almonds or walnuts. You can even drizzle some caramel over the mix for a sweet surprise. This will make your puppy chow even more special. If you have dietary needs, you can still enjoy this treat. Look for gluten-free rice chex cereal and candy melts. There are many brands that make gluten-free options that taste great. For a vegan version, use plant-based butter instead of regular butter. You can also find vegan chocolate and candy melts. This way, everyone can enjoy the yummy flavors of puppy chow without worry. To keep your Cherry Cheesecake Puppy Chow fresh, use an airtight container. A glass jar works well, or you can use a plastic food storage container. This helps to keep the puppy chow crunchy. Store it in a cool, dry place away from heat and sunlight. A pantry shelf is a perfect spot. You can store your Cherry Cheesecake Puppy Chow for up to two weeks. After that, it may start to lose its crunch. Watch for signs of spoilage, like a stale smell or off taste. If you notice any clumps or moisture, it's best to throw it out. Enjoy it fresh for the best flavor! Yes, you can make Cherry Cheesecake Puppy Chow ahead of time. It stays fresh for several days. To prepare in advance, follow these steps: - Make the puppy chow as directed in the Full Recipe. - Allow it to cool completely before storing. - Place it in an airtight container. - Store it at room temperature. This keeps it crunchy and tasty. If you need a substitute, try these cereals: - Corn Chex - Honeycomb - Crispix These options work well. Each cereal will change the taste a bit. Corn Chex adds a sweet note, while Crispix has a nice crunch. Using fresh cherries is not ideal for this recipe. Fresh cherries add moisture. This can make the puppy chow soggy. If you want to use fresh cherries, chop them very finely. Drain any excess juice first. This way, you can keep a good texture. Cherry Cheesecake Puppy Chow is a fun and tasty treat you can make easily. We covered the main ingredients like Rice Chex and candy melts, plus tips to get the best results. Remember to store it properly to keep it fresh. You can even try different flavors or make dietary swaps. Experimenting can lead to new favorites! Enjoy crafting this snack, and share it with friends for added joy!
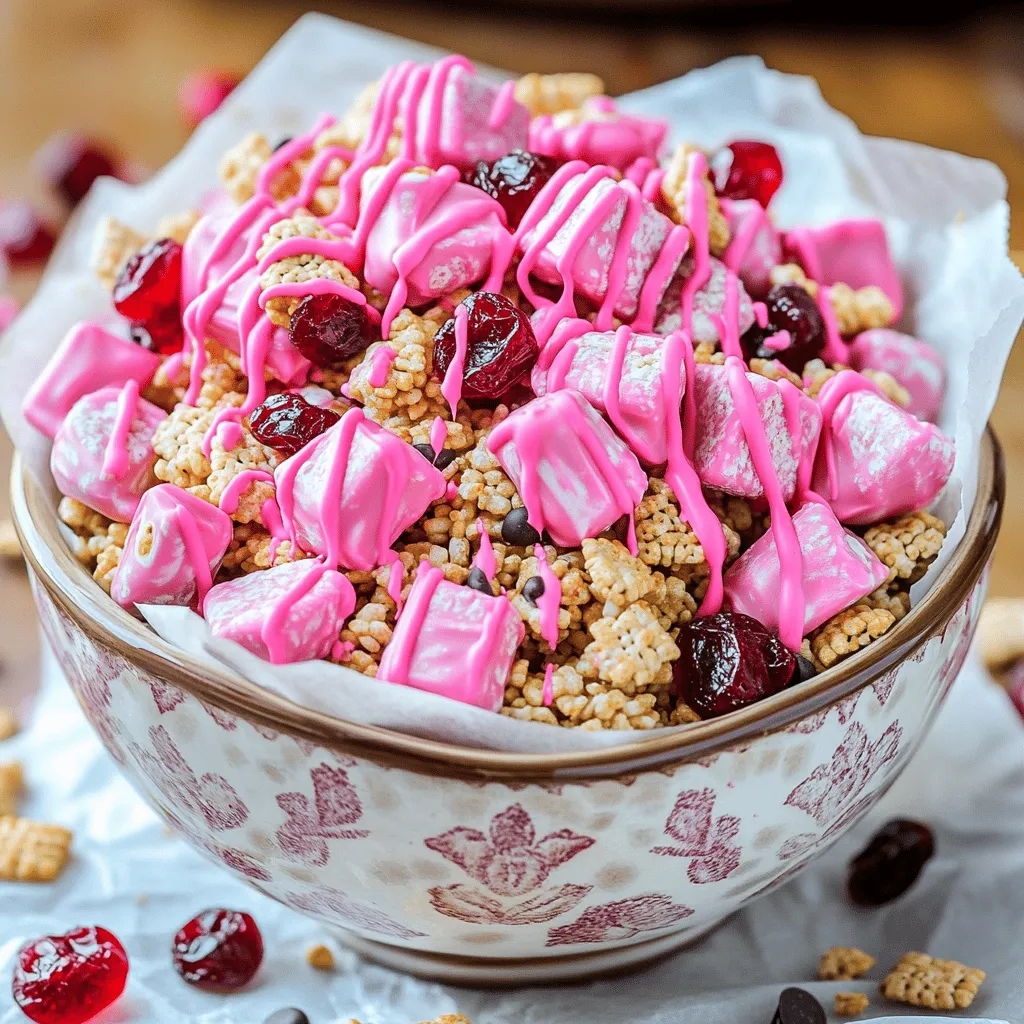
Cherry Cheesecake Puppy Chow Easy Dessert Recipe
Are you ready to make a fun and tasty treat? This Cherry Cheesecake Puppy Chow is an easy dessert that mixes sweet and tangy flavors
To make churros poppers, you need a few key ingredients. Here is what you will need: - 1 cup all-purpose flour - 1/4 cup granulated sugar - 1/2 teaspoon baking powder - 1/4 teaspoon salt - 1/2 cup water - 2 tablespoons unsalted butter - 1/2 teaspoon vanilla extract - 2 large eggs - Oil for frying - Cinnamon sugar mixture (1/2 cup sugar mixed with 2 teaspoons cinnamon) - Chocolate dipping sauce (for serving) These ingredients create a simple dough that puffs up into delicious bites. You can add a few touches to enhance your churros poppers. Consider these optional ingredients: - Zest from one orange or lemon for a citrus flavor - A pinch of nutmeg for added warmth - Different flavored extracts like almond or coconut These additions can give your poppers a unique twist. If you need to change any ingredients, here are some good substitutions: - Use gluten-free flour instead of all-purpose flour for a gluten-free option. - Swap granulated sugar with coconut sugar for a healthier choice. - Replace unsalted butter with coconut oil for a dairy-free version. These swaps keep the taste while fitting different diets. For the full recipe, you can follow the steps to create these tasty treats. To start, gather all your ingredients. You need flour, sugar, baking powder, salt, water, butter, vanilla, and eggs. First, heat water, butter, and vanilla in a medium pan. Bring it to a gentle boil. Once boiling, take it off the heat. Stir in the flour, baking powder, and salt. Mix until it forms a dough ball. Let it cool for a few minutes. Then, beat in the eggs one at a time. Your batter should feel smooth and a bit sticky. Next, you need to fry the poppers. Heat oil in a deep fryer or a pot to 360°F (182°C). While the oil warms, transfer your batter to a piping bag with a large star tip. Pipe small balls or swirls into the hot oil. Use scissors to cut them off. Fry in small batches; this prevents overcrowding. Cook each batch for about 2-3 minutes. Turn them occasionally until they turn golden brown and puffed. Use a slotted spoon to remove them from the oil. Place them on paper towels to drain. While they are still warm, roll the churros poppers in cinnamon sugar. This gives them a sweet crunch. Serve them warm with a side of chocolate dipping sauce. It's a great way to enjoy these treats! For the full recipe, check out the detailed instructions above. To get the best texture, focus on your dough. After you mix the flour, baking powder, and salt into the hot butter mixture, allow it to cool slightly. This keeps your poppers fluffy. When you add the eggs, mix until smooth. The batter should feel sticky but hold its shape when piped. If it’s too runny, your poppers won’t puff up. Avoid overmixing the dough. This can make the poppers tough. Fry in small batches to keep the oil hot. If you crowd the pot, they will steam instead of fry. Also, don't skip the cinnamon sugar coating! It adds that sweet crunch we all love. Lastly, make sure your oil is hot enough. If it’s too cool, your poppers will absorb oil and become greasy. A deep fryer or a heavy pot works best for frying. A thermometer helps you keep track of the oil temperature. For piping, use a piping bag with a large star tip to create fun shapes. Scissors make cutting the dough easy. Have paper towels ready for draining the excess oil. These tools make your churros poppers fun and tasty! For more details, check out the Full Recipe! {{image_2}} You can easily change the flavor of churros poppers. For a chocolate twist, mix cocoa powder into the dough. Use about 2 tablespoons of cocoa for a rich taste. If you prefer vanilla, add an extra splash of vanilla extract. This makes each bite sweet and fragrant. You can also try adding spices like nutmeg or cardamom for a fun kick. Want to enjoy churros poppers without gluten? Use a gluten-free flour blend in place of all-purpose flour. Look for blends that include xanthan gum. This helps keep the dough together. Follow the same recipe steps, and you’ll have tasty poppers that everyone can enjoy. Dipping sauces can take churros poppers to the next level. While chocolate sauce is classic, try caramel or white chocolate for a twist. You can even make a spicy dipping sauce by mixing chocolate with chili powder. Another idea is to mix yogurt with honey and cinnamon for a fresh dip. These sauces will make your churros poppers even more fun to eat! For the full recipe, check out the Full Recipe section. To keep your churros poppers fresh, store them in an airtight container. Make sure they cool completely before sealing. This helps avoid any extra moisture that can make them soggy. Place a paper towel at the bottom of the container to absorb any moisture. Store them at room temperature for up to two days. If you need to save them longer, try freezing. To reheat churros poppers, first preheat your oven to 350°F (175°C). Spread the poppers on a baking sheet in a single layer. Heat them for about 5 to 7 minutes. This will help them regain their crunch. Avoid using a microwave, as it can make them soft and chewy. To freeze churros poppers, let them cool completely. Arrange them in a single layer on a baking sheet. Place them in the freezer for about an hour. After they are frozen, transfer them to a freezer-safe bag. They will stay fresh for up to three months. When you’re ready to enjoy them, just follow the reheating steps. This way, you can have a tasty treat anytime! Churros poppers are small, bite-sized treats. They are light, sweet, and crunchy. I create them from a dough that puffs when fried. The dough contains flour, sugar, and eggs. After frying, I coat them in cinnamon sugar. They are fun to eat and perfect for sharing. You can prepare the dough ahead of time. Just store it in the fridge for up to 24 hours. When you're ready, fry them fresh! This keeps them warm and crispy. You can also freeze cooked churros poppers for later. Just reheat them in the oven to restore their crunch. Churros poppers can be hard to find in stores. Many bakeries or specialty shops sell them. Some grocery stores might carry them too, especially in the frozen aisle. For fresh poppers, check local fairs or food trucks. They often serve churros in fun shapes and sizes. To make more churros poppers, simply double the ingredients. Use two cups of flour and adjust the water and eggs accordingly. Keep the cooking time the same, but fry in batches. This helps each popper cook evenly and stay crispy. You can get creative with toppings! Try powdered sugar, sprinkles, or even a drizzle of caramel. If you love chocolate, use melted chocolate or Nutella. You can also serve them with fruity dips, like berry sauce. Each topping adds a fun twist to this sweet treat! In this blog post, we explored how to make delicious churros poppers. We covered essential and optional ingredients, detailed steps for preparation, frying, and serving, and tips to perfect your treats. We also looked at variations, storage methods, and answered frequently asked questions. Try these tips and switch up flavors to create your own churros poppers. Enjoy making these sweet snacks, and share them with friends and family! Your next dessert will be a hit.
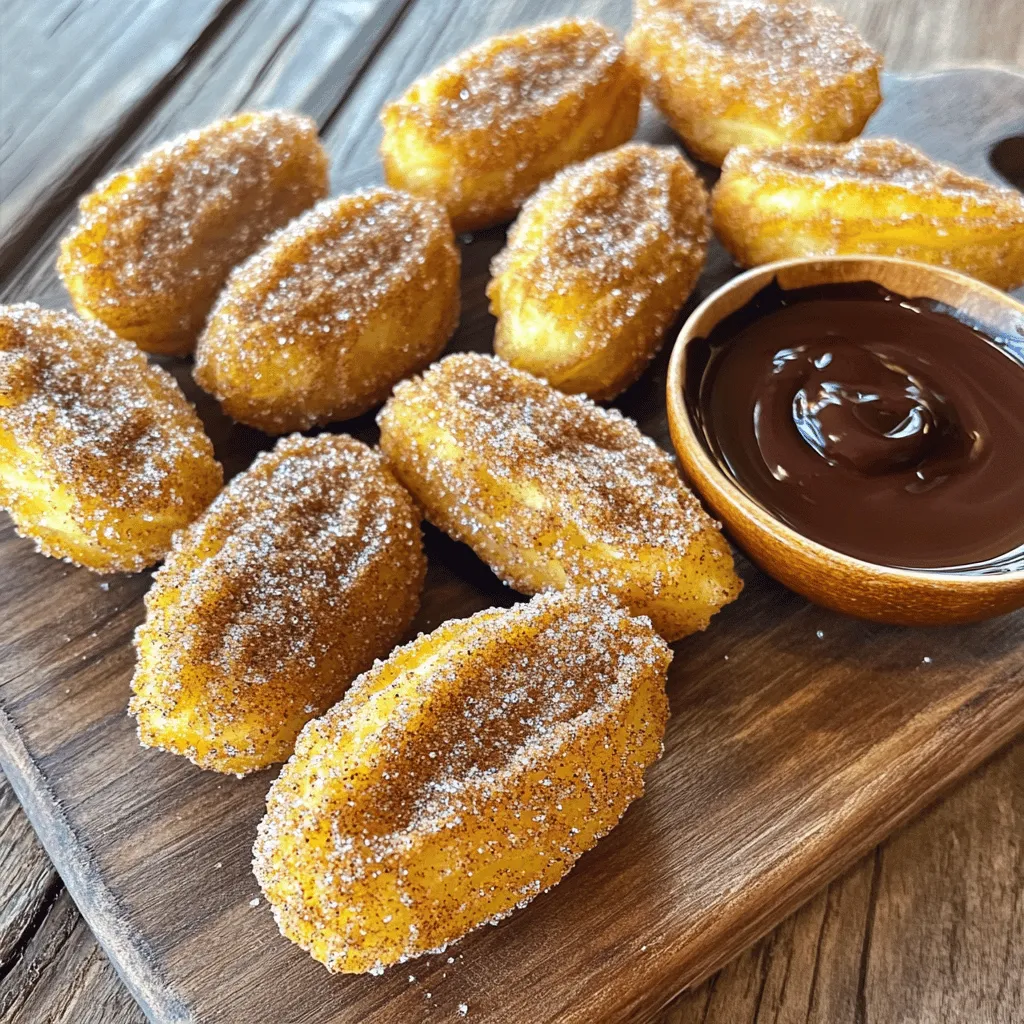
Churros Poppers Delightfully Sweet and Crunchy Treat
Get ready to fall in love with Churros Poppers! These sweet and crunchy treats are perfect for any snack. You’ll enjoy making them as much
To make these delightful Oreo balls, gather the following items: - 1 package (14.3 oz) Oreo cookies - 8 oz cream cheese, softened - 1 cup semi-sweet chocolate chips - 1 tablespoon vegetable oil - Optional toppings: crushed Oreos, mini chocolate chips, or sprinkles These ingredients create a sweet and creamy treat that everyone loves. If you want to switch things up, here are some alternatives: - Use gluten-free Oreo cookies for a gluten-free treat. - Swap cream cheese for mascarpone for a richer flavor. - Try dark chocolate chips if you prefer a deeper taste. - Choose coconut oil instead of vegetable oil for a hint of coconut flavor. These changes keep the recipe fun and fresh! To make your Oreo balls, you will need a few tools: - Food processor for crushing the Oreos. - Mixing bowl to combine the ingredients. - Baking sheet lined with parchment paper for easy cleanup. - Microwave-safe bowl for melting chocolate. - Fork for dipping the balls in chocolate. Having the right tools makes the process smooth and easy. Enjoy creating these yummy treats! Making Oreo balls is simple and fun. Start by gathering your ingredients. You will need: - 1 package (14.3 oz) Oreo cookies - 8 oz cream cheese, softened - 1 cup semi-sweet chocolate chips - 1 tablespoon vegetable oil - Optional toppings: crushed Oreos, mini chocolate chips, or sprinkles 1. First, take the Oreo cookies and crush them. Use a food processor for this step. Pulse until you get fine crumbs. 2. Next, mix the crushed Oreos with the softened cream cheese in a bowl. Blend until it forms a dough-like texture. 3. Now, roll the mixture into 1-inch balls. Place them on a baking sheet lined with parchment paper. 4. Chill the balls in the fridge for 30 minutes. This helps them firm up. 5. While they chill, melt the chocolate chips. Use a microwave-safe bowl, heating them in 30-second bursts. Stir in between until smooth. 6. Once melted, add vegetable oil to the chocolate for a shiny finish. 7. Take the chilled Oreo balls out. Dip each ball into the melted chocolate. Make sure they are fully coated. 8. Lift them out with a fork. Allow excess chocolate to drip off before placing them back on the baking sheet. 9. If you want, sprinkle toppings on the balls before the chocolate hardens. 10. Finally, place the baking sheet back in the fridge for 15 minutes to let the chocolate set. While I can't show pictures, I can help you visualize each step. Think of the food processor whirring as you crush the Oreos. Imagine the creamy mixture as you blend it with the cream cheese. Picture rolling the dough into perfect little balls. Each step is exciting! - Make sure your cream cheese is soft. This helps mix the ingredients well. - Chill the balls long enough. This step is key to easy dipping. - When melting chocolate, stir often. This prevents burning. - Use a fork to dip the balls. This helps keep your hands clean. - Experiment with toppings. Get creative! Use what you like best. Follow these steps, and you will make delightful Oreo balls with ease. For the full recipe, check out the details above. Enjoy your sweet treat! To get the right texture, you want to mix the cream cheese and crushed Oreos well. Ensure the cream cheese is very soft. This helps it blend smoothly. If your mixture feels too dry, add a bit more cream cheese. If it’s too wet, add more crushed Oreos. One big mistake is not chilling the balls long enough. Chilling helps them firm up. If you skip this step, they may fall apart when dipped in chocolate. Another mistake is not coating them fully in chocolate. Make sure each ball gets a nice, thick layer. Try adding a pinch of sea salt to the chocolate for a nice contrast. You can also mix in different flavors like almond or mint extract to change things up. For a fancy look, use colored sprinkles or drizzle white chocolate over the top. These small changes can make your Oreo balls stand out! If you want the full recipe, check it out! {{image_2}} You can change the flavor of your Oreo balls easily. Start by swapping the regular Oreos for other types. Try using mint, peanut butter, or birthday cake Oreos. Each choice gives a fun twist to the dessert. You can also mix in some flavored extracts. A drop of peppermint or vanilla extract can brighten the taste. The chocolate coating is key, but there are lots of options! Instead of semi-sweet chocolate, try white chocolate or dark chocolate. Each one gives a unique taste. You can also make the chocolate coating with colored candy melts for a festive look. For toppings, crushed nuts, coconut flakes, or even crushed candy canes work well. Get creative with what you like! If you have dietary needs, you can adjust the recipe. Use dairy-free cream cheese and chocolate for a vegan option. Gluten-free Oreos are available, so you can make this treat gluten-free too. Don't hesitate to try different nuts or seeds if you're nut-free. The key is to keep the fun and flavor while meeting your needs. This way, everyone can enjoy these delightful treats! To keep your Oreo balls fresh, place them in an airtight container. I recommend using a container with a tight seal. This method prevents air from getting in. It also keeps them from drying out. You can layer parchment paper between the balls. This way, they won't stick together. When stored properly, Oreo balls can last up to two weeks in the fridge. If you keep them in the freezer, they can last for about three months. Just remember to thaw them in the fridge before serving. This keeps the texture nice and creamy. Freezing Oreo balls is simple. First, let them chill in the fridge for 15 minutes after coating. Next, place them on a baking sheet in a single layer. Once frozen, transfer them to a freezer bag. This prevents them from sticking together. When you want to enjoy them, just take out the amount you need. Let them thaw in the fridge for a few hours. Enjoy your sweet treat! Yes, you can make Oreo balls ahead of time. They stay fresh in the fridge for up to one week. Just store them in an airtight container. If you need more time, freeze them. They can last for up to three months in the freezer. Just thaw them in the fridge before serving. If you don’t have cream cheese, you can use Greek yogurt. It gives a similar creamy texture. You can also try mascarpone cheese for a rich flavor. Another option is cottage cheese, but blend it first for a smoother mix. These substitutes work well in the Oreo balls recipe. You can tell the chocolate coating has set when it feels firm to the touch. It should no longer be sticky. If you see a nice shine, that’s a good sign too. To speed up the process, place the Oreo balls in the fridge. They usually take about 15 minutes to set. Oreo balls are easy to make and fun to share. We covered the ingredients, steps, and tips that ensure sweet success. You learned about variations to suit your taste and how to store them. Remember to avoid common mistakes for the best results. With just a few ingredients and some creativity, you can make delightful treats. Try these ideas, and enjoy the smiles they bring. Happy making!
Quick and Easy Oreo Balls Delightful Dessert Treat
Looking for a sweet treat that’s quick and easy to make? With just a few simple ingredients, you can whip up delicious Oreo balls in
To make these delightful mini cakes, gather these simple items: - 1 cup all-purpose flour - 1/2 cup granulated sugar - 1/4 cup brown sugar - 1/2 tsp baking powder - 1/4 tsp baking soda - 1/4 tsp salt - 1/3 cup unsalted butter, softened - 1 large egg - 1/2 tsp vanilla extract - 1/4 cup buttermilk - 2 ripe peaches, pitted and sliced - 1 tsp ground cinnamon Measuring ingredients correctly makes a big difference. Use dry measuring cups for flour and sugar. Spoon the flour in gently, then level it off with a knife. For liquids, use a clear measuring cup and check at eye level. Always pack brown sugar firmly in the cup. This ensures you have the right amount for a moist cake. You can adjust ingredients based on what you have. If you don’t have buttermilk, mix 1/4 cup of milk with 1/2 tsp of vinegar. Let it sit for five minutes to thicken. For a dairy-free version, swap the butter with coconut oil and use almond or soy milk instead of buttermilk. Feel free to use any stone fruit like nectarines or plums in place of peaches. Each will add its own flavor twist. For the full recipe, check the details above. Start by preheating your oven to 350°F (175°C). This step ensures even baking. Line a muffin tin with cupcake liners or grease it well. Greasing helps the cakes come out easily. Use a non-stick spray or a little butter to coat each cup. This part is key for a good finish. In a small bowl, melt 2 tablespoons of unsalted butter. Mix this with 1/4 cup of brown sugar. Stir until you see a smooth blend. Spoon this mixture into each muffin cup. Make sure to spread it evenly at the bottom. This sweet layer will create a tasty caramel base for the peach slices. In a large bowl, whisk together the dry ingredients. Combine 1 cup of all-purpose flour, 1/2 cup granulated sugar, 1/2 teaspoon baking powder, 1/4 teaspoon baking soda, and 1/4 teaspoon salt. In another bowl, cream the softened butter until it’s fluffy. Add in 1 large egg and 1/2 teaspoon vanilla extract. Mix it well. Gradually add the dry mix to the wet mix, alternating with 1/4 cup buttermilk. Stir until just combined. Be careful not to overmix. Now, arrange the peach slices on top of the brown sugar mixture in each muffin cup. You can create a lovely design. Then, spoon the cake batter over the peaches, filling each cup about 2/3 full. Sprinkle a pinch of ground cinnamon on top for extra flavor. Bake the mini cakes for 18-20 minutes. Check doneness with a toothpick. If it comes out clean, they are ready! Let them cool for 5 minutes in the tin. Carefully invert them onto a wire rack or serving plate. Enjoy them warm or at room temperature. You can add whipped cream or ice cream for a treat! For the full recipe, check out the details above. To make these mini cakes soft and moist, don't overmix the batter. Mix until just blended. This keeps the cakes light and fluffy. Use room temperature butter and eggs. They blend better and create air pockets for a nice rise. Peeling peaches can be tricky. Start by boiling water in a pot. Dip the peaches for 30 seconds, then place them in ice water. The skin will slip right off. For slicing, cut around the pit and twist to separate the halves. Slice each half into even wedges for the best look. You need a few key tools for perfect mini cakes. A good muffin tin is essential. Use silicone or paper liners for easy removal. A whisk works well for mixing. A rubber spatula helps scrape every bit of batter. Lastly, keep a toothpick handy to check for doneness. Check out the Full Recipe for more detailed steps! {{image_2}} You can swap peaches for other tasty fruits. Pineapple rings add a tropical twist. Cherries give a sweet and bright flavor. Apples and pears work well, too. They bring a nice crunch and sweetness. Try using berries for a fun and colorful mix. Blueberries or raspberries can be a great addition to your mini cakes. Making these mini cakes gluten-free is simple. Use a gluten-free flour blend instead of all-purpose flour. This swap keeps the taste while making it suitable for everyone. For a vegan option, replace the egg with a flaxseed meal. Just mix one tablespoon of flaxseed meal with three tablespoons of water. Let it sit for a few minutes until it thickens. Use a plant-based butter to replace regular butter. These changes keep your mini cakes light and fluffy. Adding flavors can make your mini cakes even better. Nuts like walnuts or pecans add crunch and richness. They also give a nice contrast to the soft cake. You can mix in spices, like nutmeg or cardamom, for warmth. A touch of almond extract will enhance the fruit flavor. These small tweaks can elevate your dessert from good to amazing. For the full recipe, check out the Peach Paradise Upside Down Mini Cakes. To keep your peach upside down mini cakes fresh, store them in an airtight container. Place parchment paper between layers if stacking. This helps prevent sticking. Keep them at room temperature for up to three days. If you need to store them longer, the fridge is a good option. Just remember they might dry out a bit in the fridge. When you're ready to enjoy these mini cakes again, reheating is key. Place a cake in the microwave for about 10-15 seconds. This warms it without drying it out. For a crispier texture, pop them in a preheated oven at 350°F (175°C) for about five minutes. This helps revive the peach flavor and gives a nice warm treat. You can freeze these mini cakes for later enjoyment. Wrap each cake in plastic wrap and then place them in a freezer bag. They will last up to three months in the freezer. When you're ready to eat, thaw them in the fridge overnight. Then, reheat as mentioned above. This way, you always have a delicious treat ready to go! For the full recipe, check out the Peach Paradise Upside Down Mini Cakes. Enjoy! These mini cakes last about three days at room temperature. Store them in an airtight container to keep them fresh. If you want to keep them longer, place them in the fridge. They can last up to a week when chilled. Just remember to bring them back to room temperature before serving. Yes, you can use canned peaches if fresh ones are not available. Drain the canned peaches well to avoid excess moisture. This helps keep the cakes from becoming soggy. The flavor may be slightly different, but they will still taste great. Try to choose peaches packed in juice or light syrup for better results. Upside-down cakes have fruit on the bottom, which caramelizes during baking. When you flip the cake, the fruit is on top and looks beautiful. Traditional cakes do not have this feature. They are baked with frosting or icing on the top. The presentation is what makes upside-down cakes special. Yes, you can adjust this recipe for a larger cake. Use a 9-inch round cake pan instead of a muffin tin. You will need to increase the baking time to about 30 to 35 minutes. Check for doneness by inserting a toothpick in the center. If it comes out clean, your cake is ready. Follow the same steps in the Full Recipe for best results. In this blog post, we covered how to make Peach Upside Down Mini Cakes. I explained the complete ingredient list and tips for perfect measurements. Then, we went through clear, step-by-step instructions to create the cakes. I shared helpful tips for texture and fruit handling. You also learned fun variations and the best ways to store the cakes. Making these mini treats is fun and easy. Enjoy experimenting with flavors and textures!
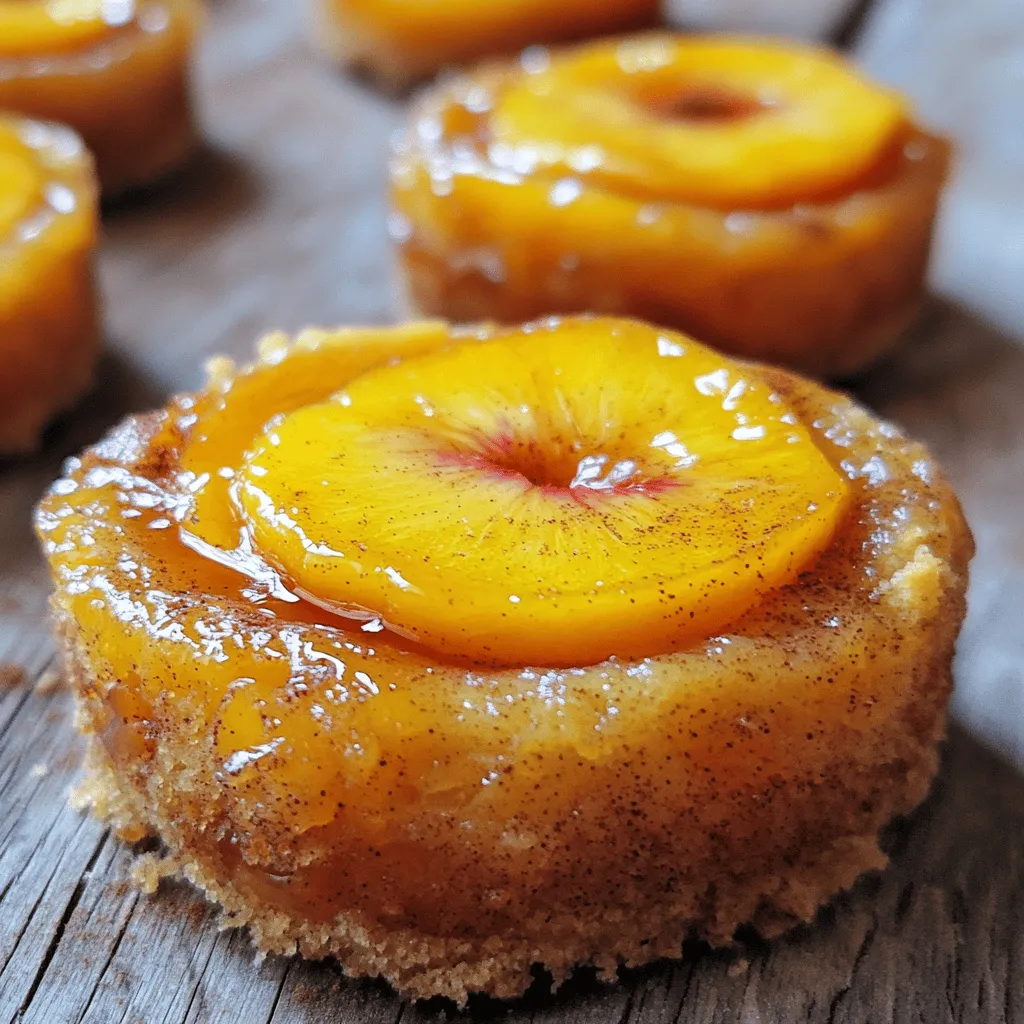
Peach Upside Down Mini Cakes Delightful and Easy Treat
Do you want to enjoy a sweet, fruity treat that’s easy to make? Look no further than Peach Upside Down Mini Cakes! These little delights
To make No Bake Orange Creamsicle Truffles, you'll need these key ingredients: - 1 cup vanilla Oreo cookies, crushed - ½ cup cream cheese, softened - 1 tablespoon orange zest - 2 tablespoons fresh orange juice - 1 teaspoon vanilla extract - 1 cup white chocolate chips - 1 tablespoon coconut oil These items are easy to find in most grocery stores. The vanilla Oreos give a sweet base. Cream cheese adds a nice creaminess that blends well with the orange flavor. The fresh orange juice and zest brighten the taste and make it pop! You can enhance your truffles with these optional garnishes: - Extra orange zest for a fresh touch - Shredded coconut for added texture - Colored sprinkles to make them fun Adding these garnishes can make your truffles look more festive. They also provide extra flavor and a nice crunch. If you need to swap out ingredients, here are some great options: - Instead of vanilla Oreos, use any plain cookie like graham crackers. - For cream cheese, Greek yogurt works well for a lighter option. - Use almond extract instead of vanilla for a nutty flavor. - Dark chocolate can replace white chocolate for a richer taste. These substitutes can help if you have dietary needs or just want to try something new. Don't be afraid to experiment! You can still enjoy the fun and flavor of these truffles with your personal twists. For the full recipe, refer to the detailed instructions above. To start, gather all your ingredients. You need vanilla Oreo cookies, cream cheese, orange zest, fresh orange juice, vanilla extract, white chocolate chips, and coconut oil. Begin by crushing the Oreo cookies in a bowl. You want them to be fine crumbs, similar to sand. Next, add the softened cream cheese. Mix them together until they are smooth. Then, add the orange zest, fresh orange juice, and vanilla extract. Stir until everything is well combined. This mixture should be creamy and fragrant. Now, pop it in the fridge for about 15 minutes. This step helps the mix firm up a bit. After chilling, take the mixture out of the fridge. Use your hands to roll it into small balls, about one inch wide. Make sure they are even in size for the best look. Place the truffles on a baking sheet lined with parchment paper. Chill them again for 30 minutes. While they chill, melt the white chocolate chips with coconut oil. Do this in a microwave-safe bowl, heating in 30-second bursts. Stir between each burst until smooth. Once melted, take the truffles out. Dip each truffle into the melted chocolate. Let any extra chocolate drip off before placing them back on the parchment paper. If you want, sprinkle more orange zest on top before the chocolate sets. For a delightful look, arrange the truffles on a nice platter. You can also use cupcake liners for individual servings. This makes them fun and easy to grab. If you added extra orange zest, it will brighten the dish and add a pop of color. The bright orange zest against the white chocolate looks beautiful. Plus, it boosts the flavor too. Remember, the more appealing the truffles look, the more they will impress your guests. For the full recipe, check out the detailed instructions above. When making No Bake Orange Creamsicle Truffles, avoid overmixing your ingredients. If you mix too much, the truffles may become tough. Use a gentle hand when combining the cream cheese with the Oreo crumbs. Another mistake is not chilling the mixture long enough. If it's too soft, rolling it into balls will be hard. Also, ensure your chocolate is melted properly. If it seizes, it won't coat the truffles well. To adjust sweetness, you can change the amount of cream cheese. Using less cream cheese gives a sweeter taste. You can also add more or less orange juice. If you prefer a less sweet truffle, replace some white chocolate with unsweetened cocoa powder. This will balance the flavors and give a rich taste. Always taste your mixture before rolling it into balls. This way, you can make changes as needed. For melting chocolate, use a microwave-safe bowl. Heat the chocolate chips and coconut oil in short bursts. Start with 30 seconds, then stir. Repeat until smooth. Be careful not to overheat the mixture. If it gets too hot, the chocolate can burn. You can also use a double boiler if you prefer. This method allows for more even heating. Just make sure the bowl does not touch the water. This technique helps maintain a good texture. {{image_2}} You can change the flavor of your No Bake Orange Creamsicle Truffles easily. Try adding cocoa powder to make chocolate orange truffles. Simply mix in 2 tablespoons of cocoa with the original recipe. For a zesty twist, use lemon instead of orange. Just switch the orange juice and zest for lemon juice and zest. This gives a fresh, bright flavor. You can also mix in other fruits like lime or berry purees. Each fruit brings a new taste and color to your truffles. You can make these truffles fit special diets. To make them vegan, replace cream cheese with dairy-free cream cheese. Use a vegan white chocolate or simply skip the coating. Instead, roll the truffles in crushed nuts or coconut flakes. For gluten-free options, ensure your Oreo cookies are gluten-free. This way, everyone can enjoy these tasty treats. Changing the size of your truffles is easy and fun. You might want to make mini truffles for bite-sized treats. Just roll smaller balls, about half an inch in diameter. You can also create truffle bars. Press the mixture into a lined baking dish instead of rolling balls. Chill it, then cut it into squares for a different serving style. These options add variety to your dessert table. For the full recipe, check the full recipe section. Store your No Bake Orange Creamsicle Truffles in an airtight container. This keeps them fresh. Place a layer of parchment paper between each truffle to prevent sticking. You can keep them in the fridge for easy access. These truffles last about one week in the fridge. After that, they may lose texture and taste. Check for any signs of spoilage before eating. If they look or smell off, it’s best to throw them away. You can freeze these truffles for longer storage. Place them on a baking sheet and freeze for about one hour. Once firm, move them to a freezer bag. They can last up to three months in the freezer. To enjoy, let them thaw in the fridge overnight before serving. For the full recipe, check out the details on how to make these tasty treats! No Bake Orange Creamsicle Truffles can last about one week when stored properly. Keep them in an airtight container in the refrigerator. This helps maintain their fresh taste and texture. If you notice any change in smell or appearance, it is best to discard them. Yes, you can make these truffles ahead of time. I often prepare them a day or two in advance. This allows the flavors to blend and develop. Just store them in the fridge until you are ready to serve. This makes them a great choice for parties or gatherings. The best way to serve these truffles is chilled and arranged on a nice platter. You can garnish them with extra orange zest for a pop of color. Placing them in individual cupcake liners adds a fun touch, too. Your guests will love the look and taste of these sweet treats. Don't forget to enjoy a few yourself! For a full recipe, check out the original instructions. We covered all the steps to make perfect No Bake Orange Creamsicle Truffles. From vital ingredients to tips for great presentation, you learned how to avoid common mistakes. You can even adjust sweetness and try tasty variations. Store your truffles well, so they last longer. With these easy steps, making truffles is fun and rewarding. Enjoy your tasty creations and impress your friends with your skills!
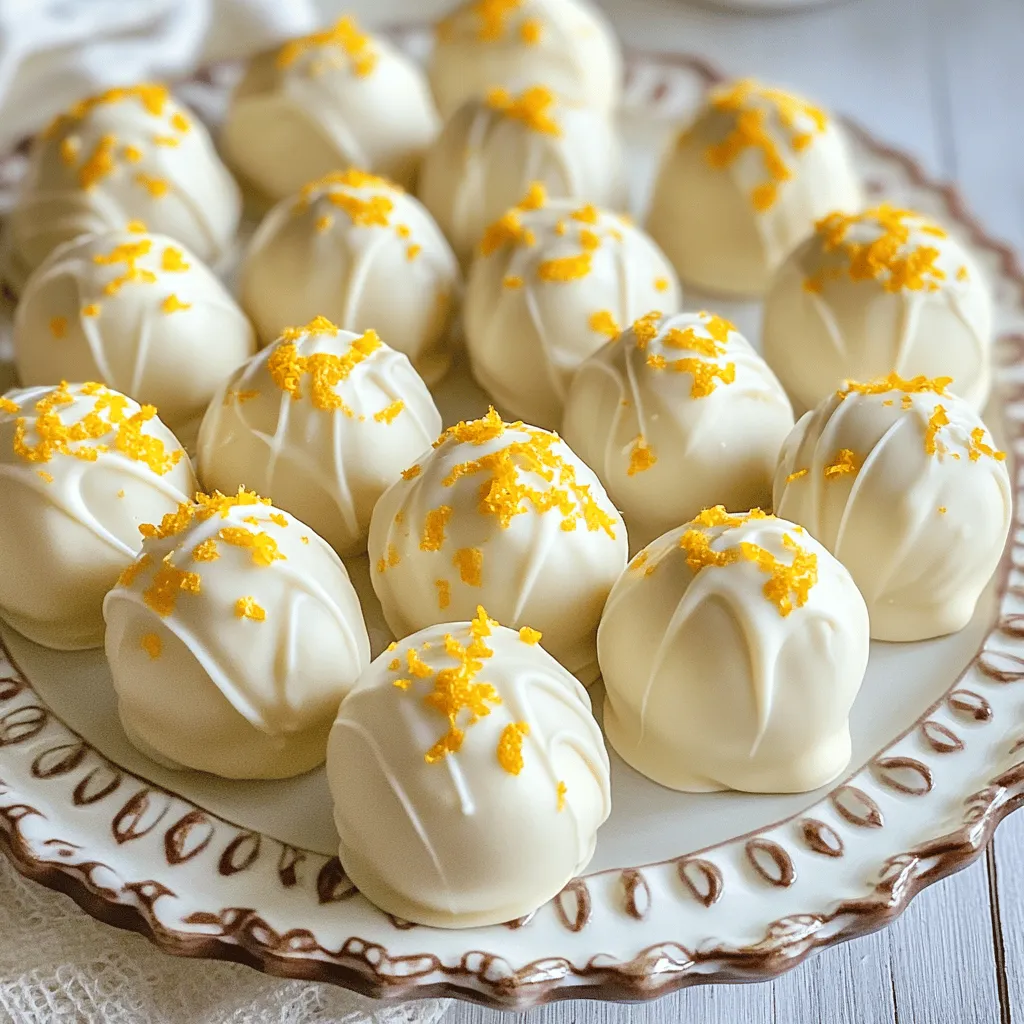
No Bake Orange Creamsicle Truffles Easy and Quick Recipe
Craving a sweet treat that’s simple to make? Look no further! These No Bake Orange Creamsicle Truffles are both easy and quick. You’ll enjoy a
To make these salted caramel cheesecake cookies, gather these key ingredients: - 1 cup cream cheese, softened - 1/2 cup unsalted butter, softened - 1 cup granulated sugar - 1/2 cup brown sugar - 1 large egg - 1 teaspoon vanilla extract - 2 cups all-purpose flour - 1 teaspoon baking soda - 1/2 teaspoon salt - 3/4 cup caramel sauce (store-bought or homemade) - 1/4 cup coarse sea salt (for topping) These ingredients blend well to create a rich, soft cookie. The cream cheese makes them creamy, while the caramel adds a sweet touch. You can customize your cookies with a few optional ingredients: - Chopped nuts (like pecans or walnuts) for crunch - Chocolate chips for extra sweetness - A dash of cinnamon for warmth - Different types of caramel sauces for unique flavors Feel free to mix and match based on your taste. To make these cookies, you'll need some basic tools: - Mixing bowls for combining ingredients - An electric mixer for creamy batter - A cookie scoop or spoon for portioning dough - A baking sheet lined with parchment paper - A wire rack for cooling cookies Having these tools on hand will make your baking process smooth and enjoyable. Remember, the right tools help create perfect cookies every time. For a full recipe, check out the included details above. To start, gather your ingredients. You need cream cheese, butter, sugars, an egg, and vanilla. Mix the softened cream cheese and butter in a bowl. Use an electric mixer to blend them until smooth. Next, add the granulated and brown sugars. Beat this mixture until it looks fluffy. Then, crack in the egg and pour in the vanilla extract. Mix everything until it’s well combined. In another bowl, whisk together the flour, baking soda, and salt. Gradually add this dry mix to the cream cheese mixture. Stir gently until just combined. Now, fold in the caramel sauce. The dough may feel thick, but that's okay. When you scoop the dough, use a cookie scoop or tablespoon. Place the dough on a lined baking sheet. Leave enough space between each scoop. This helps them spread and bake evenly. Before baking, sprinkle coarse sea salt on top of each dough ball. This adds a nice salty touch. Bake the cookies in a preheated oven at 350°F for 12 to 15 minutes. Watch for the edges to turn golden. The centers may look soft, but they will firm up as they cool. After baking, let the cookies cool on the baking sheet for five minutes. This helps set them. Then, move them to a wire rack to cool completely. For extra flair, drizzle some caramel sauce on top. You can also add a few more sea salt flakes for a beautiful finish. Enjoy your cookies warm or let them cool to room temperature. They are a tasty treat for any occasion. For the full recipe, check the link above. When making salted caramel cheesecake cookies, a few mistakes can ruin your fun. First, don't skip the softening step for cream cheese and butter. If they are cold, your dough will be lumpy. Second, don't overmix the dough. This can make your cookies tough. Lastly, avoid adding too much caramel sauce. It can cause the cookies to spread too much while baking. To get the best texture, chill your dough for about 30 minutes. This helps the flavors blend and keeps cookies from spreading too much. Also, measure your flour carefully. Too much flour makes cookies dry. Finally, bake them until the edges are golden but the center looks soft. They will firm up as they cool. To boost the flavor, use high-quality caramel sauce. It makes a big difference! You can also add a pinch of cinnamon or nutmeg to the dough for warmth. If you like a bit of crunch, consider adding chopped nuts or chocolate chips. For an extra touch, drizzle more caramel on top after baking. This will make them even more irresistible. For the complete recipe, check out the [Full Recipe]. {{image_2}} You can make these cookies even better! Add chocolate chips to the dough. This makes the cookies richer and more fun. I suggest using semi-sweet or dark chocolate chips. They balance the sweetness of the caramel. Just fold in one cup of chips when you mix in the caramel sauce. Bake as usual, and enjoy the gooey chocolate paired with the creamy cheesecake flavor. Want to go gluten-free? No problem! You can swap the all-purpose flour for gluten-free flour. Look for a blend that works for cookies. This change keeps the taste and texture great. Just make sure to check the labels to avoid any hidden gluten. Follow the same steps in the recipe. You will have tasty cookies that everyone can enjoy. Feeling creative? You can customize your cookies in many ways! Here are some ideas: - Nuts: Add chopped pecans or walnuts for crunch. - Dried Fruits: Mix in dried cranberries or cherries for a fruity twist. - Extra Caramel: Drizzle more caramel sauce on top after baking. These toppings let you mix flavors and textures. Feel free to try different combinations. Each batch can be a new adventure! For the full recipe, check the details above and let your baking skills shine! To keep your salted caramel cheesecake cookies fresh, store them in an airtight container. This keeps moisture out and prevents them from drying out. Line the bottom of the container with parchment paper. This helps absorb extra moisture. Place the cookies in a single layer to avoid sticking. If you have many cookies, use additional layers of parchment between them. You can freeze these cookies to enjoy later. First, let them cool completely. Then, place them in a single layer on a baking sheet. Freeze for about an hour. Once frozen, transfer the cookies to a freezer-safe bag or container. Squeeze out as much air as possible before sealing. They will stay fresh for up to three months in the freezer. To enjoy, thaw them at room temperature for about 30 minutes before serving. When stored properly at room temperature, these cookies last about one week. If you refrigerate them, they can last up to two weeks. Just remember, the longer they sit, the softer they may become. For the best taste and texture, enjoy them fresh or within the first few days. For more details, check the Full Recipe. Yes, you can make these cookies ahead of time. Prepare the dough and scoop it onto a baking sheet. Then, cover it with plastic wrap and freeze it. When you’re ready to bake, just take the dough out and bake from frozen. This way, you can enjoy fresh cookies anytime! If you don’t have cream cheese, you can use mascarpone cheese. It has a similar texture and flavor. You can also try Greek yogurt. Just make sure to use plain yogurt for the best taste. Both options will give your cookies a rich, creamy flavor. Absolutely! Homemade caramel sauce works great in this recipe. Just make sure it’s thick enough to hold its shape. If your homemade sauce is too runny, it might make the dough too wet. A good caramel sauce will add a lovely depth to your cookies. For the full recipe, check out the details above. These salted caramel cheesecake cookies are a delight. We explored the main and optional ingredients, tools you need, and how to prep the dough. Baking tips helped ensure you get perfect cookies every time. We shared common mistakes and how to enhance flavor, plus fun variations to try. Store these cookies correctly for longer freshness, and now you know how to freeze them. Your baking journey can be fun and rewarding. Get ready to enjoy every bite!
Salted Caramel Cheesecake Cookies Irresistible Treat
Get ready to indulge in the sweet and salty goodness of Salted Caramel Cheesecake Cookies! These cookies bring the best of both worlds, combining creamy
You need 1 fresh pineapple. Peel it and cut it into rings. Fresh pineapple gives the best taste. It adds a juicy sweetness to the dish. For the marinade, gather these items: - 1 cup coconut sugar (or brown sugar) - 1 tablespoon vanilla extract - 1 teaspoon ground cinnamon Mix these together in a large bowl. The sugar adds sweetness, and the vanilla gives a lovely aroma. The cinnamon adds warmth and spice. This mix is key to flavoring the pineapple. You can add some optional ingredients to take this dessert up a notch: - 1 cup shredded sweetened coconut - 1 pint vanilla ice cream (for serving) - Fresh mint leaves (for garnish) The shredded coconut gives a nice crunch. Ice cream makes it creamy and cool. Mint leaves add a fresh touch. Feel free to use any or all of these add-ins for a more delightful dessert. For the full recipe, check out the details above. First, gather your fresh pineapple and cut it into rings. In a large bowl, mix the coconut sugar, vanilla extract, and ground cinnamon. This creates a sweet marinade that adds flavor. Toss the pineapple rings in the marinade, making sure every piece gets coated. Let the pineapple soak for at least 30 minutes. This soaking time allows the flavors to soak in, making each bite juicy and tasty. Now, it’s time to prepare the oil for frying. Choose a frying pan and add enough oil to cover the bottom. Coconut oil or vegetable oil works best for frying. Place the pan over medium heat. To check if the oil is ready, drop a small drop of water in the pan. If it sizzles, you’re all set to fry! If you’re using shredded coconut, spread it on a plate. Take each marinated pineapple ring and press both sides into the coconut. This adds a crunchy layer. Carefully place the coated pineapple rings in the hot oil. Fry them for about 2-3 minutes on each side. You want them to be golden and crispy. If your pan is small, fry in batches to avoid crowding. Once done, remove the fried pineapple and place it on a paper towel. This helps drain any extra oil. Serve these warm with a scoop of vanilla ice cream. Drizzle any leftover marinade over the ice cream for extra flavor. Garnish with fresh mint leaves for a beautiful touch. For the full recipe, check the details above. To fry pineapple right, use fresh and ripe fruit. Cut the pineapple into rings. This shape helps it cook evenly. Heat the oil to medium. It should shimmer but not smoke. Test the oil with a drop of water. If it sizzles, it's ready. Fry the rings in batches. Overcrowding makes them steam, not fry. Fry for 2-3 minutes until golden brown. Turn them only once to keep the crust intact. You can boost the flavor of the pineapple. Try adding a splash of rum to the marinade. This gives a fun kick to your dessert. Adding citrus juice, like lime or orange, brightens the taste. You can also sprinkle some chili powder for a spicy twist. If you want a sweeter touch, drizzle honey over the fried rings. Each option gives a unique and tasty spin. Presentation makes the dish more inviting. Arrange the fried rings in a circle on a plate. Place a scoop of vanilla ice cream in the middle. Drizzle the leftover marinade over the ice cream. It adds shine and flavor. Garnish with fresh mint leaves for a pop of color. This makes your dessert look as good as it tastes. Serve it warm for the best experience. For the full recipe, check the earlier section. {{image_2}} You can switch things up by adding more fruits. Try using mango, banana, or even peaches. Just cut them into thick slices. These fruits caramelize well and add great flavor. They also soak up the rum and spices nicely, just like pineapple. Mix and match fruits to create your favorite blend. This medley will bring a fresh twist to the dish. If you prefer a non-alcoholic version, leave out the rum. Instead, use pineapple juice or coconut water. This keeps the sweet flavor while making it safe for everyone. Just soak the pineapple in the juice for a similar taste. The marinade will still work well, giving you a delightful treat without the alcohol. You can also change the sugar type for different flavors. Use honey, maple syrup, or agave nectar instead of coconut sugar. Each sweetener brings its own unique taste. Keep in mind that these sweeteners may change the cooking time slightly. Adjust as needed to ensure your pineapple gets that perfect caramelized finish. For the full recipe, check out Rum-Soaked Fried Pineapple Delight. After you make your rum-soaked fried pineapple, let it cool completely. Place the leftover pineapple in an airtight container. It will stay fresh in your fridge for up to three days. If you want to enjoy it later, make sure to store it without the ice cream. The ice cream will melt and lose its texture. You can freeze the fried pineapple for longer storage. Allow it to cool, then place it in a single layer on a baking sheet. Freeze the rings until solid. Once frozen, transfer them to a freezer bag. They will last for about two months. When you want to eat them, let them thaw in the fridge overnight. To enjoy leftover fried pineapple, reheat it in a skillet over medium heat. This keeps it crispy. Heat for about two to three minutes on each side. You can also use an air fryer for a few minutes. If you want, add a drizzle of honey or a sprinkle of cinnamon for extra flavor. This way, you can bring back its delicious taste! For the full recipe, check out the complete guide. Yes, you can use canned pineapple. Drain the liquid well. Fresh pineapple adds a crisp texture, but canned pineapple works too. Choose slices or chunks that fit your taste. The flavor may be sweeter, so adjust the sugar in the marinade if needed. You can use brown sugar as a substitute. It provides a similar taste and texture. Other options include white sugar mixed with a bit of molasses. Each option will add sweetness, but the flavor may change slightly. Experiment to find what you like best. This dessert is naturally gluten-free. Just make sure to use gluten-free oil for frying. Check all your ingredients to confirm they are gluten-free. Enjoy this treat without worry, as it can fit into a gluten-free diet perfectly. For the complete experience, check out the full recipe. We explored how to make delicious fried pineapple. I covered essential ingredients like fresh pineapple, marinade components, and optional add-ins. You learned step-by-step instructions for marinating and frying. I shared tips for perfect frying and flavor ideas. We also discussed variations like a tropical fruit mix and storage info. Now, get ready to enjoy a tasty treat. These fried pineapple rings can brighten any day!
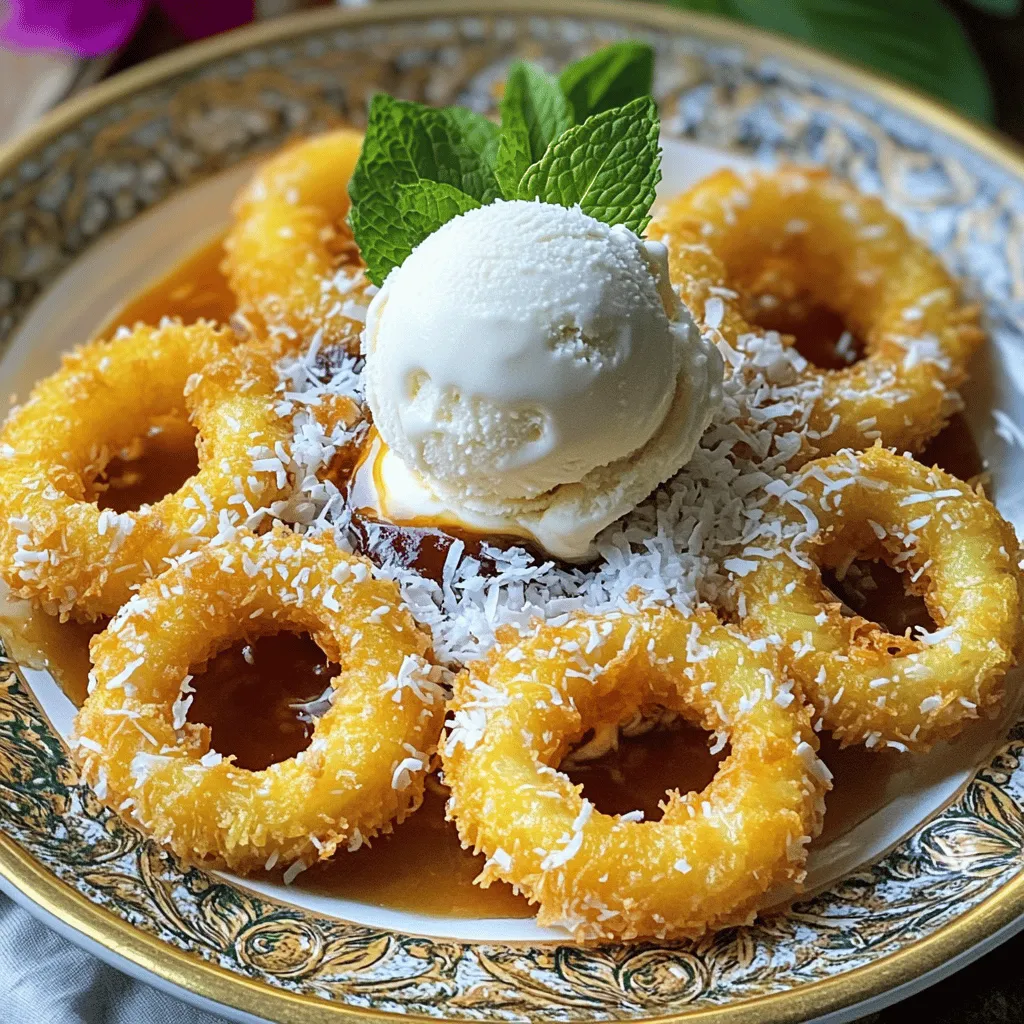
Rum-Soaked Fried Pineapple Dessert Delight Recipe
Are you ready to elevate your dessert game? My Rum-Soaked Fried Pineapple Dessert is a tropical treat that’s easy and fun to make! With fresh
For a tasty monkey bread, you will need: - 3 cans of refrigerated biscuit dough (16 oz each) - 1 cup granulated sugar - 2 teaspoons ground cinnamon - 1/2 cup unsalted butter, melted - 1/2 cup brown sugar, packed - 1 teaspoon vanilla extract - 1/4 teaspoon salt These ingredients make the sweet, gooey treat that everyone loves. Each one plays a key role in the flavor and texture. For the best results, I recommend using well-known brands. For biscuit dough, Pillsbury works great. If you want a healthier option, you can try whole wheat dough. For sugar, any granulated or brown sugar is fine. Use real butter for the best taste. For those who are dairy-free, you can swap butter for coconut oil. Choosing the right biscuit dough is key. Look for dough that is fresh and not past its date. Check the packaging for any signs of damage. The dough should be soft and pliable. If you can, pick a brand that uses simple ingredients. This choice leads to a better flavor and texture in your monkey bread. To start, preheat your oven to 350°F (175°C). This step is key for even baking. Grease a bundt pan with non-stick spray or butter. This helps the bread come out easily later. Next, open the biscuit dough cans. Cut each biscuit into quarters. This makes bite-sized pieces for your monkey bread. In a large bowl, mix the granulated sugar and cinnamon. This blend gives your bread that sweet, warm flavor. Roll each biscuit piece in this mixture. Make sure each piece is fully coated. This is where the magic begins! In another bowl, whisk together the melted butter, brown sugar, vanilla extract, and salt. This mix adds richness and depth to your bread. Now it’s time to assemble! Place half of the coated biscuit pieces into the prepared bundt pan. Make sure they are evenly spread out. Drizzle half of the butter-sugar mixture over this layer. This adds flavor and moisture. Next, add the remaining biscuit pieces on top. Pour the rest of the butter-sugar mixture over them. Use a fork or spoon to gently press down. This helps everything settle nicely in the pan. Bake your monkey bread in the preheated oven for 30-35 minutes. Look for a golden brown color and bubbling edges. This means your bread is ready! After baking, allow it to cool for about 10 minutes. This makes it easier to invert onto a serving plate. For a final touch, drizzle any remaining butter-sugar mixture over the top. Serve warm with cream cheese frosting for dipping. This adds a lovely touch and is a family favorite! Enjoy your delightful treat. For the complete recipe, check out the Full Recipe. To get the best flavor in your monkey bread, use fresh ingredients. Always pick high-quality butter and spices. The cinnamon should be fragrant. Mix the sugar with cinnamon well for even taste. Adding a pinch of salt helps balance the sweetness. You can also add nuts or chocolate chips for extra flavor. To save time, prep your ingredients first. Cut the biscuit dough into quarters while your oven heats. Use a large bowl for mixing. You can also buy pre-made cinnamon sugar to skip that step. If you have kids, let them join in. It makes the process fun and quick. One common mistake is not greasing the pan well. This can cause the bread to stick. Make sure to coat the bundt pan with non-stick spray or butter. Avoid overmixing the dough pieces in sugar. They should be coated but not mushy. Lastly, don’t skip the cooling time. Let it sit for a bit before serving. This helps keep the shape when you flip it. For the full recipe, just follow the steps mentioned above. Enjoy your baking! {{image_2}} You can turn your monkey bread into a sweet chocolate treat. Use chocolate chips along with the cinnamon sugar. After coating the biscuit pieces, mix in 1 cup of chocolate chips. Layer the coated dough and chips in the bundt pan. The melting chocolate adds a rich flavor. Your family will love this gooey twist. Try a savory version for a fun change. Use garlic powder and Italian herbs instead of cinnamon. Mix 1 teaspoon of garlic powder with 1 teaspoon of Italian seasoning in the sugar. You can even add shredded cheese between the layers. This makes a great snack or side dish for dinner. For fall, pumpkin spice monkey bread is a hit. Replace the cinnamon with pumpkin pie spice. Add 1/2 cup of pureed pumpkin to your butter mixture. This adds moisture and flavor. You can serve this warm with cream cheese frosting. It’s perfect for holiday gatherings. You can find the full recipe at the start of this article! To keep your monkey bread tasty, store it in an airtight container. This helps keep it soft and fresh. If you have a lot left, cut it into slices. This makes it easier to grab a piece later. Place a piece of parchment paper between layers to avoid sticking. Always store it at room temperature for up to three days. Reheating monkey bread is simple. Preheat your oven to 300°F (150°C). Place the bread on a baking sheet. Cover it with foil to keep it moist. Heat for about 10-15 minutes. You can also use a microwave. Heat it in short bursts of 20 seconds. Check to see if it's warm enough. This method may make it a bit chewy, so the oven is best. You can freeze monkey bread for later. First, let it cool completely. Wrap it tightly in plastic wrap. Then, place it in a freezer-safe bag. Be sure to remove as much air as possible. It can stay in the freezer for up to three months. To enjoy, thaw it in the fridge overnight. Reheat it in the oven to restore its tasty texture. Monkey bread has a fun and playful past. It likely began in the United States in the 1950s. The name comes from the playful way eaters pull apart the bread. Some say it reminds them of monkeys. Others say it’s because of the way the bread is shared. This treat became popular at family gatherings and brunches. It quickly became a favorite for its ease and delicious taste. Yes, you can use homemade dough! Making your dough can add a personal touch. Just ensure it is soft and easy to work with. This will help it rise and pull apart well. You can use any biscuit or bread dough recipe you love. Just keep in mind that it may take longer to bake. There are many fun toppings to try! Here are a few ideas: - Cream cheese frosting for a sweet dip - A drizzle of chocolate sauce for extra sweetness - Chopped nuts for added crunch - Fresh fruit like berries for a fruity twist - A sprinkle of sea salt to balance the sweetness Feel free to mix and match these toppings to find your favorite! You can tell when monkey bread is done by its color and texture. It should be golden brown on top and bubbling. You can also insert a toothpick into the center. If it comes out clean, your monkey bread is ready! Let it cool slightly before serving. Enjoy the warm, gooey goodness! For a detailed guide, check out the Full Recipe. Making monkey bread is simple and fun. We covered the essential ingredients, tips for success, and easy steps to follow. Explore variations like chocolate or savory versions for added flair. I shared storage tips so your leftovers stay fresh. Finally, I answered common questions to help you feel confident. Now, gather your ingredients and enjoy making monkey bread today. It’s a tasty treat that brings joy to any occasion. Happy baking!
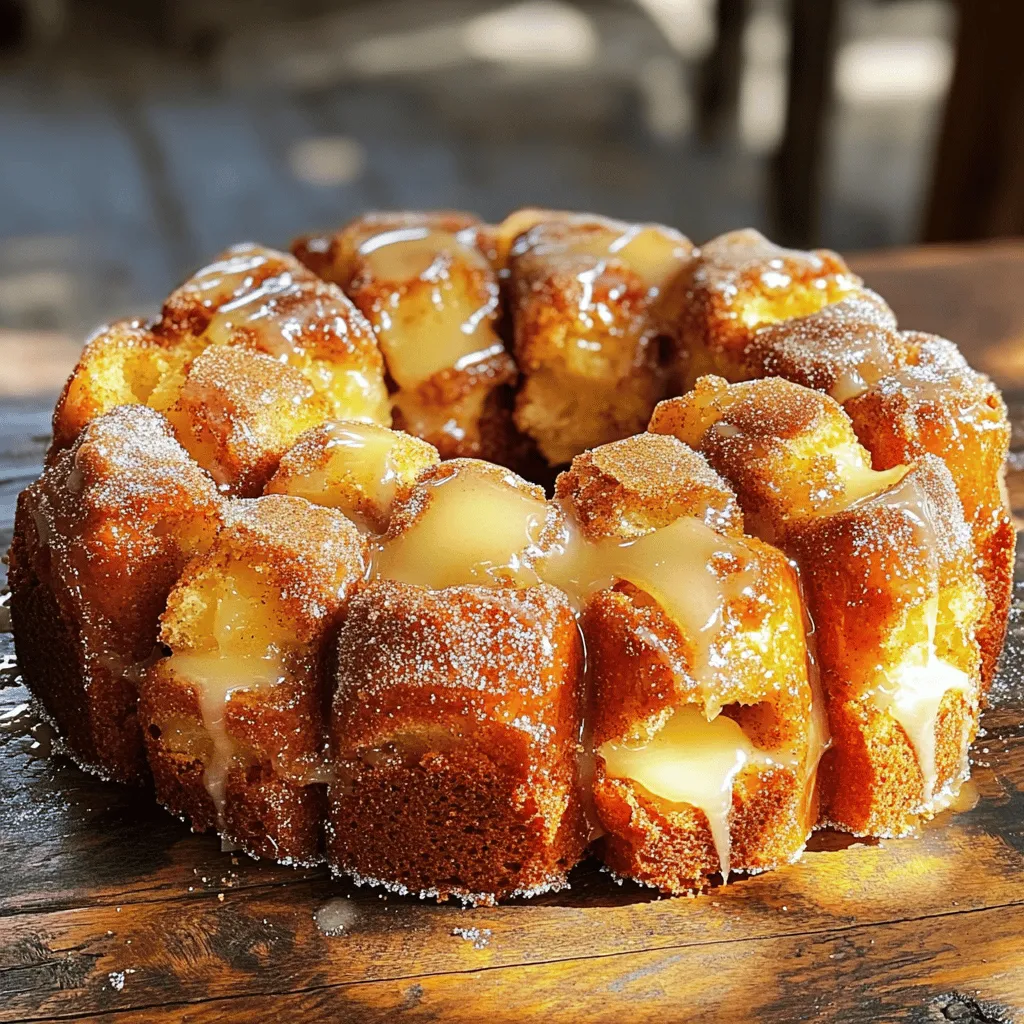
Monkey Bread Delightful and Easy Family Treat
If you’re looking for a fun and tasty treat, monkey bread is perfect! This sweet pull-apart bread is a hit for family gatherings or any
- 2 cups all-purpose flour - 1 cup fresh or frozen blueberries - 1/2 cup sugar - 1/2 cup cream cheese, softened - 1/2 cup unsalted butter, melted - 2 large eggs - 1/4 cup milk - 1 teaspoon vanilla extract - 2 teaspoons baking powder - 1/2 teaspoon baking soda - 1/4 teaspoon salt - Zest of 1 lemon (optional) - Powdered sugar for dusting (optional) You need simple and fresh ingredients to make blueberry cream cheese bread. The flour provides the base. Blueberries bring bursts of flavor. Cream cheese adds a rich, creamy texture. Sugar sweetens the bread, while butter gives it richness. Eggs help bind everything together. Milk adds moisture. Vanilla extract boosts flavor, and baking powder gives it lift. Baking soda helps balance acidity. A pinch of salt enhances the taste. If you want a bright note, add lemon zest. Dust the finished bread with powdered sugar for a sweet touch. These ingredients combine to create a delightful bread. Use fresh blueberries when you can. If they are not available, frozen ones will work too. Just make sure to thaw them first. This recipe is flexible and fun! You can find the full recipe in this article. - Preheat your oven to 350°F (175°C). Grease a 9x5-inch loaf pan or line it with parchment paper. - In a mixing bowl, cream together 1/2 cup of softened cream cheese and 1/2 cup of sugar until smooth. - Add 1/2 cup of melted butter, 2 large eggs, 1/4 cup of milk, and 1 teaspoon of vanilla extract. Beat until well mixed. - In another bowl, whisk together 2 cups of all-purpose flour, 2 teaspoons of baking powder, 1/2 teaspoon of baking soda, 1/4 teaspoon of salt, and optional lemon zest. - Gradually add the dry mix to the wet mixture. Stir gently until just combined. - Fold in 1 cup of blueberries gently to avoid breaking them. - Pour the batter into the prepared loaf pan. Spread it evenly. - Bake in the preheated oven for 50-60 minutes. Check for doneness by inserting a toothpick into the center. If it comes out clean, the bread is ready. - Let the bread cool in the pan for 10 minutes. Then, transfer it to a wire rack to cool completely. - To slice, use a serrated knife. Serve the bread warm or at room temperature. - For a beautiful display, arrange slices on a platter. Add a few fresh blueberries and a light dusting of powdered sugar on top. Enjoy with tea or coffee! For the full recipe, check out Blueberry Cream Cheese Delight Bread. To make great blueberry cream cheese bread, avoid overmixing. When you mix too much, the berries break apart. This can make your bread less pretty and change its texture. Gently fold in the blueberries at the end. This keeps them whole and adds bursts of flavor. Proper pan prep is also key for even baking. Grease your loaf pan well or use parchment paper. This will help the bread come out easily. An even surface means all parts of the bread cook nicely. Check if your oven is properly heated before you bake. An oven thermometer can help keep the temperature right. Storing leftover bread well keeps it fresh. First, let the bread cool completely. Wrap it in plastic wrap or aluminum foil. This keeps moisture in and prevents it from drying out. You can also place it in an airtight container. To freeze blueberry cream cheese bread, slice it first. Wrap each slice tightly in plastic wrap. Then, place them in a freezer bag. This way, you can take out just what you need. It stays tasty for up to three months when frozen. Blueberry cream cheese bread pairs perfectly with coffee or tea. The flavors complement each other well. For a fun twist, try adding toppings. A dollop of whipped cream or a smear of butter can make it even better. You can also create a beautiful display. Arrange the slices on a platter with fresh blueberries. A sprinkle of powdered sugar adds a nice touch. This makes your bread look as good as it tastes. {{image_2}} You can easily change the flavor of your blueberry cream cheese bread. Try adding nuts like walnuts or pecans for a crunchy twist. Nuts give the bread a nice texture and taste. You can also include spices like cinnamon or nutmeg. These spices add warmth and depth to the flavor. Just a little sprinkle will do! If you need gluten-free options, you can swap all-purpose flour for gluten-free flour. Many blends work well and keep the bread light. For those who follow a vegan diet, replace the eggs with flax eggs or applesauce. Use vegan cream cheese instead of regular cream cheese. These swaps let everyone enjoy this tasty treat! Want to mix things up? You can swap blueberries for raspberries or strawberries. These berries add a different flavor and color. If you have a sweet tooth, include chocolate chips in your batter. They melt and create little pockets of chocolatey goodness. This makes the bread even more delightful. For the full recipe, check out the instructions provided above. Each slice of Blueberry Cream Cheese Bread has about 200 calories. This includes: - Carbohydrates: 30 grams - Protein: 3 grams - Fat: 9 grams - Fiber: 1 gram - Sugar: 8 grams These numbers can vary based on your ingredient choices. This bread is a treat, so enjoy it in moderation. You can make this bread a bit healthier. Try using whole grain flour instead of all-purpose flour. This change adds fiber and nutrients. You can also reduce sugar to just 1/3 cup. This keeps the bread tasty while cutting calories. Blueberries are packed with vitamins. They have antioxidants that help keep you healthy. These tiny fruits also support heart health and boost brain function. Cream cheese adds a rich flavor. It also provides calcium, which is good for your bones. If you choose low-fat cream cheese, you can enjoy the same creamy taste with fewer calories. For the Full Recipe, check the ingredients and steps to make this delicious bread! - How do I know when the bread is done baking? The bread is done when a toothpick comes out clean. Insert it into the center. If it has wet batter, bake a bit longer. The bread should also look golden brown. - Can I use frozen blueberries directly in the recipe? Yes, you can use frozen blueberries. Just make sure to thaw them first. Drain any extra juice to keep the batter from getting too wet. - What is the best way to reheat leftover bread? To reheat, slice the bread and place it in a toaster or oven. Heat at 350°F for about 5-10 minutes. This keeps the bread soft and tasty. - Can I replace cream cheese with yogurt? You can replace cream cheese with yogurt, but the texture will change. The bread may be less rich and creamy. It’s a good option for a lighter version. - What can I use if I don’t have fresh lemons for zest? If you don't have lemons, try using orange zest. It adds a nice flavor. You can also skip the zest if you want. - How to scale the recipe for larger gatherings? To scale the recipe, simply multiply the ingredients by the number of loaves you need. Use larger pans and adjust baking time as needed. - Can this be made as muffins instead of bread? Yes, you can make muffins! Just pour the batter into a muffin tin. Bake for about 20-25 minutes. Check for doneness with a toothpick. This blog post covers how to make delicious blueberry cream cheese bread. You learned about the ingredients, step-by-step instructions, and baking tips. I shared storage methods and variations too. You can even adjust it to meet dietary needs. Blueberries and cream cheese not only taste great but offer health benefits as well. Enjoy experimenting with flavors and serve it warm or as a tasty snack. Happy baking!
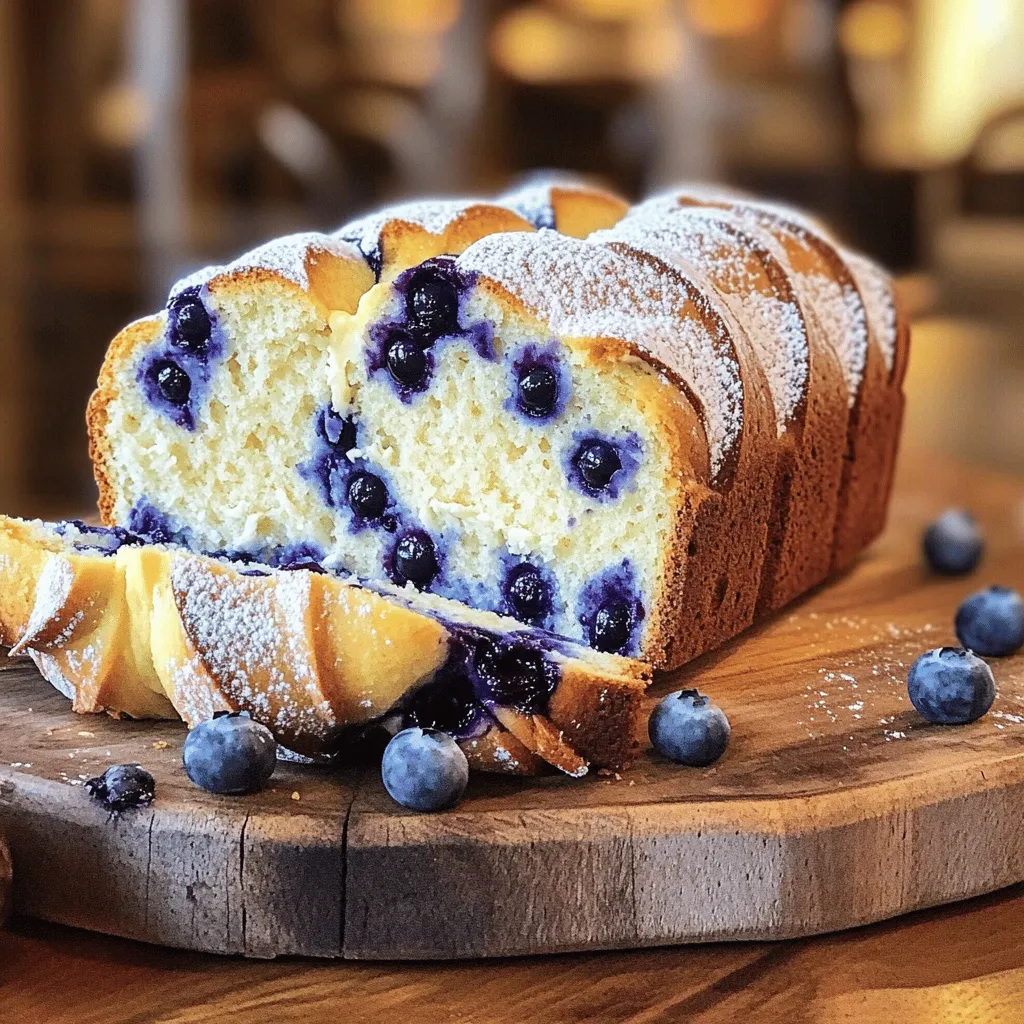
Blueberry Cream Cheese Bread Savory and Simple Recipe
Are you ready to bake something delicious? This Blueberry Cream Cheese Bread recipe is both savory and simple. With fresh blueberries and creamy cheese, it’s
To make a tasty berry croissant bake, you need these main ingredients: - 4 large croissants, torn into bite-sized pieces - 1 cup mixed berries (strawberries, blueberries, raspberries) - 3 large eggs - 1 cup milk - 1/2 cup sugar - 1 teaspoon vanilla extract - 1/2 teaspoon ground cinnamon - 1/4 teaspoon salt - 1 tablespoon butter, for greasing - Powdered sugar, for dusting - Fresh mint leaves, for garnish These ingredients work together to create a sweet and creamy dish. The croissants soak up the egg mixture, making them soft and fluffy. The berries add a burst of flavor and color. You can add some optional ingredients to enhance your bake. Consider these: - A pinch of nutmeg for warmth - Chopped nuts for crunch - A splash of orange juice for zest - Cream cheese for extra creaminess These additions can make your dish unique. Feel free to mix and match based on what you like! If you can't find some ingredients, don't worry. Here are some good substitutes: - Use any bread instead of croissants, like brioche or challah. - Almond milk or oat milk can replace regular milk. - Replace sugar with honey or maple syrup for a different sweetness. - Use vanilla bean paste if you want a richer flavor. These swaps can help you make this dish while using what you have at home. Check out the Full Recipe for more details on how to put it all together. To start, gather your ingredients. You will need: - 4 large croissants, torn into bite-sized pieces - 1 cup mixed berries (strawberries, blueberries, raspberries) - 3 large eggs - 1 cup milk - 1/2 cup sugar - 1 teaspoon vanilla extract - 1/2 teaspoon ground cinnamon - 1/4 teaspoon salt - 1 tablespoon butter, for greasing - Powdered sugar, for dusting - Fresh mint leaves, for garnish First, preheat your oven to 350°F (175°C). While it heats, grease your baking dish with butter. Next, in a large bowl, whisk together the eggs, milk, sugar, vanilla extract, cinnamon, and salt. Mix until smooth. Now, arrange the torn croissant pieces evenly in the greased dish. Scatter the mixed berries over the croissants. This adds color and taste. Pour the egg mixture over the croissants and berries. Ensure all pieces soak well. Press down gently to help the croissants absorb the mixture. Let it sit for about 10 minutes. This step is key for flavor. When your oven is hot, place the dish inside. Bake for 30 to 35 minutes. Look for a golden brown top. The custard should be set. Once baked, take it out and let it cool for a few minutes. This helps with serving. Dust the top with powdered sugar for a sweet finish. Serve your Berry Croissant Bake warm. Garnish with fresh mint leaves for a pop of color. You can also pair it with whipped cream or a scoop of ice cream. This adds a creamy touch. For extra flair, serve it with a side of maple syrup or honey. Enjoy this delightful dish with family or friends! For the complete guide, refer to the Full Recipe. To make your berry croissant bake shine, pay close attention to the soaking. After you pour the egg mixture over the croissants and berries, press down gently. This helps the croissants absorb the milk and egg mixture well. Let it sit for about 10 minutes. This step ensures a soft, custardy texture. One common mistake is not tearing the croissants enough. If the pieces are too big, they won't soak properly. Another mistake is rushing the bake time. Always check for a golden top and a set custard. Trust your oven, and use a toothpick to test for doneness. If it comes out clean, you're ready! For the best taste, serve your berry croissant bake warm. Let it cool for a few minutes after baking. This allows the flavors to meld. You can enjoy it plain or dust it with powdered sugar. Fresh mint leaves add a nice touch, too. If you prefer it cold, that's okay! It tastes great chilled, too. {{image_2}} You can use many kinds of berries in this dish. Strawberries, blueberries, and raspberries mix well. You can also try blackberries or even chopped cherries. Each berry brings its own flavor. The tartness of raspberries pairs nicely with sweet croissants. Blueberries add a juicy burst. When you choose berries, pick ripe ones for the best taste. You can even mix frozen berries if fresh ones are not available. Just remember to thaw and drain them first. If you want a dairy-free or vegan Berry Croissant Bake, it's easy to adjust. Use plant-based milk like almond or oat milk. For the eggs, chia seeds or flaxseeds work great. Mix 1 tablespoon of chia seeds or flaxseeds with 3 tablespoons of water. Let it sit for a few minutes until it thickens. This mix acts like an egg in your bake. You can also find vegan croissants at some stores. Check the labels to be sure they are dairy-free. To make this bake even more special, add some extras. A splash of almond extract can boost the flavor. You might also sprinkle in some chocolate chips for a sweet surprise. Nuts like chopped almonds or pecans add a fun crunch. For a touch of zest, try adding orange or lemon zest. Each of these options brings a new twist to your dish. Feel free to mix and match based on your taste. These small changes can take your Berry Croissant Bake to a whole new level! To store your Berry Croissant Bake, let it cool first. Then, place leftover portions in an airtight container. You can keep it in the fridge for up to three days. This method helps keep the bake fresh and tasty. When you're ready to enjoy leftovers, preheat your oven to 350°F (175°C). Place the Berry Croissant Bake in an oven-safe dish. Cover it with foil to keep it moist. Heat for about 15-20 minutes, or until it's warm throughout. If you want a crisp top, remove the foil for the last few minutes. You can freeze Berry Croissant Bake for later enjoyment. First, cool it completely. Then, cut it into portions and wrap each piece tightly in plastic wrap. Place the wrapped pieces in a freezer-safe bag or container. You can freeze it for up to three months. When you're ready to eat, let it thaw in the fridge overnight, then reheat as described above. This way, you have a quick and tasty treat ready to go! Yes, you can make Berry Croissant Bake ahead of time. Simply prepare it the night before. After you arrange the croissants and berries, pour the egg mixture over them. Cover the dish with plastic wrap and store it in the fridge. In the morning, just bake it as usual. This saves you time and lets the flavors blend well. Berry Croissant Bake pairs well with many dishes. You can serve it with whipped cream or yogurt for added creaminess. Fresh fruit on the side enhances the berry flavor. A drizzle of maple syrup adds sweetness. You could also offer a warm beverage like coffee or tea to complete the meal. Absolutely! Store-bought croissants work great for this recipe. They save you time and still taste delicious. Choose fresh or day-old croissants for the best results. Day-old croissants soak up the egg mixture well, making your bake even tastier. Just tear them into pieces and follow the full recipe. You learned about making a delicious berry croissant bake. We covered key ingredients, step-by-step methods, and helpful tips to ensure success. You can use different berries and even try dairy-free options. Remember to store any leftovers properly so they stay fresh. This dish is perfect for breakfast or brunch with family and friends. Enjoy getting creative in the kitchen. Your berry croissant bake will surely impress everyone!
Berry Croissant Bake Delightful and Easy Recipe
Get ready to delight your taste buds with my Berry Croissant Bake. This easy recipe combines flaky croissants and juicy berries for a dish that’s