Desserts

To whip up these delightful mini lemon cheesecakes, you need a few simple items. Each ingredient plays a key role in creating that perfect balance of tangy and sweet. Here’s what you will need: - 1 cup graham cracker crumbs - 1/4 cup unsalted butter, melted - 2 tablespoons sugar - 16 oz cream cheese, softened - 1 cup powdered sugar - 2 large eggs - 1 tablespoon lemon zest - 1/4 cup fresh lemon juice - 1 teaspoon vanilla extract - Whipped cream and lemon slices for garnish (optional) These ingredients come together to create a creamy texture and bright flavor. The graham cracker crumbs form a crunchy base. The cream cheese gives it a rich and smooth filling. Fresh lemon juice and zest add zing, making each bite refreshing. Using high-quality ingredients can elevate your cheesecakes. Fresh lemons provide the best flavor. Make sure your cream cheese is at room temperature to blend smoothly. This will ensure your mini cheesecakes turn out perfect every time. Check out the Full Recipe for detailed steps on how to mix these ingredients and bake your delightful treats! - Preheat oven and prep muffin tin Start by preheating your oven to 325°F (160°C). Line a muffin tin with paper liners. This will help your cheesecakes come out easily. - Create the graham cracker crust In a medium bowl, mix 1 cup of graham cracker crumbs, 1/4 cup of melted unsalted butter, and 2 tablespoons of sugar. Stir until the crumbs feel moist. Then, press about 1 tablespoon of this mixture into the bottom of each muffin liner. Use a spoon or your fingers to pack it down tightly. - Make the cheesecake filling In a large bowl, beat 16 oz of softened cream cheese with an electric mixer. Keep mixing until it is smooth. Slowly add 1 cup of powdered sugar, mixing until it is well blended. Add 2 large eggs one at a time, mixing well after each. Then, stir in 1 tablespoon of lemon zest, 1/4 cup of fresh lemon juice, and 1 teaspoon of vanilla extract until everything is mixed well. - Pour and bake the cheesecakes Pour the cheesecake mixture over your crusts in the muffin tin. Fill each liner about 3/4 full. Bake for 18-20 minutes. The centers should be set but still jiggle when shaken. - Cool and refrigerate After baking, remove the cheesecakes from the oven. Let them cool to room temperature. Then, place them in the fridge for at least 2 hours. This chilling time helps them set perfectly. For the complete process, check out the Full Recipe. - Ensuring the cream cheese is properly softened: Softened cream cheese mixes easily, making a smooth filling. Leave it out for about 30 minutes before using. You can also microwave it for 10 seconds if you're in a hurry. Just don’t melt it! - Importance of not overmixing the eggs: Mix the eggs just until blended. Overmixing can add too much air, causing cracks. This will help keep your mini cheesecakes smooth and rich. - Cooling and chilling time for best texture: After baking, let the cheesecakes cool at room temperature. Then refrigerate them for at least 2 hours. This will help them set perfectly and taste even better. - Recommended toppings for a delightful finish: Whipped cream adds a lovely touch. A slice of lemon on top brightens the flavor and makes it pretty. You can also sprinkle some lemon zest for extra zing. - Best side dishes or drinks to pair with cheesecakes: Serve these cheesecakes with a cup of tea or a light lemonade. A fresh fruit salad on the side balances the rich flavors. These pairings enhance the lemony goodness and make your dessert shine. {{image_2}} You can change the crust for mini lemon cheesecakes easily. Instead of graham crackers, try Oreos for a rich flavor. Just crush them and mix with melted butter. If you prefer a gluten-free option, use almond flour. Mix it with melted butter, just like before. You can also skip baking entirely. For a no-bake cheesecake, use a mix of cream cheese, sugar, and lemon juice. Press the crust into cups and refrigerate. It sets up nicely without the oven. Want to add more flavor? You can use fruit puree. Just stir in a spoonful of raspberry or strawberry puree into the cheesecake mix. It adds color and taste. You can also try flavored extracts, like almond or coconut, to give a twist. If you like your desserts less sweet, consider using alternative sweeteners. Options like honey or agave syrup work great. Adjust according to your taste. This way, you can make mini lemon cheesecakes that fit your style. For the full recipe, check out the instructions above. To keep your mini lemon cheesecakes fresh, store them in the fridge. Place them in an airtight container. This helps prevent any drying or absorbing unwanted odors. If you want to freeze them, wrap each cheesecake in plastic wrap. Then, place them in a freezer-safe bag. This way, they won’t lose their taste or texture. When ready to eat, thaw them in the fridge overnight. Mini lemon cheesecakes last about 4 to 5 days in the fridge. Be sure to check them before eating. If they smell off or look discolored, it’s best to throw them away. Fresh cheesecakes should look bright and inviting. Enjoy them while they’re still tasty! - Can I make these ahead of time? Yes, you can make mini lemon cheesecakes a day in advance. Store them in the fridge. This helps the flavors meld. - Is it possible to make a dairy-free version? You can use dairy-free cream cheese for a dairy-free option. It provides a similar texture. - How do I know when they are done baking? The cheesecakes are done when the edges are set. The center should jiggle slightly. This means they will firm up as they cool. - Can I substitute the eggs in this recipe? You can use flax eggs or applesauce as substitutes. Each egg equals 1 tablespoon of flaxseed meal mixed with 2.5 tablespoons of water. - What can I use instead of cream cheese? You can try ricotta cheese or mascarpone. Both give a creamy texture and mild flavor. - How can I adjust the recipe for different serving sizes? To make more, double the ingredients. For fewer, halve everything. Use a smaller muffin tin for mini bites. - What do I do if my cheesecakes crack? To prevent cracks, avoid overmixing the batter. Bake at a lower temperature and add a water bath for moisture. If they crack, cover with whipped cream for a tasty fix. For the full recipe, don't forget to check out the details above! Mini lemon cheesecakes are tasty and fun to make. You learned the key ingredients and steps needed. Tips helped you avoid common mistakes. You can even explore variations for more flavor. Remember to store them well so they stay fresh. Try new toppings and pairings for an extra treat. I hope you feel ready to impress everyone with these delicious cheesecakes! Enjoy your baking journey.
Mini Lemon Cheesecakes Delightful and Easy Treat
If you crave a sweet, tangy treat, look no further! Mini lemon cheesecakes are simple to make and bursting with flavor. With a creamy filling
To make Puff Pastry Vanilla Custard Squares, you need simple, fresh ingredients. Here’s what you will need: - 1 sheet of puff pastry (thawed) - 2 cups milk - 1/2 cup granulated sugar - 1/4 cup cornstarch - 4 large egg yolks - 2 teaspoons vanilla extract - 1/4 teaspoon salt - Powdered sugar for dusting - Fresh berries (for garnish, optional) Each ingredient plays a key role. The puff pastry gives a light, flaky texture. Milk and sugar create a creamy, sweet base for the custard. Egg yolks and cornstarch help thicken the custard, making it smooth. Vanilla adds delightful flavor, while salt balances the sweetness. For a fun twist, you can add fresh berries as a garnish. They bring a pop of color and taste. If you want to see all the steps, check the Full Recipe. Enjoy the process, and get ready to impress! 1. Preheat Oven: Start by heating your oven to 400°F (200°C). This temperature helps the pastry puff up nicely. Line a baking sheet with parchment paper to prevent sticking. 2. Rolling Out Puff Pastry: Take your thawed puff pastry and place it on a lightly floured surface. Use a rolling pin to smooth it out. This helps remove any creases and makes it easier to cut. 3. Cutting and Scoring the Pastry: Cut the pastry into squares, about 3x3 inches. Place these squares on your baking sheet. With a knife, score a smaller square inside each piece. Be careful not to cut through. Leave about a 1/2 inch around the edge. This will create a nice border once baked. 1. Baking Time and Temperature: Bake the puff pastry squares in the preheated oven for 15-18 minutes. You want them to turn golden brown and puff up beautifully. 2. Cooling the Pastry: After baking, remove the squares from the oven. Let them cool on the baking sheet for a few minutes. This cooling period prepares them for the delicious custard. 1. Heating the Milk Mixture: In a medium saucepan, combine 2 cups of milk, 1/4 cup of sugar, and a pinch of salt. Heat this mixture over medium heat. Stir it until it starts to steam, but do not let it boil. 2. Mixing Egg Yolks and Cornstarch: While the milk heats, take a mixing bowl. Whisk together 4 egg yolks and 1/4 cup of cornstarch with the remaining sugar. Mix until it is smooth and free of lumps. 3. Tempering and Thickening the Custard: Gradually pour about 1/3 of the hot milk into the egg mixture. Make sure to whisk continuously. This step prevents the eggs from cooking too fast. Then pour the tempered egg mixture back into the saucepan. Continue to cook, whisking constantly. The custard will thicken and boil in about 3-5 minutes. 1. Creating Cavities in Puff Pastry: Once the puff pastry is cool, gently press down the center of each square. This creates a cavity for the custard. 2. Filling with Vanilla Custard: Carefully spoon the warm vanilla custard into the center of each puff pastry square. Fill them generously but avoid overfilling. 3. Chilling Before Serving: Place the assembled custard squares in the refrigerator for at least 30 minutes. This chilling time helps set the custard and makes it easier to serve. For the complete recipe, check the Full Recipe section. Proper Thawing Techniques To get the best puff pastry, thaw it slowly. Leave it in the fridge overnight. This keeps the layers cold and helps them puff up. If you're in a hurry, you can leave it out at room temperature for about 30 minutes. Just don’t let it get too warm. Avoiding Overworking the Dough When handling puff pastry, use gentle hands. Overworking it can ruin the layers. Roll it out just enough to smooth it, and then cut it. The less you touch it, the flakier it will be. Temperature Control When Heating When heating your milk mixture, keep a close eye on it. You want it hot, but not boiling. Steaming is the goal. Too much heat can scorch the milk and ruin the flavor. Thickening Tips for Custard To thicken custard, constant stirring is key. Once the mixture starts to steam, whisk it well. Cook it until it coats the back of a spoon. This usually takes about 3 to 5 minutes. If it doesn’t thicken, continue cooking a bit longer. Dusting Techniques Dusting with powdered sugar makes the squares look fancy. Use a fine sieve for an even layer. This adds sweetness without being too much. Flavor Pairing Suggestions Fresh berries like strawberries or blueberries pair well with the custard. They add color and a tart flavor that balances the sweet custard. You can also add a drizzle of chocolate sauce for extra flair. These tips will help you create perfect Puff Pastry Vanilla Custard Squares. For the complete guide, check the Full Recipe. {{image_2}} You can change up the flavor of your custard easily. Try a chocolate custard for a rich twist. To do this, add melted dark chocolate to the milk as it heats. This adds a deep, sweet taste. Mix well to ensure even flavor. You can also make fruit-infused custard. Use fruit puree like strawberry or mango. Just mix your puree into the custard after it thickens. This gives your squares a fresh and fruity flavor. If you want to switch things up, consider using phyllo dough. It gives a nice, crispy texture. Layer several sheets of phyllo, brushing with butter between them. Then cut and bake as you would with puff pastry. Shortcrust pastry is another option. It has a crumbly texture and a buttery taste. Roll it out and cut it into squares. Use the same assembly method as with puff pastry for a different style. You can make special custard squares for holidays. Try adding spices like cinnamon or nutmeg for a festive touch. This warms up the flavors and fits the season. For a summer treat, top your squares with seasonal fruit. Fresh berries or sliced peaches can make your dessert pop. They add color and a burst of flavor that pairs well with custard. Feel free to explore these variations to keep your Puff Pastry Vanilla Custard Squares exciting and fresh! For the full recipe, click here. To keep your puff pastry vanilla custard squares fresh, store them carefully. - Refrigerating Custard Squares: Place the squares in an airtight container. This helps keep them moist and tasty. They can last in the fridge for about 2 to 3 days. - Freezing Instructions: If you want to save some for later, freeze them! Wrap each square in plastic wrap. Then, put them in a freezer-safe bag. They can stay good for up to 2 months. Knowing how long your treats last is key. - How Long They Last in the Fridge: In the fridge, these squares stay fresh for 2 to 3 days. After that, the custard may lose its creaminess. - Signs of Spoilage: If you notice any off smells or a watery texture, it's best to toss them. Freshness is always best! Reheating your custard squares can be tricky. You want to keep that lovely texture and flavor. - Best Methods to Reheat: The oven works best! Preheat it to 350°F (175°C). Place the squares on a baking sheet and heat for about 10 minutes. This warms them evenly. - Maintaining Texture and Flavor: Avoid the microwave if you can. It may make the pastry soggy. A quick oven reheat keeps everything crispy and delightful. For the full recipe, be sure to check out the details above. Enjoy! Yes, you can prepare Puff Pastry Vanilla Custard Squares in advance. Make the pastry and custard separately. Preparation and Storage Tips: - Puff Pastry: Bake the squares and let them cool. Store them in an airtight container. They are best if eaten within two days. - Custard: Chill the custard in the fridge. Use it within three days for the best taste. You can fill the pastry just before serving. If you want an egg-free custard, there are great options. Egg Substitute Options for Custard: - Silken Tofu: Blend silken tofu until smooth. Use about 1/4 cup per egg. - Cornstarch: Use extra cornstarch to thicken. For each egg, add 2 tablespoons more. - Flaxseed Meal: Mix 1 tablespoon of flaxseed meal with 2.5 tablespoons of water. Let it sit for 5 minutes to thicken. These substitutes will help you create a creamy custard. Curdling can ruin your custard. Here are simple tips to avoid it. Tips for Successful Custard Making: - Temperature Control: Heat the milk slowly. Avoid boiling. - Tempering: Slowly mix hot milk into the egg mixture. This protects the eggs from cooking too fast. - Constant Whisking: Always whisk when cooking. This keeps the mixture smooth and even. These steps help ensure a silky, smooth custard every time. You now have all the steps to make Puff Pastry Vanilla Custard Squares. We’ve covered ingredients, baking, and sweet additions. Remember to master the custard for the best flavor. Don’t rush; let the pastry cool and the custard chill. Try different flavors for a fun twist. Store them well to keep their taste fresh. With practice, you'll make these treats perfectly every time. Enjoy making and sharing your delicious creations!
Puff Pastry Vanilla Custard Squares Easy Delight Recipe
If you’re craving a sweet treat that’s both delicious and easy to make, look no further! This Puff Pastry Vanilla Custard Squares recipe is my
- 1 sheet of puff pastry, thawed - 1 cup fresh raspberries - 4 oz cream cheese, softened - Zest of 1 lemon - Additional toppings like powdered sugar - Rolling pin - Baking sheet - Mixing bowls These ingredients create a simple yet delightful dessert. Puff pastry is light and flaky, making it perfect for a Danish. Fresh raspberries offer a tart flavor that pairs well with sweet cream cheese. You can add lemon zest for a bright touch. Use a rolling pin to shape the pastry easily. A baking sheet is crucial for even baking. Mixing bowls help you combine ingredients smoothly. If you want to dive deeper into the recipe, check out the Full Recipe. It provides details on measurements and steps to create this delightful treat. Enjoy the process and have fun in the kitchen! First, you need to thaw the puff pastry. Leave it in the fridge for a few hours or on the counter for about 30 minutes. Once it's soft, roll it out on a lightly floured surface. Aim for a square that measures about 12 inches on each side. Then, cut it into four equal squares. Each square will hold the tasty filling. In a medium bowl, combine 1 cup of fresh raspberries with 1/4 cup of granulated sugar. Gently stir them together. Then, add 1 tablespoon of cornstarch and 1 teaspoon of vanilla extract. If you like, add the zest of 1 lemon for extra flavor. This mixture will create a sweet and tangy filling. Take one square of puff pastry and place it on a baking sheet. Spread about a tablespoon of the cream cheese mixture in the center. Leave about an inch around the edges. Next, spoon several raspberries on top of the cream cheese layer. To shape the pastry, fold the corners over the filling, forming a diamond shape. Make sure the edges are sealed well. Repeat this with the other squares. Before baking, preheat your oven to 400°F (200°C). Brush the tops of the pastries with an egg wash made from 1 beaten egg mixed with 1 tablespoon of milk. This gives them a golden color when baked. Place them in the oven for 15 to 20 minutes. Keep an eye on them. They should puff up and turn golden brown. Once done, take them out and let them cool for a few minutes before serving. Enjoy your Delightful Raspberry Danish! To make your Danish nice and puffy, you need to keep the pastry cold. Cold butter in the dough makes it flaky. Avoid pressing too hard when rolling it out. This keeps the layers intact. To avoid soggy bottoms, use parchment paper. This helps with airflow and prevents moisture from getting trapped. You can also bake on a preheated baking sheet. It gives the bottom a nice crisp. You can boost the flavor of your filling. Try adding a pinch of cinnamon or nutmeg. A few drops of almond extract can make it special. For serving, consider a scoop of vanilla ice cream. It pairs well with the tartness of the raspberries. Make your Danish look fancy by dusting it with powdered sugar. It adds a sweet touch and looks great. You can also add whole raspberries on top. A sprig of mint adds a nice pop of color. These little details impress your guests. {{image_2}} For a dairy-free Delightful Raspberry Danish, you can swap cream cheese for a vegan option. Use a vegan cream cheese made from nuts or soy. This keeps the texture creamy and rich. You can also try different fruit fillings. Instead of raspberries, use blueberries, strawberries, or peaches. Each fruit adds its own flavor and twist to the pastry. Do you want to mix things up? Add different berries to your filling! Blackberries and strawberries make great additions. You can even use a mix of berries for a burst of flavor. Another fun option is to incorporate chocolate or nuts. Adding chocolate chips gives a sweet touch. Chopped nuts like almonds or walnuts add a nice crunch. Both options will enhance your Danish experience! If you need a gluten-free Delightful Raspberry Danish, look for gluten-free puff pastry. Many brands offer this option now. It works just like the regular kind. You can also use alternative flours in your dough. Almond flour or oat flour can work well. Just remember to adjust the liquid since different flours absorb moisture differently. To keep your Delightful Raspberry Danish fresh, store it in an airtight container. This helps prevent drying out. Place parchment paper between layers to avoid sticking. Use a container that fits the pastries well. It will keep them safe without squashing them. You can freeze both raw and baked Danish. To freeze raw pastries, assemble them but do not bake. Place them on a baking sheet and freeze until firm. Then, transfer the pastries to a freezer bag. Seal tightly, removing as much air as possible. For baked Danish, let them cool completely first. Wrap each pastry in plastic wrap, then place them in a freezer bag. They can last up to three months in the freezer. To thaw, move the pastries to the fridge overnight. For reheating, place baked Danish in a preheated oven at 350°F (175°C) for about 10 minutes. This warms them up and keeps the pastry crisp. A Delightful Raspberry Danish is a sweet pastry made with puff pastry and fresh raspberries. It has a creamy filling of cream cheese and a hint of vanilla. This pastry is light, flaky, and packed with flavor. You can enjoy it as a dessert or a special treat any time of day. Yes, you can use frozen raspberries. They are convenient and save time. However, there are some pros and cons. Pros: - Frozen raspberries are often available year-round. - They save time since you don't need to wash or stem them. Cons: - Frozen raspberries can be mushy after thawing. - They may release extra juice, which can make the pastry soggy. If you use frozen raspberries, try to drain any excess juice before mixing them with the sugar and cornstarch. To reheat leftover pastries, use the oven for best results. Preheat the oven to 350°F (175°C). Place the pastries on a baking sheet. Heat for about 10-15 minutes until warm. You can also use a microwave, but the pastry may become soft. If you choose this method, heat for just 15-20 seconds at a time. Serve a Raspberry Danish warm for the best taste. You can dust it with powdered sugar for a pretty touch. Pair it with a scoop of vanilla ice cream or a dollop of whipped cream. Fresh mint leaves also add a nice color and flavor. For a lovely presentation, place the pastries on a nice platter. Add a few whole raspberries around them for extra charm. For the complete recipe with all ingredients and step-by-step guide, check out the [Full Recipe](#). In this blog post, we explored making a Delightful Raspberry Danish. We covered the main ingredients, tools needed, and step-by-step instructions. You learned how to prepare the puff pastry and make a fresh raspberry filling. We shared tips for perfecting your pastry and ways to enhance flavor. Don’t forget the variations for dairy-free and gluten-free options. Enjoy this easy treat fresh, or store it properly for later. This Danish is sure to impress any guest, or you can savor it yourself. Happy baking!
Delightful Raspberry Danish Easy and Tasty Dessert
Are you ready to impress your friends and family with a scrumptious dessert? A Delightful Raspberry Danish is an easy and tasty treat that you
- 1 package of pre-made puff pastry (thawed) - 8 oz cream cheese, softened - 1/4 cup sugar - 1 egg yolk - 1 teaspoon vanilla extract - 1 tablespoon lemon juice - 1 egg (for egg wash) - 1 tablespoon milk (for egg wash) - Powdered sugar (for dusting, optional) To make this Easy Breakfast Cheese Danish, gather these ingredients first. The puff pastry is key. It gives you that flaky, buttery base. I love using pre-made pastry because it saves time and effort. Cream cheese adds a rich and creamy filling. The sugar sweetens it just right. Use an egg yolk for color and richness in the filling. Vanilla extract and lemon juice add nice flavor notes. The egg wash, made with the egg and milk, helps the pastry turn golden brown when baking. You can dust the final treats with powdered sugar for a sweet touch, but this is optional. These ingredients come together to create a delightful treat. They make breakfast feel special. For the full recipe, follow the steps ahead. First, I preheat the oven to 375°F (190°C). This step is key for crisp pastry. While the oven warms up, I line a baking sheet with parchment paper. This keeps the cheese danish from sticking and makes cleanup easy. Next, I take the pre-made puff pastry from the fridge. Make sure it is fully thawed. I roll it out on a lightly floured surface. The goal is to get it to about 1/4 inch thick. Then, I cut the pastry into 4 squares. Each square will hold the creamy filling. Now, I mix the filling. I start with 8 oz of softened cream cheese in a bowl. Then, I add 1/4 cup of sugar and 1 egg yolk. I also put in 1 teaspoon of vanilla extract and 1 tablespoon of lemon juice. I mix it all until smooth. This mixture will add a sweet and tangy taste to the danish. For assembly, I place a spoonful of the cheese filling in the center of each pastry square. I fold the corners of the square toward the center. This creates a pinwheel shape. I press the edges to seal them well. This step keeps the filling from leaking while baking. In a small bowl, I whisk 1 egg with 1 tablespoon of milk to make the egg wash. I brush this mixture over the tops of the pastries. This gives them a nice golden color. I bake the danish in the preheated oven for 20-25 minutes. They should puff up and turn golden brown. Once done, I let them cool slightly. If I want, I dust them with powdered sugar before serving. For the full recipe, check out the [Full Recipe]. To get great puff pastry, first, ensure the right thickness. Roll it to about 1/4 inch. Thin pastry can burn, while thick pastry may not puff well. Next, work with cold pastry. Keep it in the fridge until ready. Cold pastry puffs better in the oven. You can add flavor to the cheese filling. Try mixing in lemon zest or fresh herbs. These flavors brighten the dish. Using different spices or extracts can change the taste too. For a twist, try almond extract or cinnamon. A little can go a long way. Presentation makes food more appealing. Dust the baked Danish with powdered sugar. This adds a sweet touch and looks lovely. For creative serving ideas, place them on a colorful plate. You can also add fresh fruit around them. This makes your dish pop and adds flavor. {{image_2}} You can add fresh or canned fruits to your cheese danish. Berries, peaches, or apples work great. If you use fresh fruit, chop it small. For canned fruit, drain it well. This keeps the filling from getting too wet. Adjust the cheese filling by adding a bit of fruit juice for flavor. You might want to cut down on the sugar too, depending on how sweet your fruit is. Try herbs and veggies for a savory twist! Mix in chopped spinach, garlic, or herbs like dill or chives. Adding some crumbled feta or goat cheese can kick it up a notch. Make sure to sauté any veggies first. This brings out their flavors and helps them soften. You can even top your danish with a sprinkle of cheese before baking. Don’t worry if you need gluten-free or vegan options! For gluten-free, use a gluten-free puff pastry. Many stores sell this now. For vegan, swap the cream cheese for a dairy-free version. You can use mashed tofu mixed with a bit of lemon juice. Replace the egg with a flax egg or a vegan egg substitute. This way, everyone can enjoy a tasty danish! For the full recipe, check out the Cheesy Morning Delight Danish. Store leftover cheese danish in an airtight container. This keeps them fresh. You can place them in the fridge for up to three days. To freeze cheese danish, you can do it before or after baking. If freezing before baking, wrap each piece in plastic wrap. This prevents freezer burn. For baked danish, let them cool first. Then, place them in a freezer bag. They stay fresh for up to three months. To reheat your cheese danish, use the oven for the best texture. Preheat the oven to 350°F (175°C). Place the danish on a baking sheet for about 10-15 minutes. This warms them without making them soggy. You can also use a microwave, but this may make them soft. For the microwave, heat them for about 30 seconds. Making Easy Breakfast Cheese Danish takes about 40 minutes. You will spend around 15 minutes on prep. Baking takes 20 to 25 minutes. This time is perfect for a quick morning treat. Yes, you can use homemade pastry. But, keep in mind that it needs to be rolled out thin. The dough must be cold to puff up well. If you choose to make it from scratch, plan for extra time. If your pastry does not puff, check a few things. First, ensure the dough is cold. Warm dough will not create the right layers. Second, use a light touch when rolling. Lastly, avoid overworking the dough, as this can lead to dense pastry. You can prepare some parts in advance. Make the cheese filling and store it in the fridge. You can also cut the pastry squares ahead of time. Just remember to bake them fresh for the best taste. For the full recipe, check out the details above. You now understand how to make an Easy Breakfast Cheese Danish. We covered ingredients, step-by-step instructions, and tips to perfect your pastry. Don't forget the fun variations you can try, from fruity to savory. Now you can enjoy this tasty treat any way you like. Bake a batch for breakfast or save some for later. With these tips, you’ll impress friends and family with your baking skills. Enjoy your delicious creation!
Easy Breakfast Cheese Danish Simple and Tasty Treat
Start your mornings on a sweet note with my Easy Breakfast Cheese Danish! This simple recipe combines crispy puff pastry and a creamy cheese filling,
To make Brownie Crinkle Cookies, you need simple and tasty ingredients. Each one plays a key role in creating that rich, chocolatey flavor. Here’s what you’ll need: - 1 cup semi-sweet chocolate chips - 1/2 cup unsalted butter - 3/4 cup granulated sugar - 1/4 cup packed brown sugar - 2 large eggs - 1 teaspoon vanilla extract - 1 cup all-purpose flour - 1/2 teaspoon baking powder - 1/4 teaspoon salt - 1/2 cup powdered sugar (for rolling) You can find all these items at your local grocery store. Using high-quality chocolate chips makes a big difference. They add depth to the flavor. Unsalted butter allows you to control the saltiness in the cookie. Make sure your eggs are at room temperature. This helps them mix in better. Also, sift your flour, baking powder, and salt together. This will ensure even mixing and a light texture. If you want to dive deeper into the recipe, check out the Full Recipe for detailed steps. Happy baking! First, you need to preheat your oven to 350°F (175°C). This step is key for even baking. Next, grab a baking sheet and line it with parchment paper. This helps the cookies not stick and makes cleaning easy. Now, let’s melt the chocolate and butter. Take a microwave-safe bowl and add 1 cup of semi-sweet chocolate chips and 1/2 cup of unsalted butter. Microwave them in 20-second intervals. Stir in between until the mix is smooth and fully melted. This rich blend gives the cookies their deep flavor. In a mixing bowl, whisk together 3/4 cup of granulated sugar, 1/4 cup of brown sugar, 2 large eggs, and 1 teaspoon of vanilla extract. You want this mixture to be smooth and a bit frothy. It adds sweetness and lightness to the cookies. Then, pour the melted chocolate mix into your sugar mix. Stir until it combines well. In a different bowl, whisk together 1 cup of all-purpose flour, 1/2 teaspoon of baking powder, and 1/4 teaspoon of salt. Gradually add this dry mix to the wet mix, stirring just until combined. Don’t overmix; we want soft, fudgy cookies. After mixing, chill the dough in the fridge for about 30 minutes. This makes the dough easier to handle and helps with the crinkle effect. After chilling, it’s time to shape the cookies. Use a tablespoon to scoop the dough and roll it into balls. Then, roll each ball in 1/2 cup of powdered sugar until it’s fully coated. This gives them their unique look. Place the dough balls on the prepared baking sheet, spacing them about 2 inches apart. Bake these cookies for 10 to 12 minutes. You want the edges to be set, and the tops should look crinkled. Once baked, take them out and let the cookies cool on the baking sheet for 5 minutes. After that, transfer them to a wire rack to cool completely. Now you have delicious Brownie Crinkle Cookies! For the full recipe, check out the earlier section. To get that lovely crinkle on your cookies, chilling the dough is key. When you chill the dough, it firms up and helps control spread while baking. This means your cookies will maintain their shape and rise beautifully. Aim to chill your dough for at least 30 minutes. Now, let's talk about baking time and temperature. Preheat your oven to 350°F (175°C). Bake your cookies for 10-12 minutes. Keep an eye on them! You want the edges set but the tops to look slightly soft. This will help you achieve that perfect chewy center. You can easily enhance the flavor of your Brownie Crinkle Cookies. One way is to substitute ingredients. For a richer taste, try using dark chocolate chips instead of semi-sweet. Dark chocolate has a more intense flavor that adds depth. You can also mix in different types of chocolate. For example, white chocolate chips or even mint chocolate chips can create a fun twist. Each type of chocolate brings its own unique flavor to the cookie, making them even more irresistible. {{image_2}} To make Brownie Crinkle Cookies even more fun, you can play with flavors. - Adding nuts or chocolate chunks: You can mix in nuts like walnuts or pecans. These add a nice crunch. You might also try chocolate chunks for extra chocolate goodness. Just fold them into the batter before chilling. - Incorporating spices or extracts: Want to spice things up? Add a pinch of cinnamon or a dash of espresso powder. These flavors enhance the chocolate. You can also try almond or peppermint extract for a twist. Just a little goes a long way! You can adjust this recipe to fit different diets. - Gluten-free adaptations: If you need a gluten-free option, swap the all-purpose flour for a gluten-free blend. Many blends work well. Just make sure your other ingredients are also gluten-free. - Vegan alternatives: To make these cookies vegan, replace the eggs. You can use flaxseed meal mixed with water or applesauce. Use vegan butter in place of regular butter. This way, you still get that rich taste without any animal products. Feel free to experiment with these variations. Each change brings a new twist to your Brownie Crinkle Cookies. For a full recipe, check out the details above! To keep your brownie crinkle cookies fresh, use an airtight container. This will help lock in moisture and flavor. You can separate layers with parchment paper to avoid sticking. Store the cookies at room temperature, away from heat and light. This keeps them soft and chewy. If you live in a humid area, consider chilling them in the fridge. Brownie crinkle cookies last about 5 to 7 days at room temperature. If you want them to last longer, freezing is a great option. Place the cookies in a freezer-safe bag or container. They can stay fresh for up to three months in the freezer. When you’re ready to enjoy them, just thaw and savor! What contributes to the crinkle effect? The crinkle effect comes from two main factors. First, the dough must be chilled before baking. This helps create those lovely cracks. Second, rolling the dough in powdered sugar adds a layer that helps the cookies rise. As they bake, the sugar crust forms, leaving cracks on top. This process gives the cookies their signature look. Can these cookies be made in advance? Yes, you can make these cookies in advance! You can prepare the dough and chill it in the fridge for up to three days. For longer storage, roll the dough into balls, then freeze them. When you are ready to bake, just pull them out and bake them straight from the freezer. This way, you can enjoy warm cookies anytime. Best pairings for Brownie Crinkle Cookies Brownie Crinkle Cookies pair well with many treats. A tall glass of cold milk is a classic choice. You can also serve them with coffee or hot chocolate for a cozy treat. For a fun twist, try serving them with a scoop of vanilla ice cream. The warm cookies and cold ice cream make a delightful dessert. How to serve for parties or gatherings When serving at parties, stack the cookies on a tiered platter for a beautiful display. Dust them lightly with more powdered sugar for a special touch. You can also offer a variety of dips, like chocolate or caramel sauce, for guests to enjoy. This makes your cookie table fun and interactive. In this blog post, we explored the sweet world of Brownie Crinkle Cookies. We discussed the key ingredients needed and the step-by-step method for making them. You learned tips for achieving the perfect crinkle and ways to customize flavors. I also shared storage tips to keep your cookies fresh. Whether you prefer nutty bites or gluten-free options, there’s a recipe for you. Enjoy baking and sharing these delicious treats with others!
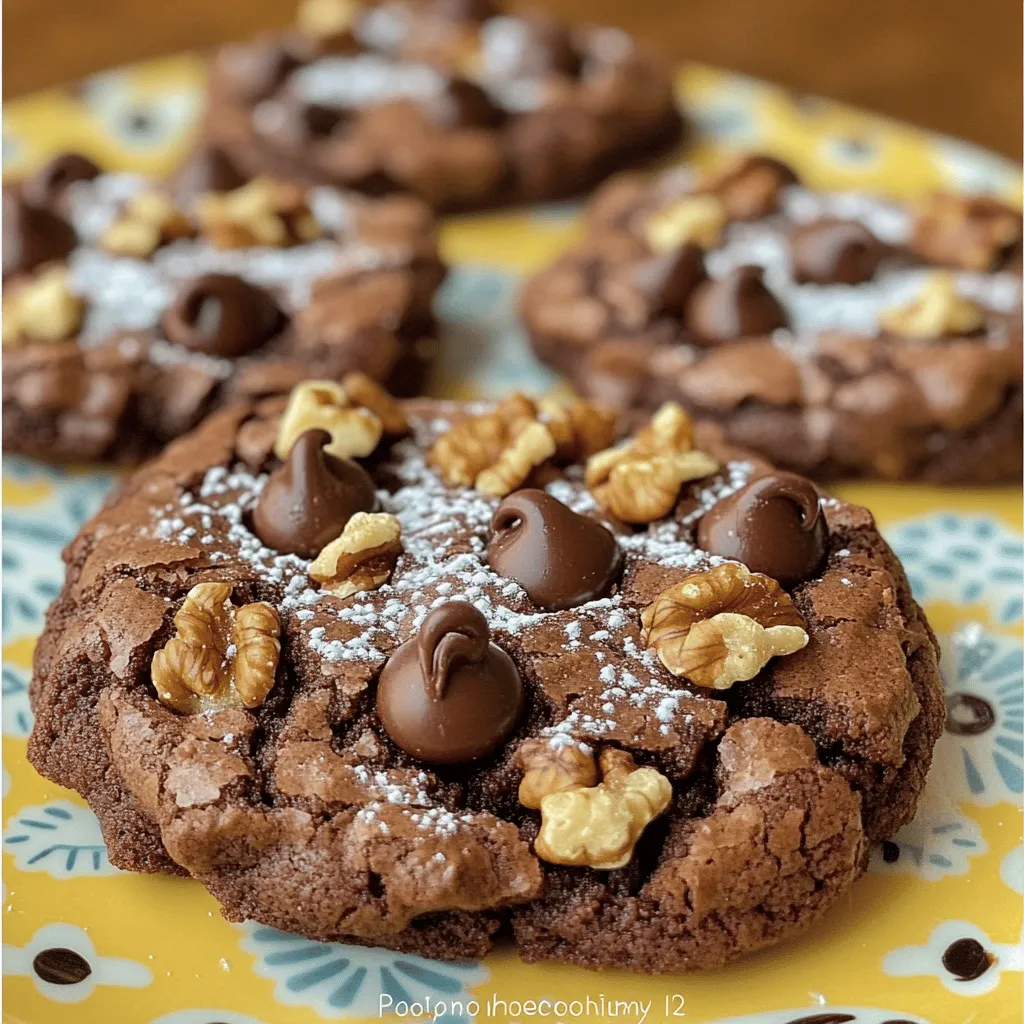
Brownie Crinkle Cookies Irresistible Chocolate Treat
If you crave chocolate, then you’ll love Brownie Crinkle Cookies! They bring all the rich, fudgy goodness of brownies, but with an irresistible cookie twist.
To make decadent white chocolate raspberry cheesecake cookies, gather the following ingredients. Each piece plays a vital role in achieving that creamy, fruity flavor with a touch of sweetness. - 1 cup unsalted butter, softened - 1 cup cream cheese, softened - 1 cup granulated sugar - 1 cup brown sugar, packed - 2 large eggs - 1 teaspoon vanilla extract - 3 cups all-purpose flour - 1 teaspoon baking soda - 1/2 teaspoon salt - 1 cup white chocolate chips - 1 cup fresh raspberries, gently halved - 1/2 cup powdered sugar (for dusting) Each ingredient brings something special. The cream cheese adds richness. The white chocolate chips melt in your mouth, while fresh raspberries give a burst of flavor. This blend creates a cookie that feels like a dessert and tastes divine. You can find the full recipe to make these cookies and indulge in their deliciousness. Enjoy the process of mixing and baking as much as the sweet treat itself! 1. Preheating the Oven and Preparing the Baking Sheets Start by preheating your oven to 350°F (175°C). This step is key for even baking. Next, line two baking sheets with parchment paper. This helps prevent sticking and makes cleanup easy. 2. Creaming the Butter and Sugars In a large mixing bowl, add 1 cup of softened butter and 1 cup of cream cheese. Then, add 1 cup of granulated sugar and 1 cup of brown sugar. Mix these together until the mixture is light and fluffy. This should take about 3 to 4 minutes. The fluffy texture is crucial for soft cookies. 3. Incorporating Eggs and Vanilla Add 2 large eggs to the bowl one at a time, mixing well after each addition. Then, pour in 1 teaspoon of vanilla extract. This brings warmth and depth to the flavor of the cookies. 1. Combining Flour, Baking Soda, and Salt In another bowl, whisk together 3 cups of all-purpose flour, 1 teaspoon of baking soda, and 1/2 teaspoon of salt. This blend provides structure and balance to your cookies. 2. Folding in the Chocolate Chips and Raspberries Gradually add the dry mixture to the wet ingredients. Mix until just combined. Next, gently fold in 1 cup of white chocolate chips and 1 cup of fresh raspberries, halved. Be careful not to smash the raspberries too much. You want to keep their shape for bursts of flavor. 1. Dropping Cookie Dough onto Sheets Using a tablespoon or a cookie scoop, drop rounded balls of dough onto your prepared sheets. Space them about 2 inches apart. This gives them room to spread while baking. 2. Baking Duration and Visual Cues Bake in the preheated oven for 12 to 15 minutes. Look for lightly golden edges, while the centers should still seem soft. This contrast gives the perfect cookie texture. 3. Cooling Instructions After baking, let the cookies cool on the sheets for about 5 minutes. This helps them set. Then, transfer them to wire racks to cool completely. Once cooled, you can dust them lightly with powdered sugar for a lovely touch. For the full experience, check the Full Recipe for additional tips and precise measurements! How to Avoid Overmixing Overmixing can lead to tough cookies. Mix until just combined. When adding the flour, stir gently. This lets the cookies stay light and fluffy. Tips for Perfectly Soft Centers Keep an eye on your baking time. Pull the cookies out when the edges are golden but the centers look soft. Let them cool on the sheet for a few minutes. This helps the centers stay soft. Creative Serving Ideas Arrange the cookies on a pretty plate. Drizzle melted white chocolate over them for extra flair. You can also stack them in a clear jar. This makes a lovely gift. How to Dust with Powdered Sugar Use a fine sieve to dust powdered sugar over the cookies. Hold it high above the cookies for an even sprinkle. This adds a beautiful touch and makes them look fancy. Preventing Raspberry Crush Gently fold in the raspberries. This way, they won’t get smashed. You want nice, whole pieces in each cookie for the best taste. Ensuring Even Baking Make sure to space the dough balls two inches apart on the baking sheet. This gives them room to spread. Rotate the sheets halfway through baking for even heat distribution. {{image_2}} You can mix up the taste of your cookies by changing the chocolate. Instead of white chocolate, try dark or semi-sweet chocolate. This gives a rich flavor that pairs well with raspberries. You can also add a bit of citrus zest. Lemon or orange zest brightens the cookies and adds a nice twist. If you need gluten-free cookies, swap regular flour for gluten-free flour. This keeps the texture light and tasty. For vegan options, replace butter with coconut oil and use a plant-based cream cheese. You can also try flax eggs instead of regular eggs. These changes keep the cookies delicious and friendly for various diets. Change your fruit based on the season. In summer, try peaches or strawberries. In fall, use apples or pumpkin puree. You can also theme your cookies for holidays. Decorate them with colored icing for birthdays or festive sprinkles for the holidays. These seasonal tweaks make your cookies fun and special for any occasion. For the full recipe, check out my White Chocolate Raspberry Cheesecake Cookies . To keep your White Chocolate Raspberry Cheesecake Cookies fresh for a few days, store them in an airtight container. Line the bottom of the container with parchment paper. Place the cookies in a single layer, ensuring they don’t touch. If you have many cookies, add parchment paper between layers. This method keeps them soft and prevents sticking. For longer storage, you can freeze both cookie dough and baked cookies. To freeze cookie dough, scoop rounded dough balls onto a baking sheet. Freeze them until firm, then transfer to a freezer-safe bag. Label the bag with the date. For baked cookies, cool them completely, then wrap each cookie in plastic wrap. Place them in a freezer-safe container or bag. They can last up to three months in the freezer. When you’re ready to enjoy your cookies again, simply place them on a baking sheet. Heat them in a preheated oven at 350°F (175°C) for about 5-7 minutes. This will help revive their softness. For microwave reheating, heat them for about 10-15 seconds. This method softens them nicely. Always check to make sure they don’t get too hot. Enjoy each bite as if they were just baked! To make these cookies from scratch, start with softened butter and cream cheese. Mix them with granulated and brown sugar until fluffy. Then, add eggs and vanilla. In another bowl, whisk flour, baking soda, and salt. Combine both mixtures and fold in white chocolate chips and raspberries. Finally, scoop dough onto baking sheets and bake until golden. For the full recipe, check the details above. Yes, you can use frozen raspberries. They work fine but may release more juice. This can make your cookies a bit softer. If you choose frozen, do not thaw them before adding to the dough. Gently fold them in to minimize juice release. Store the cookies in an airtight container. This keeps them fresh for several days. If you want to keep them longer, consider freezing them. Just make sure to wrap them well to avoid freezer burn. To make a smaller batch, simply divide the ingredients in half. For instance, use half a cup of butter and cream cheese. Adjust the baking time if needed, as smaller cookies may bake faster. Yes, you can use mascarpone cheese or a thick yogurt. These options give a similar creamy texture. If you need a dairy-free option, try a plant-based cream cheese. Just keep in mind the flavor might slightly change. This blog post covered everything you need to whip up delicious White Chocolate Raspberry Cheesecake Cookies. We discussed the essential ingredients, step-by-step preparation, and helpful tips to perfect your baking. You now have options for flavor variations and dietary needs to suit any preference. Don't forget to store your cookies properly to keep them fresh. Baking can be a fun and rewarding experience, so get your ingredients ready. Enjoy creating tasty treats that everyone will love!
Decadent White Chocolate Raspberry Cheesecake Cookies
If you’re craving a sweet treat that’s both rich and fruity, you’ve found it! These Decadent White Chocolate Raspberry Cheesecake Cookies blend creamy white chocolate
To make Raspberry Cream Cheese Bites, gather these key ingredients: - 1 package (8 oz) cream cheese, softened - 1/4 cup powdered sugar - 1 teaspoon vanilla extract - 1/2 cup fresh raspberries, plus extra for garnish - 1 package (1 lb) phyllo pastry dough, thawed - 1/2 cup unsalted butter, melted - 1/4 cup chopped pistachios (optional, for garnish) - Fresh mint leaves for garnish (optional) Using fresh raspberries is crucial. They add a bright, tart flavor that pairs well with the creamy cheese. Frozen raspberries may work, but they can lose texture and taste. Fresh raspberries provide a burst of juiciness that makes each bite special. You will need a few simple tools to make this recipe easy: - Mixing bowl and whisk - Baking sheet and parchment paper A mixing bowl helps combine the cream cheese and sugar smoothly. A whisk ensures you mix everything evenly. Use a baking sheet lined with parchment paper to prevent sticking and make cleanup a breeze. These tools make the process quick and fun! 1. Preheat your oven to 350°F (175°C). This makes sure your bites bake evenly. 2. Prepare the phyllo dough by rolling it out on a clean surface. Cut it into squares that are about 4x4 inches. This size works great for filling. 3. Mix the cream cheese filling. In a mixing bowl, beat together 8 oz of softened cream cheese, 1/4 cup of powdered sugar, and 1 teaspoon of vanilla extract. Keep mixing until it’s smooth and creamy. 4. Fold in the fresh raspberries gently. Use about 1/2 cup. Be careful not to crush them. Set this mixture aside while you work on the dough. 1. Layer your phyllo squares. Brush a square of phyllo dough with melted butter. Place another square on top and brush it again. Do this for three layers. 2. Add the filling. Place a tablespoon of your raspberry cream cheese mixture in the center of your layered phyllo. This is where all the flavor lives! 3. Seal the bites. Fold the corners of the phyllo over the filling. Pinch the edges to keep everything inside. This way, they won’t leak during baking. 4. Brush with butter again. Place your assembled bites on a parchment-lined baking sheet. Give the tops a final brush of melted butter for a golden finish. 1. Bake the bites in your preheated oven for 15-20 minutes. Look for a golden brown color. 2. Achieving that perfect finish is key! Keep an eye on them as they bake. If they start to brown too quickly, reduce the heat slightly. 3. Once done, remove them from the oven and let them cool for a few minutes. This will help them set properly. Enjoy the delicious aroma that fills your kitchen as they bake! For the complete flavor experience, don’t forget to check the full recipe. To get great Raspberry Cream Cheese Bites, the texture is key. Start with the cream cheese. You want it soft and smooth. If it’s too cold, it won’t mix well. Let it sit at room temperature for about 30 minutes before using. This helps you blend it easily with the powdered sugar and vanilla. Next, let’s talk about phyllo dough. This dough can be tricky. It dries out quickly, which makes it hard to work with. To keep it moist, cover the sheets with a damp cloth while you work. This will help you layer the dough without it cracking. Always brush each layer with melted butter for that crispy finish. When it comes to serving, presentation matters! Garnish your Raspberry Cream Cheese Bites with fresh berries. This adds color and makes them pop. You can also sprinkle chopped pistachios on top for a crunchy texture. If you want something extra, add mint leaves for freshness. For parties, arrange the bites on a nice platter. You can even serve them with a side of whipped cream or a fruit dip. This will impress your guests and make your treat stand out. You can find the Full Recipe for all the details on making these delicious bites. {{image_2}} You can play with flavors in your raspberry cream cheese bites. Use different fruits to change the taste. Blueberries and strawberries work great. They add a sweet twist and a pop of color. You can also add spices for more warmth. Cinnamon gives a cozy taste. Nutmeg can add a nice touch too. Sprinkle a little in your cream cheese mix. This will make your bites unique and fun! If you need gluten-free options, look for gluten-free phyllo dough. Many brands offer it, and it tastes just as good. You can find it in health food stores or online. For vegan options, swap the cream cheese for a plant-based cream cheese. These substitutes work well and keep the bites creamy. You can still enjoy the same great flavors while meeting your dietary needs. These variations keep your raspberry cream cheese bites fresh and exciting! For the complete recipe, check the [Full Recipe]. Store unbaked Raspberry Cream Cheese Bites in the fridge. Place them on a baking sheet and cover with plastic wrap. This keeps them fresh. You can store them for up to two days before baking. For baked bites, let them cool first. Then, place them in an airtight container. You can keep baked bites in the fridge for about three days. Reheat them in the oven at 350°F for about 5-10 minutes to get them crispy again. To freeze unbaked bites, follow these steps: 1. Assemble the bites as usual. 2. Lay them on a baking sheet, not touching each other. 3. Freeze for an hour or until solid. 4. Move them to a freezer-safe bag or container. You can store them frozen for up to a month. When you're ready to bake, do not thaw. Just bake them straight from the freezer. For baked bites, let them cool completely. Then, place them in a freezer-safe bag. They freeze well for up to two months. To reheat, thaw them in the fridge overnight, then warm in the oven. To keep texture and flavor, avoid microwaving. The oven is the best way to reheat, ensuring they stay crispy and delicious. Can I use frozen raspberries instead of fresh? Yes, you can use frozen raspberries! Just let them thaw first. Drain excess liquid to avoid a soggy filling. Fresh raspberries offer a better flavor, but frozen ones work well in a pinch. They also help keep the bites cool while you prepare. How do I make these bites ahead of time? You can prepare the filling and phyllo bites in advance. Make the cream cheese mixture and fill the phyllo squares. Store them in the fridge for up to a day before baking. Just remember to brush them with butter before you bake. What can I serve with Raspberry Cream Cheese Bites? These bites pair well with sweet dips. Consider serving them with a chocolate sauce or a berry compote. You can also add a dollop of whipped cream for a fun twist. They make a great dessert at parties or gatherings. Can I use a different type of cheese for the filling? Absolutely! You can try mascarpone or ricotta cheese for a different taste. Both options will give your bites a unique flavor. Just make sure the cheese is creamy to maintain the right texture. For the full recipe, check out the details to create these tasty treats! In this blog post, I shared a detailed guide on making delicious raspberry cream cheese bites. We covered essential ingredients, step-by-step instructions, and helpful tips for success. Fresh raspberries are key for flavor, while phyllo dough adds crunch. You can also explore variations to suit your taste or dietary needs. Remember, these bites are perfect for sharing at gatherings. Enjoy the process and get creative with your fillings for unique flavors. With practice, you’ll master this treat and impress your friends and family.
Raspberry Cream Cheese Bites Easy and Tasty Treat
Looking for a simple yet delightful treat? You’ve found it! Raspberry Cream Cheese Bites are the perfect mix of sweet and creamy, ideal for any
- Granulated sugar: Use 1 cup (200g) of granulated sugar. It adds sweetness and helps the cookies rise. - Brown sugar: Use 1/2 cup (100g) of packed brown sugar. Packed means you press it into the measuring cup. This sugar adds moisture and a rich flavor. - Unsalted butter: Use 1/2 cup (115g) of unsalted butter, melted. Unsalted lets you control the salt in your cookies. - Chocolate chips: Choose between semi-sweet or dark chocolate chips. Semi-sweet has a balanced sweetness, while dark chocolate offers a more intense flavor. - Nuts: You can add 1/2 cup (90g) of chopped walnuts or pecans. Walnuts provide a more bitter taste, while pecans are sweeter and softer. - Gluten-free options: To make gluten-free cookies, swap all-purpose flour with a gluten-free blend. Check that your chocolate chips and other ingredients are also gluten-free. For the full recipe, check out the 20-Minute Fudgy Chocolate Brownie Cookies. First, preheat your oven to 350°F (175°C). This step is crucial for baking cookies evenly. While the oven warms up, get your baking sheet ready. Line the sheet with parchment paper to prevent sticking. This will make cleanup easier and keep your cookies intact. In a large bowl, combine the granulated sugar, brown sugar, and melted butter. Mix these until they look smooth and creamy. This blend gives your cookies a rich taste. Next, add the eggs one by one. This step is important. Mixing in each egg fully helps create a nice, fluffy texture. Now, it’s time to mix the dry and wet ingredients. Sift in the flour, cocoa powder, baking powder, and salt. Gently fold these into the wet mix. Be careful not to over-mix. This keeps your cookies fudgy. Bake the cookies for 10 to 12 minutes. The edges should look firm, but the centers can be soft. This is what makes them fudgy. After baking, let the cookies cool on the sheet for about 5 minutes. This helps set them. Then, move them to a wire rack to cool completely. For serving, enjoy these cookies warm. They pair well with a glass of milk. You can also store them in an airtight container for up to a week. For a special touch, dust them with powdered sugar before serving. For the full recipe, check out the detailed steps above. To get your brownie cookies fudgy, avoid over-mixing the batter. When you fold in the dry ingredients, do it gently. Stop mixing as soon as the flour disappears. Over-mixing adds air, making cookies less dense. Baking time is key too. If you live at a high altitude, reduce the time a bit. For humid days, check your cookies a minute earlier. They should look set around the edges but still soft in the middle. You can take these cookies to the next level by adding different extracts. Almond or hazelnut extracts can add a lovely twist to your brownie cookies. Just a teaspoon can make a big difference in taste. Spices also work wonders. A pinch of cinnamon gives a warm depth to the flavor. You can even try a bit of espresso powder for a rich chocolate boost. Mix and match until you find your favorite flavor combo! {{image_2}} You can make these cookies your own with fun mix-ins. Try using different types of chocolate. White chocolate or milk chocolate can add a sweet twist. You can even mix semi-sweet with dark chocolate for a richer flavor. Dried fruits also work great in these cookies. I love adding cranberries or cherries. They give a tart taste that pairs perfectly with the sweetness. You can also try raisins or even chopped apricots. The options are endless! Want to make these cookies vegan? You can easily swap out some ingredients. For eggs, use flaxseed meal or applesauce. Both work well to bind the dough without eggs. For butter, look for dairy-free alternatives. Coconut oil or vegan butter are great choices. Make sure to choose a dairy-free chocolate too. This way, everyone can enjoy these fudgy brownie cookies! To keep your cookies fresh, I recommend using an airtight container. This container prevents air from making them dry or hard. A simple glass jar or a plastic box works well. Make sure you let the cookies cool completely before you put them away. You can store them at room temperature for up to a week. If you live in a hot place, it’s best to keep them in the fridge. However, cold storage can change their texture slightly. They might lose some fudginess but will stay fresh longer. If you want to save your cookies for later, freezing is a great option. To freeze unbaked cookie dough, scoop the dough onto a baking sheet. Space them out, then pop the sheet in the freezer for about an hour. Once frozen, transfer the dough balls to a freezer bag. Make sure to label the bag with the date. When you’re ready to bake, just take out what you need. Thaw the cookies in the fridge for a few hours before baking. Bake them straight from the freezer for an extra minute or so. Enjoy fresh cookies any time! Check the full recipe for more tips on baking. To make your cookies chewy, you can use a few simple tricks. First, try adding an extra egg yolk. This adds moisture and richness. You can also use less flour in your mix. Aim for a slightly thicker dough. When you mix the dough, don’t overdo it. Just mix until the ingredients blend. This keeps the cookies soft. Lastly, bake them for a shorter time. Remove them from the oven while still soft in the center. Yes, you can use coconut sugar in place of regular sugar. Coconut sugar gives a lovely caramel flavor. The texture may change a bit. Your cookies may be less sweet but still tasty. They might also be a bit darker in color. If you want a sweeter cookie, consider adding a bit more chocolate. This helps balance the flavors well. If your cookies spread too much, adjust the dough. Start by chilling the dough for at least 30 minutes. This firms it up and helps cookies hold their shape. You can also add a little extra flour to thicken the dough. Check your oven temperature too. If it’s too hot, cookies will spread quickly. Use an oven thermometer to be sure. This blog post covered essential ingredients and steps for perfect cookies. We explored sugars, butter, and chocolate options. You learned how to mix your ingredients and the importance of baking time. The tips went further, helping you achieve a fudgy texture and enhance flavors. In my experience, making cookies is both fun and rewarding. Experiment with variations, and don’t forget about storage. Enjoy fresh cookies or share them with friends. Follow these guidelines, and you’ll surely impress everyone with your baking skills!
20-Minute Fudgy Chocolate Brownie Cookies Delight
Are you ready to dive into a chocolate lover’s dream? In just 20 minutes, you can whip up fudgy brownie cookies that will melt in
To make these creamy cheesecake crescent rolls, you will need: - 1 can of crescent roll dough - 8 oz cream cheese, softened - 1/2 cup powdered sugar - 1 teaspoon vanilla extract - 1/4 teaspoon almond extract - 1/2 cup fresh blueberries (or fruit of choice) - 1 tablespoon lemon zest - 1 egg (for egg wash) - 1 tablespoon sugar (for sprinkling) You can add fun twists to your rolls with these ingredients: - Chopped strawberries or raspberries for a fruity touch - A sprinkle of cinnamon for warmth and spice - A drizzle of chocolate or caramel sauce for extra sweetness If you run out of an ingredient, here are some easy swaps: - Use ricotta cheese instead of cream cheese for a lighter filling. - Swap powdered sugar for granulated sugar if you don't have any. - Replace almond extract with additional vanilla extract for a different flavor profile. These choices help you create your own version of creamy cheesecake crescent rolls. Check out the Full Recipe for more tips and tricks! First, you need to set your oven to 375°F (190°C). This is the perfect temperature for baking. While the oven heats, take a baking sheet and line it with parchment paper. This will help prevent sticking and make cleanup easy. Now, grab a mixing bowl. Add 8 oz of softened cream cheese. Then, pour in 1/2 cup of powdered sugar. Next, add 1 teaspoon of vanilla extract and 1/4 teaspoon of almond extract. Finally, mix in 1 tablespoon of lemon zest. Stir everything until it is smooth and creamy. This filling is the heart of your rolls and adds a rich flavor. Unroll the can of crescent roll dough. You should see triangles of dough. Take each triangle and spoon about 1 tablespoon of your cheesecake filling onto the wide end. Add a few fresh blueberries on top of the filling. Starting from the wide end, roll up each triangle tightly, making sure the filling stays inside. Place the rolls seam-side down on your baking sheet. In a small bowl, whisk one egg. This egg wash will give your rolls a nice golden color. Brush the egg wash over each crescent roll. Then, sprinkle a little sugar on top for extra sweetness and crunch. Bake your rolls in the oven for 12-15 minutes. They should turn golden brown and smell amazing. Let them cool slightly before you serve. If you want, drizzle any leftover cheesecake mixture over the top for an extra treat. You can find the Full Recipe [here](#). To get the best texture, you want to keep your cream cheese smooth. Make sure it’s softened well before mixing. This helps the filling spread easily in the dough. If your dough is cold, it might tear. So, let it sit out for a few minutes before using. When you roll them, start from the wide end. Roll tightly for a nice shape. The secret to a golden color lies in the egg wash. Whisk the egg well and brush it over each roll. This gives them a nice sheen. Don’t forget to sprinkle sugar on top! It adds sweetness and helps with that golden crust. Bake them until they turn a rich brown. Keep an eye on them as they cook. Serve these rolls warm for the best taste. You can dust them with powdered sugar for a sweet look. Fresh mint leaves also add color and flavor. For extra fun, drizzle any leftover cheesecake mixture on top. Pair them with coffee or tea for a lovely treat. You can find the full recipe to make these delightful rolls! {{image_2}} You can change the fruit in your creamy cheesecake crescent rolls. Try using raspberries, strawberries, or blackberries. They add a nice burst of flavor. If you want something tropical, use diced mango or pineapple. Each fruit gives a different taste and texture. Mixing fruits can also create a fun twist. For example, combine blueberries and strawberries for a summer vibe. You can also play with the flavors of the cheesecake filling. Instead of vanilla, try using lemon or orange zest. This adds a bright note to the rolls. For a chocolate twist, mix in cocoa powder or melted chocolate. If you love spices, add a pinch of cinnamon or nutmeg. These changes can make each batch unique and exciting. If you need a gluten-free version, look for gluten-free crescent roll dough. Many brands offer tasty options that work well. You can find these in most grocery stores. Just follow the same steps as the regular recipe. This way, everyone can enjoy these creamy cheesecake crescent rolls. For the full recipe, check out the Creamy Cheesecake Crescent Rolls guide. To store your leftover creamy cheesecake crescent rolls, let them cool first. Place them in an airtight container. If you have more rolls than you can eat, wrap them tightly in plastic wrap. This keeps them fresh and prevents drying out. Remember to keep them in the fridge if you plan to save them for more than a day. When you’re ready to enjoy your leftover rolls, preheat the oven to 350°F (175°C). Place the rolls on a baking sheet. Cover them lightly with foil. Heat for about 10 to 12 minutes. This helps keep them soft and avoids overcooking. You can also use a microwave, but they may turn out a bit chewy. Heat them for 10 to 15 seconds at a time until warm. These creamy cheesecake crescent rolls can last in the fridge for about three days. If you freeze them, they can last up to three months. Just make sure to wrap them well before freezing. When you’re ready to eat, thaw them in the fridge overnight. Then, reheat as mentioned above. Enjoy your delightful dessert treat fresh! For the full recipe, check out the section above. Yes, you can make these rolls ahead of time. I suggest preparing the cheesecake filling and storing it in the fridge. You can also roll the crescent rolls, place them on a baking sheet, and cover them with plastic wrap. Keep them in the fridge for up to 24 hours. When you are ready to bake, just remove them and let them sit for 10 minutes before brushing with the egg wash. These rolls pair well with many things. I love serving them warm with fresh fruit on the side. A scoop of vanilla ice cream enhances the flavor. You can also try them with a drizzle of chocolate or caramel sauce. For a fun twist, serve with a berry compote for a burst of freshness. If your rolls come out too doughy, it might be due to underbaking. Make sure to bake them until they are golden brown. If they still feel doughy, try increasing the baking time slightly. You can also check your oven temperature with an oven thermometer. Sometimes, ovens run cooler than the set temperature. For more tips, check out the Full Recipe for Creamy Cheesecake Crescent Rolls! In this post, we explored how to make delicious creamy cheesecake crescent rolls. We covered the key ingredients, step-by-step instructions, and helpful tips. You learned about tasty variations and storage methods. Now, you can enjoy these treats any time. Don't hesitate to try different flavors or fruit options. Your homemade crescent rolls will impress everyone. Follow these steps, and you’ll have a sweet delight ready to share.
Creamy Cheesecake Crescent Rolls Delightful Dessert Treat
Are you ready for a dessert that’s easy, creamy, and oh-so-delicious? Let me introduce you to Creamy Cheesecake Crescent Rolls! This delightful treat is perfect
To make these delightful treats, gather these main ingredients: - 1 cup fresh blueberries - 4 oz cream cheese, softened - 2 tablespoons powdered sugar - 1 teaspoon vanilla extract - 6 egg roll wrappers - 1 egg, beaten (for sealing) - Cooking oil (for frying) - 2 tablespoons granulated sugar (for sprinkling) These ingredients work together to create a creamy, sweet filling wrapped in a crispy shell. For a little twist, consider these optional ingredients: - Cinnamon for a gentle spice - Lemon zest for a bright touch - A splash of almond extract for deeper flavor These additions can elevate the taste and add your personal flair. To complement your egg rolls, try one of these dipping sauces: - Blueberry sauce for a fruity dip - Whipped cream for a rich touch - Chocolate sauce for a sweet contrast These sauces can enhance your dessert and bring even more joy to each bite. Enjoy crafting your own unique experience with Blueberry Cream Cheese Egg Rolls. For the complete recipe, check out the [Full Recipe]. Start with a mixing bowl. Add the softened cream cheese, powdered sugar, and vanilla extract. Use a hand mixer or a spatula to blend them together until the mixture is smooth and creamy. This will create a rich base for your egg rolls. Once smooth, gently fold in the fresh blueberries. Be careful not to crush them too much. You want the blueberries to keep their shape. Set this mixture aside for now. Grab your egg roll wrappers. Lay one on a clean surface, with a corner pointing towards you. This makes it easier to fill. Spoon about 2 tablespoons of the blueberry cream cheese mixture into the center. Next, brush the edges of the wrapper with the beaten egg. This helps seal the egg rolls. Fold the bottom corner over the filling first. Then, fold in the sides and roll it up tightly. Make sure to press the edges to seal them well. Repeat this with the rest of the wrappers and filling. Now it's time to fry! In a deep skillet or pot, pour in about 1 inch of cooking oil. Heat the oil over medium heat until it reaches 350°F (175°C). Carefully place a few egg rolls in the hot oil. Fry them for about 2-3 minutes on each side. You want them golden and crispy. Once done, take them out and place them on paper towels to drain any excess oil. While they are still warm, sprinkle granulated sugar on top. If you like, add a bit of cinnamon for extra flavor. Enjoy your beautiful Blueberry Cream Cheese Egg Rolls as a delicious dessert treat! For the full recipe, check above. Frying egg rolls can be tricky. Here are some tips to help you: - Use the right oil: Choose oils like vegetable or canola oil. They have high smoke points. - Heat oil properly: Heat the oil to 350°F (175°C). This helps cook the egg rolls evenly. - Don’t overcrowd the pan: Fry a few at a time. This keeps the oil's temperature steady. - Monitor closely: Fry until golden brown, about 2-3 minutes per side. Soggy egg rolls are no fun! Follow these steps to keep them crispy: - Drain excess oil: Use paper towels after frying to remove oil. - Don’t overfill: Use just 2 tablespoons of filling per egg roll. This helps them seal better. - Serve immediately: Enjoy them fresh out of the fryer for the best crunch. - Keep warm in the oven: If serving later, keep them in a warm oven at 200°F (93°C) to stay crispy. Pair your egg rolls with fun dips and sides: - Dipping sauces: Try blueberry sauce, whipped cream, or chocolate sauce. - Fresh fruit: Serve with more fresh blueberries or strawberries for color. - Ice cream: A scoop of vanilla ice cream is a great contrast to the warm rolls. - Presentation: Use a nice platter and add a sprinkle of powdered sugar on top for a lovely finish. For the complete recipe, check out the [Full Recipe]. {{image_2}} You can change the fruit in these egg rolls for fun. Try strawberries, raspberries, or peaches. Each fruit brings a new flavor. For instance, strawberries add a sweet and tart taste. Raspberries give a slight tanginess, while peaches add a juicy, soft bite. Just make sure to keep the filling creamy, just like with blueberries. If you like your desserts sweeter, add more sugar to the cream cheese mix. Start with an extra tablespoon and taste it. If you want less sweetness, reduce the powdered sugar. You can also use honey or maple syrup for a natural touch. This way, you can make it perfect for your taste buds. If frying isn't your thing, you can bake these egg rolls. Preheat your oven to 375°F (190°C). Place the egg rolls on a baking sheet lined with parchment. Brush them lightly with oil for a golden finish. Bake for about 15-20 minutes until they are crispy. This method cuts down on oil and makes for a lighter dessert. You can still enjoy the same great taste! Check out the Full Recipe for more details. To store leftover egg rolls, let them cool first. Place them in an airtight container. You can keep them in the fridge for up to three days. If you want to enjoy them later, you can freeze them. Just make sure to wrap them tightly in plastic wrap before placing them in a freezer bag. This keeps them fresh and tasty. When you're ready to eat your leftover egg rolls, you want them crispy. The best way to reheat them is in the oven. Preheat your oven to 375°F (190°C). Place the egg rolls on a baking sheet lined with parchment paper. Bake for about 10-15 minutes. This method keeps them crispy and warm without making them soggy. You can also use an air fryer for a quicker option. Just heat them at 350°F (175°C) for about 5-7 minutes. To freeze your egg rolls, place them on a baking sheet in a single layer first. This prevents them from sticking together. Freeze them for about 1-2 hours until solid. Then, transfer them to a freezer bag. You can keep them in the freezer for up to three months. When you're ready to cook them, no need to thaw. Just fry or bake them straight from the freezer for a quick and delicious treat. For the full recipe, refer to the earlier sections. Yes, you can prepare the filling and wrappers ahead. Store the filling in the fridge. Wrap the egg rolls just before frying. This keeps them crisp. You can also freeze the assembled rolls. Just make sure to separate them with parchment paper. Fry them straight from the freezer when ready to enjoy. If you can't find egg roll wrappers, use spring roll wrappers. They are thinner but work well. You can also try using phyllo dough for a flaky texture. Just keep in mind, cooking times may vary. Make sure to adjust based on the wrapper you choose. Leftover egg rolls can last for about 2 to 3 days in the fridge. Store them in an airtight container to keep them fresh. When reheating, use an oven to restore their crispness. Microwaving can make them soggy, so avoid that if possible. For longer storage, consider freezing them. In this post, we explored the tasty world of Blueberry Cream Cheese Egg Rolls. You learned about essential ingredients, step-by-step instructions, and helpful tips for perfecting your dish. We also looked at fun variations and smart storage options. Now you’re ready to make these treats at home. Enjoy sharing them with friends and family. They'll love the flavors and crispy texture. Happy cooking!
Blueberry Cream Cheese Egg Rolls Delicious Dessert Treat
Ready to elevate your dessert game? Blueberry Cream Cheese Egg Rolls combine sweet blueberries and creamy cheese in a crispy wrapper that’s simply irresistible. Whether