Desserts
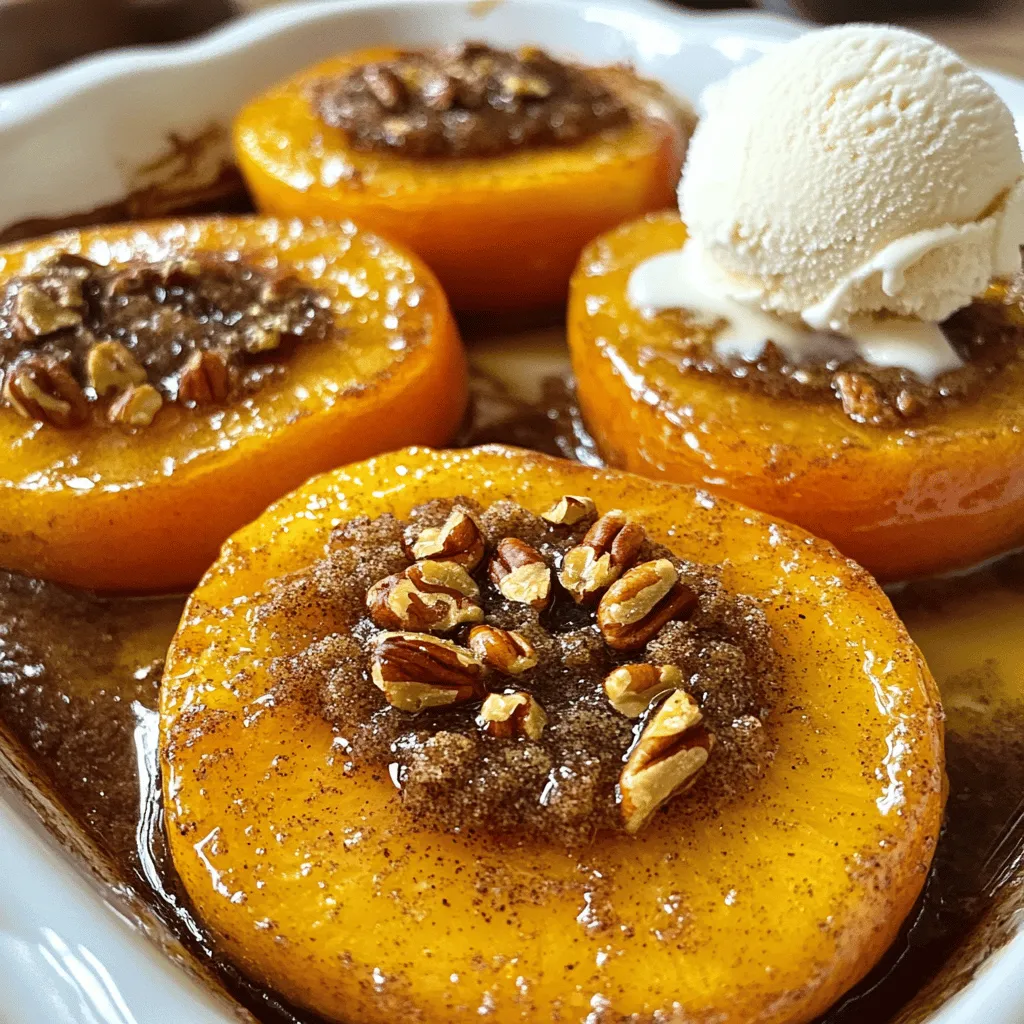
Easy Baked Peaches with Cinnamon Sugar Delight
If you love simple and sweet desserts, you’re in for a treat! My Easy Baked Peaches with Cinnamon Sugar Delight is a game-changer. With minimal
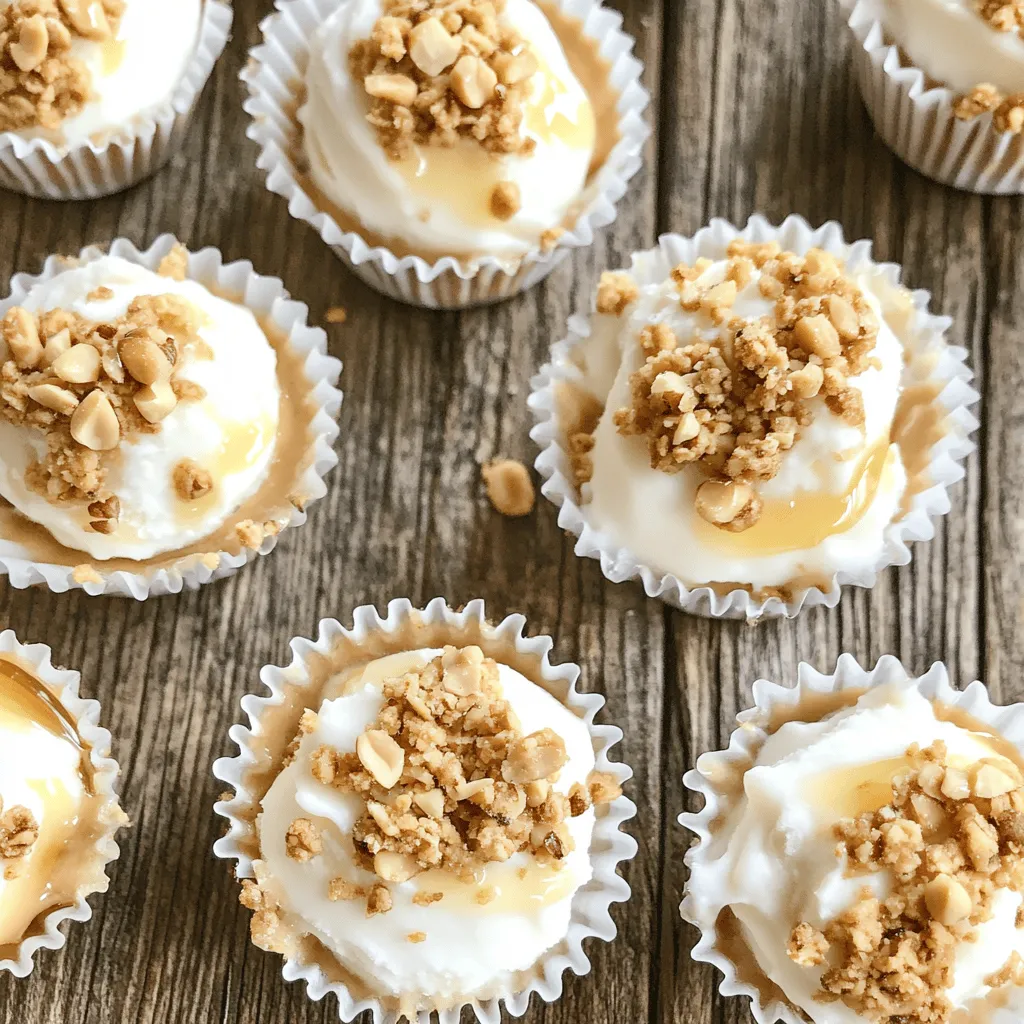
Frozen Greek Yogurt Peanut Butter Bites Delight
Looking for a tasty and healthy treat? Frozen Greek Yogurt Peanut Butter Bites are your answer! These bites are creamy, rich, and packed with protein.

Quick 10-Minute Peanut Butter Chocolate Bark Recipe
Craving a sweet treat that’s quick and easy? Look no further! This 10-minute Peanut Butter Chocolate Bark is your answer. With just a few ingredients,
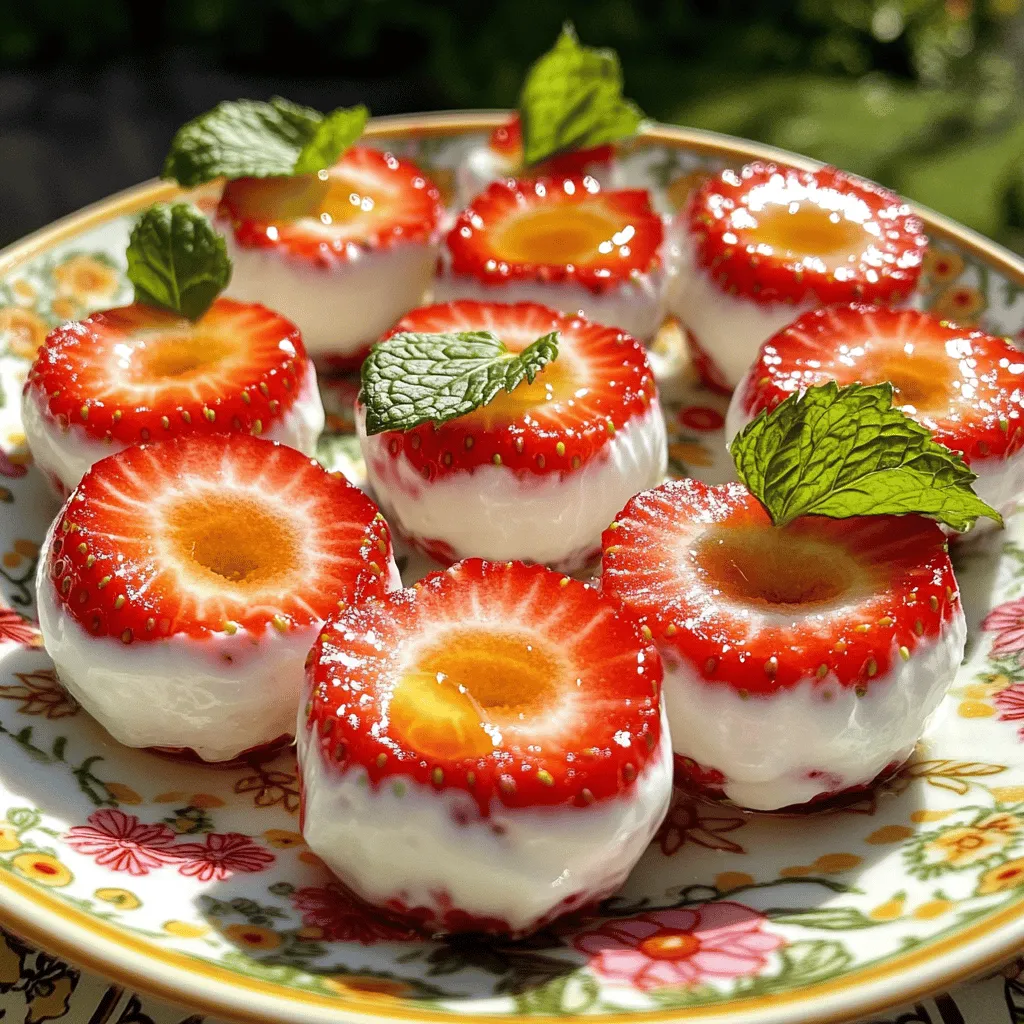
![To make these tasty treats, you need a few simple items. Here’s what you will need: - 1 cup Greek yogurt (plain or vanilla) - 1 cup fresh strawberries, hulled and halved - ½ cup dark chocolate chips - 1 tablespoon coconut oil - Pinch of sea salt These key ingredients work together to create the perfect balance of flavors. The Greek yogurt gives a creamy texture, while the strawberries add fresh sweetness. Dark chocolate provides a rich finish, and coconut oil helps the chocolate melt smoothly. You can enhance your clusters with a few optional ingredients. Consider adding: - 1 tablespoon honey or maple syrup (for extra sweetness) - Fresh mint leaves for garnish Honey or maple syrup can boost sweetness, making the clusters irresistible. Mint leaves add a lovely touch and a burst of freshness when you serve them. Each cluster is not only delicious but also packed with nutrients. Here’s a quick look at what you get with these ingredients: - Greek yogurt provides protein and calcium. - Strawberries are rich in vitamins and antioxidants. - Dark chocolate contains healthy fats and can boost mood. This treat is a great snack or dessert, offering a mix of health benefits and delightful flavors. Enjoy knowing you’re indulging in a sweet that’s good for you! For the full recipe, check out the [Full Recipe]. Start by hulling and halving your fresh strawberries. This makes them easy to dip. In a bowl, mix Greek yogurt with honey or maple syrup if you want it sweeter. The yogurt should be smooth and creamy. Take each strawberry half and dip it in the yogurt mix. Make sure it’s well coated. Place the coated strawberries on a baking sheet lined with parchment paper. This will keep them from sticking. Next, grab a microwave-safe bowl. Add dark chocolate chips and coconut oil to the bowl. Microwave this mix in 30-second bursts. Stir between each burst until it is completely melted. The chocolate should be smooth and shiny. If you want a thinner drizzle, add a little more coconut oil. This helps the chocolate flow better over the strawberries. Now it’s time to bring it all together. Drizzle the melted chocolate over the yogurt-coated strawberries. Let the chocolate create lovely clusters as you work. After drizzling, sprinkle a pinch of sea salt over the clusters. This adds a nice flavor contrast. Put the baking sheet in the freezer for at least 2 hours. Once they are firm, take them out and store them in an airtight container. Enjoy these tasty treats straight from the freezer! For the full recipe, check out the details above. To melt chocolate smoothly, use a microwave-safe bowl. Combine the chocolate chips and coconut oil. Heat in 30-second bursts. Stir well after each burst. This keeps the chocolate from burning. If lumps remain, stir until it’s smooth. You want a nice, shiny chocolate for drizzling. For the best results, use high-quality chocolate. Once your chocolate strawberry yogurt clusters are ready, let them freeze fully. After two hours, check if they are firm. Then, remove them from the baking sheet. Place them in an airtight container. Store them in the freezer to keep them fresh. They last up to a month. Always grab a few when you need a quick treat! For a lovely presentation, use a clean platter. Arrange the clusters neatly. You can add a few fresh mint leaves for color. This makes your dish look even more inviting. Serve directly from the freezer for a cool snack. Everyone will love the sweet and creamy bites! {{image_2}} You can switch strawberries for other fruits. Try bananas, blueberries, or raspberries. Each fruit adds its own taste. Bananas provide a creamy texture, while blueberries add a burst of flavor. Raspberries bring a tartness that pairs well with chocolate. Just make sure the fruit is fresh. Cut larger fruits into smaller pieces to ensure even coating. Greek yogurt is great, but other types work too. You can use regular yogurt, coconut yogurt, or even dairy-free options. Each yogurt brings a different flavor and texture. Coconut yogurt adds a tropical twist. If you want extra creaminess, use full-fat yogurt. Experiment with what you like best. Adding spices or extracts can boost the flavor of your clusters. Try cinnamon or nutmeg for warmth. A dash of vanilla extract can make it even tastier. Almond extract gives a nice nutty hint. Just a little goes a long way. Mix these flavors into your yogurt before coating the fruit. It adds a fun twist to your clusters. For the complete recipe, check out the Full Recipe section! To keep your chocolate strawberry yogurt clusters fresh, freezing is key. After you make the clusters, place them on a baking sheet. Make sure they are not touching each other. Put the baking sheet in the freezer for at least 2 hours. This helps them firm up nicely. Once they are solid, transfer them to an airtight container. You can store them in the freezer for up to 3 months. Just take out what you need and enjoy! When you want to eat your clusters, take them out of the freezer. Place them on a plate at room temperature. Let them sit for about 10 to 15 minutes. This will help them soften just enough to eat. If you are in a hurry, you can eat them frozen too. They make a great cold treat on a hot day! The ingredients in these clusters have different shelf lives. Greek yogurt can last up to 2 weeks in the fridge. Fresh strawberries are best when used within 3 to 5 days. Dark chocolate chips can last for about a year if stored well. If you mix these ingredients right before making clusters, they will taste best. Always check for freshness before using any ingredient in your recipe. Yes, you can make these clusters ahead of time. They freeze well, which is great. You can prepare them and store them in an airtight container. They stay fresh in the freezer for up to two months. This makes them a perfect treat for busy days. Just take them out whenever you want a sweet snack! These clusters are not vegan as they use Greek yogurt, which is dairy. However, you can easily adapt the recipe. Use a plant-based yogurt such as coconut or almond yogurt instead. Make sure to check that the chocolate chips are vegan, too. This way, you can enjoy a delicious vegan version of the clusters! You can find pre-made Chocolate Strawberry Yogurt Clusters at some grocery stores. Look in the frozen dessert section. Health food stores may also have them. However, making your own is easy and fun! You can customize the flavors and ingredients to your liking. For the full recipe, check out the earlier section. Chocolate Strawberry Yogurt Clusters are fun and easy to make at home. We covered key ingredients, step-by-step instructions, and helpful tips. You learned how to store and present these treats, plus variations to try. Remember, these clusters offer great taste and nutrition. Get creative with fruits and yogurt types. Make them suit your taste. Enjoy making these delicious snacks any time.](https://toastedrecipes.com/wp-content/uploads/2025/06/7b69520a-7d67-4f8f-b46b-021fe45a11ca.webp)
Chocolate Strawberry Yogurt Clusters Easy and Delicious
If you’re looking for a quick, tasty treat, you’ve found it! These Chocolate Strawberry Yogurt Clusters are simple to make and packed with flavor. You’ll
Easy Strawberry Yogurt Bites Simple and Healthy Treat
Looking for a tasty and healthy snack? You’ll love these Easy Strawberry Yogurt Bites! They’re simple to make and perfect for any time of day.
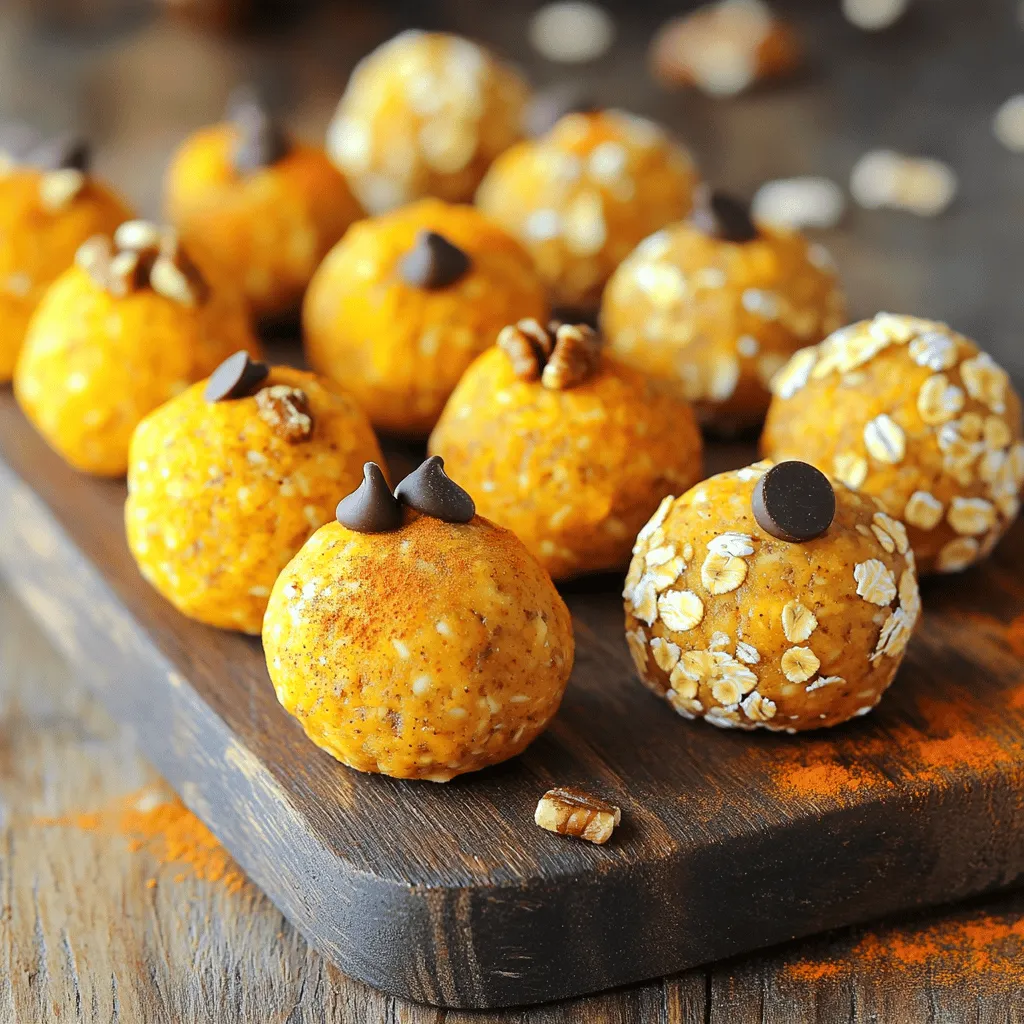
No-Bake Pumpkin Pie Energy Balls Delightful Snack
Looking for a delicious snack that’s easy to make? Try these No-Bake Pumpkin Pie Energy Balls! They are packed with healthy ingredients like oats, pumpkin
![- 2 cups rolled oats - 1 ripe banana, mashed - 1/2 cup almond butter (or peanut butter) - 1/3 cup honey or maple syrup - 1/2 cup almond milk (or any milk of choice) - 1 teaspoon vanilla extract - 1 teaspoon baking powder - 1/2 teaspoon cinnamon - 1/4 teaspoon salt - 1/2 cup mixed nuts (like walnuts, almonds, and pecans), chopped - 1/4 cup chocolate chips To make baked oatmeal bars, gather the ingredients listed above. Rolled oats are the base of this recipe. They provide fiber and help keep you full. The ripe banana adds natural sweetness and moisture. Almond butter or peanut butter gives healthy fats and a delicious nutty flavor. Honey or maple syrup acts as the sweetener. You can adjust the amount based on your taste. Almond milk keeps the bars moist but feel free to use any milk you like. The vanilla extract enhances the flavor. Next, we have the dry ingredients. Baking powder helps the bars rise while baking. Cinnamon gives a warm, cozy taste, and salt balances all the flavors. For optional add-ins, mixed nuts add crunch and protein. If you love chocolate, toss in chocolate chips for a treat! You can find the full recipe [here]. - Preheat the oven to 350°F (175°C). - Line an 8x8 inch baking pan with parchment paper. To start, preheating the oven is key. This ensures even cooking. While the oven warms up, prepare your baking pan. Parchment paper helps with easy removal later. Next, let’s mix the wet ingredients. In a large bowl, mash the ripe banana well. Add in almond butter, honey or maple syrup, almond milk, and vanilla extract. Stir this mixture until it’s smooth. You want everything to blend nicely. - Incorporate dry ingredients into the wet mixture. - Fold in nuts and chocolate chips. Now, it’s time to add the dry ingredients. Sprinkle in the rolled oats, baking powder, cinnamon, and salt. Stir gently until everything is fully combined. Be careful not to overmix. Once mixed, fold in the chopped nuts and chocolate chips if you want that extra sweetness. Make sure they are evenly distributed throughout the mixture. - Pour mixture into the pan and level it. - Bake and check doneness. Pour the mixture into your prepared baking pan. Use a spatula to spread it out evenly. This helps the bars cook uniformly. Now, place it in the oven. Bake for 25-30 minutes. You’ll know it’s done when the edges turn golden brown. A toothpick inserted in the center should come out clean. Let the bars cool for about 10 minutes in the pan. Then, transfer them to a cutting board. Once cool, cut them into bars. Enjoy your tasty baked oatmeal bars! For the full recipe, check out the complete instructions above. - Ensure bananas are ripe for best flavor. - Don’t overmix to keep bars soft. Using ripe bananas adds sweetness and moisture. They mash easily, blending well with other ingredients. If your bananas are slightly spotty, that’s perfect! They add depth to the bars. Mixing is important. Stir gently until the ingredients blend. Overmixing makes the bars dense and chewy. You want a light, soft texture. - Adjust baking time for a chewier or firmer texture. - Use parchment paper for easy removal. Baking time matters. For chewier bars, bake for about 25 minutes. For firmer bars, leave them in for 30 minutes. Check for golden edges and a clean toothpick. Parchment paper helps lift the bars out easily. It saves time and makes cleanup a breeze. Just line the baking pan before adding the mixture. - Top with yogurt or fresh fruit. - Store in the fridge for a quick snack. Serving can be fun! Add a dollop of yogurt or fresh berries on top. This adds flavor and a pop of color. Storing these bars in the fridge keeps them fresh. They make a great snack for busy days. Just grab one and enjoy! For the full recipe, check the earlier section. {{image_2}} You can switch things up with flavor. Swap almond butter for peanut or cashew butter. This change adds a new taste while keeping it creamy. You can also add dried fruits like cranberries or apricots. This addition gives a sweet burst and makes bars chewy. If you need a gluten-free option, use certified gluten-free oats. They work just as well as regular oats. For a sugar-free treat, you can use alternative sweeteners like stevia or monk fruit. This keeps the bars sweet without added sugar. Want to boost the nutrition? Include protein powder in your mix. This simple change makes your bars a great post-workout snack. You can also experiment with spices like nutmeg or ginger. They add warmth and depth to the flavor, making each bite exciting. Feel free to explore the [Full Recipe], and try your own twists! To keep your baked oatmeal bars fresh, store them in an airtight container at room temperature. This method is simple and works well if you plan to eat them within a week. If you want them to last longer, refrigerate them. The cold will help keep the bars moist and tasty. Freezing is a great option for meal prep. You can freeze individual bars for easy grab-and-go snacks. Just wrap each bar tightly in plastic wrap and then in foil. This extra layer helps prevent freezer burn and keeps the bars fresh. These delicious bars are best eaten within one week when stored at room temperature. If you freeze them, they can last for up to three months. Just remember to let them thaw in the fridge for a few hours before eating. Enjoy your tasty treat anytime! For the step-by-step cooking guide, check the Full Recipe. Yes, you can use quick oats. Quick oats cook faster but may change the bar's texture. Rolled oats give a chewier bite. If you use quick oats, keep an eye on your baking time. The bars are done when the edges turn golden brown. A toothpick inserted in the center should come out clean. If it’s still wet, bake for a few more minutes. You can top your bars with yogurt or fresh fruit. Nuts, seeds, or a drizzle of honey also work well. Consider adding a sprinkle of cinnamon for extra flavor. To make these bars vegan, swap honey for maple syrup. Use almond milk or another plant-based milk. Almond butter or peanut butter works great without any animal products. Yes, you can adjust the sweetness. Add more honey or maple syrup if you like it sweeter. You can also reduce the sweetener if you prefer a less sweet bar. For the full recipe, check out the detailed steps above. This blog post covered how to make tasty oatmeal bars using simple ingredients. You learned about the main and dry ingredients, along with helpful tips and tricks for baking. We also explored variations for flavor and dietary needs, plus storage methods to keep them fresh. Now you can enjoy healthy snacks that fit your lifestyle. Remember, you can customize these bars to match your tastes! Happy baking!](https://toastedrecipes.com/wp-content/uploads/2025/06/e98a449d-3510-449f-814a-eba6780ff6ba.webp)
Baked Oatmeal Bars Tasty and Healthy Snack Idea
Looking for a quick and healthy snack? Baked oatmeal bars are your answer! These easy-to-make bars are packed with nutrition and flavor. With just a
![The main ingredients in these fudgy chocolate protein brownies pack a protein punch. Here’s what you need: - 1 cup almond butter - 1/2 cup unsweetened cocoa powder - 1/2 cup protein powder (chocolate-flavored) - 1/2 cup maple syrup - 2 large eggs - 1 teaspoon vanilla extract - 1/4 teaspoon salt - 1/2 cup dark chocolate chips Overview of protein-rich ingredients: Almond butter and protein powder are stars in this recipe. Almond butter adds healthy fats and protein. It gives a rich texture and nutty flavor. Protein powder boosts the protein content, making these brownies a great post-workout snack. Nutritional benefits of almond butter and protein powder: Almond butter is full of vitamin E, magnesium, and fiber. It helps you feel full and supports muscle recovery. Protein powder, especially chocolate-flavored, adds taste and helps with muscle growth. Together, they make these brownies not just tasty but also good for you. You can add fun extras to your brownies. Here are some ideas: - Suggestions for nuts or seeds: Chopped walnuts or pecans add crunch and flavor. You can also use sunflower seeds for a nut-free option. - Ideas for flavor variations: Want something different? Try adding a dash of cinnamon or a splash of espresso. These flavors enhance the chocolate taste and make the brownies even more special. For the full recipe, check out the detailed instructions above. Enjoy making these fudgy chocolate protein brownies! First, gather all your ingredients. You’ll need almond butter, cocoa powder, protein powder, maple syrup, eggs, vanilla extract, salt, dark chocolate chips, and optional nuts. 1. Preheat the oven to 350°F (175°C). This step is important for even baking. 2. Line an 8x8 inch baking dish with parchment paper. This makes it easy to lift the brownies out later. 3. Mix the wet ingredients: In a big bowl, combine the almond butter, cocoa powder, protein powder, and maple syrup. Stir until everything blends well. 4. Add the eggs: Crack in the eggs, pour in the vanilla extract, and add the salt. Whisk this mixture until it looks smooth and creamy. 5. Fold in the chocolate chips: Gently mix in the dark chocolate chips and any nuts you want. This adds nice texture and flavor. 1. Pour the batter into your lined baking dish. Spread it out evenly using a spatula. 2. Bake in the oven for 20-25 minutes. Set a timer and keep an eye on them. 3. Check for doneness: Stick a toothpick in the center. If it comes out mostly clean with a few moist crumbs, they are done. If it’s wet, give them a few more minutes. Once baked, let the brownies cool for about 10 minutes in the pan. Then, move them to a cooling rack. Wait until they are cool before cutting them into squares. Enjoy your fudgy chocolate protein brownies! For the complete recipe, see [Full Recipe]. To get that rich, fudgy texture in your brownies, follow these tips: - Use almond butter instead of regular butter. Almond butter adds moisture and a nutty flavor. - Make sure to add enough protein powder. It helps bind the ingredients and keeps the brownies soft. - Mix your dry ingredients separately first. This helps avoid lumps and ensures even texture. - Don’t overbake! Check your brownies at 20 minutes. They should be soft in the middle. You can also swap almond butter for peanut butter if you like a different taste. If you want a nut-free option, try using sunflower seed butter. To keep your brownies fresh, follow these storage tips: - Store them in an airtight container. This keeps moisture in and prevents them from drying out. - Place parchment paper between layers to avoid sticking. - Keep them at room temperature for up to four days. You can refrigerate them for longer freshness. If you want to enjoy them warm, here’s how to reheat: - Preheat your oven to 350°F (175°C). - Place the brownies on a baking sheet. Heat for about 5-10 minutes until warm. - You can also use the microwave. Heat for 10-15 seconds at a time until just warm. Freshly reheated brownies taste best with a scoop of ice cream or a dollop of Greek yogurt. For the full recipe, check it out here. {{image_2}} You can make these fudgy chocolate protein brownies even healthier. Start by lowering the sugar content. Instead of maple syrup, try using mashed bananas or unsweetened applesauce. Both options add sweetness without the extra sugar. You can also use a sugar substitute like stevia or monk fruit for a low-calorie option. Adding superfoods can boost the nutrition of your brownies. Consider mixing in chia seeds or ground flaxseeds. They add fiber and healthy fats. You can also fold in a scoop of spinach powder for a green boost. It blends well and keeps the brownies fudgy. Swapping ingredients can change the flavor of your brownies. Instead of dark chocolate chips, try white chocolate or peanut butter chips. You can even add some espresso powder for a rich, deep flavor. Just a teaspoon can enhance the chocolate taste. Spices and extracts can take your brownies to the next level. Consider adding a pinch of cinnamon or a dash of cayenne for some heat. Vanilla extract is a classic choice, but almond extract can add a nice twist. Experiment with these to find your favorite flavor combinations! For the full recipe, check out the original version. To keep your fudgy chocolate protein brownies fresh, use airtight containers. Glass or plastic containers with tight lids work best. Store them at room temperature for up to three days. If you want them to last longer, refrigerate them. This can give you an extra week of freshness. For longer storage, consider freezing the brownies. Cut them into squares and wrap each piece in plastic wrap. Then, place them in a freezer bag. They can last for up to three months in the freezer. Just make sure to label the bag with the date, so you know when to enjoy them! When stored at room temperature, these brownies stay fresh for about three days. After that, they may start to lose their soft texture. In the fridge, they can last for up to a week. Watch out for signs of spoilage. If you see mold or an off smell, it’s time to toss them. If they feel dry or hard, they have likely passed their prime. Enjoy your brownies while they are still fudgy and delicious! Yes, you can use different protein powders in these brownies. Whey protein mixes well and gives a nice texture. If you're vegan, try plant-based protein like pea or rice. These options can change the flavor a bit. You might need to adjust the liquid in the recipe if you use a protein that absorbs more moisture. Always choose a flavor you enjoy, as it will affect the final taste of your brownies. If your brownies turn out dry, don’t worry; I have tips to fix them. First, check your oven’s temperature. An oven that runs hot can dry out baked goods. Next, try adding a bit more almond butter or maple syrup to the batter next time. You can also add a small amount of water or milk to the mix. For now, serve the brownies warm with a scoop of ice cream or a dollop of yogurt. This helps add moisture back in. Making these brownies gluten-free is simple. Just use gluten-free flour instead of regular flour. Almond flour is a great choice and works well with the other ingredients. You can also try oat flour or coconut flour. If you use coconut flour, reduce the amount, as it absorbs more liquid. Always check the labels on your ingredients to ensure they are gluten-free. Enjoy your brownies without worry! For the complete recipe, check the [Full Recipe]. These fudgy chocolate protein brownies are rich in taste and nutrients. You learned about key ingredients, like almond butter and protein powder. Optional add-ins let you tailor flavors and textures. Detailed steps guide you through preparing and baking. Tips help you achieve the perfect fudginess. Storing and reheating advice ensures they stay fresh. Variations show you how to make healthier or different flavored brownies. With simple swaps, you can adjust to your needs. Enjoy your delicious creations every time!](https://toastedrecipes.com/wp-content/uploads/2025/06/fcca74bc-198f-48e5-803d-479d3da21350.webp)
Fudgy Chocolate Protein Brownies Healthy and Delicious
If you love sweets but want a healthy twist, you’re in the right spot! These fudgy chocolate protein brownies are both rich and nourishing. Packed
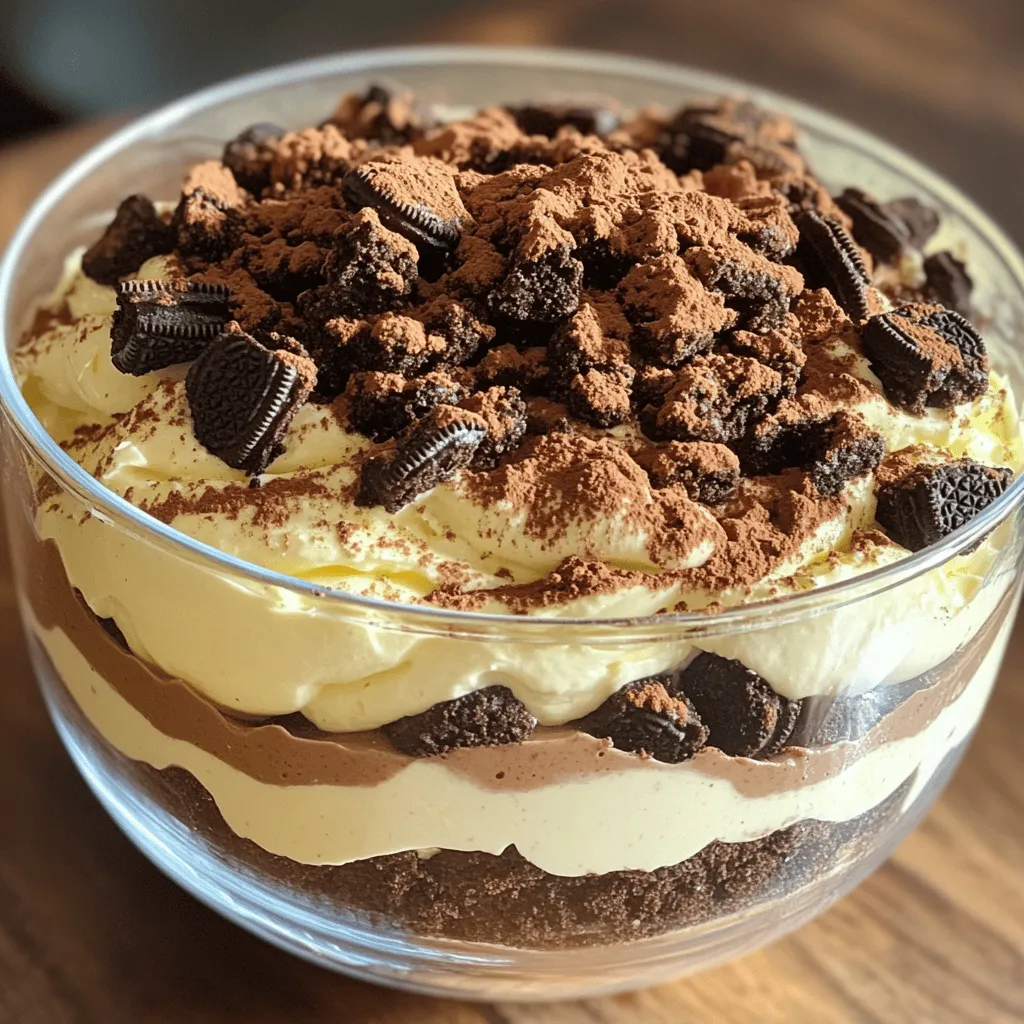
Protein Oreo Fluff Dessert Dreamy and Simple Treat
Looking for a fun and healthy dessert? Try my Protein Oreo Fluff! This dreamy treat is packed with protein and is super simple to make.
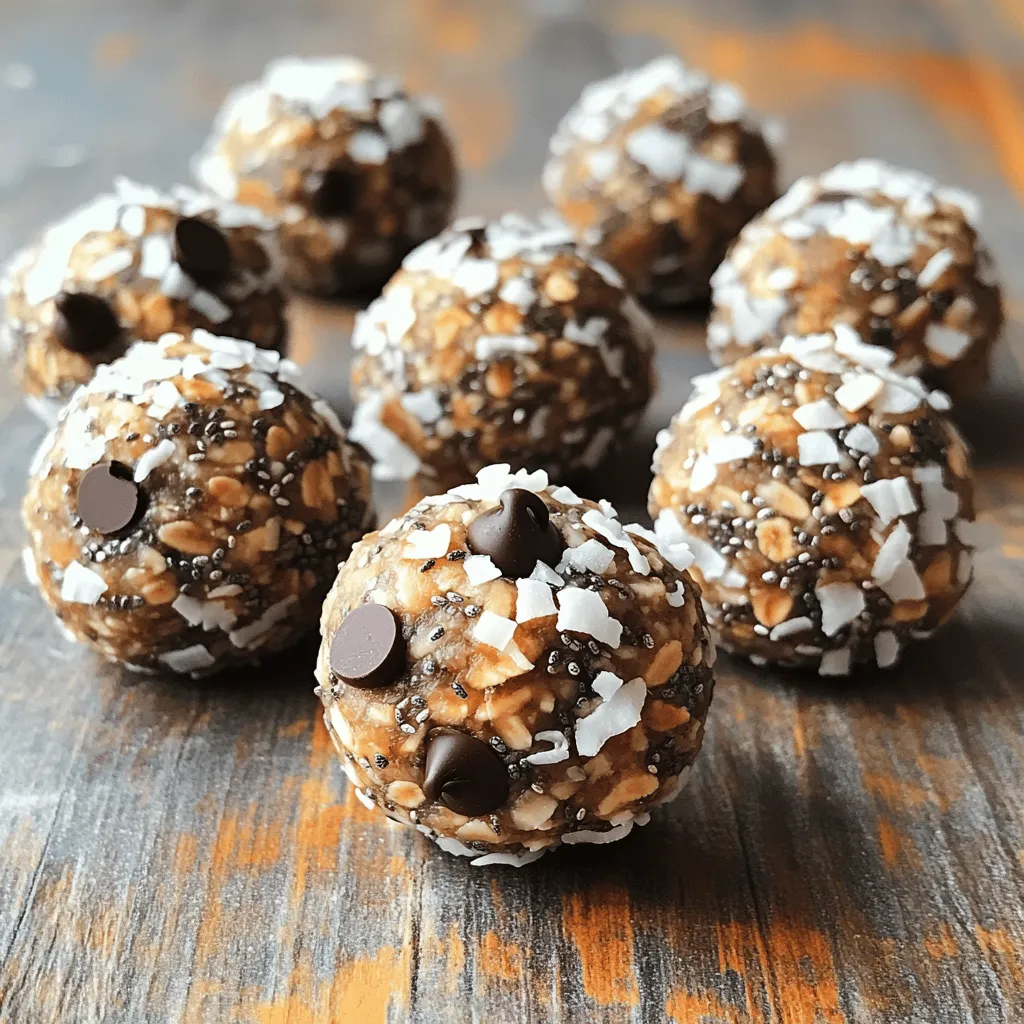
No-Bake Energy Balls Easy and Nutritious Snack
Looking for a quick and healthy snack? No-bake energy balls are your answer! With just a few simple ingredients, they provide a tasty boost anytime