Desserts
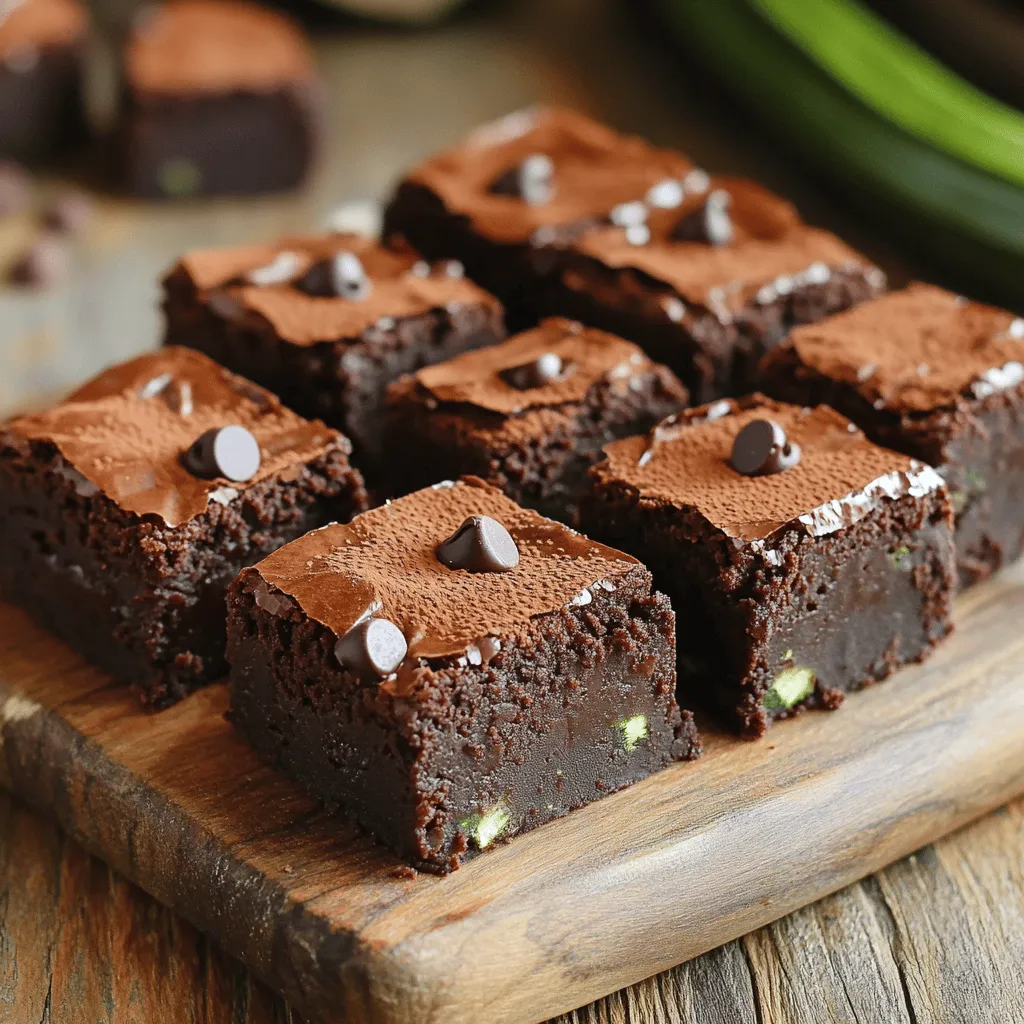
Flourless Zucchini Brownies Delightful Recipe to Try
Are you ready to indulge in a treat that’s both delicious and healthy? These Flourless Zucchini Brownies will spark joy in your kitchen! Packed with
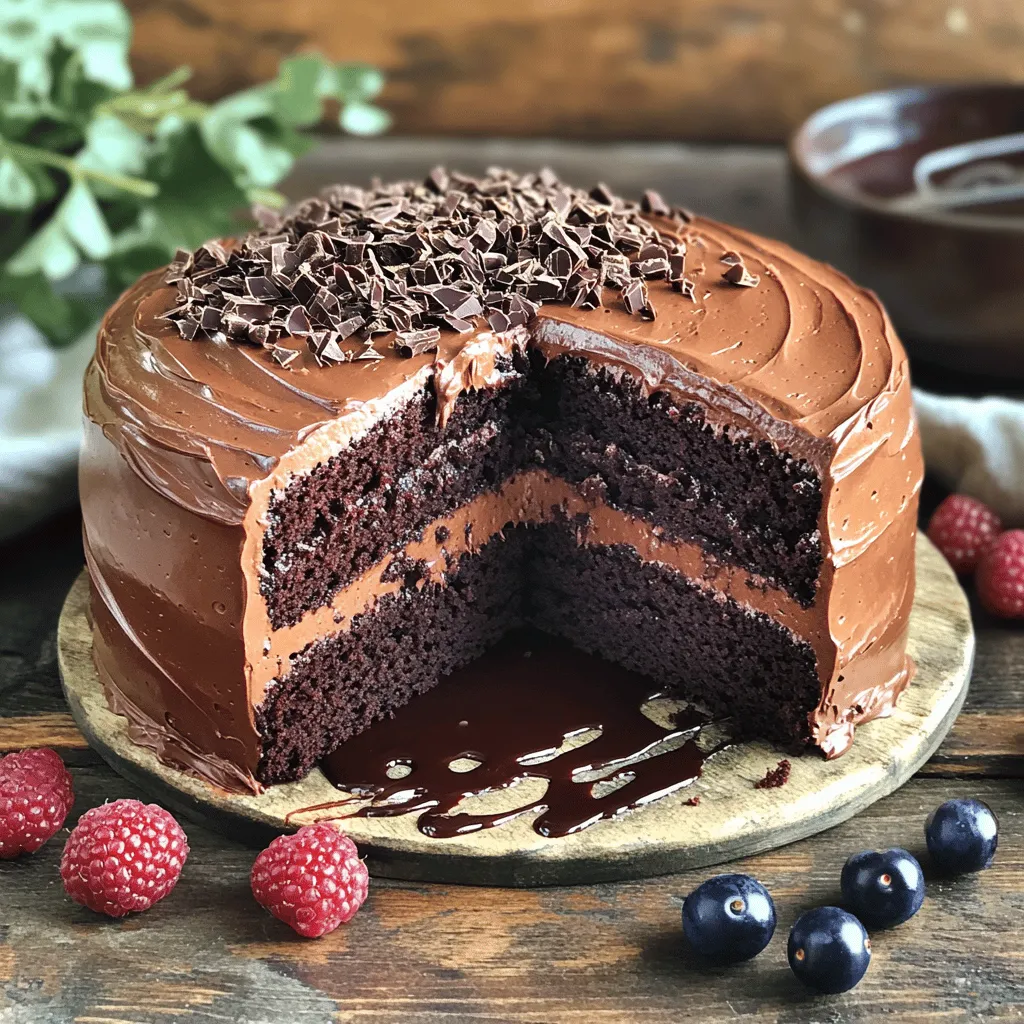
Super Moist Chocolate Cake Irresistible and Decadent
If you crave the ultimate chocolate cake, you’re in the right place! My Super Moist Chocolate Cake is a dream come true for any dessert
![To make a great lemon zucchini bread, you need a few key items: - 1 cup grated zucchini (about 1 medium zucchini) - 1 cup granulated sugar - 1/2 cup unsalted butter, softened - 2 large eggs - 1/4 cup lemon juice (freshly squeezed) - Zest of 1 lemon These ingredients create a sweet base. The zucchini adds moisture and texture. The lemon gives a bright, fresh flavor. Next, you’ll need some dry ingredients to balance the wet ones: - 1 1/2 cups all-purpose flour - 1 teaspoon baking powder - 1/2 teaspoon baking soda - 1/2 teaspoon salt - 1/2 teaspoon ground cinnamon - 1/4 teaspoon nutmeg These dry ingredients help the bread rise and give it a nice crumb. The spices add warmth and depth to the flavor. If you want to make your bread even better, consider these add-ins: - 1/2 cup chopped walnuts or pecans - 1 tablespoon granulated sugar (for topping) The nuts add a nice crunch. A sprinkle of sugar on top creates a sweet crust. You can find the full recipe to see how everything comes together. Enjoy making this delicious lemon zucchini bread! 1. Preheat your oven to 350°F (175°C). Grease a 9x5 inch loaf pan. You can also use parchment paper for easy removal. 2. In a mixing bowl, cream together the softened butter and granulated sugar until light and fluffy. This should take about 3-4 minutes. 3. Beat in the eggs, one at a time. Mix well after each egg. Add the lemon juice and lemon zest, then mix until combined. 4. In a separate bowl, whisk together the flour, baking powder, baking soda, salt, cinnamon, and nutmeg. 5. Gradually add the dry ingredients to the wet mixture. Stir just until combined. Be careful not to overmix. 6. Fold in the grated zucchini and chopped nuts if using. The batter will be somewhat thick. 7. Pour the batter into the prepared loaf pan. Smooth the top with a spatula. Sprinkle a tablespoon of sugar over the top for a nice crust. 8. Bake in the preheated oven for 50-60 minutes. Check for doneness with a toothpick. It should come out clean. 9. Once baked, remove from the oven. Let the bread cool in the pan for about 10 minutes. Transfer to a wire rack to cool completely. These steps will help you create a moist and delicious Lemon Zucchini Bread. For the full recipe, check out [Full Recipe]. To get the best texture in your lemon zucchini bread, avoid overmixing. When you mix the batter, stir just until the ingredients combine. This keeps the bread light and fluffy. Overmixing can make it dense and tough. Using fresh ingredients also matters. Fresh zucchini gives moisture and flavor. If your zucchini is old, it can lead to a dry bread. Always choose firm, bright green zucchini for the best taste. Checking for doneness is key. Use a toothpick to test the center of the bread. Insert it into the bread; if it comes out clean, it’s done! If not, bake a little longer. After baking, cool the bread in the pan for ten minutes. Then, transfer it to a wire rack. Cooling helps the bread set and makes slicing easier. For a lovely presentation, slice the zucchini bread and serve it on a rustic wooden board. You can garnish each slice with lemon zest. A dollop of crème fraîche adds a nice touch, too. Pair the bread with a warm cup of tea or coffee. It also goes well with fresh fruit or yogurt. Enjoy this delightful treat with family or friends! For the full recipe, check out Lemon Zucchini Delight! {{image_2}} You can add a twist to your lemon zucchini bread. Try mixing in other citrus fruits, like orange. This gives a bright, fresh flavor. You can also add chocolate chips or dried fruits. Chocolate chips add richness, while dried fruits add texture. Both options make your bread even more delightful. If you need gluten-free options, use almond flour or coconut flour instead of all-purpose flour. This keeps the bread light and moist. For vegan substitutions, swap eggs with flax eggs or applesauce. You can also use plant-based butter and almond milk for a creamy texture. These changes ensure everyone can enjoy this treat. You can explore different regions with your lemon zucchini bread. Add Mediterranean-inspired ingredients like olives or sun-dried tomatoes for a savory flavor. Or, try Southern-style additions like buttermilk or pecans. These changes give your bread a unique touch, making it a fun and tasty experiment. For the full recipe, check the section above. Enjoy your baking! Let the Lemon Zucchini Bread cool completely on a wire rack. Once cool, wrap it tightly in plastic wrap. This keeps the bread fresh. Place it in an airtight container. Store it in the fridge for up to one week. This method works well to keep the flavors bright. To save your Lemon Zucchini Bread for later, freeze it. First, slice the bread into portions. Wrap each slice in plastic wrap. Then, place the slices in a freezer bag. Remove as much air as possible before sealing. You can freeze it for up to three months. When you want to enjoy a slice, thaw it in the fridge overnight. Lemon Zucchini Bread lasts about one week in the fridge. If stored properly in the freezer, it can last up to three months. Signs of spoilage include a dry texture and off smells. If you see mold, discard the bread immediately. Enjoy your fresh and flavorful delight! For the full recipe, refer back to the beginning. You can change the sweetness by using alternative sweeteners. Try honey, maple syrup, or agave nectar. These options add unique flavors. You may need to adjust the liquid in the recipe. Use about 3/4 cup of honey for 1 cup of sugar. When using liquid sweeteners, reduce other liquids slightly. This keeps the bread from being too wet. You can also lower the sugar amount if you prefer less sweetness. Start by using 3/4 cup of sugar instead of 1 cup. Taste the batter before baking to ensure it meets your needs. Yes, you can use frozen zucchini. First, thaw it completely and drain excess water. Squeeze it in a clean towel to remove moisture. This prevents the bread from becoming soggy. Use about one cup of frozen zucchini for the recipe. Frozen zucchini works well if you don’t have fresh. It saves time and reduces food waste. Just remember to chop it into smaller pieces if needed. This helps it blend well into your batter. Keeping zucchini bread moist is easy with a few tips. First, don’t overmix the batter. This helps keep it light and fluffy. Letting the bread cool in the pan prevents it from drying out. Also, store the bread in an airtight container or wrap it tightly. This keeps moisture in and helps it stay fresh longer. If you want to enjoy it later, freeze slices individually. This way, you can take them out as needed. You can also add a bit more grated zucchini for extra moisture. Just be careful not to add too much! In this blog post, we explored how to make lemon zucchini bread. We covered key ingredients, from fresh zucchini to sweeteners, and shared useful preparation steps. You learned about mixing, baking, and the importance of texture. Our tips included serving ideas and storage methods to keep your bread fresh. Finally, I shared variations and dietary options to suit your tastes. Baking lemon zucchini bread is simple and fun, so get started and enjoy!](https://toastedrecipes.com/wp-content/uploads/2025/07/9f023ff1-ce57-41ff-a71d-fa13961d43e8.webp)
Lemon Zucchini Bread Fresh and Flavorful Delight
If you’re looking for a fresh and tasty treat, lemon zucchini bread is the answer. This simple recipe blends the vibrant taste of lemon with

Chocolate Zucchini Cupcakes Rich and Moist Delight
If you’re looking for a sweet treat that sneaks in some veggies, you’re in the right place! These Chocolate Zucchini Cupcakes are rich and moist,

Blueberry Bread Delightful and Easy Recipe
Are you ready to bake a treat that’s both simple and delicious? This Blueberry Bread recipe brings joy to your kitchen with its vibrant flavors
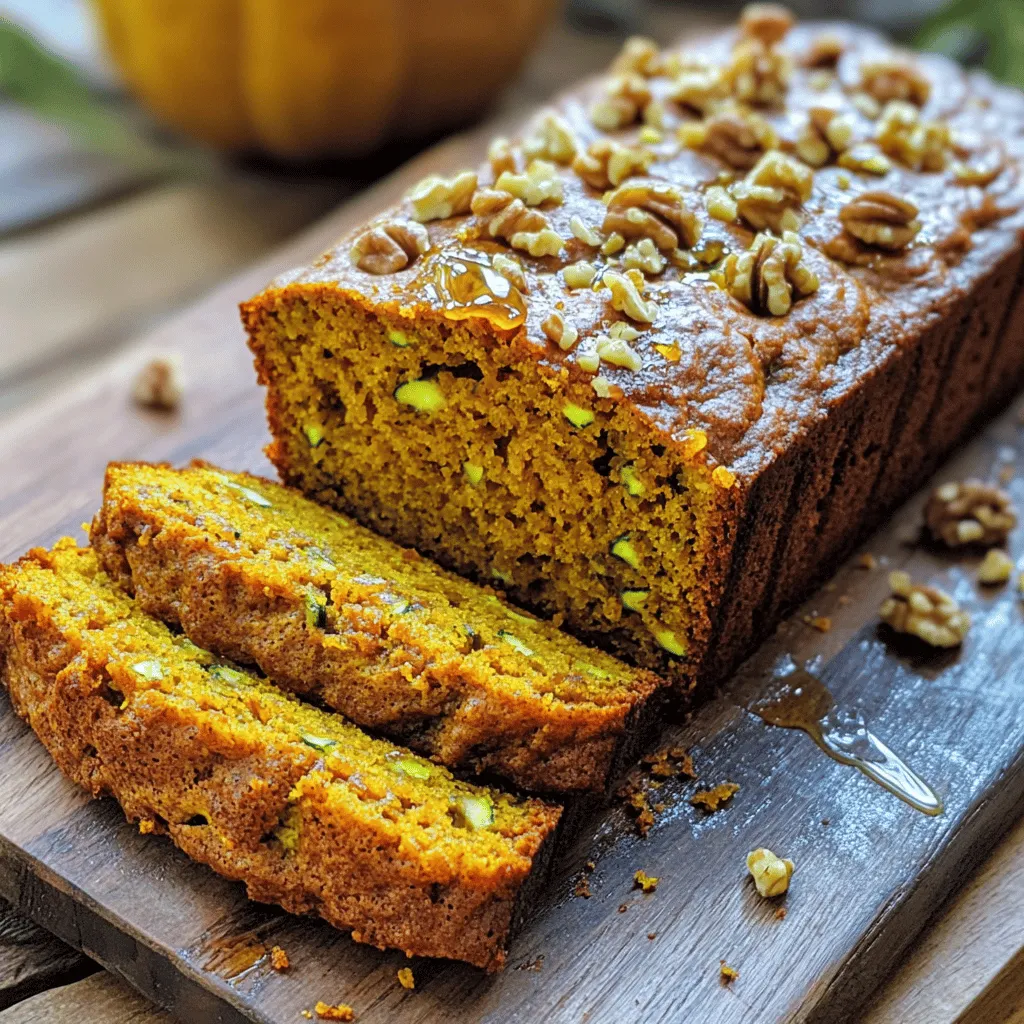
Pumpkin Zucchini Bread Flavorful and Easy Recipe
Looking for a tasty treat that’s easy to make? This Pumpkin Zucchini Bread is perfect for you! With its rich flavors and moist texture, it

Healthy Chocolate Zucchini Muffins Simple and Tasty
Do you crave something sweet but want to keep it healthy? Try my Healthy Chocolate Zucchini Muffins! These simple and tasty treats sneak in veggies
![This recipe brings together fresh flavors. Here are the key ingredients: - 1 medium zucchini, grated (about 1 cup) - 1 cup fresh blueberries (or frozen if out of season) - 1/2 cup granulated sugar - 1/2 cup brown sugar, packed - 1/2 cup vegetable oil (or melted coconut oil) - 2 large eggs - 1 teaspoon vanilla extract - Zest of 1 lemon - 2 tablespoons fresh lemon juice - 1 1/2 cups all-purpose flour - 1 teaspoon baking powder - 1/2 teaspoon baking soda - 1/2 teaspoon salt - 1 teaspoon ground cinnamon - 1/4 teaspoon ground nutmeg (optional) These ingredients create a moist and tasty bread. The zucchini keeps it soft while the blueberries add bursts of flavor. You can add a few extras for a fun twist. Consider these: - 1/4 cup chopped walnuts or pecans for crunch - 1/2 teaspoon almond extract for a nutty taste - A pinch of cardamom for warmth Using these options can elevate your bread. Each addition enhances the flavor profile. If you lack an ingredient, don't worry! Here are some easy swaps: - Use applesauce instead of oil for a lighter bread - Replace granulated sugar with honey or maple syrup - Swap all-purpose flour for whole wheat flour for more fiber These changes keep the recipe flexible. You can still enjoy a delicious loaf no matter what you have on hand. For the complete recipe, check the [Full Recipe]. Gather all your ingredients first. This makes cooking easy and fun. You will need: - 1 medium zucchini, grated (about 1 cup) - 1 cup fresh blueberries (or frozen) - 1/2 cup granulated sugar - 1/2 cup brown sugar, packed - 1/2 cup vegetable oil (or melted coconut oil) - 2 large eggs - 1 teaspoon vanilla extract - Zest of 1 lemon - 2 tablespoons fresh lemon juice - 1 1/2 cups all-purpose flour - 1 teaspoon baking powder - 1/2 teaspoon baking soda - 1/2 teaspoon salt - 1 teaspoon ground cinnamon - 1/4 teaspoon ground nutmeg (optional) Grate your zucchini and set it aside. If using frozen blueberries, let them thaw and drain. In a large bowl, mix the granulated sugar, brown sugar, and vegetable oil. Stir until smooth and well combined. Add the eggs, vanilla extract, lemon zest, and lemon juice. Whisk together until everything blends well. This mixture brings moisture and flavor to the bread. In a separate bowl, whisk the flour, baking powder, baking soda, salt, cinnamon, and nutmeg. Gently add the dry mixture to the wet ingredients. Stir lightly until combined. Be careful not to overmix. A few lumps are perfectly fine! Then, fold in the grated zucchini and blueberries. This step adds texture and bursts of flavor. Pour the batter into a greased and floured 9x5-inch loaf pan. Smooth the top with a spatula. Bake in a preheated oven at 350°F (175°C) for 50-60 minutes. To check for doneness, insert a toothpick in the center. If it comes out clean, your bread is ready. Let it cool for about 10 minutes in the pan, then transfer to a wire rack. Enjoy your delightful lemon blueberry zucchini bread! Check the Full Recipe for more details. To get a soft and moist texture in your lemon blueberry zucchini bread, follow these steps: - Grate the zucchini: Use a box grater or food processor. Make sure to squeeze out excess water. - Do not overmix: Gently fold the wet and dry ingredients. A few lumps are fine. - Use room temperature eggs: This helps the batter mix evenly and rise well. If you live at a high altitude, you may need to adjust your baking time. Here are some tips: - Reduce baking time: Start checking for doneness a few minutes early. - Add extra liquid: Consider adding a tablespoon of milk or water to the batter. - Increase oven temperature: Raise the heat by 15-25°F for better rise and texture. Both fresh and frozen blueberries work well in this recipe, but each has its perks: - Fresh blueberries: They hold their shape and flavor better. They give a nice burst in every bite. - Frozen blueberries: They are convenient and can be used year-round. If using frozen, do not thaw them before mixing. This keeps the batter from turning blue. For the complete recipe, check out the [Full Recipe]. Enjoy baking! {{image_2}} You can make this bread gluten-free! Use a gluten-free flour blend. Look for one that works well in baking. I often suggest blends with almond flour, coconut flour, or oat flour. These flours keep the bread moist and tasty. You may need to add a bit more liquid since gluten-free flours absorb moisture differently. Test with a toothpick to see if it is done. Want some crunch in your zucchini bread? Consider adding nuts or seeds. Walnuts and pecans work well. They add a lovely texture and nutty flavor. I also like using sunflower seeds or pumpkin seeds. Toss in about half a cup into the batter. This small change makes a big difference in taste and texture. You can play with flavors by adding herbs or spices. Basil or mint can give a fresh twist. You might also try adding more cinnamon or a pinch of cardamom for warmth. Lemon thyme can bring a bright note that pairs well with blueberries. Start with a small amount and adjust to taste. Be creative! There are many ways to make this recipe your own. For the full recipe, check out the details above. Store your lemon blueberry zucchini bread at room temperature. Wrap it well in plastic wrap or foil. This keeps it moist and fresh. Place it in an airtight container if you have one. It can last for up to three days this way. For longer storage, consider the freezer. You can easily freeze your zucchini bread. First, let it cool completely. Then, slice it into pieces. Wrap each slice tightly in plastic wrap. Place the slices in a freezer bag or container. This helps prevent freezer burn. It will stay good for about three months. When you want a slice, just thaw it at room temperature. When you’re ready to enjoy your bread, try toasting a slice. A bit of butter or cream cheese makes it even better. You might also sprinkle some powdered sugar on top. Fresh blueberries or lemon zest can add a nice touch too. Enjoy your delicious lemon blueberry zucchini bread! For the full recipe, check out the complete guide. To keep your zucchini bread light, avoid overmixing the batter. Mix just until the dry and wet ingredients combine. Overmixing adds too much air and can make the bread dense. Also, make sure you measure the flour correctly. Too much flour can lead to a heavy loaf. Use a spoon to scoop the flour, then level it with a knife. Lastly, make sure your baking powder and baking soda are fresh. Old leavening agents won’t rise the bread properly. Yes, you can use other fruits! Bananas or apples can be great substitutes. They add moisture and flavor. You can also try peaches or raspberries for a twist. Just make sure to chop the fruits into small pieces. If you choose fruits with higher moisture, reduce the amount of zucchini slightly. This keeps the bread from becoming too wet. Homemade zucchini bread lasts 3 to 4 days at room temperature. Store it in an airtight container or wrap it tightly in plastic wrap. If you want it to last longer, freeze it. Wrap slices in plastic wrap, then place them in a freezer bag. It can last up to 3 months in the freezer. Just thaw it in the fridge overnight before enjoying. For the best taste, eat it fresh within the first few days. Lemon blueberry zucchini bread is a tasty treat you can make with easy steps. First, we looked at key and optional ingredients to add flavor. Then, we went through simple instructions for mixing and baking. I shared tips to help you get the best texture and storage advice to keep it fresh. Lastly, I offered variations to fit your taste. Enjoy making this bread, and feel free to explore different flavors. You’ll create something delicious that's perfect for any time!](https://toastedrecipes.com/wp-content/uploads/2025/07/43f4976e-dbeb-4308-87fb-8c2aea04b3f5.webp)
Savory Lemon Blueberry Zucchini Bread Recipe
Are you ready to bake a delicious treat that’s both sweet and savory? My Savory Lemon Blueberry Zucchini Bread mixes fresh flavors for a fun

Delicious Blueberry Zucchini Bread Easy to Bake Treat
Are you ready for a tasty twist on your baking routine? This delicious blueberry zucchini bread is not only easy to make, but it also
![- 1 ½ cups finely grated zucchini - 1 cup all-purpose flour - ½ cup unsweetened cocoa powder - 1 tsp baking soda - ½ tsp baking powder - ½ tsp salt - ½ cup granulated sugar - ½ cup brown sugar, packed - 2 large eggs - ½ cup vegetable oil - 1 tsp vanilla extract - ½ cup semi-sweet chocolate chips (optional) How to properly grate zucchini Grating zucchini is easy. First, wash the zucchini well. Use a box grater or a food processor. Grate it until you have fine pieces. This helps the zucchini mix well into the batter. Do not peel the zucchini; the skin adds flavor and nutrients. Importance of using fresh ingredients Fresh ingredients make a big difference in flavor. Choose firm zucchini without soft spots. Fresh eggs should be kept in the fridge and used before the expiration date. Also, check your flour and cocoa powder for freshness. Old ingredients can lead to a dry or flat cake. Using fresh items helps create a moist and rich treat. First, we need to prepare the zucchini. Use a box grater to finely grate it. You want about 1 ½ cups of grated zucchini. Once grated, place the zucchini in a medium bowl. Sprinkle a pinch of salt on top. This step helps draw out moisture. Let it sit for about 10 minutes. After 10 minutes, grab a clean kitchen towel. Place the grated zucchini in the towel, then squeeze tightly. You want to remove as much liquid as possible. This keeps your cake from being too wet. Now, let’s mix the ingredients. In one bowl, combine the dry ingredients. This includes the flour, cocoa powder, baking soda, baking powder, and salt. Use a whisk to blend them well. In a separate bowl, beat the granulated sugar, brown sugar, and eggs. Mix until the mixture is light and fluffy. Then, add the vegetable oil and vanilla extract. Stir until everything is well combined. Next, slowly add the dry mixture to the wet mixture. Stir gently until just combined. Finally, fold in the squeezed zucchini and chocolate chips if you like. Now, it’s time to bake! Pour the batter into a greased 8x8-inch baking pan. Spread it evenly. Preheat your oven to 350°F (175°C). Bake for 25 to 30 minutes. To check for doneness, use a toothpick. Insert the toothpick into the center of the cake. If it comes out clean, the cake is done. Let it cool in the pan for about 10 minutes. Then, transfer it to a wire rack to cool completely. Enjoy your easy chocolate zucchini cake! For the full recipe, check out the [Full Recipe]. To get a great texture in your cake, do not overmix the batter. When you mix too much, the cake can turn out tough. Mix just until you see no dry flour. This keeps the cake light and fluffy. Remember, it's okay if there are a few lumps. They will bake out nicely. You can make your cake extra special with some spices or extracts. A pinch of cinnamon or nutmeg adds warmth. You can also try adding a teaspoon of almond or orange extract for a fresh twist. These flavors blend well with the chocolate and zucchini. To make your cake look fancy, dust it with powdered sugar. You can also drizzle a chocolate glaze on top. Serve each slice with whipped cream and a bit of fresh mint. These small touches make your cake shine at any gathering. For the full recipe, check out the details above. {{image_2}} If you need a gluten-free option, consider using almond flour or coconut flour. Both work well in this cake. You can also try a gluten-free all-purpose flour blend. Just check that it contains xanthan gum for best results. Each substitute may change the texture slightly, but they still taste great. You can switch up the chocolate type for fun flavors. Dark chocolate gives a rich taste. Milk chocolate makes it sweeter. You can also add nuts like walnuts or pecans to the batter. Just chop them roughly and fold them in with the zucchini. This adds a nice crunch to each bite. Pairing the cake with ice cream is a fantastic choice. Vanilla ice cream goes well, but chocolate or mint can add a twist. Fresh fruits like berries or sliced bananas can brighten up the dish too. You can serve these on the side or top the cake with them. For an extra treat, drizzle a bit of chocolate sauce on top. For the full recipe, check out the details above. After baking, let the cake cool completely. This keeps it moist. Cover the cake with plastic wrap or aluminum foil. You can also place it in an airtight container. This protects it from drying out. Store it in the fridge if you plan to eat it in a few days. Want to save some for later? Slice the cake into pieces. Wrap each slice tightly in plastic wrap. Then, place the slices in a freezer bag. Be sure to label the bag with the date. This way, you can enjoy it later. Just thaw the slices in the fridge overnight before serving. The cake stays fresh for about 3 to 4 days in the fridge. If you freeze it, it keeps well for about 2 to 3 months. This makes it a great treat to have on hand. Enjoy your chocolate zucchini cake whenever you want! For the full recipe, check out the complete guide to make this delightful treat. You can use carrots or apples instead of zucchini. Both provide moisture. Grated carrots add sweetness and texture. Apples give a nice flavor and moisture. Each option offers a unique twist on the cake but still keeps it moist and rich. Zucchini contains a lot of water. When you bake with it, this moisture makes the cake soft. The key is to squeeze out some water first. This helps balance the wet and dry ingredients. This balance helps the cake rise and stay tender. Yes, you can make the cake a day in advance. Let it cool completely before wrapping it. Store it in an airtight container. For longer storage, freeze slices. When you’re ready to eat, thaw and enjoy. This cake stays tasty for up to four days. Check out the Full Recipe for more tips! This blog post covered how to create a delicious zucchini cake. We discussed key ingredients like zucchini and cocoa powder and how to prepare them correctly. I shared step-by-step instructions and tips for the best texture and flavor. You can also explore fun variations and learn about storage options. Zucchini cake is a unique treat that combines veggies with sweetness. Try making it for your next gathering or cozy night in. Enjoy every bite!](https://toastedrecipes.com/wp-content/uploads/2025/07/02944de0-1735-48f5-b971-2e24baa92d9f.webp)
Easy Chocolate Zucchini Cake Delightfully Rich Treat
Welcome to your new favorite dessert! This Easy Chocolate Zucchini Cake is a delightful, rich treat that surprises everyone. You won’t believe it has zucchini