Breakfast
![To make the Easy Bundt Cake Breakfast Delight, you need these simple ingredients: - 2 cups all-purpose flour - 1 cup granulated sugar - 1/2 cup unsalted butter, softened - 1 cup Greek yogurt (plain or vanilla) - 3 large eggs - 1 teaspoon vanilla extract - 1 teaspoon baking powder - 1/2 teaspoon baking soda - 1/4 teaspoon salt - 1 cup mixed berries (blueberries, raspberries, and strawberries) - 1 tablespoon lemon juice - 1 teaspoon lemon zest - Optional: powdered sugar for dusting These ingredients are easy to find in any grocery store. The butter and yogurt add moisture, while the berries give a burst of flavor. The lemon juice and zest help brighten the taste. If you want to make it extra special, a dusting of powdered sugar makes it look lovely. For the full recipe, you can refer to [Full Recipe]. 1. Preheat the oven and prepare the bundt pan. Start by setting your oven to 350°F (175°C). Grease your bundt pan well with butter or a non-stick spray. This step ensures your cake comes out easily after baking. 2. Mix wet ingredients for the batter. In a large bowl, combine 1/2 cup softened butter and 1 cup granulated sugar. Beat them together until the mixture is light and fluffy. Add in 1 cup Greek yogurt, 3 large eggs, and 1 teaspoon vanilla extract. Stir until everything is well mixed. 3. Combine dry ingredients separately. In another bowl, whisk together 2 cups all-purpose flour, 1 teaspoon baking powder, 1/2 teaspoon baking soda, and 1/4 teaspoon salt. Mixing these dry ingredients first helps avoid lumps in your batter. 1. Fold in berries and pour batter into the pan. Gently toss 1 cup of mixed berries with 1 tablespoon lemon juice and 1 teaspoon lemon zest. Carefully fold these berries into your wet batter. Then, pour this mixture into the prepared bundt pan, smoothing the top with a spatula. 2. Baking time and temperature guidelines. Place your pan in the preheated oven. Bake for 40-45 minutes. Use a toothpick to check doneness; it should come out clean when inserted into the center of the cake. 1. Cooling the cake properly. After baking, take the cake out and let it cool in the pan for about 10 minutes. Then, invert it onto a wire rack to cool completely. This method prevents sogginess. 2. Optional garnishing tips for serving. Once cooled, you can dust the cake with powdered sugar for a sweet touch. Serve it on a nice cake stand, topped with fresh berries. This adds color and makes it look beautiful. Enjoy your easy bundt cake breakfast delight with coffee or tea. For the full recipe, check the details above. To achieve a moist bundt cake, use fresh ingredients. Make sure your butter is softened, but not melted. This helps create a light texture. Mixing the batter too much can make the cake dense. You want to mix just until the flour disappears. This keeps your cake fluffy and tender. If you don’t have Greek yogurt, you can use sour cream or buttermilk. Both will keep your cake moist. For butter, try using coconut oil or applesauce for a lighter option. Seasonal fruits work great, too! Swap in peaches or apples in summer or fall for a fun twist. Serve your cake on a beautiful cake stand. Garnish it with fresh berries and a light dusting of powdered sugar. This adds color and makes it look fancy. Pair it with a cup of coffee or tea, and it’s perfect for breakfast! You can also slice it and serve with yogurt or whipped cream for a treat. {{image_2}} You can easily change the taste of your bundt cake. Try adding spices like cinnamon or nutmeg for warmth. Both spices pair well with fruit. You can also switch up the fruit you use. Instead of mixed berries, consider chopped apples or peaches. Each fruit gives the cake a new flavor. If you want a healthier bundt cake, there are simple swaps. You can reduce the sugar by half or use natural sweeteners like honey or maple syrup. These options keep the cake sweet without adding too much sugar. Another option is to use whole wheat flour instead of all-purpose flour. This change adds fiber and nutrients to your cake. Add-ins can make your bundt cake even more special. Consider mixing in nuts like walnuts or pecans for a crunchy texture. Chocolate chips are another great option for a sweet surprise. You can also create themed variations. For example, during holidays, add spices like ginger or pumpkin for a seasonal twist. Each variation makes your bundt cake unique and fun. Check the Full Recipe for more ideas! To keep your bundt cake fresh, wrap it in plastic wrap. This protects it from air and moisture. You can also store it in an airtight container. The cake stays good for about 3 to 5 days at room temperature. If you see any mold, throw it away. For freezing, slice the bundt cake first. Wrap each slice tightly in plastic wrap. Then place the slices in a freezer bag. This method keeps the cake tasty for up to three months. When you want to enjoy a slice, take it out of the freezer and put it in the fridge overnight. This helps it thaw slowly. To reheat, place a slice on a microwave-safe plate. Heat it for 10 to 15 seconds. Check if it’s warm enough; if not, add a few more seconds. Serving it warm makes it extra yummy. You can also serve it at room temperature. It tastes great either way! Enjoy it with your favorite drink. For more details, check the Full Recipe. Can I make this cake ahead of time? Yes, you can make this cake a day early. Just store it in an airtight container. This keeps it moist and fresh. You can serve it at breakfast or brunch. What can I substitute for eggs? You can use applesauce or mashed bananas. Use 1/4 cup of either for each egg. This works well in most cakes and keeps them moist. Why is my bundt cake dense? A dense cake can come from overmixing the batter. Make sure to mix just until combined. Also, check if your baking powder is fresh. Old baking powder may not rise well. What if my bundt cake sticks to the pan? To avoid sticking, grease the pan well with butter or non-stick spray. You can also dust it with flour after greasing. If it still sticks, run a knife around the edges to help loosen it. Can I use a different cake pan? Yes, you can use a different pan, but baking time may change. If you use a loaf pan, it may take longer. Just keep an eye on it while baking. Tips for checking the doneness of the cake Insert a toothpick into the center of the cake. If it comes out clean, the cake is done. If it has wet batter, bake it a few more minutes. This bundt cake recipe combines delicious flavors and simple steps. You learned about key ingredients, baking tips, and practical variations. Remember to prep well for the best results. Use fresh fruit and pay attention to texture for a moist cake. Don't hesitate to experiment with flavors or sugar options. With these tools, you can create a delightful treat. Enjoy every slice and share your masterpiece with others. You’ve got this!](https://toastedrecipes.com/wp-content/uploads/2025/04/610a8b74-ca88-45c0-9c44-90350e1eb8ca.webp)
Easy Bundt Cake Breakfast Delight in 50 Minutes
Start your day with a burst of flavor and joy! In just 50 minutes, you can whip up a delightful bundt cake that’s perfect for
![- 1 package (16 oz) refrigerated biscuit dough - 1 pound breakfast sausage (preferably spicy) - 1/4 cup all-purpose flour - 2 cups milk - 1/2 teaspoon garlic powder - 1/2 teaspoon onion powder - 1/2 teaspoon black pepper - 1 teaspoon salt - 4 large eggs - 1 cup shredded cheddar cheese - Fresh chives or parsley for garnish (optional) I love using these fresh and simple ingredients to make my biscuits and gravy breakfast casserole. The biscuit dough gives a soft base, while the spicy sausage packs in the flavor. Flour and milk create a rich gravy that pairs perfectly with the eggs and cheese. Together, these ingredients make a tasty dish that is both filling and comforting. - Additional spices (e.g., cayenne pepper for heat) - Different cheeses (e.g., pepper jack or mozzarella) - Vegetables (e.g., bell peppers or spinach) Feel free to mix in some optional ingredients to make it your own. A touch of cayenne can add a nice kick. You can switch up the cheese, too. If you want extra veggies, bell peppers or spinach work great. These little tweaks can elevate your casserole and surprise your taste buds. For the full recipe, refer to the [Full Recipe]. 1. Preheat the oven to 350°F (175°C). This will make sure the casserole cooks evenly. 2. In a large skillet, brown the sausage over medium heat. Break it into small pieces as it cooks. Cook it until it is no longer pink. 1. After the sausage is cooked, sprinkle the flour over it. Stir to combine, cooking for 1-2 minutes. This helps to toast the flour. 2. Gradually pour in the milk while stirring. This keeps lumps from forming. Add the garlic powder, onion powder, black pepper, and salt. Cook until the mixture thickens, which takes about 5-7 minutes. Then remove it from the heat. 3. In a large bowl, whisk the eggs until fully beaten. Add the shredded cheddar cheese and gently fold it in. 4. Cut the biscuit dough into quarters. Add it to the egg and cheese mixture. Stir until just combined. 1. Grease a 9x13 inch baking dish. Pour half of the biscuit mixture into the bottom. 2. Layer the sausage gravy over the biscuit mixture. 3. Top with the rest of the biscuit mixture, spreading it evenly. 4. Bake in your preheated oven for 25-30 minutes. Look for a golden brown color to know it is done. For the complete guide, check out the Full Recipe. Enjoy this hearty meal! To get the perfect gravy consistency, start by cooking the sausage well. Brown it until it’s fully cooked. After that, add flour, stirring for a few minutes. Then, stir in milk slowly. This helps avoid lumps. Cook the mixture until it thickens, about 5-7 minutes. If it’s too thick, add a bit more milk. Letting the casserole cool before serving is key. This allows the layers to set. If you cut it too soon, it may fall apart. A few minutes of patience makes a big difference for perfect slices. When plating your Biscuits and Gravy Breakfast Casserole, cut it into squares. Serve it warm for the best taste. Drizzle extra sausage gravy on top for a delicious touch. Fresh herbs like chives or parsley can add color and flavor. For side dishes, consider fresh fruit or breakfast potatoes. These add freshness and balance to your meal. A nice fruit salad pairs well and adds a bright touch to your plate. One mistake to avoid is overcooking the biscuits. Keep an eye on the casserole while it bakes. You want them golden brown but not dry. Another common issue is not seasoning the sausage properly. Taste the gravy mixture before baking. You can add more salt or pepper if needed. This helps the flavors shine in your casserole. For a complete guide, check out the Full Recipe. {{image_2}} You can easily switch up the meats in this dish. Try using turkey sausage for a leaner option. If you want a vegetarian meal, use a plant-based sausage. Both options taste great and fit well with the gravy. For those who need gluten-free options, look for gluten-free biscuit dough. Many brands offer tasty choices. You can still enjoy this dish without the gluten! If you crave a kick, go for a Southwest twist. Add diced jalapeños and pepper jack cheese to the gravy. This gives your casserole a spicy flair that wakes up your taste buds. For a fresh Italian vibe, add spinach and mozzarella cheese. The spinach adds color and nutrients, while the mozzarella brings a creamy texture. Both options make this dish exciting and unique. Think about how you want to serve this casserole. You can make it family-style in a big dish or serve it in individual portions. Cutting it into squares gives everyone their own piece. Garnishing makes a big difference. Fresh herbs like chives or parsley add color and flavor. You can drizzle extra gravy on top for a tasty touch. These small changes make your casserole look as good as it tastes. After enjoying your Biscuits and Gravy Breakfast Casserole, let it cool. This step helps keep the texture. Place the leftovers in an airtight container. Glass containers work well, but plastic ones are fine too. Store them in the fridge for up to three days. To reheat, you have two options: the oven or the microwave. For the oven, preheat it to 350°F (175°C). Place the casserole in a baking dish and cover it with foil. Heat for about 15-20 minutes, or until warm. The microwave is quicker. Use a microwave-safe dish and cover it loosely. Heat for about 1-2 minutes, checking often. This keeps the casserole moist and tasty. If you want to save some for later, freezing works great. Allow the casserole to cool completely. Cut it into squares, and wrap each piece in plastic wrap. Then, place them in a freezer-safe bag. This way, you can grab one when needed. To thaw, move it to the fridge overnight. Bake it at 350°F (175°C) for 20-25 minutes. Enjoy this delicious meal anytime, even from frozen! For the full recipe, check out the link. Yes, you can prepare this casserole the night before. First, make the sausage gravy and biscuit mixture as usual. After mixing, store them in the fridge overnight. In the morning, simply layer the biscuit mixture and gravy in your baking dish. Bake it as directed, and enjoy a hot meal with no fuss. This method saves time and makes for a stress-free morning. Yes, frozen biscuits work great in this recipe. Just follow the package instructions for baking. If you use frozen biscuits, bake them first and then cut them into pieces for the casserole. This keeps the biscuits light and fluffy. You can also use refrigerated dough if you prefer a quicker option. This casserole pairs well with fresh fruit, like berries or melons. A side of crispy breakfast potatoes adds a nice crunch. For drinks, consider coffee or fresh juice. These options create a balanced breakfast that everyone will love. Enjoy your meal with a side that complements the rich flavors of the casserole. This Biscuits and Gravy Breakfast Casserole is a tasty choice for any morning. It combines savory sausage, fluffy biscuits, and creamy gravy for a crowd-pleaser. You can spice it up or change the cheese to fit your taste. Remember, let it cool before serving for the best texture. With simple steps for prep and cooking, you’ll impress everyone. Enjoy leftovers by storing them right, and know you can even freeze it for a busy day. This dish is sure to brighten your breakfast table.](https://toastedrecipes.com/wp-content/uploads/2025/04/bb8388a2-7ed8-460d-9188-85984d25d507.webp)
Biscuits and Gravy Breakfast Casserole Delight
Are you ready to elevate your breakfast game? This Biscuits and Gravy Breakfast Casserole Delight will make your mornings unforgettable. Packed with savory sausage, fluffy
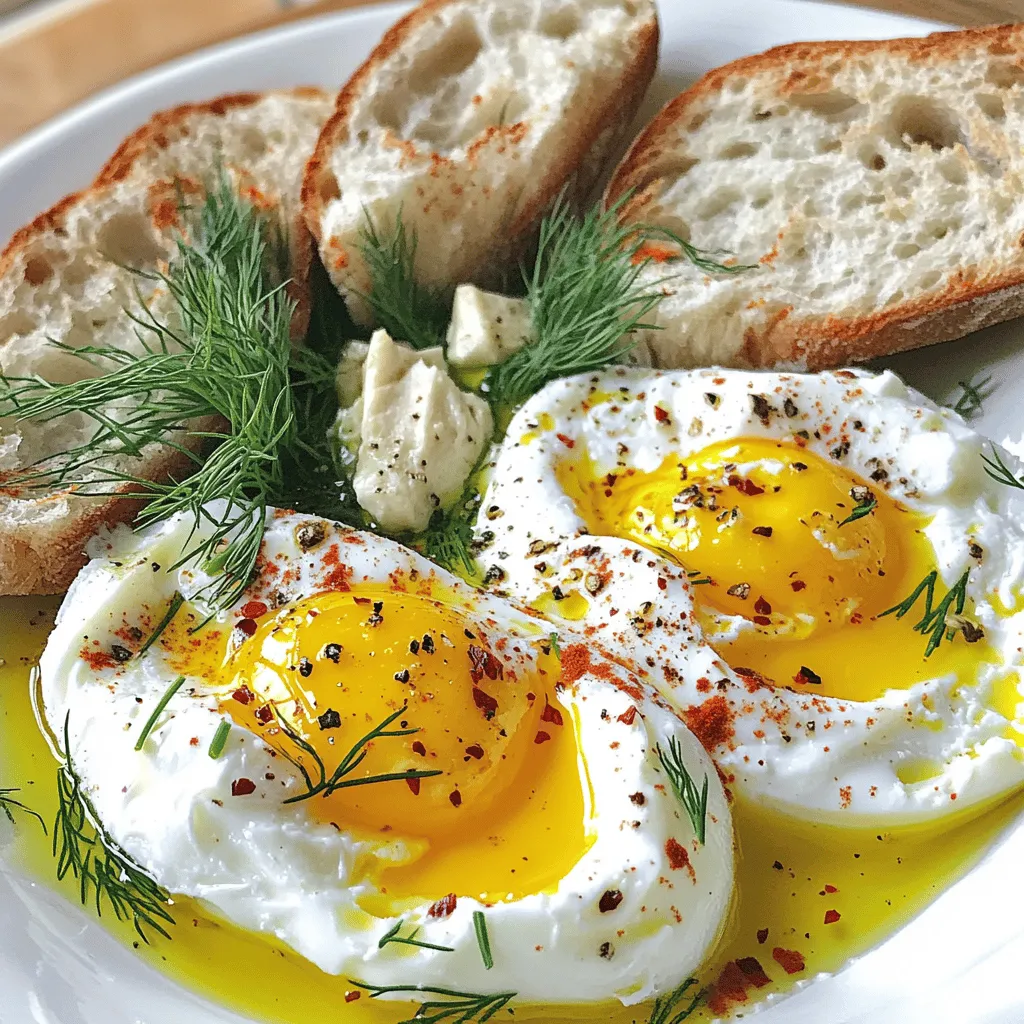
Turkish Eggs (Cilbir) Irresistible Flavor Experience
Looking for a dish that packs a punch of flavor? Turkish Eggs, or Cilbir, deliver a delightful taste sensation. This dish combines creamy yogurt, perfectly