Breakfast

- 1 cup all-purpose flour - 2 tablespoons sugar - 2 teaspoons baking powder - 1/2 teaspoon salt - 1 cup milk - 1 large egg - 2 tablespoons unsalted butter, melted - 1 teaspoon vanilla extract - 1/2 teaspoon ground cinnamon - Maple syrup for drizzling - Optional: Chopped nuts or chocolate chips Each ingredient plays a role in the flavor and texture of your poppers. All-purpose flour gives the right structure. Sugar adds sweetness. Baking powder makes them rise and be fluffy. Salt enhances the overall taste. Milk adds moisture and richness. The egg binds everything together and adds protein. Butter provides a lovely flavor. Vanilla extract adds warmth, and ground cinnamon brings a hint of spice. Fresh ingredients make your poppers taste better and ensure they rise perfectly. If you need gluten-free options, use gluten-free flour blends. For a dairy-free version, swap milk with almond or oat milk. You can also try honey or maple syrup as sweetener alternatives. These changes keep your pancake poppers tasty and fun for everyone! For the full recipe, check the recipe section above. Mixing dry ingredients: Start by taking a large mixing bowl. Add 1 cup of all-purpose flour, 2 tablespoons of sugar, 2 teaspoons of baking powder, 1/2 teaspoon of salt, and 1/2 teaspoon of ground cinnamon. Whisk these dry ingredients together until they blend well. This step is key for even flavor. Combining wet ingredients: In another bowl, whisk together 1 cup of milk, 1 large egg, 2 tablespoons of melted unsalted butter, and 1 teaspoon of vanilla extract. Mix until the ingredients are fully combined. Pour this mixture into the dry ingredients. Stir gently until it's just mixed. Remember, it is okay to leave a few lumps! Preheating the oven: Preheat your oven to 350°F (175°C). If you are using a non-stick mini muffin pan or a doughnut hole pan, place it in the oven to get hot. This helps the poppers to rise nicely. Filling the molds and baking time: Once the pan is hot, take it out and lightly grease it with cooking spray or brush it with oil. Fill each mold about 2/3 full with the pancake batter. Bake in the preheated oven for 10-12 minutes. They should turn golden and a toothpick should come out clean when inserted. Cooling and drizzling with maple syrup: After baking, allow the pancake poppers to cool slightly. This makes them easier to remove from the pan without breaking. Once cooled, drizzle warm maple syrup over them for a sweet touch. Presentation tips for serving: Arrange the pancake poppers on a platter. You can place small dishes of maple syrup for dipping. To make them look even more special, sprinkle powdered sugar on top before serving. This simple touch makes them a hit at any gathering. To make the best maple pancake poppers, avoid over-mixing the batter. When you mix the wet and dry ingredients, stir gently. A few lumps are fine. Over-mixing can make the poppers tough, not fluffy. Ensuring even baking is key. Preheat your oven to 350°F (175°C) before putting the pan inside. This helps the poppers rise nicely. Use a mini muffin or doughnut hole pan for best results. Lightly grease the molds to prevent sticking. One common mistake is measuring ingredients incorrectly. Always use proper measuring cups for dry and liquid ingredients. Too much flour can make the poppers dry. Another mistake is failing to preheat the pan. A cold pan will lead to uneven baking. Always remember to preheat your pan. This step is crucial for getting that golden brown color. To boost flavor and texture, consider adding mix-ins like nuts or chocolate chips. Chopped walnuts or pecans add a nice crunch. Chocolate chips bring sweetness and fun. You can also flavor the batter. A bit of orange zest or a dash of almond extract brings a new twist. Experiment with different spices, like nutmeg, for added warmth. Each change can make your poppers exciting and delicious. For the full recipe, check the recipe card. {{image_2}} You can easily change the flavor of your maple pancake poppers. Try banana pancake poppers. Just mash one ripe banana and mix it into the wet ingredients. This will give your poppers a sweet banana taste. Another great option is blueberry pancake poppers. Add one cup of fresh or frozen blueberries to the batter before baking. The burst of flavor from the blueberries makes every bite special. You can also make seasonal adaptations. In fall, try pumpkin spice poppers. Just add half a cup of pumpkin puree and one teaspoon of pumpkin spice to the batter. This will give your poppers a warm, cozy flavor. For the holidays, consider peppermint pancake poppers. Add a teaspoon of peppermint extract to the batter. You can also sprinkle crushed candy canes on top for a festive touch. If you need dietary variations, I have some ideas. Make vegan-friendly maple pancake poppers by using plant-based milk and replacing the egg with a flaxseed egg. Just mix one tablespoon of ground flaxseed with three tablespoons of water and let it sit for five minutes. For a protein-packed option, you can add protein powder to the batter. Replace a quarter cup of flour with protein powder. This boosts the nutrition without changing the taste. Explore these variations to make your maple pancake poppers unique! You can find the full recipe [here]. To keep your pancake poppers fresh, store them in an airtight container. Place a piece of parchment paper between layers to avoid sticking. These poppers last about 3 to 5 days in the fridge. To freeze pancake poppers, let them cool completely. Then, place them in a single layer on a baking sheet. Once frozen, transfer them to a freezer bag. They keep well for up to 3 months. For best reheating, use an oven set at 350°F (175°C). Place the poppers on a baking sheet and heat for about 10 minutes. This method keeps them warm and fluffy. You can also microwave them for about 20-30 seconds, but they might not stay as crisp. Got leftover batter? You can make waffles or pancakes with it! Just adjust the cooking time. If you have extra ingredients, consider making a small batch of muffins or adding them to smoothies. This way, you enjoy every part of your cooking adventure! Can I make pancake poppers in advance? Yes, you can make these poppers ahead of time. Bake them, let them cool, and store them in an airtight container. They stay fresh for up to three days in the fridge. Just reheat them in the oven or microwave before serving. What can I serve with maple pancake poppers? Maple pancake poppers pair well with many tasty options. Serve them with fresh fruit like strawberries or blueberries. You can also offer whipped cream, yogurt, or a dollop of nut butter for extra flavor. Drizzle more maple syrup on top for a sweet touch. Why are my pancake poppers not rising? If your poppers don’t rise, it’s likely due to old baking powder. Always check the expiration date. Also, make sure to mix the batter without overdoing it. Over-mixing can lead to dense poppers. How can I make pancake poppers more fluffy? To boost fluffiness, separate the egg yolk and white. Whip the egg white to stiff peaks, then fold it into the batter gently. This adds air and makes them lighter. Can I use whole wheat flour instead of all-purpose flour? Absolutely! Whole wheat flour adds more fiber and nutrients. You may need to adjust the liquid slightly. Start with a bit less milk and add more if the batter is too thick. How to adjust the recipe for larger or smaller batches? To change batch size, simply scale the ingredients. For half the recipe, use half the amounts. For double, just double everything. Use a measuring cup for accuracy to keep the taste just right. This blog post shared how to make delicious maple pancake poppers. You learned about the key ingredients, their benefits, and substitutes. I provided step-by-step instructions for easy preparation and baking. Helpful tips will keep your poppers perfect, while tasty variations let you get creative. Store leftovers well and reduce waste with smart ideas. Now, you can enjoy tasty treats any time! Happy cooking and enjoy your pancake poppers!
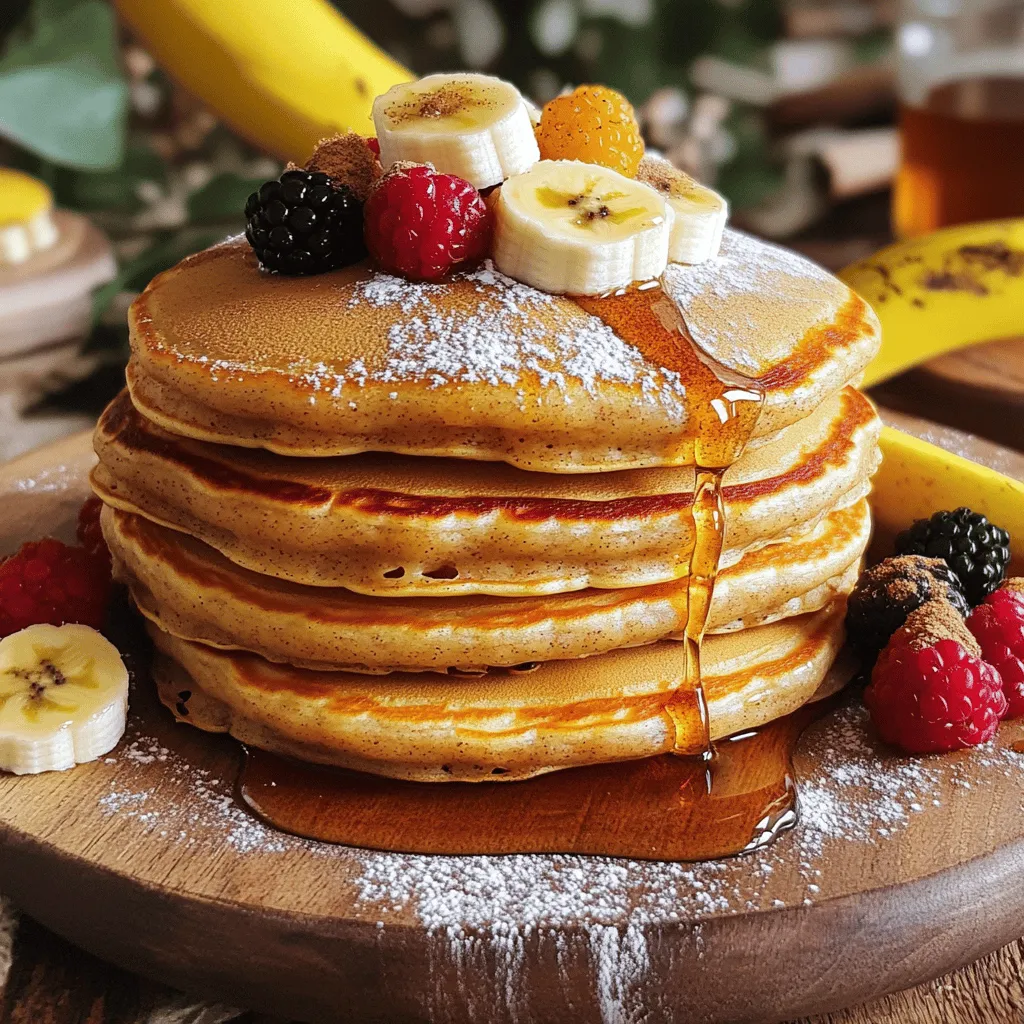
Maple Pancake Poppers Tasty Treat for Any Occasion
Get ready to enjoy a fun twist on breakfast with my Maple Pancake Poppers! Perfect for any occasion, these bite-sized treats combine the classic flavors
Cinnamon brown sugar pancakes are a delightful treat. They are fluffy and easy to make. You will love the warm spices and sweet flavor. This recipe uses simple ingredients that you may already have. - Flour Use 1 cup of all-purpose flour. This gives the pancakes structure. - Brown Sugar Add 2 tablespoons of brown sugar. This adds sweetness and a hint of caramel flavor. - Baking Powder and Baking Soda Use 1 teaspoon of baking powder and 1/2 teaspoon of baking soda. These help the pancakes rise and become fluffy. - Ground Cinnamon Add 1/2 teaspoon of ground cinnamon. This gives the pancakes their warm and cozy taste. - Salt A small pinch of salt (1/4 teaspoon) enhances all the flavors. - Buttermilk (or substitute) Use 1 cup of buttermilk for a rich taste. If you don’t have buttermilk, mix regular milk with a splash of vinegar. - Large Egg One large egg adds moisture and helps bind the batter. - Melted Butter Use 2 tablespoons of melted butter for flavor. You will need more butter for cooking too. - Vanilla Extract Add 1 teaspoon of vanilla extract. This adds depth to the flavor. - Optional Add-ins You can mix in chopped nuts or chocolate chips for fun flavor twists. Start by gathering your dry ingredients. You need: - 1 cup all-purpose flour - 2 tablespoons brown sugar - 1 teaspoon baking powder - 1/2 teaspoon baking soda - 1/2 teaspoon ground cinnamon - 1/4 teaspoon salt In a large bowl, whisk together these ingredients. Make sure they mix well. This step is key for even flavor in your pancakes. Now, let’s prepare the wet ingredients. In another bowl, combine: - 1 cup buttermilk (or milk with a splash of vinegar) - 1 large egg - 2 tablespoons melted butter - 1 teaspoon vanilla extract Whisk these together until fully mixed. This helps create a smooth batter once we combine everything. Next, pour the wet mixture into the dry ingredients. Use a spatula to mix gently. It’s okay if the batter has a few lumps. Overmixing can make the pancakes tough. If you want, you can fold in some chopped nuts or chocolate chips for extra flavor. Heat a non-stick skillet or griddle over medium heat. Add a little butter to grease the surface. For each pancake, pour 1/4 cup of batter onto the skillet. Cook until bubbles form on top and the edges look set, about 2-3 minutes. Then, flip the pancakes. Cook for another 1-2 minutes until they turn golden brown. Stack your pancakes on a plate. Drizzle with maple syrup and sprinkle with powdered sugar and a bit more cinnamon. For a pop of color, add fresh fruit like sliced bananas or berries. Enjoy your fluffy cinnamon brown sugar pancakes! For the full recipe, refer back to the earlier section. To make your pancakes fluffy, use fresh baking powder. This helps them rise well. Mix dry and wet ingredients gently. Overmixing makes the pancakes dense. Let the batter rest for a few minutes. This gives time for the baking powder to activate. You can also separate the egg and whip the white. Fold it in at the end for an extra lift. Avoid using too much flour. Measuring it correctly is key. Scooping directly from the bag packs it down. You want a light, airy batter. Don't skip the buttermilk or its substitute. It adds flavor and helps with texture. Lastly, don't flip the pancakes too soon. Wait for bubbles to form on the surface. This ensures even cooking. A non-stick skillet works best for cooking pancakes. It prevents sticking and ensures even heat. A flat spatula helps flip them easily. A ladle or measuring cup makes pouring the batter simple. If you have a griddle, that’s great too! It can cook multiple pancakes at once. For the perfect pancake, keep your heat at medium. This avoids burning while allowing them to cook through. For the full recipe, check out the Cinnamon Brown Sugar Pancakes section! {{image_2}} You can change the taste of your pancakes with seasonal ingredients. Try adding pumpkin puree in the fall. It gives a warm, cozy feel. In summer, fresh berries like blueberries or strawberries add a fruity twist. These fruits can also make your pancakes more colorful and fun. You can mix in grated apples in winter for a sweet crunch. These added ingredients can bring new life to your pancakes. You can easily make these pancakes vegan. Swap the egg with a mashed banana or flaxseed meal mixed with water. For milk, use almond, soy, or oat milk. To make them gluten-free, use a good gluten-free flour blend. This way, everyone can enjoy delicious pancakes. Just ensure the baking powder is gluten-free as well. Adding chocolate chips or nuts makes pancakes even yummier. Chocolate chips give a sweet burst in every bite. You can use dark, milk, or even white chocolate, depending on your taste. Chopped walnuts or pecans add a nice crunch and nutty flavor. Mix these add-ins into the batter before cooking. This is your chance to get creative. You can try different combos to find your favorite flavor. For the full recipe, check out the details above. To store leftover pancakes, let them cool first. Stack the pancakes with a piece of wax paper between each one. This keeps them from sticking together. Place the stack in an airtight container. You can also use plastic wrap. Store them in the fridge for up to three days. To reheat pancakes, use a microwave or a skillet. For the microwave, place a pancake on a plate. Heat it for about 20-30 seconds. Check if it's warm enough; if not, heat a bit longer. For a skillet, add a little butter over low heat. Warm the pancake for about one minute on each side. This makes them nice and soft again. To freeze pancakes, make sure they are fully cool. Stack them with wax paper in between, just like for the fridge. Place the stack in a freezer-safe bag or container. Seal tightly to prevent freezer burn. You can freeze them for up to three months. When you’re ready to eat, just reheat them as usual. This way, you can enjoy your cinnamon brown sugar pancakes any time! For the full recipe, check out the earlier section. To make pancakes fluffier, use fresh baking powder. Always sift dry ingredients. This helps mix air into the batter. Also, don’t overmix your batter. A few lumps are fine. Let the batter rest for a few minutes before cooking. This lets the baking powder work better. Yes, you can substitute buttermilk. Mix regular milk with a splash of vinegar or lemon juice. Let it sit for five minutes before using. This mimics buttermilk's tangy flavor. You can also use yogurt mixed with water for a similar result. Pancakes will last about three to four days in the fridge. Store them in an airtight container. Place parchment paper between layers to prevent sticking. If you want them to last longer, consider freezing them instead. Many toppings suit cinnamon brown sugar pancakes. Try maple syrup for sweetness. Fresh fruits like bananas or berries add color and flavor. You can also sprinkle nuts for crunch. Whipped cream or yogurt makes a lovely addition too. To prevent pancakes from sticking, use a non-stick skillet. Heat it well before pouring batter. Always add a little butter or oil. Wipe the pan with a paper towel to spread it evenly. This ensures a nice, golden brown pancake without sticking. This blog post covered everything you need for making perfect pancakes. We discussed the key ingredients, like flour and brown sugar, and shared a step-by-step guide to cooking. You learned tips for fluffy pancakes and ways to customize your recipe with seasonal ingredients. In the end, pancakes are fun and easy to make. Don't hesitate to experiment with flavors or serve them your way. Enjoy your cooking journey!
Cinnamon Brown Sugar Pancakes Fluffy and Easy Recipe
Get ready for a pancake treat! My Cinnamon Brown Sugar Pancakes are fluffy and easy to make. With simple ingredients like brown sugar and cinnamon,
To make my pumpkin chocolate chip pancakes, you need a few simple ingredients. Here’s the list: - 1 cup all-purpose flour - 1 tablespoon baking powder - 1 teaspoon ground cinnamon - 1/2 teaspoon ground nutmeg - 1/4 teaspoon ground ginger - 1/2 teaspoon salt - 1 cup canned pumpkin puree - 1 cup buttermilk (or milk with vinegar) - 2 large eggs - 2 tablespoons brown sugar - 1 teaspoon vanilla extract - 1/2 cup chocolate chips - Butter or oil for cooking These ingredients bring together a warm, cozy flavor. Pumpkin puree gives the pancakes a soft texture. The spices add warmth and aroma, while the chocolate chips lend a sweet touch. You can find canned pumpkin puree in the store, or make your own if you feel adventurous. Each ingredient plays a part in making this dish fluffy and delicious. For the full recipe, check out the details above. - First, sift the flour and baking powder into a bowl. - Next, combine the spices: cinnamon, nutmeg, ginger, and salt. This step ensures everything mixes well. Sifting adds air and makes the flour lighter. Mixing the spices adds flavor. - In another bowl, combine the pumpkin puree, buttermilk, and eggs. - Whisk in the brown sugar and vanilla extract. These wet ingredients bring moisture and taste. Pumpkin adds a lovely color and flavor. Buttermilk gives a nice tang. - Fold the wet ingredients into the dry ingredients gently. - Carefully incorporate the chocolate chips. Do not overmix! A few lumps are okay. Folding keeps the pancakes fluffy and light. - Heat a non-stick skillet over medium heat and add butter or oil. - Pour 1/4 cup of batter for each pancake. Cook until bubbles form. - Flip the pancakes and cook until golden brown. Watch for bubbles! This means they are ready to flip. Cooking at medium heat helps them cook evenly. For the full recipe, check the ingredients section. Enjoy your cooking! To make your pancakes fluffy, avoid overmixing the batter. Mix it gently until just combined. Lumps are okay; they help with the fluffiness. If the batter seems too thick, add a bit more buttermilk. This helps create a light and airy texture. Use a non-stick skillet for easy flipping. It makes cooking less stressful. Keep the heat at medium. This helps cook the pancakes evenly and prevents burning. If the heat is too high, the outside will cook too fast while the inside stays raw. Drizzle warm maple syrup over the pancakes for added sweetness. A light dusting of powdered sugar also looks great. For extra joy, top with whipped cream or more chocolate chips. This adds flavor and makes your plate look beautiful. For the full recipe, refer to the detailed instructions above. {{image_2}} You can easily make these pancakes dairy-free. Just swap buttermilk for almond or oat milk. Both options work well and keep the pancakes soft. This change helps those with lactose intolerance enjoy the dish. Want to change things up? Add nuts or dried fruits to the batter. Walnuts, pecans, or raisins bring great texture and taste. You can also experiment with different spices. Try adding cloves or allspice for a warm, cozy flavor. A pinch of cardamom can also add a nice twist. To make breakfast even better, layer your pancakes with yogurt and fruit. Greek yogurt adds protein and creaminess. Fresh berries or sliced bananas make it colorful and tasty. This way, you create a nutritious breakfast stack that looks as good as it tastes. Enjoy your pumpkin chocolate chip pancakes with these fun variations! For the full recipe, click here. To keep leftover pancakes fresh, store them in the fridge. Place them in an airtight container. This helps to keep them soft and yummy. They can last for about three to four days. When you want to eat them, reheat in the microwave. Heat for about 20-30 seconds. You can also warm them in a skillet over low heat for a nice crisp outside. Freezing pancakes is a great way to save time. First, let them cool completely. Stack the pancakes with a piece of parchment paper between each one. This prevents them from sticking. Then, place the stack in a freezer bag. Squeeze out the air before sealing it. Pancakes can stay fresh in the freezer for up to two months. To thaw, simply take them out and let them sit at room temperature for a bit. You can also microwave them for about a minute. To keep your canned pumpkin fresh, store it in the fridge once opened. Use a tight lid or plastic wrap. It should be used within five to seven days. For chocolate chips, keep them in a cool, dry place. An airtight container works best. This will keep them from going stale. If you have leftover chocolate chips, you can also freeze them. Just place them in a bag and remove the air. That way, they stay fresh for baking later on. For the Full Recipe of Pumpkin Chocolate Chip Pancakes, refer to the earlier section. Yes, you can easily make these pancakes vegan. To replace the eggs, use one of these: - 1/4 cup unsweetened applesauce - 1/4 cup mashed banana - 1 tablespoon ground flaxseed mixed with 3 tablespoons water For the buttermilk, swap it with plant-based milk. Add 1 tablespoon of vinegar to 1 cup of almond or oat milk. Let it sit for five minutes before mixing it into the batter. These swaps keep the pancakes tasty and fluffy. To make pancakes gluten-free, use a gluten-free flour blend. You can try these options: - Almond flour - Coconut flour - Oat flour You may need to adjust the liquid in the recipe. Gluten-free flours often absorb more moisture. Start by adding a little extra buttermilk or water to get the right pancake batter consistency. If you don’t have pumpkin puree, here are good substitutes: - Sweet potato puree - Butternut squash puree - Applesauce If you use applesauce, your pancakes will be sweeter. Adjust the brown sugar in the recipe to taste. Each option can change the flavor slightly but still makes for a delightful pancake. These pancakes last for about three days in the fridge. Store them in an airtight container. For best results, place a piece of parchment paper between each pancake. This prevents them from sticking together. Reheat in the microwave or a skillet before serving. These pumpkin pancakes are easy to make and fun to enjoy. We covered all the key ingredients and steps for perfect pancakes. You can customize them with different flavors or toppings. Storing leftovers is simple, so you can enjoy them later. Remember, the right cooking tips help make them fluffy and delicious. Keep experimenting with your pancake creations. You’ll find a new favorite in no time! Enjoy cooking and sharing these treats with others!
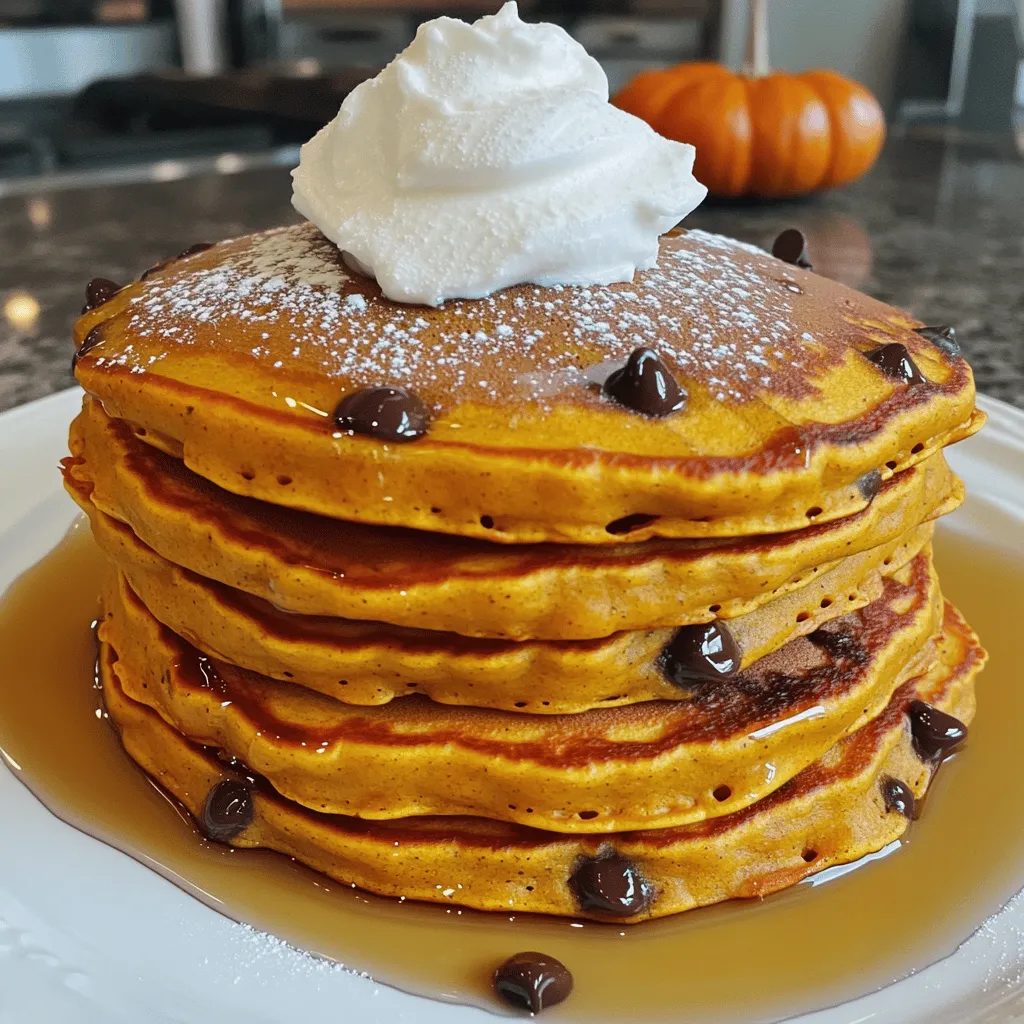
Pumpkin Chocolate Chip Pancakes Fluffy and Delicious Dish
Pumpkin chocolate chip pancakes are a fall favorite you don’t want to miss. They are fluffy, warm, and oh-so-delicious! With simple ingredients and easy steps,
To make mini pancakes, you need simple items. Here’s what you will need: - 1 cup all-purpose flour - 2 tablespoons sugar - 1 tablespoon baking powder - 1/2 teaspoon salt - 1 cup milk - 1 large egg - 2 tablespoons melted butter - 1/2 teaspoon vanilla extract These ingredients come together to create a light and fluffy pancake base. Start with dry ingredients in one bowl. Mix the wet ones in another. This keeps the batter smooth and tasty. Fresh fruit makes this dish special. You can use: - Strawberries - Blueberries - Banana slices - Kiwi Feel free to add other seasonal fruits too. Apples or peaches can work well. The bright colors and flavors make your stack pop! Toppings add sweetness and flair. Consider these options: - Maple syrup - Honey - Powdered sugar You can also add fresh mint leaves for a nice look. These small details make your mini pancake fruit stack even more delightful. The taste and look will impress anyone who sees it. You can find the Full Recipe for all steps needed to create this masterpiece! To make the batter, first, you need to blend the dry ingredients. In a large bowl, whisk together: - 1 cup all-purpose flour - 2 tablespoons sugar - 1 tablespoon baking powder - 1/2 teaspoon salt Next, in a different bowl, mix the wet ingredients. Combine: - 1 cup milk - 1 large egg - 2 tablespoons melted butter - 1/2 teaspoon vanilla extract Pour the wet mix into the dry mix. Stir gently until they blend. You want a few lumps, so don’t overmix. Now, heat your skillet over medium heat. Lightly grease it with butter or oil. This helps prevent sticking. For each mini pancake, pour about 2 tablespoons of batter onto the hot skillet. Cook for 1 to 2 minutes. You’ll see bubbles on the top. When this happens, it’s time to flip them. Cook for another 1 to 2 minutes until golden brown. Take 3 or 4 mini pancakes and stack them on a plate. In between each pancake, layer your choice of fresh fruits. Use strawberries, blueberries, banana slices, or kiwi for great flavors. Drizzle maple syrup or honey on top. For a fun touch, add more fruit and mint leaves for garnish. It makes the dish look pretty and taste great. This process brings your Mini Pancake Fruit Stack to life. You can find the Full Recipe for detailed instructions and tips. Enjoy your delicious breakfast! To make fluffy mini pancakes, avoid overmixing. Mix the batter until just combined. A few lumps are okay. Overmixing leads to tough pancakes. For even cooking, preheat your skillet. Use medium heat to ensure they cook through. Flip them when bubbles form on top. This timing helps your pancakes turn golden brown. Presentation matters! Use colorful plates to make your meal pop. Arrange the pancakes in a stack. Alternate layers of pancake and fruit for a fun look. You can also try different heights for your stacks. Top with mint leaves for a fresh touch. A light dusting of powdered sugar adds sweetness and flair. Have leftovers? You can warm them up easily. Place pancakes on a plate and cover with a damp paper towel. Microwave them for about 20-30 seconds. Serve your mini pancake stacks with yogurt or a side of fresh fruit. They pair well with crispy bacon or sausage for a hearty meal. {{image_2}} You can make your mini pancakes taste even better with a few spices. Adding a pinch of cinnamon gives a warm flavor. Nutmeg can also add a sweet touch. For a fun twist, try adding flavored extracts. Almond or orange zest can change the whole vibe. You don't have to stick with just fruit. Yogurt is creamy and makes a great layer. Whipped cream can add a light and fluffy feel. Chocolate sauce is a sweet treat that kids love. If you're looking for crunch, nut butters are a great option. Granola can also add texture and flavor. If you need to avoid gluten, you can use gluten-free flour. Many brands work well in pancakes. For those who prefer vegan options, you can replace the egg with flaxseed meal mixed with water. Use almond milk or oat milk instead of dairy milk. These swaps make it easy for everyone to enjoy this dish. To keep leftover pancakes fresh, use airtight containers. Glass or plastic containers work well. Make sure they cool down before sealing. Store pancakes in the fridge for up to three days. This keeps them soft and tasty. You can freeze mini pancakes for longer storage. Place them in a single layer on a baking sheet. Freeze for about an hour until firm, then transfer to a zip-top bag. This prevents pancakes from sticking together. To reheat, pop them in the toaster or microwave. They will taste almost fresh! If you have extra fruit, get creative! Use leftover fruits in smoothies or yogurt bowls. You can also top oatmeal or cereal with them. For an easy dessert, mix fruits with a little honey and yogurt. Your leftover toppings can also make a fun fruit salad. Enjoy experimenting with flavors! Yes, you can make mini pancakes in advance. To prepare, cook the pancakes as usual. Let them cool completely. After that, stack them with parchment paper between each pancake. This helps keep them from sticking. Place the stack in an airtight container. Store in the fridge for up to three days. You can also freeze them. Use a freezer-safe bag and separate each pancake with parchment paper. To stack pancakes nicely, choose a flat plate. Start with a mini pancake at the bottom. Add a layer of fruit, then another pancake. Repeat this process. Make sure each layer is aligned. Use fresh fruit to keep the stack stable. Drizzle syrup on top for a beautiful finish. This method gives a lovely look and makes it easy to serve. You can make mini pancakes healthier by reducing sugar. Try using mashed bananas or applesauce instead. You can also use whole wheat flour instead of all-purpose flour. This adds fiber and nutrients. You can swap out butter for yogurt for creaminess without extra fat. These changes keep the taste great while making them better for you. Mini pancakes taste great with many fruits. Strawberries and blueberries are classic choices. Bananas add a nice sweetness. Kiwi brings a tart flavor that pairs well too. You can mix and match fruits for variety. For seasonal options, use peaches in summer and apples in fall. These combinations enhance both flavor and color. Yes, you can use different types of flour. Almond flour is good for gluten-free diets. Oat flour adds a nice flavor and texture. Coconut flour absorbs more liquid, so use less. Each flour will change the pancake's texture slightly. Experiment with different flours to find your favorite. You can find the full recipe for Mini Pancake Fruit Stack by following this link: [Full Recipe]. It includes detailed instructions and tips to help you prepare this delightful dish. Now you know how to make delicious mini pancakes with fresh fruit. We covered the best ingredients, easy steps, and helpful tips to make your pancakes perfect. You can try different flavors and toppings to suit your taste. Don't forget to store leftovers properly for a tasty treat later. Enjoy stacking, serving, and sharing your mini pancake creations. With these ideas, you'll impress everyone at breakfast!
Mini Pancake Fruit Stack Delightful Breakfast Recipe
Are you ready to transform your breakfast routine? This Mini Pancake Fruit Stack is not just fun to make; it’s deliciously cute too! With fresh
This recipe for pumpkin pie overnight oats is simple and tasty. It takes just 10 minutes to prep. You need to let it chill overnight for the best flavor. This dish serves two people. Here are the must-have items for your pumpkin pie overnight oats: - 1 cup rolled oats - 1 cup almond milk (or any milk of choice) - 1/2 cup pumpkin puree - 1 tablespoon maple syrup (adjust to taste) - 1 teaspoon pumpkin pie spice - 1/2 teaspoon vanilla extract - 1 tablespoon chia seeds - Pinch of salt These ingredients work together to give you a creamy, spiced treat that tastes just like pumpkin pie. You can add some fun toppings to make it your own. Here are a few ideas: - Chopped nuts - Shredded coconut - A dollop of Greek yogurt These extras add texture and flavor. Feel free to mix and match based on what you have at home or what you like best! To make pumpkin pie overnight oats, start by gathering your ingredients. You need: - 1 cup rolled oats - 1 cup almond milk (or any milk of choice) - 1/2 cup pumpkin puree - 1 tablespoon maple syrup (adjust to taste) - 1 teaspoon pumpkin pie spice - 1/2 teaspoon vanilla extract - 1 tablespoon chia seeds - Pinch of salt - Optional toppings: chopped nuts, shredded coconut, or a dollop of Greek yogurt In a mixing bowl, combine the rolled oats, almond milk, pumpkin puree, maple syrup, pumpkin pie spice, vanilla, chia seeds, and salt. Whisk it all together until smooth. This step helps mix all flavors well. Next, divide the mixture into two jars or containers. Seal them tightly and place in the fridge for at least four hours or overnight. This lets the oats soak up the liquid. When you're ready to eat, take the jars out of the fridge. Stir the oats well. If you find them too thick, add a splash of almond milk. You can top your oats with chopped nuts, shredded coconut, or Greek yogurt. These toppings add a nice crunch and creaminess to your meal. Enjoy your tasty treat! To get the best texture, use rolled oats instead of instant oats. Rolled oats absorb the liquid better and provide a nice chew. Also, don't skip the chia seeds. They help thicken the oats and give more healthy nutrients. If you want creamier oats, add a bit more almond milk before serving. For the sweetest flavor, adjust the maple syrup to your taste. This simple tweak can make a big difference. For more details on making this delicious dish, check out the Full Recipe. To make the best pumpkin pie overnight oats, follow these tips. First, always use rolled oats. They soak up the liquid well and give a nice texture. Avoid instant oats, as they can turn mushy. Next, use a good ratio of oats and liquid. For each cup of oats, use one cup of milk. This keeps the oats creamy but not too thick. Also, mix well. Ensure all ingredients blend for the best flavor. Toppings can take your oats to the next level. Try adding chopped nuts for crunch. Walnuts or pecans work well. Shredded coconut adds a sweet touch. If you want extra creaminess, add Greek yogurt on top. A drizzle of maple syrup can also boost the flavor. You can get creative with toppings based on your taste! Overnight oats are perfect for meal prep. You can make several jars at once. Store them in the fridge for up to five days. This way, you always have a healthy breakfast ready. Just grab a jar in the morning. You can also try different flavors in each jar to keep it exciting. For the full recipe, check the section above. Enjoy! {{image_2}} You can use different types of milk for your oats. Almond milk works great, but you can also try: - Cow's milk - Soy milk - Oat milk - Coconut milk Each milk adds its own flavor. If you prefer creaminess, go for full-fat cow's milk or coconut milk. For a lighter option, almond or oat milk is perfect. Feel free to get creative with flavors! Here are some tasty ideas: - Swap maple syrup for honey or agave nectar. - Add a spoonful of peanut butter for a nutty twist. - Mix in some cocoa powder for chocolate pumpkin pie oats. - Try a handful of dried fruit like cranberries or raisins. These swaps can change the taste and make your oats special each time. Pumpkin pie oats are perfect for fall, but you can enjoy them anytime. For spring and summer, try these ideas: - Use fresh fruit like berries instead of pumpkin. - In winter, add spices like nutmeg or ginger for warmth. - For a tropical twist, mix in mashed banana and coconut. These variations keep your overnight oats fresh and fun all year long. Check out the Full Recipe for more ideas! You can store your pumpkin pie overnight oats in glass jars or airtight containers. After mixing, divide the oats into jars. Seal them tightly and place them in the fridge. This keeps the oats fresh and tasty for you. These oats can stay fresh for up to five days in the fridge. They taste best within the first three days. To keep them fresh, avoid adding toppings until you are ready to eat. This helps maintain texture and flavor. You can enjoy your oats cold or warm. If you prefer them warm, take the jar out of the fridge. Remove the lid and heat in the microwave for about 30 seconds. Stir well and check the temperature. Add a splash of almond milk if they seem thick. Top with your choice of nuts or yogurt for a tasty finish. Enjoy! Yes, you can use instant oats. They cook faster and absorb liquid quickly. This choice may change the texture. Instant oats can make your dish creamier but less chewy. If you use instant oats, reduce the soak time. Check after a few hours. Adjust the liquid for desired thickness. To adjust the sweetness, change the amount of maple syrup. Start with one tablespoon. Taste the mixture before it chills. If you want it sweeter, add a little more. You can also use honey or agave syrup. Just remember, a small amount goes a long way! Yes, pumpkin pie overnight oats can be gluten-free. Use certified gluten-free rolled oats. Most oats are naturally gluten-free, but some may be cross-contaminated. Always check the label to be safe. This way, you can enjoy your oats worry-free! Overnight oats are easy to make and taste great. You just need the right ingredients and steps. Remember, you can adjust flavors and storage options. Try different milks and toppings for fun. Meal prep will save you time and keep your meals fresh. By following these tips and tricks, you will enjoy a delicious breakfast daily. Keep experimenting to find your favorite mix. Now, grab your ingredients and start making your perfect bowl of overnight oats!
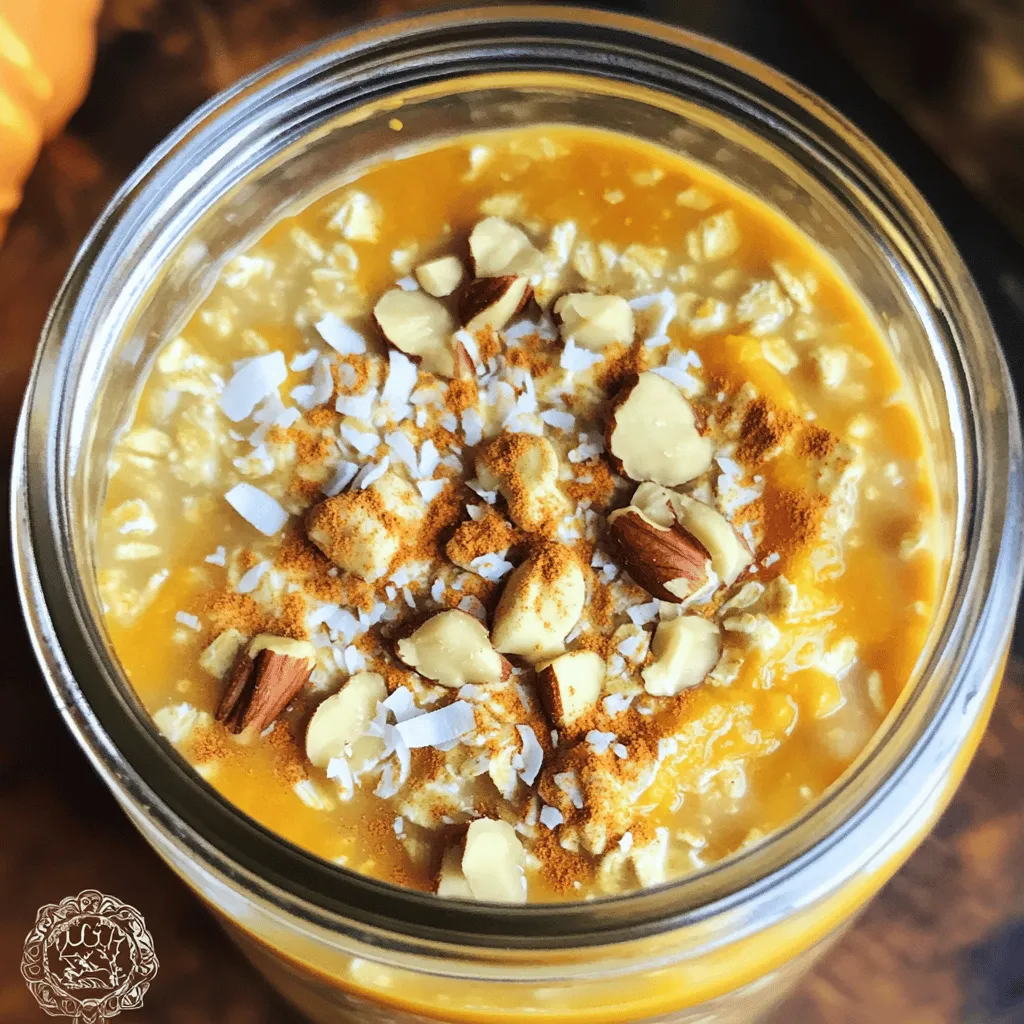
Pumpkin Pie Overnight Oats Simple and Tasty Recipe
Get ready to enjoy a fall favorite with my Pumpkin Pie Overnight Oats! This simple and tasty recipe combines the warm flavors of pumpkin spice
To make Blueberry Zucchini Bread, you need fresh and simple ingredients. Here’s what you will need: - 1 cup grated zucchini - 1 cup fresh blueberries - 1 ½ cups all-purpose flour - 1 teaspoon baking powder - ½ teaspoon baking soda - ½ teaspoon salt - 1 teaspoon ground cinnamon - ½ teaspoon vanilla extract - ½ cup granulated sugar - ½ cup brown sugar, packed - 2 large eggs - ⅓ cup vegetable oil or melted coconut oil - Optional: ½ cup chopped walnuts or pecans Each ingredient plays a role. The zucchini adds moisture and nutrition. Blueberries bring sweetness and flavor. The sugars create a nice balance, while the spices add warmth. Using fresh blueberries gives the best taste, but frozen ones work too. I always recommend measuring accurately. It helps keep the texture just right. If you want a nutty crunch, toss in walnuts or pecans. The Full Recipe will guide you through the steps. - Preheat your oven to 350°F (175°C). Grease a 9x5-inch loaf pan or line it with parchment paper. - In a medium bowl, combine 1 ½ cups all-purpose flour, 1 teaspoon baking powder, ½ teaspoon baking soda, ½ teaspoon salt, and 1 teaspoon ground cinnamon. Mix well and set aside. - In a large bowl, whisk together ½ cup granulated sugar, ½ cup brown sugar, 2 large eggs, ⅓ cup vegetable oil, and ½ teaspoon vanilla extract until smooth. - Stir in 1 cup of grated zucchini into the wet mixture. This adds moisture and flavor. - Gradually fold in the dry ingredients. Mix until just combined. Don't overmix, or the bread may be tough. - Gently fold in 1 cup of fresh blueberries and, if you like, ½ cup chopped walnuts or pecans. These add texture and taste. - Pour the batter into the prepared loaf pan. Smooth the top with a spatula for an even bake. - Bake for 50-60 minutes. The bread is ready when a toothpick inserted into the center comes out clean. - Once baked, let the bread cool in the pan for 10 minutes. Then, transfer it to a wire rack to cool completely. You can find the Full Recipe for detailed steps and measurements. Enjoy baking! - Avoiding overmixing: When you mix the batter, stir just until you see no dry flour. Overmixing makes the bread tough. I like to fold gently. This keeps it soft and tender. - Achieving the best texture: The right texture is moist and fluffy. To get there, use fresh zucchini. Grate it and let it drain a bit. This helps reduce excess moisture in the bread. - Tips for using fresh vs. frozen blueberries: Fresh blueberries are sweet and juicy. If using frozen, make sure to thaw and drain them first. They can add extra moisture if you don't. Dusting them with flour before mixing helps keep them from sinking. - Serving suggestions: Slice the bread and enjoy it warm. It’s great for breakfast or as a snack. You can serve it with a dollop of cream cheese for added flavor. - Enhancing appearance with garnishes: To make it look fancy, sprinkle powdered sugar on top. Add a few fresh blueberries for a pop of color. A mint leaf can add a nice touch too. - Storing and slicing tips: Store the bread in an airtight container. To slice, use a serrated knife. This gives you nice, clean slices without squishing the bread. For best taste, eat it within a few days. If you need to keep it longer, freeze it. Enjoy the full recipe for more details! {{image_2}} You can easily change some ingredients in this blueberry zucchini bread. For those who need gluten-free options, try almond flour or oat flour. They work well and taste great. If you like to sweeten naturally, use honey or maple syrup instead of sugar. This swap adds a unique flavor. Want to spice things up? Add a pinch of nutmeg or ginger for warmth. You can also mix in some lemon zest for a fresh twist. Each swap can create a new flavor experience. This blueberry zucchini bread is not just for breakfast. You can enjoy it as a snack too. Serve it warm with a bit of butter. It pairs nicely with tea or coffee. If you have leftovers, you can get creative. Make French toast with it by soaking slices in a mixture of eggs and milk. Or, toast it and spread some cream cheese on top. This adds a rich flavor that everyone will love. For a fun treat, cut the bread into cubes. Use them to make a bread pudding. It’s a delicious way to use any extra bread. How do I store Blueberry Zucchini Bread? Store Blueberry Zucchini Bread in an airtight container. This keeps it fresh for a longer time. You can also wrap it tightly in plastic wrap or aluminum foil. If you plan to eat it within a few days, keep it at room temperature. For longer storage, place it in the fridge. What are the best practices for freezing? To freeze your bread, first let it cool completely. Then slice it to make serving easier. Wrap each slice in plastic wrap, then place all slices in a freezer bag. Make sure to remove excess air from the bag. This method prevents freezer burn and preserves taste. What thawing methods can I use? When you’re ready to enjoy your frozen bread, you have a few options. You can thaw it overnight in the fridge. For a faster method, leave it at room temperature for about an hour. If you want it warm, pop it in the microwave for 15-20 seconds. How long does Blueberry Zucchini Bread last in the fridge? If stored properly in the fridge, Blueberry Zucchini Bread can last about one week. Keep it in an airtight container to maintain its moisture. What are the signs that the bread has gone bad? Check for a few signs of spoilage. If the bread has an off smell, it may be bad. Look for mold or any discoloration on the surface. If it feels dry or hard, it is best to toss it. Always trust your senses when it comes to food safety. Can I use shredded zucchini? Yes, shredded zucchini works well in this recipe. It adds moisture and flavor. Just remember to squeeze out some water first. This helps keep the bread from getting too wet. How to prevent soggy bread? To prevent soggy bread, make sure to drain the zucchini well. You can also bake it a bit longer. Check with a toothpick. If it comes out clean, your bread is ready. What can I substitute for eggs? You can use applesauce or mashed bananas as an egg substitute. Use 1/4 cup for each egg. This keeps the bread moist and adds sweetness. Is this recipe vegan-friendly? This recipe is not vegan due to the eggs. However, if you use egg substitutes, it can be vegan. Just ensure all other ingredients are also vegan. How can I make it more flavorful? To make the bread more flavorful, add spices like nutmeg or ginger. You can also mix in lemon zest or vanilla. These add a nice twist to the taste. What are the health benefits of zucchini bread? Zucchini bread has many health benefits. Zucchini is low in calories and high in vitamins. It adds fiber, helping with digestion. The blueberries provide antioxidants, which are good for your health. How can I make this recipe healthier? You can make this recipe healthier by using whole wheat flour instead of all-purpose flour. Reduce the sugar or use a natural sweetener. Adding nuts can also boost nutrition. Can I make mini loaves instead? Yes, you can make mini loaves! Just adjust the baking time. Mini loaves usually bake for about 25-30 minutes. Check for doneness with a toothpick. Enjoy your smaller, cute loaves! For the full recipe, check out the Blueberry Zucchini Bread section above. You learned how to make delicious Blueberry Zucchini Bread. We covered the ingredients, from fresh zucchini to blueberries, and the easy steps to bake it. I shared tips for texture and presentation, plus ways to personalize your bread. Storage advice helps you keep it fresh longer. Remember, you can swap ingredients and get creative with flavors. Enjoy your baking journey and let your taste buds shine with this recipe. You won't regret making this tasty treat!
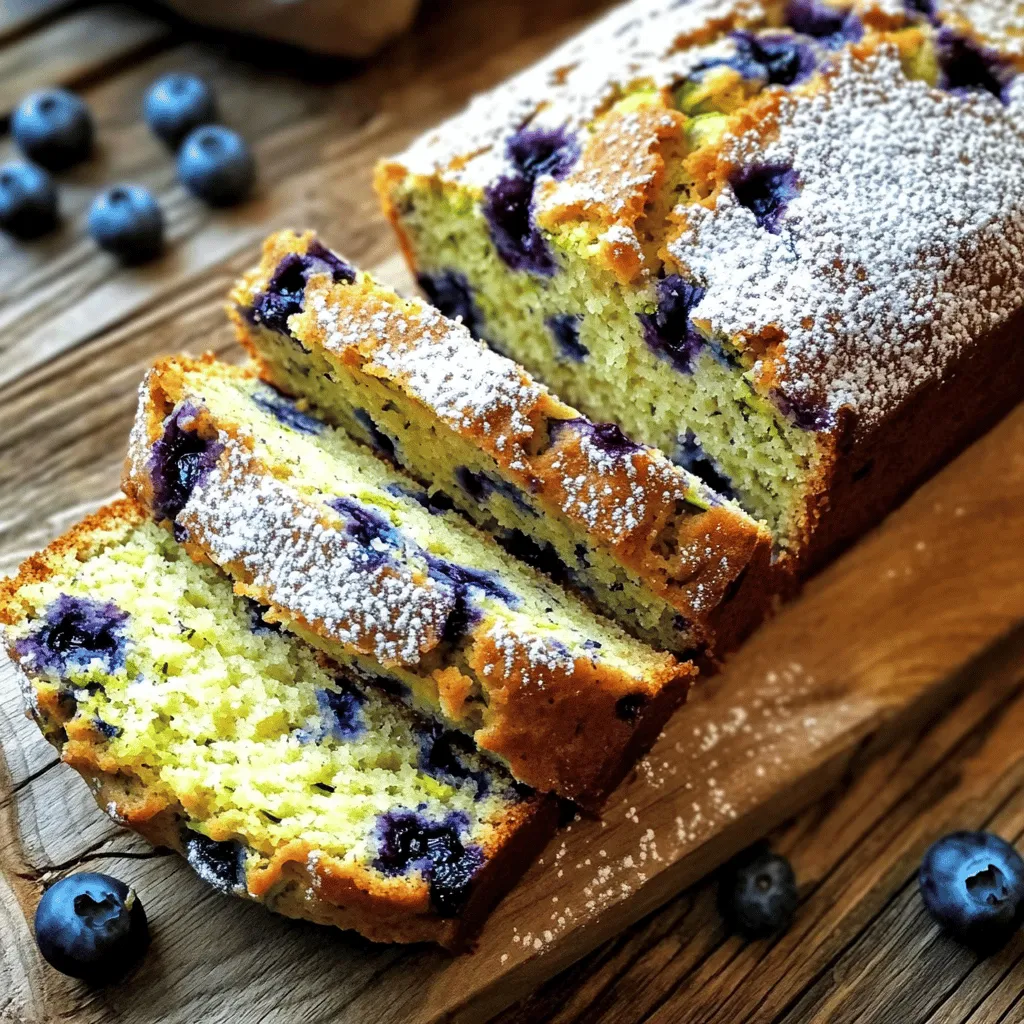
Blueberry Zucchini Bread Easy and Delicious Recipe
Are you ready to bake something easy and delicious? Blueberry Zucchini Bread is a simple treat you’ll love! This moist bread combines fresh blueberries and
- 2 medium zucchinis, grated - 1 cup crumbled feta cheese - 6 large eggs - 1/2 cup milk (or dairy-free alternative) The main ingredients create a nice balance. Zucchini adds moisture and fiber. Feta cheese brings a creamy, salty flavor. Eggs bind everything together while milk keeps it soft. - 1/2 cup cherry tomatoes, halved - 1 small onion, finely chopped - 2 cloves garlic, minced - 2 tablespoons olive oil Other ingredients add layers of taste. Cherry tomatoes offer sweetness and color. Onion and garlic give depth and aroma. Olive oil helps cook the veggies and enhances flavor. - 1 teaspoon dried oregano - 1/2 teaspoon salt - 1/4 teaspoon black pepper Seasoning is key for taste. Oregano adds an earthy note. Salt boosts all flavors, while black pepper brings a touch of heat. These simple seasonings let the veggies shine. This dish is not only tasty but also easy to make. For the full recipe, check out the details above. - Preheat the oven: Set your oven to 375°F (190°C). This ensures even cooking. - Sauté the onions and garlic: In a large pan, heat 2 tablespoons of olive oil over medium heat. Add 1 small onion, finely chopped. Cook for about 3-4 minutes until it turns translucent. Next, add 2 cloves of minced garlic and stir until fragrant, about 1 minute. - Add zucchini and cook until soft: Grate 2 medium zucchinis and add them to the pan. Cook for another 5 minutes. Stir often until the zucchini softens and loses excess moisture. Remove from heat and let it cool a bit. - Combine egg mixture and zucchini: In a bowl, whisk 6 large eggs, 1/2 cup milk, 1 teaspoon dried oregano, 1/2 teaspoon salt, and 1/4 teaspoon black pepper. Mix well. Then, add the cooked zucchini mixture, 1 cup crumbled feta cheese, and 1/2 cup halved cherry tomatoes. Stir until everything is well combined. - Pour into the baking dish: Grease a 9x9-inch baking dish. Pour the egg-zucchini mix into the dish, spreading it evenly. - Bake until set: Place the dish in the oven and bake for 25-30 minutes. The casserole is done when it is set and the top is golden. For a full overview, you can check the Full Recipe. To make your zucchini feta egg casserole just right, start with the zucchini. Grate it and then squeeze out extra moisture using a clean kitchen towel. This step keeps your dish from turning soggy. For fluffy eggs, whisk them well. Air is key, so beat until they are light and frothy. Mixing in the eggs gently helps maintain that fluffiness. Fresh herbs can boost the taste of your casserole. Try adding fresh basil or parsley as a garnish. They add color and flavor. For a little kick, mix in spices like paprika or cayenne pepper. Just a pinch can make a big difference in taste without overwhelming the dish. This casserole shines at brunch. Serve it warm with a fresh salad on the side. You can also pair it with crusty bread for a complete meal. For a lighter touch, add some sliced avocado or a dollop of yogurt. These sides balance the flavors and textures beautifully. {{image_2}} You can easily change the cheese in this dish. Try using goat cheese for a tangy twist. Mozzarella gives a creamy texture. You can also use cheddar for a sharper taste. Adding proteins can make this dish heartier. Chopped ham adds a savory flavor. Cooked bacon gives a nice crunch. You can even mix in cooked sausage for a meaty bite. If you need a gluten-free option, this recipe is already safe. Just ensure your other ingredients, like cheese and milk, are gluten-free. For a dairy-free version, use a plant-based milk. Substitute feta with a dairy-free cheese. There are many great options on the market today. You can cook this casserole in a slow cooker. Just mix all the ingredients and pour them in. Set it on low for about 3-4 hours. This method keeps it moist and easy. The air fryer is another fun way to make this dish. Pour your mixture into an air fryer pan. Cook at 350°F for about 20-25 minutes. You’ll get a crispy top layer that is hard to resist. This recipe is a great base. You can make it your own! For the full recipe, check the details above. After enjoying your Zucchini Feta Egg Casserole, store any leftovers in an airtight container. This keeps the flavors fresh and the texture just right. Place the casserole in the fridge right away. It will stay good for up to 3-4 days. Make sure it cools to room temp before sealing. This helps avoid extra moisture. If you want to keep it longer, freezing is a great option. First, let the casserole cool completely. Cut it into squares for easy serving. Wrap each piece tightly in plastic wrap. Then, place the wrapped portions in a freezer bag. You can freeze it for up to 3 months. To reheat frozen portions, take them out of the freezer and let them thaw overnight in the fridge. This helps maintain the taste and texture. You can reheat the casserole in the oven or microwave. For the oven method, preheat it to 350°F (175°C). Place the casserole pieces on a baking sheet. Cover them with foil to keep them moist. Heat for about 15-20 minutes until warm. For microwave reheating, place a piece on a microwave-safe plate. Heat for 1-2 minutes, checking every 30 seconds. This way, it warms evenly without drying out. Enjoy your dish just like fresh! You can prepare this dish a day in advance. Cook the zucchini, onion, and garlic as directed. Mix it with the egg mixture and pour it into your baking dish. Cover it tightly with plastic wrap and place it in the fridge. When you are ready to bake, remove the wrap and bake as usual. This saves time and makes busy mornings easier. Yes, you can switch up the veggies! Try using spinach, bell peppers, or mushrooms. Just chop them finely and sauté them like the zucchini. Keep in mind that different vegetables may change the flavor and texture a bit. Experiment to find your favorite mix! If you need an egg substitute, use flaxseed meal. Mix one tablespoon of flaxseed meal with three tablespoons of water. Let it sit for five minutes until thick. This works well in most egg dishes, including this casserole. You can also try silken tofu, blended until smooth, as another option. This blog post covered a delicious zucchini dish, focusing on key ingredients like zucchini, feta, and eggs. We explored how to prepare, cook, and bake for best results. Remember to balance flavors with fresh herbs and seasonings while managing moisture for the right texture. You can customize this dish with variations to suit dietary needs. With proper storage and reheating tips, you can enjoy your creation later. Now, go ahead and get creative in the kitchen! Your culinary adventure awaits!
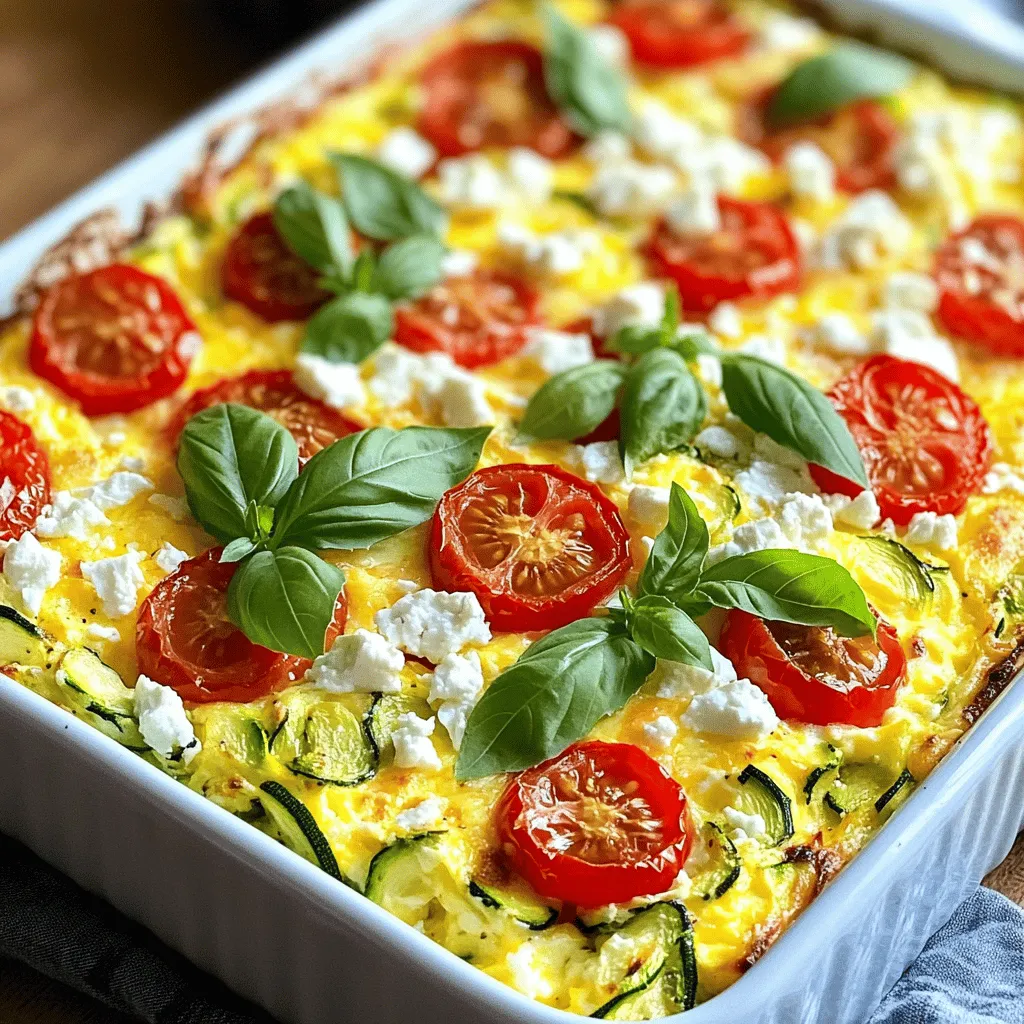
Zucchini Feta Egg Casserole Flavorful and Easy Dish
If you’re looking for a quick, tasty, and healthy meal, this Zucchini Feta Egg Casserole is perfect! Packed with fresh ingredients like zucchini, feta cheese,
- 2 medium zucchinis, grated - 1 cup sharp cheddar cheese, shredded - 1 cup all-purpose flour - 1/2 cup cornmeal - 1 tablespoon baking powder - 1/2 teaspoon baking soda - 1/2 teaspoon salt - 1/4 teaspoon black pepper - 1/2 teaspoon garlic powder - 1/4 cup fresh chives, chopped (or 1 teaspoon dried chives) - 2 large eggs - 1/2 cup milk - 1/4 cup olive oil For best results, use precise measurements. This keeps the muffins light and fluffy. If you need gluten-free options, swap all-purpose flour with a gluten-free blend. For dairy-free muffins, use a non-dairy milk and cheese. Both swaps work well without losing flavor. Each muffin has around 150 calories. They are rich in protein from the cheese and eggs. The zucchini adds fiber and moisture, making these muffins not just tasty but healthy too. Enjoy knowing you’re eating something that fuels your body! 1. Preheat your oven to 375°F (190°C). 2. Prepare a muffin tin by greasing it or lining it with muffin liners. 3. Grate the zucchinis. Then, in a bowl, sprinkle them with a pinch of salt. 4. Let the zucchini sit for about 10 minutes. This helps it release moisture. 5. After 10 minutes, use a clean kitchen towel to squeeze out extra moisture from the zucchini. 1. In a large mixing bowl, combine the dry ingredients: flour, cornmeal, baking powder, baking soda, salt, black pepper, and garlic powder. 2. Add the shredded cheddar cheese and chopped chives to the dry mix. Stir well to ensure even distribution. 3. In another bowl, whisk together the eggs, milk, and olive oil until mixed. 4. Pour the wet ingredients into the dry mixture. Stir until just combined. Be careful not to overmix; the batter should be slightly lumpy. 5. Gently fold in the squeezed zucchini. Make sure it spreads evenly throughout the batter. 1. Spoon the batter into the prepared muffin tin. Fill each cup about two-thirds full. 2. Bake in the preheated oven for 18-20 minutes. 3. To check for doneness, insert a toothpick into the center of a muffin. If it comes out clean, the muffins are ready. 4. Let the muffins cool in the pan for 5 minutes. Then, transfer them to a wire rack to cool completely. You can find the [Full Recipe] for Savory Cheddar Zucchini Muffins to guide you through the process. Enjoy your baking! To make the best Savory Cheddar Zucchini Muffins, avoid overmixing the batter. Overmixing makes muffins dense. A few lumps in the batter are okay. Just stir until the ingredients combine. Another key tip is to squeeze out excess moisture from the zucchini. After grating the zucchini, sprinkle it with a little salt and let it sit for ten minutes. This will help release moisture. Then, use a clean kitchen towel to squeeze out the water. This step keeps your muffins from getting soggy. After baking, let the muffins cool completely. Once cooled, store them in an airtight container. This helps keep them fresh. You can keep them at room temperature for about three days. For longer storage, place them in the fridge or freezer. When you're ready to enjoy your muffins again, reheating is easy. Just pop them in the microwave for about 15-20 seconds. You can also warm them in an oven set to 350°F (175°C) for about 5-10 minutes. These muffins taste great on their own, but you can enhance them. Try spreading cream cheese or butter on top while they are warm. The heat makes the spreads melt deliciously. You can also mix these muffins into different meals. They are perfect with soups or salads. Enjoy them as a snack, breakfast, or even at a picnic. For more ideas, check the Full Recipe. {{image_2}} You can easily change up the cheese in this recipe. Mozzarella or feta works great. Each cheese gives a different taste and texture to your muffins. You can also add herbs or spices. Try dried oregano, thyme, or even a pinch of chili powder. These additions boost the flavor and make each batch unique. You can mix in seasonal veggies or dried fruits. In summer, add corn or bell peppers for a fresh twist. In fall, try diced apples or pumpkin for a sweet touch. Each season brings new flavors. You can also adjust your muffins for holidays. For example, add cinnamon in December for a warm spice that fits the season. For gluten-free muffins, swap the all-purpose flour with a gluten-free blend. You can also replace milk with almond or oat milk. If you want a vegan option, use flax eggs instead of regular eggs. Just mix one tablespoon of flaxseed meal with three tablespoons of water and let it sit for a few minutes. You can top your vegan muffins with avocado spread or a vegan cream cheese. This makes them rich and tasty! Check out the Full Recipe for all the details on making these delightful muffins. To keep your savory cheddar zucchini muffins fresh, use airtight containers. They protect muffins better than plastic wrap. If you plan to eat them soon, store them in the fridge. For longer storage, the freezer is your best bet. At room temperature, muffins last for about two days. In the fridge, they can stay fresh for up to a week. If you freeze them, they last for about three months. Just remember, the longer they sit, the more flavor they may lose. Reheat muffins in the oven for the best results. Set the oven to 350°F (175°C), wrap the muffins in foil, and heat them for about 10 minutes. This method keeps them moist. You can also use a microwave. Heat for 15-20 seconds, but be careful not to overdo it. Enjoy these tasty bites warm! For the full recipe, check out the details above. How do I make my muffins fluffier? To make your muffins fluffier, use fresh baking powder. Also, avoid overmixing the batter. Mix until just combined, leaving some lumps. This keeps the air in the batter, giving you a nice rise. Can I freeze Savory Cheddar Zucchini Muffins? Yes, you can freeze these muffins. Once they cool, wrap each muffin in plastic wrap. Place them in an airtight container or freezer bag. They can last up to three months in the freezer. How to adjust the recipe for fewer servings? To adjust for fewer servings, simply halve the ingredients. Use one medium zucchini, 1/2 cup cheese, and so on. This makes six muffins instead of twelve. Can I substitute zucchini with other vegetables? Yes, you can substitute zucchini with carrots or yellow squash. Grate them finely, just like zucchini. Other veggies like spinach work too, but chop them small to mix well. What to do if muffins are too dry? If your muffins are too dry, check the flour measurement. Too much flour can lead to dryness. You can also try adding a bit more milk or oil next time. Fixing overbaked muffins If your muffins are overbaked, they may be crumbly. You can try adding a spread like butter or cream cheese. This adds moisture and helps bring back some softness. For the full recipe, check the earlier section. This blog post covered how to make Savory Cheddar Zucchini Muffins. You learned the ingredients needed, precise measurements, and step-by-step instructions for baking. I shared tips to achieve perfect muffins and how to store them for freshness. You can also explore variations to fit your taste and dietary needs. In short, enjoy baking these delicious muffins. They are easy to make and fun to customize. Your kitchen will smell amazing, and the taste will impress everyone!
Savory Cheddar Zucchini Muffins Easy and Wholesome Recipe
Looking for a tasty way to use up all that zucchini? Try my Savory Cheddar Zucchini Muffins! These muffins are easy to make and packed
- 1 cup grated zucchini (squeezed to remove excess moisture) - 1 cup rolled oats - 1/2 cup almond flour (or all-purpose flour) - 1/4 cup maple syrup - 1/4 cup nut butter (peanut, almond, or sunflower) - 1/2 teaspoon baking powder - 1/2 teaspoon cinnamon - 1/4 teaspoon nutmeg - 1/4 teaspoon salt - 1/2 cup chopped nuts (walnuts or pecans) - 1/2 cup dark chocolate chips or raisins These ingredients make a tasty treat. The zucchini adds moisture and nutrition. You can use rolled oats for fiber and energy. Almond flour gives a nice texture and flavor. Sweeteners like maple syrup add a natural sweetness. Nut butter provides healthy fats and protein. The baking powder helps the cookies rise a little. Spices like cinnamon and nutmeg give warm flavors. A pinch of salt balances the sweetness. Optional add-ins let you customize your cookies. Nuts add crunch, while chocolate chips or raisins add sweetness. You can mix and match based on what you like. For the full recipe, check the details above. Enjoy exploring these ingredients as you prepare your delicious zucchini bread breakfast cookies! - Preheat the oven to 350°F (175°C). - Line a baking sheet with parchment paper. - Combine zucchini, oats, flour, maple syrup, and nut butter. - Add baking powder, cinnamon, nutmeg, and salt. Start by grating your zucchini. Make sure to squeeze it well to get rid of excess moisture. This helps keep your cookies from being too soggy. In a large bowl, mix the grated zucchini with rolled oats, almond flour, maple syrup, and nut butter. Stir this mixture until it’s smooth and well combined. Next, add in the baking powder, cinnamon, nutmeg, and salt. These ingredients boost the flavor and help the cookies rise. Mix everything together until just combined. You don’t want to overmix, or your cookies may turn out tough. - Fold in nuts and chocolate chips or raisins. - Drop spoonfuls of dough on the baking sheet. - Bake for 15-18 minutes until lightly golden. Now it’s time to add some fun! Fold in your choice of chopped nuts and dark chocolate chips or raisins. This adds texture and a delightful taste to your cookies. Using a cookie scoop or tablespoon, drop spoonfuls of dough onto the lined baking sheet. Space them about two inches apart. They won’t spread much, so flatten them slightly with the back of the scoop. Bake in the preheated oven for 15-18 minutes. Keep an eye on them. You want the edges to turn lightly golden. When they’re done, let them cool on the baking sheet for a few minutes before moving them to a wire rack. Enjoy your warm, tasty cookies! Check the Full Recipe for more tips. To make the best zucchini bread breakfast cookies, start by squeezing out excess moisture from the grated zucchini. This step keeps your cookies from being too wet. Use a clean kitchen towel to wring out the zucchini well. Next, flatten the cookies before baking. This helps them hold their shape and ensures even cooking. I love serving these cookies warm. A sprinkle of cinnamon on top adds a nice touch. You can also pair them with almond milk or your favorite morning beverage. This makes for a fun and tasty breakfast! Zucchini brings many nutritional advantages. It is low in calories and high in fiber, making it great for digestion. Plus, it is loaded with vitamins A and C. Using nut butter, like almond or peanut, adds healthy fats and protein. This choice keeps you full longer and boosts your energy for the day. {{image_2}} You can make these cookies gluten-free. Just substitute regular oats and flour with gluten-free oats and flour. This way, you can enjoy the same tasty treat without gluten. You can change the flavor of your cookies. Add spices like ginger or cloves for a warm taste. You can also mix in dried fruits, such as cranberries. This will add a chewy texture and extra sweetness. If you want a vegan version, swap nut butter for a plant-based option. Use maple syrup as your sweetener instead of honey. This keeps the cookies plant-based while still being delicious. For the full recipe, check out the detailed instructions above. Enjoy baking! To keep your zucchini bread breakfast cookies fresh, follow these tips: - Allow cookies to cool completely. - Place them in an airtight container. - Store at room temperature for up to a week. - If you live in a humid area, keep them in the fridge to prevent sogginess. If you want to save cookies for later, freezing is a great option: - Wrap each cookie tightly in plastic wrap. - Place wrapped cookies in a freezer bag or container. - Label the bag with the date for easy tracking. - They can be frozen for up to three months. When you want to enjoy a cookie: - Thaw cookies at room temperature for about an hour. - For a warm treat, pop them in the microwave for 10-15 seconds. At room temperature, your zucchini bread breakfast cookies last about a week. Look for these signs of spoilage: - A strong, sour smell. - Changes in texture, like becoming hard or dry. - Visible mold or unusual spots. For the best taste and quality, enjoy them fresh! Yes, you can use different flours. Here are some good options: - Whole wheat flour adds fiber. - Coconut flour gives a mild taste. - Oat flour makes the cookies gluten-free. - Almond flour is a great low-carb choice. Each type may change the texture, so adjust liquid as needed. To cut down on sugar, try these tips: - Use less maple syrup. - Add mashed banana for natural sweetness. - Use unsweetened applesauce instead of sweeteners. - Reduce chocolate chips or use dark chocolate for less sugar. These swaps will keep cookies tasty and healthy. Eggs help bind cookies. If you need a substitute, try: - Flaxseed meal mixed with water. - Chia seeds soaked in water. - Unsweetened applesauce for moisture. - Silken tofu for a creamy texture. These options work well to keep your cookies together. Yes, adding protein powder is a great idea! Here’s how: - Replace some flour with protein powder. - Start with 1/4 cup and adjust the liquid. - Choose a flavor that matches your taste. This boost makes the cookies more filling and nutritious. Look for these signs to check if your cookies are ready: - Edges should be lightly golden. - Cookies should feel firm but soft in the middle. - A toothpick inserted should come out clean or with few crumbs. These tips will help you bake perfect cookies every time! These delicious zucchini cookies blend wholesome ingredients for a tasty treat. We covered the main elements, like grated zucchini, oats, and nut butter. The step-by-step guide ensures you mix and bake these cookies perfectly every time. Remember to adjust for your taste with notes on add-ins and spices. Storing and freezing tips help keep your cookies fresh. Enjoy these treats knowing they are not just tasty but also healthy options! Happy baking!
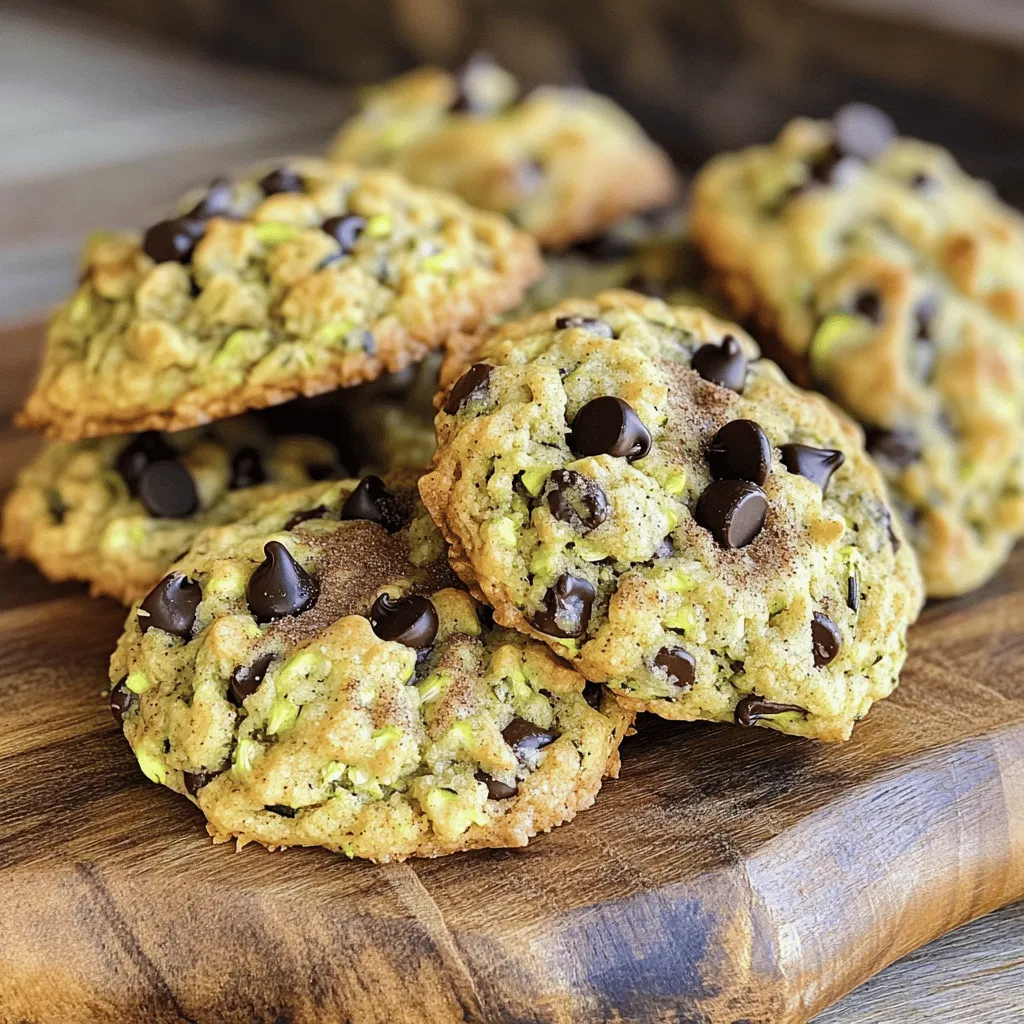
Zucchini Bread Breakfast Cookies Healthy and Tasty Treat
If you’re searching for a healthy yet delicious way to kickstart your day, look no further than zucchini bread breakfast cookies! These tasty treats blend
To make Zucchini Blueberry Baked Oatmeal, you will need some simple ingredients. Here’s a list to help you gather everything you need: - 2 cups rolled oats - 1 medium zucchini, grated - 1 cup blueberries (fresh or frozen) - 2 cups almond milk (or any milk of choice) - 1/4 cup maple syrup (or honey) - 2 teaspoons baking powder - 1 teaspoon cinnamon - 1/2 teaspoon salt - 1/4 cup chopped walnuts or pecans (optional) - 1 teaspoon vanilla extract These ingredients work together to create a dish that is both tasty and nutritious. The oats provide fiber and help keep you full. Zucchini adds moisture and a hidden veggie boost. Blueberries are sweet and packed with antioxidants. Maple syrup gives just the right amount of sweetness. Adding nuts like walnuts or pecans adds a nice crunch and healthy fats. You can easily find most of these items at your local grocery store. For the full recipe, check out the details above and enjoy cooking! - Preheat the oven to 350°F (175°C). - Grease a 9x9-inch baking dish or line it with parchment paper. - Combine the rolled oats, baking powder, cinnamon, and salt in a big bowl. - In another bowl, whisk together almond milk, maple syrup, and vanilla extract until mixed well. - Pour the wet mixture into the dry ingredients and mix until combined. - Transfer the mix into the prepared baking dish and spread it evenly. - Bake for 30-35 minutes, or until the top is golden brown. A toothpick should come out clean when inserted. - Once baked, let it cool for 5-10 minutes before slicing into squares. You can find the full recipe with all details in the main article for more fun ideas! To get the best texture, start by grating the zucchini well. This helps it blend smoothly into the oats. If the zucchini is chunky, it can make the oatmeal uneven. When your dish is baking, use a toothpick to check if it is done. Insert the toothpick in the center; it should come out clean. When it's time to serve, drizzle some maple syrup on top. You can also add a handful of extra blueberries for a fresh touch. For a creamy boost, garnish with Greek yogurt or a scoop of nut butter. This makes each bite even more delicious. To add more fiber, think about using whole grain oats. You can also toss in some seeds like chia or flax for a nutrient boost. These small changes make your dish even healthier without losing flavor. For more ideas, check out the Full Recipe. {{image_2}} You can easily change the taste of your Zucchini Blueberry Baked Oatmeal. Try adding other fruits like apples or raspberries for a new twist. Each fruit brings its own flavor. You can also mix in spices like nutmeg or ginger. These spices add warmth and depth. They make your baked oatmeal even more inviting. If you have dietary needs, you can adjust the recipe. Substitute almond milk with coconut or oat milk if you prefer. This change can give the dish a different flavor. For a low-sugar option, use agave syrup or stevia. These sweeteners work well and keep it tasty. Toppings can make your baked oatmeal special. Experiment with different nuts or seeds for added crunch. Walnuts or almonds add a nice texture. You can also top it with a sprinkle of granola. This adds a delightful crunch and makes your dish look beautiful. For the full recipe, check out the Zucchini Blueberry Baked Oatmeal recipe above. Store leftovers in an airtight container in the fridge for up to 5 days. This keeps them fresh and tasty. I love to grab a piece for breakfast on busy mornings. Freeze portions for up to 3 months for easy breakfasts. You can cut them into squares and place them in freezer bags. This way, you have a quick meal ready whenever you want. Reheat in the microwave or oven until warmed through. I usually microwave for about 1-2 minutes. If using the oven, warm at 350°F (175°C) for 10-15 minutes. This brings back the flavor and makes it nice and cozy. Yes, you can prepare it ahead of time. Just store it in the fridge. This makes breakfast easy. You can bake it in the morning or heat it later. To make it gluten-free, use certified gluten-free oats. This ensures you avoid gluten. Most oats are safe, but checking labels helps. You can use many fruits in this recipe. Apples, bananas, and peaches work well. They add different flavors and textures. Feel free to mix your favorites. This recipe is naturally vegan. Just use plant-based milk and a vegan sweetener. Almond milk works great, and maple syrup is perfect. Enjoy a delicious vegan breakfast with ease. For the full recipe, check out the details above. This baked oatmeal recipe blends oats, zucchini, and blueberries for a tasty dish. You can easily customize it with different fruits and toppings. It’s a simple, healthy option for breakfast or snacks. You can store leftovers in the fridge or freezer for quick meals. Whether you enjoy it fresh or reheated, you'll love the flavor and ease of this dish. Now, get cooking and enjoy a delicious treat that’s good for you!
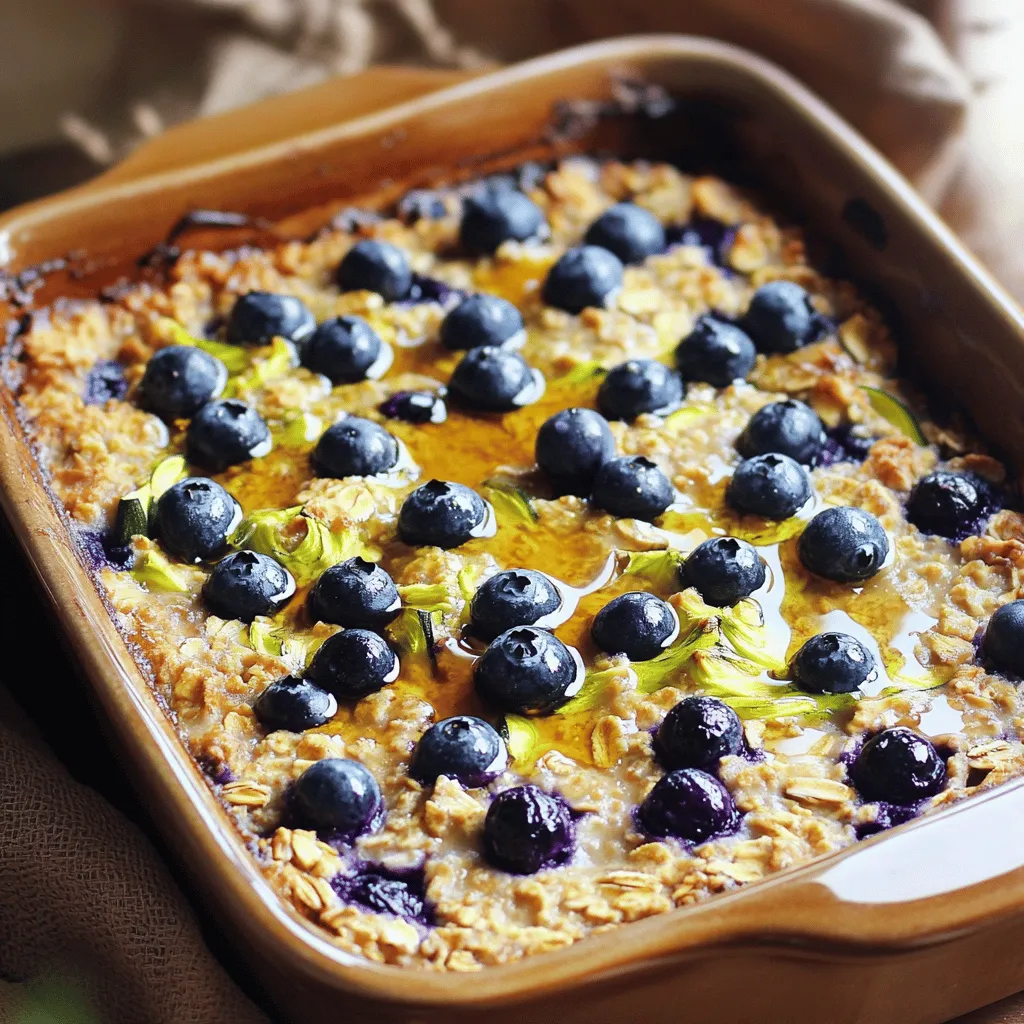
Zucchini Blueberry Baked Oatmeal Flavorful and Healthy
Looking for a tasty way to start your day? Zucchini Blueberry Baked Oatmeal is both flavorful and healthy! This easy recipe packs in wholesome ingredients