Appetizers
 for more details! Yes, you can make these bombs ahead. Prepare them and store them in the fridge. If you want to freeze them, wrap them in plastic. They can stay fresh for about a month. When ready to eat, bake them straight from the freezer or thaw them first. Many sides go great with these bombs. Here are some ideas: - Crispy fries - Fresh garden salad - Steamed vegetables - Onion rings These sides add color and balance to your meal. Look for a golden brown color. The cooking time is usually 15-18 minutes. You can check the inside with a meat thermometer. The beef should reach 160°F (71°C). The cheese should also be melted and bubbly. Absolutely! You can add different sauces for a twist. Try barbecue sauce for sweetness. Hot sauce adds heat, while ranch dressing gives creaminess. You can also serve dipping sauces on the side for fun! Check out the Full Recipe for more ideas. In this post, I shared how to make tasty Garlic Parmesan Cheeseburger Bombs. We covered the right ingredients and the best brands. You learned about simple steps to prepare, bake, and enjoy the bombs. I also provided tips for even cooking and flavor boosts. Plus, you saw options for different proteins and cheeses. Store leftovers easily and warm them up later. Enjoy trying these simple recipes, and don’t hesitate to make them your own!](https://toastedrecipes.com/wp-content/uploads/2025/06/bc25b851-4d1a-428e-b782-3a2de8374157.webp)
Garlic Parmesan Cheeseburger Bombs Tasty and Easy Meal
Craving a fun, tasty meal that’s simple to whip up? Try my Garlic Parmesan Cheeseburger Bombs! These little bites are packed with juicy beef, rich

Crispy Sea Salt Chopped Potatoes Tasty and Simple Recipe
Are you ready to elevate your potato game? My recipe for Crispy Sea Salt Chopped Potatoes is simple and oh-so-delicious. You’ll learn how to choose

Fried Sliced Mushrooms with Ranch Crispy Delight
Are you ready to make a crispy snack that everyone will love? Fried sliced mushrooms with ranch dressing are a tasty treat, perfect for any

Spicy Mexican Corn Bites Flavorful Snack Delight
Are you ready to spice up your snack game? These Spicy Mexican Corn Bites pack a punch of flavor and are a hit at any
![- 1 packet of pizza dough (store-bought or homemade) - 1 cup cooked ground beef or turkey - 1 taco seasoning packet - 1 cup shredded cheddar cheese - 1/2 cup black beans, drained and rinsed - 1/2 cup corn (canned or frozen) - 1/4 cup chopped fresh cilantro - 1 egg, beaten (for egg wash) - Salsa, for dipping - Sour cream, for serving Gather these fresh ingredients to make your cheesy taco sticks come to life. The pizza dough serves as a simple base. You can use store-bought dough for ease or make your own if you feel adventurous. The cooked ground beef or turkey adds protein and flavor. Make sure to season it well with taco seasoning for that classic taste. Cheddar cheese is a must for that gooey texture. Don't forget the black beans and corn, which add a nice bite and extra nutrition. Chopped cilantro brings a fresh twist. You will also need an egg to brush on top of the sticks for a shiny finish. For serving, have salsa and sour cream ready. These creamy and zesty dips pair perfectly with the cheesy taco sticks. Now that you have everything, you can follow the [Full Recipe] to create this fun snack! Preheat the oven to 400°F (200°C). This step is key for a crisp finish. Line a baking sheet with parchment paper. This helps keep the sticks from sticking. In a skillet, cook 1 cup of ground beef or turkey over medium heat. Brown the meat well. Drain any extra fat to keep it lean. Mix in 1 taco seasoning packet. Add a splash of water from the packet's instructions. Stir until the meat is well coated and heated through. Remove from heat. Roll out your pizza dough on a clean surface. Aim for a thickness of about 1/4 inch. Cut the dough into rectangles that are about 4x6 inches. On one half of each rectangle, spoon about 2 tablespoons of the cooked meat mixture. Layer on some black beans, corn, and a sprinkle of cheddar cheese. Add a bit of chopped cilantro for freshness. Fold the dough over the filling to create a pocket. Press the edges with a fork to seal them well. Brush the tops of the taco sticks with a beaten egg. This gives them a lovely golden color. Place the sticks on your lined baking sheet. Bake for 15 to 20 minutes or until they are golden brown and puffed up. Remove from the oven and let them cool slightly. Serve warm with salsa and sour cream for dipping. For the full recipe, check out the details above. To get that perfect golden color, brush the tops with a beaten egg. This simple step makes a big difference. Bake them at 400°F (200°C) for about 15-20 minutes. Keep an eye on them. They should be golden brown and crispy. Pair your Cheesy Taco Sticks with dips like salsa and sour cream. They enhance the flavor and add creaminess. You can also serve them with guacamole for a fresh twist. A side of crunchy veggies or a light salad works well too. Get creative with the fillings! Use shredded chicken or beans for a vegetarian option. You can add jalapeños for heat or mix in different cheeses. Top them with diced tomatoes or avocado for extra flavor. The choices are endless, so have fun! For the full recipe, refer to the [Full Recipe]. {{image_2}} You can easily make Cheesy Taco Sticks vegetarian. Simply replace the meat with plant-based proteins. Use items like lentils, mushrooms, or textured vegetable protein. These options add great flavor and texture. You can follow the same steps in the recipe. Mix your plant-based protein with taco seasoning for that familiar taste. Load your taco sticks with black beans and corn too. This keeps them filling and delicious. If you like heat, spicy Cheesy Taco Sticks are for you. Add chopped jalapeños or a splash of hot sauce. Mix these into the meat or plant-based filling. You can also sprinkle some crushed red pepper flakes for extra kick. Adjust the spice level based on your taste. When you bite into them, the heat will surprise you in a good way! Don’t hesitate to experiment with different cheeses. While cheddar is classic, you can also use pepper jack for a spicy twist. Mozzarella offers a gooey texture, while a blend of cheeses can create a unique flavor. Try mixing in some feta or goat cheese for a tangy touch. Just keep in mind the melting properties of each cheese. This will ensure your Cheesy Taco Sticks stay delicious and gooey. To keep your Cheesy Taco Sticks fresh, let them cool completely first. After cooling, place them in an airtight container. You can store them in the fridge for up to three days. If you want to save them longer, freeze them. Wrap each stick in plastic wrap and place them in a freezer-safe bag. They can last for up to three months in the freezer. When you're ready to eat them, just pull them out and reheat. For the best taste and texture, reheat your Cheesy Taco Sticks in the oven. Preheat your oven to 350°F (175°C). Place the sticks on a baking sheet and cover them with foil. This keeps them from drying out. Heat for about 10-15 minutes, or until they are warm all the way through. If you want a crispier texture, remove the foil for the last few minutes. You can also use an air fryer for a quick warm-up. Set it at 350°F and heat for about 5-7 minutes. Enjoy every bite! Yes, you can make Cheesy Taco Sticks ahead of time. Prepare them and bake as usual. After baking, let them cool. Then, wrap them tightly in plastic wrap or foil. Store in the fridge for up to two days. When you are ready to eat, reheat them in the oven for best results. To reheat Cheesy Taco Sticks, preheat the oven to 350°F (175°C). Place the sticks on a baking sheet. Bake for about 10-15 minutes, or until they are hot and the cheese is melty again. This method keeps them crispy and delicious. Yes! You can use crescent roll dough or puff pastry if you prefer. These options add unique flavors and textures. Just make sure to roll them out as needed, similar to pizza dough. Each Cheesy Taco Stick has around 200 calories. They contain about 10 grams of fat, 15 grams of carbs, and 10 grams of protein. These numbers can vary based on the ingredients you use, like lean meats or reduced-fat cheese. To make Cheesy Taco Sticks gluten-free, use gluten-free pizza dough. Many stores sell this option. Check the labels to ensure it is safe. The rest of the ingredients, like meat and cheese, are typically gluten-free. In this blog post, you learned how to make Cheesy Taco Sticks easily. We covered ingredients, step-by-step instructions, tips, variations, and storage. You now have a simple recipe that is fun and tasty. These Cheesy Taco Sticks are great for any occasion. Enjoy making them your way, and don’t forget to dip them in salsa or sour cream. Happy cooking!](https://toastedrecipes.com/wp-content/uploads/2025/06/9421b64a-1a8d-4498-a66e-b179efc11359.webp)
Cheesy Taco Sticks Flavorful and Easy Snack Recipe
Looking for a snack that’s both fun and easy to make? These Cheesy Taco Sticks are your perfect answer! With gooey cheese, savory beef, and

Beef Flautas or Taquitos Flavorful and Easy Recipe
If you crave a warm and crunchy treat, you’ll love these Beef Flautas or Taquitos! With simple ingredients and easy steps, you can whip up
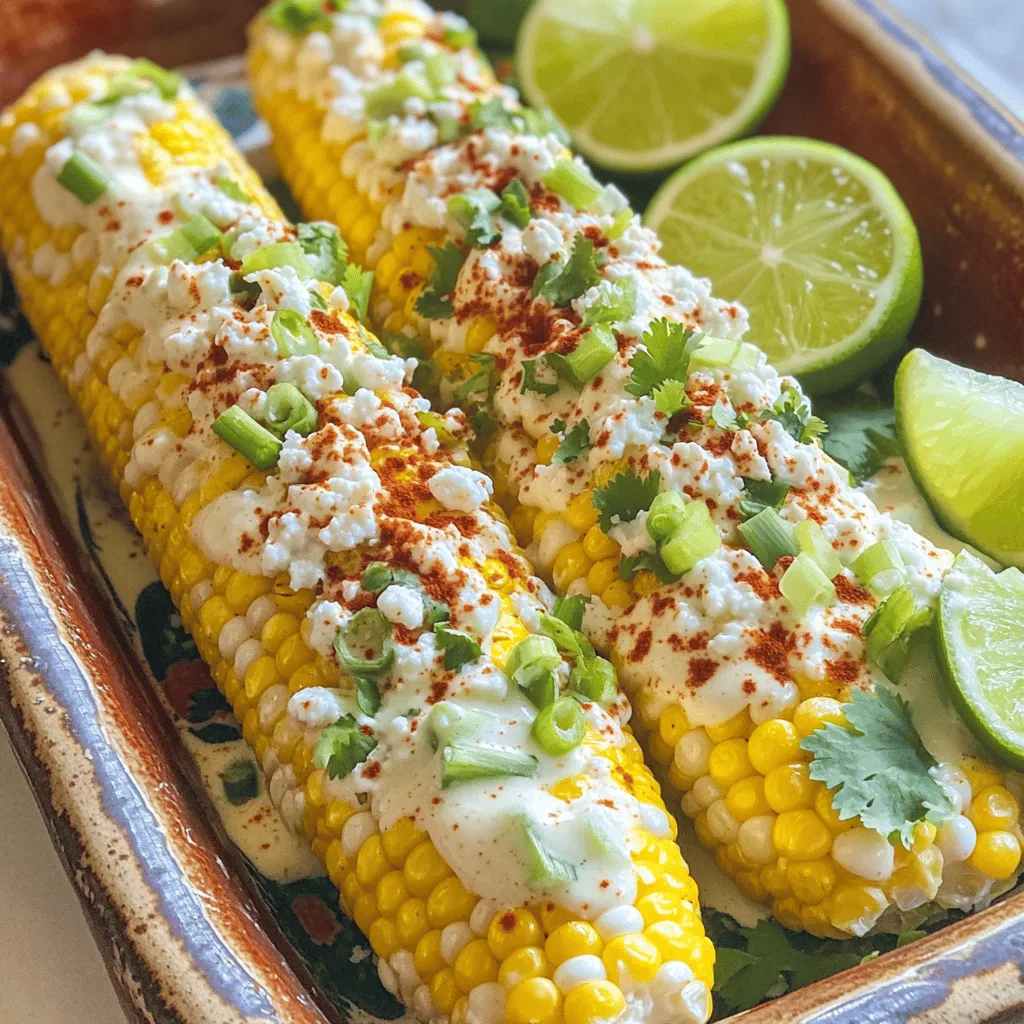
Classic Mexican Street Corn Off the Cob Delightful Dish
Have you ever craved the vibrant taste of classic Mexican street corn but wanted it easier to enjoy? This blog post, Classic Mexican Street Corn

Philly Cheesesteak Sliders Savory and Simple Recipe
If you love Philly cheesesteaks, get ready for a delicious twist! My Philly Cheesesteak Sliders are simple to make and bursting with flavor. Perfect for
![- 1 can (10 oz) diced tomatoes with green chilies (Rotel) - 1 package (8 oz) cream cheese, softened - 1 cup shredded cheddar cheese or a mix of Mexican cheeses - 1 ½ cups sour cream - 1 packet ranch seasoning mix - 1 tablespoon diced jalapeños (optional) - Fresh cilantro for garnish - Tortilla chips or veggie sticks for serving These fresh ingredients make the dip creamy and zesty. The canned tomatoes add a nice kick. Cream cheese gives it a rich texture. Sour cream adds tanginess. The ranch seasoning ties all the flavors together, making it a crowd-pleaser. - Different types of cheese - Additional spices or seasonings - Fresh herbs for garnish You can change things up with different cheeses. Try pepper jack for a spicy twist. Fresh herbs like parsley or chives can add freshness. More spices will enhance flavor depth. - Mixing bowl - Spatula - Plastic wrap - Serving bowl These tools are simple but essential. A mixing bowl helps combine all the ingredients. A spatula is great for smoothing the dip. Plastic wrap keeps it fresh in the fridge. Use a nice serving bowl for a great presentation. For the full recipe, check the detailed instructions above. - Combine cream cheese and sour cream in a bowl. - Mix in ranch seasoning until well incorporated. - Fold in Rotel tomatoes with liquid. This dip starts with a creamy base. You want to make sure the cream cheese is soft. If it is cold, it will be hard to mix. Mix the cream cheese and sour cream until smooth. This step is key to a creamy dip. The ranch seasoning adds a great flavor. Make sure you mix it well so every bite is tasty. Then, gently fold in the Rotel tomatoes. The liquid from the can adds nice moisture. - Stir in shredded cheddar cheese and any optional jalapeños. - Transfer dip to a serving bowl and smooth the top. Next, you stir in shredded cheddar cheese. This adds a nice cheesy flavor. If you like heat, toss in some jalapeños. They give the dip a nice kick. After combining everything, transfer the dip to a serving bowl. Use a spatula to smooth the top. This makes the dip look nice and ready to serve. - Cover and refrigerate for at least 30 minutes. - Garnish with cilantro before serving. - Serve with chips or veggie sticks. Now, it’s time to chill the dip. Cover the bowl and put it in the fridge for at least 30 minutes. Chilling helps the flavors blend. When you're ready to serve, sprinkle some fresh cilantro on top. It adds a pop of color and flavor. Finally, grab some tortilla chips or veggie sticks to serve with it. This dip is perfect for gatherings or a cozy night in. For the Full Recipe, check the section above. To get the best taste from your Boat Dip, let it chill longer. This time allows all the flavors to blend and deepen. If you use room temperature cream cheese, it mixes easier. This step saves you time and effort when stirring. Make your dip shine when you serve it. Use a colorful bowl to draw attention. You can also garnish your dip with fresh herbs or toppings. Chopped green onions, cilantro, or even diced tomatoes can add a fun touch. This makes your dip look as good as it tastes. Want to make your dip a bit lighter? Swap Greek yogurt for sour cream. It adds a nice creaminess while cutting calories. You can also use low-fat or vegan cream cheese. This way, everyone can enjoy the dip, no matter their diet. {{image_2}} To spice up your Boat Dip, you can add more jalapeños or hot sauce. This gives a nice kick that many enjoy. You can also incorporate diced serrano peppers for an extra layer of heat. Both options will make your dip stand out at any gathering. If you love cheese, try different cheese blends in your dip. Mixing pepper jack with cheddar adds a fun twist. For more cheese goodness, top the dip with extra cheese before serving. A quick bake will melt it perfectly, making it even more delicious. For a fresh take, add finely chopped bell peppers or green onions. Both add crunch and color to your dip. You can also mix in black olives for a salty flavor that complements the other ingredients. This variation is great for those who want a bit more veggie goodness. Feel free to get creative with these variations. Each one can bring a unique taste to your Boat Dip. For the full recipe, check out the [Full Recipe]. After enjoying Boat Dip, store any leftovers in an airtight container. Place it in the refrigerator. This helps keep the dip fresh. Use the dip within 3-5 days for the best flavor. I find that it stays tasty for a few days, but it's best when fresh. If you want to save some for later, you can freeze the dip. I suggest freezing it in small portions. This makes it easy to defrost just what you need. When you are ready to use it, thaw the dip in the fridge overnight. This keeps the taste and texture nice. You can serve Boat Dip cold or at room temperature. I prefer it chilled, as it stays creamy and delicious. If you choose to reheat, be careful. Avoid reheating it in the microwave. This may change the dip's texture. Enjoy it fresh from the fridge for the best experience! Yes, you can prepare it a day in advance for convenience. This helps the flavors mix well. I often make it the night before a party. Just store it in the fridge. It tastes even better the next day! Suggested pairings include tortilla chips, veggie sticks, and crackers. Tortilla chips add a nice crunch. Veggie sticks like carrots and celery bring freshness. You can even use pita chips for a twist! Absolutely! Experiment with ingredients to suit your taste preferences. You can swap cheeses or add spices. Try adding black olives or chopped bell peppers. This dip is all about your taste! Add more jalapeños or a few dashes of your favorite hot sauce. I love using fresh jalapeños for heat. You can also try sriracha for a different flavor. Adjust the spice to your liking! This post shared a simple and tasty boat dip recipe. You learned about essential and optional ingredients, plus tips for great flavor and presentation. We covered fun variations to match your taste and how to store leftovers. Remember, you can customize this dip for any event. Enjoy this easy dish with friends or family. It’s perfect for parties or a snack at home. Dive in, get creative, and serve something special!](https://toastedrecipes.com/wp-content/uploads/2025/05/9aadeea9-5419-482e-8788-1bc79e6e6ac1.webp)
Boat Dip Rotel Ranch Dip Easy and Flavorful Recipe
Looking for a crowd-pleasing snack? Try my easy Boat Dip, also known as Rotel Ranch Dip. With just a few simple ingredients, you’ll create a
![- 1 pound Brussels sprouts, trimmed and halved - 2 tablespoons olive oil - 3 tablespoons sweet chili sauce - 1 tablespoon soy sauce - 1 teaspoon garlic powder - Salt and pepper to taste - 1 tablespoon sesame seeds - 2 green onions, chopped Gather these ingredients before you start. Fresh Brussels sprouts are key for the best taste. Trim and halve them, so they cook evenly. Olive oil adds richness and helps the sauce stick. Sweet chili sauce brings a nice balance of heat and sweetness. The soy sauce gives depth, while garlic powder adds flavor. Remember to season with salt and pepper to enhance all the tastes. For garnish, sesame seeds add crunch, and green onions bring a fresh bite. This combination creates a dish that’s both simple and delicious. You can find the full recipe below for easy reference. To prep Brussels sprouts, start by trimming the stem end. This helps them cook evenly. Next, cut each sprout in half. This step makes them crispier in the air fryer. Rinsing them under cold water removes dirt and debris. After rinsing, dry them well with a clean towel. Moisture can make them soggy, and we want crispy bites. In a large bowl, combine the halved Brussels sprouts, olive oil, sweet chili sauce, soy sauce, garlic powder, salt, and pepper. Mix it well. You want every sprout to be covered. Use your hands or a spoon for this. Ensure they are evenly coated for the best flavor. Trust me, this step makes a huge difference. Set your air fryer to 375°F (190°C). This temperature is perfect for getting that crispy texture. Place the seasoned Brussels sprouts in the air fryer basket. Make sure they are in a single layer. This helps air circulate for even cooking. Air fry for 15 to 18 minutes. Shake the basket halfway through to promote even browning. When they are done, they should be crispy outside and tender inside. Enjoy the deliciousness of your Sweet Chili Air Fryer Brussels Sprouts. For the complete recipe, check out the Full Recipe. To make your Brussels sprouts crispy, avoid overcrowding the air fryer basket. Place them in a single layer. This way, hot air can flow freely. If they are too close, they will steam instead of crisp. Use the shaking technique for even cooking. Halfway through cooking, shake the basket gently. This helps all sides get that golden brown finish. It will also improve texture and flavor. Want more spice? You can add chili flakes or sriracha to the mix. This will give your dish a nice kick. If you prefer milder flavors, consider using less sweet chili sauce. You can also try alternative sauces. Teriyaki sauce or garlic aioli can change the taste. These options keep the dish fresh and exciting. You can mix and match based on your mood. For the complete method, refer to the [Full Recipe]. {{image_2}} Adding bacon makes these Brussels sprouts even more delicious. The crispy, salty bacon pairs perfectly with the sweet chili sauce. To make this, cook diced bacon in the air fryer for a few minutes first. Once it gets a little crispy, add your Brussels sprouts to the basket. Toss the sprouts and bacon together with the olive oil and sweet chili sauce. The bacon adds richness and depth to the flavor. You can easily make a vegan version of this dish. Instead of using bacon, try adding more veggies like bell peppers or mushrooms. Switch the soy sauce for a gluten-free option or tamari if needed. Ensure the sweet chili sauce you pick is vegan-friendly. This version keeps the same great taste while being plant-based. Sweet chili Brussels sprouts go well with many main dishes. They pair nicely with grilled chicken or fish. You can also serve them with rice or quinoa for a healthy meal. Add a fresh salad on the side to create a colorful plate. Feel free to mix and match sides to suit your taste. For the full recipe, you can check the details above. To keep your sweet chili air fryer Brussels sprouts fresh, follow these steps. First, let them cool down. Once cool, transfer them to an airtight container. This helps keep moisture out. Store the container in your fridge. They will stay good for about 3 to 4 days. If possible, avoid stacking them. This prevents them from getting mushy. If you want to keep them longer, you can freeze them. Just remember to use freezer-safe containers. When reheating, you want to keep them crispy. The best way is to use the air fryer again. Preheat it to 350°F (175°C). Place the Brussels sprouts in a single layer in the basket. Heat for about 5 to 7 minutes. Check them halfway through. If they need more time, give them a minute or two. You can also use an oven if you don’t have an air fryer. Just spread them on a baking sheet and heat at the same temperature. Enjoy your crispy leftovers! For the full recipe, check out the details above. Yes, you can use frozen Brussels sprouts. However, fresh ones taste better. If you use frozen sprouts, thaw them first. Drain any excess water to avoid sogginess. You may need to cook them longer. Check them often, as they cook differently than fresh sprouts. You have many choices! Try teriyaki sauce for a sweet twist. Soy sauce mixed with honey adds a nice glaze. You can also make a spicy version with sriracha or chili paste. Mix and match flavors to find your favorite! Look for a golden brown color on the outside. They should feel crispy when you touch them. The inside should be tender but not mushy. If they are soft with a slight crunch, they are ready. Enjoy your tasty Sweet Chili Air Fryer Brussels Sprouts! For the full recipe, refer to the earlier section. In this blog post, you learned how to make delicious air fryer Brussels sprouts. We covered the key ingredients, from Brussels sprouts to sweet chili sauce. You saw step-by-step instructions for prepping and cooking them perfectly. I shared tips for getting that crispy texture and ideas for flavor variations. Don’t forget to store leftovers properly to keep that great taste. Try these easy recipes, and enjoy a tasty dish that fits any meal. Soon, you’ll impress everyone with your cooking!](https://toastedrecipes.com/wp-content/uploads/2025/05/f1df7059-e624-4dc8-98f6-8ad50e5ae900.webp)
Sweet Chili Air Fryer Brussels Sprouts Delight
Are you ready to transform Brussels sprouts into a tasty treat? My Sweet Chili Air Fryer Brussels Sprouts Delight recipe will make you love these