Appetizers

Easy Air Fryer Lasagna Fritta Quick and Tasty Recipe
Craving a crispy, cheesy delight? Look no further! This Easy Air Fryer Lasagna Fritta recipe is quick, fun, and bursts with flavor. You’ll layer tender

Air Fryer Buffalo Cauliflower Crispy and Flavorful Treat
Craving a delicious snack that’s both crispy and packed with flavor? Look no further! My Air Fryer Buffalo Cauliflower recipe transforms ordinary cauliflower into a
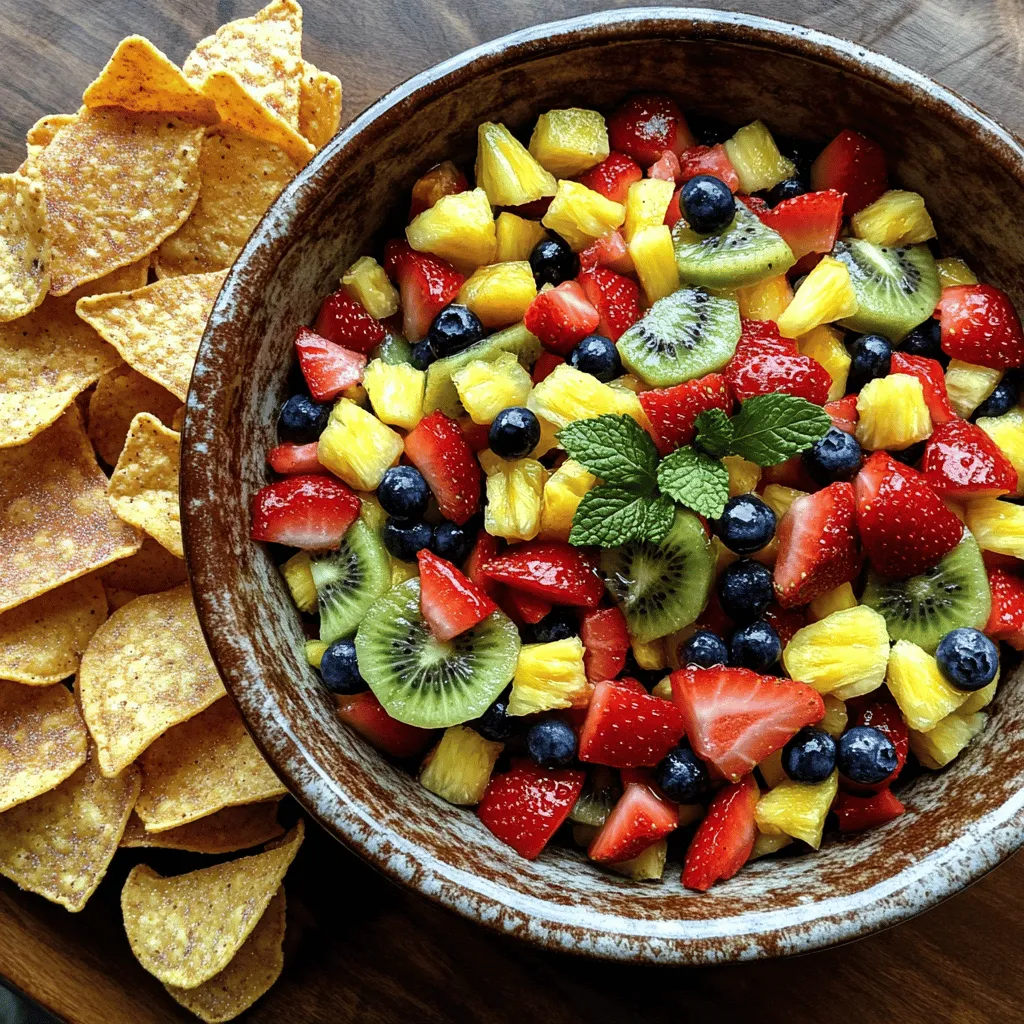
Fruit Salsa with Cinnamon Sugar Tortilla Chips Delight
Dive into a world of flavor with my Fruit Salsa with Cinnamon Sugar Tortilla Chips Delight! This easy and fun recipe will make your taste

Savory Chicken Parmesan Pillows Simple and Tasty Delight
Looking for an easy and delicious treat? These Chicken Parmesan Pillows combine savory chicken, creamy cheeses, and crispy puff pastry. Perfect as a snack, appetizer,
![- Ground beef - Vegetables: onion, garlic, red bell pepper - Spices: cumin, paprika, salt, black pepper For the filling, I always use high-quality ground beef. It adds great flavor and richness. You will also want to chop one medium onion, two cloves of garlic, and one red bell pepper. These veggies bring sweetness and depth to the dish. The spices are key too! Use one teaspoon each of cumin and paprika, plus a teaspoon of salt and half a teaspoon of black pepper. This blend creates a warm, inviting taste. - All-purpose flour - Chilled unsalted butter - Salt - Cold water For the dough, I stick with two cups of all-purpose flour. This gives the empanadas a nice, flaky crust. Add one teaspoon of salt for flavor. The magic ingredient? Cold, unsalted butter—half a cup, chilled and cubed. This makes the dough tender. Lastly, you’ll need five to six tablespoons of cold water. This helps bring the dough together without making it sticky. - Frozen peas - Hard-boiled eggs - Fresh cilantro If you want to elevate your filling, consider adding some frozen peas. About one cup adds a pop of sweetness. You can also chop two hard-boiled eggs for extra protein and texture. For freshness, toss in a tablespoon of chopped cilantro if you like. These optional ingredients add layers of flavor and make your empanadas even more special. For the full recipe, check out the complete guide. 1. Sautéing vegetables: Start by heating 2 tablespoons of olive oil in a large skillet over medium heat. Add 1 medium onion and 1 finely chopped red bell pepper. Cook them for about 5 minutes until they soften. Stir in 2 minced garlic cloves and cook for another minute. This step builds a great base flavor. 2. Browning the beef: Now, add 1 pound of ground beef to the skillet. Break it apart with a spoon as it cooks. Cook until the beef is browned and no longer pink. If there’s excess fat, drain it to keep the filling light. 3. Adding spices and peas: To the beef, mix in 1 teaspoon of ground cumin, 1 teaspoon of paprika, 1 teaspoon of salt, and ½ teaspoon of black pepper. Stir well. Then add 1 cup of frozen peas and cook for another 3 to 4 minutes. Remove it from heat and fold in 2 chopped hard-boiled eggs and chopped cilantro if you like. Let this mixture cool. 1. Mixing ingredients: In a large bowl, combine 2 cups of all-purpose flour with 1 teaspoon of salt. Cut in ½ cup of chilled unsalted butter using a pastry knife or your fingers. You want the mixture to look like coarse crumbs. 2. Chilling the dough: Gradually add cold water, about 5 to 6 tablespoons, mixing until the dough forms a ball. Wrap it in plastic wrap and chill in the fridge for about 30 minutes. This makes the dough easier to roll out. 1. Rolling out dough: Preheat your oven to 400°F (200°C). On a floured surface, roll out the chilled dough until it’s about 1/8-inch thick. Use a round cutter or a bowl to cut 5 to 6-inch circles. 2. Filling and sealing empanadas: Place a heaping tablespoon of the beef filling in the center of each dough circle. Brush the edges with the egg wash made from 1 beaten egg mixed with 1 tablespoon of water. Fold the dough over to create a half-moon shape. Press the edges to seal tightly and crimp them with a fork. 3. Baking until golden brown: Arrange the empanadas on a baking sheet lined with parchment paper. Brush the tops with the remaining egg wash and poke small holes in each for steam. Bake for 20 to 25 minutes, or until they are golden brown. Enjoy the smell that fills your kitchen! For the complete recipe, check out the Full Recipe. To make the best beef empanadas, you need to balance flavors. Use spices like cumin and paprika to add depth. The ground beef needs to be well-seasoned. Adding vegetables helps create a rich taste. Make sure to sauté the onion and bell pepper until soft. This brings out their natural sweetness. Texture matters, too. You want your filling to be moist but not soggy. The frozen peas and chopped hard-boiled eggs add great texture. Mix everything well before letting it cool. This helps the flavors meld together. For a flaky crust, keep your butter cold. Cut it into small pieces before mixing with flour. Use a pastry knife or your fingers for the best results. Adding cold water slowly helps form the dough without making it sticky. If the dough feels too wet, sprinkle in a bit more flour. Always chill the dough for at least 30 minutes. This allows the gluten to relax, making it easier to roll out. Watch your baking time closely. Preheat your oven to 400°F (200°C) for even cooking. Bake for 20 to 25 minutes. Your empanadas should turn a lovely golden color. If they look pale, they need more time. Before baking, brush the tops with egg wash. This gives them a beautiful shine. Poke tiny holes in the tops for steam to escape. This helps keep your empanadas from becoming soggy. {{image_2}} You can change the filling in empanadas to fit your taste. For a vegetarian twist, use ingredients like mushrooms, spinach, or black beans. These options add a nice texture and flavor. You can also create a chicken or pork filling. Simply swap the ground beef with shredded chicken or ground pork. Season it just like the beef for a tasty treat. If you prefer convenience, consider using pre-made pastry. This shortcut saves time and still gives you a great empanada. Many stores offer frozen dough that works well. For those who need it, gluten-free dough is also available. You can find it in stores or make your own with almond flour or rice flour. This allows everyone to enjoy empanadas. To spice things up, add jalapeños to the filling. This gives your empanadas a nice kick. You can also make cheese-stuffed empanadas. Just mix cheese with your filling for extra creaminess. Both options will delight your taste buds and add fun to your meal. Check out [Full Recipe] for more ideas and details. To keep your empanadas fresh, storing them correctly is key. - Refrigerating cooked empanadas: Place your cooked empanadas in an airtight container. They will stay fresh for up to 3 days. Before eating, let them sit at room temperature for a few minutes. - Freezing before or after baking: You can freeze empanadas either way. If you freeze them before baking, place them on a baking sheet to freeze individually. Once frozen, transfer them to a freezer bag. They last up to 3 months. If you bake them first, let them cool, then freeze in a similar way. When it's time to enjoy your empanadas again, reheating them properly makes a big difference. - Best methods for reheating: Use an oven or an air fryer for the best results. Preheat to 350°F (175°C) and heat for about 10-15 minutes. - Keeping empanadas crispy: Avoid microwaving if you want that crispy texture. The oven or air fryer keeps the outside crunchy. Knowing how long to store your empanadas helps avoid waste. - Duration for storage in fridge and freezer: In the fridge, cooked empanadas last for 3 days. In the freezer, they can stay good for up to 3 months. Always label your containers with dates to keep track. For all the steps and tips, check the Full Recipe for making these tasty beef empanadas! - Chimichurri - Spicy salsa Chimichurri is a fresh sauce made with parsley, garlic, olive oil, and vinegar. It adds a burst of flavor. The bright taste complements beef well. Spicy salsa brings heat and freshness. It is a fun contrast to the savory filling. - Checking for golden-brown color Look for a golden-brown color on the empanadas. This shows they are cooked well. The crust should be flaky and crisp. If they are pale, they need more time in the oven. Trust your eyes! - Yes, with freezing and reheating tips You can make beef empanadas ahead. If you freeze them, they stay fresh longer. To freeze, place them on a tray and freeze until firm. Then, transfer them to a bag. When ready to eat, bake them straight from the freezer. Just add a few extra minutes to the baking time. - Historical background and cultural significance Beef empanadas have roots in Spain and Latin America. They were made for easy meals on the go. Many cultures have their own versions. Each one tells a story of local flavors and traditions. They are a symbol of comfort food around the world. In this blog post, we explored how to make delicious beef empanadas. You learned about the essential ingredients needed for both filling and dough. I shared step-by-step instructions for preparing your empanadas, along with tips for perfecting the filling and dough. Don’t forget about the possible variations and storage tips to enjoy these treats later. My final thought? Empanadas are fun to make and full of flavor. Try your own twist and share with friends!](https://toastedrecipes.com/wp-content/uploads/2025/06/c31af023-5891-4ad9-9ff2-386a6b453e9a.webp)
The Best Beef Empanadas Easy and Flavorful Recipe
Are you ready to impress your family and friends with delicious beef empanadas? In this easy and flavorful recipe, I’ll guide you step-by-step from making

Grilled Jerk Shrimp and Pineapple Skewers Delight
Get ready for a flavor explosion with my Grilled Jerk Shrimp and Pineapple Skewers Delight! These skewers combine juicy shrimp, sweet pineapple, and spicy jerk

Irresistible Pizza Monkey Bread Quick and Tasty Recipe
Are you ready to elevate your snack game? This Irresistible Pizza Monkey Bread is quick, easy, and a perfect treat for any gathering. With gooey
 for more details! Yes, you can make these bombs ahead. Prepare them and store them in the fridge. If you want to freeze them, wrap them in plastic. They can stay fresh for about a month. When ready to eat, bake them straight from the freezer or thaw them first. Many sides go great with these bombs. Here are some ideas: - Crispy fries - Fresh garden salad - Steamed vegetables - Onion rings These sides add color and balance to your meal. Look for a golden brown color. The cooking time is usually 15-18 minutes. You can check the inside with a meat thermometer. The beef should reach 160°F (71°C). The cheese should also be melted and bubbly. Absolutely! You can add different sauces for a twist. Try barbecue sauce for sweetness. Hot sauce adds heat, while ranch dressing gives creaminess. You can also serve dipping sauces on the side for fun! Check out the Full Recipe for more ideas. In this post, I shared how to make tasty Garlic Parmesan Cheeseburger Bombs. We covered the right ingredients and the best brands. You learned about simple steps to prepare, bake, and enjoy the bombs. I also provided tips for even cooking and flavor boosts. Plus, you saw options for different proteins and cheeses. Store leftovers easily and warm them up later. Enjoy trying these simple recipes, and don’t hesitate to make them your own!](https://toastedrecipes.com/wp-content/uploads/2025/06/bc25b851-4d1a-428e-b782-3a2de8374157.webp)
Garlic Parmesan Cheeseburger Bombs Tasty and Easy Meal
Craving a fun, tasty meal that’s simple to whip up? Try my Garlic Parmesan Cheeseburger Bombs! These little bites are packed with juicy beef, rich

Crispy Sea Salt Chopped Potatoes Tasty and Simple Recipe
Are you ready to elevate your potato game? My recipe for Crispy Sea Salt Chopped Potatoes is simple and oh-so-delicious. You’ll learn how to choose

Fried Sliced Mushrooms with Ranch Crispy Delight
Are you ready to make a crispy snack that everyone will love? Fried sliced mushrooms with ranch dressing are a tasty treat, perfect for any