Appetizers

Here’s what you need to make these tasty zucchini breadsticks: - 2 medium zucchinis, grated and excess moisture squeezed out - 1 cup all-purpose flour - 1/2 cup grated parmesan cheese - 1/2 cup shredded mozzarella cheese - 1 large egg - 2 tablespoons olive oil - 1 teaspoon garlic powder - 1 teaspoon dried oregano - 1/2 teaspoon salt - 1/4 teaspoon black pepper - 1/4 teaspoon red pepper flakes (adjust to taste) - Optional: Marinara sauce for dipping These simple ingredients come together to create a savory and satisfying treat. The zucchinis give moisture and flavor. The cheeses add creaminess and a rich taste. Using garlic and oregano gives them a wonderful aroma. Be sure to squeeze out the moisture from the zucchini. This step helps keep the breadsticks from becoming soggy. You can enjoy these breadsticks on their own or dip them in marinara sauce. For the full recipe, check out the instructions. You'll love how easy they are to make! 1. Preheat your oven to 400°F (200°C). Line a baking sheet with parchment paper. 2. Take your zucchinis and grate them. Squeeze out the extra moisture using a clean towel. This step keeps your breadsticks from being soggy. 1. In a large bowl, combine the grated zucchini, flour, parmesan cheese, mozzarella cheese, and the egg. Mix well until everything blends nicely. 2. Add olive oil, garlic powder, oregano, salt, black pepper, and red pepper flakes to the bowl. Stir until all ingredients are evenly mixed. 1. Spread the mixture onto the prepared baking sheet. Shape it into a rectangle, about 1/2 inch thick. 2. Bake in the preheated oven for 20-25 minutes. Look for golden edges and a firm center. 3. Once baked, remove the sheet from the oven and let it cool for 5 minutes. Use a knife to cut the baked mixture into sticks. 4. For added crispiness, return the cut breadsticks to the oven for another 5 minutes. 5. Serve warm with marinara sauce on the side for dipping. For the complete list of ingredients and details, refer to the Full Recipe. To make great zucchini breadsticks, you need to squeeze out excess moisture from the zucchini. Here’s how: - Grate the zucchini using a box grater or food processor. - Place the grated zucchini in a clean kitchen towel. - Twist the towel and squeeze hard to remove water. This step keeps your breadsticks from becoming soggy. For even baking, spread the zucchini mixture evenly on the baking sheet. Aim for about half an inch thick. This helps all sides cook the same. Rotate the baking sheet halfway through cooking. This helps the breadsticks brown nicely on all sides. Zucchini breadsticks are great on their own, but you can elevate them. Pair them with marinara sauce for a classic touch. You can also try these toppings for extra flavor: - Sprinkle more cheese on top before baking. - Add fresh herbs like basil or parsley for color and taste. - Serve with a creamy dip like ranch or hummus. These small changes make the breadsticks even more fun to eat. Enjoy your savory and satisfying treat! {{image_2}} You can make tasty swaps for the ingredients in zucchini breadsticks. This makes them fit your needs. - Gluten-free flour options: Use almond flour or coconut flour instead of all-purpose flour. Both work well and keep the breadsticks moist. - Non-dairy cheese alternatives: Try using vegan mozzarella or nutritional yeast. They add great flavor without dairy. To make your zucchini breadsticks stand out, add more flavor! Here’s how: - Extra spices for heightened flavor: You can mix in cumin or smoked paprika. These spices bring warmth and depth to each bite. - Adding herbs and other vegetables: Fresh basil or chopped spinach can be added. They boost the taste and add more nutrition. You can also add bell peppers or onions for extra crunch. For the full recipe, check out the Zesty Zucchini Breadsticks section above. Enjoy experimenting with these variations! To store your leftover zucchini breadsticks, let them cool first. Place them in an airtight container. You can keep them in the fridge for up to three days. If you want to save them longer, consider freezing. Wrap each stick tightly in plastic wrap. Then, place them in a freezer bag. They can last for up to three months in the freezer. When you're ready to enjoy your zucchini breadsticks again, reheating is simple. The best method is to use an oven. Preheat your oven to 350°F (175°C). Place the breadsticks on a baking sheet. Heat them for about 10-15 minutes. This will make them crispy again. You can also use a microwave for quick reheating. Just remember, this may make them a bit softer. If you want to dip them in marinara sauce, warm that up too for the best flavor. How to keep zucchini breadsticks from being soggy? To prevent sogginess, remove excess moisture from the grated zucchini. Squeeze it in a clean kitchen towel or paper towels. Use a good amount of flour to balance moisture in the mix. Baking them until golden brown also helps. Can I make zucchini breadsticks ahead of time? Yes, you can make zucchini breadsticks ahead of time. Bake them and let them cool. Store them in the fridge for up to three days. Then, simply reheat them in the oven before serving. This keeps them fresh and tasty. What can I use instead of marinara sauce for dipping? If you want a change from marinara sauce, try ranch dressing or hummus. You can also use tzatziki for a cool, refreshing dip. Another option is a spicy salsa for a kick. Get creative with your favorite flavors! Feel free to check out the Full Recipe for more details! This article covered how to make tasty zucchini breadsticks. We detailed the key ingredients and offered step-by-step baking instructions. You learned tips for perfecting your recipe and explored variations. Storing leftovers and reheating options were also discussed. In closing, these breadsticks are a fun, healthy snack. Experiment with flavors and enjoy every bite. You’ll impress friends and family with your skills!
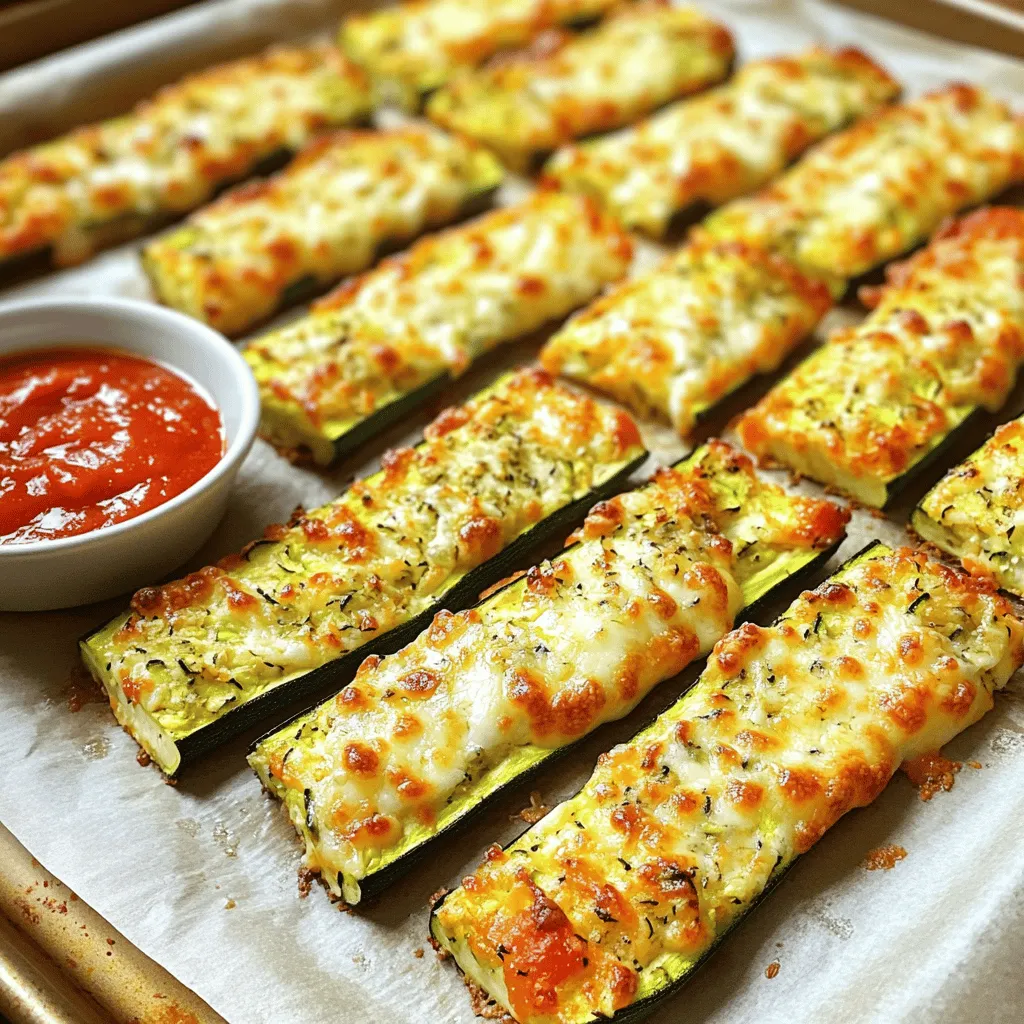
Zucchini Breadsticks Savory and Satisfying Treat
Are you ready to enjoy a tasty snack that’s both healthy and fun to make? My Zucchini Breadsticks are a savory treat perfect for any
To make quick and easy refrigerator pickles, you need a few key ingredients: - 1 medium cucumber, sliced into thin rounds - 1 cup distilled white vinegar - 1 cup water - 2 tablespoons granulated sugar - 1 tablespoon sea salt - 1 teaspoon mustard seeds - 1 teaspoon dill seeds - 1 clove garlic, peeled and smashed These ingredients create a perfect brine that gives the pickles their tangy flavor. You can add some extra flair with optional ingredients: - 1/2 teaspoon red pepper flakes (for a little heat) - 1 tablespoon fresh dill, chopped (for garnish) These additions can enhance the taste and make your pickles unique. To make these pickles, you will need: - A medium saucepan - A clean glass jar with a lid Using the right equipment helps ensure your pickles turn out great. You can find the full recipe for more details. First, wash your cucumber well. Use cold water to remove dirt. Then, slice it into thin rounds. Thin slices soak up the brine better. You can use a knife or a mandoline for even slices. Set the slices aside while you make the brine. Grab a medium saucepan and add the vinegar, water, sugar, and salt. Heat it on medium. Stir until both the sugar and salt dissolve. This step is key for flavor. Once mixed, take it off the heat and let it cool a bit. After a few minutes, add the mustard seeds, dill seeds, smashed garlic, and red pepper flakes if you want some heat. Next, place the cucumber slices into a clean glass jar. You can pack them in tightly, which helps with flavor. Pour the cooled brine over the cucumbers. Make sure they are fully submerged. If needed, press down gently to fit everything. Seal the jar tightly with a lid. Let it cool to room temperature before moving it to the fridge. For the best taste, let the pickles marinate for at least 24 hours. You can enjoy them for up to two weeks. Check out the Full Recipe for more details! To boost flavor, add herbs and spices to your brine. Fresh dill gives a nice touch. You can also use thyme, coriander, or bay leaves. Each herb adds a unique taste. For more kick, try adding a few slices of jalapeños. Experimenting is key! If you love garlic, add more cloves. The flavor will deepen as the pickles sit. Balancing sweetness and salt makes your pickles shine. If you prefer sweeter pickles, add more sugar. Start with a teaspoon at a time. Taste the brine after each addition. For saltiness, reduce salt if needed. Remember, the longer the pickles sit, the flavors will intensify. Packing your pickles right helps in flavor development. Use a clean glass jar for storage. Pack the cucumber slices tightly. This keeps them submerged in the brine. Use a weight, like a small plate, if needed. Store your jar in the fridge for best results. Pickles taste better after 24 hours. They can last up to two weeks. For a full recipe, check out the detailed steps above! {{image_2}} You can add heat to your pickles. Just include red pepper flakes for a kick. For more spice, try sliced jalapeños or chili peppers. These spicy additions bring extra flavor and excitement to each bite. Cucumbers are great, but you can try other veggies too. Carrots, radishes, and green beans work well. Slice them thin for quick pickling. Each vegetable brings its own taste and texture, making your pickles unique. You can balance sweet and savory flavors in your pickles. For sweet pickles, add more sugar or try a bit of honey. If you prefer savory, increase the salt or add garlic. This way, you tailor the taste to fit your mood. For the full recipe, check out the Quick & Easy Refrigerator Pickles. To keep your refrigerator pickles fresh, use a clean glass jar. A tightly sealed jar helps keep out air. Make sure the cucumbers stay submerged in the brine. If needed, add more liquid. Store the jar in the fridge to maintain crispness and flavor. Refrigerator pickles can last up to two weeks. After making them, wait at least 24 hours for the best taste. The brine helps preserve them. Always check for any signs of spoilage before eating. If the pickles look or smell off, it's best to toss them. Watch for any changes in color or smell. If the brine becomes cloudy, that’s a sign of spoilage. Also, check the texture. If the pickles feel mushy or slimy, do not eat them. Always trust your senses; if something seems wrong, it’s safer to discard them. Refrigerator pickles can last for up to two weeks. Store them in the fridge. After two weeks, the taste may change. They might still be safe to eat, but the crunch could fade. Yes, you can use different types of vinegar. Apple cider vinegar adds a fruity flavor. Rice vinegar is milder and sweet. Experiment with what you like best. Each vinegar gives a unique taste to your pickles. Some common mistakes include not using enough salt or sugar. Skipping the marination time can also lead to bland pickles. Another mistake is not packing the cucumbers tightly. Make sure to follow the recipe for the best results. To make your pickles crunchier, use fresh cucumbers. You can also soak them in cold water for a few hours before pickling. Adding ice to the brine is another trick. These methods help keep your pickles firm. Yes, letting the pickles marinate for 24 hours is important. This time allows the flavors to blend well. If you taste them sooner, they will be less flavorful. For the best taste, wait at least a day. For the full recipe, check out the section above! Refrigerator pickles are easy and fun to make at home. We covered essential ingredients, step-by-step instructions, and helpful tips. Adding your choice of spices can enhance your pickles' flavor. Remember to customize them to suit your taste. Proper storage extends their life, so keep an eye on them. Enjoy your crunchy, tangy creations while sharing them with friends and family. Making refrigerator pickles can be a great bonding activity and a tasty reward!
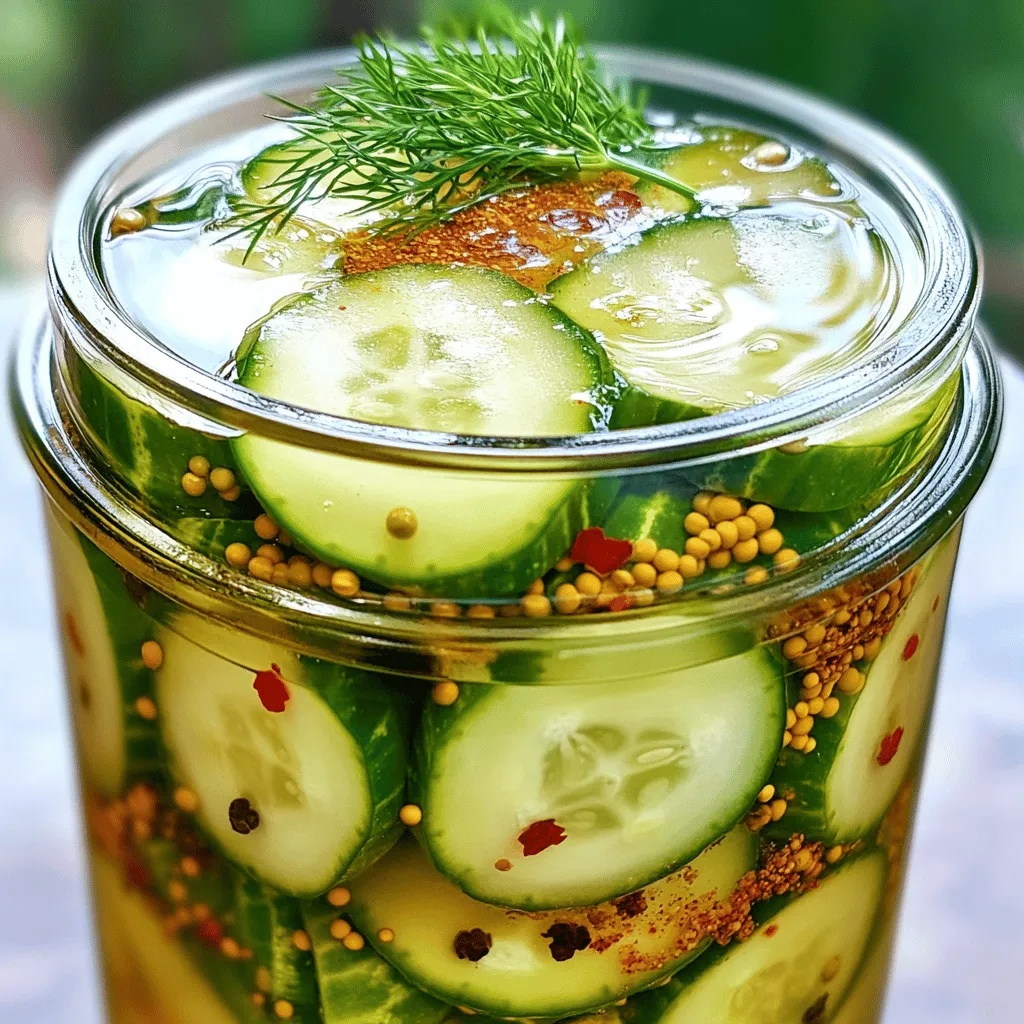
Quick and Easy Refrigerator Pickles for Fresh Flavor
Are you ready to add a burst of fresh flavor to your meals? Making quick and easy refrigerator pickles is a game-changer in the kitchen!
To make crispy pan-fried zucchini, you will need these simple ingredients: - 2 medium zucchinis - 1/2 cup all-purpose flour - 1 large egg - 1 cup breadcrumbs (panko recommended) - 1/2 cup grated Parmesan cheese - Seasonings: garlic powder, paprika, salt, and pepper - 3 tablespoons olive oil - Fresh parsley for garnish These ingredients create a great balance of flavor and texture. The zucchinis give a fresh taste. The egg helps the breadcrumbs stick. Parmesan adds a rich flavor. Panko breadcrumbs provide that perfect crunch. You can adjust the seasonings to fit your taste. If you want to learn how to put these ingredients together, check out the Full Recipe. It will show you how to make this tasty treat step by step! First, wash the zucchinis under cold water. This helps remove dirt and bacteria. Next, slice them into 1/4 inch rounds. Try to keep the slices even. This ensures they cook evenly. After slicing, pat the rounds dry with a paper towel. Removing excess moisture is key to achieving a crispy texture. Now, let's set up a breading station. You will need three shallow bowls. In the first bowl, add 1/2 cup of flour. Season this flour with salt and pepper to taste. In the second bowl, crack one large egg and whisk it until blended. In the third bowl, mix 1 cup of breadcrumbs with 1/2 cup of grated Parmesan cheese, 1 teaspoon of garlic powder, and 1/2 teaspoon of paprika. This mixture will add flavor and a nice crunch. Heat 3 tablespoons of olive oil in a large skillet over medium heat. Make sure the oil shimmers but does not smoke. Take each zucchini round and dip it into the flour first. Coat it lightly, then shake off the excess. Next, dip the floured zucchini into the beaten egg, letting any extra egg drip off. Finally, coat the zucchini in the breadcrumb mixture. Press gently to make sure the crumbs stick well. Once breaded, place the zucchini rounds into the hot skillet. Do not overcrowd them; fry in batches if needed. Cook each side for about 2-3 minutes or until they turn golden brown and crispy. After cooking, transfer them to a paper towel-lined plate. This helps absorb any extra oil. Enjoy your crispy pan fried zucchini! For the full recipe, refer to the complete instructions. To get the best crispy texture, start by patting the zucchinis dry. This step removes water that can make them soggy. When frying, use medium heat. If the heat is too low, the zucchinis will soak up oil instead of frying. If it’s too high, they can burn quickly. A hot pan helps to lock in that crunch. For breading, you can use all-purpose flour or gluten-free flour. All-purpose flour gives a nice coat. Gluten-free flour can work well too but may change the texture. For breadcrumbs, panko is my favorite. It makes the zucchini extra crunchy and light. Regular breadcrumbs can be used, but they won’t give the same crispiness. To elevate the flavor, try adding spices like cayenne pepper for heat or Italian seasoning for a herby touch. Garlic powder and paprika are great staples, but don’t stop there! Fresh herbs like basil or dill can also pair well with zucchini. Each adds a unique flavor that makes your crispy zucchini stand out. {{image_2}} You can change the taste of crispy pan-fried zucchini in fun ways. One great option is to add different cheeses. Try mozzarella for a mild taste or cheddar for a sharp kick. Each cheese brings its own unique flavor to the dish. You can also spice things up with herbs and spices. Italian seasoning adds a warm, earthy flavor. If you like heat, sprinkle in some cayenne pepper. This adds a nice kick to your crispy bites. If you need a gluten-free option, you can easily swap out the flour and breadcrumbs. Almond flour works well as a substitute for all-purpose flour. For breadcrumbs, try using gluten-free panko. These changes keep the dish tasty and safe for those avoiding gluten. To make a lighter version of crispy zucchini, consider baking instead of frying. Preheat your oven to 425°F (220°C). Coat the zucchini rounds in the same breadcrumb mix. Place them on a baking sheet lined with parchment paper. Bake for about 20 minutes, flipping halfway through. This method gives you a crispy texture with less oil. To keep your crispy pan-fried zucchini fresh, place it in an airtight container. Layer the zucchini with paper towels to absorb any moisture. Store it in the fridge for up to three days. This method helps maintain some crispness and flavor. For the best results, reheat your zucchini in an oven or an air fryer. Preheat the oven to 400°F (200°C). Spread the zucchini on a baking sheet. Heat for about 10 minutes or until crispy again. If using an air fryer, set it to 375°F (190°C) and reheat for 5 to 7 minutes. Both methods revive the crunch. Yes, you can freeze crispy zucchini! First, let the zucchini cool completely. Then, place the pieces in a single layer on a baking sheet. Freeze until solid, about an hour. After that, transfer them to a freezer bag or container. To reheat, follow the same steps as above. However, frozen zucchini may lose some crispness. To keep your zucchini crispy, start by patting it dry. Moisture makes it soggy. Use a hot skillet with enough oil. This helps create a nice crust. Don’t overcrowd the pan. Fry in batches if needed. After frying, place the zucchini on a paper towel. This absorbs any extra oil. Yes, you can prep zucchini in advance. Slice it and store it in the fridge for a few hours. This saves time when you’re ready to cook. However, for the best crispiness, fry it right before serving. If you need to warm up leftovers, use an oven or air fryer. Crispy Pan Fried Zucchini pairs well with many dishes. Try it with grilled chicken or fish. It also goes great with pasta or a fresh salad. For a fun twist, use it as a topping on burgers or sandwiches. The crunch adds a lovely texture! For the complete details on how to make this dish, check the [Full Recipe](#). Crispy pan-fried zucchini is easy and fun to make. We covered the ingredients, steps, and tips to ensure success. You learned how to achieve that perfect crunch and explore flavor variations. Don’t forget to store and reheat for the best taste. Now, go ahead and try this dish with your favorite sides! Enjoy your cooking journey!
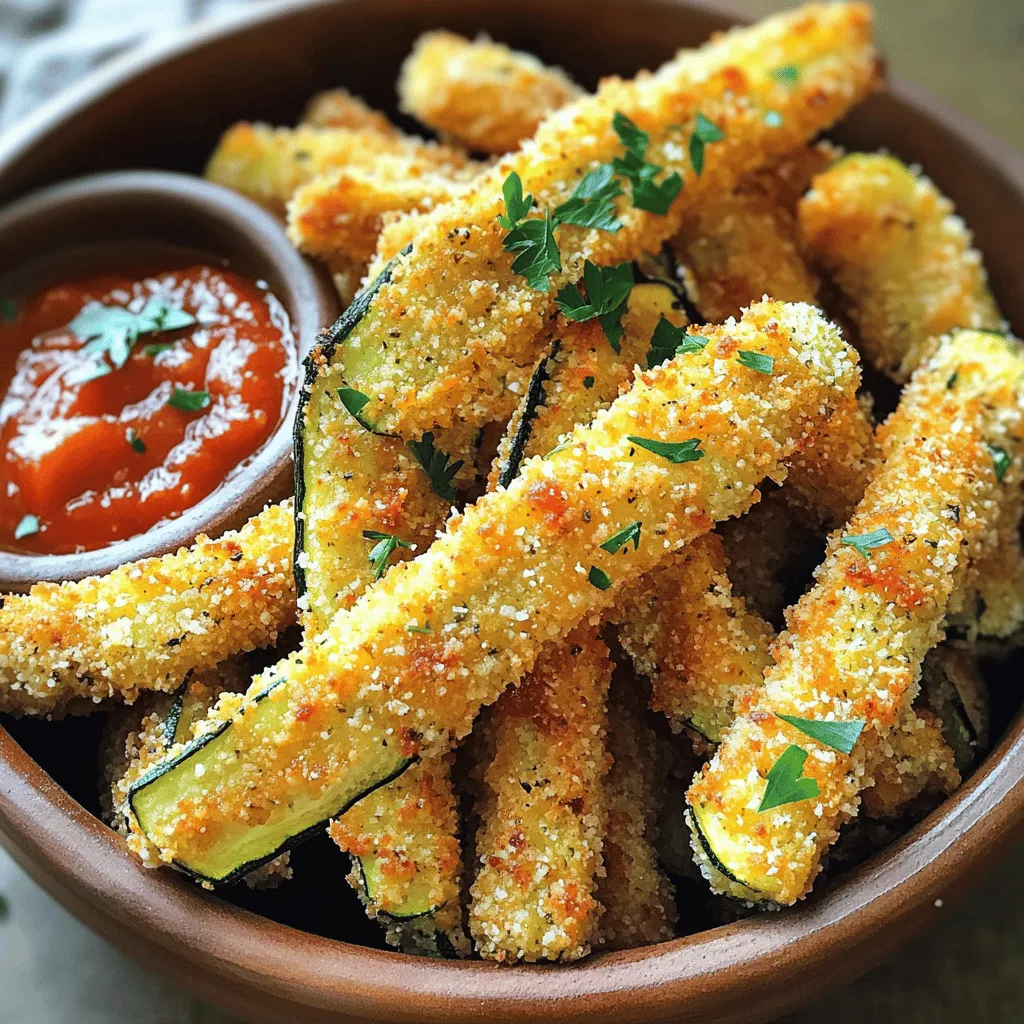
Crispy Pan Fried Zucchini Simple and Tasty Treat
Are you ready to transform simple zucchini into a delicious crunchy snack? My Crispy Pan Fried Zucchini recipe is quick, easy, and packed with flavor.
- 2 medium zucchinis - 1 cup panko bread crumbs - 1/2 cup grated Parmesan cheese - 1 teaspoon garlic powder - 1 teaspoon onion powder - 1/2 teaspoon paprika - 1/4 teaspoon black pepper - 1/4 teaspoon salt - 1/2 cup all-purpose flour - 2 large eggs, beaten - Olive oil spray The magic of these extra crispy zucchini fries starts with fresh ingredients. I choose medium zucchinis because they are tender and perfect for frying. Panko bread crumbs give a crunchy texture. The grated Parmesan adds savory flavor. Garlic and onion powder bring depth. Paprika adds a hint of warmth. Black pepper and salt round out the taste. To coat the fries, I use all-purpose flour and eggs. The flour helps the coating stick. The beaten eggs create a rich layer of flavor. Finally, a light spray of olive oil helps everything crisp up in the oven. - Baking sheet - Parchment paper - Shallow bowls for dredging - Knife and cutting board - Oven Gathering the right tools makes your cooking easier. A baking sheet lined with parchment paper helps with cleanup. Shallow bowls are great for dredging the zucchini. A knife and cutting board will help you cut the zucchinis into fry shapes. Finally, your oven will be the star of the show, transforming these fries into a crispy delight. For the full recipe, check out the complete guide to making these extra crispy oven baked Parmesan zucchini fries. To start, cut the zucchinis into fries. Aim for sticks about 1/4 inch thick. This size helps them cook evenly. If they are all the same size, they will crisp up together. Use a sharp knife for clean cuts. If you have a mandoline slicer, it can make this job easier. Next, set up your dredging station. You will need three shallow bowls. In the first bowl, add all-purpose flour. In the second bowl, beat the eggs. In the last bowl, mix panko bread crumbs, Parmesan cheese, garlic powder, onion powder, paprika, black pepper, and salt. Now for the fun part! Take each zucchini fry and coat it in flour first. Shake off any extra flour. Then, dip it into the beaten eggs. Let any excess egg drip off. Finally, roll it in the panko mixture. Press down gently to make sure it sticks. Preheat your oven to 425°F (220°C). Line a large baking sheet with parchment paper. This makes cleanup easy and helps the fries not stick. Arrange the coated zucchini fries on the baking sheet in a single layer. Make sure they are not touching each other. This is key for getting them crispy. Lightly spray the tops with olive oil spray. This helps them brown nicely. Bake the fries for 20-25 minutes. Flip them halfway through for even cooking. Look for a golden brown color and a crispy texture. Once they are done, take them out and let them cool for a few minutes before serving. For the full recipe, check out the complete instructions above. Enjoy your crispy delights! To get those extra crispy oven-baked parmesan zucchini fries, choose panko bread crumbs. They are lighter and crunchier than regular bread crumbs. This texture makes every bite satisfying. Next, use olive oil spray. It helps the fries crisp up nicely without adding too much fat. A light spray keeps them golden and crunchy. Be careful not to overcrowd the baking sheet. If the fries touch, they will steam instead of crisp. Spread them out in a single layer for the best results. Also, coat the fries properly. Make sure each fry gets a good layer of the flour, egg, and panko mix. This ensures they are fully coated and crispy after baking. Zucchini fries are best served with dips. Marinara sauce is a classic choice. Ranch dressing also pairs well. For garnish, sprinkle fresh parsley on top. This adds a pop of color and makes the dish look more appealing. Remember, presentation matters! {{image_2}} To make your zucchini fries extra tasty, add spices to the coating. Try cayenne for heat or Italian seasoning for a fresh twist. Mixing in smoked paprika gives a nice depth of flavor. You can also incorporate herbs. Fresh or dried parsley, basil, or oregano work well with zucchini. Just mix them into the panko before coating. This adds a burst of flavor and a pop of color. If you want to try a different method, use an air fryer. Air frying gives you that crispy texture with less oil. Just set it to 400°F (200°C) and cook for about 10 to 15 minutes. Grilling is another great option. Slice the zucchini into thicker pieces. Brush them with olive oil, season with salt, and grill them for about 5 to 7 minutes per side. This adds a smoky flavor and is perfect for summer. For a vegan version, swap eggs with flaxseed meal. Mix one tablespoon of flaxseed with three tablespoons of water. Let it sit until it thickens. Instead of Parmesan cheese, use nutritional yeast for a cheesy taste. It’s dairy-free and adds a savory flavor to your zucchini fries. This way, everyone can enjoy these tasty treats. For the full recipe, check out the details above. To keep leftover zucchini fries fresh, place them in an airtight container. This will help maintain their flavor and crunch. I recommend using glass containers or BPA-free plastic ones. Store them in the fridge for up to three days. Be sure to let them cool before sealing the container, as this prevents moisture buildup. You can freeze the fries before or after baking. If you freeze them raw, place them on a baking sheet in a single layer. After they freeze, transfer them to a freezer bag. This method saves space and keeps them separate. If you freeze them after baking, allow them to cool first. Store them in a freezer-safe container. They will last up to two months. When you're ready to use them, thaw in the fridge overnight for best results. If you’re short on time, you can microwave them briefly. However, this may affect their crispiness. For the best way to reheat, use the oven. Preheat it to 400°F (200°C). Place the zucchini fries on a baking sheet. Bake for about 10-15 minutes until they are hot and crispy. This method helps restore their crunch. You can also reheat them in an air fryer. Set the air fryer to 350°F (175°C) for about 5-7 minutes. This will give them a nice crisp without drying them out. Enjoy your fries just as you did fresh! For the full recipe, check out the Extra Crispy Oven Baked Parmesan Zucchini Fries. You can dip your zucchini fries in many tasty sauces. Here are some popular options: - Marinara sauce - Ranch dressing - Garlic aioli - Spicy mustard - Ketchup Each sauce adds a unique flavor. Try mixing sauces for a fun twist! Yes, you can use regular breadcrumbs. However, panko is lighter and crispier. It creates a better crunch. Regular breadcrumbs tend to be denser and may not give the same result. If you have panko, use it for that extra crisp! Look for a golden brown color on your zucchini fries. They should feel crisp when you touch them. If they look dry and crunchy, they are likely ready. Keep an eye on them as they bake. Enjoy them hot for the best taste! For the complete recipe, check out the Full Recipe section. In this post, we explored how to make crispy zucchini fries. We covered the right ingredients, tools, and cooking steps. I shared tips for perfecting your fries and ideas for serving them. You can also adapt the recipe for different flavors or dietary needs. Lastly, we discussed storage options to keep your fries fresh. Making zucchini fries is fun and rewarding. Try this recipe for a tasty and healthier snack. You won't regret it!
Extra Crispy Oven Baked Parmesan Zucchini Fries Delight
If you crave a tasty snack that’s both healthy and crunchy, you’re in for a treat! These Extra Crispy Oven Baked Parmesan Zucchini Fries are
To make the best crunchy zucchini chips, here are the essential ingredients you'll need: - 2 medium zucchinis - 1 cup breadcrumbs (panko for extra crunch) - 1/2 cup grated Parmesan cheese - 1 teaspoon garlic powder - 1 teaspoon onion powder - 1 teaspoon paprika - 1/2 teaspoon salt - 1/4 teaspoon black pepper - 2 large eggs - Cooking spray or olive oil for drizzling Choosing the right zucchinis is key to great chips. Look for firm, bright green zucchinis. They should feel heavy for their size. Avoid ones with soft spots or blemishes. For breadcrumbs, I recommend using panko. Panko gives a great crunch! Regular breadcrumbs work too, but they may not be as crispy. Each serving of these zucchini chips has about: - 150 calories - 7 grams of fat - 9 grams of carbs - 5 grams of protein - Vitamins A and C for added health benefits Enjoy these chips guilt-free as a tasty snack! For the full recipe, check the section above. To start, wash the zucchinis under cool water. Trim the ends off each zucchini. Slice them into thin rounds, about 1/8 inch thick. Use a sharp knife for clean cuts. Pat the slices dry with a paper towel. This step helps them get crispier in the oven. Next, you need to coat the zucchini slices. In one bowl, whisk two large eggs until they are well beaten. In another shallow dish, mix the breadcrumbs, Parmesan cheese, garlic powder, onion powder, paprika, salt, and black pepper. Dip each zucchini slice in the egg. Let any extra egg drip off. Then, coat it in the breadcrumb mixture. Press gently to make sure the crumbs stick well. Now, it's baking time! Preheat your oven to 225°F (110°C). Line two baking sheets with parchment paper. Arrange the coated zucchini slices in a single layer on the sheets. Make sure they don’t overlap. This helps them bake evenly. Lightly spray the tops with cooking spray or drizzle with olive oil for an extra crunch. Bake them for 2-3 hours or until they turn golden brown and crispy. Remember to flip the slices halfway through baking. This ensures even cooking and crispiness on both sides. When your zucchini chips are done, let them cool for a few minutes on the baking sheets. Then, transfer them to a wire rack to cool completely. For a fun presentation, serve the chips in a rustic basket lined with parchment paper. Pair them with a side of garlic aioli or your favorite dipping sauce. Enjoy your crunchy snack! To get those perfect crunchy zucchini chips, moisture removal is key. I like to slice zucchinis into thin rounds, about 1/8 inch thick. After slicing, I pat them dry with a paper towel. This step is simple but crucial for crispiness. You can also sprinkle a bit of salt on the slices and let them sit for about 20 minutes. This helps draw out even more water. When it comes to your oven, set it to 225°F (110°C) for the best results. Low and slow baking ensures even cooking and maximum crunch. Baking at this temperature allows the moisture to escape without burning the chips. One common mistake is overcrowding the baking sheet. When you place too many zucchini slices together, they steam instead of bake. Make sure to arrange them in a single layer with space in between. This allows hot air to circulate and helps them crisp up nicely. Another mistake is skipping the egg wash process. The egg helps the breadcrumbs stick better. If you miss this step, the coating can fall off during baking. Dip each slice into the beaten eggs before coating it in breadcrumbs. For extra flavor, consider adding spices and herbs to your breadcrumb mix. Garlic powder and paprika add a nice kick, but you can experiment with your favorites. Try adding cayenne for heat or Italian seasoning for a classic touch. Fresh herbs like thyme or rosemary also work well. Don't be afraid to mix and match! {{image_2}} To keep things fun, try different seasonings on your zucchini chips. Here are some tasty ideas: - Italian Blend: Use oregano, basil, and Parmesan cheese. - Spicy Mix: Add cayenne pepper and chili powder for heat. - Sweet and Savory: Mix cinnamon and a hint of sugar for a unique twist. You can also use different coatings. Instead of breadcrumbs, try crushed cashew nuts for a nutty flavor. For vegan options, use chickpea flour instead of eggs. This keeps the chips crisp while making them plant-based. If you want to change up how you cook, try these methods: - Air Fryer: This method cooks the chips quickly. Set your air fryer to 375°F (190°C). Place the coated zucchini slices in a single layer. Cook for about 10 to 12 minutes, flipping halfway through. - Pan-Frying: For a fast snack, heat oil in a pan over medium heat. Fry the coated slices for 2-3 minutes on each side until golden brown. This method gives a nice crunch, but be sure to watch them closely. Zucchini chips taste great with dips. Here are some of my favorites: - Garlic Aioli: This creamy dip adds a rich flavor. - Salsa: A fresh, zesty option that adds a kick. - Hummus: This smooth dip brings a nice balance to the crunchy chips. Check out the Full Recipe for step-by-step details on making these delicious zucchini chips! To keep your zucchini chips crunchy, start with a cool, dry place. Store them in an airtight container. This helps keep moisture out. If you have leftovers, wait until they are fully cooled before putting them away. For best results, use glass or plastic containers with tight lids. Avoid paper bags; they let air in, which makes chips soft. If you want to save some chips for later, freezing is a great option. First, let the chips cool completely. Then, place them in a single layer on a baking sheet. Freeze for about one hour. After that, transfer the chips to a freezer-safe bag. This way, they won’t stick together. Label the bag with the date, and use them within three months for the best taste. To bring back the crunch, you can reheat your chips. Preheat your oven to 350°F (175°C). Spread the chips on a baking sheet in a single layer. Heat for about 5 to 10 minutes. Keep an eye on them to avoid burning. This will help restore their crispy texture, making them tasty again! You can use several methods for coating zucchini chips without breadcrumbs. One option is to use finely ground nuts, like almonds or cashews. They add flavor and crunch. Another method is to use a mix of grated cheese and spices. This also gives a nice flavor. You can even try using cornmeal or crushed rice cereal for a gluten-free option. These alternatives can work just as well and may even add unique flavors to your chips. Yes, a dehydrator works great for zucchini chips. Start by slicing the zucchinis thinly, just like in the oven method. You want them about 1/8 inch thick. Pat them dry to remove moisture. Then, season them with salt or your favorite spices. Lay the slices in a single layer on the dehydrator trays. Set it to 125°F (52°C) and let them dry for about 6 to 10 hours. Check them every few hours. They are done when they are crisp and snap easily. There are a few reasons your zucchini chips may not be crispy. First, if the zucchini slices are too thick, they won't dry out properly. Aim for thin, even slices. Another common issue is moisture. Make sure to pat the slices dry before coating them. If you overcrowd the baking sheet, the chips will steam instead of bake. Lastly, not baking them long enough can leave them chewy. Bake until they turn golden brown for the best crunch. In this post, we covered how to make crispy zucchini chips. You learned about key ingredients, like fresh zucchinis and different breadcrumb types. I shared step-by-step prep and baking techniques for the perfect crunch. We discussed tips to avoid common mistakes and explored fun variations. Finally, I provided storage methods to keep your chips fresh. Try these tips and enjoy your crispy snacks!
Best Crunchy Zucchini Chips Crispy and Simple Recipe
Looking for a tasty snack that’s healthy and easy to make? You’re in the right place! These Best Crunchy Zucchini Chips are simple, crispy, and
- 2 medium zucchinis, grated - 2 medium potatoes, peeled and grated - 1 cup grated Parmesan cheese Zucchini brings moisture and a mild taste. Potatoes add texture and heartiness. Parmesan cheese gives a rich flavor and helps with browning. - 1/4 cup green onions, finely chopped - 2 cloves garlic, minced - Spices like black pepper and paprika Green onions add a fresh crunch. Garlic boosts the savory taste. Spices can elevate the flavors. - For gluten-free, use almond flour or a gluten-free mix. - For dairy-free, try nutritional yeast or a dairy-free cheese. These swaps make the muffins fit various diets. Experimenting keeps your cooking fun and creative. For the full recipe, check out the complete details provided. - Preheat the oven to 375°F (190°C). - Grate the zucchinis and potatoes using a box grater or food processor. Start by preheating your oven. This ensures your muffins bake evenly. Next, grate the zucchinis and potatoes. I find it best to use a box grater for this. It gives a nice texture. After grating, use a clean kitchen towel to squeeze out extra moisture. This step is key. Too much water will make the muffins soggy. - Combine wet and dry ingredients. - Ensure proper consistency. In a large bowl, mix the grated zucchini and potatoes. Then, add the other ingredients: Parmesan cheese, flour, eggs, green onions, minced garlic, baking powder, salt, black pepper, and paprika. Stir until just combined. It’s okay if the batter is slightly chunky. This helps keep the muffins light and fluffy. - Filling the muffin tin. - Baking time and temperature. Now, scoop the mixture into the prepared muffin tin. Fill each cavity about 3/4 full. This gives room for the muffins to rise. Bake in the preheated oven for 25-30 minutes. You want them golden brown. The toothpick test works well here. Insert a toothpick in the center; it should come out clean. Enjoy the wonderful smell while they bake! To make the best muffins, you must avoid excess moisture. Zucchini can hold a lot of water. Grate the zucchini and potatoes, then squeeze them in a clean towel. This removes the extra liquid. Mixing is also key. Combine your dry and wet ingredients gently. Overmixing can make your muffins tough. Just mix until everything is together. You want a chunky batter, not a smooth one. Add herbs or spices to boost flavor. Try fresh parsley or dill for a fresh taste. You can also add a pinch of red pepper flakes for some heat. For cheese variations, you can swap Parmesan with cheddar or feta. Each cheese brings a unique flavor. Experiment and find what you love best. Serve the muffins warm or at room temperature. They look great on a platter. You can also place them in a basket lined with a cloth for a cozy touch. Garnish your muffins with extra Parmesan or chopped green onions on top. This adds color and an extra burst of flavor. These little details make your dish shine and impress your guests. For the full recipe, check the detailed instructions above! {{image_2}} You can change the flavor by adding different veggies. Try grated carrots, sweet potatoes, or even chopped spinach. Each of these adds taste and nutrition. If you want to swap cheese, use cheddar or mozzarella instead of Parmesan. This switch gives a different flavor and texture. For a vegan version, replace eggs with flaxseed meal. Mix 1 tablespoon of flaxseed with 2.5 tablespoons of water and let it sit for a few minutes. This acts like an egg binder. For low-carb options, use almond flour instead of all-purpose flour. This keeps the muffins tasty and healthy. Seasonal vegetables can change the muffins’ taste. In summer, add fresh corn or bell peppers. In fall, try pumpkin or butternut squash. Each season brings new flavors. Use herbs like thyme in spring or rosemary in winter to enhance the taste. These small changes keep the recipe exciting year-round. For the full recipe, check out the Crispy Parmesan Zucchini Potato Muffins. You can store your Crispy Parmesan Zucchini Potato Muffins in the fridge. Place them in an airtight container to keep them fresh. They last about 3 to 5 days in the fridge. This way, you can enjoy leftover muffins without losing flavor or texture. To freeze these muffins, let them cool completely. Then, wrap each muffin in plastic wrap and place them in a freezer bag. They stay good for up to 2 to 3 months. When you want to eat one, take it out and thaw it in the fridge overnight. Reheating is easy, too! You can warm them in the oven or microwave. Just remember to not overheat them, as this can make them soggy. The best way to reheat the muffins is in the oven at 350°F (175°C). This keeps them crispy. Place the muffins on a baking sheet and heat for about 10 minutes. Alternatively, you can use a microwave for 20 to 30 seconds. If you go this route, consider toasting them in a pan for a minute to regain some crispiness. By following these storage and reheating tips, you can enjoy your Crispy Parmesan Zucchini Potato Muffins whenever you like! For the full recipe, check out the details above. To check if the muffins are done, use a toothpick. Insert it into the center of a muffin. If it comes out clean, the muffins are ready. If it has wet batter, keep baking for a few more minutes. Look for visual cues too. The muffins should be golden brown on top. They should feel firm to the touch. If they bounce back when pressed lightly, they're done! Yes, you can make these muffins ahead of time. To do so, bake them and let them cool completely. Then, store them in an airtight container. They can stay fresh in the fridge for up to five days. If you want to keep them longer, freeze them. Wrap each muffin tightly in plastic wrap, then place them in a freezer bag. They can last for up to three months. These muffins pair well with many dishes. Serve them with a fresh salad for a light meal. They also go great alongside soups, especially tomato or vegetable soup. For a fun twist, serve them with dips like hummus or tzatziki. You can also enjoy them as snacks on their own. They make a tasty side dish for grilled meats or roasted veggies. For the full recipe, check out the details above! These crispy Parmesan zucchini potato muffins blend taste and health. You can use fresh ingredients or swap them based on your needs. Baking helps create the perfect texture, and simple tips make all the difference. Remember, you can freeze extras or enjoy them fresh. Experiment with flavors to match your mood or the season. Now, get ready to impress friends and family with your delicious creations!
Crispy Parmesan Zucchini Potato Muffins Delightful Bite
Are you looking for a tasty snack that’s easy to make and healthy? You’ll love these Crispy Parmesan Zucchini Potato Muffins! Packed with flavor and
To make the best tomato galette, you will need: - 1 pre-made pie crust (or homemade) - 4-5 medium ripe tomatoes, assorted colors, sliced - 1 cup fresh mozzarella cheese, sliced or torn - 2 tablespoons Dijon mustard - 1 tablespoon olive oil - 1 teaspoon dried oregano - 1 teaspoon fresh basil, chopped (plus extra for garnish) - 1 teaspoon garlic powder - Salt and pepper, to taste - 1 egg (for egg wash) - 1 tablespoon grated Parmesan cheese (optional) You can swap ingredients for different flavors: - Use goat cheese or feta instead of mozzarella for a tangy taste. - Try using a different mustard, like whole grain, for added texture. - Replace olive oil with avocado oil or melted butter if you prefer. - For herbs, you can substitute oregano with thyme or rosemary. - If you can't find fresh tomatoes, canned tomatoes work too. Just drain them well before using. The quality of your ingredients will change the taste of your galette. Fresh, ripe tomatoes bring sweetness and juiciness. Look for tomatoes that feel heavy for their size and have a nice smell. Good mozzarella cheese melts beautifully and adds creaminess. If you use a pre-made crust, choose one without preservatives. This will keep your galette tasting fresh and bright. Always use fresh herbs when possible; they add a vibrant flavor that dried herbs cannot match. To start, grab your pie crust. If you're using a pre-made one, take it out of the package. If you prefer to make your own, roll it out on a clean surface. Aim for about 12 inches in diameter. This size will hold all the tasty filling. Place the rolled crust on a baking sheet lined with parchment paper. This step helps with easy cleanup later. Next, spread Dijon mustard evenly over the crust, leaving a 2-inch border. This mustard adds a nice kick to the galette. Now, it’s time to layer the cheese and tomatoes. Begin by adding the fresh mozzarella cheese to the center of the crust. You want to overlap the pieces for a rich, cheesy base. After that, arrange your sliced tomatoes over the cheese. Mix up the colors for a beautiful look. Drizzle olive oil on top, and sprinkle with oregano, basil, garlic powder, salt, and pepper. These spices bring out the tomato flavors and keep it simple yet delicious. Fold the edges of the crust over the filling. Pinch and pleat the crust to create a rustic style. This folding makes the galette look special while holding everything inside. Before baking, beat an egg and brush it over the crust. This egg wash gives your galette a golden finish. If you like, sprinkle some grated Parmesan cheese on top for extra flavor. Now, bake the galette in your preheated oven at 400°F (200°C). Set a timer for 30 to 35 minutes. You want the crust to turn golden brown and the tomatoes to soften. When it’s done, take it out and let it cool a bit. Finally, garnish with extra fresh basil before slicing. Your savory tomato galette is ready to enjoy! For more details, check out the Full Recipe. To get a flaky crust, keep your ingredients cold. Use chilled butter or shortening when making the dough. If you buy a pre-made pie crust, let it thaw slowly in the fridge. When rolling out the dough, don’t overwork it. This keeps the layers light and flaky. Use a mix of tomatoes for better flavor. Combine sweet heirloom tomatoes with tart Roma tomatoes. This gives depth to your galette. Add salt right after cutting the tomatoes. This will draw out excess moisture. If your tomatoes are too wet, the crust may turn soggy. For a stunning look, layer the tomatoes in a circular pattern. Alternate colors for visual appeal. After baking, add fresh basil on top. This not only adds color but also fresh taste. Serve the galette warm on a wooden board for a rustic feel. Pair it with a light salad for a complete meal. For the full recipe, check out the details above. Enjoy your cooking! {{image_2}} You can change the taste of your tomato galette by using different cheeses. Besides mozzarella, try goat cheese for a tangy kick. Feta cheese adds a nice crumbly texture. For a rich flavor, use aged cheddar or Gruyère. Each cheese brings its own unique taste, making your galette fun and exciting. Mix and match to find your favorite combo! The great thing about a galette is its versatility. You can easily add seasonal veggies. Zucchini, bell peppers, or eggplant pair well with tomatoes. Slice them thin and layer them alongside the tomatoes. In fall, add roasted butternut squash for a sweet touch. In winter, try sautéed greens to bring color and nutrition. These veggies not only taste great but also make your dish vibrant. Herbs and spices can elevate your galette. While I love using oregano and basil, don’t stop there! Try fresh thyme or rosemary for a unique twist. A pinch of red pepper flakes adds heat if you like spice. For a fresh taste, sprinkle some lemon zest on top before baking. These small changes can make a big difference in flavor. Explore different combinations to find what you enjoy most. To keep your tomato galette fresh, store it in the fridge. Wait until it cools down. Wrap it tightly in plastic wrap or place it in an airtight container. This helps prevent it from drying out. The galette will stay good for about 3 days in the fridge. If you want the best taste, eat it within the first two days. You can also freeze your tomato galette. If you want to save some for later, wrap it well. Use plastic wrap and then foil for extra protection. This way, you avoid freezer burn. When properly wrapped, it can last for up to 3 months in the freezer. To enjoy it later, thaw it overnight in the fridge before reheating. Reheating your galette the right way is key. Preheat your oven to 350°F (175°C). Place the galette on a baking sheet. Cover it loosely with foil to keep it from browning too much. Heat for about 15-20 minutes, or until hot. This method keeps the crust crispy while warming the filling. Avoid using the microwave, as it can make it soggy. For the best results, enjoy your galette fresh, but these tips will help keep it tasty! You can serve the tomato galette with a simple green salad. A mix of greens, like arugula and spinach, pairs well. Add some lemon juice and olive oil for a fresh touch. You can also enjoy it with a side of roasted vegetables. Grilled zucchini or asparagus adds great flavor. If you like, serve it with a dollop of yogurt or sour cream for a creamy contrast. Yes, you can prepare the tomato galette ahead of time. You can assemble it and keep it in the fridge for a day before baking. Just cover it well with plastic wrap. You can also bake it in advance and store it. Let it cool, then wrap it tightly and refrigerate. Reheat it in the oven before serving. This way, you save time when guests arrive. The egg wash gives the crust a beautiful golden color. It helps the crust become crisp and shiny. Brushing the crust with egg also adds flavor. If you want, you can add some herbs to the egg wash for extra taste. It’s an easy step that makes your galette look more inviting. Don't skip this step for the best results. In this article, we explored how to create a delicious tomato galette. We discussed key ingredients, alternative options, and why quality matters. We walked through prepping the pie crust, assembling, and baking the galette. I shared tips for a flaky crust, flavor balance, and presentation. Variations included adding cheeses, seasonal veggies, and herbs for a twist. Lastly, we covered storage and reheating tips. Enjoy your galette! It's satisfying and easy to make.
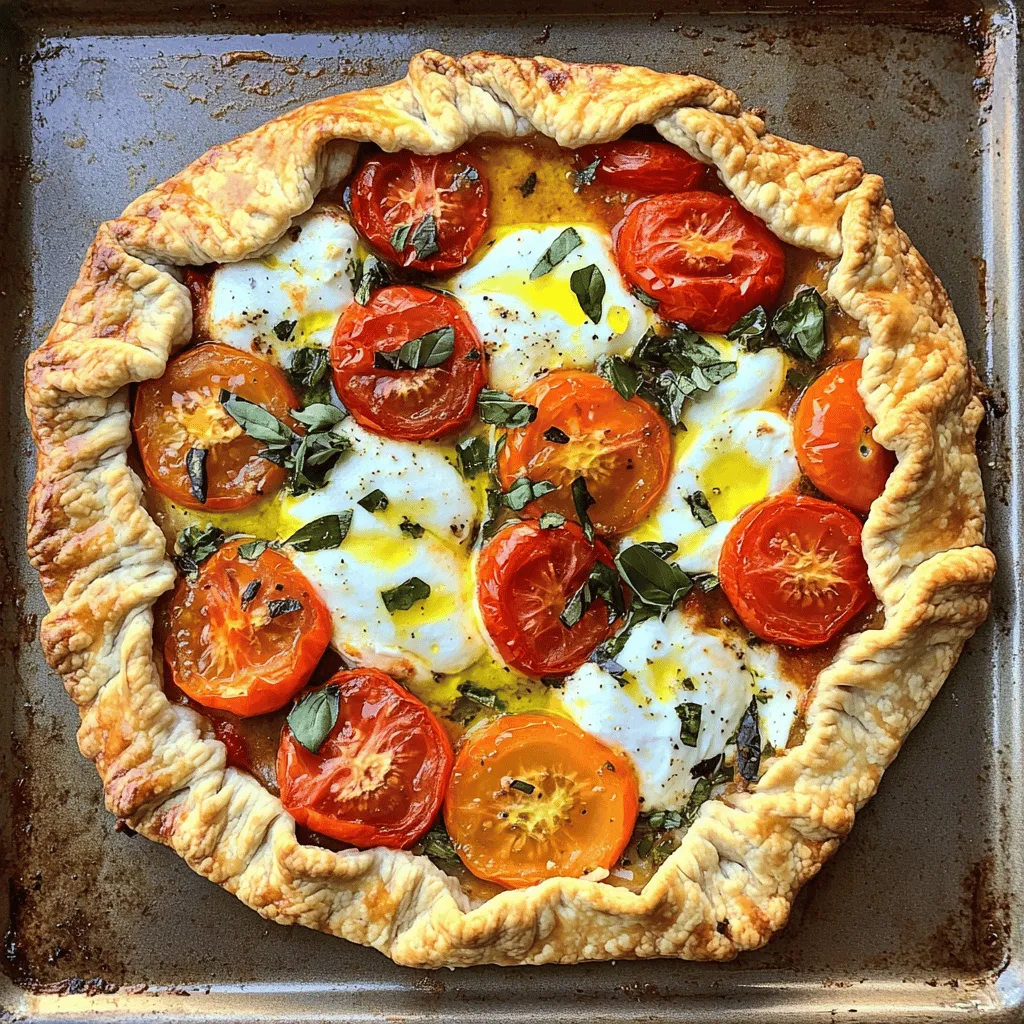
The Best Tomato Galette Simple and Flavorful Recipe
Are you ready to make the best tomato galette you’ll ever taste? This simple and flavorful recipe brings together fresh tomatoes and flaky pastry in
- 1 cup cornmeal - 1/2 cup all-purpose flour - 1 cup fresh okra, chopped - 1/2 cup finely chopped onion - 1/4 cup chopped green bell pepper The main ingredients form the base of your okra hush puppies. Cornmeal gives them that classic texture. All-purpose flour helps bind everything together. Fresh okra adds a unique flavor and fun texture. Onions and green bell peppers bring sweetness and crunch. - 1 tablespoon baking powder - 1 teaspoon salt - 1/2 teaspoon black pepper - 1/2 teaspoon paprika - 1/2 teaspoon garlic powder These spices make the hush puppies pop! Baking powder makes them light and fluffy. Salt enhances all the flavors. Black pepper adds a hint of heat. Paprika gives a lovely color and smokiness, while garlic powder adds depth. - 1/2 cup buttermilk - 1 large egg - Vegetable oil for frying The wet ingredients bring everything together. Buttermilk adds a tangy flavor and moisture. The egg binds the batter, creating a lovely texture. Vegetable oil is crucial for frying, ensuring that your hush puppies turn out crispy and golden. For the Full Recipe, check the detailed instructions to create these tasty treats! Start by grabbing a large mixing bowl. In it, combine 1 cup of cornmeal and 1/2 cup of all-purpose flour. Add 1 tablespoon of baking powder, 1 teaspoon of salt, and 1/2 teaspoon each of black pepper, paprika, and garlic powder. Use a whisk to mix these dry ingredients well. Make sure everything blends evenly with no clumps. This step is key for great flavor in your hush puppies. Next, chop 1 cup of fresh okra and finely chop 1/2 cup of onion and 1/4 cup of green bell pepper. Add these veggies to your dry mix. Stir gently to coat them with the flour mixture. In another bowl, whisk together 1/2 cup of buttermilk and 1 large egg until smooth. Slowly pour this wet mixture into the dry ingredients. Stir until just combined. It’s okay if the batter is a bit lumpy; this helps keep the hush puppies light and fluffy. Now it’s time to fry! Heat vegetable oil in a deep frying pan or skillet to 350°F (175°C). To check if the oil is ready, drop a small spoonful of batter into it. If it sizzles and floats, you’re good to go. Using a spoon or small ice cream scoop, drop spoonfuls of the batter into the hot oil. Don’t overcrowd the pan; this can make them soggy. Fry for about 3-4 minutes on each side until they turn golden brown. Once cooked, remove them and place on a paper towel-lined plate to drain excess oil. Enjoy this crispy and flavorful delight! For the full recipe, check the details above. To make the best okra hush puppies, you must not overmix the batter. Overmixing makes the hush puppies dense and tough. Mix just until the dry ingredients and wet ingredients come together. Lumpy batter is okay; it keeps them fluffy. Frying temperature is also key. Heat your oil to 350°F (175°C). If it's too cool, the hush puppies soak up oil. If it's too hot, they burn outside but stay raw inside. Use a small spoon of batter to test the oil. If it sizzles and rises, you’re ready to fry! Serving these hush puppies is fun! I love to pair them with a tangy dipping sauce. Try ranch dressing or a spicy remoulade for a kick. You can use a simple plate or a rustic wooden board for a nice touch. To plate them, stack a few hush puppies in a small bowl. Place it on a colorful plate with sauces around it. This makes for a great visual appeal and invites people to dig in! One common mistake is overcrowding the frying pan. If you add too many hush puppies at once, they will stick together. This also cools down the oil. Fry in small batches for the best results. Another mistake is using incorrect oil temperature. Always check the heat before frying. Too low means soggy hush puppies; too high means burnt ones. Keep your oil at the right temperature for crispy, golden-brown results. {{image_2}} You can easily switch up the veggies in okra hush puppies. Try adding corn, zucchini, or diced carrots for extra color and taste. These swaps keep the hush puppies fresh and exciting. If you need a gluten-free option, use a gluten-free flour blend instead of all-purpose flour. This keeps the texture right while making it safe for those with gluten issues. To add a cheesy twist, mix in some shredded cheddar cheese. This gives the hush puppies a rich, creamy flavor. You can also play with spices. Adding cayenne or a dash of hot sauce brings heat and depth. In some regions, people add crawfish or shrimp for a seafood touch. This change makes the dish even more special. Okra hush puppies shine as both an appetizer and a main dish. Serve them warm with a dipping sauce like ranch or tartar sauce to start a meal. Pair them with fried catfish or collard greens to create a true Southern feast. They’re perfect for gatherings or a cozy dinner at home. To store your leftover okra hush puppies, let them cool first. Place them in an airtight container. You can store them in the fridge for up to three days. Make sure they are sealed well to keep them fresh. For the best crispiness, reheating in the oven works best. Preheat your oven to 350°F. Place the hush puppies on a baking sheet and warm them for about 10 minutes. This method keeps them crunchy. If you use a microwave, they may turn soft. If you must use it, heat them for 30 seconds at a time. Yes, you can freeze hush puppies! To freeze, let them cool completely. Arrange them in a single layer on a baking sheet and freeze until solid. Once frozen, transfer them to a freezer bag. They can stay in the freezer for up to three months. To thaw, place them in the fridge overnight before reheating. Enjoy your crispy okra hush puppies later! For the full recipe, check the earlier section. You can serve okra hush puppies with many tasty sides. Here are some great options: - Coleslaw - Fried green tomatoes - Grilled shrimp - Spicy remoulade sauce - A cold beer or sweet tea These sides pair well and bring out the okra flavor in the hush puppies. Yes, you can make hush puppies ahead of time. Prepare the batter and store it in the fridge for up to two hours. When you're ready, fry them fresh for the best taste. If you want to reheat cooked hush puppies, place them in a warm oven. This keeps them crispy and delicious. The classic hush puppy recipe uses egg and buttermilk. You can make it vegan by swapping these ingredients. Use a flax egg instead of a regular egg. Mix one tablespoon of ground flaxseed with three tablespoons of water, then let it sit until it thickens. For buttermilk, use plant milk mixed with lemon juice or vinegar. These swaps keep the flavor! If you like heat, you can make okra hush puppies spicier. Here are some ideas: - Add diced jalapeños or serrano peppers to the batter - Mix in cayenne pepper or chili powder - Serve with a spicy dipping sauce These additions make for a bold flavor that enhances the dish! For the best results, check out the Full Recipe for more tips. You now have a solid recipe for okra hush puppies, packed with flavor and texture. We covered essential ingredients like cornmeal, fresh veggies, and spices. The step-by-step guide ensures your frying technique is spot on. Use our tips to avoid common mistakes and achieve the perfect dish. Remember, you can customize flavor and presentation to suit your style. Store extras properly, and enjoy them later. With these insights, you'll impress friends and family at your next gathering. Dive into this Southern classic and make it your own!
Okra Hush Puppies Crispy and Flavorful Delight
If you’ve never tasted okra hush puppies, you’re in for a treat! These little bites are crispy on the outside and bursting with flavor inside.
To make easy pickled red onions, gather these key items: - 2 medium red onions, thinly sliced - 1 cup apple cider vinegar - 1 cup water - 2 tablespoons sugar - 1 teaspoon salt - 1 teaspoon black peppercorns - 1 teaspoon mustard seeds You can enhance your pickled onions with these extras: - 1/2 teaspoon crushed red pepper flakes (optional) - 2 cloves garlic, smashed (optional) These optional ingredients add a nice kick and depth of flavor. You will need a few simple tools for this recipe: - A sharp knife or mandoline for slicing - A saucepan for heating the pickling liquid - A clean jar or airtight container for storage - A stirring spoon to mix ingredients These tools make the process quick and easy. For the full recipe, refer to the earlier section. First, peel the red onions. Slice them thinly into rings. A mandoline helps with even slices. Thin slices ensure the onions soak up the pickling liquid well. It also makes them easy to eat. Set the sliced onions aside. Now, grab a saucepan to make the pickling liquid. Combine one cup of apple cider vinegar and one cup of water in the pan. Add two tablespoons of sugar and one teaspoon of salt. Next, toss in one teaspoon of black peppercorns and one teaspoon of mustard seeds. If you like heat, add half a teaspoon of crushed red pepper flakes. You can also add two smashed garlic cloves for extra flavor. Place the saucepan on medium heat. Bring the mixture to a gentle boil. Stir it as it heats. This helps the sugar and salt dissolve completely. Once it boils, remove the pan from the heat. Add the sliced onions to the hot liquid. If you used garlic, add that too. Stir everything to combine well. Let the mixture sit for 20 to 30 minutes at room temperature. This allows the flavors to blend. Next, transfer the onions and liquid to a clean jar. Make sure the onions are fully submerged in the liquid. If they float, press them down gently. Seal the jar and place it in the fridge. Your pickled onions will be ready to enjoy after a few hours. For the best taste, let them sit for a day. You can find the full recipe for this zesty treat earlier in this article. Enjoy your tasty creation! When slicing red onions, aim for thin, even rings. Use a sharp knife to make clean cuts. A mandoline slicer also works well for uniform slices. Thin slices soak up the pickling liquid better. This makes them more flavorful and crunchy. If you find onions make you cry, chill them in the fridge before slicing. This helps reduce the tears. You can easily change the taste of your pickled onions. If you want it sweeter, add more sugar. If you prefer a tangy bite, increase the vinegar. For heat, add more crushed red pepper flakes. Feel free to play with spices too. You can try adding coriander seeds or fresh herbs. Taste the liquid as you mix it. Adjust until it suits your palate. Pickled red onions add color and taste to many dishes. Use them on tacos or burgers for a nice crunch. They also brighten up salads or grain bowls. Try them with roasted vegetables or fish for extra flavor. You can even serve them on a charcuterie board. Their vibrant color makes any dish pop. You can find more ideas in the Full Recipe section. {{image_2}} You can use many types of vinegar for pickled red onions. Apple cider vinegar is a favorite because it adds a nice, fruity taste. You might try white wine vinegar for a light flavor. Rice vinegar works well too, giving a sweeter touch. Each vinegar changes the taste, so feel free to experiment. Adding herbs and spices can give your pickled onions a new twist. You can include fresh dill for a bright flavor. Try adding thyme or oregano for an earthy note. If you want heat, toss in some peppercorns or red pepper flakes. These spices bring out the onion's natural sweetness. You can also add fruit or citrus for a fun kick. Slices of jalapeño add heat and flavor. Try adding orange or lime zest for a citrus twist. You can even throw in some diced mango or pineapple for sweetness. These additions make your pickled onions stand out in any dish. For the full recipe, check out the details above. Store your pickled red onions in a clean jar. Make sure it has a tight lid. Keep the jar in the fridge. This helps keep the onions fresh and crisp. Always ensure the onions stay submerged in the pickling liquid. If they float, press them down gently with a clean spoon. Pickled red onions last up to three weeks in the fridge. After a week, they develop more flavor. You can enjoy them right away or let them sit longer for a stronger taste. Just keep an eye out for any changes in smell or color. If something seems off, it’s best to toss them. You can reuse the pickling liquid for more onions. Just strain it to remove any bits. It still has great flavor. You can add fresh onions to the same liquid after a week. This way, you enjoy the tangy taste without wasting anything. Try adding some other veggies for a fun twist! Pickled onions can last up to two weeks in the fridge. Store them in a clean, airtight jar. The vinegar helps preserve them. After a few days, their flavor deepens. If you see any signs of spoilage, discard them. Yes, you can use other onions. Sweet onions or yellow onions work well too. Each type brings its own flavor. Red onions are vibrant and add color. Sweet onions offer a milder taste. Experiment to find what you like best! Pickled red onions are versatile. You can use them on tacos, salads, or sandwiches. They add a tangy crunch to burgers or grilled meats. You can also serve them with cheese and charcuterie boards. They brighten up any dish! For more ideas, check the Full Recipe. You now have a clear guide for making pickled onions. We covered ingredients, tools, and steps for perfect results. Remember to adjust flavors and try different vinegars or spices for your twist. Store them properly for long-lasting taste. With these tips, you can enjoy pickled onions on tacos, sandwiches, or salads. Try it and see how easy it is to add bold flavor to your meals. Happy pickling!
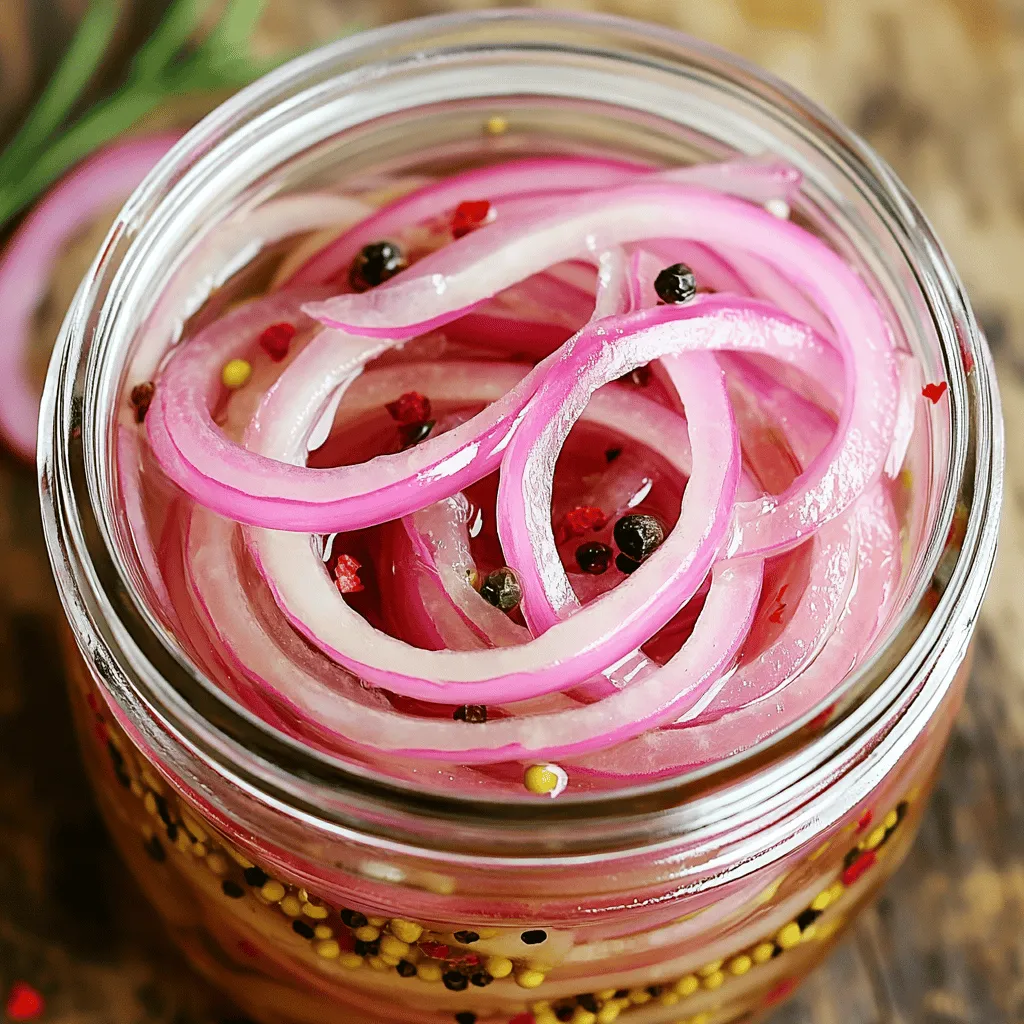
Easy Pickled Red Onions Quick and Flavorful Recipe
Looking to jazz up your meals? My easy pickled red onions recipe is quick and bursting with flavor! You’ll discover simple steps to make these
- 2 lbs chicken wings - 1 cup buttermilk - 1 cup all-purpose flour - ½ cup cornstarch - 1 tablespoon garlic powder - 1 teaspoon onion powder - 1 teaspoon paprika - 1 teaspoon baking powder - Salt and pepper to taste The main ingredients create a flavorful base for your crispy garlic fried chicken wings. The chicken wings are the star, offering juicy meat under a crunchy crust. Buttermilk adds tang and helps the coating stick. All-purpose flour and cornstarch mix for a light, crispy shell. Seasonings like garlic powder and paprika give depth and warmth to each bite. - Oil for frying - 4 cloves garlic, minced - 2 tablespoons fresh parsley, chopped You need oil to fry the wings. It should be hot enough to create a crispy texture. Fresh garlic adds a rich, aromatic flavor. Parsley serves as a bright garnish that enhances the dish's look. - Deep frying pan or pot - Mixing bowls - Slotted spoon Using a deep frying pan or pot ensures even cooking. Mixing bowls help keep your workspace organized. A slotted spoon lets you drain excess oil from the wings after frying. These tools make the process smooth and simple. For the full recipe, check out the details provided earlier. To make the wings juicy and tasty, start by marinating them. In a large bowl, place the chicken wings and add one cup of buttermilk. Mix well to coat each wing. Cover the bowl and refrigerate for at least two hours. For the best flavor, marinate overnight. This helps tenderize the wings and adds flavor. Next, prepare the coating. In another bowl, mix the dry ingredients. You will need one cup of all-purpose flour, half a cup of cornstarch, one tablespoon of garlic powder, one teaspoon of onion powder, one teaspoon of paprika, and salt and pepper to taste. The cornstarch gives a nice crunch. The right texture is key for crispy wings. Now, it’s time to fry the wings. Heat oil in a deep frying pan to 350°F (175°C). Make sure the oil is deep enough to cover the wings. Fry the wings in batches, not crowding the pan. Cook for about 10 to 12 minutes or until they turn golden brown and crispy. Use a slotted spoon to take them out and let them drain on paper towels. For the garlic sauce, heat a tablespoon of oil in a small skillet. Add four cloves of minced garlic and sauté for one to two minutes until fragrant. Mix in a pinch of salt. Toss the fried wings in the garlic sauce until they are well-coated. This step adds a punch of flavor. To get crispy garlic fried chicken wings, the coating matters. A good mix of flour and cornstarch gives the wings crunch. Aim for a thick coating, but don’t overdo it. Shake off any extra flour. This keeps the wings light and crispy. For frying oil, choose oils with high smoke points. Peanut or canola oil works best. These oils let you fry at high heat without burning. This is key for crispy wings. Marinate the wings in buttermilk for at least two hours. Overnight gives the best flavor and tenderness. The buttermilk helps break down the chicken. This makes the wings juicy and tasty. You can add spices to the buttermilk. Try hot sauce for a kick. Garlic powder or herbs can also enhance the flavor. Experiment to find your favorite mix! Hot oil can be dangerous, so be careful. Always use a deep pot to avoid spills. Keep the pot on the stove and away from kids. A thermometer helps you keep track of oil temp. Aim for 350°F (175°C) for frying. When frying, do not overcrowd the pan. This lowers the oil temperature. Fry in small batches for the best results. This ensures even cooking and crispiness. {{image_2}} You can easily change the flavor of these wings. Try adding other spices like cayenne for heat or smoked paprika for a smoky taste. Mixing dried herbs can also give your wings a fresh twist. For a spicy version, toss the wings in hot sauce before serving. You can even mix the hot sauce into the garlic sauce for extra kick. This way, you get that perfect balance of garlic and heat. If you want a healthier dish, consider baking the wings instead of frying them. Preheat your oven to 425°F (220°C). Place the coated wings on a baking sheet lined with parchment paper. Bake for about 40-45 minutes, flipping halfway through. This method keeps the wings crispy without all the oil. For an air fryer option, preheat your air fryer to 380°F (193°C). Cook the wings for 25-30 minutes, shaking the basket halfway. You’ll get crispy wings with less fat. These crispy garlic wings pair well with many dipping sauces. Ranch and blue cheese are popular choices. A sweet chili sauce adds a fun twist too. For sides, try coleslaw or carrot sticks. These fresh sides balance the rich flavors of the wings. Serve them on a large platter with parchment paper and extra parsley for a beautiful presentation. Check out the Full Recipe to make these wings today! To store leftover wings, first let them cool. Place them in an airtight container. You can also use a zip-top bag. Make sure to remove as much air as possible. This helps keep them fresh longer. You can store them in the fridge for up to 3 days. For reheating, preheat your oven to 350°F (175°C). Place the wings on a baking sheet. Heat for about 15-20 minutes until they're warm and crispy again. You can also use an air fryer set to 350°F for about 10 minutes. This keeps them crispy and delicious. If you want to freeze cooked wings, let them cool first. Place them in a freezer-safe bag or container. Be sure to label it with the date. You can keep them frozen for up to 3 months. When you’re ready to eat them, take the wings out of the freezer. Let them thaw in the fridge overnight. For reheating, use the oven or air fryer as mentioned before. This ensures they stay crispy and tasty. In the fridge, cooked wings last about 3 days. If you freeze them, they can last up to 3 months. Always check for any signs of spoilage before eating. Proper storage helps maintain their flavor and texture. Enjoy your crispy garlic fried chicken wings anytime! Cornstarch plays a key role in making wings crispy. It forms a light, crunchy layer when fried. A good resting time after coating helps too. This allows the flour and cornstarch to stick better. I always let my wings rest for 10-15 minutes. This small step makes a big difference in texture. Yes, you can prepare the wings ahead. Marinate them in buttermilk up to overnight. After marinating, coat the wings and store them in the fridge. You can fry them whenever you are ready. This way, you save time and still enjoy fresh wings! I recommend using fresh garlic for the best flavor. Fresh garlic gives a strong, rich taste. Garlic powder is a good backup, but it has a milder flavor. If you want a bold taste, use fresh garlic. About four cloves should do the trick for this recipe. To check if the wings are done, use a meat thermometer. They should reach 165°F (74°C). You can also look for a golden-brown color. If they look crisp and golden, they are likely ready. Always use a slotted spoon to remove them carefully. This keeps them nice and hot! This blog post gave you all the details for making tasty chicken wings. We covered core ingredients, steps for marinating, coating, and frying. You learned tips for achieving crispiness and safety. We discussed fun flavor variations and storage methods. Now, you can create delicious wings at home, impressing friends and family. Enjoy experimenting with flavors and cooking methods. Trust the process, follow the tips, and you’ll have amazing wings every time.
Crispy Garlic Fried Chicken Wings Easy and Delicious Recipe
Are you ready for crispy, garlic-flavored perfection? My easy recipe for Crispy Garlic Fried Chicken Wings will wow your taste buds! With simple ingredients like