Appetizers

To make classic bruschetta, gather these key ingredients: - 1 French baguette, sliced into 1/2-inch pieces - 3 ripe tomatoes, finely diced - 1/4 cup fresh basil leaves, chopped - 2 cloves garlic, minced - 2 tablespoons balsamic glaze - 1/4 teaspoon sea salt - 1/4 teaspoon freshly cracked black pepper - 3 tablespoons extra virgin olive oil - 1/2 cup fresh mozzarella balls, halved These ingredients create a fresh and tasty dish. The baguette acts as a crunchy base. The tomatoes and basil bring bright flavors, while garlic adds a nice kick. You can add a few more ingredients to spice up your bruschetta: - Red onion, finely diced - A splash of lemon juice - Crumbled feta cheese - Sliced black olives - Capers These add-ins can change the taste. For example, red onion gives a sweet crunch, while olives add a briny bite. To make bruschetta, you need some simple tools: - A sharp knife for slicing - A cutting board for prep - Mixing bowls for combining ingredients - Baking sheet for toasting the bread - A spoon for serving Having these tools makes the process easier. You’ll be ready to prepare this dish quickly and efficiently. For the full recipe, check the steps included. To start, preheat your oven to 400°F (200°C). Slice the French baguette into 1/2-inch pieces. Arrange these slices on a baking sheet in one layer. Brush one side of each slice with olive oil. This step helps them turn golden and crispy. Bake the bread for about 5-7 minutes. Keep an eye on them so they don’t burn. You want the edges to be just right. Next, grab a mixing bowl. Dice the ripe tomatoes into small pieces. You want them to mix well. Add the chopped basil leaves, minced garlic, balsamic glaze, sea salt, and black pepper. Stir everything together until it’s mixed well. This mixture brings fresh flavor to your bruschetta. Once the baguette slices are out of the oven, let them cool for a moment. Now, take a spoon and add a good amount of the tomato mixture on the toasted side of each slice. Don’t be shy! Top each bruschetta with a halved mozzarella ball. If you like, drizzle a bit more olive oil. Serve your bruschetta right away for the best taste. You can find the Full Recipe for more details. Toasting bread is key for good bruschetta. Start with a French baguette. Slice it into 1/2-inch pieces. I recommend brushing one side with olive oil. This helps it brown nicely. Preheat your oven to 400°F (200°C). Bake the slices for 5-7 minutes. Watch them closely! They should be golden and crispy but not burned. Fresh ingredients make a big difference. Look for ripe tomatoes; they should be firm and fragrant. Fresh basil should smell sweet and green. Choose garlic that is plump and firm, not sprouting. Always use fresh mozzarella for a creamy texture. Balsamic glaze adds a sweet touch. Quality olive oil really enhances the flavor. Bruschetta is fun to customize! You can add many toppings. Try diced avocado or roasted red peppers. Crumbled feta adds a salty bite. For a bit of heat, add jalapeños or red pepper flakes. You could even switch the herbs. Use parsley or arugula for a different taste. The options are endless! Check the Full Recipe for more ideas. {{image_2}} Bruschetta is fun because you can change the toppings. The classic mix is fresh tomatoes, basil, and garlic. Some people like to add mozzarella, as it adds creaminess. Others enjoy a mix of olives and artichokes for a briny kick. You can even use roasted peppers for a smoky flavor. Try different toppings to find your favorite! In Italy, bruschetta changes from region to region. In Tuscany, they often add beans and olive oil. In Naples, you might find it topped with fresh seafood. Each area uses local ingredients, making every bruschetta unique. This shows the beauty of Italian cooking. You can explore these variations to taste Italy on your plate. Don't be afraid to get creative! Add fruits like peaches or figs for sweetness. Mix goat cheese with herbs for a tangy twist. You can even try spicy toppings like jalapeños or sriracha. The Full Recipe gives you a solid base, but your imagination can take it further. Play with flavors and find new combinations that excite your taste buds! To store bruschetta leftovers, keep the bread and toppings separate. Place the toasted bread in a sealed container at room temperature. Do not refrigerate it. The bread will get soggy. For the topping, use an airtight container in the fridge. This keeps the mixture fresh and flavorful. Use the topping within two days for the best taste. To reheat bruschetta, preheat your oven to 350°F (175°C). Place the bread slices on a baking sheet. Heat for about 5 minutes. This warms the bread without making it chewy. Avoid microwaving, as it makes the bread soft. After reheating, add fresh toppings to keep your bruschetta vibrant. The fresh ingredients in bruschetta have different shelf lives. Ripe tomatoes stay good for about three to five days. Fresh basil lasts about one week. Minced garlic keeps well for two weeks in the fridge. Olive oil can last months if stored in a cool, dark place. Always check for freshness before you use ingredients. Bruschetta comes from Italy. The name comes from the word "bruscare," which means to toast. This tasty dish started in Central Italy. People used to eat it with oil and garlic. Over time, they added toppings like tomatoes and herbs. Now, bruschetta is popular worldwide. It’s a go-to starter at many Italian restaurants. You can prep bruschetta in advance, but some parts should wait. Make the tomato mixture ahead. Just store it in the fridge for a few hours. Toast the bread just before serving. This keeps it crunchy. If you top the bread too early, it may get soggy. A crisp white wine pairs best with bruschetta. Sauvignon Blanc and Pinot Grigio are great choices. They have fresh flavors that match the toppings. If you prefer red, try a light Chianti. It won’t overpower the dish. Enjoy your bruschetta with the right drink for a complete experience. For the full recipe, check out the details above! Bruschetta is easy to make with fresh, simple ingredients. You can customize it with tasty add-ins and flavors. Remember to toast the bread just right for the best bite. Store leftovers properly to enjoy later. With its roots in Italy, bruschetta brings joy to every meal. Explore different toppings to keep things fun and exciting. Now, gather your ingredients and get ready to impress everyone with your bruschetta skills!
Bruschetta Recipe Simple and Flavorful Appetizer
Are you ready to impress your guests with a simple and tasty appetizer? Bruschetta is the perfect choice! This classic dish gives you fresh flavors
To make tasty zucchini fritters, gather these main ingredients: - 2 medium zucchinis, grated - 1 teaspoon salt (for zucchini) - 1 cup all-purpose flour - 1/2 cup grated Parmesan cheese - 2 large eggs - 1/4 cup green onions, finely chopped - 1 clove garlic, minced - 1/2 teaspoon black pepper - 1/2 teaspoon smoked paprika - Olive oil for frying - Sour cream or Greek yogurt (for serving) These ingredients create a great flavor and texture. The grated zucchini is key. It adds moisture and nutrition. The cheese gives it a nice salty bite. Eggs hold everything together. You’ll need some simple tools to make your fritters: - Grater - Colander - Mixing bowl - Non-stick skillet - Spoon or ice cream scoop - Paper towels Using the right tools helps make the cooking process smooth. A non-stick skillet is best. It prevents sticking and makes flipping easy. Feel free to get creative! Here are some optional ingredients you can add: - Fresh herbs like dill or parsley - Chopped bell peppers - Feta cheese for a tangy twist - Chili flakes for heat These extras enhance the taste and give your fritters a personal touch. You can mix and match them to suit your taste. For the full recipe, check out the Zesty Zucchini Fritters section above! To start, grate the zucchini using a box grater. This step breaks down the zucchini into small pieces. Place the grated zucchini in a colander and sprinkle it with 1 teaspoon of salt. The salt helps pull out extra moisture. Let it rest for about 10-15 minutes. This allows the zucchini to sweat. After that, use a clean kitchen towel to wring out the zucchini. Remove as much water as you can. This is key for crunchy fritters. In a mixing bowl, combine the squeezed zucchini with the following ingredients: - 1 cup all-purpose flour - 1/2 cup grated Parmesan cheese - 2 large eggs - 1/4 cup finely chopped green onions - 1 clove minced garlic - 1/2 teaspoon black pepper - 1/2 teaspoon smoked paprika Mix everything well until you form a thick batter. This batter will hold the fritters together. Heat a generous amount of olive oil in a non-stick skillet over medium heat. Once the oil is hot, drop spoonfuls of batter into the skillet. Use a spoon to flatten them slightly. Cook for about 3-4 minutes on each side. You want them golden brown and crispy. If your pan is small, fry in batches. After cooking, place the fritters on a paper towel-lined plate. This absorbs extra oil. Serve them warm with sour cream or Greek yogurt. For a full recipe, check out the details above. To get the best texture in your zucchini fritters, start with the zucchini. Grate it well and sprinkle salt on it. Let it sit for about 10-15 minutes. This step pulls out extra water. After resting, wring the zucchini in a towel. Removing moisture is key for crisp fritters. If you skip this, your fritters might be soggy. Mix the dry and wet ingredients well, but don’t overmix. A lumpy batter helps keep the fritters light and airy. One common mistake is not salting the zucchini. This step is vital to remove moisture. Another mistake is overcrowding the pan while frying. This leads to steaming instead of frying. Fry in batches to keep the heat high. Lastly, don’t skip the resting time for the batter. Let it sit for a few minutes before frying. This helps the flavors meld together for a richer taste. Use a non-stick skillet for best results. Heat the olive oil on medium heat. The oil should shimmer before you add the batter. Use a spoon or scoop to drop the batter into the pan. Flatten them slightly for even cooking. Fry for 3-4 minutes until golden brown. Flip them carefully to avoid breaking. Once done, place them on paper towels to absorb excess oil. Serve them warm for a delightful snack! Check out the Full Recipe for more details. {{image_2}} You can change the taste of zucchini fritters by adding herbs and spices. Fresh herbs like basil or dill bring bright flavors. Try adding a teaspoon of dried oregano or thyme for a savory kick. You can also use spices like cumin or chili powder for heat. Experimenting with different herbs and spices can make each batch unique. Cheese adds a creamy texture to fritters. If you want a twist, try different cheeses. Feta cheese gives a tangy flavor. Cheddar adds sharpness, while mozzarella makes them gooey and delicious. You can even use vegan cheese for a plant-based option. Mixing cheeses can create a rich and tasty experience. You can easily make zucchini fritters gluten-free. Substitute all-purpose flour with gluten-free flour or almond flour. This swap keeps the fritters light and tasty. You may need to adjust the amount of flour to get the right consistency. Enjoy these fritters without worrying about gluten! For the complete recipe, check out the Full Recipe for Zesty Zucchini Fritters. After enjoying your fritters, let them cool. Place them in an airtight container. Store them in the fridge for up to three days. This keeps them fresh and tasty. If you want to keep them longer, consider freezing. To reheat, use an oven for best results. Preheat the oven to 350°F (175°C). Place fritters on a baking sheet. Bake for about 10 minutes. This method restores their crispiness. You can also use a skillet. Heat a little olive oil and cook on medium heat for a few minutes on each side. For freezing, first cool the fritters completely. Lay them on a baking sheet in a single layer. Freeze them for about one hour until firm. Then, transfer them to a zip-top freezer bag, removing as much air as possible. These can stay in the freezer for up to three months. When you’re ready to eat, just reheat them directly from the freezer. Enjoy your zesty zucchini fritters anytime! You can find the full recipe above. You can serve zucchini fritters with a variety of tasty sides. Here are some ideas: - Sour cream or Greek yogurt adds a creamy touch. - A fresh salad pairs well with the fritters. - Serve with a tangy dipping sauce for extra flavor. - For a heartier meal, add grilled chicken or fish. These options enhance the zucchini fritters and make them a full meal. To keep your fritters crisp, follow these simple steps: - Always squeeze out excess moisture from the grated zucchini. - Use a clean kitchen towel or cheesecloth for best results. - Avoid adding too much flour; it can make them dense. - Fry in hot oil until golden brown for a crispy outside. These tips will help you achieve the perfect texture. Yes, you can prepare zucchini fritters in advance. Here’s how: - Mix the batter and store it in the fridge for up to 2 hours. - Cook the fritters, then let them cool completely. - Store cooked fritters in an airtight container in the fridge. When ready to eat, reheat them in a skillet for a few minutes. You can find the full recipe to guide you in making these delicious snacks. Enjoy! Zucchini fritters are simple and fun to make. We explored key ingredients, tools, and extra flavor tips. I shared step-by-step instructions for easy cooking. I provided useful tips for perfect texture and common mistakes to avoid. You can get creative with herbs, spices, and even cheese. Storing and reheating tips help keep your fritters fresh. Now, you can enjoy these tasty bites anytime! Embrace your cooking journey and enjoy every delicious crunch.
Zucchini Fritters Crisp and Flavorful Snack Delight
Craving a tasty snack that’s both crisp and flavorful? Zucchini fritters are perfect for you! They’re easy to make and packed with fresh taste. In
- 2 medium zucchinis - 4 cloves of garlic, minced - 1 cup shredded mozzarella cheese - ½ cup grated Parmesan cheese - 2 tablespoons olive oil - 1 teaspoon Italian seasoning - Salt and black pepper to taste - Fresh parsley, chopped (for garnish) When choosing zucchinis, look for firm ones that are bright green. Avoid zucchinis that are soft or have blemishes. Fresh zucchinis will give you the best flavor and texture. You can swap the mozzarella and Parmesan cheeses for other types. Try using cheddar for a sharp taste or a blend of Italian cheeses for more depth. For a dairy-free version, use vegan cheese. It melts well and adds great flavor. Prepping the zucchini steaks Start by washing two medium zucchinis. Cut them lengthwise into thick slices, about half an inch thick. These will be your zucchini steaks. Make sure the slices are even; this helps them cook well. Making the garlic marinade In a large bowl, mix four minced garlic cloves, two tablespoons of olive oil, one teaspoon of Italian seasoning, and salt and black pepper to taste. Stir well to combine. This garlic marinade adds flavor to the zucchini. Arranging zucchini on the baking sheet After marinating, brush both sides of the zucchini steaks with the garlic marinade. Let them sit for about 10 minutes. Then, place them on a baking sheet lined with parchment paper. Arrange them in a single layer to ensure even cooking. Baking time and temperature details Preheat your oven to 400°F (200°C). Once ready, bake the zucchini steaks for 15 to 20 minutes. You want the cheese to melt and turn golden brown. The zucchini should be tender when done. Ideas for side dishes These cheesy garlicky zucchini steaks pair well with a fresh salad or some roasted potatoes. You can also serve them with grilled chicken for a hearty meal. Tips for plating When serving, sprinkle freshly chopped parsley on top for a pop of color. Arrange the zucchini steaks neatly on a plate. This makes the dish look inviting and delicious. For the full recipe, check the earlier section. To keep zucchini steaks firm, cut them thick. Aim for about ½ inch. When baking, avoid overlapping them. This way, they cook evenly. Use a high oven temperature of 400°F (200°C). This helps them roast well. For the perfect cheesy topping, add cheese towards the end of cooking. This prevents it from burning. You can add extra herbs for more flavor. Fresh basil or thyme work great. They add a nice touch. If you like heat, try adding red pepper flakes. A pinch can really kick up the taste. A good baking sheet is key. I recommend using one lined with parchment. This makes for easy cleanup. You'll also need a sharp knife for slicing the zucchini. A mixing bowl is useful for the marinade. A brush can help spread the marinade evenly. You might also want a spatula for serving. These tools make your cooking process smooth and fun. For the complete recipe, check out the Full Recipe. {{image_2}} You can switch up the cheese for fun flavors. Try gouda for a smoky taste. Cheddar gives a sharp bite, while feta adds a nice tang. If you want a dairy-free option, look for vegan mozzarella or almond-based cheeses. These can melt well and keep the dish creamy. Add more veggies to the dish for extra nutrition. Bell peppers or cherry tomatoes pair well with zucchini. If you want protein, grilled chicken or shrimp can make this a full meal. For more flavor, try adding a pinch of smoked paprika or a dash of cayenne pepper to the garlic mix. You can grill or bake these zucchini steaks. Grilling gives a charred flavor, perfect for summer. Baking is easy and keeps the kitchen cool. If you have an air fryer, use it! It cooks quickly and makes the cheese crispy. Just set it to 375°F (190°C) and cook for about 10 minutes. For the full recipe, check the earlier section. Store any leftover cheesy garlicky zucchini steaks in an airtight container. Keep them in the fridge to stay fresh. They will last about 3 to 4 days. Make sure they cool down before sealing the container. This helps keep the texture nice. To reheat, use the oven for the best taste. Set it to 350°F (175°C). Place the zucchini steaks on a baking sheet and heat for about 10 minutes. This keeps the cheese melty and the zucchini tender. If you use a microwave, the zucchini may get soggy. To avoid this, place a paper towel over the zucchini while reheating. Freezing zucchini steaks is an option, but it may change the texture. To freeze, first let them cool completely. Wrap each steak in plastic wrap, then place them in a freezer bag. They can stay frozen for up to 3 months. When you want to eat them, thaw in the fridge overnight. Reheat them in the oven for the best results. This way, they stay tasty and enjoyable. For detailed cooking steps, refer to the Full Recipe. To keep zucchini steaks from being watery, you can follow these tips: - Choose firm zucchinis. Look for ones that feel solid and heavy. - Salt before cooking. Sprinkle salt on the sliced zucchinis and let them sit for 10-15 minutes. This draws out moisture. - Pat them dry. Use a paper towel to remove excess water after salting. - Don’t overcrowd the pan. Give each steak space to cook evenly. These tips help ensure your cheesy garlicky zucchini steaks stay firm and tasty. Yes, you can prepare them ahead of time. Here are some suggestions: - Cut and marinate. Slice the zucchinis and apply the garlic marinade a few hours before. - Store in the fridge. Place the marinated steaks in an airtight container. They can last up to 2 days. - Bake when ready. Just pop them in the oven when you’re ready to eat. This makes meal prep easy and saves time for busy days. Cheesy garlicky zucchini steaks pair well with many dishes. Consider these options: - Grilled chicken or fish. These proteins complement the flavors nicely. - A fresh salad. A light green salad will add freshness. - Quinoa or rice. These grains provide a hearty side. - Wine or iced tea. A crisp white wine or herbal iced tea works well with this dish. These pairings enhance your meal and create a balanced plate. You can tell zucchini steaks are done by looking for these signs: - Cheese is bubbly. The cheese should be golden and melted. - Zucchini is tender. A fork should easily pierce through the steak. - Edges are slightly crisp. The outer edges should have a nice, light browning. These signs ensure your cheesy garlicky zucchini steaks are perfect and ready to enjoy. In this article, I showed you how to make cheesy garlicky zucchini steaks, from selecting ingredients to serving suggestions. You learned the best practices for prepping and cooking, plus tips to keep them firm and flavorful. Remember, you can easily modify this dish with different cheeses or cooking methods. I hope these tips help you create a delicious meal that impresses your family and friends. Enjoy your cooking adventure!
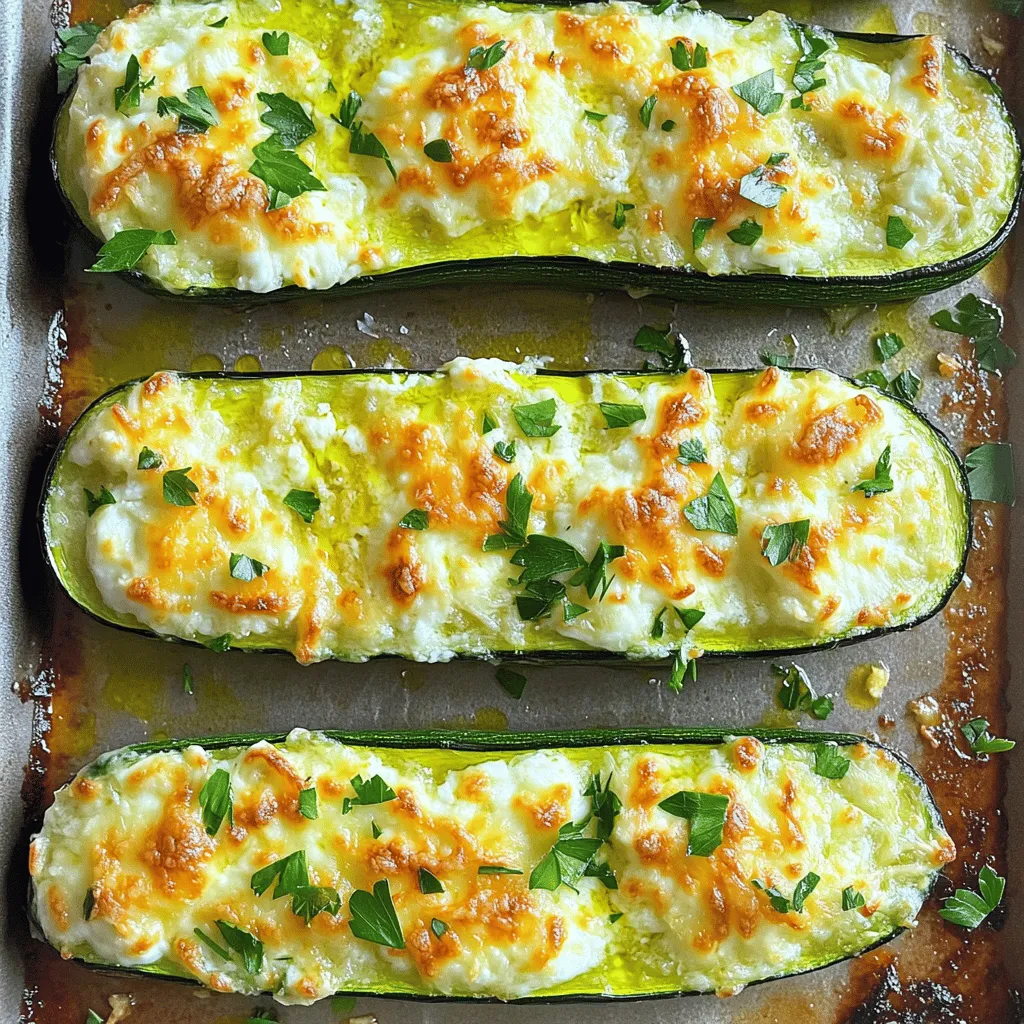
Cheesy Garlicky Zucchini Steaks Simple and Savory Dish
Are you ready to elevate your veggie game? These Cheesy Garlicky Zucchini Steaks are simple, savory, and oh-so-satisfying! With just a few fresh ingredients, including
Here’s what you need to make delicious overnight refrigerator pickles: - 4 small cucumbers, sliced into thin rounds - 1 cup white vinegar - 1 cup water - ½ cup granulated sugar - 1 tablespoon kosher salt - 1 teaspoon mustard seeds - 1 teaspoon celery seeds - 1 teaspoon red pepper flakes (adjust for heat preference) - 2 cloves garlic, peeled and smashed - Fresh dill sprigs for garnish I love using fresh, firm cucumbers for this recipe. They add a nice crunch. The vinegar gives the pickles their tangy flavor. The sugar balances the tartness, making them sweet and spicy. Don’t forget the garlic and dill; they add great depth. This is a simple list, but together, they create something special. For the full recipe, check out the detailed steps on how to bring these ingredients together into a delightful dish. - Combine the following in a saucepan: - 1 cup white vinegar - 1 cup water - ½ cup granulated sugar - 1 tablespoon kosher salt - 1 teaspoon mustard seeds - 1 teaspoon celery seeds - 1 teaspoon red pepper flakes Heat the mixture over medium heat. Stir until the sugar and salt dissolve. Once mixed, remove from heat and let it cool for about 15 minutes. Cooling is key, as hot brine can soften the cucumbers. Slice 4 small cucumbers into thin rounds. Next, smash 2 cloves of garlic. Place the cucumber slices in a clean glass jar. Add the smashed garlic and a few sprigs of fresh dill for flavor. Pour the cooled brine over the cucumbers. Make sure they are fully submerged. If necessary, use a small plate or a weight to keep them down. Seal the jar tightly and refrigerate for at least 24 hours. For best taste, let them sit for 2-3 days. Enjoy these crunchy pickles as a snack, on sandwiches, or as a side dish! You can find the full recipe for these crispy sweet and spicy overnight refrigerator pickles in the article. - Use fresh, firm cucumbers for better crunch. - Allow at least 2-3 days for optimal flavor development. - Keep the jar sealed tightly to enhance the pickling process. I always choose cucumbers that look firm and bright. They give the best crunch. Waiting a few days before tasting helps the flavors blend better. This patience pays off. Sealing the jar tightly is key. It locks in the flavor and makes sure the pickles soak up all the good stuff. - Not cooling the brine before pouring. - Overfilling the jar, causing brine overflow. - Ignoring the required refrigeration time. Many people rush. They pour hot brine over cucumbers. This can make them soft. Cooling the brine first keeps the crunch. Also, don’t fill the jar too much. Leave some space to prevent spills. Finally, don’t skip the refrigeration time. The longer they sit, the better they taste. Enjoy your crispy sweet and spicy overnight refrigerator pickles! For the full recipe, check out the link. {{image_2}} You can easily change the flavor of your pickles. Here are some fun ideas: - Add sliced jalapeños for heat. This will give your pickles a spicy kick. Just adjust the amount based on your heat level. - Incorporate sliced onions or bell peppers. These add sweetness and color to your pickles. They also bring new textures that make each bite exciting. - Experiment with different herbs like thyme or oregano. Fresh herbs can change the flavor profile. Try adding them to the brine for a unique twist. Adjusting the sweetness of your pickles can suit your taste better. Here’s how you can do it: - Scale back or increase sugar levels for desired sweetness. If you like it sweeter, add more sugar. If you prefer a tangy taste, reduce the sugar. - Use alternative sweeteners like honey or agave syrup. These can add a different flavor dimension. Just keep in mind that they may alter the brine's consistency slightly. Feel free to play around with these variations to create your perfect batch of crispy sweet and spicy overnight refrigerator pickles! Enjoy the process and make it your own. For a complete guide, check out the Full Recipe. Store your pickles in an airtight container in the fridge. This keeps them fresh and crunchy. Avoid light and heat sources, as these can change the flavor and texture. A dark, cool spot in your fridge is best. You’ll get the best flavor from your pickles within 1 to 2 weeks after making them. However, if stored well, they can last up to 1 month. Always check for signs of spoilage before eating. Keeping track of the date you prepared them helps you enjoy them at their best. Refrigerator pickles need at least 24 hours to sit. However, they taste best after 2-3 days. This waiting time allows the flavors to meld and develop. You will enjoy a more vibrant taste when you wait longer. Yes, you can use many other vegetables for pickling. Carrots, radishes, and green beans work wonderfully. Each vegetable has its unique crunch and flavor. Feel free to experiment and find your favorites! Refrigerator pickles are quick-pickled and kept cold. They do not require boiling. Canned pickles, on the other hand, are shelf-stable. They undergo a boiling and sealing process to last longer. If you want quick, tasty pickles, stick with refrigerator pickles. For long-term storage, canned pickles are the way to go. In this post, I shared a simple recipe for making refrigerator pickles. We covered ingredients, step-by-step instructions, and tips for the best results. Remember to use firm cucumbers and cool your brine before pouring. Don’t forget to experiment with flavors! Proper storage is key for a great taste. Just keep your pickles airtight and chilled. Enjoy your homemade pickles, and have fun with the variations! Try new flavors and share your creations. It’s all about enjoying fresh, tasty snacks at home.
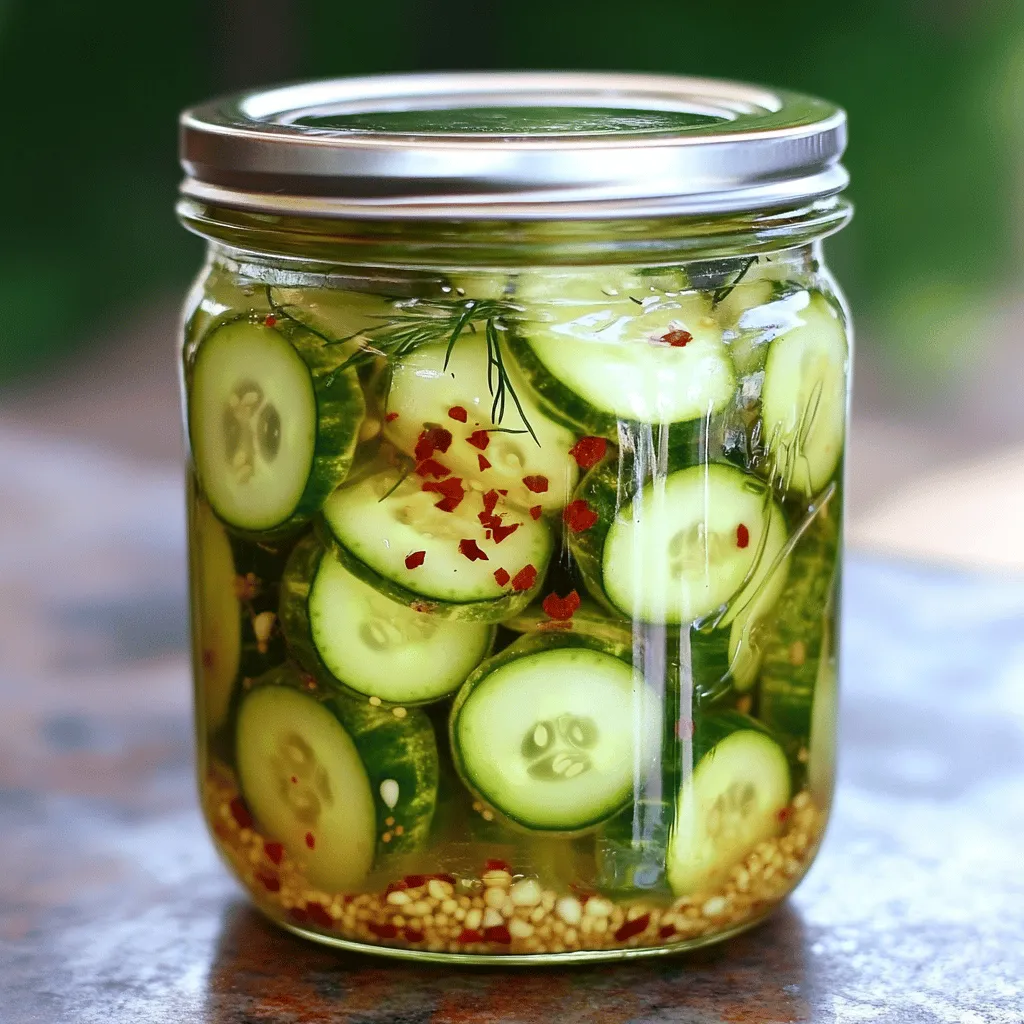
Overnight Refrigerator Pickles Crunchy and Easy Recipe
Are you ready to crunch into some tasty Overnight Refrigerator Pickles? This easy recipe takes just a few simple ingredients and a little time. In
- 2 medium zucchinis, thinly sliced - 1 tablespoon olive oil - 1 cup breadcrumbs (preferably Panko for extra crunch) - 1/2 cup grated Parmesan cheese - 1 teaspoon garlic powder - 1 teaspoon onion powder - 1/2 teaspoon paprika - Salt and pepper to taste - Optional: Fresh herbs (like rosemary or thyme) for garnish - You can swap olive oil for avocado oil or melted coconut oil. - For gluten-free options, use gluten-free breadcrumbs made from rice or corn. - If you prefer vegan snacks, use nutritional yeast or vegan cheese instead of Parmesan. These ingredients are simple yet pack a punch. The zucchini provides a fresh base, while the spices and cheese add great flavor. You can mix and match these ingredients based on what you have at home. Enjoy creating your own version of this tasty snack! First, wash your zucchinis under running water. Make sure to remove any dirt. Next, slice them thin, about 1/8-inch thick. This thinness helps them get that perfect crunch. After slicing, put the zucchini in a large bowl. Drizzle with one tablespoon of olive oil. Toss the slices to coat them evenly. This step is important because the oil helps the seasoning stick. In another bowl, mix together your breadcrumbs, Parmesan cheese, garlic powder, onion powder, paprika, salt, and pepper. Stir well to combine all the flavors. This mixture adds a nice crunch and taste to your chips. Now, grab a zucchini slice and dip it into the breadcrumb mix. Make sure to coat it entirely. Shake off any extra crumbs to avoid clumps. Repeat this for all the slices. Preheat your air fryer to 375°F (190°C). This step ensures that your chips cook evenly. Place the coated zucchini chips in a single layer in the air fryer basket. Don’t overcrowd them; this helps with crispiness. Cook for 10-12 minutes. Flip the chips halfway through to ensure they brown evenly. Once they turn golden brown, they are ready to enjoy. Thin slicing is key for crispy zucchini chips. Aim for 1/8-inch thick slices. This helps them cook evenly and become crunchy. If your slices are too thick, they will be soft and chewy. Another tip is to avoid overcrowding in the air fryer. When you stack the chips, they won’t cook well. Place them in a single layer for the best results. You can enhance the flavor of your zucchini chips with extra spices. Try adding cayenne pepper for heat or smoked paprika for a smoky taste. You can also mix in Italian herbs like oregano or basil. Fresh herbs can brighten the dish. After cooking, sprinkle some chopped herbs on top for added flavor and color. Cooking in batches is essential for the best chips. Depending on your air fryer size, keep the batch small. A good rule is to cook about half of the zucchini slices at once. This ensures each chip gets enough hot air. If you want to keep them warm, place cooked chips on a wire rack. This way, they won’t steam and lose their crunch. Enjoy your crispy air fryer zucchini chips from the [Full Recipe]! {{image_2}} You can spice up your zucchini chips in fun ways. Try adding cayenne pepper for a kick. Mix about 1/2 teaspoon of cayenne with your breadcrumb mix. This will give your chips a nice heat. For a cheesy twist, use different cheese types. You can blend mozzarella, cheddar, or even a spicy pepper jack. The cheese adds a rich flavor and helps the chips turn golden. Zucchini is just the start! You can make chips from many veggies. Sweet potatoes, carrots, and beets work great too. Each has its own unique taste and texture. To cook them, adjust the time based on thickness. For sweet potatoes, aim for 15 minutes. For carrots, about 12 minutes should do. Always check for crispiness. Pair your zucchini chips with tasty dips. Ranch dressing or marinara sauce works well. You can also try hummus or guacamole for something different. Another fun idea is to top your chips with salsa and cheese. This gives them an extra flavor boost. Enjoy your chips any way you like! For the full recipe, check out the link above. To keep your zucchini chips fresh, store them in an airtight container. This helps prevent them from getting stale. You can put parchment paper at the bottom of the container to absorb moisture. Also, separate layers with parchment paper to keep chips crisp. Refrigerate them if you plan to eat them within a few days. To reheat zucchini chips, the air fryer is your best friend. Set it to 350°F (175°C) and heat the chips for about 3-5 minutes. This method keeps them crispy. Avoid using the microwave, as it makes chips soggy. If you want to reheat them in the oven, spread them out on a baking sheet. Bake at 350°F for 5-7 minutes. If you want to freeze raw zucchini chips, slice them and coat them as usual. Then, place them in a single layer on a baking sheet. Freeze until solid, then transfer them to a freezer bag. This method lets you cook them later without thawing. For cooked chips, allow them to cool first. Store them in an airtight container or freezer bag with parchment paper. This helps keep them from sticking together. To make zucchini chips, wash and slice two medium zucchinis thinly. Aim for slices about 1/8-inch thick. This helps the chips get crispy. Toss the slices in one tablespoon of olive oil until they are coated. In another bowl, mix one cup of breadcrumbs, half a cup of grated Parmesan cheese, and spices like garlic powder, onion powder, and paprika. Dip each zucchini slice into this mixture until it is fully covered. Preheat your air fryer to 375°F. Place the slices in a single layer in the basket and air fry for about 10-12 minutes. Flip them halfway to ensure even cooking. Once they turn golden brown, they are ready. For the full recipe, check out the earlier section. An air fryer cooks food by circulating hot air, making it a healthier option. It uses less oil than traditional frying, cutting down on fat and calories. Air-fried zucchini chips come out crispy without the greasiness. You also avoid the mess of hot oil, making clean-up easier. Plus, air fryers cook food faster, saving you time in the kitchen. Yes, you can use zucchini with skin on. The skin adds extra texture and flavor. Some people enjoy the crunch the skin provides, while others prefer peeled zucchini. It all comes down to personal taste. If you like a softer chip, try peeling the zucchini first. Seasoning is key to tasty zucchini chips. A simple mix of garlic powder, onion powder, and paprika works great. You can also add cayenne pepper for heat. For a cheesy flavor, sprinkle on more Parmesan cheese. Fresh herbs like rosemary or thyme add a nice touch too. Experiment with different blends to find your favorite! In this post, I discussed how to make crispy air-fried zucchini chips. I covered essential ingredients, from fresh zucchini to seasonings, and provided helpful tips for perfect crunch. You learned about variations and storage options, so your chips stay tasty. Now, you can enjoy this healthy snack anytime. Experiment with spices and dips to find your favorite flavors. With practice, making these chips will be easy and fun!
Air Fryer Zucchini Chips Crispy and Flavorful Snack
Are you ready to enjoy a tasty, crunchy snack that’s good for you? Air fryer zucchini chips are a fun twist on your usual chips.
To make the best Southern fried squash, start with fresh yellow squash. Look for two medium-sized squash. They should feel firm and have a bright color. Slice them into 1/4-inch rounds. This size cooks well and gives a nice crunch. For the perfect coating, you need a few key seasonings. Gather these items: - 1 cup buttermilk - 1 cup cornmeal - 1/2 cup all-purpose flour - 1 teaspoon garlic powder - 1 teaspoon onion powder - 1/2 teaspoon paprika - Salt and black pepper to taste Soaking the squash in buttermilk adds flavor and moisture. The cornmeal and flour mix gives the squash a crispy outer layer. The garlic powder, onion powder, and paprika enhance the taste, making each bite delicious. Choosing the right oil is crucial for frying. I recommend using vegetable oil. It has a high smoke point, perfect for frying at medium heat. This oil lets the squash cook evenly while achieving that golden brown color. Make sure to pour enough oil into your pan, around 1/4 inch deep, to fry the squash properly. Start with fresh yellow squash. I like to use medium-sized ones for the best texture. Slice them into 1/4-inch rounds. This shape helps them cook evenly. Next, soak the squash slices in buttermilk for about 30 minutes. This step adds moisture and flavor, making the squash rich and tasty. Now, let’s make the coating. In a shallow dish, mix together the following: - 1 cup cornmeal - 1/2 cup all-purpose flour - 1 teaspoon garlic powder - 1 teaspoon onion powder - 1/2 teaspoon paprika - Salt and black pepper to taste This mixture gives the squash a great crunch. Mix well to ensure all the spices blend together. Heat 1/4 inch of vegetable oil in a large frying pan over medium heat. To check if the oil is ready, drop a small pinch of the cornmeal mixture into the oil. If it sizzles, it’s time to fry. Remove the squash from the buttermilk, letting the excess drip off. Dredge each slice in the coating mixture, pressing lightly. Carefully place the coated squash in the hot oil in a single layer. Don’t overcrowd the pan; this helps them fry evenly. Cook for about 2-3 minutes on each side until golden brown and crispy. Once cooked, transfer the fried squash to a plate lined with paper towels. This will soak up any excess oil. While still warm, sprinkle with a bit of extra salt if you like. Enjoy your crispy Southern fried squash! For the full recipe, check out the details above. To get that ideal crunch, follow these steps. First, soak the squash in buttermilk. This adds flavor and moisture. Next, coat each slice well in the cornmeal mixture. Press lightly to ensure the coating sticks. Fry in hot oil to get a golden color. Avoid overcrowding the pan; this keeps the heat steady. Using the right tools makes a big difference. A large frying pan or cast iron skillet works best. These pans heat evenly. You also need a slotted spoon to flip and remove the squash. A thermometer can help check the oil temperature, but it's not required. Just drop a pinch of cornmeal in to check if it sizzles. Serve your crispy squash hot for the best taste. A rustic basket lined with parchment paper looks great. Add fresh parsley for a pop of color. You can pair it with your favorite dipping sauce. Ranch dressing or a spicy aioli are excellent choices. For a twist, serve with a side of pickled vegetables. This adds a tangy contrast to the rich flavor. For the full recipe, check earlier in the article. {{image_2}} You can switch up the coating for a different taste. Try using crushed crackers instead of cornmeal. This gives a nice crunch. You can also use panko bread crumbs for extra crispiness. If you want a gluten-free option, use almond flour or chickpea flour. Both add unique flavors and textures. Each choice will change your fried squash in a fun way. Herbs and spices can make your fried squash exciting. Try adding dried herbs like oregano or thyme to the coating mix. For a spicy kick, add cayenne pepper or chili powder. You can also use fresh herbs like dill or basil after frying. Just sprinkle them on top for a fresh taste. Experimenting with flavors keeps the dish interesting. How you serve your fried squash can be fun and creative. Serve it in a cute basket lined with parchment paper. This makes it look rustic and inviting. You can also pair it with dips like ranch or spicy aioli. For a twist, serve it with a side salad. This adds freshness to your meal. Don’t forget to garnish with fresh herbs for a pop of color. Enjoying your dish visually makes it even more appealing. To store leftover fried squash, let it cool first. Place it in an airtight container. Keep it in the fridge for up to three days. The squash may lose some crispiness, but it will still taste good. For best flavor, try to eat it within the first two days. When reheating your fried squash, avoid the microwave. The microwave can make it soggy. Instead, use the oven or a skillet. Preheat the oven to 350°F (175°C). Place the squash on a baking sheet. Heat for about 10-15 minutes, or until warm and crispy. If using a skillet, add a little oil over medium heat. Heat each piece for about 2-3 minutes on each side. You can freeze fried squash, but it may change in texture. To freeze, let it cool completely. Spread it out on a baking sheet in a single layer. Freeze for 1-2 hours until firm. Then, transfer to a freezer bag. Remove as much air as possible. Use within three months for the best taste. To reheat, follow the same method as above, but it may take a bit longer. For the complete recipe, check out the Full Recipe section. You can pair Southern fried squash with many delicious dishes. Try serving it with fried chicken or barbecue ribs. It also goes great with a fresh salad or coleslaw. For a fun twist, serve it with ranch or spicy dipping sauce. You will love how the flavors blend together! Yes, you can easily make this dish gluten-free. Just swap the all-purpose flour for a gluten-free flour blend. Ensure that your cornmeal is also gluten-free. This way, you can still enjoy the crispy goodness without the gluten! Fried squash can last up to three days in the fridge. Store it in an airtight container. This helps keep it fresh. When you reheat it, the squash may not be as crispy, but it will still taste good. Here are some common pitfalls to avoid: - Don’t skip soaking the squash in buttermilk. This step adds flavor and moisture. - Avoid overcrowding the frying pan. It can cause uneven cooking. - Make sure the oil is hot enough before frying. This helps achieve that perfect crisp. For the full recipe, check out the details above. The steps are simple and lead to a tasty dish that everyone will enjoy! Southern fried squash is a tasty dish made with fresh ingredients and simple steps. We discussed how to prepare, coat, and fry squash perfectly. Tips helped in achieving that desired crunch, while storage options provide convenience. You can explore variations for more flavor or keep it classic. Remember, great cooking is about practice. Enjoy your crispy squash and share it with others. It’s a dish that brings joy and flavor to any table.
Southern Fried Squash Crispy and Delicious Dish
Are you ready to savor a crispy and delicious dish that captures the essence of Southern cooking? In this blog post, I’ll guide you through
- 2 medium yellow squash or zucchini - 2 tablespoons olive oil - 3 tablespoons grated Parmesan cheese - 1 teaspoon garlic powder - 1 teaspoon onion powder - ½ teaspoon paprika - Salt and pepper to taste - Fresh parsley, chopped When I make Crispy Garlic Parmesan Squash Chips, I focus on fresh ingredients. First, I use two medium yellow squash or zucchini. They are great for this dish. The squash should be firm and bright. I slice them thin to get that perfect crisp. Next, I grab some olive oil. This adds flavor and helps the chips crisp up nicely. I use two tablespoons to coat the squash slices evenly. Now, let’s talk about the seasoning. I love using grated Parmesan cheese. It gives a rich, savory taste. I add three tablespoons of it. Then, I mix in garlic powder, onion powder, and paprika. Each adds a unique flavor. I finish with salt and pepper to taste. These spices really make the chips pop! For garnish, I chop fresh parsley. It adds color and a fresh taste. I sprinkle it on top before serving. This simple touch makes the chips look great. You can find the full recipe in the main article. Enjoy these crispy delights! To make perfect crispy garlic Parmesan squash chips, start by slicing the squash. Use a sharp knife and aim for even slices, about 1/8 inch thick. This helps them cook evenly. If you have a mandoline, it makes slicing even easier and quicker. Next, prepare your baking sheet. Line it with parchment paper. This prevents the chips from sticking. It also makes cleanup a breeze. Make sure your baking sheet is large enough for all the slices to fit without overlapping. Now, it’s time to coat the squash. In a large mixing bowl, add the thinly sliced squash. Drizzle 2 tablespoons of olive oil over the slices. Toss them well until each piece is covered. The oil helps the chips get crispy and golden. In another small bowl, mix your seasoning. Combine 3 tablespoons of grated Parmesan cheese, 1 teaspoon of garlic powder, 1 teaspoon of onion powder, ½ teaspoon of paprika, and salt and pepper to taste. Mix this blend well, then sprinkle it over the squash. Toss gently again to coat each slice evenly. Preheat your oven to 425°F (220°C). Once it’s hot, lay the squash slices in a single layer on your prepared baking sheet. Avoid overlapping them. Bake for 15-20 minutes. Halfway through, flip the chips over. This is key for even crispiness. You’ll know the chips are done when they are golden brown and crispy. Once baked, let them cool for a few minutes. Finally, sprinkle with fresh chopped parsley for a pop of color before serving. For the full recipe, check the earlier section! To get your squash chips nice and crispy, follow these steps: - Baking tips for a crispy texture: Make sure your oven is preheated to 425°F (220°C). This high heat helps the chips cook quickly, which is key to a crisp texture. Use parchment paper on your baking sheet. This prevents sticking and helps with even browning. - Avoiding moisture in the squash: Moisture is the enemy of crispiness. After slicing your squash, pat the pieces dry with a paper towel. This removes extra water and helps them crisp up in the oven. To make your squash chips even tastier, consider these flavor boosts: - Suggested spices and herbs: Besides garlic and onion powder, you can add dried herbs like thyme or oregano. These herbs add depth and an earthy taste. Experiment with your favorites to create your unique blend. - Adding heat: red pepper flakes or cayenne: If you enjoy a little kick, sprinkle some red pepper flakes or cayenne pepper into your spice mix. Start with a small amount and adjust to your taste. This adds an exciting zing to your chips. How you serve your chips makes a big difference: - Serving suggestions: Serve your crispy chips as a snack, appetizer, or side dish. Pair them with a dip like ranch or hummus for extra flavor. - Plating and garnishing tips: For a beautiful presentation, arrange your chips in a single layer on a serving platter. Sprinkle fresh chopped parsley on top for color and a fresh taste. This simple touch makes your dish look inviting. For the full recipe, check the details provided above! {{image_2}} You can switch up the squash for other veggies. Sweet potatoes make a great choice. They add a sweet, earthy flavor. Zucchini works well too, offering a similar texture. You can also try carrots or beets for a fun color. Each veggie will bring its own taste and crunch. If you want to try different cheeses, cheddar is a great option. It adds a sharp taste that many people love. Nutritional yeast is another choice for a cheesy flavor. It’s also vegan-friendly and packed with vitamins. Both options can make your chips unique and tasty. For a vegan version, skip the Parmesan and use nutritional yeast. This keeps the chips flavorful without dairy. If you need gluten-free options, rest assured, these chips are naturally gluten-free. Just make sure your seasoning is free from gluten. This way, everyone can enjoy the crispy goodness. To keep your crispy garlic Parmesan squash chips fresh, use airtight containers. Glass or plastic containers work well. Before sealing, let the chips cool completely. This step prevents moisture buildup, which can make them soggy. When you want to enjoy your leftovers, reheating is key. The oven is best for keeping the chips crispy. Preheat your oven to 350°F (175°C). Spread the chips on a baking sheet and heat for about 10 minutes. If you use the microwave, they may lose their crunch. However, for a quick fix, a minute or two on medium power can work in a pinch. You can freeze these chips, but it’s best to freeze them uncooked. Lay the seasoned squash slices on a baking sheet. Freeze them for an hour, then transfer to a freezer bag. When you're ready to eat, bake them straight from the freezer. If you freeze cooked chips, they may turn soft upon thawing, so I do not recommend it. For thawing, let them sit in the fridge overnight. Yes, you can bake the squash chips. Baking is a great way to make them healthier. When you bake, you use less oil. This also helps keep the chips light and crispy. The oven's heat cooks them evenly. You get a nice crunch without the mess of frying. Plus, baking is safer for kids to help with! You will know the chips are done when they are golden brown. Look for a crispy texture. If they feel soft or floppy, they need more time. A good tip is to flip them halfway through baking. This helps them cook evenly. Keep an eye on them in the last few minutes. You want them crunchy but not burnt. Using frozen squash is not the best choice. Frozen squash tends to be softer. This can make the chips mushy instead of crispy. Fresh squash has a firmer texture. It also holds up better during baking. If you only have frozen, try to thaw and drain the excess water. But, for the best chips, fresh is the way to go. This blog post covered how to make delicious and healthy squash chips. You learned about the main ingredients, seasoning options, and step-by-step instructions for perfect baking. We shared tips for crispiness, flavor boosts, and creative serving ideas. You can even try different vegetables and adapt the recipe for dietary needs. Remember to store your leftovers properly for the best taste later. With these easy steps, you can enjoy tasty snacks without guilt. Get cooking and enjoy your crispy treats!
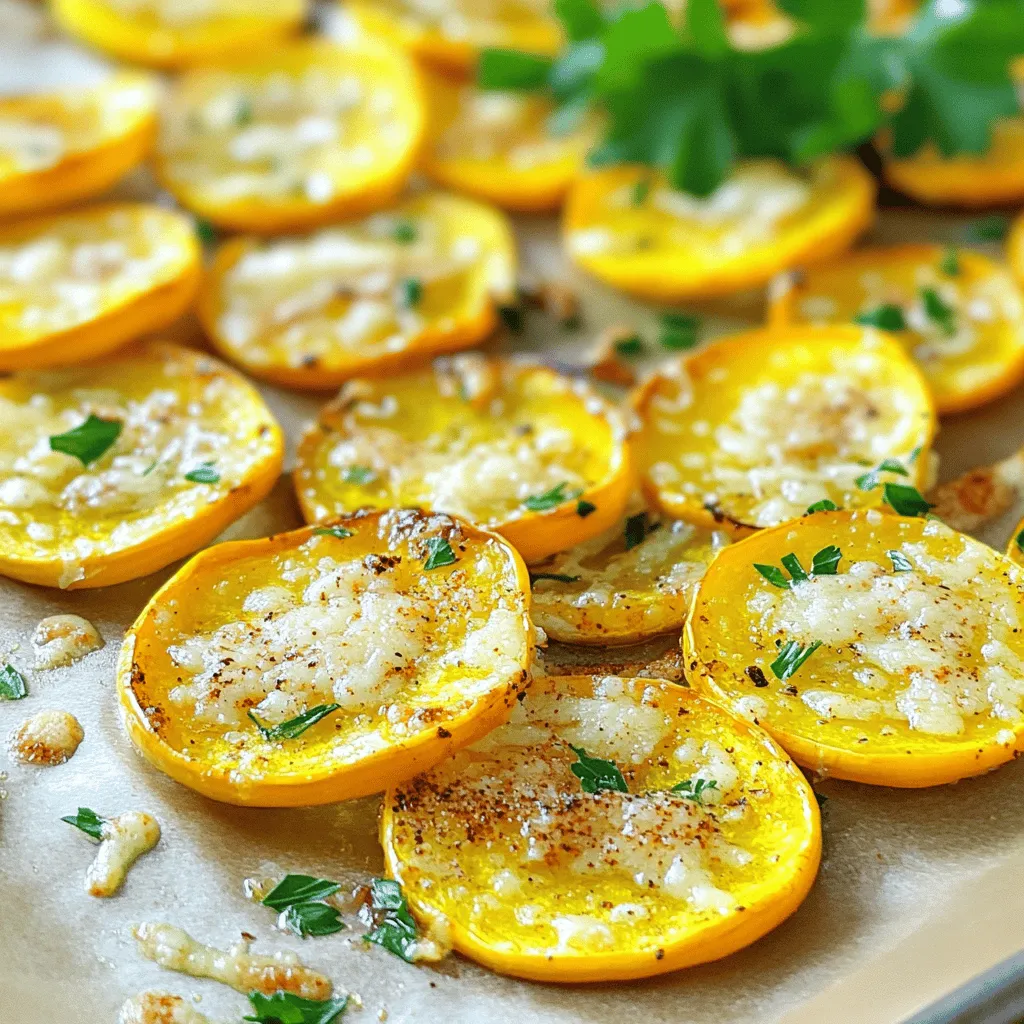
Crispy Garlic Parmesan Squash Chips Simple and Tasty
If you’re searching for a fun and tasty snack, look no further! These Crispy Garlic Parmesan Squash Chips are easy to make and full of
The key to making the best cheesy zucchini tots is in the ingredients. Here’s what you need: - 2 medium zucchinis, grated - 1 cup shredded cheese (cheddar or mozzarella) - 1/2 cup breadcrumbs (panko or regular) - 1/4 cup grated Parmesan cheese - 1 large egg - 2 green onions, finely chopped - 2 cloves garlic, minced - 1 teaspoon onion powder - 1/2 teaspoon salt - 1/4 teaspoon black pepper - Cooking spray or olive oil for greasing Each ingredient plays an important role. The zucchinis provide moisture and texture. Cheese adds that gooey, rich flavor we all love. Breadcrumbs help bind everything together and create a crispy crust. Using fresh green onions and garlic gives the tots a nice kick. The spices, salt, and pepper enhance all the flavors. Remember, you can mix and match cheese types for your favorite taste. Follow the [Full Recipe] to see how these ingredients come together for a tasty treat. 1. Preheat the oven and prepare the baking sheet. Start by setting your oven to 400°F (200°C). Line a baking sheet with parchment paper. This helps prevent sticking and makes cleanup easier. 2. Grate zucchini and remove excess moisture. Take two medium zucchinis and grate them using a box grater or a food processor. After grating, place the zucchini in a clean kitchen towel. Squeeze out as much moisture as possible. This step is key! If you skip it, your tots will be soggy. 1. Combine ingredients in a mixing bowl. In a large mixing bowl, add the drained zucchini, 1 cup of shredded cheese (cheddar or mozzarella), 1/2 cup of breadcrumbs, 1/4 cup of grated Parmesan cheese, 1 large egg, 2 finely chopped green onions, 2 minced garlic cloves, 1 teaspoon of onion powder, 1/2 teaspoon of salt, and 1/4 teaspoon of black pepper. Mix everything well until it's fully combined. 2. Shape the mixture into tots. Using your hands, form small shapes from the mixture. Aim for about 1-2 inches long. Place each tot on the prepared baking sheet. Make sure to leave some space between them so they cook evenly. 1. Place on prepared baking sheet and apply oil. Lightly spray or brush the tops of the tots with cooking spray or olive oil. This helps them brown nicely while baking. 2. Bake and achieve desired crispiness. Place the baking sheet in the preheated oven. Bake the tots for 20-25 minutes. Flip them halfway through for even browning. They should be golden brown and crispy on the outside when done. Now you’re ready to enjoy these tasty cheesy zucchini tots. You can find the complete recipe in the Full Recipe section. Draining the grated zucchini is key. If you skip this step, your tots may turn soggy. Zucchini has a lot of water. After grating, place it in a clean kitchen towel. Squeeze out as much moisture as you can. This simple trick makes a big difference in texture. Your tots will be crispy and delightful. Feel free to get creative with flavors. Adding herbs makes a big impact. Consider using fresh basil or dill for a fresh taste. A pinch of red pepper flakes can give a nice kick. You can also try adding smoked paprika for a unique twist. Experiment with spices to find your favorite mix. Each tweak can make your zucchini tots special. For even baking, space the tots well on the baking sheet. This allows hot air to circulate. Flipping them halfway through baking helps achieve that golden color. If you want a crunchier top, spray or brush the tops lightly with oil. Every small step counts in making your tots perfectly crispy. For the full recipe, check out the detailed instructions above. Enjoy making these delicious bites! {{image_2}} You can switch up the cheese for fun flavors. Instead of cheddar or mozzarella, try using gouda or pepper jack. Goat cheese adds a creamy tang, while feta brings a salty kick. Each choice changes the taste and texture of your tots. Mix and match to find your favorite combo! Zucchini is great, but you can add more veggies to the mix. Finely chopped carrots or bell peppers blend well. Spinach or kale can boost nutrition and color. Just remember to drain any extra moisture. This keeps your tots crispy and delicious. If you like heat, add some spice! Chopped jalapeños or red pepper flakes work wonders. You can adjust the amount based on your heat preference. This fiery twist makes your cheesy zucchini tots a tasty treat. Enjoy the kick that brings life to each bite! For the full recipe, check out the [Full Recipe]. To store leftover cheesy zucchini tots, let them cool completely. Place them in an airtight container. Keep the container in the fridge. They stay fresh for about 3 days. You can enjoy them cold or reheat them later. For longer storage, you can freeze the tots. First, let them cool completely. Arrange them in a single layer on a baking sheet. Freeze them for about an hour. Once frozen, transfer the tots to a freezer bag. They can last for up to 3 months in the freezer. When ready to eat, do not thaw before reheating. To keep your cheesy zucchini tots crispy, use an oven or an air fryer. Preheat the oven to 375°F (190°C). Place the tots on a baking sheet. Heat them for about 10-15 minutes. For an air fryer, set it to 350°F (175°C) and cook for about 8-10 minutes. This way, they stay warm and crispy. Enjoy them as if they were freshly made! Yes, you can prepare Cheesy Zucchini Tots ahead of time. - Grate the zucchinis and drain them as you normally would. - Mix the ingredients in a bowl. - Form the tots and place them on a baking sheet. - Cover the sheet with plastic wrap and store it in the fridge. You can keep them for up to 24 hours before baking. This makes it easy for busy days. Just bake them right before serving! Cheesy Zucchini Tots taste great on their own, but they pair well with dips. - Marinara sauce adds a nice tang. - Ranch dressing gives a creamy touch. - Ketchup works for a classic flavor. You can also serve them with a fresh salad or some roasted veggies for a full meal. Yes, you can make Cheesy Zucchini Tots gluten-free! - Use gluten-free breadcrumbs instead of regular ones. - Check the cheese packaging to ensure it is gluten-free. This way, everyone can enjoy these tasty bites without worry. Enjoy the Full Recipe to start making your own! Cheesy zucchini tots are a fun and tasty treat. You learned about key ingredients, preparation steps, and tips for the perfect bake. Don’t forget the flavor boosts from herbs or spice! You can even mix in other veggies or choose different cheeses. Store leftovers well for later or freeze them for future snacks. Remember, these tots are not just easy to make; they’re also great for getting kids to eat their greens. Enjoy your cooking adventure with these cheesy bites!
Cheesy Zucchini Tots Flavorful and Crispy Treat
Want a tasty snack that’s easy to make? These Cheesy Zucchini Tots are just the thing! Packed with flavor, they’re perfect for kids and adults
- 2 medium yellow squashes, grated - 1 cup all-purpose flour - 1 large egg - 1/2 teaspoon baking powder - 1/4 cup green onions, chopped - 1/2 teaspoon garlic powder - Salt and pepper to taste - Oil for frying - 1 cup plain Greek yogurt - 1 teaspoon sriracha (or more, to taste) - 1 tablespoon lemon juice - 4 medium yellow squashes - 1 cup cooked quinoa - 1 bell pepper, finely chopped - 1 small onion, diced - 1 teaspoon cumin - 1 teaspoon paprika - Salt and pepper to taste - 1/2 cup shredded cheese (cheddar or mozzarella) - Olive oil - 2 medium yellow squashes, diced - 1 cup corn kernels (fresh or frozen) - 1 small onion, chopped - 2 cloves garlic, minced - 4 cups vegetable broth - 1 cup coconut milk - 1 teaspoon thyme - Salt and pepper to taste - 2 tablespoons olive oil - 2 medium yellow squashes, sliced into half moons - 1 zucchini, sliced - 1 red bell pepper, chopped - 1 tablespoon olive oil - 1 teaspoon dried oregano - 1 teaspoon dried thyme - Salt and pepper to taste - Fresh parsley for garnish - Step 1: Grate the yellow squashes into a bowl. Squeeze out extra moisture with a towel. This step helps keep the fritters crisp. - Step 2: In a large bowl, mix grated squash, flour, egg, baking powder, green onions, garlic powder, salt, and pepper. Stir until you have a batter. - Step 3: Heat oil in a frying pan over medium heat. Drop spoonfuls of batter into the pan. Fry for 3-4 minutes on each side until golden brown. For the yogurt sauce, mix Greek yogurt, sriracha, and lemon juice in a small bowl. Serve the fritters warm with the sauce on the side. [Full Recipe] - Step 1: Preheat the oven to 375°F (190°C). Cut the yellow squashes in half lengthwise. Scoop out some flesh to make boats. Brush lightly with olive oil. - Step 2: In a skillet, heat olive oil over medium heat. Add diced onion and bell pepper. Sauté until soft, about 5-7 minutes. - Step 3: Stir in cooked quinoa, cumin, paprika, salt, and pepper. Fill each squash boat with this mixture. Top with shredded cheese. Bake for 25-30 minutes until the squash is tender and cheese is bubbly. - Step 1: In a large pot, heat olive oil over medium heat. Add chopped onion and minced garlic. Sauté for 2-3 minutes until fragrant. - Step 2: Add diced yellow squash and corn. Cook for about 5 minutes, stirring often. - Step 3: Pour in vegetable broth and coconut milk. Add thyme, salt, and pepper. Bring to a boil, then simmer for 15-20 minutes. Blend part of the soup if you prefer a creamier texture. Serve hot, garnished with herbs. - Step 1: Preheat the oven to 400°F (200°C). Slice yellow squashes into half moons. - Step 2: In a large bowl, toss the squash with zucchini, red bell pepper, olive oil, oregano, thyme, salt, and pepper. - Step 3: Spread the mixture on a baking sheet. Roast for about 20-25 minutes until tender. Garnish with fresh parsley before serving. - Use a clean kitchen towel to squeeze out moisture. This step helps keep fritters crispy. - Make sure the oil is hot before frying. This ensures a nice golden brown color. - Customize your filling with any vegetables you like. Spinach, mushrooms, or zucchini work well. - Use different types of cheese for extra flavor. Try feta, goat cheese, or Monterey Jack. - Blend the chowder to your desired creaminess. Some like it chunky, while others prefer smooth. - Add fresh herbs just before serving. Basil or cilantro can boost the flavor greatly. - Mix in other seasonal vegetables for variety. Carrots, bell peppers, or eggplant can add color. - Garnish with fresh herbs for a nice presentation. Parsley or thyme can brighten up your dish. Try these tips to elevate your yellow squash recipes. For detailed steps, check the Full Recipe! {{image_2}} - You can add cheese to the batter for richness. Cheese blends well and adds flavor. - Spice the fritters with herbs like dill or parsley. Fresh herbs bring brightness to the dish. - Try using brown rice instead of quinoa. Brown rice adds a nutty flavor and heartiness. - For a heartier dish, add cooked ground meat. Ground turkey or beef works great. - Substitute coconut milk with heavy cream for a richer taste. This makes the chowder creamy and smooth. - Include potatoes for added thickness. Potatoes add body and texture to your chowder. - Experiment with fresh lemon or lime juice for brightness. Citrus adds a fresh zing to the dish. - Add nuts or seeds for crunch. Toasted pine nuts or pumpkin seeds add texture and flavor. For more details, check out the [Full Recipe]. Keep these tasty fritters in an airtight container. Store them in the refrigerator for up to 3 days. They make a great snack or quick meal. For the stuffed boats, refrigerate them in a covered container. They will stay fresh for up to 4 days. You can enjoy them again for lunch or dinner. This chowder is comforting and delicious. Store it in a sealed container in the fridge for up to a week. It's perfect for warming up on chilly days. Refrigerate any leftovers of the roasted medley in an airtight container. They will last for up to 3 days. Reheat them for a quick side dish. Fresh squash is best for texture and taste. However, you can use frozen squash if you must. Just remember to thaw and drain it well to avoid extra moisture in your dish. This way, you keep the flavors and textures nice! A ripe yellow squash is firm and smooth. It should feel heavy for its size and have no blemishes. Look for a bright yellow color. If it’s too soft or has dark spots, it’s best to avoid it. You can pair yellow squash with proteins like chicken, fish, or tofu. These proteins add extra flavor and nutrients. You can also serve it with grains like rice or quinoa for a full meal. Absolutely! These recipes are great for meal prep. You can make them in advance and store them as indicated. This makes it easy to enjoy quick meals throughout the week. Just heat them up when you are ready to eat! Check out the Full Recipe for more details. You now have four easy and tasty yellow squash recipes. Each offers a new way to enjoy this versatile veggie. From fritters to chowder, there's something for everyone. Remember to customize your dishes with your favorite ingredients and tips. Enjoy the health benefits and flavors of yellow squash. Don’t forget to store leftovers for quick meals later. With these recipes, cooking can be fun and simple!
Yellow Squash: 4 Simple Recipes for Quick Meals
If you’re searching for quick and tasty meals, look no further! Yellow squash is a versatile veggie that shines in countless dishes. In this article,
To make easy zucchini puffs, gather these ingredients: - 2 medium zucchinis, grated - 1 cup all-purpose flour - ½ cup grated Parmesan cheese - 2 large eggs - 1 teaspoon garlic powder - 1 teaspoon onion powder - ½ teaspoon baking powder - Salt and pepper to taste - ¼ cup chopped fresh herbs (such as parsley or basil) - Olive oil for frying Each ingredient plays a key role. The zucchini brings moisture and flavor. The eggs and flour bind everything together. The cheese adds a nice creaminess, while the herbs give a fresh touch. When picking zucchini, look for firm and shiny ones. Choose zucchinis that are medium-sized. Avoid ones with soft spots or blemishes. Fresh zucchini should feel heavy for its size. You can store it in the fridge for up to a week. If you want to add more flavor, consider these options: - Red pepper flakes for heat - Feta cheese for a tangy taste - Chopped sun-dried tomatoes for sweetness - Lemon zest for brightness These ingredients can transform your zucchini puffs into a unique dish. Mix and match based on your taste! For the full recipe, check out the detailed instructions in the article. To make Easy Zucchini Puffs, start with fresh zucchinis. Grate two medium zucchinis using a box grater. This step helps them cook evenly. After grating, place the zucchini in a clean kitchen towel. Gather the corners of the towel and squeeze out excess moisture. Removing this water is key for crispy puffs. In a large mixing bowl, combine the dried zucchini, one cup of all-purpose flour, and half a cup of grated Parmesan cheese. Add two large eggs, one teaspoon of garlic powder, one teaspoon of onion powder, and half a teaspoon of baking powder. Season with salt and pepper to taste. Mix all these ingredients well until you create a thick batter. Next, fold in a quarter cup of chopped fresh herbs, like parsley or basil. These herbs add great flavor and freshness to your puffs. Now, heat a large skillet over medium heat. Add a thin layer of olive oil to the pan. Once the oil is hot, drop spoonfuls of the zucchini mixture into the skillet. Make sure to flatten them slightly with the back of a spoon. Cook the puffs for about three to four minutes on each side. Look for a golden brown and crispy finish. As you cook, repeat with the remaining mixture, adding more oil as needed. Finally, transfer the cooked puffs to a paper towel-lined plate to soak up any excess oil. For crispy Easy Zucchini Puffs, moisture control is crucial. Grating zucchinis is just the first step. Squeezing out the excess moisture helps the puffs crisp up nicely when frying. If they are too wet, the puffs will turn out soggy. Using the right heat is also important. Medium heat allows the puffs to cook through without burning. If the oil is too hot, the outside will brown too quickly. Be patient, and let them cook until golden. Finally, ensure even cooking by flattening the mixture in the skillet. This helps create a nice, uniform texture. Flip them carefully to maintain their shape. To prepare easily, gather all your ingredients before you start. This makes the cooking process smoother. Set a timer for about 15 minutes for prep. Grating zucchinis and mixing the batter shouldn't take long. While cooking the puffs, use the time to clean up. Wipe down counters and wash mixing bowls. This keeps your kitchen tidy and makes it easier to enjoy your meal. By managing your time well, you can have delicious Zucchini Puffs ready in just 30 minutes. For the full recipe, check back to ensure you have all the steps covered. To make crispy zucchini puffs, you need to remove excess water. After grating the zucchinis, place them in a clean kitchen towel. Squeeze tightly to get rid of moisture. This step is key. A drier mixture leads to a crispier puff. Also, use enough oil in your skillet. A thin layer helps fry them evenly. Don't overcrowd the pan; this can lower the oil temperature. Cook in batches for the best results. Grating zucchinis can be simple with a few tips. First, use a box grater for fast results. Choose medium-sized zucchinis for easy handling. Grate them right before cooking for freshness. If you notice too much moisture, squeeze it out as mentioned. This helps keep the puffs from getting soggy. Finally, use a large bowl to mix everything. It makes combining ingredients much easier. A few mistakes can ruin your zucchini puffs. First, don’t skip squeezing out the moisture. Skipping this makes puffs soggy. Second, avoid using too much flour. If you add more than the recipe states, the texture changes. It can make them dense. Third, don't cook them on high heat. This can burn the outside while leaving the inside raw. Stick to medium heat for even cooking. Follow the Full Recipe for the best outcome! {{image_2}} You can easily change up the Easy Zucchini Puffs to keep things fun. Try adding corn or diced bell peppers for a sweet crunch. You can also mix in cooked bacon bits for a savory twist. If you like a kick, add some diced jalapeños or a dash of hot sauce. These changes will bring new flavors and textures to your snack. Cheese choices can really change the taste. Instead of Parmesan, try feta or cheddar. Each cheese gives a unique flavor. You can also play with spices. Add smoked paprika for a deep, warm flavor. Or, sprinkle in some Italian herbs like oregano or thyme. These options let you customize the puffs to fit your taste. Making these puffs vegetarian is simple. Just skip the cheese or use a plant-based option. For a vegan version, replace the eggs with flaxseed meal or a banana. Both options bind the ingredients well. You can also add nutritional yeast for a cheesy flavor without dairy. These swaps make the puffs friendly for all diets. Check out the Full Recipe for the complete details! Store leftover zucchini puffs in an airtight container. Let them cool completely first. Keep the container in the fridge for up to three days. This keeps the puffs fresh but may soften them. To freeze zucchini puffs, let them cool completely. Place them in a single layer on a baking sheet. Freeze for about an hour until firm. Then, transfer the puffs to a freezer bag. Label the bag and store for up to three months. To reheat, preheat your oven to 375°F (190°C). Place the puffs on a baking sheet. Bake for about 10 minutes until they are hot and crispy again. You can also use an air fryer for a quicker option. This method keeps them crunchy, just like when you first made them. For more details, check the Full Recipe. To make Easy Zucchini Puffs gluten-free, swap the all-purpose flour for a gluten-free blend. Look for a blend that includes xanthan gum. This helps bind the mixture. You can also use almond flour or coconut flour. These options add unique flavors. Keep in mind that the texture may change slightly, but they will still be delicious. Zucchini Puffs pair well with many dips and sides. Here are some ideas: - Tzatziki sauce - Spicy yogurt dip - Tomato salsa - A fresh salad - Sliced avocados These will enhance the flavors of your puffs. You can serve them warm or at room temperature. Yes, you can bake Zucchini Puffs! Preheat your oven to 400°F (200°C). Line a baking sheet with parchment paper. Place spoonfuls of the zucchini mixture on the sheet. Flatten them slightly. Bake for about 20-25 minutes, flipping halfway through. They may not be as crispy as fried puffs, but they will still be tasty and healthy. For the best results, brush them lightly with olive oil before baking. For the full recipe, check out the details above. Enjoy making these Easy Zucchini Puffs! In this post, we explored how to make Easy Zucchini Puffs. We covered the best ingredients, how to prepare them, and tips for success. You learned key cooking methods, storage tips, and how to avoid common mistakes. Try adding your favorite spices or cheeses for a new twist. With these steps, you'll enjoy crisp, tasty puffs every time. Enjoy your cooking journey!
Easy Zucchini Puffs Simple and Flavorful Snack
If you’re looking for a quick and tasty snack, Easy Zucchini Puffs are the answer. I love how simple they are to make, and they