Appetizers
![- 4 ripe tomatoes, diced - 1 small red onion, finely chopped - 2 cloves garlic, minced - 1 jalapeño, deseeded and minced (adjust for spiciness) - 1 cup fresh cilantro, chopped - Juice of 2 limes - 1 teaspoon ground cumin - Salt and pepper to taste - 1 tablespoon olive oil - 1 yellow bell pepper, diced Each ingredient brings its own flavor to the salsa. Ripe tomatoes add sweetness and juiciness. Red onion offers a sharp bite. Garlic gives depth, while jalapeño adds heat. Fresh cilantro gives a bright finish. Lime juice brings freshness and acidity. Ground cumin adds warmth. Salt and pepper enhance all the flavors. Olive oil adds richness, and yellow bell pepper provides sweetness and crunch. If you can’t find fresh ingredients, use canned tomatoes. They work well in a pinch. You can also swap red onion for green onion for a milder taste. If you want more heat, try adding a serrano pepper instead of jalapeño. For a twist, consider adding diced mango or pineapple for a sweet touch. When you chop or dice, keep your knife skills in mind. For tomatoes, remove the core first. Cut them into quarters, then dice. For onion, slice it in half, then chop finely. When dicing jalapeños, use gloves to protect your hands. Always remove the seeds for less heat. A sharp knife makes all the difference in achieving uniform pieces. This ensures the salsa has a nice texture. To make the best homemade salsa, start by preparing your ingredients. Chop each one carefully to keep the flavors fresh. Here are some tips for dicing and chopping: - Tomatoes: Use a sharp knife. Cut the tomatoes in half, scoop out the seeds, and dice the flesh. - Onion: Cut off the ends, peel, and slice. Then, chop into tiny pieces. - Garlic: Smash the cloves with the knife for easy peeling. Then, mince finely. - Jalapeño: Cut in half, remove the seeds, and dice. Adjust the amount based on your spice level. - Cilantro: Rinse it well. Chop the leaves and tender stems for more flavor. Tools you need for preparation include: - A sharp chef's knife - A cutting board - A mixing bowl - Measuring spoons After preparing the ingredients, it’s time to mix them. Start by adding the diced tomatoes, yellow bell pepper, and red onion into a medium bowl. Next, add the minced garlic and jalapeño. Stir gently to combine each ingredient well. Then, fold in the chopped cilantro. Pour in the lime juice, ground cumin, and olive oil. Finally, season with salt and pepper to taste. Stir everything until well mixed. This step ensures each bite bursts with flavor. Chilling your salsa makes a big difference. It allows the flavors to meld together. This step is vital for a tasty result. Cover your bowl with plastic wrap and place it in the fridge. Let the salsa chill for at least 30 minutes. Timing matters here. If you can wait longer, even better! A few hours will deepen the flavors more. Enjoy your salsa with chips or on your favorite dishes. For the complete recipe, check the [Full Recipe]. To adjust the spiciness of your salsa, taste as you go. If you want more heat, add minced jalapeño. For less heat, use less jalapeño or remove the seeds. To balance acidity, squeeze more lime juice into the mix. This adds brightness. Season your salsa well. Salt enhances the flavors, bringing everything together. The best pairings for homemade salsa include crispy tortilla chips, grilled chicken, or fish tacos. You can also use salsa as a topping for nachos or tacos. For a creative twist, serve it over a fresh salad or as a dip for veggies. Try mixing it with cream cheese for a tasty spread. When plating your salsa, use a colorful bowl to make it pop. A bright dish catches the eye. Garnish with cilantro leaves and lime wedges for added flair. This not only looks great but also adds freshness. To impress guests, serve salsa with a side of crispy tortilla chips arranged neatly on a platter. {{image_2}} You can easily change your salsa with fun swaps. For a tropical twist, add mango or pineapple. These fruits bring sweetness and bright color. They balance the heat from the jalapeño. Just chop them finely and mix them in. If you want a smoky flavor, try chipotle peppers. These peppers add depth and a nice kick. Use them carefully, as they can be spicy. You can find them dried or canned. Just chop them and stir them into your salsa. Some people love chunky salsa, while others prefer it smooth. To make it chunky, simply chop your veggies into larger pieces. This gives you a fresh crunch. For a smooth salsa, blend everything until it’s creamy. A food processor works best for this. Adjust the texture to fit your taste. Feel free to mix in other veggies or fruits. Seasonal ingredients can really boost your salsa. In summer, try fresh corn or zucchini. In fall, add roasted red peppers or even pumpkin. Each season brings new flavors to explore. Just dice and mix them in, and enjoy your creation. For more ideas, check out the Full Recipe. To store your homemade salsa in the fridge, place it in an airtight container. This keeps out air and moisture. Make sure the lid closes tightly. Salsa can stay fresh in the fridge for about 3 to 5 days. Always use a clean spoon to scoop out salsa. This helps prevent bacteria from growing. If you want to keep salsa longer, freezing is a great option. Use a freezer-safe container or a heavy-duty freezer bag. Leave some space at the top for expansion. Salsa can last up to 6 months in the freezer. When you're ready to eat, thaw it in the fridge overnight. Homemade salsa lasts about 3 to 5 days in the fridge. If you see any mold or smell something off, throw it away. Always check before eating. For the best taste, enjoy it fresh. The flavors are at their peak right after making it. Yes, you can can homemade salsa! To preserve salsa, follow these steps: - Choose fresh ingredients: Use ripe tomatoes, crisp peppers, and fresh herbs. - Cook the salsa: Heat the salsa mixture in a pot before canning. This helps kill bacteria. - Use clean jars: Sterilize your jars and lids to prevent spoilage. - Seal properly: Fill jars while hot, leaving some space at the top. Seal tightly. - Process in a water bath: Boil the jars for 15-20 minutes to ensure a good seal. Make sure to check the seals after cooling. Properly canned salsa can last for up to a year in a cool, dark place. If you lack fresh cilantro, don't worry. Here are some great substitutes: - Parsley: This herb has a fresh taste and works well in salsa. - Basil: Adds a sweet, fragrant note that can change the flavor profile. - Mint: Provides a refreshing twist that pairs nicely with tomatoes. - Dill: Has a unique flavor that can give your salsa a new spin. Feel free to experiment with these herbs. Each will give your salsa a different taste. Making salsa less spicy is easy. Try these tips: - Remove seeds and membranes: For jalapeños, these parts hold most of the heat. - Add more tomatoes: Increase the amount of tomatoes to dilute the spiciness. - Incorporate sugar: A little sugar can balance out the heat. - Use mild peppers: Swap jalapeños for bell peppers for a sweeter, milder taste. Adjust the spice level to your liking, and enjoy your salsa! You now have all the tools to make great salsa. Start with fresh ingredients, like ripe tomatoes and garlic. Use the tips to chop and mix well for the best flavor. Consider chilled salsa for enhanced taste. Remember to adjust spice and acidity to your liking. You can also explore fun variations with fruits and vegetables. Proper storage helps keep your salsa fresh. Try these ideas, and create delicious salsa that impresses everyone. Enjoy your tasty creation!](https://toastedrecipes.com/wp-content/uploads/2025/07/ac8274a9-650f-4261-b8bf-e0b2520f93cb.webp)
Best Homemade Salsa Ever Simple and Flavorful Recipe
Are you ready to spice up your meals? This simple and flavorful recipe for the best homemade salsa ever will have your taste buds dancing!

Rice Patties Flavorful and Easy Recipe Guide
If you’re on the hunt for a delicious, easy-to-make dish, rice patties are your answer. In this guide, I’ll show you how to whip up

Hatch Chile Queso Bold and Creamy Dip Recipe
Get ready to elevate your snack game with my bold and creamy Hatch Chile Queso! This dip is rich, cheesy, and packed with the smoky
![To make these tasty broccoli cheese pinwheels, you need: - 1 cup fresh broccoli florets, chopped - 1 cup shredded cheddar cheese - 1/2 cup cream cheese, softened - 1/4 cup grated Parmesan cheese - 1 tsp garlic powder - Salt and pepper to taste - 1 large tortilla wrap (whole wheat or regular) - 1/2 cup shredded carrots (optional) - Olive oil (for brushing) You can switch up the ingredients to suit your taste. Use any cheese you love, like mozzarella or pepper jack. If you want a healthier option, try using a whole wheat tortilla or a gluten-free one. You can also add other veggies, like spinach or bell peppers. For extra flavor, toss in some herbs or spices. When picking broccoli, look for bright green florets with no yellowing. The stems should feel firm. For cheese, choose blocks over pre-shredded, as they melt better. Check the expiration date on cream cheese. Fresh ingredients make a big difference in taste. Always select the best for your pinwheels. First, gather all your ingredients. You need fresh broccoli, cheddar cheese, cream cheese, Parmesan cheese, garlic powder, and a tortilla wrap. This recipe takes about 30 minutes from start to finish. You will have a tasty snack ready in no time. 1. Preheat the Oven: Set your oven to 375°F (190°C). This step is key for even cooking. 2. Steam the Broccoli: Place the chopped broccoli in a steaming pot. Steam it for 3-4 minutes. It should turn bright green and be tender. After steaming, let it cool for a few minutes. 3. Mix the Cheese: In a bowl, combine softened cream cheese, shredded cheddar, grated Parmesan, garlic powder, salt, and pepper. Mix until it’s all smooth. 4. Combine Ingredients: Add the cooled broccoli to the cheese mixture. If you want more color and crunch, add shredded carrots. Mix until everything is well-coated. 5. Prepare the Tortilla: Lay the tortilla flat on a clean surface. Spread the broccoli cheese mixture evenly over the tortilla. 6. Roll It Up: Start from one end and roll the tortilla tightly. Make sure the filling stays inside as you roll. 7. Slice the Pinwheels: Cut the rolled tortilla into 1-inch thick slices. You should get about 12-15 pinwheels. 1. Arrange on Baking Sheet: Place the pinwheels on a lined baking sheet. 2. Brush with Olive Oil: Lightly brush the tops of the pinwheels with olive oil. This helps them crisp up. 3. Bake: Put the baking sheet in the preheated oven. Bake for 10-12 minutes. The cheese should melt and the edges should turn golden. 4. Cool and Serve: Take the pinwheels out of the oven. Let them cool for a couple of minutes. Serve warm for the best taste. For the full recipe, you can refer to our earlier section to ensure all steps are clear. Enjoy your delicious broccoli cheese pinwheels! To make the best broccoli cheese pinwheels, start with fresh ingredients. The broccoli should be bright green and crisp. Chop it finely to mix well with the cheeses. Use softened cream cheese for easy spreading. This is key for a smooth texture. Spread the cheese mixture evenly on the tortilla. Roll it tightly but gently. This keeps the filling inside and helps with slicing. A sharp knife works best for cutting the pinwheels. Aim for 1-inch slices for a good bite size. One mistake is overcooking the broccoli. Steaming it for just 3-4 minutes keeps it bright and crunchy. Another error is using too much filling. If you overstuff, the pinwheels can fall apart. Also, avoid using cold cream cheese. Always let it soften first. Lastly, don’t skip brushing olive oil on top. This helps the pinwheels brown nicely in the oven. For a great look, serve the pinwheels on a large platter. Add a sprinkle of extra Parmesan cheese on top for flair. Fresh broccoli florets can add color and freshness. You can even arrange them like a flower. This makes your dish pop and look inviting. For extra fun, serve with a colorful dip on the side. This makes it more appealing and interactive for your guests. Enjoy creating your masterpiece! {{image_2}} You can change up your broccoli cheese pinwheels with fun add-ins. Try adding cooked bacon for a smoky flavor. You can also mix in sun-dried tomatoes for a pop of color and taste. For a spicy kick, add some diced jalapeños. If you want extra veggies, consider spinach or bell peppers. These small changes can make a big difference in taste. Don't be afraid to experiment! If you need gluten-free pinwheels, use a gluten-free tortilla. For a vegan version, swap out the cheese for vegan cheese. You can also use a nut-based cream cheese. This way, everyone can enjoy these tasty snacks. Adjusting the recipe helps make it fit your needs while keeping the flavor strong. Serve your pinwheels warm or cold. They taste great either way! Arrange them on a platter for a fun party snack. Pair them with your favorite dips, like ranch or salsa. You can also serve them with a fresh salad for a light meal. Don’t forget to garnish with extra cheese or broccoli florets for a nice touch. For the full recipe, check out the details above! To keep your broccoli cheese pinwheels fresh, store them in an airtight container. Place a paper towel inside the container to absorb moisture and keep the pinwheels crisp. They can last in the fridge for up to three days. If you want to enjoy them later, it’s best to freeze them. To freeze the pinwheels, first, slice them and place them on a baking sheet. Make sure they are not touching. Freeze them for about one hour until solid. Then, transfer them to a freezer bag or container. This method helps keep their shape. You can freeze them for up to three months. When you're ready to eat the pinwheels, preheat your oven to 350°F (175°C). Place the pinwheels on a baking sheet and cover them loosely with foil. Heat them for about 10-15 minutes. This helps them warm through without drying out. You can also microwave them for a quick option, but they may lose some crispness. Enjoy your tasty snack! If you want the full recipe for these delicious pinwheels, check out the [Full Recipe]. Broccoli cheese pinwheels last about 3 to 4 days in the fridge. Keep them in an airtight container. This helps keep them fresh and tasty. If you notice any changes in smell or texture, it's best to toss them. Yes, you can make these pinwheels ahead of time. Prepare them a day before serving. Just wrap them tightly and place them in the fridge. When you're ready, bake them for a quick snack. Absolutely! You can use many types of cheese. Try mozzarella for a milder taste or pepper jack for some heat. Mixing cheeses can add fun flavors to your pinwheels. Great dips include ranch, sour cream, or even a spicy salsa. You can also try a creamy garlic dip for a rich flavor. These dips complement the cheesy taste well and make snacking even better. This article covered everything you need for broccoli cheese pinwheels. We discussed key ingredients, cooking steps, tips, and variations. You learned how to avoid common pitfalls and make your pinwheels shine. Remember to store any leftovers properly for later enjoyment. Experiment with flavors and adaptations to suit your taste. With these insights, you can create tasty pinwheels that impress everyone at your next gathering. Happy cooking!](https://toastedrecipes.com/wp-content/uploads/2025/07/021e23ee-904e-41fe-bb84-1f1117c07a01.webp)
Broccoli Cheese Pinwheels Tasty and Easy Snack Recipe
Are you ready to try a fun, tasty snack? Broccoli Cheese Pinwheels are super easy to make and perfect for any time. With fresh broccoli

Deep Dish Mini Pizzas Tasty and Fun Snack Ideas
Craving a tasty snack that’s both fun and easy to make? Let’s dive into the world of Deep Dish Mini Pizzas! These bite-sized delights pack
![- 1 cup pumpkin puree - 4 oz feta cheese, crumbled - 1/2 cup cream cheese, softened - 2 tablespoons Greek yogurt The main ingredients create the base of the dip. Pumpkin puree gives it a nice creamy texture. Feta cheese adds a salty flavor that balances the sweet pumpkin. Cream cheese makes the dip rich and smooth. Greek yogurt adds a tangy taste, which brightens the mix. - 1 tablespoon olive oil - 1 teaspoon garlic powder - 1 teaspoon smoked paprika - 1/2 teaspoon salt - 1/4 teaspoon black pepper - Optional: toasted pumpkin seeds, fresh parsley Seasonings are key to making this dip pop. Olive oil adds richness and helps the flavors blend. Garlic powder gives a nice savory note. Smoked paprika adds warmth and a hint of smokiness. Salt and black pepper enhance all the flavors. To make it extra special, add toasted pumpkin seeds and chopped parsley. They give a nice crunch and fresh look. For the full recipe, you can check the original source. To make the pumpkin whipped feta dip, start by combining the base ingredients. In a medium mixing bowl, add the pumpkin puree, crumbled feta cheese, softened cream cheese, and Greek yogurt. These ingredients create a smooth and flavorful base. Next, blend the mixture to achieve creaminess. You can use a hand mixer or a food processor. Blend until the mix is smooth and fluffy. This step is key for the perfect texture. Now it's time to adjust the seasoning for flavor. Drizzle in the olive oil, then add garlic powder, smoked paprika, salt, and black pepper. Blend again until everything is well mixed. Taste the dip and adjust the seasoning as needed. If you want a bolder taste, feel free to add more smoked paprika. Garnishing the dish makes it more appealing. Transfer the whipped feta dip to a serving bowl. Top it with toasted pumpkin seeds and chopped parsley. This adds extra texture and a pop of color. For pairing options, this dip is great with pita chips, fresh veggies, or crusty bread. Each option brings a different flavor and crunch that complements the creamy dip. Enjoy this treat at your next gathering or snack time. For the full recipe, check the [Full Recipe]. To make your dip smooth, use a food processor. This tool blends everything well. If you don’t have one, a hand mixer works too. Start with the cream cheese. Softened cream cheese is key for a creamy texture. Leave it out for 30 minutes before mixing. This small step makes a big difference. You can boost the flavor with spices. Try adding a pinch of cayenne for heat. A dash of cinnamon adds warmth too. Fresh herbs like thyme or chives can brighten up the dip. Just chop them finely before mixing. These small tweaks can elevate your pumpkin whipped feta dip to a new level. For the full recipe, check out the details above. {{image_2}} If you want to switch things up, there are great options. You can use goat cheese instead of feta. Goat cheese gives a tangy taste that pairs well with pumpkin. Creamy ricotta is another alternative for feta. It makes the dip light and fluffy. For a non-dairy option, try cashew cream. Blend soaked cashews with a bit of water. This will give you a smooth and creamy texture. You can also use tofu cream cheese for a dairy-free choice. It has a mild flavor and takes on the taste of other ingredients well. You can create sweet or savory versions of this dip. For a sweet twist, add maple syrup or honey. This makes a great spread for toast or bagels. You might also mix in cinnamon or nutmeg for warmth. For savory flavors, think about adding fresh herbs. Chopped thyme or rosemary can elevate the taste. You can also use chili flakes for a spicy kick. Seasonal adaptations are fun too! During the holidays, try adding cranberries for a festive touch. This adds color and a nice tartness. You can find the full recipe to get started on this tasty dip! To keep your Pumpkin Whipped Feta Dip fresh, store it in an airtight container. This helps to lock in the flavors and keep the dip creamy. Use glass or plastic containers with tight-fitting lids. Avoid using bowls that are not sealed well, as air can dry out the dip. In the fridge, this dip lasts about 5 days. Make sure to keep it cold and check for any signs of spoilage before serving. If you want to save it for later, you can freeze the dip too. Just place it in a freezer-safe container, leaving some space at the top for expansion. It can last up to 3 months in the freezer. When ready to use, thaw it overnight in the fridge. Re-blend it before serving to regain that smooth texture. Yes, you can make this dip ahead of time. Store it in the fridge. Put it in an airtight container. It will stay fresh for up to three days. The flavors will blend and taste even better. Just give it a good stir before serving. You have many options to serve with this dip. Here are some tasty ideas: - Pita chips - Fresh veggies like carrots and cucumbers - Crusty bread - Tortilla chips - Sliced apples or pears These pairings add crunch and freshness. You can also use it as a spread on sandwiches. Yes, fresh pumpkin can be used. First, cut the pumpkin into pieces. Remove the seeds and skin. Then, steam or roast the pieces until soft. After that, blend it until smooth. This process takes more time, but fresh pumpkin adds a nice flavor. This blog post covered how to make a delicious Pumpkin Whipped Feta Dip. We started with the key ingredients and flavors you'll need. Then, I walked you through simple steps for preparation. I shared tips for creaminess and flavor too. Lastly, we explored ways to store and enjoy your dip. I hope you feel excited to try this tasty recipe. It’s easy to make and share. You can adapt it to match your taste, ensuring everyone enjoys it. Happy dipping!](https://toastedrecipes.com/wp-content/uploads/2025/07/dceceee2-962b-4175-826d-6cf79c64cb2f.webp)
Pumpkin Whipped Feta Dip Creamy and Flavorful Treat
Looking for a delicious dip that screams comfort and flavor? Try my Pumpkin Whipped Feta Dip! This creamy treat combines pumpkin, feta, and just the
. The recipe has all the details you need, from ingredients to step-by-step instructions. Spicy Dilly Garlic Beans offer fresh flavors with simple steps. We covered essential ingredients and how to enhance them. Your green beans need proper prep for the best results. I shared tips to avoid common mistakes and ways to adjust spice levels for every taste. Use your creativity with different herbs or serving suggestions. You can store them long-term or enjoy them fresh. Dive into this tasty recipe and make it your own. Happy cooking!](https://toastedrecipes.com/wp-content/uploads/2025/07/8f9c1d28-2423-49ba-b4e8-21a23a4f7c68.webp)
Spicy Dilly Garlic Beans Quick and Tasty Recipe
Get ready to spice up your meals with my quick and tasty recipe for Spicy Dilly Garlic Beans! This dish packs a punch with fresh

Sushi Rolls Made Easy Refreshing and Tasty Recipe
Are you ready to impress family and friends with homemade sushi rolls? In Sushi Rolls Made Easy: Refreshing and Tasty Recipe, I’ll share simple steps
![- 1 lb fresh green beans - 3 tablespoons unsalted butter - 3 cloves garlic - 2 tablespoons honey - 1 tablespoon soy sauce - Salt and pepper to taste - Red pepper flakes (optional) - Chopped parsley for garnish The main ingredients for Garlic Honey Butter Green Beans are simple yet packed with flavor. Start with a pound of fresh green beans. They should be bright and firm for the best texture. Then, use three tablespoons of unsalted butter for a rich taste. To add that garlic kick, include three cloves of minced garlic. For the sweet and savory sauce, you’ll need two tablespoons of honey and one tablespoon of soy sauce. Adjust the salt and pepper to your liking. If you want a bit of heat, add red pepper flakes. Finally, finish with chopped parsley for a fresh touch. You can find the full recipe linked above for detailed steps. This dish is easy, quick, and perfect for any meal. - First, prepare the green beans by trimming their ends. - Next, blanch the green beans in boiling water for 3-4 minutes. Blanching makes the beans bright green and softens them just right. After blanching, drain the beans. Place them in a bowl of ice water to stop cooking. This keeps them crisp and vibrant. - In a large skillet, melt the butter over medium heat. - Sauté the minced garlic for 1-2 minutes until fragrant. Be careful not to brown the garlic. Brown garlic can taste bitter. After the garlic scents the air, stir in the honey and soy sauce. Mix well to create a smooth sauce. - Add the blanched green beans to the skillet. Toss them gently in the garlic honey butter sauce. Make sure every bean is coated well. This is where the flavor shines. Cook for an additional 2-3 minutes until the beans are heated through. - Season the green beans with salt, pepper, and red pepper flakes if you want a kick. - Finally, remove from heat and garnish with chopped fresh parsley before serving. These steps create a beautiful dish. The green beans shine with flavor and color. For the full recipe, check the details above. Enjoy your tasty side dish! How to achieve perfect blanching Blanching keeps green beans bright and crisp. Start with a big pot of boiling salted water. Add the green beans and cook for 3-4 minutes. This time makes them tender but still crunchy. Right after, plunge them into ice water. This stops the cooking and locks in the color. Ensuring the garlic doesn't burn Garlic adds flavor, but it can burn quickly. When you melt the butter, keep the heat on medium. Add minced garlic and stir it for 1-2 minutes. You want it fragrant, not brown. This way, the garlic gives a sweet taste without bitterness. Suggested spices to elevate flavor To boost the taste, think about adding spices. Try a pinch of cumin or a dash of smoked paprika. These spices add warmth and depth. Red pepper flakes can give a nice kick too. Just use them based on your heat preference. Alternative sweeteners to use instead of honey If you want to switch honey, use maple syrup or agave nectar. Both add sweetness and a unique flavor. Adjust the amount slightly, as these sweeteners can be sweeter than honey. Creative garnishes for presentation Garnishing makes your dish look fancy. Chopped fresh parsley adds color and freshness. You could also use toasted nuts, like almonds or walnuts, for crunch. A sprinkle of sesame seeds can add a nice touch too. Pairing options with other dishes Garlic honey butter green beans pair well with many meals. They go great with grilled chicken or fish. Serve them alongside rice or quinoa for a complete dish. These green beans also complement pasta and roasted meats. {{image_2}} You can change the type of beans you use. Try snap peas or asparagus for a fun twist. These swaps add new flavors and textures. You can also use butter alternatives. Olive oil or coconut oil works great. These options can make the dish lighter or give it a unique taste. Want a tangy twist? Add some lemon juice or zest. This brightens the dish and balances the sweetness. You can also mix in nuts like almonds or walnuts. The crunch adds a nice contrast to the soft beans. These changes make your Garlic Honey Butter Green Beans even more exciting. Garlic Honey Butter Green Beans pair well with many dishes. They are perfect with grilled chicken or steak. You can also serve them with rice or quinoa. This creates a balanced meal with grains and protein. Try them at your next dinner party or family meal. They will impress your guests! For the complete recipe, check out the [Full Recipe]. To store leftovers, place the green beans in an airtight container. This keeps them fresh in the fridge. Make sure to cool them to room temperature first. You can enjoy them within three days. For reheating, use a skillet on low heat. Add a splash of water or butter to keep them moist. Stir occasionally until heated through. You can also microwave them for a quick option. Just cover the dish to trap steam and heat for one to two minutes. You can freeze Garlic Honey Butter Green Beans for longer storage. First, blanch the green beans as you do in the recipe. After cooling in ice water, drain them well. Spread the beans on a baking sheet and freeze them for about an hour. Once frozen, transfer them to a freezer-safe bag. This prevents clumping. When ready to use, you can thaw the beans overnight in the fridge. For a quicker method, add frozen beans straight to your skillet. Just adjust the cooking time. Heat until they are hot and tender. In the fridge, these green beans last around three to four days. Keep an eye out for any changes. If the beans look dull or slimy, it’s time to toss them out. Also, if they smell off or sour, don’t eat them. Trust your senses; they help keep you safe! Green beans are packed with nutrients. They are low in calories and high in fiber. A one-cup serving has about 44 calories. They also contain vitamins A, C, and K. These vitamins support your immune system and help with bone health. The garlic in this recipe adds more health perks. Garlic can boost your immune system and lower blood pressure. Honey offers natural sweetness and antioxidants. Together, these ingredients create a dish that is not only tasty but good for you. Yes, you can make this dish vegan with some easy swaps. Instead of butter, use vegan butter or olive oil. For honey, try agave syrup or maple syrup. These substitutes keep the flavor great and make the dish plant-based. Using these vegan ingredients may change the taste slightly. However, the dish will still be rich and tasty. You can enjoy this delightful side dish without animal products. If you love heat, there are many ways to spice it up. You can add more red pepper flakes to the dish. Start with half a teaspoon and adjust to your liking. Another option is to mix in sliced jalapeños or crushed red pepper. These will add a nice kick. You can also use a dash of hot sauce for an extra layer of flavor. Enjoy your spicy Garlic Honey Butter Green Beans! In this post, we covered how to make Garlic Honey Butter Green Beans. We explored key ingredients, detailed cooking steps, and offered tips for flavor and storage. You learned about variations and how to make the dish your own. With simple steps and fresh ingredients, this side dish can elevate any meal. Try it out and enjoy the rich flavors! Your taste buds will thank you for this easy, delicious recipe.](https://toastedrecipes.com/wp-content/uploads/2025/07/f57230b6-ad12-450e-9bf7-d9b276287f25.webp)
Garlic Honey Butter Green Beans Tasty Side Dish
Looking for a side dish that’s both simple and delicious? Try these Garlic Honey Butter Green Beans! They bring vibrant flavor and bright color to
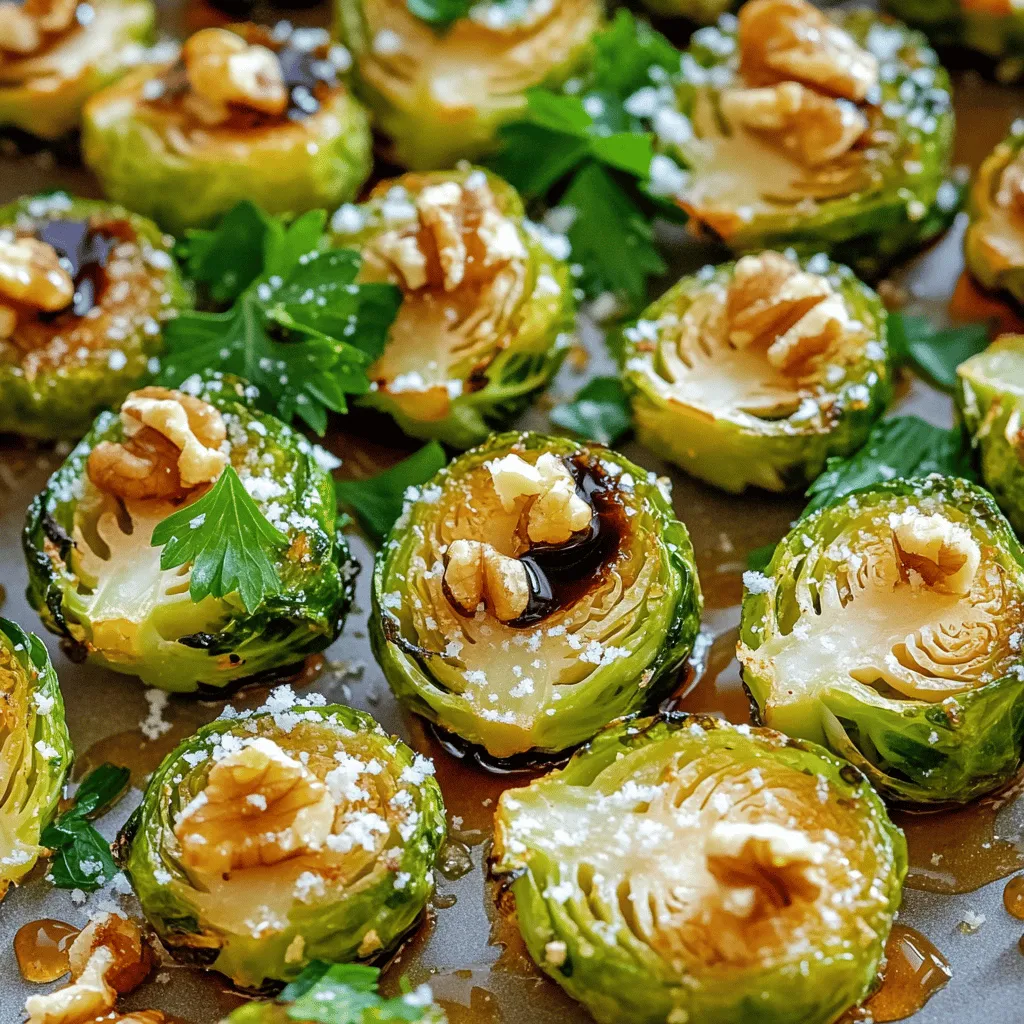
Crispy Brussels Sprouts with Balsamic Glaze Delight
Crispy Brussels sprouts with balsamic glaze are a game-changer for your meals. They’re easy to make and bursting with flavor! I’ll share my step-by-step guide