Appetizers

- 8 oz cream cheese, softened - 1 cup crab meat (preferably sweet, lump crab) - 2 green onions, finely chopped - 1 tablespoon soy sauce - 1 teaspoon garlic powder - 1 teaspoon ginger powder - 1 teaspoon sesame oil - 1 package of wonton wrappers - Vegetable oil for frying - Sweet and sour sauce for dipping (optional) To make the Ultimate Crab Rangoon, I focus on fresh and high-quality ingredients. The cream cheese gives a rich base. I love using sweet lump crab, as it adds a delightful texture and taste. Green onions add a hint of freshness, while soy sauce, garlic powder, ginger powder, and sesame oil enhance the flavor profile. For the wrapping, wonton wrappers are light and crispy. They create the perfect shell around the creamy filling. I recommend using vegetable oil for frying. It has a high smoke point, which helps the rangoons fry evenly. Sweet and sour sauce is a nice touch for dipping. It balances the richness of the rangoon beautifully. For the full recipe, you can check the detailed steps to create this tasty dish. To make the filling, start with a mixing bowl. Add 8 oz of softened cream cheese and 1 cup of crab meat. I suggest using sweet, lump crab for the best taste. Then, add 2 finely chopped green onions, 1 tablespoon of soy sauce, 1 teaspoon of garlic powder, 1 teaspoon of ginger powder, and 1 teaspoon of sesame oil. Mix everything until it’s creamy and well blended. This combination creates a rich and flavorful filling. Next, lay out the wonton wrappers on a clean surface. Place about a teaspoon of the crab mixture in the center of each wrapper. It’s important to seal the wrappers properly. Wet the edges of each wrapper with a little water. Then, fold the wrapper in half to make a triangle. Press down to seal it tightly. Bring the two corners of the triangle together and pinch to secure. This classic shape keeps the filling inside during frying. Now it’s time to cook! Heat vegetable oil in a deep frying pan or pot over medium heat. The oil should reach about 350°F (175°C). Make sure there is enough oil to submerge the rangoons. Carefully drop the prepared crab rangoons into the hot oil in batches. Don’t overcrowd the pan. Fry for about 3-4 minutes until they turn golden brown and crispy. Use a slotted spoon to remove the rangoons and let them drain on paper towels. Enjoy your Ultimate Crab Rangoon with sweet and sour sauce or your favorite dip! For the complete guide, refer to the Full Recipe. To avoid leaks, you need to seal your rangoons tightly. First, wet the edges of the wonton wrapper. This helps the dough stick together. Fold the wrapper to form a triangle. Press the edges firmly. Then, bring the two corners together and pinch them. Make sure there are no gaps. If you have gaps, the filling can escape while frying. Getting the oil temperature right is key to perfect rangoons. Heat the oil to about 350°F (175°C). Use a thermometer to check. If the oil is too cold, the rangoons absorb too much oil. This makes them greasy. If it's too hot, they can burn quickly. Fry in small batches to keep the temperature steady. This way, you ensure even cooking. For extra crunch, use a few simple tricks. First, make sure your oil is hot enough. Next, try adding a bit of cornstarch to the crab mixture. This gives the filling a nice texture. Finally, avoid overcrowding the pan. This helps each rangoon get the right amount of heat. Fry until golden brown, about 3-4 minutes, for that perfect crispy bite. {{image_2}} You can get creative with your crab rangoon filling. Try adding shrimp for a seafood twist. Just chop the shrimp finely and mix it into the filling. If you love cheese, cream cheese can pair well with mozzarella or cheddar. These add-ins give new flavors that make each bite special. If you prefer a lighter option, baking is a great choice. Preheat your oven to 375°F (190°C). Place the filled wontons on a baking sheet. Brush them lightly with oil to help them crisp up. Bake for about 15-20 minutes until they are golden brown. This way, you enjoy the same great taste with less oil. Pair your crab rangoons with various dipping sauces. Sweet and sour sauce is a classic choice. You might also enjoy a spicy chili sauce or soy sauce mixed with a bit of vinegar. These sauces bring out the flavors of the rangoon. You can serve them with crunchy veggies or a fresh salad for a fun meal. To store leftover rangoons, let them cool down first. Place them in an airtight container. You can keep them in the fridge for up to three days. If you want, you can also wrap them in plastic wrap before putting them in the container. This extra step helps keep them fresh. If you want to freeze uncooked rangoons, lay them out on a baking sheet. Make sure they don’t touch each other. Freeze them for an hour, then move them to a freezer bag. This way, you can easily grab a few later. For cooked rangoons, let them cool before putting them in a freezer-safe container. They can stay in the freezer for up to a month. To reheat rangoons, the oven works best. Preheat it to 375°F (190°C). Place the rangoons on a baking sheet and heat for about 10-15 minutes. This helps keep them crispy. You can also use an air fryer. Heat them at 350°F (175°C) for about 5 minutes. Avoid using the microwave, as it will make them soggy. Enjoy your delicious crab rangoons! Crab Rangoon is a tasty treat that has roots in American Chinese cuisine. It likely started in the mid-20th century. Many think it came from restaurants in San Francisco. The dish blends cream cheese and crab in a crispy wrapper. It became popular in the U.S., especially as a party snack or appetizer. Yes, you can! If you want a crab-free version, try using shrimp or imitation crab. You can also use cream cheese with herbs and spices for a rich flavor. Another great option is to mix in some sautéed mushrooms for a savory bite. To boost flavor, add more spices to the filling. A pinch of cayenne pepper adds heat. You can also mix in fresh herbs like cilantro or basil. Another idea is to use flavored soy sauce or add a splash of lemon juice. This will wake up the taste of your rangoon. Sweet and sour sauce is a classic choice. It balances the creamy filling well. You can also try a spicy chili sauce for a kick. Another option is a soy sauce blend mixed with sesame oil. Each sauce brings out the flavors of the rangoon in a unique way. Making Ultimate Crab Rangoon takes about 30 minutes. You will spend 20 minutes preparing the filling and wrapping the rangoons. Frying them takes an additional 3-4 minutes. This dish is quick and rewarding, perfect for any gathering. This blog post has taken you through the delicious journey of making Crab Rangoon. You learned the key ingredients, from cream cheese to crab meat, and the tips for perfect frying and sealing. Variations let you customize your dish, while storage tips keep rangoons fresh. In my experience, these steps lead to a delightful treat loved by many. Whether you fry or bake, your Crab Rangoon will surely impress! Enjoy your cooking and the tasty results!
Ultimate Crab Rangoon Irresistible Flavor Delight
Crab Rangoon is a crowd-pleaser, and today, I’ll share my Ultimate Crab Rangoon recipe! You’ll learn how to combine creamy cheese with sweet crab meat
- 2 medium sweet potatoes, sliced into 1/2-inch rounds - 8 oz cream cheese, softened - 2 tablespoons fresh herbs (chives, dill, or parsley) These simple ingredients make a delightful dish. Sweet potatoes bring a natural sweetness and a bright color. Cream cheese adds a rich and creamy layer. Fresh herbs give a burst of flavor and freshness. When choosing sweet potatoes, look for firm ones. They should have smooth skin without any blemishes. For cream cheese, pick a brand you trust. The herbs should be fresh, as they elevate the taste. You can mix and match your herbs based on what you have. Chives offer a mild onion taste, while dill brings a light, grassy note. This combination is easy to prepare and looks great on a plate. You can impress your guests without spending hours in the kitchen. Check out the Full Recipe for more details! - Preheat your oven to 400°F (200°C). - Line a baking sheet with parchment paper. - Arrange the sweet potato slices on the sheet. Season with salt and pepper. Baking at this temperature helps the sweet potatoes become crispy on the outside. The parchment paper prevents sticking and makes cleanup easy. - Mix the softened cream cheese with the chopped herbs. - Ensure a smooth and well-combined texture. Using fresh herbs gives the cream cheese a bright flavor. You can choose any herbs you like, such as chives, dill, or parsley. Make sure it is well-mixed for a great taste in every bite. - Bake the sweet potatoes for 25-30 minutes until golden and tender. - Remove from the oven and let cool slightly. - Top each sweet potato round with a generous dollop of the herbed cream cheese. This step combines warm, crispy sweet potatoes with creamy, flavorful cheese. It creates a perfect bite for your guests. For the full recipe, check out the details provided. - Serve on a stylish platter. This adds a nice touch to your table. - Garnish with extra herbs for color. Fresh herbs make your dish pop. - Pair with a dipping sauce. A tangy sauce can enhance the flavor. - Offer alongside other appetizers. This creates a fun tasting experience. - Overbaking sweet potatoes. Keep an eye on them to stay tender. - Using cold cream cheese. Let it soften for a smooth topping. {{image_2}} When it comes to making your appetizers shine, variations can elevate your dish. Here are some fun ideas to try. You can switch up the toppings for a new taste. - Try different cheeses: Cream cheese works well, but goat cheese or feta can add a tangy kick. - Add spicy elements like jalapeños: For those who love heat, a slice of jalapeño can spice things up. These toppings can transform your sweet potato bites into something special. Sometimes, you may want to change the base ingredients. Here are some easy swaps. - Use different root vegetables: Instead of sweet potatoes, try using beets or parsnips. They bring their own unique flavors and colors. - Experiment with flavored cream cheese: Try adding herbs or spices to your cream cheese. A garlic or chipotle cream cheese can give a new twist. These substitutions keep your appetizer fresh and exciting. Enjoy discovering new combinations! For the full recipe, check out the details above! After you make these tasty bites, let them cool completely. Place them in a sealed container in your fridge. They taste best when eaten within 2 days. Storing them right keeps the sweet potatoes soft and the cream cheese fresh. To reheat your appetizers, use the oven. Set it to 350°F (175°C) and bake for about 10 minutes. This method helps keep them crispy. If you are short on time, you can use a microwave. Heat them in short bursts, around 15 to 20 seconds, until warm. Just be careful not to overheat them. Enjoy your crispy sweet potato bites again! Yes, you can prep the ingredients ahead of time. Slice the sweet potatoes and mix the cream cheese with herbs. Store them in separate containers in the fridge. This saves time on the day of your gathering. Pair them with wine or cocktails for a classy touch. A crisp white wine matches well with the cream cheese. If you prefer cocktails, try a light spritzer or a gin and tonic. Both options enhance the flavors and make your gathering feel special. This recipe serves 4-6 people. It’s perfect for small gatherings or as a starter. If you need more, feel free to double the recipe. Everyone will enjoy these bites. Not recommended for best texture; best eaten fresh. Freezing can make sweet potatoes mushy. They taste best when warm and crispy, right after baking. Enjoy them fresh for the best experience. This blog outlined a tasty sweet potato dish topped with herbed cream cheese. You learned simple steps to prepare, bake, and assemble the appetizers. I also shared tips for presentation, serving, and common mistakes to avoid. Remember, experimenting with toppings can make this dish even better. Enjoy making these easy appetizers that impress your guests. They’ll love the flavors and presentation, making it a win for any gathering. Keep these ideas in mind, and have fun in the kitchen!
3-Ingredient Elegant Appetizers for Gatherings
Hosting a gathering? Impress your guests with delightful 3-ingredient elegant appetizers. With simple ingredients, you can create tasty bites that look gourmet! I’ll guide you
To make these tasty cruffins, you need a few key ingredients: - 2 cups all-purpose flour - 1/2 cup cold unsalted butter, cubed - 1/4 cup grated Parmesan cheese - 1 cup shredded mozzarella cheese - 1 tsp garlic powder - 1 tsp dried oregano - 1/2 tsp salt - 1/2 cup warm water - 1 tsp instant yeast - 1 tbsp sugar - 1/4 cup fresh parsley, chopped (for garnish) These ingredients work together to create a soft, cheesy, and flavorful treat. The combination of mozzarella and Parmesan gives a rich, savory taste. Garlic powder and oregano add an aromatic touch, making each bite exciting. While the cruffins are delicious on their own, you can add some fun garnishes: - Extra grated cheese on top - Fresh herbs like basil or chives - Marinara or garlic sauce for dipping These garnishes enhance the flavor and make your cruffins look even more appealing. If you have dietary needs, there are simple swaps to try: - Use gluten-free flour for a gluten-free option. - Substitute vegan butter for a dairy-free version. - Replace cheese with a plant-based alternative. These substitutions keep the spirit of the dish while accommodating different diets. Each option can still provide a tasty and enjoyable experience. You can find the Full Recipe above to guide you through making these amazing Garlic Cheesy Cruffins! First, grab a small bowl. Combine warm water, sugar, and instant yeast. Stir gently with a spoon. Let this sit for 5-10 minutes. You want it to get frothy on top. This shows the yeast is ready to work its magic. In a large mixing bowl, whisk together the flour, garlic powder, oregano, and salt. Make sure everything is mixed well. Once your yeast mixture is frothy, slowly add it to the dry mix. Stir until a dough forms. Now, put some flour on a clean surface and knead the dough for about 5 minutes. You want it to be smooth and soft. Roll your dough into a rectangle, about 1/4 inch thick. Take your cold butter and spread it evenly over the dough. Next, sprinkle the grated Parmesan and shredded mozzarella cheese on top of the butter. Starting from the long side, carefully roll the dough into a tight log. Slice the log into 1-inch thick rounds. Place the rounds in a greased muffin tin, standing them upright. Cover with a kitchen towel and let them rise in a warm spot for 30 minutes. For the full recipe, check the earlier section. This will ensure each step is clear and easy to follow. To make great cruffins, your dough needs to feel just right. It should be soft, not sticky. If it's too wet, add a little more flour. If it's too dry, add a tiny bit of water. Knead it gently until it feels smooth. This will help you create those lovely layers later on. For that perfect golden color, preheat your oven well. I love baking my cruffins at 375°F (190°C). Keep an eye on them while they bake. They need around 20-25 minutes. If they brown too fast, cover them with foil. This keeps them from burning while they finish cooking. Flaky layers come from the butter. Make sure your butter is cold and cubed. When you roll the dough, be gentle. This helps keep the butter pieces intact. When baking, the butter melts and creates steam. This steam puffs up the layers, giving you that great flakiness. It's all about the right touch! {{image_2}} You can switch up the cheese in your cruffins. Try using sharp cheddar for a tangy kick. Cream cheese offers a rich, creamy texture inside. Blue cheese adds a bold flavor that pairs well with garlic. Mixing different cheeses can create fun flavor layers. Herbs and spices can change the taste of your cruffins. Add fresh thyme or rosemary for an earthy touch. A pinch of red pepper flakes gives a nice heat. You can also try adding some smoked paprika for a unique twist. Mixing in these flavors makes your cruffins extra special. If you want a sweet treat, you can make sweet cruffins too! Swap out garlic and cheese for cinnamon and sugar. Add chocolate chips or fruit for sweetness. Try using a cream cheese filling for a dessert-style cruffin. Sweet cruffins are perfect for breakfast or a snack! For more details on making these delicious cruffins, check the Full Recipe. To keep your leftover cruffins fresh, let them cool completely. Place them in an airtight container. You can store them at room temperature for up to two days. For longer storage, refrigerate them for up to five days. Make sure to separate layers with parchment paper to prevent sticking. This way, you can enjoy these tasty treats later without losing their flavor. When it’s time to enjoy your cruffins again, reheating is key. The best way is to use an oven. Preheat your oven to 350°F (175°C). Place the cruffins on a baking sheet and heat for about 10 minutes. This method helps restore their flaky texture. If you’re in a hurry, you can use a microwave. Heat each cruffin for about 20-30 seconds. However, be careful not to overheat them, as they may get soggy. If you want to save cruffins for a later date, freezing is a great option. Wrap each cruffin tightly in plastic wrap. Then, place them in a freezer-safe bag or container. They can last in the freezer for up to three months. When you’re ready to eat, thaw them in the fridge overnight. Then, reheat using the oven method for best results. This way, you can always have a warm, cheesy treat on hand! A cruffin is a mix of a croissant and a muffin. It has flaky layers, like a croissant, but is shaped like a muffin. This unique treat is perfect for breakfast or a snack. You get the best of both worlds with every bite. Yes, you can make Garlic Cheesy Cruffins ahead of time. Prepare the dough and shape it. Then, cover the muffin tin and store it in the fridge overnight. This way, you can bake them fresh in the morning. Your cruffins are done baking when they turn a golden brown color. You can also check by tapping the top gently. If it sounds hollow, it is ready. A toothpick inserted in the center should come out clean. Garlic Cheesy Cruffins are great for many occasions. They work well for brunch with friends, holiday gatherings, or a cozy family dinner. Serve them as a side dish or a fun snack. They add a tasty twist to any meal. You can find the full recipe for Garlic Cheesy Cruffins in the previous sections. It’s easy to follow and makes a delightful treat that you will love. You now know how to make Garlic Cheesy Cruffins, starting with key ingredients and step-by-step methods. I shared tips for perfect dough and even variations to try. Remember, you can customize these treats with different cheeses and flavors. Store any extras properly so you can enjoy them later. These cruffins are great for any gathering or just a snack. Cooking is fun, and I hope you enjoy your cruffins!
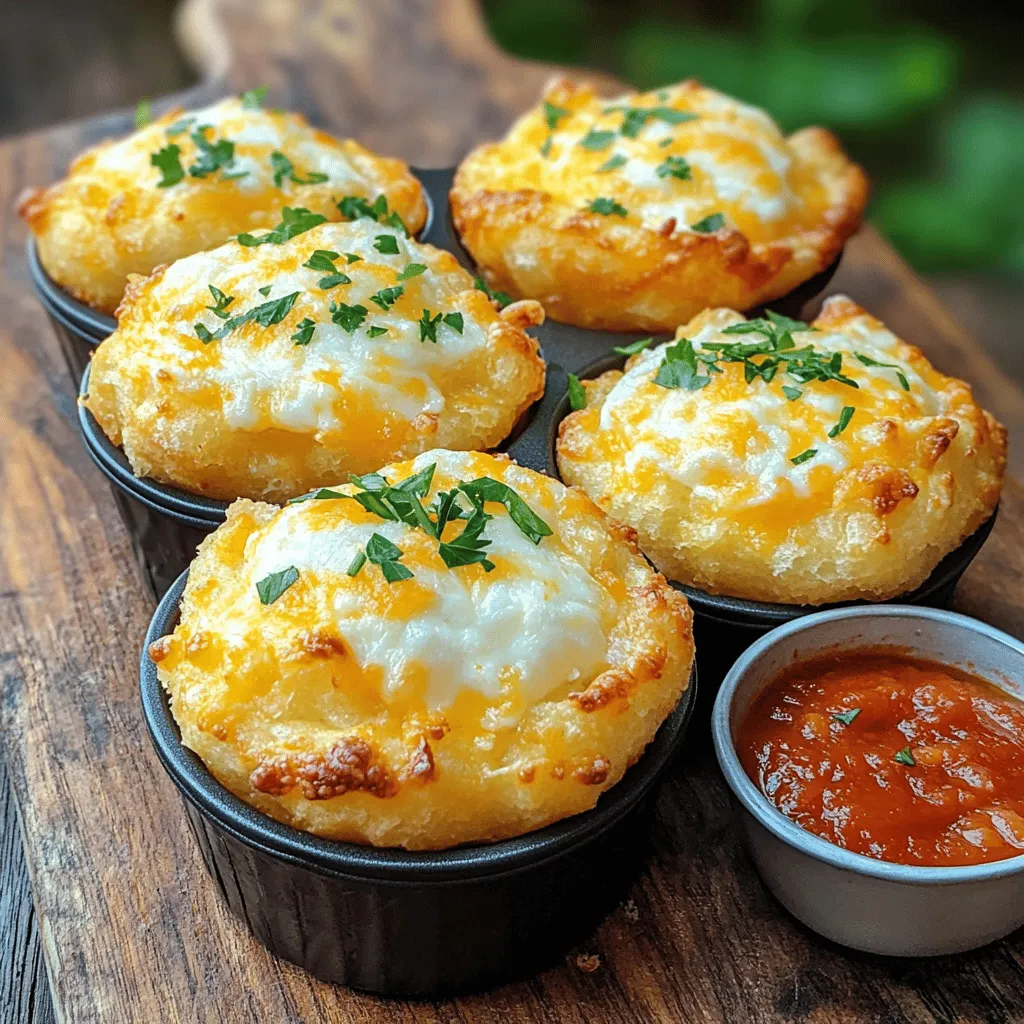
Garlic Cheesy Cruffins Flavorful and Easy Delight
Get ready to elevate your snack game with Garlic Cheesy Cruffins! These flaky, cheesy delights are packed with bold garlic flavor and are super easy
To make cheesy garlic breadsticks, you need these simple ingredients: - 2 cups all-purpose flour - 1 packet (2 1/4 tsp) instant yeast - 3/4 cup warm water (110°F/43°C) - 1/2 teaspoon sugar - 1 teaspoon salt - 2 tablespoons olive oil - 3 tablespoons unsalted butter, melted - 4 cloves garlic, minced - 1 cup shredded mozzarella cheese - 1/2 cup grated Parmesan cheese - 1 tablespoon dried oregano - Fresh parsley, chopped (for garnish) - Pinch of red pepper flakes (optional) Using good ingredients makes a big difference. Fresh garlic gives a strong flavor that sets these breadsticks apart. Good cheese melts well and creates that stretchy, gooey texture we all love. Quality flour helps the dough rise nicely. Always check expiration dates on yeast; you want it to be active for a great rise. For best results, choose high-quality olive oil and butter. They enhance flavor and aroma, making your breadsticks even tastier. You can swap some ingredients if needed. For a gluten-free option, use gluten-free flour. This may change the texture a bit but should still taste great. If you don’t have Parmesan cheese, try using Pecorino Romano or even nutritional yeast for a vegan twist. For a different flavor, add herbs like thyme or basil instead of oregano. You can also use garlic powder if you don’t have fresh garlic on hand. These tweaks can help you make the recipe work for your taste and pantry. First, we need to make the dough. In a small bowl, mix warm water, sugar, and yeast. Let it sit for about 5 minutes. You want it to look frothy. This shows the yeast is alive. In a large bowl, combine flour and salt. Make a well in the center. Add the yeast mixture and olive oil. Mix until a dough forms. Knead the dough on a floured surface for 5 to 7 minutes. It should feel smooth and elastic. Place the dough in a greased bowl. Cover it with a damp cloth. Let it rise in a warm spot for about one hour or until it doubles in size. Once your dough has risen, preheat your oven to 425°F (220°C). Roll out the dough on a floured surface into a rectangle. Aim for about 1/2 inch thick. In a small bowl, mix melted butter, minced garlic, and oregano. Brush this mixture generously over the dough. Then, sprinkle mozzarella and Parmesan cheese evenly on top. If you want a kick, add red pepper flakes. Cut the dough into strips, about 1-2 inches wide. Carefully transfer the strips to a lined baking sheet. Bake in the preheated oven for 12 to 15 minutes. They should turn golden and the cheese should be bubbly. After baking, remove the breadsticks from the oven. Garnish them with freshly chopped parsley for color and flavor. Serve them warm, alongside a small bowl of marinara sauce for dipping. For a rustic touch, arrange the breadsticks in a basket lined with a clean cloth. Enjoy your cheesy garlic breadsticks as a perfect snack or side dish! For the full recipe, check out the section above. One key mistake is not letting the dough rise enough. Let it double in size. This step makes the breadsticks soft and fluffy. Another mistake is using cold water. Warm water helps the yeast wake up. If you skip the yeast, your breadsticks won't rise. Also, make sure to measure the flour correctly. Use a spoon to scoop it into the cup, then level it off. Too much flour can make the dough dense. For the best texture, knead the dough well. This develops the gluten, which gives bread a nice chew. Aim for about 5 to 7 minutes of kneading. If the dough is sticky, sprinkle a bit more flour. For great flavor, don't skip the garlic butter mix. Use fresh, minced garlic for a stronger taste. After baking, let the breadsticks cool slightly. This helps enhance the flavors, making each bite better. To boost the garlic flavor, add more minced garlic to the butter. For cheese, try mixing different types. Cheddar or Gouda can offer a nice twist. If you want a bit of heat, add red pepper flakes to the cheese mix. Finally, fresh herbs like basil or thyme can bring extra flavor. You can mix them right into the dough or sprinkle them on top before baking. For even more yum, serve with marinara sauce for dipping. For the full recipe, check out the detailed steps above. {{image_2}} You can change up the cheese for fun. Try cheddar for a sharp bite. Fontina adds creaminess, while gouda gives a smoky flavor. Mix mozzarella with a bit of blue cheese for a bold twist. You can even use a blend of cheeses for unique tastes. Just keep the total amount around one and a half cups. This way, your breadsticks will still be cheesy and delicious. Adding herbs and spices makes your breadsticks exciting. Fresh basil or thyme adds a nice touch. You can mix in some garlic powder for extra flavor. A pinch of Italian seasoning works well too. For a little heat, try adding crushed red pepper flakes. Just be careful with the amount. You want to enhance the flavor, not overpower it. If you need gluten-free breadsticks, use a gluten-free flour blend. Look for one that includes xanthan gum for the best texture. For a vegan version, swap dairy cheese for your favorite plant-based cheese. You can also use olive oil instead of butter. This way, everyone can enjoy these tasty treats. Don't forget to check the ingredient labels for hidden animal products. For the full recipe, follow the instructions above! To keep your cheesy garlic breadsticks fresh, store them in an airtight container. Place a piece of parchment paper between layers if you stack them. This helps prevent them from getting soggy. Keep the container at room temperature for up to two days. For longer storage, the fridge is fine, but it may dry them out. When it's time to enjoy your leftover breadsticks, the oven is best. Preheat the oven to 350°F (175°C). Place the breadsticks on a baking sheet. Heat them for about 10 minutes, or until warm. You can also microwave them for 30 seconds. However, the microwave may make them chewy, not soft. If you want to save your cheesy garlic breadsticks for later, freezing is a great option. Wrap them tightly in plastic wrap, then place them in a freezer-safe bag. They can stay in the freezer for up to three months. To eat them, thaw in the fridge overnight and reheat as mentioned above. For a quick fix, you can bake them directly from frozen. Just add a few extra minutes to the bake time. Enjoy your homemade treat anytime! For the full recipe, check the earlier section. To make Cheesy Garlic Breadsticks from scratch, start by mixing warm water, sugar, and yeast. Let it sit for five minutes. In a big bowl, combine flour and salt. Make a well and add the yeast mix and olive oil. Mix until the dough forms. Knead it for about five to seven minutes until smooth. Let it rise in a greased bowl for one hour. Roll it out into a rectangle, brush with garlic butter, and top with cheese. Cut into strips and bake at 425°F for 12 to 15 minutes. For the full recipe, check the earlier section. Yes, you can use other cheeses! While mozzarella and Parmesan are classic choices, feel free to mix it up. Cheddar adds a sharp flavor, while Gouda gives a smoky touch. You can even try feta for a tangy twist. Just remember, when choosing cheese, aim for a good melt. This will keep your breadsticks gooey and delicious. Cheesy Garlic Breadsticks pair well with many dishes. You can serve them with marinara sauce for a classic dip. They also go nicely with a fresh salad for a light meal. If you want some protein, try them with a hearty soup or pasta. You can also enjoy them as a snack on their own. In this article, we explored how to make perfect cheesy garlic breadsticks. We covered the best ingredients, step-by-step instructions, and tips for flavor. I discussed fun variations for different diets and how to store extras. Remember, using fresh ingredients leads to the best taste. Avoid common mistakes for the perfect texture. Enjoy making these breadsticks as a snack or side. With practice, you’ll impress everyone with your skills. Now, go ahead and bake!
Cheesy Garlic Breadsticks Irresistible Homemade Treat
If you’re craving a warm, cheesy treat, you’ve come to the right place! My homemade Cheesy Garlic Breadsticks are simple to make and utterly delicious.
To make the best feta spinach stuffed French bread, gather these ingredients: - 1 large French bread loaf - 1 cup fresh spinach, chopped - 1 cup feta cheese, crumbled - 1/2 cup cream cheese, softened - 1/4 cup sour cream - 2 tablespoons olive oil - 2 cloves garlic, minced - 1/4 teaspoon red pepper flakes (optional) - Salt and pepper to taste - Fresh parsley, chopped (for garnish) Each ingredient plays a key role in creating a rich and tasty filling. The spinach adds freshness, while feta brings a salty bite. Cream cheese and sour cream make the mixture creamy and smooth. Olive oil helps sauté the garlic and spinach, adding depth to the flavors. You can adjust the red pepper flakes for a little heat, or skip them if you prefer milder tastes. Lastly, fresh parsley gives a beautiful touch when you serve your dish. For full details, check the Full Recipe. - Preheat your oven to 375°F (190°C). Line a baking sheet with parchment paper. - In a skillet, heat 2 tablespoons of olive oil over medium heat. Add 2 cloves of minced garlic. Sauté for about 1 minute until you smell the garlic. - Add 1 cup of chopped fresh spinach to the skillet. Cook until it wilts, about 2-3 minutes. Remove from heat and let it cool for a bit. - In a mixing bowl, combine the wilted spinach, 1 cup of crumbled feta cheese, 1/2 cup of softened cream cheese, and 1/4 cup of sour cream. If you want some heat, add 1/4 teaspoon of red pepper flakes. Mix well until all ingredients blend. Season with salt and pepper to taste. - Take 1 large French bread loaf and slice it in half lengthwise. This creates a top and bottom half. Hollow out some bread from the center of each half. This makes room for your filling. - Spread the spinach and feta mixture evenly on the bottom half of the French bread. Place the top half back on and gently press down. - Wrap the stuffed loaf in aluminum foil. Place it on your prepared baking sheet. Bake in the preheated oven for 15 minutes. - After 15 minutes, carefully remove the foil. Bake for an additional 10 minutes. This step makes the bread crispy and golden. - Once baked, remove from the oven and let it cool for a few minutes. Slice it into pieces before serving. - Garnish with chopped fresh parsley for a nice touch. Enjoy your Feta Spinach Stuffed French Bread! For the full recipe, refer to the instructions above. - Choosing the right bread: Use a large, fresh French bread loaf. A good crust adds flavor. Look for one that feels light and sounds hollow when tapped. This helps the stuffed bread hold up well. - Ensuring filling balance: Mix creamy and salty flavors. The feta and cream cheese create a smooth base. Add spinach for freshness and a pop of color. Adjust salt to taste, as feta is naturally salty. - Tips for hollowing out the bread: Slice the bread in half lengthwise. Use a sharp knife to remove some of the inside. Leave enough bread on the sides for support. This creates a nice pocket for the filling. - Pairing with sides or dips: Serve with a simple salad or a bowl of soup. A yogurt dip or tzatziki adds a cool touch. These pair well with the warm, savory bread. - Ideal occasions for serving: This dish shines at parties or casual gatherings. It's great for game day or family dinners. You can even serve it as a fun appetizer at a potluck. - How to garnish beautifully: After baking, sprinkle fresh parsley on top. This adds color and a fresh taste. You can also add a drizzle of olive oil for extra richness. This dish is a delightful treat that brings joy to any table. For the complete recipe, check the Full Recipe. {{image_2}} You can change the cheese for a new flavor. Try using goat cheese or ricotta. They add a creamy texture and taste great. You can also mix in herbs like dill or basil. A pinch of oregano gives a nice touch. If you love spice, add some cayenne pepper or smoked paprika for a kick. For veggies, consider mushrooms or bell peppers. They blend well with the spinach and cheese. If you want a vegan version, use tofu instead of cheese. You can blend the tofu with nutritional yeast for a cheesy taste. Substitute the cream cheese with cashew cream or coconut yogurt. For gluten-free bread, use gluten-free French bread. You can find this at many stores now. If you're on a low-carb diet, try using a cauliflower bread or a low-carb wrap. These swaps keep the dish tasty and fun for everyone! To keep your feta spinach stuffed French bread fresh, follow these easy tips: - Refrigeration: Wrap the leftover bread tightly in plastic wrap or aluminum foil. Store it in the fridge for up to 3 days. The bread will stay soft with this method. - Freezing: For longer storage, freeze the stuffed bread. Wrap it well in plastic wrap and then in foil. It can last up to 2 months in the freezer. Be sure to label it with the date. When you're ready to enjoy your leftovers, reheating is key. Here’s how to do it right: - Best methods for reheating: Preheat your oven to 350°F (175°C). Remove the wrapping and place the bread on a baking sheet. Heat for about 10-15 minutes. This keeps the bread crispy. - Avoiding sogginess or over-drying: If you notice the bread is getting soggy, place it on a wire rack while reheating. This allows air to circulate and keeps the crust nice. If it seems too dry, you can sprinkle a bit of water on the bread before wrapping it in foil. This helps it stay moist. How to make Feta Spinach Stuffed French Bread? To make this dish, you need to gather your ingredients. First, preheat your oven to 375°F (190°C). Sauté minced garlic in olive oil until fragrant, then add chopped spinach and cook until wilted. Mix this with feta, cream cheese, sour cream, and seasonings. Hollow out the French bread, fill it with the mixture, and bake wrapped in foil. After 15 minutes, uncover and bake for 10 more minutes until golden. Can I prepare this dish in advance? Yes, you can prepare it ahead. Make the filling a day prior and store it in the fridge. You can stuff the bread just before baking. This saves time and lets the flavors blend nicely. What are the best sides to serve with this recipe? This stuffed bread pairs well with a fresh salad or a bowl of soup. You can also serve it with a yogurt dip or a side of roasted veggies. The bread is filling, so lighter sides work best. What if my filling is too runny? If your filling is too runny, add more feta or cream cheese. You can also mix in some breadcrumbs to absorb excess moisture. This will help firm it up without losing flavor. How to fix overcooked French bread? If your bread is overcooked, you can try to revive it. Wrap the bread in a damp paper towel and microwave for a few seconds. This adds moisture back into the bread, making it softer. What to do if the bread is too crusty? If the bread is too crusty, slice it thinner next time. You can also add butter or oil on the crust before baking. This keeps it soft while still getting that nice golden color. For the full recipe, please check the earlier section in this article. You learned the key ingredients and steps to make Feta Spinach Stuffed French Bread. Remember, cooking is about balance and creativity. Use my tips for better results and tasty variations. Don’t forget to store leftovers properly! This dish is perfect for any occasion, from parties to family dinners. I hope you feel confident to try your version of this recipe. Enjoy your cooking adventure and make delicious memories!
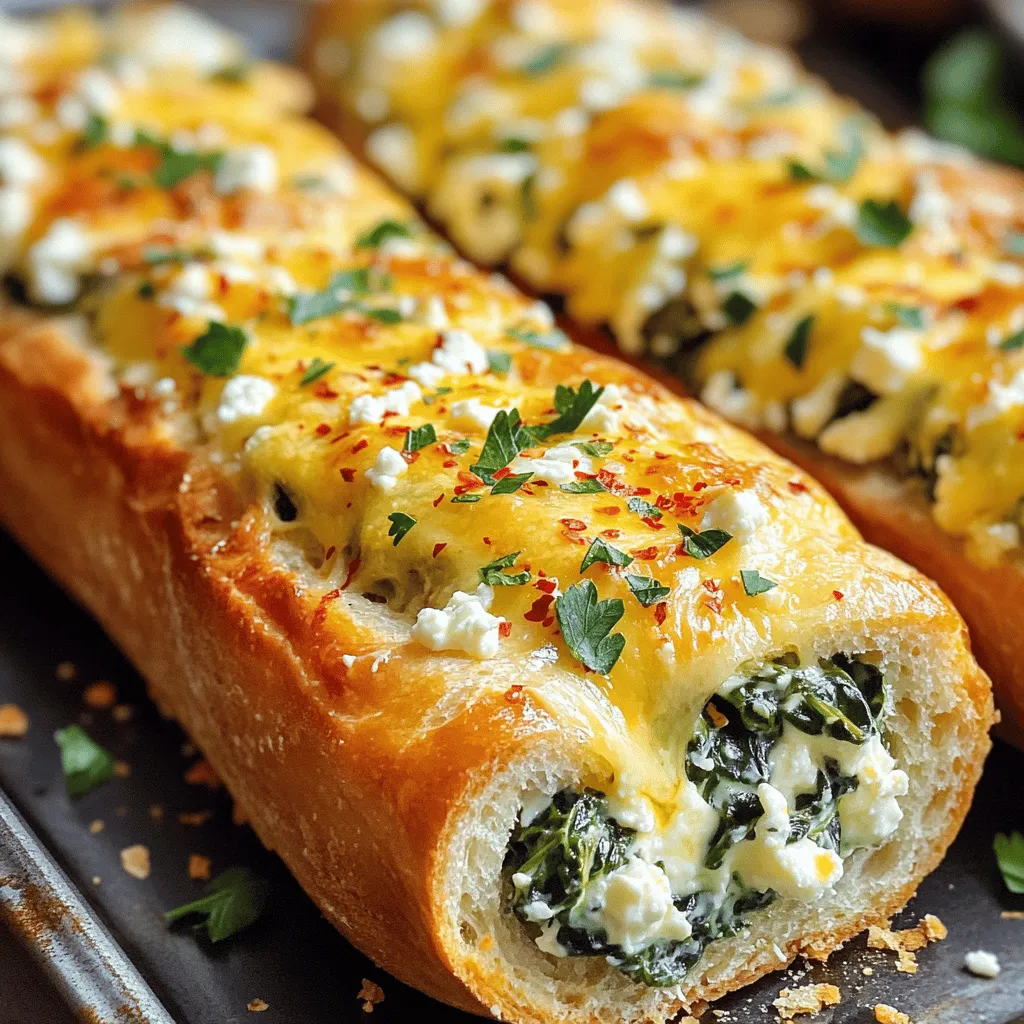
Feta Spinach Stuffed French Bread Irresistible Treat
Are you ready to elevate your snack game? Let’s dive into making Feta Spinach Stuffed French Bread, an irresistible treat that combines rich flavors and
- 1 package (8 oz) refrigerated croissant dough - 1 cup fresh mozzarella cheese, shredded - 1 cup sliced pepperoni - 1/2 cup marinara sauce (for dipping) - 1 teaspoon Italian seasoning - 1 egg, beaten (for egg wash) - Fresh basil leaves for garnish (optional) - Olive oil spray - Baking sheet - Parchment paper - Small saucepan - Pastry brush When I make Mozzarella Pepperoni Croissant Rolls, I always gather my ingredients first. It keeps me organized and makes cooking easy. The dough is soft and flaky. Fresh mozzarella adds a creamy texture, while pepperoni brings a savory kick. I love to serve these rolls warm with marinara sauce for dipping. For tools, I use a baking sheet lined with parchment paper. The parchment keeps the rolls from sticking and makes cleanup a breeze. A small saucepan warms the marinara sauce nicely. The pastry brush helps spread the egg wash for a shiny finish. You really need these items to make cooking simple and fun. Using fresh and quality ingredients makes a big difference in taste. When you use the right tools, you set yourself up for success in the kitchen. These rolls are sure to impress family and friends. For the complete recipe, check out the Full Recipe section. - Set oven to 375°F (190°C). - Prepare baking sheet with parchment paper. - Unroll the croissant dough and separate it into triangles. - On the wide end, add about 2 tablespoons of shredded mozzarella cheese. - Place 2-3 slices of pepperoni on top of the cheese. - Sprinkle a pinch of Italian seasoning for extra flavor. - Start at the wide end and roll each croissant tightly towards the pointed end. - Make sure the filling stays inside while you roll. - Place each rolled croissant on the prepared baking sheet, leaving space between them. - Brush the tops with the beaten egg for a golden look. - Lightly spray with olive oil to make them crispy. - Bake for 12-15 minutes until golden brown. Enjoy these tasty bites warm with marinara sauce on the side for dipping. For the complete recipe, check the Full Recipe section. To get that perfect golden look, use an egg wash. Brush the tops of the croissants with the beaten egg. This gives them a shiny, crisp finish. You can also spray them lightly with olive oil. This step adds extra crunch and makes them golden. Want to spice things up? You can add more seasonings to the filling. Try garlic powder or red pepper flakes for some heat. You can also switch up the cheese. Cheddar or provolone can add a unique taste to the rolls. These rolls taste great with sides. Serve them with a fresh salad or crispy veggies. For presentation, place the rolls on a nice plate. Drizzle a little marinara sauce around them for a pop of color. You can even add fresh basil leaves on top for a touch of green. For the full recipe, check out the details above! {{image_2}} You can change the filling in your mozzarella pepperoni croissant rolls to mix things up. Try different meats like ham or turkey. You can also use veggies like spinach or mushrooms. For cheese alternatives, consider using cheddar or gouda. Each choice gives a new taste and texture. If you need a gluten-free option, use gluten-free croissant dough. Many brands make dough that tastes great and works well. For vegan substitutions, swap mozzarella with a plant-based cheese. You can replace pepperoni with vegan sausage or even marinated tofu. These changes keep the flavor while meeting dietary needs. These croissant rolls make great appetizer bites. Cut them into smaller pieces for easy sharing. They also work well as a main dish. Serve them with a salad or some roasted vegetables on the side. This allows you to create a full meal that everyone will enjoy. For the full recipe, check out the details above. To store leftover croissants, place them in an airtight container. This keeps them fresh longer. You can also wrap them in plastic wrap for extra protection. The croissants stay good in the fridge for about 2-3 days. After that, they may lose their taste and texture. To reheat your croissants, use an oven or toaster oven. Preheat the oven to 350°F (175°C). Place the croissants on a baking sheet. Heat for about 5-7 minutes. This method keeps them crispy. Avoid using the microwave. It makes them soft and chewy. For the best results, check them often. Enjoy your Mozzarella Pepperoni Croissant Rolls warm and tasty! To make these rolls, start with homemade dough. You will need flour, yeast, water, salt, and butter. Mix the yeast with warm water until it bubbles. Add flour and salt, then knead until smooth. Let it rise in a warm spot for an hour. Roll it out, fold in butter, and shape it into layers. Cut the dough into triangles, fill them, and roll as before. Yes, you can freeze the rolls. For best results, freeze them before baking. Place the filled rolls on a baking sheet and freeze until firm. Then transfer them to a freezer bag. When ready, bake them straight from the freezer. If you bake first, let them cool, then freeze. Reheat in the oven for crispiness. These rolls are great with many dips. Try using ranch or garlic butter. You can also serve them with pesto or a spicy aioli. Experiment with your favorite sauces to find what you love best. Each dip adds a fun twist to the flavors! This blog post provided a clear recipe for making mozzarella pepperoni croissant rolls. You learned about ingredients, cooking tools, and step-by-step instructions. I also shared tips on flavor variations and serving ideas. In conclusion, these rolls are easy to make and fun to share. Customize them to suit your taste and enjoy with friends and family. Don't forget to store leftovers properly for later! Happy cooking!
Mozzarella Pepperoni Croissant Rolls Easy and Tasty Snack
Craving a fun and tasty snack? Look no further! Mozzarella Pepperoni Croissant Rolls are easy to make and packed with flavor. Using just a few
- 1 cup cooked corned beef, finely chopped - 1 cup sauerkraut, drained and chopped - 1 cup Swiss cheese, shredded - ½ cup cream cheese, softened - 1 teaspoon Dijon mustard - 1 teaspoon garlic powder - ½ teaspoon black pepper - 1 cup breadcrumbs (preferably panko) - 2 large eggs, beaten - ½ cup mayonnaise - ¼ cup ketchup - 1 tablespoon horseradish sauce - 1 teaspoon hot sauce (adjust to taste) - Salt and pepper to taste Making Reuben Balls is fun and easy. First, gather your main ingredients. You need corned beef, sauerkraut, Swiss cheese, and cream cheese. Each adds a unique taste. The corned beef gives a savory flavor, while the sauerkraut adds a nice tang. Swiss cheese brings creaminess, and cream cheese helps bind everything together. Next, we need seasonings and breading. Dijon mustard adds a kick, while garlic powder gives depth. Black pepper adds warmth. Panko breadcrumbs will give your Reuben Balls a crispy outside. You will coat the balls with beaten eggs before rolling them in the breadcrumbs. For the spicy dipping sauce, mix mayonnaise and ketchup for creaminess. Horseradish sauce adds heat, and hot sauce makes it even spicier. Adjust the hot sauce to your taste. Add salt and pepper to finish. This is all you need for a great recipe. For the full recipe, check out the instructions later on! To start, grab a large bowl. Combine the following ingredients: - 1 cup cooked corned beef, finely chopped - 1 cup sauerkraut, drained and chopped - 1 cup Swiss cheese, shredded - ½ cup cream cheese, softened - 1 teaspoon Dijon mustard - 1 teaspoon garlic powder - ½ teaspoon black pepper Mix everything well. You want all the flavors to blend nicely. Next, take about a tablespoon of the mixture. Roll it into a ball using your hands. Place each ball on a tray as you go. Repeat this step until you use up all the mixture. Now, set up a breading station. In one bowl, place the breadcrumbs. In another bowl, pour the beaten eggs. Dip each ball in the eggs first, then roll it in the breadcrumbs. Make sure they are fully coated. Heat oil in a deep fryer or a large pot over medium-high heat. Once the oil is hot, gently place the breaded balls in batches. Fry them for about 3-4 minutes until they are golden brown and crispy. After frying, remove them and drain on paper towels. In a bowl, mix together the following for the Spicy Thousand Island Dipping Sauce: - ½ cup mayonnaise - ¼ cup ketchup - 1 tablespoon horseradish sauce - 1 teaspoon hot sauce (adjust to taste) - Salt and pepper to taste Stir well to combine. Adjust the flavors to fit your taste. For the full recipe, check the details above. Enjoy making these tasty Reuben Balls! To get the right texture, make sure your cream cheese is softened. This step helps mix the filling smoothly. If you want more flavor, feel free to adjust the seasoning. Add a bit more garlic powder or pepper if you like it spicier. When frying, use a thermometer to check the oil temperature. The right heat keeps the Reuben Balls from being soggy. Aim for a temperature around 350°F (175°C). Remember, do not overcrowd the frying pot. This step ensures each ball cooks evenly and gets that perfect golden color. For the best taste and texture, serve the Reuben Balls warm. Cold balls lose their crunch and flavor. You can also add extra sides like pickles or coleslaw. These pair well with the Spicy Thousand Island Dipping Sauce and enhance the meal. {{image_2}} You can easily switch up the ingredients in Reuben Balls. If you want a lighter option, use turkey or chicken instead of corned beef. Both will still give you that great taste. For the cheese, consider using Gruyère or cheddar. These options add a unique twist while keeping it delicious. If you prefer a vegan or vegetarian dish, you have tasty choices. Tempeh or mushrooms can replace the meat while adding a nice texture. For the cheese, use vegan cream cheese. You can also swap the eggs for alternatives like flaxseed meal mixed with water. This way, everyone can enjoy these tasty treats! Love heat? You can make the dipping sauce even spicier. Just increase the amount of hot sauce to your taste. For an extra kick, add diced jalapeños. This will take the flavor to a whole new level, making your Reuben Balls even more exciting! Refrigerate your leftover Reuben Balls in an airtight container. They stay fresh for up to 3 days. This helps keep them safe to eat and tasty for later meals. You can freeze uncooked Reuben Balls for up to 2 months. Just place them on a tray and freeze until solid. Once frozen, transfer them to a freezer bag. When you’re ready to enjoy them, thaw in the refrigerator before frying. This way, you can have a quick treat whenever you want! To reheat, use an oven or air fryer. This method helps restore their crispiness. Simply preheat your oven to 350°F. Bake for about 10 minutes. If using an air fryer, set it to 375°F and cook for 5-7 minutes. Enjoy them warm and crunchy, just like when they were first made! Reuben balls are tasty bites inspired by the classic Reuben sandwich. They combine corned beef, sauerkraut, Swiss cheese, and cream cheese. I love how the flavors blend together. You get a crispy outside and a warm, cheesy inside. This dish is fun to make and even more fun to eat. They are perfect for parties or game days. Yes, you can make the dipping sauce ahead of time. Just mix the ingredients and store them in the fridge. This sauce gets better as it sits. It saves time when you are ready to serve. Just remember to stir it again before serving. To make Reuben balls gluten-free, you can use gluten-free breadcrumbs. Check the labels on your sauces and mayonnaise. Many brands now offer gluten-free options. Just swap them in, and you can enjoy this dish without worry. Reuben balls pair well with various sides. Try serving pickles or potato chips for crunch. A fresh salad can lighten up the meal. You might also serve them with some extra spicy dipping sauce on the side. These options make your meal more fun and flavorful. For the full recipe, check out the main article. Reuben balls combine classic flavors in a fun, bite-sized treat. We covered each step, from gathering ingredients to frying them to perfection. Don't hesitate to experiment with variations or dips. Remember, they are best served warm and crispy. Store leftovers for quick snacks later. Enjoy this tasty dish that brings a twist to the familiar Reuben sandwich!
Reuben Balls with Spicy Thousand Island Dipping Sauce
If you love classic Reuben flavors, you’ll adore Reuben Balls! These bite-sized treats combine delicious corned beef, tangy sauerkraut, and creamy Swiss cheese, all rolled
When making Easy Crispy Rice Balls, you need a few key ingredients. Here's what you'll need: - 2 cups cooked sushi rice - 1/2 teaspoon salt - 1/4 cup grated Parmesan cheese - 1/4 cup green onions, finely chopped - 1/2 cup panko breadcrumbs - 1/2 cup all-purpose flour - 2 large eggs, beaten - Vegetable oil for frying - Soy sauce for dipping These ingredients come together to create a crispy, delicious snack. The sushi rice gives a nice sticky texture, perfect for shaping. The salt enhances the flavor, while the Parmesan adds a cheesy twist. Green onions bring fresh flavor and color. Panko breadcrumbs ensure that crunch we all love. All-purpose flour helps the rice balls hold their shape during frying. Eggs act as a binder, keeping everything together. Vegetable oil is essential for frying, giving that golden, crispy exterior. Finally, soy sauce is a classic dip that adds umami. This simple list makes it easy to gather what you need. You can find most of these items at your local grocery store. If you want to make your rice balls extra special, feel free to add in your favorite herbs or spices! Check the Full Recipe for more detailed steps. - In a large bowl, combine the cooked sushi rice, salt, grated Parmesan cheese, and chopped green onions. - Mix thoroughly for even consistency. This helps all flavors blend well. You want every bite to be tasty. - Scoop about 2 tablespoons of the rice mixture and shape it into a ball. - Repeat until you have formed 12 rice balls. Aim for a size similar to golf balls. - Set up a breading station: Place all-purpose flour in one bowl, beaten eggs in another, and panko breadcrumbs in a third. - Roll each rice ball first in the flour, then dip into the beaten eggs, and finally coat with panko breadcrumbs. This ensures a nice crunch when frying. - In a large frying pan, heat about 1 inch of vegetable oil over medium-high heat. - When the oil is hot, test it by dropping in a breadcrumb; it should sizzle. - Gently place a few rice balls in the oil. Fry until golden brown on all sides, about 3-4 minutes. Turn them occasionally for even cooking. - Once golden, carefully remove the rice balls with a slotted spoon. Place them on a paper towel-lined plate to drain excess oil. Now, enjoy your crispy rice balls hot with soy sauce for dipping! For more details, check out the Full Recipe. For perfect crispy rice balls, panko breadcrumbs are key. They are light and help create a great crunch. Regular breadcrumbs can make your rice balls dense and chewy. Use panko for the best results. Oil temperature plays a big role in crispiness too. Heat your oil to medium-high. You can test if it’s ready by dropping in a breadcrumb. If it sizzles, you’re good to go! Frying in hot oil keeps the outside crispy while keeping the inside soft. For dipping, soy sauce is classic and tasty. You can also try spicy mayo or sweet chili sauce for a twist. Both add great flavor. Pair your rice balls with fresh salads or crunchy veggies. They balance the rich flavors and make a complete meal. Some sliced cucumbers or a simple green salad work well. A good frying pan is crucial for this recipe. A deep, heavy skillet holds heat better, frying the rice balls evenly. For shaping your rice balls, use your hands. They are the best tools! Just make sure your hands are wet to prevent sticking. You can also use a small ice cream scoop for uniform sizes. {{image_2}} You can make your rice balls even more tasty. Try adding spices like garlic powder or paprika for a kick. Fresh herbs like basil or cilantro give a bright flavor too. If cheese is your thing, swap out Parmesan for mozzarella or cheddar. Each choice brings a fun twist to the dish. Want to make these rice balls vegan? Use flaxseed meal or applesauce in place of eggs. This binding helps keep the rice balls together. For a gluten-free option, simply replace regular flour with a gluten-free blend. You can still enjoy this dish without the gluten! Get creative with fillings! You can stuff your rice balls with cheese, cooked meats, or even veggies. Small pieces of bell peppers or mushrooms add flavor and color. Mix in proteins like shredded chicken or tofu for a heartier snack. Each bite becomes a surprise! To store your rice balls, let them cool first. Place them in an airtight container. You can refrigerate them for up to three days. If you want to keep them longer, freeze the rice balls. Wrap each one tightly in plastic wrap. Then, place them in a freezer bag. They will keep well for up to three months in the freezer. To reheat, try using an oven or air fryer. Preheat your oven to 350°F (175°C). Place the rice balls on a baking sheet. Heat them for about 10-15 minutes, or until they are warm and crispy. If using an air fryer, set it to 350°F (175°C) and cook for 5-8 minutes. This method keeps them crispy and tasty. Avoid using a microwave, as it can make them soggy. In the fridge, your rice balls last about three days. In the freezer, they can stay fresh for three months. Always check for signs of spoilage. If they smell off or have a strange color, it’s best to toss them. Keeping an eye on their freshness ensures you enjoy them at their best. To keep your rice balls from falling apart, use sushi rice. It has more starch than other rice types. This starch helps bind the rice together. When forming the balls, make sure to pack the rice tightly. If needed, add a little more cheese to help with binding. Yes, you can make these rice balls ahead of time. Form the rice balls and place them on a tray. Cover them with plastic wrap and chill in the fridge. This lets the flavors mix. You can fry them just before serving for the best taste. Sushi rice is the best choice for crispy rice balls. It is short-grain rice and has more starch. This starch gives the rice a sticky texture. Other types of rice, like long-grain rice, may not hold together as well. The starch content is key for a great rice ball. Cooking crispy rice balls takes about 30 minutes. Here’s the breakdown: - Prep time: 15 minutes to mix and form the rice balls. - Cooking time: 15 minutes to fry them until golden brown. Make sure to heat the oil well before adding the rice balls. In this blog post, we covered how to make crispy rice balls. We discussed the ingredients, preparation steps, and cooking techniques. I shared tips for achieving the perfect crunch and delicious serving ideas. Don’t forget the fun variations and storage tips to keep them fresh. With these simple steps, you can create a tasty snack that satisfies. Enjoy your cooking adventure!
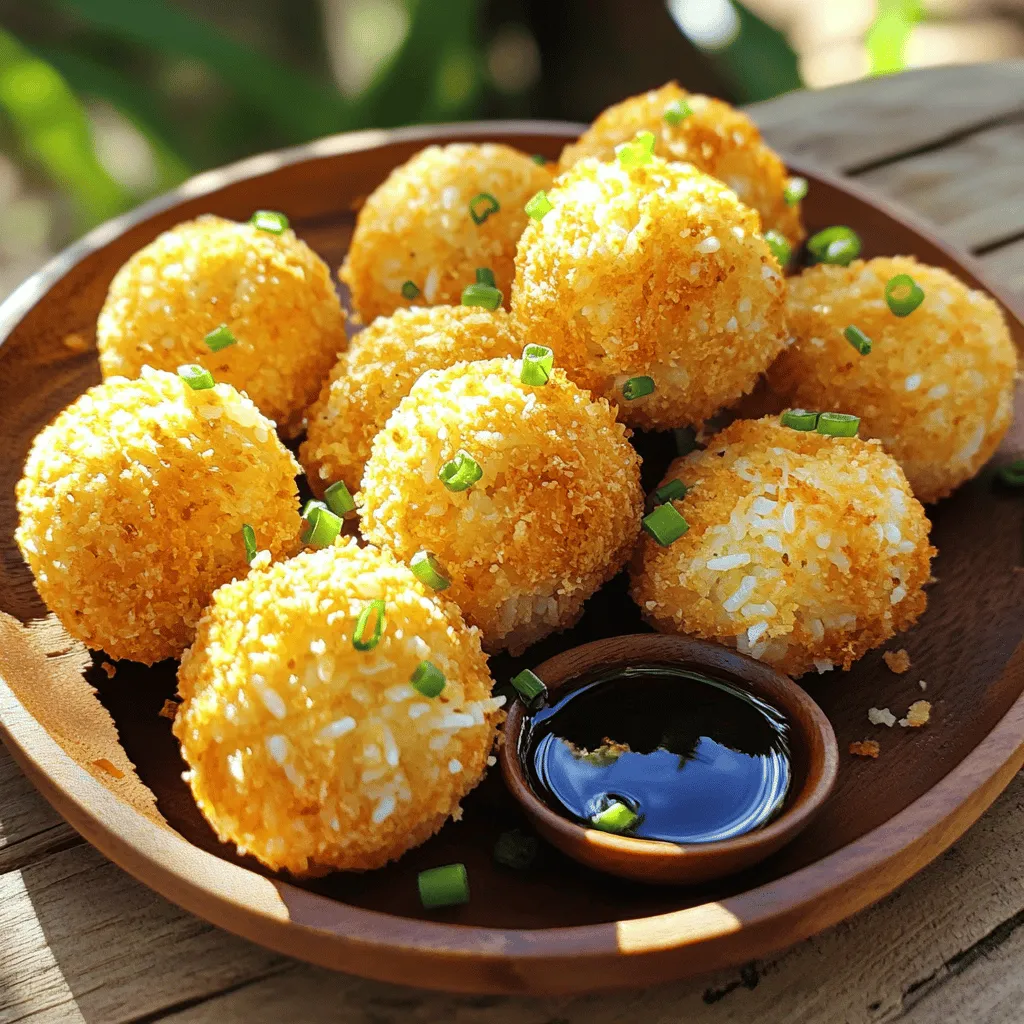
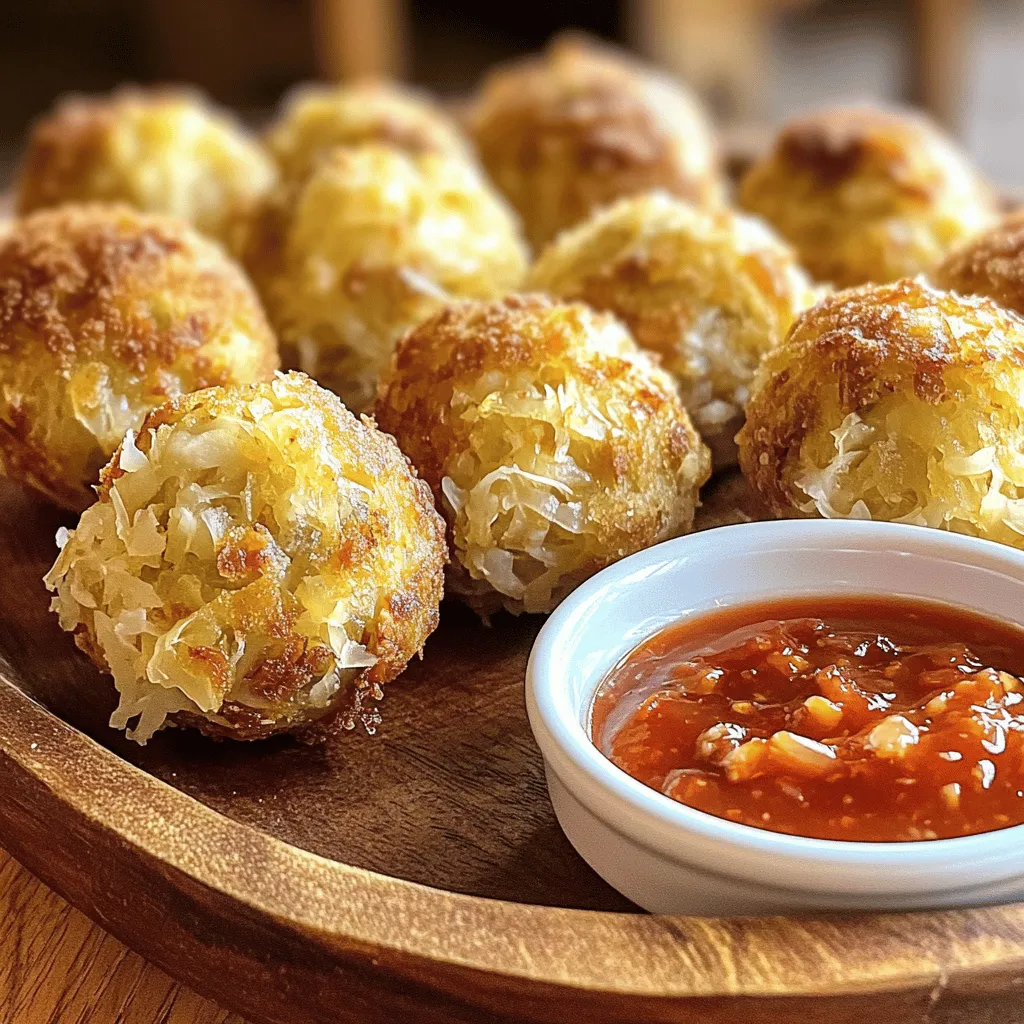
Easy Crispy Rice Balls Simple and Crunchy Recipe
If you’re craving a crunchy snack that’s easy to make, these Easy Crispy Rice Balls are perfect for you! With just a handful of simple
To make Spicy Mexican Corn Bites, you’ll need: - 2 cups corn kernels (fresh or canned) - 1/2 cup all-purpose flour - 1/2 cup cornmeal - 1/4 cup grated Parmesan cheese - 1 jalapeño, finely chopped (seeds removed for less heat) - 1/4 cup cilantro, chopped - 1 teaspoon baking powder - 1/2 teaspoon cumin - 1/2 teaspoon smoked paprika - 1/4 teaspoon cayenne pepper (adjust for spice preference) - Salt and pepper to taste - 1 large egg - 1/2 cup milk - Oil for frying You can use either fresh or canned corn for this recipe. Fresh corn gives a sweet crunch. It’s best when in season and can make your bites taste brighter. If using fresh, you’ll need to cut the kernels off the cob. Canned corn is quick and easy. Just drain and rinse it before using. Both options work well to create delicious bites. Want to kick the flavors up a notch? Here are some optional ingredients you can try: - Diced bell peppers for sweetness - Chopped green onions for a fresh bite - Crumbled feta cheese for tanginess - A splash of lime juice for zest - Diced tomatoes for added juiciness Feel free to mix and match these extras to suit your taste. You will find that the more flavors you add, the more unique your bites will become. For the full recipe, check the details above. Start by gathering all your ingredients. You need corn kernels, flour, cornmeal, Parmesan cheese, jalapeño, cilantro, baking powder, cumin, smoked paprika, cayenne pepper, salt, and pepper. In a large bowl, mix the corn, flour, cornmeal, Parmesan cheese, chopped jalapeño, and cilantro. Make sure everything is well combined. In a separate bowl, whisk together the baking powder, cumin, smoked paprika, cayenne pepper, salt, and pepper. This blend adds a nice kick to the bites. Next, in another bowl, beat the egg and mix it with milk. Pour this egg mixture into the corn mixture. Stir until just combined. Do not overmix it, or your bites will be tough. Now, it's time to fry! Heat about 2 inches of oil in a deep skillet over medium heat. You want the oil hot but not smoking. Carefully drop spoonfuls of the corn mixture into the oil. Make sure not to overcrowd the pan. Fry each batch until golden brown, which takes about 2-3 minutes per side. When they turn golden, transfer the corn bites to a plate lined with paper towels. This step helps to drain any extra oil. Serve the corn bites warm. You can squeeze fresh lime juice on top for a zesty touch. For dipping, try serving them with your favorite sauces. Options like sour cream, salsa, or guacamole work well. If you want to try something new, a spicy aioli can add a tasty twist. For the full recipe, check out the details above. Enjoy your delicious, spicy Mexican corn bites! To get your corn bites crispy, use cold ingredients. Cold milk and eggs help. After mixing, let the batter rest for ten minutes. This helps the flavors blend. When frying, heat your oil to 350°F. If the oil is too cool, the bites will soak up oil. Fry in small batches. This keeps the oil temperature steady. Lastly, drain excess oil on paper towels. This step makes a big difference. One common mistake is overmixing the batter. This can make the bites tough. Mix until just combined. Another mistake is not testing the oil's heat. Drop a small amount of batter into the oil. If it sizzles, the oil is ready. Avoid overcrowding the pan. This lowers the oil temperature and makes them soggy. Also, don't skip the seasoning. Salt and other spices enhance the flavor. If you want a milder taste, skip the cayenne pepper. For more heat, add more jalapeño. You can also try different cheeses. Cheddar or queso fresco adds a nice twist. If you love herbs, add more cilantro or fresh parsley. You can even mix in some corn salsa for extra flavor. These adjustments make it easy to customize your bites. Check out the Full Recipe for more ideas! {{image_2}} You can easily make these spicy Mexican corn bites vegetarian. The original recipe is already meat-free, which is great! If you want more texture, add diced bell peppers or mushrooms. They add flavor and crunch without losing the essence of the dish. You can also swap the Parmesan cheese for a vegan cheese option. This keeps it tasty while being plant-based. If you need gluten-free bites, simply switch the all-purpose flour with a gluten-free blend. Many brands offer great options that work well in frying. You can also use corn flour instead of regular flour. This keeps the corn flavor strong while ensuring it is safe for gluten-sensitive eaters. Do you prefer less heat? You can lower the spice by adjusting the jalapeño. Remove all the seeds and membranes, as that is where most of the heat hides. You can also reduce the cayenne pepper to a pinch or leave it out entirely. For those who love spice, add more jalapeño or a splash of hot sauce to the mix. Experimenting with flavors keeps it fun and delicious! For the full recipe, check the main article above. After enjoying your Spicy Mexican Corn Bites, let any leftovers cool down. Place them in an airtight container. Store the container in the fridge for up to three days. This keeps the bites fresh and tasty. To reheat, I recommend using an oven. Preheat it to 350°F (175°C). Place the corn bites on a baking sheet. Heat for about 10 minutes or until warm. This method keeps them crispy. You can also use an air fryer for a quick reheat. Set it to 350°F (175°C) and cook for 5 minutes. If you want to save some for later, freezing works great. First, let the corn bites cool completely. Then, place them in a single layer on a baking sheet. Freeze them for about an hour. Once frozen, transfer them to a freezer bag. They can last up to three months in the freezer. When ready to eat, thaw them overnight in the fridge before reheating. For the best taste, enjoy them fresh with the full recipe. Yes, you can make these corn bites ahead of time. Prepare the mixture and store it in the fridge. This keeps the flavors fresh. Just remember to fry them right before serving. This way, they stay crispy and warm. You can also reheat them in the oven for a few minutes if needed. If you want less heat, try using bell peppers. They add sweetness without the spice. Another option is to use banana peppers. They give a milder kick. For a smoky flavor, add a small amount of smoked paprika. You can also skip the peppers and add extra herbs for flavor. When frying, watch for a golden brown color. It usually takes about 2-3 minutes on each side. Use a slotted spoon to check one. If it’s golden and crispy, they are ready. Drain them on paper towels to remove extra oil. Enjoy them warm for the best taste! The blog post covered all the steps to make tasty corn bites. I discussed ingredients, from fresh to canned corn and optional flavors. I shared clear instructions on frying and serving them. Tips helped you make them extra crispy and avoid common mistakes. You learned about variations for different diets and how to store leftovers. These corn bites are fun and easy to make. Enjoy experimenting and find your favorite way to serve them!
Spicy Mexican Corn Bites Flavorful and Easy Treat
Are you ready to spice up your snack game? My Spicy Mexican Corn Bites are both flavorful and easy to make. With simple ingredients, you’ll
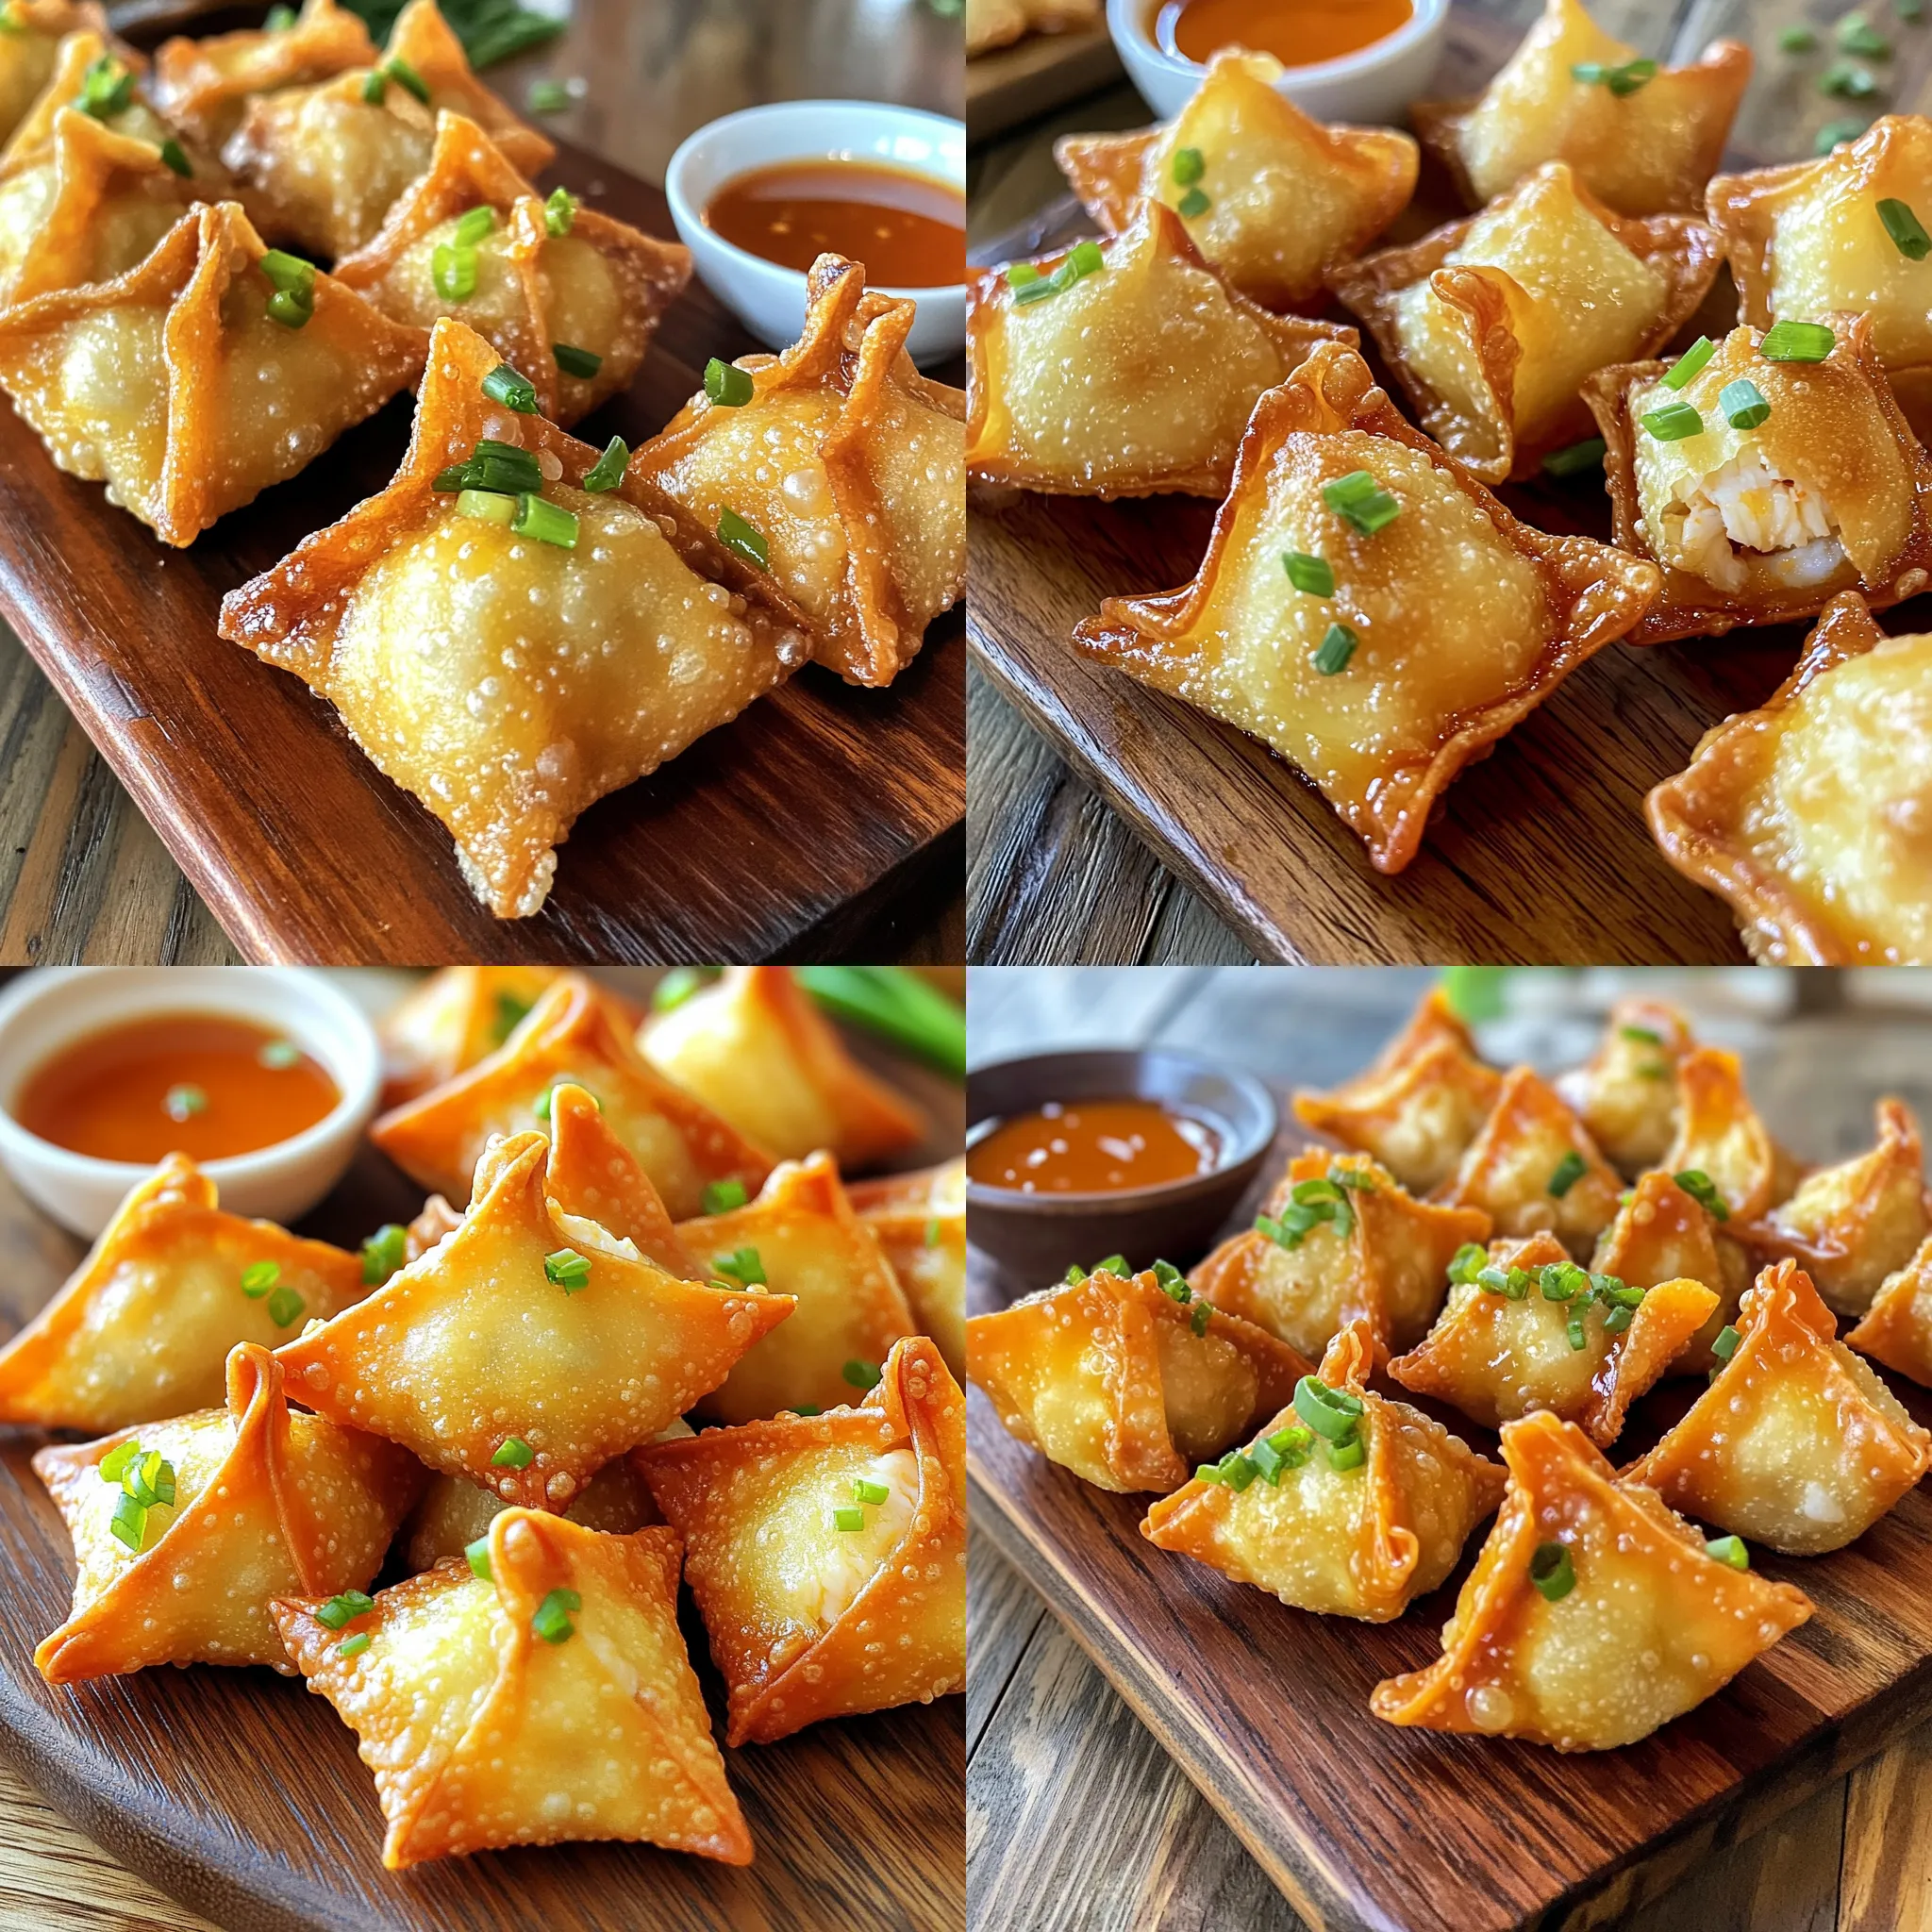
- 8 oz cream cheese, softened - 1 cup crab meat, cooked and shredded - 2 green onions, finely chopped - 1 teaspoon garlic powder - 1 teaspoon Worcestershire sauce - 1 package of wonton wrappers (about 30-40 wrappers) - Vegetable oil (for frying) - Salt and pepper to taste - Sweet chili sauce (for serving) These ingredients make a tasty Crab Rangoon. The cream cheese gives it a rich flavor. The crab meat adds a nice touch of sweetness. Green onions bring freshness. Garlic powder and Worcestershire sauce give depth. Wonton wrappers hold everything together and fry up crispy. Sweet chili sauce is perfect for dipping. You can swap cream cheese for Neufchâtel cheese. It has less fat but tastes great. For a dairy-free option, use cashew cream. You can also use imitation crab meat if fresh crab is not available. This can cut costs but still tastes good. This recipe serves about 4-6 people. If you have a big event, double the ingredients. You can also make smaller batches if you want to try it first. Each person can enjoy 4-6 pieces. Adjust the quantities based on your guests and their appetites. To start, you need to mix the filling well. In a bowl, combine 8 oz of softened cream cheese, 1 cup of cooked and shredded crab meat, 2 finely chopped green onions, 1 teaspoon of garlic powder, 1 teaspoon of Worcestershire sauce, and a pinch of salt and pepper. Use a fork or spatula to blend everything until smooth and creamy. For the right consistency, make sure the cream cheese is very soft. If it is too firm, the filling will be hard to spread. You want a mixture that is thick but smooth. Now, let’s wrap the filling in the wonton wrappers. Lay a wrapper flat on your clean surface. Place about 1 teaspoon of the crab mixture in the center of the wrapper. Next, moisten the edges with a little water. This helps the wrapper seal better. Fold the wrapper over to make a triangle and press the edges firmly to seal. For added security, fold the two outer corners towards the center. Pinch them to seal again. Common mistakes include not sealing the edges well or overfilling the wrapper. Both can cause the filling to leak during frying. For frying, heat about 2 inches of vegetable oil in a deep frying pan. Use medium-high heat. The oil needs to reach 350°F (175°C) for perfect frying. You can test the heat by dropping a small piece of the wonton wrapper into the oil. If it sizzles, it is ready. Carefully add 3-4 crab rangoon to the hot oil. Fry them for about 2-3 minutes. They should turn golden brown and crispy. Use a slotted spoon to take them out and let them drain on a paper towel-lined plate. Following these steps will give you lovely, crispy Crab Rangoon. Don't forget to serve them warm with sweet chili sauce! To make the best crab rangoon, focus on even cooking. Use a deep frying pan with enough oil. This helps the rangoon float and fry evenly. Keep the oil at 350°F (175°C). Too low or high will affect the crispiness. Drain fried rangoon on paper towels. This cuts down on grease. To store leftovers, wait until they cool. Place them in an airtight container. They will stay fresh for up to three days in the fridge. Reheat them in the oven to keep them crispy. One mistake is overfilling the wonton wrappers. This can lead to leaks during frying. Ensure you seal them tightly. Don't skip moistening the edges; it helps the seal hold. Another issue is frying oil temperature. If it’s too hot, the rangoon burns outside and stays cold inside. If it’s too cool, they absorb too much oil and become soggy. Use a thermometer for best results. Serve crab rangoon with sweet chili sauce. It adds a nice, spicy touch. Pair it with fried rice or a light salad. This balances the rich flavors. For presentation, arrange them on a platter. Place a small bowl of sauce in the center. Add green onions or cilantro as a garnish. This makes your dish look more appealing. {{image_2}} You can take your Crab Rangoon to the next level! Adding spices or herbs can change the taste. Try adding a pinch of cayenne for heat. A sprinkle of dill or chives gives a fresh twist. You can also mix in cheese like mozzarella or cheddar for creaminess. Vegetables like spinach or bell peppers can add crunch and flavor. Baking and frying are the main ways to cook Crab Rangoon. Frying gives a crunchy texture. However, it can be greasy if not done right. Baking is healthier and still tasty. It takes longer, but you can make a big batch. If you want to cut calories, an air fryer works great! It gives a crisp finish without much oil. You can get creative with Crab Rangoon! Consider a spicy version with sriracha in the filling. For a vegetarian take, use a mix of mushrooms and cream cheese. Pair these with different dipping sauces, like soy sauce or a tangy mango salsa. Each twist can make your dish unique and fun. Don't hesitate to explore! To keep uncooked crab rangoon fresh, follow these steps: - Wrap each rangoon in plastic wrap. This prevents freezer burn. - Place them in a freezer bag or container. Seal it tightly. - Label the bag with the date. This helps track freshness. Uncooked crab rangoon can last up to three months in the freezer. For best taste, use them within a month. After cooking, store your crab rangoon properly: - Let them cool completely before storing. This keeps them crispy. - Place in an airtight container with paper towels. This absorbs moisture. Cooked rangoon will stay fresh for up to four days in the fridge. To reheat, use an oven or air fryer. Heat them at 350°F (175°C) for about 10 minutes. This keeps them crispy and delicious. Don’t let leftovers go to waste! Here are some fun ideas: - Add to soups for a creamy twist. They make a great topping. - Chop and mix into a salad for added flavor. - Create a dip by blending with sour cream or yogurt. These ideas can give your leftover crab rangoon a second life! If you need more ideas, check out the Full Recipe for inspiration. Crab Rangoon has a fun history. It likely started in the 1950s in the U.S. Some say it was made in California. Others say it was created in a restaurant in New York. The dish blends flavors from Chinese and American cooking. This mix helped it become popular. Today, you can find it in many Asian restaurants across the country. Yes, you can make Crab Rangoon ahead of time. Prepare the filling and wrap the wontons. Place them on a baking sheet and freeze them. This way, they stay fresh until you are ready to fry them. For busy days, this saves time. Just remember to fry them while frozen. This helps keep them crispy. The best Crab Rangoon can be found in many places. Look for local Asian restaurants with good reviews. Some national chains also serve great versions. When choosing a place, think about freshness. Fresh ingredients make a big difference in taste. You may also want to check if they have homemade dipping sauce. If you want to try making this dish, check out the [Full Recipe]. It guides you through making Crispy Creamy Crab Rangoon step-by-step. You will enjoy the crispy outside and creamy inside! This guide covers all you need for perfect Crab Rangoon. You learned the key ingredients, how to prepare the filling, wrap, and fry. Plus, I shared tips to avoid common mistakes and make tasty variations. Whether you bake, fry, or try something new, these options will impress your guests. Remember, perfecting your technique ensures a great dish every time. Enjoy your cooking and share your delicious results!
Crab Rangoon Delight Simple and Tasty Recipe
If you’ve ever craved a crunchy, creamy bite of Crab Rangoon, you’re in the right place! This delightful recipe brings together cream cheese, real crab