Appetizers

To make perfect cheese puffs, you need a few key ingredients. Here’s what you’ll need: - 1 cup all-purpose flour - 1/2 cup unsalted butter - 1 cup water - 1 cup shredded cheddar cheese - 4 large eggs - 1/2 teaspoon garlic powder - 1/4 teaspoon cayenne pepper (optional) - Salt to taste - Fresh parsley, chopped (for garnish) The flour gives the puffs structure. Butter adds richness and flavor. Water helps form the dough. Cheddar cheese is the star, bringing a delightful taste. Eggs help the puffs rise and create a light texture. You can take your cheese puffs to the next level. Here are some optional ingredients: - 1/4 teaspoon onion powder - 1/4 cup grated Parmesan cheese - Fresh herbs like chives or thyme Adding onion powder gives a savory depth. Parmesan brings a sharp kick. Fresh herbs add brightness and aroma. If you have dietary needs, you can still enjoy cheese puffs. Consider these substitutions: - Use gluten-free flour for a gluten-free option. - Substitute vegan butter and cheese for a dairy-free version. - Use egg replacers like flaxseed meal or applesauce for egg-free puffs. These swaps keep the flavor while meeting dietary needs. For the full recipe, check out the complete instructions. 1. Preheat the oven. Set it to 400°F (200°C). Line a baking sheet with parchment paper. 2. Melt butter and water. In a saucepan, mix the butter and water. Heat it on medium until the butter melts. 3. Add flour. Pour the flour into the saucepan. Stir it well until the dough forms a ball. It should pull away from the pan. Then, remove it from heat. 4. Cool and mix in eggs. Let the dough cool for five minutes. Add eggs one by one. Mix well after each egg until the batter is smooth. 5. Incorporate cheese and seasonings. Stir in the shredded cheddar cheese, garlic powder, cayenne pepper (if using), and salt. Mix until everything is combined. 6. Shape the puffs. Use a piping bag or spoon to drop tablespoon-sized mounds of batter onto the baking sheet. Space them about two inches apart. 7. Bake. Place the sheet in the oven. Bake for 20-25 minutes until the puffs are golden and puffed up. 8. Cool and garnish. Take them out of the oven. Let them cool slightly. Garnish with fresh chopped parsley before you serve. - Use fresh cheese. Freshly shredded cheese melts better and adds more flavor. - Mix well. Make sure the eggs blend smoothly into the dough. This helps the puffs rise. - Don’t open the oven. Keep the oven closed while baking. Opening it lets heat escape and can cause puffs to deflate. - Skipping the cooling step. Don’t rush to add eggs. If the dough is too hot, it can cook the eggs and ruin the texture. - Not spacing them out. If you place puffs too close, they will merge into one big puff while baking. - Underbaking. If you remove them too soon, the centers may be gooey. They should be golden all over for the best result. For a detailed overview of the ingredients, check out the Full Recipe. To make the best cheese puffs, focus on the dough. After you mix the butter and water, let the dough cool. This step helps the eggs blend better. Add eggs slowly, mixing after each one. This keeps your puffs airy. If your batter is too thick, they won’t puff well. Aim for a thick but smooth texture. Serve your cheese puffs warm. They taste best when fresh from the oven. Arrange them on a bright platter to catch the eye. If you have leftovers, store them in an airtight container. They can stay fresh for about two days. For longer storage, freeze them. Just reheat in the oven when you're ready to enjoy. Pair cheese puffs with fun dips. Marinara sauce or ranch dressing works great. For a kick, try spicy aioli or hot sauce. Fresh herbs can also add flavor. Consider using parsley, chives, or basil for garnish. You can even sprinkle some cheese on top before serving for extra flair. For the full recipe, check out the detailed steps above. Enjoy making these delightful snacks! {{image_2}} You can make cheese puffs gluten-free. Use gluten-free flour instead of all-purpose flour. This swap keeps the texture right. Follow the same steps in the full recipe. Enjoy the same taste without gluten! You can change the flavor of cheese puffs. Want spice? Add more cayenne pepper. For herbs, mix in dried basil or thyme. If you want a sweet twist, try adding a touch of sugar. These changes give you a fun new snack. Mix different cheeses for special flavors. Cheddar is a classic choice, but you can try mozzarella for a gooey bite. Parmesan adds a nice savory touch. Blend gouda or pepper jack for a kick. Experiment with your favorite cheeses for unique puffs! To keep your cheese puffs fresh, let them cool completely. Place them in an airtight container. You can store them at room temperature for up to two days. For longer storage, use the fridge. They will last up to a week in the fridge. Make sure to separate layers with parchment paper to avoid sticking. When you want to enjoy leftover cheese puffs, the oven is your best friend. Preheat your oven to 350°F (175°C). Place the puffs on a baking sheet. Heat for about 10 minutes, or until warm and crispy. This method revives their fluffy texture. You can also use a microwave, but they may become soft. If you choose the microwave, heat in short bursts, about 15 seconds at a time. Freezing cheese puffs is simple. After they cool, place them in a single layer on a baking sheet. Freeze them for about an hour. Once frozen, transfer them to a freezer bag. They can stay in the freezer for up to three months. When ready to eat, bake them straight from the freezer. Just add a few extra minutes to the cooking time. Enjoy this tasty treat anytime with these easy storage tips! You can make cheese puffs from scratch using simple steps. First, gather your ingredients: flour, butter, water, cheese, eggs, and seasonings. Next, melt the butter with water in a pot. Once melted, add the flour and stir until it forms a dough. After that, let it cool for a short time. Then, beat in the eggs one by one. Finally, mix in the cheese and seasonings. Pipe or spoon the dough onto a baking sheet and bake until golden. You can find the Full Recipe for more details. Homemade cheese puffs contain various nutrients. Each puff has calories from flour, butter, and cheese. The amounts depend on how many you eat. Generally, one puff has about 100 calories. It offers protein from the cheese and eggs. It also has fat from the butter and cheese. For exact numbers, check the ingredients used. Yes, you can use different types of cheese in cheese puffs. Cheddar is a classic choice, but you can try mozzarella, gouda, or even feta. Each cheese adds a unique flavor and texture. Mixing cheeses can create a tasty twist. Just ensure the cheese melts well for the best result. Cheese puffs last about 2 to 3 days in the fridge. Store them in an airtight container to keep them fresh. If you want to keep them longer, consider freezing them. They can stay fresh in the freezer for up to a month. Just reheat them in the oven when you want to enjoy. You’ve learned about the key ingredients and step-by-step instructions for cheese puffs. Remember the tips for the best texture and how to avoid common mistakes. Variations and substitutions make this dish friendly for everyone. Store cheese puffs well to keep them fresh, and don’t hesitate to play with flavors. Making cheese puffs is fun, and they are a hit at any gathering. Enjoy creating your perfect cheese puffs.
Cheese Puffs Delightful and Easy Snack Recipe
Are you ready to whip up a tasty treat? Cheese puffs are a delightful snack that’s easy to make at home. In this guide, I
- 6 ripe tomatoes, finely diced - 1 cup fresh basil leaves, chopped - 2 cloves garlic, minced - 2 tablespoons extra virgin olive oil - 1 tablespoon balsamic vinegar - Salt and pepper to taste - 1 baguette, sliced into 1/2-inch thick pieces - 1/4 cup grated Parmesan cheese (optional) - Baking sheet - Mixing bowl - Knife and cutting board - Oven - Calories per serving: About 150 - Macronutrient breakdown: - Protein: 4g - Carbs: 18g - Fats: 7g Using fresh, quality ingredients makes your bruschetta sing. Ripe tomatoes bring sweetness, while basil offers a fragrant touch. You can choose any fresh herbs, but basil is classic for a reason. Use good olive oil for a rich flavor. Keep garlic minced to blend well. Don't skip the balsamic vinegar; it adds a nice zing. The baguette is key! It makes a perfect crostini. Slice it evenly for even toasting. Don't forget to add cheese if you like it creamy. The optional Parmesan is a great finishing touch. For tools, a baking sheet is needed to toast the bread. A mixing bowl helps you combine the fresh ingredients easily. Use a sharp knife and cutting board for safe chopping. Finally, your oven will help achieve that crispy texture on the crostini. This recipe is not just tasty; it's also simple to make. You can enjoy it as a snack or serve it at gatherings. For the full recipe, don't forget to check the details above. Start by dicing the ripe tomatoes. Place them in a bowl. Next, add the chopped basil and minced garlic. Drizzle in the olive oil and balsamic vinegar. Season with salt and pepper. Mix it all well. Let this mixture rest for 15 minutes. This wait allows the flavors to blend nicely. Now, preheat your oven to 400°F (200°C). Take the baguette and slice it into 1/2-inch thick pieces. Arrange the slices on a baking sheet. Brush each slice lightly with olive oil. Bake them in the oven for about 10 minutes. They should turn golden brown and crispy. Once the crostini are toasted, let them cool slightly. Top each toasted slice generously with the tomato mixture. If you like, sprinkle some grated Parmesan cheese on top for extra flavor. For a nice touch, garnish with a few extra basil leaves. Enjoy your savory tomato basil bruschetta on toasted crostini! For the full recipe, check out [Full Recipe]. To get the best taste, let the tomato mixture rest for about 15 minutes. This waiting time helps all the flavors mix well. I love using ripe tomatoes like heirloom or Roma. They add sweetness and depth to the dish. Bruschetta pairs well with a light white wine, like Sauvignon Blanc. It also goes great with other appetizers, such as cheese or olives. For parties, serve the bruschetta on a platter with fresh basil leaves. This adds a pop of color and freshness. One big mistake is over-toasting the bread. You want it crispy but not hard. Also, avoid using unripe tomatoes. They lack flavor and can ruin your bruschetta. Stick to ripe, flavorful tomatoes for the best results. {{image_2}} You can switch up the cheese. Provolone or mozzarella works well in place of Parmesan. They melt nicely and add rich flavor. You can also boost taste by adding avocado or roasted peppers. Both give a creamy texture and a sweet twist. Try different herbs to make your bruschetta unique. Oregano or thyme can add depth. You can also use flavored balsamic vinegar instead of plain. This small change can elevate your dish and surprise your guests. If you're gluten-free, look for gluten-free baguette options. Many stores carry these now. For a vegan version, simply skip the cheese. You won’t miss it, especially with all the fresh flavors. To keep your tomato mixture fresh, store it in an airtight container. This method helps lock in flavor and moisture. The mixture stays fresh in the fridge for up to three days. After that, the tomatoes may lose their crispness and flavor. Always check for any noticeable changes before use. Yes, you can freeze the tomato mixture! However, freezing may change the texture. To freeze, place the mixture in a freezer-safe bag. Remove as much air as possible before sealing. For crostini, it’s best to freeze them before toasting. Slice the baguette, brush with olive oil, and freeze the slices in a single layer. Once frozen, transfer them to a bag. To reheat toasted crostini, use the oven for best results. Preheat your oven to 350°F (175°C). Place the crostini on a baking sheet and heat for about 5-7 minutes. This method keeps the crostini crispy. Avoid using a microwave, as it can make them chewy. Always check your crostini to ensure they stay crunchy and delicious. You can store the tomato basil mixture in the fridge for up to three days. Keep it in an airtight container. For the best taste, eat it fresh. The tomatoes will lose their crunch over time. If you store the toasted crostini, they will get soft. It’s best to keep the mixture and bread separate until serving. Yes, you can make the tomato mixture a few hours before serving. Just mix the diced tomatoes, basil, garlic, olive oil, balsamic vinegar, salt, and pepper. Cover it and let it sit in the fridge. This helps the flavors blend together. If you make it too early, the tomatoes may become mushy. The best bread for bruschetta is a crusty baguette. It has a firm texture and toasts well. You can also use ciabatta or sourdough. These breads hold up against the juicy topping. Make sure to slice them thick enough for a good crunch. For a fun twist, try using garlic bread for added flavor. In this article, we explored how to make delicious Tomato Basil Bruschetta. We covered key ingredients, handy tools, and detailed step-by-step instructions. You learned how to prepare, toast, and assemble the bruschetta for maximum flavor. Remember, resting the mixture boosts its taste, and choosing the right tomatoes makes a difference. Whether you keep it simple or experiment with variations, this dish is sure to impress. Enjoy crafting your own bruschetta, and share it with friends for a perfect snack or appetizer!
Savory Tomato Basil Bruschetta on Toasted Crostini
Looking for a quick and tasty appetizer? You’ve found it! Savory Tomato Basil Bruschetta on Toasted Crostini is a simple, fresh dish perfect for any
- 1 can (15 oz) black beans, drained and rinsed - 1 cup corn kernels (fresh, canned, or frozen) - 1 small red onion, finely chopped - 2 cloves garlic, minced - 1 teaspoon ground cumin - 1 teaspoon chili powder - Salt and pepper to taste - 1 tablespoon olive oil - 8 small corn tortillas - 1 cup shredded cheese (cheddar or a blend) These ingredients create a rich and tasty filling. The black beans add protein and fiber, while corn gives sweetness. The red onion and garlic bring depth to the flavor. Ground cumin and chili powder enhance the dish with warm spices. - Fresh cilantro - Lime wedges - Additional spices (if desired) I love adding fresh cilantro for a burst of freshness. Lime wedges give a zesty kick that brightens each bite. Feel free to mix in other spices to suit your taste. - Skillet - Baking sheet - Parchment paper You will need a skillet to sauté the onions and garlic. A baking sheet lined with parchment paper helps with easy cleanup. This simple equipment makes the cooking process smooth and fun. For the full recipe, check out the complete details on how to make these delicious taquitos! - Preheat the oven to 400°F (200°C) and line a baking sheet with parchment paper. - In a medium skillet, heat the olive oil over medium heat. - Add the chopped red onion and sauté until softened, about 3-4 minutes. - Next, add the minced garlic, cumin, chili powder, salt, and pepper. Cook for one minute until fragrant. - Stir in the black beans and corn, mixing well. Cook for 3-5 minutes until heated through. - Remove the skillet from heat. Place tortillas on a flat surface. - Spoon a generous amount of the black bean mixture down the center of each tortilla. - Sprinkle shredded cheese on top of the mixture. - Roll each tortilla tightly around the filling. Place seam-side down on the prepared baking sheet. - Bake the taquitos in the oven for about 15-20 minutes. They should be crispy and golden brown. - Once done, remove from the oven and let them cool slightly. - Garnish with chopped fresh cilantro. Serve with lime wedges for a zesty kick. For the full recipe, check the detailed instructions above. Enjoy the crunch and flavor in every bite! To make your taquitos crispy, set your oven to 400°F (200°C). This high heat helps them brown nicely. For best results, use a baking sheet lined with parchment paper. It keeps them from sticking and allows for even cooking. To prevent your tortillas from cracking, warm them first. You can heat them in a pan for a few seconds on each side. This softens them and makes rolling easier. If you prefer, wrap them in a damp cloth and microwave for about 30 seconds. Prepping ingredients ahead of time saves you effort when you cook. You can chop your veggies and mix the black bean filling earlier in the day. Just store them in the fridge until you’re ready to make taquitos. If you want to freeze your taquitos, assemble them first and place them on a lined baking sheet. Freeze them until firm, then transfer them to a freezer bag. They will keep well for up to three months. When you’re ready to eat, bake them straight from the freezer. Just add a few extra minutes to the baking time. Taquitos shine when paired with delicious sides. Some great options include fresh guacamole, salsa, or a crisp salad. These sides add freshness and balance the flavors of the taquitos. For dips, try sour cream or a zesty lime crema. A spicy chipotle sauce can also kick things up a notch. These dips enhance the flavor and make your meal more fun. Enjoy exploring different combinations with your taquitos! {{image_2}} You can fill taquitos with many proteins. Here are some popular choices: - Chicken taquitos: Shred cooked chicken for a tender bite. You can use rotisserie chicken for ease. - Beef taquitos: Ground beef adds rich flavor. Season it well with spices for a tasty kick. - Vegetarian and vegan alternatives: Try black beans, lentils, or mushrooms for a meatless option. These ingredients are packed with protein and flavor. Spice up your taquitos easily. Here are some fun ways to add flavor: - Adding different spices: Experiment with smoked paprika, cayenne, or oregano for a unique twist. These spices can brighten your filling. - Incorporating additional vegetables: Bell peppers, spinach, or zucchini add color and texture. Plus, they boost nutrition without much effort. How you serve taquitos changes the vibe of your meal. Here are some ideas: - Taquitos as appetizers: Serve them with salsa or guacamole for a fun snack. Guests will love the crunch! - Plated entrees or party snacks: Arrange taquitos on a platter with dips. This makes an impressive dish for gatherings. Feel free to explore these variations and enhancements in the Full Recipe for Zesty Black Bean Taquitos! To keep your taquitos fresh, store them in the fridge. Place them in an airtight container. They taste best within three days. After that, they may lose their crunch. For longer storage, freeze your taquitos. Place them in a freezer-safe container or bag. Make sure to remove air to prevent freezer burn. When you're ready to eat, reheat them in the oven at 375°F (190°C) for about 15-20 minutes. This keeps them crispy and tasty. Use glass or plastic containers with tight lids. You can also use freezer bags. Clearly label each container with the date. This way, you can track how fresh your taquitos are. Taquitos are small rolled tacos. They are usually filled with meat, cheese, or beans. The name "taquito" means "small taco" in Spanish. They originated in Mexico and are popular in many regions. You can fry or bake them for a crispy texture. Taquitos are great for snacks, parties, or casual meals. They are often served with salsa, guacamole, or sour cream. Yes, you can make taquitos in an air fryer. Here’s how: - Preheat your air fryer to 400°F (200°C). - Place the rolled taquitos in a single layer in the basket. - Cook for 8-10 minutes until they are golden brown. - Shake the basket halfway to ensure even cooking. Using an air fryer makes them crispy with less oil. It’s a healthier way to enjoy taquitos. You can customize taquitos with many fillings. Here are some ideas: - Use shredded chicken or beef for protein. - Add sautéed vegetables like bell peppers or zucchini. - Try different beans, like pinto or refried beans. - Mix in cheese for extra flavor. Experiment with spices like taco seasoning or cumin. This lets you create your favorite flavor profiles. Look for local taquerias or Mexican markets for great taquitos. Many food trucks also serve tasty options. Check reviews on food apps for popular spots. If you travel, ask locals for their favorite taquito places. You might discover hidden gems! Try the recipe for Zesty Black Bean Taquitos from this article for a homemade option. Zesty Black Bean Taquitos are easy to prepare and full of flavor. You learned about the main ingredients, cooking steps, and tips for crispiness. You can customize them with various proteins and flavors. These taquitos can be stored for short or long terms, making them a great meal prep option. Enjoy making these tasty snacks or meals. Whether for a party or a cozy night in, they’re sure to impress. Happy cooking!
Taquitos Packed with Flavor and Crunchy Goodness
Looking for a tasty snack? You’ll love these taquitos, loaded with flavor and crunch! I’ll walk you through making zesty black bean taquitos that are
For Reuben balls, you need the following main ingredients: - 1 cup cooked corned beef, chopped finely - 1 cup sauerkraut, drained and chopped - 1 cup shredded Swiss cheese - 1/2 cup cream cheese, softened - 1 teaspoon garlic powder - 1 teaspoon onion powder - 1/2 teaspoon black pepper - 1/2 cup breadcrumbs - 1 egg, beaten - Oil for frying To make the spicy dipping sauce, gather these ingredients: - 1/2 cup mayonnaise - 2 tablespoons Dijon mustard - 1 tablespoon Sriracha sauce (adjust for spice tolerance) - 1 teaspoon honey - Salt and pepper to taste Choosing fresh ingredients is really important. Here are some tips: - Corned Beef: Look for bright pink color and a firm texture. Avoid any gray spots. - Sauerkraut: Choose sauerkraut that smells fresh and tangy. The crunchier, the better! - Swiss Cheese: Pick cheese that feels moist and has a smooth surface. - Cream Cheese: Ensure it is soft and creamy. Check the expiration date. - Spices: Use fresh spices for the best flavor. Old spices lose their taste. These fresh ingredients will help you create the best Reuben balls. For the complete recipe, check the Full Recipe section. To start, gather all your ingredients. You will need cooked corned beef, sauerkraut, Swiss cheese, and cream cheese. Also, have garlic powder, onion powder, black pepper, breadcrumbs, and one egg ready. In a large mixing bowl, add the chopped corned beef, drained sauerkraut, shredded Swiss cheese, and softened cream cheese. Sprinkle in the garlic powder, onion powder, and black pepper. Mix everything well until combined. Once mixed, shape the mixture into small balls, about one inch wide. This should make around 12 to 15 balls. Roll each ball in breadcrumbs to coat them evenly. Place the coated balls on a tray and refrigerate for about 30 minutes. This helps them firm up, making frying easier. Next, heat oil in a deep frying pan over medium heat. Make sure the oil is hot but not smoking. Carefully add the chilled Reuben balls to the hot oil. Fry them in small batches to avoid crowding. Cook each batch for 3 to 4 minutes. Look for a nice golden brown color on all sides. Once done, use a slotted spoon to remove the balls from the oil. Drain them on a paper towel to remove excess oil. This step ensures your Reuben balls stay crispy and delicious. While the Reuben balls cool, prepare the spicy dipping sauce. In a small bowl, whisk together mayonnaise, Dijon mustard, Sriracha sauce, and honey. Adjust the Sriracha to match your spice level. Add a pinch of salt and pepper for taste. Mix until smooth and creamy. Serve the hot Reuben balls with the spicy dipping sauce on the side. Enjoy this tasty treat! For the full recipe, check out the details above. To fry Reuben balls just right, heat your oil to medium. Use enough oil to cover the balls halfway. This helps them cook evenly. Fry in small batches to avoid crowding the pan. This keeps the heat steady. Cook for about 3-4 minutes until they turn golden brown. Remember to flip them halfway for an even color. One common mistake is not chilling the balls before frying. Chilling helps them hold their shape. Another mistake is using too much oil. If the oil is too hot, the outside cooks fast, but the inside stays cold. Lastly, don’t skip the breadcrumbs. They give a nice crunch and keep the filling moist. To keep the filling moist, use cream cheese. It adds a rich texture. Mix the filling just until combined; overmixing can dry it out. You can also add a splash of broth or a bit more cream cheese if needed. This keeps the balls juicy and flavorful. {{image_2}} You can switch up the filling in your Reuben balls for fun. Try pastrami instead of corned beef for a twist. You can also use turkey for a lighter version. If you want a veggie option, use mushrooms and spinach. This keeps the dish fresh and exciting. While the spicy dipping sauce adds heat, other sauces can change the game. Consider a creamy ranch for a cool dip. A tangy garlic aioli also pairs well with the balls. For a zesty kick, try a chipotle mayo. These options keep your guests guessing and delighted. Reuben balls shine at parties. Serve them on a large platter with toothpicks. This makes them easy for guests to grab. Pair them with a variety of dipping sauces for choice. You can also add a side of pickles for extra crunch. These ideas make your dish the star of the show. After enjoying your Reuben balls, store any leftovers in an airtight container. Keep them in the fridge. They will last for about 3-4 days. Make sure they cool down before sealing. This helps keep them fresh. To reheat, use the oven for the best texture. Preheat your oven to 350°F (175°C). Place the Reuben balls on a baking sheet. Heat them for about 10-15 minutes. This method keeps them crispy and delicious. You can also use a microwave, but this may make them soggy. You can freeze Reuben balls for later. First, let them cool completely. Then, place them in a single layer on a tray. Freeze until solid, about 1-2 hours. After that, transfer them to a freezer bag. They can last up to 3 months in the freezer. When ready to eat, thaw in the fridge before reheating. This way, you keep the flavor and texture intact. If you want a different meat, try pastrami or roast beef. Both give a nice flavor. You can also use turkey or chicken for a lighter option. These meats work well with the sauerkraut and cheese, keeping that Reuben taste. To make these Reuben balls gluten-free, swap regular breadcrumbs for gluten-free ones. You can also use crushed gluten-free crackers or oats. Check that the corned beef and sauces you use are gluten-free too. This way, everyone can enjoy them! Yes, you can bake Reuben balls! Preheat your oven to 400°F (200°C). Place the balls on a baking sheet lined with parchment paper. Bake for 20-25 minutes, turning halfway through. They won’t be as crispy as fried ones, but they’ll still taste great. For the full recipe, check out the steps to make these delicious Reuben balls! We explored the key ingredients for tasty Reuben Balls, along with a spicy dipping sauce. I shared tips for selecting fresh ingredients and avoiding common mistakes. You learned preparation and cooking steps, plus creative twists for variations. Storage tips will help keep leftovers fresh. Remember, great Reuben Balls start with quality ingredients. Stay confident in your cooking, and enjoy making these fun bites for your next gathering.
Reuben Balls with Spicy Dipping Sauce Delight
Get ready to impress your friends and family with these tasty Reuben Balls paired with a zesty spicy dipping sauce! This easy recipe combines all
- 2 cups cooked sushi rice - 1/2 teaspoon salt - 1 tablespoon rice vinegar - Additional flavor boosters: garlic powder, black pepper To make crispy rice balls, you need a few key ingredients. The base is cooked sushi rice. It gives a sticky texture that helps the balls hold together. The salt adds flavor while the rice vinegar brightens the taste. Garlic powder and black pepper give depth to the flavor. You can adjust these according to your taste. - 1/4 cup finely chopped green onions - 1/4 cup grated Parmesan cheese - Oil for frying (vegetable or canola) For extra flair, chop some green onions and mix them in. They add a fresh crunch. Grated Parmesan cheese brings a nutty flavor. You can use any oil for frying, but vegetable or canola works best. Frying in oil makes the outside crispy while keeping the inside soft. - Soy sauce - Spicy mayo - Sweet chili sauce Dipping sauces add more fun to the dish. Soy sauce is classic and savory. Spicy mayo gives a creamy kick. Sweet chili sauce provides a nice balance of heat and sweetness. You can pick one or try them all! For the complete recipe, check the [Full Recipe]. First, I combine 2 cups of cooked sushi rice, 1/2 teaspoon of salt, and 1 tablespoon of rice vinegar in a large bowl. I mix gently until the rice feels sticky and well-coated. This step is key for texture. Next, I cool the rice mixture for a few minutes. Once it's cool, I add 1/4 cup of finely chopped green onions, 1/4 cup of grated Parmesan cheese, 1/4 teaspoon of garlic powder, and 1/4 teaspoon of black pepper. I mix everything until it blends evenly. Now, I shape the rice mixture into balls. I take about 2 tablespoons of the mixture and use wet hands to form them into a ball shape. Wet hands help prevent sticking. I repeat this until I've shaped all the rice into balls. It's important to keep them compact but not too tight. Next, I set up my breading station. I place the beaten egg in one bowl and the panko breadcrumbs in another. I dip each rice ball into the egg first. Then, I roll it in the panko breadcrumbs until it is fully coated. This will give them a nice crunch. In a deep pan, I heat about 1 inch of vegetable or canola oil over medium heat until it shimmers. This usually happens at around 350°F (175°C). I carefully add the rice balls to the hot oil in batches. I make sure not to overcrowd the pan. I fry each ball for about 3-4 minutes on each side until they turn a lovely golden brown. Once done, I remove them and let them drain on a plate lined with paper towels. I serve them warm. For a tasty touch, I might garnish with extra green onions or serve with my favorite dipping sauce. For the full recipe, check out the instructions above! To get that perfect crunch, use panko breadcrumbs. They are light and airy. This gives your rice balls a great texture. When frying, heat your oil to about 350°F. This makes the outside crisp up fast. Fry in batches, so the oil stays hot. This way, you avoid soggy rice balls. Do not overcrowd the frying pan! If you add too many rice balls at once, they will steam. This will make them soft instead of crispy. Also, let the rice cool before forming balls. If the rice is too warm, it will fall apart. For a beautiful presentation, arrange the crispy rice balls on a platter. You can sprinkle some extra green onions on top for color. Serve with dipping sauces like soy sauce or spicy mayo. These add great flavor and make the snack even better. For the full recipe, check out the detailed steps above! {{image_2}} You can play with flavors in many ways. Adding spices gives each rice ball a unique taste. Try adding a pinch of paprika for heat or a bit of cumin for warmth. You can also mix in meats or vegetables for extra flavor. Cooked chicken or shrimp works well. Finely chopped bell peppers or carrots add color and crunch. Let’s take a trip around the world with these rice balls! For a Japanese twist, try fillings like seasoned seaweed or pickled vegetables. You can even add a small piece of cheese or spicy tuna inside each ball. On the other hand, for an Italian flair, use a mix of mozzarella or ricotta cheese along with fresh herbs like basil or oregano. These variations make the rice balls fun and exciting. If you want a lighter snack, consider baking instead of frying. Just coat the balls in breadcrumbs and place them on a baking sheet. Bake at 400°F (200°C) for about 20 minutes until they are golden. You can also use whole grain or brown rice instead of sushi rice. This adds fiber and nutrients while keeping the dish delicious. For the full recipe, check out the instructions above and get cooking! To keep your leftover rice balls fresh, place them in the fridge. The best practice is to use an airtight container. This helps prevent them from drying out or absorbing smells from other foods. Store them in the fridge for up to three days for the best taste. When reheating, you want to keep that crispy texture. The best way to reheat them is in a hot pan. Heat the pan over medium heat and add a little oil. Place the rice balls in the pan and cook for about 2-3 minutes on each side. This method makes them crispy again! You can also use an air fryer at 350°F for about 5-7 minutes. If you want to save some rice balls for later, freezing works well. To freeze, place the rice balls in a single layer on a baking sheet. Put them in the freezer until they are solid, then transfer them to a freezer bag. They can last up to two months in the freezer. When you are ready to eat them, take them out and defrost in the fridge overnight. Reheat them using the pan method to bring back the crunch. Enjoy your crispy rice balls even later! Crispy rice balls are small, round snacks made from sushi rice. They have a crunchy outer layer and a soft inside. The rice sticks together, thanks to rice vinegar and salt. Their appeal lies in the contrast of textures and flavors. You can customize them with different ingredients, making them fun to eat. These tasty bites are often served warm and can be dipped in sauces. Yes, you can make crispy rice balls ahead of time. Prepare the rice mixture and shape it into balls. Place them on a tray and cover with plastic wrap. You can keep them in the fridge for up to a day. When ready to eat, bread and fry them. This way, they stay fresh and delicious. You can dip crispy rice balls in various sauces. Popular choices include soy sauce and spicy mayo. Some people enjoy sweet chili sauce for a kick. For homemade dips, try mixing mayo with sriracha or creating a tangy soy sauce blend. Customizing your dips makes the experience even better. Crispy rice balls can be gluten-free, depending on the ingredients. Sushi rice is naturally gluten-free. However, panko breadcrumbs often contain gluten. For gluten-free options, use crushed gluten-free crackers or rice flour. Always check labels to ensure your ingredients are safe for your diet. Enjoy these snacks without worry! Crispy rice balls are fun, tasty, and easy to make. We explored key ingredients like sushi rice, salt, and rice vinegar, along with optional flavors and dipping sauces. I shared steps for preparing, shaping, and frying these treats. You learned tips for crispiness and how to store leftovers. If you're eager to try new flavor combos or healthier methods, get creative! Enjoy your crispy rice balls at your next meal or snack time. They're sure to impress!
Crispy Rice Balls Flavorful Snack Idea for Everyone
Are you ready to enjoy a unique snack that everyone will love? Crispy rice balls offer a crunchy outside and a tasty inside, making them
To make this tasty artichoke bruschetta, you need: - 1 can (14 oz) artichoke hearts, drained and chopped - 1 cup cherry tomatoes, diced - 1/4 cup red onion, finely chopped - 1/4 cup fresh basil, chopped - 2 tablespoons lemon juice - 2 tablespoons olive oil - 1 teaspoon garlic powder - Salt and pepper to taste - 1 French baguette, sliced diagonally These ingredients create a fresh and vibrant mix. The artichokes add a nice earthy flavor. Cherry tomatoes bring sweetness, while red onion adds a bit of crunch. Fresh basil ties it all together with a green, herbaceous note. You can enhance your bruschetta with these add-ons: - 1/2 cup goat cheese (optional) Adding goat cheese gives a creamy texture. You might also try feta or ricotta for a different taste. To prepare this dish, gather these kitchen tools: - Mixing bowl - Baking sheet - Oven - Sharp knife - Spoon These tools make the prep simple. A sharp knife helps with chopping, and a mixing bowl is perfect for combining all the ingredients. Using a baking sheet keeps the baguette slices organized while toasting. For the full recipe, you can check the details above. Enjoy your cooking! To make the artichoke mixture, grab a mixing bowl. Start with one can of artichoke hearts. Drain and chop them into small pieces. Next, add one cup of diced cherry tomatoes. Chop a quarter cup of red onion very finely and toss it in. Then, chop a quarter cup of fresh basil and mix that in too. Drizzle two tablespoons of lemon juice and two tablespoons of olive oil over the mix. Sprinkle in one teaspoon of garlic powder, salt, and pepper to taste. Stir everything together well. This mixture bursts with flavor and is the heart of your bruschetta. Now, let’s toast the baguette. Preheat your oven to 400°F (200°C). Slice a French baguette diagonally into thin pieces. Arrange these slices on a baking sheet. For extra flavor, you can lightly brush them with olive oil. Place the baking sheet in the oven and toast the baguette slices for about 5 to 7 minutes. Keep an eye on them until they turn golden and crisp. Remove them from the oven and let them cool slightly. It's time to assemble your bruschetta! Take the slightly cooled toasted baguette slices. Spoon the artichoke mixture generously onto each slice. If you want a creamy touch, sprinkle goat cheese on top of the mixture. Serve the bruschetta right away while the bread is warm and crisp. Enjoy this delightful dish with friends and family. For the full recipe, check out the details above. When making artichoke bruschetta, choose fresh and tasty ingredients. Select artichoke hearts packed in water or olive oil. This keeps their flavor and texture perfect. For tomatoes, pick ripe cherry tomatoes. They add sweetness and color to your dish. Look for bright green basil; it should smell fresh and strong. Use a good quality olive oil for the best taste. Extra virgin is my favorite. This oil enhances the flavors in the bruschetta and makes it shine. Serve artichoke bruschetta warm for the best experience. Place the bruschetta on a large platter. You can add a sprinkle of extra basil for color. If you love cheese, add a few crumbles of goat cheese on top. This adds creaminess and pairs well with the artichokes. Pair your bruschetta with a light salad or a glass of white wine. This adds a nice touch to your meal and makes it feel special. One common mistake is overcooking the baguette slices. Watch them closely in the oven to prevent burning. You want them golden and crisp, not dark brown. Another mistake is using old or wilted ingredients. Fresh ingredients make a big difference in flavor. Don’t skip the lemon juice; it brightens the dish. Lastly, avoid overloading the bread with the topping. Too much mixture can make the bread soggy. Spoon just enough to keep the bread crispy. For the full recipe, check the detailed instructions above. {{image_2}} You can easily make artichoke bruschetta vegetarian or vegan. For a vegan option, skip the goat cheese. The mix of artichokes, tomatoes, and herbs is still rich and tasty. You can add nutritional yeast for a cheesy flavor. This keeps your dish creamy without using dairy. To boost flavor, try adding some spices. A pinch of red pepper flakes adds heat. You might also want to use fresh herbs like dill or parsley. They give the bruschetta a fresh twist. Another fun idea is to mix in some sun-dried tomatoes. They add a sweet and tangy kick. Pair your bruschetta with a light salad or a nice soup. A crisp green salad complements the rich flavors. If you like more toppings, consider avocado slices or roasted red peppers. These add texture and taste. You can also drizzle balsamic glaze for a sweet finish. Each of these options makes your bruschetta stand out. You can explore many flavors with just one base recipe. To get the full recipe, check out the Artichoke Delight Bruschetta. After you enjoy your artichoke bruschetta, store leftovers in an airtight container. Keep the bruschetta in the fridge. It stays fresh for up to three days. If you have extra toppings, store them separately. This keeps the bread from getting soggy. When you want to eat leftovers, reheat them carefully. Preheat your oven to 350°F (175°C). Place the bruschetta on a baking sheet. Heat for about 5-10 minutes. This will make the bread crisp again. Avoid using the microwave as it makes the bread soft. You can freeze the artichoke mixture, but not the bread. Store the mixture in a freezer-safe container. It lasts for about one month. To use it later, thaw it in the fridge overnight. Then, reheat as mentioned before. Make fresh baguette slices when you're ready to enjoy. For the full recipe, check the instructions above. The best way to serve artichoke bruschetta is warm. Place the bruschetta on a nice platter. You can garnish it with fresh basil for color. Serve with toothpicks for easy eating. This way, everyone can enjoy it right away. Yes, you can make the artichoke mixture ahead of time. Just store it in the fridge. Make the baguette slices fresh before serving. This keeps the bread crispy. Mix it all before serving for the best taste. You can use cream cheese or ricotta instead of goat cheese. Both options add a creamy texture. If you want a dairy-free choice, try cashew cheese. Each option brings its own flavor to the bruschetta. Artichoke bruschetta lasts for about 2-3 days in the fridge. Keep it in an airtight container. The bread may get soft, so it’s best to eat it fresh. If you have leftovers, enjoy the artichoke mix on salads or crackers! Artichoke bruschetta combines simple ingredients into a tasty treat. We covered how to prepare the mixture, toast your bread, and assemble the dish. I shared tips on ingredient choice and common mistakes to avoid. You can mix it up with variations like vegan options or new toppings. Proper storage keeps leftovers fresh for later enjoyment. With practice, you will create delicious bruschetta that impresses friends and family. Enjoy experimenting with flavors and making this dish your own!
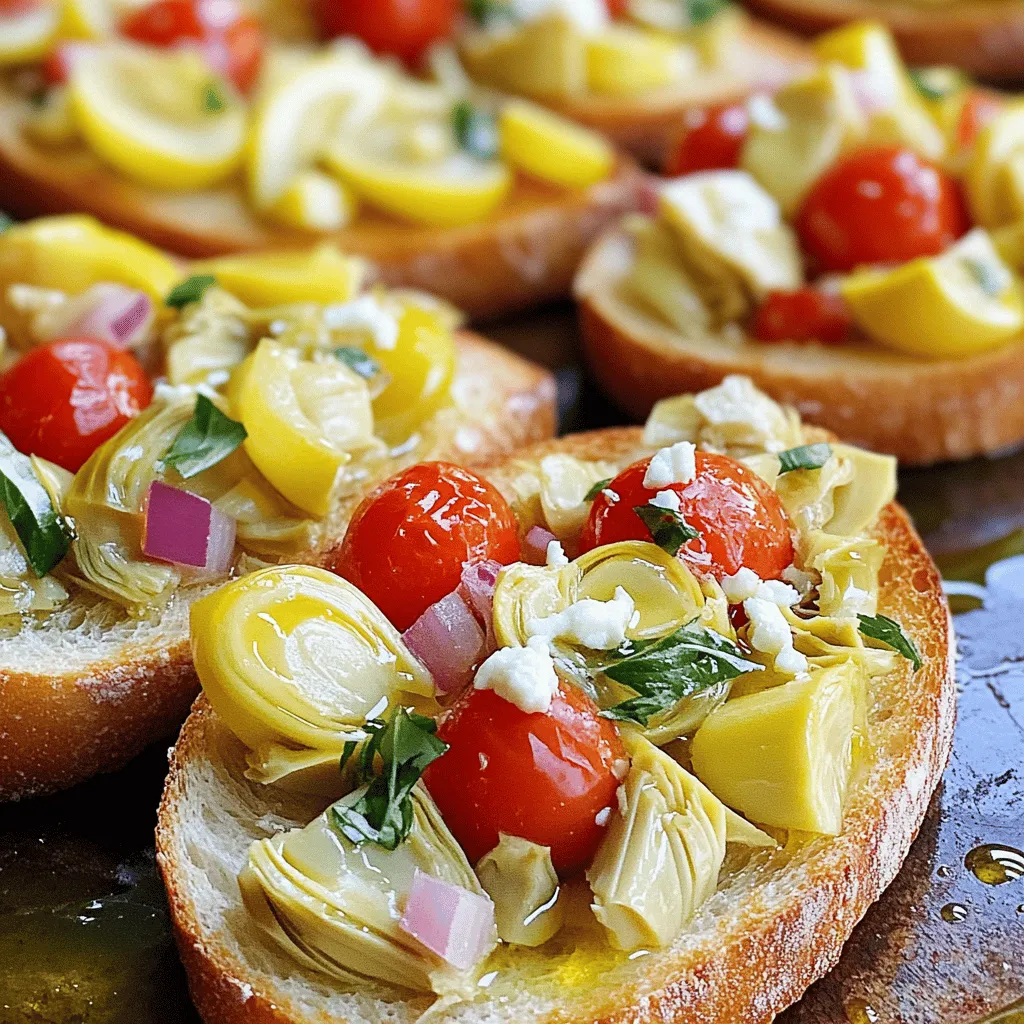
Artichoke Bruschetta Delightful and Easy Recipe
Ready to impress your guests with a tasty appetizer? This Artichoke Bruschetta is simple and delightful! I’ll share the easy steps, key ingredients, and some
To create mouthwatering crab cake egg rolls, you need: - 8 oz lump crab meat - 1/4 cup breadcrumbs - 1/4 cup mayonnaise - 1 tablespoon Dijon mustard - 1 tablespoon Worcestershire sauce - 1 teaspoon lemon juice - 1/2 teaspoon Old Bay seasoning - 1/4 teaspoon black pepper - 1 green onion, finely chopped - 8 egg roll wrappers - Vegetable oil, for frying These main ingredients blend to form a creamy and delicious crab filling. The lump crab meat gives a sweet and tender bite. The breadcrumbs help bind it all together. You can add some optional ingredients to boost flavor: - 1/2 teaspoon garlic powder - 1/2 teaspoon onion powder - Hot sauce, to taste - Fresh herbs like parsley or dill These ingredients can add a nice twist. Garlic and onion powder work well with the crab. Hot sauce can give your egg rolls a spicy kick. To make your crab cake egg rolls, gather these tools: - Large mixing bowl - Skillet or deep fryer - Tongs or slotted spoon - Paper towels - Clean work surface for wrapping With the right tools, the process becomes smooth and easy. A skillet or deep fryer helps achieve that perfect crunch. Don’t forget the paper towels for draining excess oil after frying. For the complete recipe, check out the Full Recipe. Enjoy making these tasty treats! To create the crab mixture, gather a large mixing bowl. Add 8 oz of lump crab meat. Next, mix in 1/4 cup breadcrumbs, 1/4 cup mayonnaise, and 1 tablespoon of Dijon mustard. Then, pour in 1 tablespoon of Worcestershire sauce and 1 teaspoon of lemon juice. Sprinkle in 1/2 teaspoon of Old Bay seasoning and 1/4 teaspoon of black pepper. Finally, fold in 1 finely chopped green onion. Mix gently. You want to keep the crab chunks intact for great texture. Now, take an egg roll wrapper and lay it on a clean surface. Position one corner toward you. Spoon 2 tablespoons of the crab mixture into the center. Fold the bottom corner over the filling. Next, fold in the sides. Roll it up tightly. Use a bit of water to seal the edges. Repeat until you use all the crab mixture. This step is key for creating a nice, neat roll. Heat about an inch of vegetable oil in a large skillet over medium-high heat. Once the oil is hot, carefully add the egg rolls. Fry them in small batches to avoid crowding. Cook until they turn golden brown and crispy, about 3-4 minutes on each side. Once done, remove them using tongs and place on a paper towel-lined plate to drain any excess oil. For a tasty dip, try sweet chili sauce or spicy aioli. Enjoy the crunch! For the complete recipe, check out the Full Recipe. To get the best texture for your crab cake egg rolls, use fresh lump crab meat. Fresh crab meat gives a juicy and sweet flavor. Avoid over-mixing the crab mixture. Gently fold in ingredients to keep the meat chunky. This ensures a tender bite and a nice contrast with the crispy wrapper. For even frying, heat the oil to the right temperature. Use a deep skillet with enough oil to cover the rolls. Test the oil by dropping a small piece of the wrapper in. If it bubbles and rises, the oil is ready. Fry a few egg rolls at a time. This allows proper cooking and browning on all sides. Turn them gently so they cook evenly. Drain them on paper towels to remove excess oil. Pair your crab cake egg rolls with delicious dipping sauces. I recommend sweet chili sauce for a hint of sweetness. It complements the savory crab very well. A spicy aioli adds a nice kick, balancing the flavors beautifully. You can also try a tangy lemon sauce for a fresh twist. These sauces make the egg rolls even more enjoyable. For the full recipe, check the earlier section. {{image_2}} You can make a lighter version of crab cake egg rolls by baking them. Start by preheating your oven to 400°F. After you fill and roll the egg rolls, brush them lightly with olive oil. Place them on a baking sheet lined with parchment paper. Bake for about 20 minutes, flipping halfway through. This method gives you a crispy texture without frying. If you want a vegetarian take, use a mix of veggies. Try shredded carrots, zucchini, and mushrooms. You can also add some cream cheese for a rich flavor. Instead of crab meat, use a tofu or chickpea base. It keeps the texture creamy and satisfying. Season with spices like garlic powder and Old Bay to mimic the original taste. Feel free to get creative with flavors! You can add herbs like dill or cilantro for a fresh twist. A dash of hot sauce can spice things up. You might also mix in some cheese, like pepper jack or cheddar, for a cheesy kick. Experiment with different dipping sauces too, such as garlic aioli or a tangy remoulade. Check out the Full Recipe for more ideas. Store any leftover egg rolls in an airtight container. Place them in the fridge. They stay fresh for up to three days. Ensure they cool down before sealing them. This helps keep the texture crispy. To reheat, use an oven for the best results. Preheat your oven to 350°F (175°C). Place the egg rolls on a baking sheet. Heat them for about 10-15 minutes. This method keeps them crunchy. You can also use an air fryer. Set it to 350°F and cook for 5-7 minutes. If you want to freeze egg rolls, do it before frying. Wrap each egg roll tightly in plastic wrap. Place them in a freezer bag or container. They can last up to three months in the freezer. When ready to cook, just fry them straight from the freezer. Adjust cooking time to ensure they heat through. You can find the full recipe for these tasty treats above. You can use shrimp or lobster meat. Both options give a nice taste. You can also try canned tuna for a budget-friendly choice. Each option will change the flavor but still taste great. Yes, you can prepare the filling in advance. Store it in the fridge for up to two days. You can also wrap the egg rolls ahead of time. Just keep them in the fridge until you are ready to fry them. To keep your egg rolls crispy, avoid overfilling them. Make sure to seal the edges well. Fry them in hot oil, so they cook fast. Let them drain on paper towels after frying. This will help keep them crunchy. You can find great crab cake egg rolls in many seafood restaurants. Look for places known for fresh seafood. Local eateries often have unique recipes. You can also ask friends for their favorite spots. If you want to make them at home, check the Full Recipe for a simple guide. You learned about making tasty crab cake egg rolls. We covered key ingredients, tools needed, and how to prepare, assemble, and fry them. I also shared tips for the perfect texture, cooking evenly, and great dipping sauces. Plus, you got ideas for healthier versions and tasty variations. Remember, you can store leftovers and even freeze them. Enjoy your cooking adventure and impress your family and friends with these delicious treats!
Crab Cake Egg Rolls Flavorful and Crunchy Delight
Are you ready to elevate your snack game? Crab Cake Egg Rolls are the perfect mix of seafood goodness and crunchy delight. I’ll guide you
- 1 can refrigerated biscuit dough - 1 cup shredded mozzarella cheese - 1/2 cup cream cheese, softened - 4 cloves garlic, minced - 1/4 cup unsalted butter, melted - 2 tablespoons fresh parsley, chopped - 1 teaspoon Italian seasoning - 1/2 teaspoon salt - 1/4 teaspoon black pepper You need these key ingredients to make the best Garlic Butter Cheese Bombs. The refrigerated biscuit dough gives a nice, flaky base. The mozzarella and cream cheese create a creamy, cheesy filling that melts beautifully. Garlic adds a strong, savory punch. The melted butter, parsley, and Italian seasoning bring all the flavors together. - Various types of cheese (e.g., cheddar, gouda) - Spices for added kick (e.g., red pepper flakes) If you want to mix it up, try different cheeses. Cheddar or gouda can add a unique flavor. For those who like heat, sprinkle in some red pepper flakes. These optional ingredients let you customize your cheese bombs for any taste. For the full recipe, check the detailed instructions later. 1. Preheat your oven to 375°F (190°C). This step warms the oven for a nice bake. 2. Line a baking sheet with parchment paper. This keeps the bombs from sticking. 3. In a mixing bowl, combine the shredded mozzarella, softened cream cheese, minced garlic, Italian seasoning, salt, and black pepper. 4. Mix well to create a cheesy filling. This mixture makes the bombs rich and flavorful. 1. Roll out each biscuit from the can. 2. Flatten it a bit in your palm. This makes it easier to fill. 3. Place a generous teaspoon of the cheese filling in the center of each biscuit. 4. Fold the edges of the biscuit over the filling. 5. Seal it completely by rolling it into a ball. This keeps the cheesy goodness inside. 1. In a separate bowl, mix the melted butter with the chopped parsley. This adds a nice flavor. 2. Dip each cheese bomb into the garlic butter mixture. Make sure they are well-coated. 3. Place them seam side down on the prepared baking sheet. 4. Bake in the preheated oven for about 15-20 minutes. Check for a golden brown color. 5. Once baked, brush the bombs with any remaining garlic butter. 6. Let them rest for a few minutes before serving. This helps with the cheesy pull. For the full details, check the Full Recipe. Getting the perfect garlic butter cheese bombs takes care and precision. First, measure your ingredients carefully. Each component plays a key role in the flavor and texture. If you use too much or too little, it can change the outcome. Next, make sure to seal the dough properly. This step is crucial because if it leaks, the cheesy filling can escape during baking. When you fold the edges over the filling, pinch them tightly. This helps keep the gooey goodness inside. For the best experience, serve these cheese bombs warm. When they are fresh from the oven, they provide a delightful cheesy pull. Pair them with a simple marinara sauce or a creamy ranch dip. These dips bring out the rich flavors and add a nice touch. Enjoy them best at room temperature or warm. This way, you can fully enjoy the flavors and textures. If you let them cool too much, the cheese may not stretch like it should. Remember, warmth equals flavor! {{image_2}} You can change the cheese in your garlic butter cheese bombs for a fun twist. Instead of mozzarella, try using cheddar or gouda. Both add a nice sharpness and depth of flavor. For a lighter taste, use ricotta. It pairs well with garlic and herbs. Another great choice is herb-infused cream cheese. It gives your bombs a boost of flavor right from the start. If you like some heat, add jalapeños or chili flakes to the cheese mix. This will give your cheese bombs a nice kick. You can also use spicy cheeses like pepper jack. It melts well and adds a zesty flavor. Experimenting with different spices can make each batch unique and exciting. For those watching carbs, use low-carb biscuit dough. It works just as well and tastes great. You can find these options at many grocery stores. To make your cheese bombs gluten-free, look for gluten-free biscuit mixes. These are easy to use and will keep the flavor. Just be sure to check the labels for any hidden gluten. For the full recipe, you can follow the instructions I’ve shared above. Enjoy making your garlic butter cheese bombs! After enjoying your garlic butter cheese bombs, store any leftovers in the fridge. Place them in an airtight container. This keeps them fresh for up to three days. Make sure they cool down to room temperature first. You can also wrap them tightly in plastic wrap to seal in moisture. When it’s time to enjoy your leftovers, reheating them carefully is key. The oven is the best choice for reheating. Preheat your oven to 350°F (175°C). Place the cheese bombs on a baking sheet. Warm them for about 10-15 minutes until heated through. This method keeps the texture nice and crispy. If you’re short on time, use the microwave. Place them on a microwave-safe plate. Heat for about 30-60 seconds. Keep an eye on them to avoid sogginess. Enjoy your cheesy delight just like fresh! Garlic Butter Cheese Bombs stay fresh in the fridge for about three days. Keep them in an airtight container. For longer storage, you can freeze them. Wrap each bomb in plastic wrap and place them in a freezer bag. They will stay good for up to three months. Thaw them in the fridge before baking. Yes, you can make these ahead. Prepare the cheese filling and fill the biscuits. Then, store them in the fridge for up to 24 hours. Cover them well with plastic wrap. When you are ready to bake, just pull them out and follow the baking steps. If you freeze them, bake them from frozen but add a few extra minutes to the bake time. You can use other types of biscuits, like homemade dough or frozen dough. Homemade dough gives you a fresh taste but takes more time. Frozen dough is quick and easy. The flavor and texture will vary. Refrigerated dough is soft and fluffy. Homemade versions may be more flaky and rich. You can serve Garlic Butter Cheese Bombs warm, straight from the oven. They pair well with marinara sauce for dipping. Try serving them with a fresh salad or soup for a full meal. For beverages, a light beer or sparkling water works well. You can also serve them at parties as a fun snack. Making garlic butter cheese bombs is simple and fun. You learned the ingredients, steps, and tips to make them perfect. I shared different variations, so you can customize your bomb to your taste. Store leftovers properly to keep them fresh. These bombs are a hit for any meal or snack. Enjoy experimenting with flavors and impressing your friends. Your next delicious treat is just a bake away!
Garlic Butter Cheese Bombs Fluffy and Cheesy Delight
Get ready to indulge in a warm, cheesy treat with my Garlic Butter Cheese Bombs! These fluffy bites are stuffed with gooey cheese and garlic,
To make cheesy spinach puffs, gather the ingredients needed for this tasty treat. You will mix fresh greens with creamy cheeses, wrap them in flaky pastry, and bake until golden and crispy. It's a simple dish that packs a big flavor punch. Here is the list of the main items you need: - 1 cup fresh spinach, chopped - 1 cup ricotta cheese - 1 cup shredded mozzarella cheese - 1/2 cup grated Parmesan cheese - 1/4 teaspoon garlic powder - 1/4 teaspoon onion powder - Salt and pepper to taste - 1 sheet of puff pastry, thawed - 1 egg, beaten (for egg wash) These ingredients come together to create a rich and cheesy filling. You can customize your spinach puffs by adding these extras: - Sesame seeds (optional, for garnish) - Chopped herbs like parsley or dill for extra flavor - Cooked onions or garlic for a savory kick Feel free to mix and match these add-ins to create your perfect cheesy spinach puffs. First, gather your ingredients. You will need: - 1 cup fresh spinach, chopped - 1 cup ricotta cheese - 1 cup shredded mozzarella cheese - 1/2 cup grated Parmesan cheese - 1/4 teaspoon garlic powder - 1/4 teaspoon onion powder - Salt and pepper to taste - 1 sheet of puff pastry, thawed - 1 egg, beaten (for egg wash) - Sesame seeds (optional, for garnish) Next, preheat your oven to 400°F (200°C). Line a baking sheet with parchment paper. In a large bowl, mix the chopped spinach, ricotta, mozzarella, Parmesan, garlic powder, onion powder, salt, and pepper. Stir until everything is well combined. Now, roll out the puff pastry on a floured surface. Cut it into 3-inch squares. You should get about 9 to 12 squares. Place a tablespoon of the spinach and cheese mix in the center of each pastry square. Fold the corners of each square toward the middle. Pinch the corners together to seal them. If they don’t stick, add a little water to help. Brush the tops of the puffs with the beaten egg. This gives them a golden color when baked. If you want, sprinkle sesame seeds on top for extra crunch. Bake the puffs in your preheated oven for 15 to 20 minutes. They should turn golden brown and puff up nicely. When done, take them out and let them cool a bit before serving. For a fun touch, serve them with marinara sauce or a fresh herb dip. For the full recipe, you can check out the details above. Enjoy your cheesy spinach puffs! To make your puff pastry shine, keep it cold. Warm pastry sticks and loses its puffy charm. Roll it out gently on a floured surface. Cut it into even squares for uniform baking. Ensure you seal each puff well by pinching the corners. A little water helps them stick. This way, the filling won’t escape while baking. You can boost flavor in many ways. Try adding herbs like basil or dill for freshness. A bit of lemon zest gives a bright note. If you like spice, add a pinch of red pepper flakes. You can also mix in cooked mushrooms or sun-dried tomatoes for depth. Each addition personalizes your puffs and makes them uniquely yours. Serve your cheesy spinach puffs warm for the best taste. They pair well with marinara sauce or a yogurt dip. For a colorful touch, garnish with fresh parsley or chives. Arrange them on a nice platter for parties. Guests will love the tasty bites. These puffs are perfect for any gathering or as a snack. For the full recipe, check the earlier section! {{image_2}} You can make Cheesy Spinach Puffs a bit healthier. Try using whole wheat puff pastry. It adds fiber and taste. You can also swap ricotta for cottage cheese. This change cuts fat while keeping the creamy texture. For a lighter option, use Greek yogurt instead of some cheese. This way, you keep the flavor but reduce calories. Mixing flavors can make your puffs unique. Add some sun-dried tomatoes for a burst of flavor. Chopped artichokes also bring a nice touch. If you like spice, try adding a pinch of red pepper flakes. Fresh herbs like basil or dill can brighten the taste. Experimenting with these flavors can create your own signature puffs. Cheese is key in Cheesy Spinach Puffs. While mozzarella and ricotta are great, you can switch things up. Use feta cheese for a tangy kick. Goat cheese adds a creamy and bold flavor. For a sharper taste, swap Parmesan for aged cheddar. Mixing different cheeses can give you a delightful surprise in each bite. Check the Full Recipe for the classic combination. Once you make your cheesy spinach puffs, let them cool first. Place them in an airtight container. They stay fresh in the fridge for about 3 days. If you notice any moisture, add a paper towel inside the container. This helps keep them crisp. You can freeze cheesy spinach puffs for later. After baking, let them cool completely. Place them on a baking sheet in a single layer. Freeze for 1-2 hours until firm. Then, transfer them to a freezer bag. They can stay frozen for up to 3 months. This is great for quick snacks! To reheat, preheat your oven to 350°F (175°C). Place the puffs on a baking sheet. Bake for about 10-15 minutes until hot. You can also use an air fryer for a crispier texture. Just heat for 5-7 minutes at 350°F (175°C). Enjoy them warm for the best taste! Cheesy Spinach Puffs stay fresh for about 3 days in the fridge. Store them in an airtight container. This keeps them from drying out. If you want a crisp bite, reheat them in the oven. The puff pastry will get crunchy again. Yes, you can make Cheesy Spinach Puffs ahead of time! You can prepare them up to a day before your event. Assemble the puffs, but do not bake them yet. Cover and chill them in the fridge. When ready, bake them fresh for 15-20 minutes. This way, they taste warm and delicious. You can try many fun twists on Cheesy Spinach Puffs. Add cooked bacon or ham for extra flavor. Swap the cheeses, too. Try feta or goat cheese for a different taste. You can also add herbs like dill or parsley for fresh notes. Explore your options and find what you love best! You learned what goes into making Cheesy Spinach Puffs, from key ingredients to optional add-ins. We covered step-by-step cooking and baking tips to get them just right. Remember, achieving the perfect puff pastry takes practice. You can explore healthier and tastier variations to suit your taste. Store them well to keep them fresh, and reheating is easy. With these tips, you can impress anyone. Enjoy making these snacks and share them with family and friends!
Cheesy Spinach Puffs Flaky and Tasty Appetizer Delight
Looking for a tasty and easy appetizer? Cheesy Spinach Puffs are your answer! These flaky bites burst with cheesy goodness and fresh spinach, making them
To make these creamy spinach roll ups, you need simple and fresh ingredients. Here’s what you will use: - 8 large flour tortillas - 2 cups fresh spinach, chopped - 1 cup ricotta cheese - 1 cup cream cheese, softened - 1/2 cup grated Parmesan cheese - 1/2 teaspoon garlic powder - 1/4 teaspoon nutmeg - Salt and pepper to taste - 1 cup marinara sauce (for serving) - Fresh parsley, chopped (for garnish) These ingredients work together to create a rich and creamy filling. The spinach adds color and nutrients, while the cheeses bring that delicious creamy texture. You can easily customize this recipe. Here are some ideas to make it your own: - Diced cooked chicken for extra protein - Red pepper flakes for a spicy kick - Sun-dried tomatoes for a tangy twist - Different cheeses like mozzarella or feta - Fresh herbs like basil or dill Mix and match these options to suit your taste. Each addition can change the flavor and make it unique. If you have dietary needs, you can still enjoy this dish. Here are some options: - To make it gluten-free, use gluten-free tortillas. - For a dairy-free version, try using vegan cheese. - If you want it lower in calories, use low-fat cream cheese and ricotta. These options allow everyone to enjoy creamy spinach roll ups. Just remember to adjust your ingredients based on your needs. For the full recipe, check out the recipe card. Start by gathering your ingredients. You need ricotta cheese, cream cheese, and Parmesan cheese. In a large bowl, mix the three cheeses together. Use a spatula or a fork to blend until smooth. Next, add the chopped spinach, garlic powder, nutmeg, salt, and pepper. Stir well so that the spinach is mixed evenly with the cheese. This creamy mixture is the heart of your roll-ups. Lay a tortilla flat on your kitchen counter. Spread a good amount of the creamy cheese mixture across the tortilla. Be sure to leave a small border around the edges. Now, start rolling the tortilla from one end. Roll it tightly to keep the filling inside. Once you have rolled it, repeat this with the other tortillas. After rolling, slice each roll into bite-sized pieces. Aim for about 1.5 inches thick for easy eating. To serve, arrange the roll-ups on a pretty platter. Pour marinara sauce in a small bowl and place it in the center. This makes for a lovely dipping spot. For a pop of color, sprinkle some fresh parsley on top. You can also add extra Parmesan for flavor. This dish is perfect for parties or family dinners. Enjoy! Rolling tortillas can be tricky. Start with soft, fresh tortillas. Warm them slightly in the microwave for about 10 seconds. This makes them more pliable. Spread the creamy spinach mixture evenly. Leave a small border around the edges. Tightly roll the tortilla from one end to the other. Use your fingers to keep the filling from escaping. To keep roll-ups fresh, wrap them in plastic wrap. This helps prevent drying out. Store them in the fridge for up to three days. You can also place them in an airtight container. For best taste, eat them within the first day. Avoid overfilling the tortillas. Too much filling can cause leaks. Ensure the spinach is well-drained. Excess moisture can make the roll-ups soggy. Don’t skip refrigerating them for 30 minutes if you can. This step helps with slicing. Lastly, remember to taste your filling. Adjust seasonings if needed before assembling. {{image_2}} You can easily make this dish vegetarian or vegan. For vegetarian roll-ups, just stick with the original recipe. If you want vegan roll-ups, swap the cheeses for plant-based options. Use vegan cream cheese and a nut-based ricotta. This swap keeps the creaminess while making it dairy-free. You can also add more veggies. Try roasted peppers or mushrooms for extra flavor. Feel free to spice things up! Add red pepper flakes for heat. You can also mix in herbs like basil or oregano for a fresh taste. For a smoky flavor, try adding a bit of smoked paprika. If you like it cheesy, add more Parmesan or even some feta cheese. Each of these options adds a unique twist. While marinara is great, you can get creative with sauces. A creamy Alfredo pairs well and adds richness. If you want a tangy touch, serve with a yogurt-based sauce. You can even use pesto for a fresh, herbal flavor. Each sauce changes the dish and adds a new element. Don't be afraid to experiment! For the full recipe, check out the section above. To store leftover creamy spinach roll ups, place them in an airtight container. This helps keep them fresh. You can refrigerate them for up to three days. Make sure the roll ups cool before you cover them. This avoids moisture buildup, which can make them soggy. You can freeze creamy spinach roll ups for later use. Wrap each roll up tightly in plastic wrap. Then, put them in a freezer bag. This keeps them safe from freezer burn. They stay good for up to three months. When you're ready to eat, thaw them in the fridge overnight. To reheat your roll ups, preheat the oven to 350°F (175°C). Place the roll ups on a baking sheet. Cover them with foil to keep them moist. Heat for about 15-20 minutes. You can also microwave them for quicker results. Just heat for 1-2 minutes, checking often to avoid overcooking. Serve with marinara sauce from the Full Recipe for a tasty touch. Yes, you can make Creamy Spinach Roll Ups ahead of time. Prepare them a day in advance and store them in the fridge. Cover them tightly with plastic wrap to keep them fresh. This also helps the flavors meld together. When you're ready to serve, just slice and enjoy! Creamy Spinach Roll Ups pair well with various sides. Here are some great options: - A fresh garden salad adds a nice crunch. - Garlic bread is a tasty addition. - Roasted vegetables bring color and flavor. - You can serve extra marinara sauce for dipping. These sides make your meal more exciting and filling! To keep the filling inside, use these tips: - Spread the filling evenly, but leave a small edge. - Roll the tortilla tightly, starting from one end. - Secure the roll with a toothpick if needed. These steps help hold everything together. Plus, you can chill the roll-ups for a bit before cutting them. This helps firm them up and reduces leaking. For the complete recipe, check out the Full Recipe section! Creamy Spinach Roll Ups are simple and tasty. We covered main and optional ingredients, giving you options. You learned step-by-step how to prepare and assemble them. I shared tips to keep your roll ups fresh and avoid common mistakes. You can customize these roll ups for any diet. Don’t forget to store extras properly or freeze them for later. I hope you feel ready to try this fun recipe. Enjoy your cooking and get creative!
Creamy Spinach Roll Ups Tasty and Easy Recipe
Are you craving a quick and tasty snack? Look no further than my creamy spinach roll ups! This easy recipe is packed with flavor and