Appetizers

Mini Pizza Pot Pies Flavorful and Easy to Make
Are you craving pizza but want something unique and fun? Let’s dive into the world of Mini Pizza Pot Pies! These tasty little delights are

Corn Dog Muffins Irresistible Comfort Food Recipe
Corn Dog Muffins are the perfect twist on classic comfort food! Made with simple ingredients, these tasty treats combine the joy of corn dogs with

Air Fryer Bang Bang Chicken Crispy and Flavorful Delight
Get ready to savor Air Fryer Bang Bang Chicken—a dish that’s crisp, spicy, and full of flavor! In this guide, I’ll share every detail to
![- Fresh basil leaves - Sun-dried tomatoes - Pine nuts Fresh basil leaves are key. They bring a bright, herbal taste. Look for vibrant green leaves. Sun-dried tomatoes add sweetness and depth. They should be packed in oil for the best flavor. Pine nuts give a nice crunch. Toast them lightly to enhance their nuttiness. - Different types of cheese - Variations of nuts (e.g., walnuts, hazelnuts) - Flavor enhancers (e.g., garlic, lemon juice) You can mix in different cheeses. Parmesan is classic, but try pecorino for a twist. If you want a nutty flavor, use walnuts or hazelnuts instead of pine nuts. Garlic adds a punch, while lemon juice brightens the mix. These optional ingredients can enhance your tomato pesto’s taste. For the full recipe, check out Tomato Basil Pesto Delight. To start, toast the pine nuts. Place them in a dry skillet over medium heat. Stir them frequently until they turn golden brown. This should take about 3 to 5 minutes. Remove them from heat and let them cool. This step adds a nice, nutty flavor to the pesto. Next, prepare your fresh basil and sun-dried tomatoes. Rinse the basil leaves gently under cool water. Pat them dry with a clean towel. For the sun-dried tomatoes, make sure they are packed in oil and drained well. This will help blend smoothly. Now, it’s time to blend! Grab your food processor and add in the fresh basil leaves, sun-dried tomatoes, toasted pine nuts, grated Parmesan cheese, and minced garlic. Pulse these ingredients together until they start to break down. Slowly drizzle in the extra-virgin olive oil while the food processor runs. This helps to create a smooth paste. Blend until you reach your desired consistency. If it seems too thick, add a bit more olive oil. Once blended, it’s time to adjust the seasoning. Add the lemon juice, salt, and pepper to taste. Blend again to mix everything well. Taste your pesto and adjust the flavors if needed. A little more lemon juice or salt can enhance the taste. Finally, transfer your pesto to an airtight container. You can use it right away or store it in the fridge for up to a week. If you want to keep it longer, freeze it in ice cube trays. This way, you can enjoy this delicious tomato pesto whenever you want! For the complete recipe, check the [Full Recipe]. To make a great tomato pesto, start with high-quality ingredients. Fresh basil gives the best flavor. Look for vibrant green leaves without any brown spots. Sun-dried tomatoes should be plump and packed in oil. This adds depth to your pesto. Pine nuts must be toasted lightly for a nutty taste. Avoid burnt nuts; they ruin the flavor. When making pesto, avoid common mistakes. Do not over-blend the mixture; it should remain slightly chunky. This adds texture to your dish. Be careful with salt. Start with a little, then add more if needed. You can always add but can’t take away! For the best taste, let your pesto rest overnight in the fridge. This allows the flavors to blend beautifully. Use an airtight container to keep it fresh. The next day, give it a quick stir before using. Feel free to experiment with ingredient proportions. If you love garlic, add more. If you want a creamier texture, use more cheese. Each small change can lead to a new flavor adventure. Try different nuts or add a hint of spice for a twist. Creating the perfect tomato pesto is all about your taste. Enjoy this flavorful blend in your dishes. For a complete guide, check out the Full Recipe. {{image_2}} Tomato pesto is so fun to make! You can try different versions to mix things up. One popular type is sun-dried tomato pesto. This version gives a richer flavor. You simply swap fresh tomatoes for sun-dried ones. They add a wonderful sweetness. Just blend them with the other ingredients, and you’re all set! If you're looking for nut-free options, you can skip the pine nuts. Instead, use seeds like pumpkin or sunflower. These seeds still add a nice crunch. You can also use more cheese to keep the texture creamy. It’s easy to adapt the recipe to fit your needs. Tomato pesto can jazz up many dishes. One of my favorite uses is in pasta. Just toss it with hot pasta for a quick meal. The heat makes the pesto melt into a sauce. You can add veggies or protein for a complete dish. You can also use tomato pesto as a spread. It works great on sandwiches or wraps. Simply spread some on your bread for extra flavor. It also makes a tasty dip for crackers or veggies. The options are endless! To keep your tomato pesto fresh, store it in the fridge. Use an airtight container. This helps to prevent air from spoiling the flavors. Your pesto can last up to a week in the fridge. If you want to store it longer, freezing is a great option. - Freezing Tips: You can freeze tomato pesto in ice cube trays. Once frozen, pop the cubes into a freezer bag. This way, you can use just what you need later. The pesto will stay good for up to six months in the freezer. How long does homemade pesto last? Homemade pesto can last about a week in the fridge. Always check the smell and color before using. - Signs of Spoilage: If your pesto smells sour or changes color, it’s time to toss it. Mold is another sign that your pesto has gone bad. Always trust your senses when it comes to food safety. Can I use fresh tomatoes instead of sun-dried? Yes, you can use fresh tomatoes. However, fresh tomatoes will change the texture. Sun-dried tomatoes offer a deeper and richer flavor. If you prefer fresh, use a variety that is sweet and ripe. You might need to adjust the other ingredients to balance the moisture. Is tomato pesto healthy? Tomato pesto can be healthy. It includes fresh herbs, healthy fats, and vitamins. The olive oil and nuts provide beneficial fats. Just be mindful of portion sizes, as it can be calorie-dense. How far in advance can I make it? You can make tomato pesto up to a week ahead. Store it in an airtight container. To keep it fresh, drizzle a little olive oil on top before sealing. Can I prepare it without a food processor? Yes, you can make pesto without a food processor. Use a sharp knife to chop the ingredients finely. You can also use a mortar and pestle to blend everything together. It takes longer but gives you a nice texture. Where to find high-quality products? Look for tomato pesto at local grocery stores or specialty shops. Check the aisle with pasta sauces or condiments. Many farmers' markets also sell homemade versions. What to look for when purchasing store-bought pesto? When buying pesto, read the label. Look for fresh ingredients and no preservatives. A good pesto should have olive oil listed first. Check for a bright color, as this shows quality and freshness. Tomato pesto is a simple and tasty treat. We explored key ingredients like fresh basil, sun-dried tomatoes, and pine nuts. I shared steps to prepare, blend, and tweak flavors to get it just right. You learned tips to enhance taste and store your pesto safely. Whether you prefer sun-dried or nut-free versions, the options are endless. Remember, quality ingredients matter. Enjoy making and sharing your own unique tomato pesto creations.](https://toastedrecipes.com/wp-content/uploads/2025/07/d245d974-c952-469b-b062-e934f6b5c3e1.webp)
Tomato Pesto Flavorful Blend for Your Dishes
Are you ready to elevate your meals? Tomato pesto is a delightful mix that adds a burst of flavor to any dish. With key ingredients
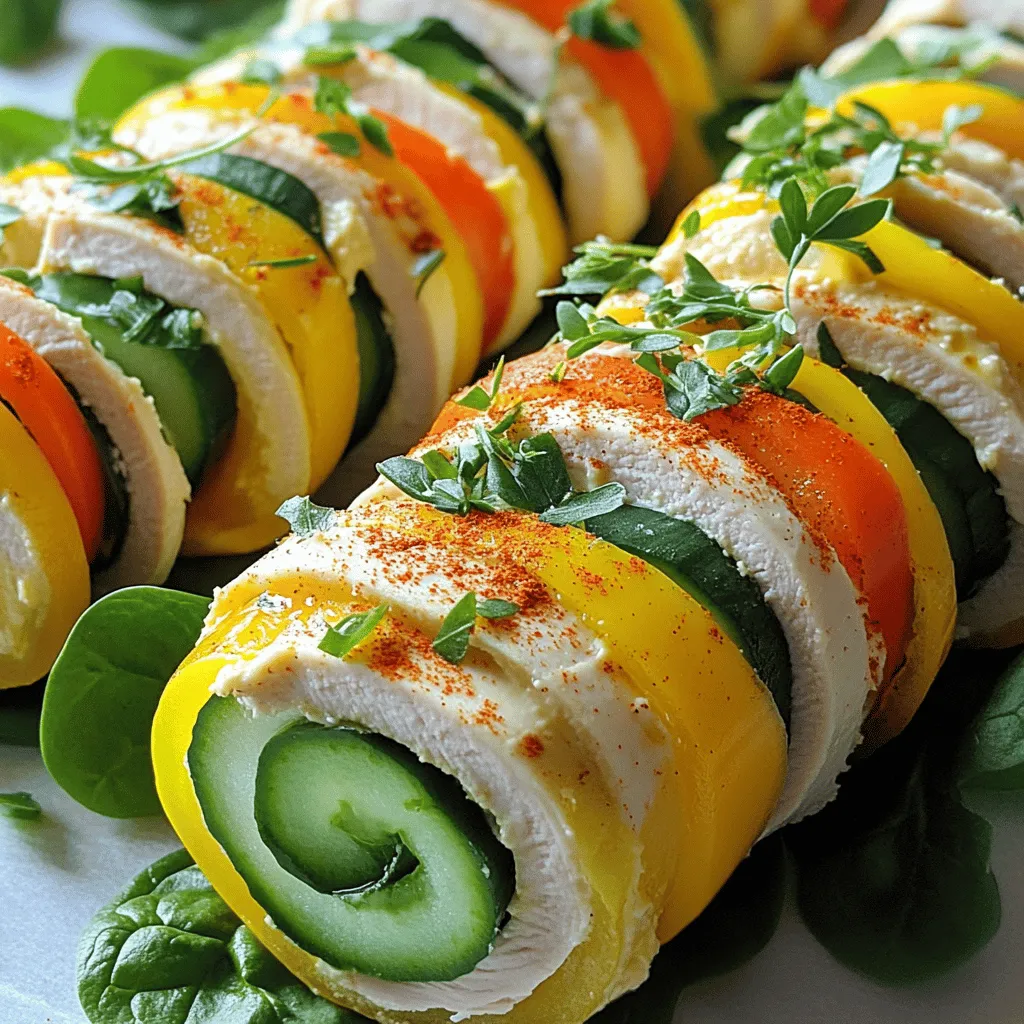
Hungry Girl’s Turkey Protein Rollups Easy and Tasty Meal
Looking for a quick, healthy meal that’s bursting with flavor? Hungry Girl’s Turkey Protein Rollups are your answer. In just a few minutes, you can

Turkey and Cheese Crescent Rolls Flavorful and Easy Dish
Looking for a fun and easy dish to impress your family? Turkey and Cheese Crescent Rolls are the answer! With just a few simple ingredients
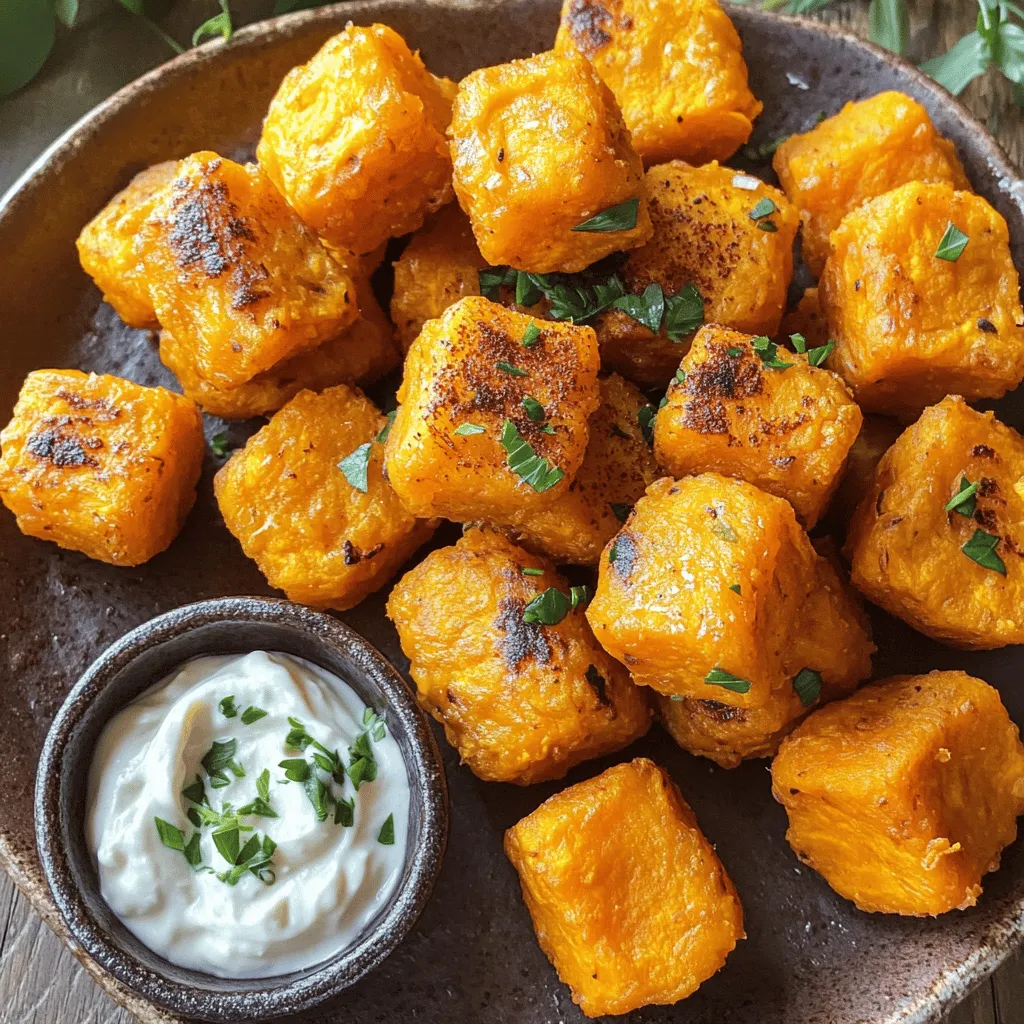
Sweet Potato Tots Flavorful and Fun Snack Idea
Looking for a fun snack that’s both tasty and easy to make? Sweet potato tots are the answer! They’re crispy on the outside and soft
![- 4 ripe tomatoes, diced - 1 small red onion, finely chopped - 2 cloves garlic, minced - 1 jalapeño, deseeded and minced (adjust for spiciness) - 1 cup fresh cilantro, chopped - Juice of 2 limes - 1 teaspoon ground cumin - Salt and pepper to taste - 1 tablespoon olive oil - 1 yellow bell pepper, diced Each ingredient brings its own flavor to the salsa. Ripe tomatoes add sweetness and juiciness. Red onion offers a sharp bite. Garlic gives depth, while jalapeño adds heat. Fresh cilantro gives a bright finish. Lime juice brings freshness and acidity. Ground cumin adds warmth. Salt and pepper enhance all the flavors. Olive oil adds richness, and yellow bell pepper provides sweetness and crunch. If you can’t find fresh ingredients, use canned tomatoes. They work well in a pinch. You can also swap red onion for green onion for a milder taste. If you want more heat, try adding a serrano pepper instead of jalapeño. For a twist, consider adding diced mango or pineapple for a sweet touch. When you chop or dice, keep your knife skills in mind. For tomatoes, remove the core first. Cut them into quarters, then dice. For onion, slice it in half, then chop finely. When dicing jalapeños, use gloves to protect your hands. Always remove the seeds for less heat. A sharp knife makes all the difference in achieving uniform pieces. This ensures the salsa has a nice texture. To make the best homemade salsa, start by preparing your ingredients. Chop each one carefully to keep the flavors fresh. Here are some tips for dicing and chopping: - Tomatoes: Use a sharp knife. Cut the tomatoes in half, scoop out the seeds, and dice the flesh. - Onion: Cut off the ends, peel, and slice. Then, chop into tiny pieces. - Garlic: Smash the cloves with the knife for easy peeling. Then, mince finely. - Jalapeño: Cut in half, remove the seeds, and dice. Adjust the amount based on your spice level. - Cilantro: Rinse it well. Chop the leaves and tender stems for more flavor. Tools you need for preparation include: - A sharp chef's knife - A cutting board - A mixing bowl - Measuring spoons After preparing the ingredients, it’s time to mix them. Start by adding the diced tomatoes, yellow bell pepper, and red onion into a medium bowl. Next, add the minced garlic and jalapeño. Stir gently to combine each ingredient well. Then, fold in the chopped cilantro. Pour in the lime juice, ground cumin, and olive oil. Finally, season with salt and pepper to taste. Stir everything until well mixed. This step ensures each bite bursts with flavor. Chilling your salsa makes a big difference. It allows the flavors to meld together. This step is vital for a tasty result. Cover your bowl with plastic wrap and place it in the fridge. Let the salsa chill for at least 30 minutes. Timing matters here. If you can wait longer, even better! A few hours will deepen the flavors more. Enjoy your salsa with chips or on your favorite dishes. For the complete recipe, check the [Full Recipe]. To adjust the spiciness of your salsa, taste as you go. If you want more heat, add minced jalapeño. For less heat, use less jalapeño or remove the seeds. To balance acidity, squeeze more lime juice into the mix. This adds brightness. Season your salsa well. Salt enhances the flavors, bringing everything together. The best pairings for homemade salsa include crispy tortilla chips, grilled chicken, or fish tacos. You can also use salsa as a topping for nachos or tacos. For a creative twist, serve it over a fresh salad or as a dip for veggies. Try mixing it with cream cheese for a tasty spread. When plating your salsa, use a colorful bowl to make it pop. A bright dish catches the eye. Garnish with cilantro leaves and lime wedges for added flair. This not only looks great but also adds freshness. To impress guests, serve salsa with a side of crispy tortilla chips arranged neatly on a platter. {{image_2}} You can easily change your salsa with fun swaps. For a tropical twist, add mango or pineapple. These fruits bring sweetness and bright color. They balance the heat from the jalapeño. Just chop them finely and mix them in. If you want a smoky flavor, try chipotle peppers. These peppers add depth and a nice kick. Use them carefully, as they can be spicy. You can find them dried or canned. Just chop them and stir them into your salsa. Some people love chunky salsa, while others prefer it smooth. To make it chunky, simply chop your veggies into larger pieces. This gives you a fresh crunch. For a smooth salsa, blend everything until it’s creamy. A food processor works best for this. Adjust the texture to fit your taste. Feel free to mix in other veggies or fruits. Seasonal ingredients can really boost your salsa. In summer, try fresh corn or zucchini. In fall, add roasted red peppers or even pumpkin. Each season brings new flavors to explore. Just dice and mix them in, and enjoy your creation. For more ideas, check out the Full Recipe. To store your homemade salsa in the fridge, place it in an airtight container. This keeps out air and moisture. Make sure the lid closes tightly. Salsa can stay fresh in the fridge for about 3 to 5 days. Always use a clean spoon to scoop out salsa. This helps prevent bacteria from growing. If you want to keep salsa longer, freezing is a great option. Use a freezer-safe container or a heavy-duty freezer bag. Leave some space at the top for expansion. Salsa can last up to 6 months in the freezer. When you're ready to eat, thaw it in the fridge overnight. Homemade salsa lasts about 3 to 5 days in the fridge. If you see any mold or smell something off, throw it away. Always check before eating. For the best taste, enjoy it fresh. The flavors are at their peak right after making it. Yes, you can can homemade salsa! To preserve salsa, follow these steps: - Choose fresh ingredients: Use ripe tomatoes, crisp peppers, and fresh herbs. - Cook the salsa: Heat the salsa mixture in a pot before canning. This helps kill bacteria. - Use clean jars: Sterilize your jars and lids to prevent spoilage. - Seal properly: Fill jars while hot, leaving some space at the top. Seal tightly. - Process in a water bath: Boil the jars for 15-20 minutes to ensure a good seal. Make sure to check the seals after cooling. Properly canned salsa can last for up to a year in a cool, dark place. If you lack fresh cilantro, don't worry. Here are some great substitutes: - Parsley: This herb has a fresh taste and works well in salsa. - Basil: Adds a sweet, fragrant note that can change the flavor profile. - Mint: Provides a refreshing twist that pairs nicely with tomatoes. - Dill: Has a unique flavor that can give your salsa a new spin. Feel free to experiment with these herbs. Each will give your salsa a different taste. Making salsa less spicy is easy. Try these tips: - Remove seeds and membranes: For jalapeños, these parts hold most of the heat. - Add more tomatoes: Increase the amount of tomatoes to dilute the spiciness. - Incorporate sugar: A little sugar can balance out the heat. - Use mild peppers: Swap jalapeños for bell peppers for a sweeter, milder taste. Adjust the spice level to your liking, and enjoy your salsa! You now have all the tools to make great salsa. Start with fresh ingredients, like ripe tomatoes and garlic. Use the tips to chop and mix well for the best flavor. Consider chilled salsa for enhanced taste. Remember to adjust spice and acidity to your liking. You can also explore fun variations with fruits and vegetables. Proper storage helps keep your salsa fresh. Try these ideas, and create delicious salsa that impresses everyone. Enjoy your tasty creation!](https://toastedrecipes.com/wp-content/uploads/2025/07/ac8274a9-650f-4261-b8bf-e0b2520f93cb.webp)
Best Homemade Salsa Ever Simple and Flavorful Recipe
Are you ready to spice up your meals? This simple and flavorful recipe for the best homemade salsa ever will have your taste buds dancing!

Rice Patties Flavorful and Easy Recipe Guide
If you’re on the hunt for a delicious, easy-to-make dish, rice patties are your answer. In this guide, I’ll show you how to whip up
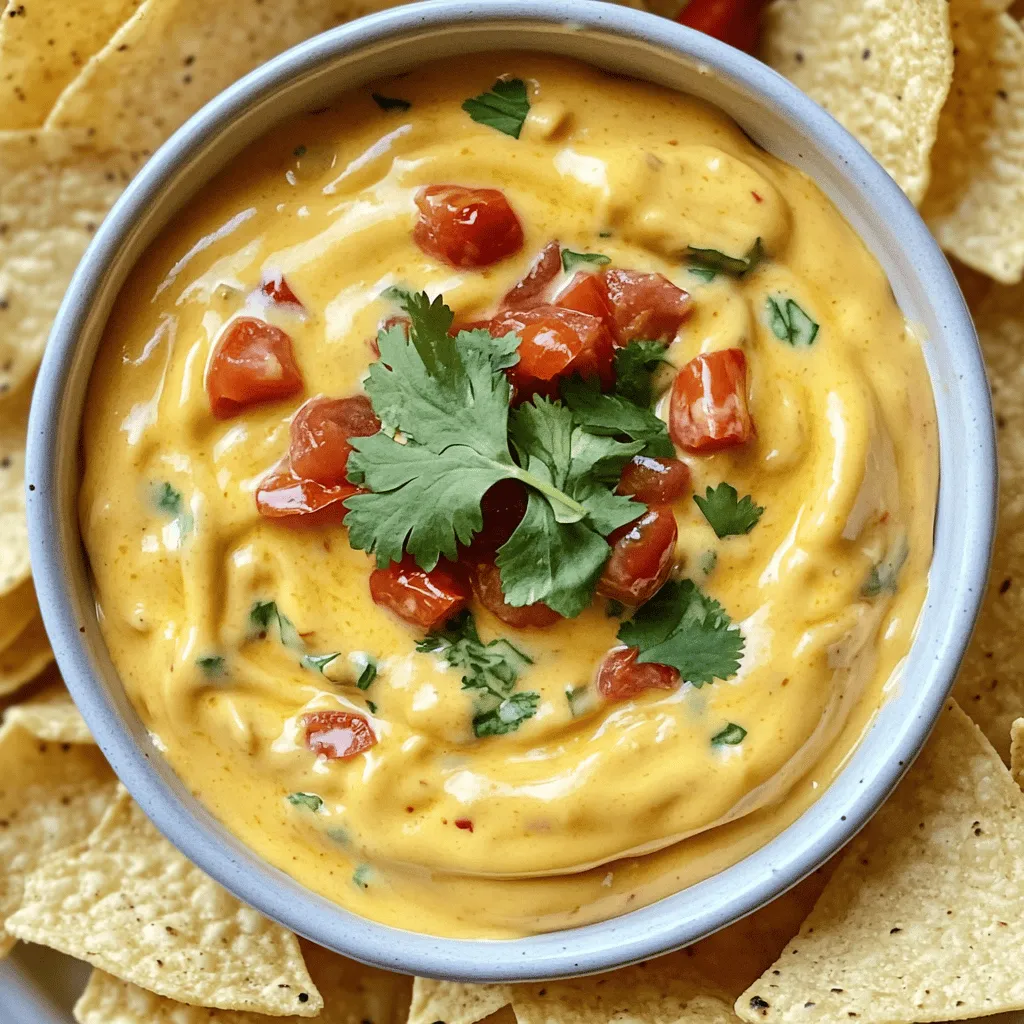
Hatch Chile Queso Bold and Creamy Dip Recipe
Get ready to elevate your snack game with my bold and creamy Hatch Chile Queso! This dip is rich, cheesy, and packed with the smoky