Skip to content
toastedrecipes.com
  • Home
  • Appetizers
  • Desserts
  • Salads
  • Breakfast
  • Dinner
  • Privacy Policy
  • Contact
  • About

Chef Theo

Easy Stuffed Shells Delicious Family Dinner Recipe

May 10, 2025May 4, 2025 by Chef Theo
To make easy stuffed shells, gather these main ingredients: - 20 jumbo pasta shells - 2 cups ricotta cheese - 1 cup fresh spinach, chopped - 1 cup mozzarella cheese, shredded - 1/2 cup Parmesan cheese, grated - 1 egg, lightly beaten - 1 teaspoon garlic powder - 1 teaspoon Italian seasoning - Salt and pepper to taste - 2 cups marinara sauce - Fresh basil leaves for garnish These ingredients create a rich and creamy filling. You’ll love how they blend together. If you want to mix it up, consider these optional ingredients: - Cooked ground beef or turkey - Sautéed mushrooms - Artichoke hearts - Different cheeses like feta or goat cheese - A pinch of red pepper flakes for a kick These options let you customize your stuffed shells. Feel free to get creative and use what you have. For this recipe, you will need: - A large pot for boiling pasta - A mixing bowl for the filling - A 9x13 inch baking dish - A spoon for stuffing the shells - Aluminum foil to cover the dish Having the right tools makes cooking easier and more fun. Get your kitchen ready for this delicious meal! To start, I boil water in a large pot. Add salt to the water for flavor. Once boiling, I add 20 jumbo pasta shells. I cook them until they are al dente, which means firm to the bite. This usually takes about 8-10 minutes. After cooking, I drain the shells and set them aside to cool. This step is key so they don't break when I stuff them later. In a large bowl, I mix together the filling. I add 2 cups of ricotta cheese. Then, I fold in 1 cup of chopped fresh spinach. This adds a healthy green touch. Next, I add 1/2 cup of shredded mozzarella cheese and 1/4 cup of grated Parmesan cheese. For flavor, I mix in 1 teaspoon of garlic powder and 1 teaspoon of Italian seasoning. I also add one lightly beaten egg, salt, and pepper. I stir everything until it’s well-blended. This creamy filling is what makes the stuffed shells so tasty. Now, I pour 1 cup of marinara sauce into a 9x13 inch baking dish. I spread it evenly across the bottom. Next, I take each cooled pasta shell and stuff it with the cheese and spinach mixture. I place the stuffed shells seam-side up in the dish. Once all the shells are in the dish, I pour the remaining marinara sauce on top. I sprinkle the rest of the mozzarella and Parmesan cheeses over the sauce. To bake, I cover the dish with aluminum foil and put it in the oven at 375°F (190°C) for 25 minutes. After that, I remove the foil and bake for another 10-15 minutes. The cheese should be bubbly and slightly golden when done. I let the shells cool for a few minutes, then garnish with fresh basil leaves. This dish looks as good as it tastes! For the full recipe, refer to the section above. When picking jumbo shells, look for even sizes. This helps with even cooking. Choose a brand that feels sturdy. Avoid thin shells as they can break. Check the package for freshness dates. Fresh pasta shells taste better and cook well. One common mistake is overcooking the shells. Cook them just until al dente. This keeps them firm for stuffing. Another mistake is overfilling the shells. A generous spoonful is enough. Stuff them too much, and they may burst. Lastly, don’t forget to cover the dish. This keeps the cheese from burning. Adding herbs can really boost flavor. Fresh basil, parsley, or oregano work well. Mix these into your cheese filling. You can also use garlic powder for a nice kick. Italian seasoning adds depth, too. Experiment with spices to find your favorite mix. A little can go a long way in making these shells shine. For the full recipe, check out the details above. {{image_2}} For meat lovers, stuffed shells can be a real treat. You can use ground beef, turkey, or sausage. Brown the meat in a pan, then mix it with ricotta. Add some Italian herbs for extra flavor. You can also add diced tomatoes for moisture. This mix fills the shells well and makes a hearty meal. If you want a lighter option, think about using veggies. You can stuff shells with mushrooms, zucchini, or bell peppers. Sauté the veggies first to bring out their flavors. Mix them with ricotta, herbs, and a bit of mozzarella. This gives a fresh taste and keeps it healthy. You can even toss in some artichokes for a unique twist. For those on special diets, there are great choices. Use gluten-free pasta shells made from rice or corn. For a dairy-free filling, try cashew cheese or tofu. Blend the tofu with herbs and spices to mimic the creamy texture of ricotta. This way, everyone can enjoy stuffed shells without missing out. These variations make this dish fun and flexible. You can find the Full Recipe to explore more ideas! After enjoying your stuffed shells, let them cool. Place any leftovers in an airtight container. Make sure they are sealed well. Store them in the fridge for up to three days. If you want to keep them longer, freezing is a great option. To freeze your stuffed shells, first, let them cool completely. Use a freezer-safe dish and layer the shells. You can also wrap them tightly in plastic wrap. This will help prevent freezer burn. When ready to eat, you can bake them straight from frozen. Just add extra baking time. When reheating, preheat your oven to 350°F (175°C). Place the shells in a baking dish. Add a splash of marinara sauce to keep them moist. Cover the dish with foil to keep the heat in. Bake for about 20 minutes or until heated through. Enjoy your delicious meal again! Yes, you can make stuffed shells ahead. Prepare them up to the baking step. Cover the dish and store it in the fridge for up to 24 hours. When you’re ready, bake them straight from the fridge. Just add a few extra minutes to the baking time. If you want a ricotta substitute, try cottage cheese. You can also use cream cheese or a vegan option like tofu. Blend the tofu to get a smooth texture. Each option gives a different taste but still works well. Stuffed shells last about 3 to 5 days in the fridge. Make sure to store them in an airtight container. This keeps them fresh and tasty for later meals. Just reheat them well before eating. Yes, you can freeze stuffed shells. Prepare them fully, then let them cool. Place them in a freezer-safe dish. Cover tightly with plastic wrap and foil. They can last up to 3 months in the freezer. To reheat, first let them thaw in the fridge overnight. Preheat your oven to 375°F (190°C). Place the shells in a baking dish and cover with foil. Bake for about 25 minutes. Check for warmth before serving. Sure! You can mix in different cheeses like feta or goat cheese. These add unique flavors. You can also try adding more mozzarella for extra gooeyness. You can add cooked ground meat, like beef or turkey, for a heartier dish. Chopped vegetables like mushrooms or zucchini also work great. Feel free to get creative with flavors and textures! Stuffed shells pair well with a simple salad and garlic bread. You can also serve them with a side of veggies. A light, fresh dish balances the richness of the shells. Absolutely! You can add red pepper flakes to the cheese mixture. Using spicy marinara sauce is another great option. Adjust the spice to your liking for a kick! Yes, fresh spinach works great! Just chop it finely and cook it a bit before mixing. This helps reduce moisture and adds vibrant flavor to the dish. For the complete recipe, check the Full Recipe section above. You learned about making delicious stuffed shells. We covered the key ingredients, tools, and step-by-step instructions. We also discussed tips to choose shells and enhance flavors. Variations let you explore meat, veggie, and gluten-free options. Remember to store leftovers properly for later enjoyment. With these ideas and methods, you can create your own tasty dish. Now, it’s time to gather your ingredients and start cooking. Enjoy your culinary journey with stuffed shells!

Looking for a dinner that pleases the whole family? Try these Easy Stuffed Shells! This dish is simple to prepare and full of flavor. With just a few ingredients and …

Read more

Categories Dinner

Blackened Chicken and Sweet Potato Bowls Delight

May 10, 2025May 4, 2025 by Chef Theo
- 2 boneless, skinless chicken breasts - 2 medium sweet potatoes, peeled and cubed - 2 tablespoons olive oil - 1 cup cooked quinoa - 1 avocado, sliced - 1/2 cup cherry tomatoes, halved - 1/4 cup fresh cilantro, chopped - 1 lime, cut into wedges To get that perfect blackened flavor, you need: - 1 tablespoon smoked paprika - 1 teaspoon garlic powder - 1 teaspoon onion powder - 1/2 teaspoon cayenne pepper (adjust to taste) - Salt and black pepper to taste Mix these spices in a small bowl. This blend will add depth and heat to your chicken. Rub it all over your chicken breasts. Make sure they are well coated for the best flavor. You can add extra flair to your bowls with: - Greek yogurt or sour cream for creaminess - Extra cilantro for freshness - Sliced jalapeños for added heat - Lime wedges for a zesty kick These toppings can enhance the flavors and add a bit of fun to your meal. You can find the full recipe to guide you through the steps. Enjoy creating your own delicious blackened chicken and sweet potato bowls! First, grab your chicken breasts. In a small bowl, mix smoked paprika, garlic powder, onion powder, cayenne, salt, and black pepper. This spice mix gives the chicken bold flavor. Rub the mix all over the chicken. Make sure every part is well coated. Set the chicken aside while you prep the sweet potatoes. Next, preheat your oven to 425°F (220°C). Peel and cube the sweet potatoes. Toss them in 1 tablespoon of olive oil and add a pinch of salt. Spread the cubed potatoes on a baking sheet. Roast them for 25-30 minutes. Flip them halfway through to ensure even cooking. They should be tender and a little caramelized when done. While the sweet potatoes roast, heat 1 tablespoon of olive oil in a skillet over medium-high heat. Once the oil is hot, add the seasoned chicken breasts. Cook for about 6-7 minutes on each side. You want a nice blackened crust. Check that the chicken is cooked through. Take it off the heat and let it rest for a few minutes. Then, slice it into strips. Now it’s time to build your bowls. Start with a base of cooked quinoa in each bowl. Top it with the roasted sweet potatoes. Next, add the sliced blackened chicken. Don't forget the avocado slices and halved cherry tomatoes. For a fresh touch, sprinkle chopped cilantro on top. Serve with lime wedges on the side. You can squeeze lime juice over the bowl for extra flavor. For complete details on the recipe, check the Full Recipe. To get the most flavor, I always use a hot skillet. Start with a cast iron pan. It holds heat well and gives a nice crust. Make sure to preheat it for a few minutes. This step is key for that signature blackened flavor. First, coat the chicken with the spice mix. I love using smoked paprika; it adds depth. When the skillet is hot, add the chicken. Don’t move it around too much. Let it sear for about six minutes. Then flip and repeat. A good sear is what gives that blackened look. I like to serve these bowls with a lime wedge on the side. The lime juice adds a fresh zing. You can also top with sliced avocado for creaminess. Fresh cilantro brightens the dish and adds color. For a twist, try adding Greek yogurt or sour cream on top. It makes each bite even better. You can find the full recipe for all the details. {{image_2}} You can easily make this dish fit your diet. For gluten-free needs, ensure your spices are gluten-free. Most spices are safe, but always check labels. If you're following a keto diet, swap the quinoa for cauliflower rice. This change cuts carbs while keeping the flavors. Feel free to get creative with your veggies. Instead of sweet potatoes, try butternut squash or zucchini. You can also add bell peppers or spinach for extra color and nutrients. If chicken isn't your thing, use shrimp or tofu. Both options pair well with the spices. Add depth to your bowls with extra toppings. A sprinkle of feta or goat cheese adds creaminess. For a zesty kick, drizzle some hot sauce over the dish. Fresh herbs like basil or parsley can brighten up the flavors too. You can find more ideas in the Full Recipe for even more inspiration. After you enjoy your blackened chicken and sweet potato bowls, store any leftovers right away. Use airtight containers to keep them fresh. Place the chicken and sweet potatoes in one container and the quinoa in another. This helps keep the flavors bright. You can store them in the fridge for up to four days. Make sure to cool everything down before sealing them tightly. When you are ready to eat your leftovers, reheat them gently. You can use the microwave for quick reheating. Place the food on a plate and cover it with a damp paper towel. This keeps the moisture in. Heat in 30-second bursts until warm. If you want a crispy texture, try reheating in a skillet over medium heat. Just give it a few minutes on each side. This recipe is perfect for meal prep. You can cook a big batch at once. Prep all the ingredients and store them separately. This way, you can mix and match throughout the week. Cooked chicken, sweet potatoes, and quinoa keep well in the fridge. You can also freeze portions for later. Just thaw overnight in the fridge before reheating. For easy lunches, pack the bowls with your favorite toppings. For the full recipe, check out the detailed instructions. Blackened chicken is a method of cooking chicken. You coat the chicken with spices. Then, you cook it in a hot skillet. This method creates a dark, crispy crust. The spices give it a rich flavor. You can use various spices for your blend. To adjust the spiciness, change the cayenne pepper amount. If you like it mild, use less. For more heat, add more cayenne. You can also use milder spices like paprika. Taste the spice blend before applying it to the chicken. This way, you can find your perfect heat. Yes, you can prepare parts of this dish ahead of time. Cook the sweet potatoes and chicken early. Store them in the fridge for up to three days. When you're ready to eat, just reheat and assemble the bowls. This makes meal time quick and easy. Many sides pair well with this dish. Try a fresh green salad for crunch. You can also add steamed broccoli or green beans. For a heartier option, serve with brown rice or cornbread. Each side enhances the flavors of the chicken and sweet potatoes. Yes, this recipe is great for meal prepping. Each component stores well. Keep the chicken and sweet potatoes in separate containers. This keeps them fresh and tasty. You can mix and match your bowls throughout the week. Enjoy a new meal every day without extra cooking! For the full recipe, check out the main article. This article covered the key steps to make a tasty blackened chicken and sweet potato bowl. We explored ingredients, cooking methods, variations, and storage tips. With the right spices and techniques, you can create a dish full of flavor. Remember to customize it to fit your diet and preferences. Enjoy experimenting with different toppings and sides. With this guide, you have the tools to make a satisfying meal for any occasion.

If you crave bold flavors and healthy meals, you’ll love these Blackened Chicken and Sweet Potato Bowls. This dish combines spicy, crispy chicken with sweet, tender potatoes for a winning …

Read more

Categories Dinner

Chinese Beef and Broccoli Simple One Pan Recipe

May 10, 2025May 4, 2025 by Chef Theo
To make Chinese beef and broccoli, you need a few key items. Here is your shopping list: - 1 pound beef sirloin, thinly sliced - 3 cups broccoli florets - 1 bell pepper, sliced (any color) - 3 cloves garlic, minced - 1 tablespoon ginger, grated - 1/4 cup soy sauce - 2 tablespoons hoisin sauce - 1 tablespoon cornstarch - 1 tablespoon sesame oil - 2 tablespoons vegetable oil - 1 teaspoon red pepper flakes (optional) - Cooked rice or noodles (for serving) You need some simple tools to cook this dish. Gather these before you start: - Large pan or wok - Knife and cutting board - Mixing bowl - Measuring spoons and cups - Spatula or wooden spoon If you don't have some ingredients, don't worry! Here are some swaps: - Use flank steak instead of sirloin for a different flavor. - Any color bell pepper works, but you can use snap peas or carrots instead. - If you lack hoisin sauce, try a mix of soy sauce and a bit of sugar. - For a gluten-free option, use tamari instead of soy sauce. - Swap sesame oil for olive oil if you need to. This list will help you get ready for the full recipe. Enjoy cooking! To start, take your 1 pound of beef sirloin and slice it thinly. You want pieces that cook fast. In a bowl, mix the beef with 1/4 cup soy sauce, 1 tablespoon cornstarch, and 1 tablespoon sesame oil. This helps add flavor and tenderizes the meat. Make sure each slice is coated well. Let it sit for about 15 minutes. This step is key for juicy beef in your dish. Now, heat a large pan or wok over medium-high heat. Once hot, add 2 tablespoons of vegetable oil. You want the oil to shimmer. Place the marinated beef in a single layer in the pan. Sear it for about 2-3 minutes until it turns brown. Don't overcrowd the pan. This step keeps the beef juicy. After browning, remove the beef and set it aside on a plate. In the same hot pan, add 3 cloves of minced garlic and 1 tablespoon of grated ginger. Stir them for about 30 seconds until you smell a great aroma. Next, toss in 3 cups of broccoli florets and 1 sliced bell pepper. Stir-fry these veggies for about 4-5 minutes. You want them tender but still crisp. Finally, return the beef to the pan. Add 2 tablespoons of hoisin sauce and mix well. Cook for another 2-3 minutes, letting the flavors blend. Now, you're ready to serve this beefy broccoli delight over rice or noodles. For the full recipe, check the earlier section. To get that nice flavor, start by marinating your beef. Use soy sauce, cornstarch, and sesame oil. Let it sit for about 15 minutes. This step adds depth to the meat. The garlic and ginger also play a big role. Sauté them until fragrant. This will make your kitchen smell amazing! Cooking times matter a lot. For the beef, sear it for just 2-3 minutes. If you overcook it, it can turn tough. For the veggies, stir-fry for 4-5 minutes. This keeps them crisp and bright. Remember, each stove is different. You may need to adjust times slightly. Texture is key in this dish. The beef should be tender, not chewy. The broccoli should be bright green and slightly crisp. To achieve this, do not overcrowd the pan. Cook in batches if needed. If you want a bit of crunch, add the bell pepper at the end. This gives a nice bite to the dish. {{image_2}} You can swap beef for many other proteins. Chicken, shrimp, or tofu work well. Chicken has a light flavor that pairs nicely with broccoli. Shrimp cooks fast and adds a sweet taste. Tofu is great for a plant-based meal. Just press and cube it before cooking. Each protein changes the dish's taste and texture. Try different proteins to find your favorite. You can also change the vegetables in this recipe. Instead of broccoli, use snap peas, bok choy, or green beans. Snap peas add a nice crunch. Bok choy brings a mild flavor and soft texture. Green beans add a fresh taste and bright color. Mix and match your favorites to create new blends. Your dish will feel fresh and exciting with every swap. The sauce can change your dish's flavor too. If you want a different taste, try oyster sauce instead of hoisin. It gives a savory, rich flavor. You could also use teriyaki sauce for a sweet twist. For a spicy kick, add chili garlic sauce or sriracha. Each sauce will give your dish a new character. Explore these options to find your perfect flavor profile. To keep your beef and broccoli fresh, store leftovers in an airtight container. Let the dish cool down before sealing it. Place it in the fridge if you plan to eat it within three days. This method helps keep the flavors intact while preventing spoilage. When you're ready to enjoy your leftovers, reheat them gently. You can use a pan on the stove or a microwave. If using a pan, add a splash of water to prevent sticking. Heat on low until warm. If using a microwave, cover the dish with a lid to keep moisture. Heat in short bursts, stirring in between. If you want to save your beef and broccoli for later, freezing is a great option. Cool the dish completely, then place it in a freezer-safe container. Make sure to leave some space for expansion. You can freeze it for up to three months. When you're ready to eat, thaw it in the fridge overnight before reheating. Yes, you can make this dish gluten-free. Use gluten-free soy sauce or tamari instead of regular soy sauce. You can also check the hoisin sauce for gluten. Some brands offer gluten-free versions. You can serve this dish with cooked rice or noodles. Steamed rice pairs well and so do chow mein noodles. You can also add a side of egg rolls or spring rolls for extra crunch. Homemade Chinese Beef and Broccoli lasts about 3 to 4 days in the fridge. Make sure to store it in an airtight container. This keeps the flavors fresh and prevents spoilage. Yes, you can make this recipe in advance. Prepare the beef and veggies, and store them separately. When ready to eat, just stir-fry everything together. This saves time and makes meal prep easier. For the complete recipe, check the Full Recipe section. You learned about key ingredients for a tasty dish. We covered how to marinate and cook beef, sauté veggies, and achieve great flavor. I shared tips for adjusting cooking times and perfecting texture. You can explore variations with different proteins and veggies. Proper storage and reheating can keep your dish fresh. Remember, cooking is fun and can be customized to your taste. Enjoy your cooking journey!

Are you craving takeout but want a healthy option at home? I’ve got the perfect solution: my Chinese Beef and Broccoli Simple One Pan Recipe! This dish is quick, easy, …

Read more

Categories Dinner

Irresistible One-Pan Honey BBQ Chicken Rice Recipe

May 10, 2025May 4, 2025 by Chef Theo
To make this dish, gather the following main ingredients: - 4 chicken thighs, skinless and boneless - 1 cup long-grain rice - 2 cups chicken broth - 1 cup BBQ sauce (your favorite brand) - 1 tablespoon honey - 1 red bell pepper, diced - 1 cup frozen peas - 1 small onion, finely chopped - 2 cloves garlic, minced - 1 tablespoon olive oil - Salt and pepper to taste - Chopped parsley for garnish These ingredients work together to create a tasty and balanced meal. The chicken gives protein, while the rice serves as a hearty base. The BBQ sauce and honey add sweetness and depth to the dish. While the dish is great on its own, you can add some garnishes for extra flavor and color. Consider these options: - Chopped green onions for a fresh crunch - Sliced avocado for creaminess - A squeeze of lime juice for brightness - Crushed red pepper for some heat These garnishes can take your meal to the next level. Feel free to mix and match based on what you enjoy! If you’re missing some ingredients, don’t worry! Here are some easy substitutions: - Chicken thighs can be replaced with chicken breasts or drumsticks. - Use vegetable broth instead of chicken broth for a vegetarian option. - Swap BBQ sauce with teriyaki sauce for a different flavor. - Jasmine rice can replace long-grain rice if you prefer it. These substitutions keep the dish delicious while allowing you to use what you have at home. For the full recipe, check out the complete guidelines to make this meal a hit! Start by gathering all your ingredients. This makes cooking easier and faster. You'll need: - 4 chicken thighs, skinless and boneless - 1 cup long-grain rice - 2 cups chicken broth - 1 cup BBQ sauce (your favorite brand) - 1 tablespoon honey - 1 red bell pepper, diced - 1 cup frozen peas - 1 small onion, finely chopped - 2 cloves garlic, minced - 1 tablespoon olive oil - Salt and pepper to taste - Chopped parsley for garnish Chop the onion, garlic, and red bell pepper. This helps them cook evenly. Measure out your rice and broth. Set everything aside, ready to go. Heat the olive oil in a large skillet over medium heat. Add the chopped onion and garlic. Sauté them for 2-3 minutes until they smell good and the onions turn clear. Next, season the chicken thighs with salt and pepper. Push the onion and garlic to the side of the pan. Now, add the chicken thighs. Cook them for 5-6 minutes on each side until they are golden brown. In a small bowl, mix the BBQ sauce and honey. Once the chicken is browned, pour this mixture over the chicken. Make sure it covers the chicken well. Now, stir in the rice, making sure it is coated with the sauce. Pour in the chicken broth and bring this to a boil. When it boils, lower the heat, cover the pan, and let it simmer for about 20 minutes. After 10 minutes, add the diced red bell pepper and frozen peas. Cover again and cook for another 10 minutes until the rice is soft and the liquid is gone. When done, take the skillet off the heat. Let it sit for 5 minutes. Then fluff the rice with a fork. Serve warm and sprinkle with chopped parsley for a fresh look. Enjoy your one-pan honey BBQ chicken rice! For a complete guide, check the Full Recipe. To get fluffy rice, start with rinsing it under cold water. This removes extra starch. Use long-grain rice for the best texture. It cooks evenly and stays separate. Once you add the rice to the pan, stir it gently. This helps coat each grain with the sauce. When you cover the pan, keep it sealed. This traps steam and helps the rice cook perfectly. Choose a BBQ sauce that you love. The flavor of the sauce makes a big difference. Mix in honey to add a touch of sweetness. If you crave a spicy kick, add a pinch of cayenne or hot sauce. You can also toss in some smoked paprika for a richer taste. Let the chicken soak in the BBQ sauce for a few minutes before cooking. This helps the flavor seep in deeper. To save time, chop your veggies ahead. Store them in the fridge for easy access. You can also buy pre-diced onions and bell peppers. This cuts down on prep time. Use frozen peas; they cook fast and add color. If you're in a rush, you can cook the chicken and rice in the same pot. Just follow the steps in the Full Recipe for a quick and easy meal. {{image_2}} You can boost the nutrition of your One-Pan Honey BBQ Chicken Rice by adding vegetables. Try these options: - Carrots: Dice them small so they cook quickly. They add a nice sweetness. - Zucchini: Chop it into half-moons. It cooks fast and brings moisture. - Broccoli: Cut the florets small. Add them during the last 10 minutes of cooking. Adding veggies not only makes the dish colorful but also adds vitamins and minerals. If you enjoy spice, you can change the heat level of your dish. Here are some ideas: - Red Pepper Flakes: Stir in a pinch for a bit of heat. - Hot Sauce: Mix in your favorite hot sauce with the BBQ sauce. - Jalapeños: Dice them finely and add them with the onions. Adjust the spice to match your taste. Just be careful not to overpower the sweetness of the honey. You don’t have to stick with chicken. Here are some tasty alternatives: - Turkey Thighs: They work well and have a similar flavor. - Tofu: Use firm tofu for a vegetarian option. Make sure to press it first to remove excess water. - Pork Chops: They add a nice twist to the dish. Just adjust cooking times for different meats. These alternatives can change the flavor while keeping the dish easy and fun. You can find the Full Recipe for more details on how to make this dish delicious! To store your One-Pan Honey BBQ Chicken Rice, let it cool first. Place it in an airtight container. Store it in the fridge for up to three days. Make sure to seal it well to keep it fresh. When you're ready to enjoy leftovers, reheat them in a pan. Add a splash of water or broth to keep it moist. Heat on low until warm. You can also use the microwave. Just cover the bowl and heat in short bursts to avoid drying it out. You can freeze this dish for later. Use a freezer-safe container or bag. Label it with the date and contents. It can last up to three months in the freezer. When you’re ready to eat, thaw it overnight in the fridge. Reheat it fully before serving. Enjoy your meal without the hassle! Yes, you can make One-Pan Honey BBQ Chicken Rice ahead of time. Cook it fully, then let it cool. Store it in an airtight container in the fridge for up to three days. When you’re ready to eat, just reheat it in a pan or microwave. This makes it a great meal for busy days. This dish pairs well with several sides. Here are some tasty options: - Corn on the cob: It's sweet and crunchy. - Green salad: A light salad adds freshness. - Coleslaw: This adds a nice crunch. - Garlic bread: It’s great for soaking up the sauce. Each of these sides complements the flavors of the chicken rice. Check the chicken's internal temperature. It should reach 165°F (75°C) for safe eating. You can use a meat thermometer for accuracy. If you don’t have one, cut into the thickest part of the thigh. The meat should be white, not pink. This ensures your chicken is juicy and safe to eat. One-Pan Honey BBQ Chicken Rice is simple and tasty. We covered ingredients, steps, and tips to help you. You can add veggies or adjust spice levels for your taste. Store leftovers correctly for another meal later. This dish is great for busy nights and will please everyone. Enjoy making and sharing this meal with friends and family!

Looking for a quick and tasty meal? You’ve found it! My Irresistible One-Pan Honey BBQ Chicken Rice is simple to make and packed with flavor. In just one pan, you’ll …

Read more

Categories Dinner

Philly Cheesesteak Sloppy Joes Tasty and Easy Recipe

May 10, 2025May 4, 2025 by Chef Theo
To make Philly Cheesesteak Sloppy Joes, gather these key ingredients: - 1 lb ground beef - 1 green bell pepper, diced - 1 small onion, finely chopped - 2 cloves garlic, minced - 1 cup mushrooms, diced - 1 tablespoon Worcestershire sauce - 1 teaspoon salt - 1/2 teaspoon black pepper - 1/2 teaspoon smoked paprika - 1 cup provolone cheese, shredded - 4 hamburger buns - 2 tablespoons olive oil Adding a garnish can elevate your dish. Here are some tasty options: - Fresh parsley, chopped - Sliced jalapeños for heat - Pickles for crunch Using the right tools makes cooking easier. Here’s what you need: - Large skillet - Spatula - Knife and cutting board - Measuring spoons and cups - Lid for the skillet These ingredients, garnishes, and tools will set you up for success. Check out the Full Recipe for more details on how to put it all together! Start by gathering all your ingredients. You need a green bell pepper, a small onion, garlic, and mushrooms. Dice the bell pepper and chop the onion into small pieces. Mince the garlic to release its flavor. Then, chop the mushrooms into small bits. Each veggie brings its own taste to the dish. Heat the olive oil in a large skillet over medium heat. Add the diced onion and green bell pepper. Sauté them for about 3-4 minutes. This step makes them tender and sweet. Next, add the minced garlic and diced mushrooms. Cook for another 2-3 minutes until the mushrooms soften. Now, increase the heat to medium-high and add the ground beef. Break it apart with a spatula. Cook it until it turns brown, about 5-7 minutes. After that, drain any fat from the skillet. Stir in Worcestershire sauce, salt, black pepper, and smoked paprika. Mix well to blend all the flavors. Lower the heat and sprinkle shredded provolone cheese over the beef mixture. Cover the skillet with a lid for 2-3 minutes. This lets the cheese melt nicely. If you like a crunchy bun, toast the hamburger buns while the cheese melts. Once the cheese is gooey, spoon the cheesy beef mixture onto the bottom half of each bun. Finally, place the top half of the bun over the filling. Garnish with fresh parsley for a pop of color. Enjoy your Philly cheesesteak sloppy joes! For the full recipe, check out the details provided earlier. To boost the flavor of your Philly cheesesteak sloppy joes, use fresh ingredients. Fresh herbs like parsley add bright notes. You can also try adding a splash of hot sauce for a kick. Mixing in some cheese whiz can give it that classic Philly taste. To melt cheese perfectly, keep it on low heat. After adding provolone, cover the skillet. This traps steam and helps the cheese melt evenly. You can also use a mix of cheeses for more depth. For a gooey texture, add a bit of cream cheese. Chop your veggies ahead of time to save minutes during cooking. You can even prep the beef mixture ahead and store it in the fridge. This makes dinner quick. Use pre-sliced cheese to cut down on prep time. You can also toast the buns while the beef cooks for a crunchier bite. For the full recipe, check the [Full Recipe]. {{image_2}} You can make a tasty vegetarian version of Philly Cheesesteak Sloppy Joes. Swap the ground beef for lentils or black beans. Both options work well. Use diced portobello mushrooms for a meaty texture. Add the same veggies, like bell peppers and onions, to keep the flavor strong. Melt some vegan cheese on top to keep it cheesy and delicious. If you're not into beef, there are many options. Ground turkey or chicken are great substitutes. They provide a leaner choice while still being juicy. For a unique twist, try shredded pulled pork. It adds a smoky flavor that pairs well with the cheese. Just adjust the cooking time to ensure everything heats through properly. Want more kick in your Sloppy Joes? You can add spicy elements easily. Mix in some diced jalapeños or crushed red pepper flakes. Both add heat without overpowering the dish. If you like a smoky flavor, try adding chipotle sauce. It gives a nice depth of flavor that warms the palate. Just remember to adjust the amount to your spice level! Storing your Philly cheesesteak sloppy joes is easy. First, let the mixture cool down. Then, place it in an airtight container. It will keep in the fridge for up to four days. Make sure to separate the buns if you have any left. This will keep them from getting soggy. When you are ready to eat leftovers, reheat them on the stove. Use a medium heat to warm the mixture. Stir it often to heat evenly. If you prefer, you can use the microwave. Place the mixture in a bowl and cover it. Heat for about one to two minutes. Check and stir halfway through to ensure it heats well. You can freeze Philly cheesesteak sloppy joes for later. First, let the mixture cool completely. Then, put it in a freezer-safe container. It will last up to three months in the freezer. When you want to eat it, thaw it overnight in the fridge. Reheat as mentioned before. This makes dinner quick and easy! For the full recipe, check out the details above. Philly Cheesesteak Sloppy Joes mix two popular dishes. The Philly cheesesteak comes from Philadelphia. It started in the 1930s with a simple steak sandwich. The sloppy joe is a classic American dish, known for its messy, beefy goodness. Combining these dishes is fun and tasty. It brings the rich flavors of both together in one bite. You get the savory beef, melted cheese, and fresh veggies. This dish is a twist on the original, perfect for casual meals. Yes, you can make this recipe ahead of time. Cook the beef mixture and store it in the fridge. It stays fresh for up to three days. When you're ready to eat, just reheat it in a skillet. You can also microwave it, but the skillet keeps it tasty. Toast the buns fresh for the best texture. Making it ahead saves time on busy nights. You can make this dish healthier with a few easy swaps. Use lean ground turkey or chicken instead of beef. This cuts down on fat and calories. You can add more veggies, like spinach or zucchini, for extra nutrients. Try whole-grain buns to boost fiber. Another option is to use low-fat cheese or skip it altogether. Each change makes the dish lighter but still delicious. Enjoy your meal without the guilt! This blog post covered the key ingredients, step-by-step instructions, and helpful tips for making Philly Cheesesteak Sloppy Joes. You learned about essential ingredients and optional garnishes, and I shared useful kitchen tools. We discussed variations like vegetarian options and ways to store your dish. Remember, cooking should be fun and creative. Don’t hesitate to make this recipe your own! Enjoy the process and share your delicious results with others.

If you love the rich flavor of a Philly cheesesteak, you’ll adore this easy sloppy joe twist! I’ll guide you step-by-step to create a dish that combines juicy beef, gooey …

Read more

Categories Dinner

Best Smothered Chicken and Rice Recipe for Comfort

May 10, 2025May 4, 2025 by Chef Theo
- 4 boneless, skinless chicken thighs - 1 cup long grain white rice - 2 cups chicken broth - 1 medium onion, chopped - 3 cloves garlic, minced - 1 bell pepper (any color), chopped - 1 teaspoon smoked paprika - 1 teaspoon dried thyme - 1 teaspoon garlic powder - Salt and black pepper to taste - 1 cup heavy cream - 2 tablespoons olive oil - Fresh parsley for garnish The heart of my best smothered chicken and rice recipe lies in fresh, quality ingredients. I start with tender chicken thighs. They stay moist and have great flavor. The long grain white rice cooks perfectly in chicken broth. This adds depth to each bite. Next, I choose a medium onion, three cloves of garlic, and a colorful bell pepper. These veggies bring sweetness and aroma. The spices—smoked paprika, thyme, and garlic powder—elevate the dish. They give it warmth and comfort. I finish with heavy cream, which creates a rich sauce. Olive oil adds a touch of richness while searing the chicken. Finally, fresh parsley brightens the dish and makes it pretty. For the full recipe, check out the Best Smothered Chicken and Rice Recipe for a Cozy Dinner. - Season the chicken thighs with salt, pepper, smoked paprika, and garlic powder. - Chop the onion, garlic, and bell pepper as described. Preparing your ingredients makes cooking smooth and fun. - Heat olive oil in a large skillet over medium-high heat. - Add the seasoned chicken thighs and sear for about 4-5 minutes on each side until golden brown. - Remove the chicken from the pan and set it aside. Searing gives the chicken a nice crust. This step locks in flavor and moisture. - In the same skillet, add the chopped onion, garlic, and bell pepper. Sauté for about 3-4 minutes until soft. - Stir in the rice and toast it for about 2 minutes. This adds flavor. - Pour in the chicken broth and bring it to a boil. Once boiling, reduce the heat to low, cover, and let it simmer for 15 minutes. - After 15 minutes, stir in the heavy cream. Place the chicken back into the skillet on top of the rice. Cover and cook for another 10-15 minutes until the rice is tender and the chicken is cooked through (165°F). This process combines all the flavors into a rich dish. It makes the chicken and rice creamy and comforting. For the full recipe, see the top of the article. To cook perfect smothered chicken and rice, follow these tips: - Cooking times: Sear chicken thighs for 4-5 minutes each side. Simmer rice for 15 minutes, then add cream and cook for 10-15 minutes more. - Resting the chicken: After cooking, let the chicken rest for 5 minutes. This keeps it juicy and tender. Want to spice things up? Here are some ideas: - Additional spices: Try adding cayenne pepper for heat or a dash of cumin for warmth. - Richer sauce: For a deeper flavor, add a splash of white wine or a spoonful of mustard when sautéing the vegetables. Serve your smothered chicken and rice with these sides: - Best sides: Coleslaw or steamed green beans pair well. They add a nice crunch and freshness. - Garnishing techniques: Sprinkle fresh parsley on top for color. You can also add lemon zest for a bright touch. For all the specifics, check out the Full Recipe. Enjoy your cozy dinner! {{image_2}} You can switch chicken thighs for chicken breast or drumsticks. Chicken thighs add rich flavor, while breasts are leaner. Drumsticks give a fun, rustic feel to your meal. You can also use brown rice instead of long grain white rice. Brown rice has more fiber and a nutty taste. It may take longer to cook, so adjust your broth and cooking times. Adding extra veggies can boost taste and nutrition. Try mushrooms for an earthy flavor or spinach for a fresh twist. You can also use herbs to enhance your dish. Rosemary adds a piney taste, while basil gives a sweet note. Toss these in during the last few minutes of cooking for the best flavor. For gluten-free options, use gluten-free chicken broth and rice. This keeps your meal safe for those with gluten issues. If you want a vegetarian dish, replace chicken with hearty vegetables like eggplant or cauliflower. Use vegetable broth instead of chicken broth. This way, you still get a warm, cozy feel in your meal. For more tips, check out the Full Recipe. To store smothered chicken and rice, place it in an airtight container. Let the food cool down first. This helps prevent moisture build-up. Store it in the fridge for up to four days. When reheating, use a microwave or stovetop. If using a microwave, cover it with a damp paper towel. This keeps the chicken moist. Stir halfway through reheating for even warmth. You can freeze smothered chicken and rice for longer storage. But consider portion sizes. Store them in freezer-safe containers or bags. Make sure to remove as much air as possible. Label the bags with the date. To thaw, move the containers to the fridge overnight. For quick use, you can also thaw in the microwave. Reheat it on the stovetop over low heat until hot. In the fridge, this dish lasts about four days. After that, the quality may fade. Look for signs of spoilage like off smells or discoloration. If you see any mold, throw it away right away. Enjoy your cozy dinner with peace of mind knowing how to store and handle your leftovers! Cooking this dish takes about 50 minutes in total. You need 15 minutes for prep. The cooking time is around 35 minutes, which includes searing and simmering. This timing gives you juicy chicken and soft rice, perfect for comfort food. Yes, you can prep ingredients ahead of time. Chop the onion, garlic, and bell pepper the night before. Store them in the fridge to keep them fresh. You can also season the chicken in advance. Just cover and refrigerate it. When you are ready to cook, it will save you time. You can try many fun twists! Swap chicken thighs for breasts or even drumsticks. Add veggies like mushrooms or spinach for extra flavor. You can also mix in some herbs, like rosemary or basil, to change the taste. If you want a kick, add some diced jalapeños. The chicken should reach an internal temperature of 165°F. Use a meat thermometer to check. Look for juices that run clear when you cut into the chicken. If there’s no pink, your chicken is ready to enjoy! This blog post covered how to make delicious smothered chicken and rice. You learned about the main ingredients, cooking steps, and how to enhance flavors. I shared tips for serving and storing leftovers too. Experiment with variations to make the dish your own. Remember, cooking is about enjoying the process as much as the meal. Try this recipe and impress your family or friends with your tasty creation. Enjoy the rich flavors and lovely textures in your dish!

Are you ready for a dish that wraps you in warmth and joy? This Best Smothered Chicken and Rice Recipe for Comfort is your go-to for cozy dinners. With tender …

Read more

Categories Dinner

Marry Me Chicken Pasta Recipe for a Romantic Dinner

May 10, 2025May 4, 2025 by Chef Theo
To make the Marry Me Chicken Pasta, gather these ingredients: - 2 chicken breasts, sliced - 8 oz penne pasta - 1 tablespoon olive oil - 3 cloves garlic, minced - 1 cup heavy cream - 1 cup sun-dried tomatoes, chopped - 1 cup baby spinach - 1 teaspoon dried oregano - Salt and pepper to taste - ½ cup grated Parmesan cheese - Fresh basil leaves for garnish You can adjust the amounts if needed. Use more or less chicken based on your taste. If you want a lighter dish, swap heavy cream for half-and-half. You can replace penne pasta with farfalle or fettuccine. If you are out of sun-dried tomatoes, fresh tomatoes work too. Just chop them finely to release flavor. Always choose fresh ingredients for the best taste. Look for chicken breasts that are pink and firm. Sun-dried tomatoes should be soft and bright in color. Fresh spinach should be crisp and vibrant. For cheese, go for freshly grated Parmesan. It melts better and offers richer flavor than pre-grated cheese. When you use quality ingredients, your dish will shine. You can find the full recipe to explore cooking details. Start by boiling water in a large pot. Make sure you add salt to the water. This adds flavor to the pasta. Once boiling, add the penne pasta. Cook it according to the package instructions. You want it to be al dente, which means firm but not hard. This usually takes about 8-10 minutes. Once done, drain the pasta and set it aside. In a large skillet, heat the olive oil over medium heat. While the oil heats, season the sliced chicken breasts with salt, pepper, and dried oregano. Once the oil is hot, add the chicken to the skillet. Cook for about 5-7 minutes until it turns golden brown. Make sure it's cooked all the way through. When done, remove the chicken and set it aside. In the same skillet, add the minced garlic. Sauté it for about 30 seconds until it smells good. Next, add the chopped sun-dried tomatoes and heavy cream. Stir to mix everything well. Let the sauce simmer for 2-3 minutes. This helps it thicken slightly. Now it's time to add the cooked chicken back into the skillet. Toss in the baby spinach and the cooked pasta as well. Gently mix everything together until the spinach wilts and all ingredients are coated in sauce. Stir in the grated Parmesan cheese. This cheese makes the sauce creamy and rich. Taste the dish. You might want to add more salt or pepper based on your liking. Once you’re happy with the flavor, serve it warm in bowls. Garnish with fresh basil leaves and extra Parmesan on top if you want. Enjoy your Marry Me Chicken Pasta! For the full recipe, check the complete list of steps and ingredients. To get the best flavor in your Marry Me Chicken Pasta, use fresh ingredients. Fresh garlic and sun-dried tomatoes bring depth. Season your chicken well with salt and pepper. Cooking it until golden adds great taste. Use a high-quality olive oil. It enhances the sauce's richness. Don’t rush the simmering step for the sauce. Let it thicken to make it creamy and delicious. One common mistake is overcooking the pasta. Follow package instructions for perfect al dente pasta. Another mistake is not seasoning enough. Taste as you cook and adjust the salt and pepper. Also, avoid cooking the chicken too fast. This can leave it dry. Lastly, don’t skip the Parmesan cheese. It adds a nice creaminess to the dish. Herbs and spices can elevate your Marry Me Chicken Pasta. Fresh basil adds a bright touch. Try adding a pinch of red pepper flakes for heat. You can also mix in fresh herbs like thyme or parsley. If you want more flavor, consider adding a splash of lemon juice before serving. This brightens the dish and balances the creaminess. {{image_2}} You can easily make a vegetarian version of this dish. Instead of chicken, use tofu or mushrooms. They add a great texture. For the sauce, keep the sun-dried tomatoes and spinach. You can also add bell peppers for color and taste. Just sauté them with the garlic before adding the cream. This makes a tasty meal without meat. If you need a gluten-free version, switch to gluten-free pasta. Many brands offer great options that cook well. You can also use spiralized zucchini or spaghetti squash as a noodle substitute. Just make sure to adjust the cooking time. These options keep the dish light and fresh. The rest of the ingredients are naturally gluten-free, so enjoy without worry. Feel free to get creative with add-ins. Here are a few ideas: - Artichoke hearts: They add a nice tangy flavor. - Cherry tomatoes: Halve them for a burst of sweetness. - Olives: They offer a briny taste that pairs well with cream. - Red pepper flakes: If you like heat, add these for a kick. These variations help you create a dish that suits your taste. Each option adds a unique twist to the classic Marry Me Chicken Pasta. Explore these choices to make the recipe your own. For the full recipe, refer to the section above. To keep your Marry Me Chicken Pasta fresh, store it in an airtight container. Make sure it has cooled down to room temperature before sealing. This avoids extra moisture that can lead to sogginess. Place it in the fridge if you plan to eat it within three days. For longer storage, consider freezing it. When reheating, use a skillet over medium heat. Add a splash of water or cream to help keep the sauce creamy. Stir often to heat it evenly and prevent sticking. You can also microwave it. Heat in short bursts, stirring in between. This method helps retain flavor and texture. To freeze Marry Me Chicken Pasta, portion it into freezer-safe containers. Leave space at the top for expansion. It can last up to three months in the freezer. When ready to eat, thaw it overnight in the fridge. Reheat using the tips above for best results. Enjoy your meal even after some time! Marry Me Chicken Pasta is a creamy and flavorful dish. It features tender chicken, al dente penne pasta, and a rich sauce. The sauce includes sun-dried tomatoes, garlic, and heavy cream. Fresh baby spinach adds color and nutrition. This dish is perfect for a romantic dinner or special occasion. Yes, you can make Marry Me Chicken Pasta ahead of time. Cook the pasta and chicken separately. Store them in the fridge in airtight containers. When ready to eat, reheat them together in a skillet. Add the sauce and spinach just before serving. This keeps everything fresh and tasty. Great side options include: - Garlic bread - A fresh green salad - Roasted vegetables - Steamed asparagus These sides balance the richness of the pasta. They add freshness and texture to your meal. - Variations for dietary needs? For a vegetarian version, swap chicken for mushrooms or tofu. Use vegetable broth instead of chicken broth in the sauce. For gluten-free options, use gluten-free pasta. - How to make Marry Me Chicken Pasta spicy? Add red pepper flakes to the sauce for heat. You can also use spicy sun-dried tomatoes. Adjust the amount based on your spice preference. This adds a lovely kick to the dish! In this blog, we covered how to make Marry Me Chicken Pasta from start to finish. We looked at the best ingredients, shared step-by-step instructions, and offered tips for great flavor. You can even try variations for different diets and learn how to store leftovers. Cooking is fun and rewarding. Follow these steps to impress your family and friends. Enjoy making this tasty dish again and again!

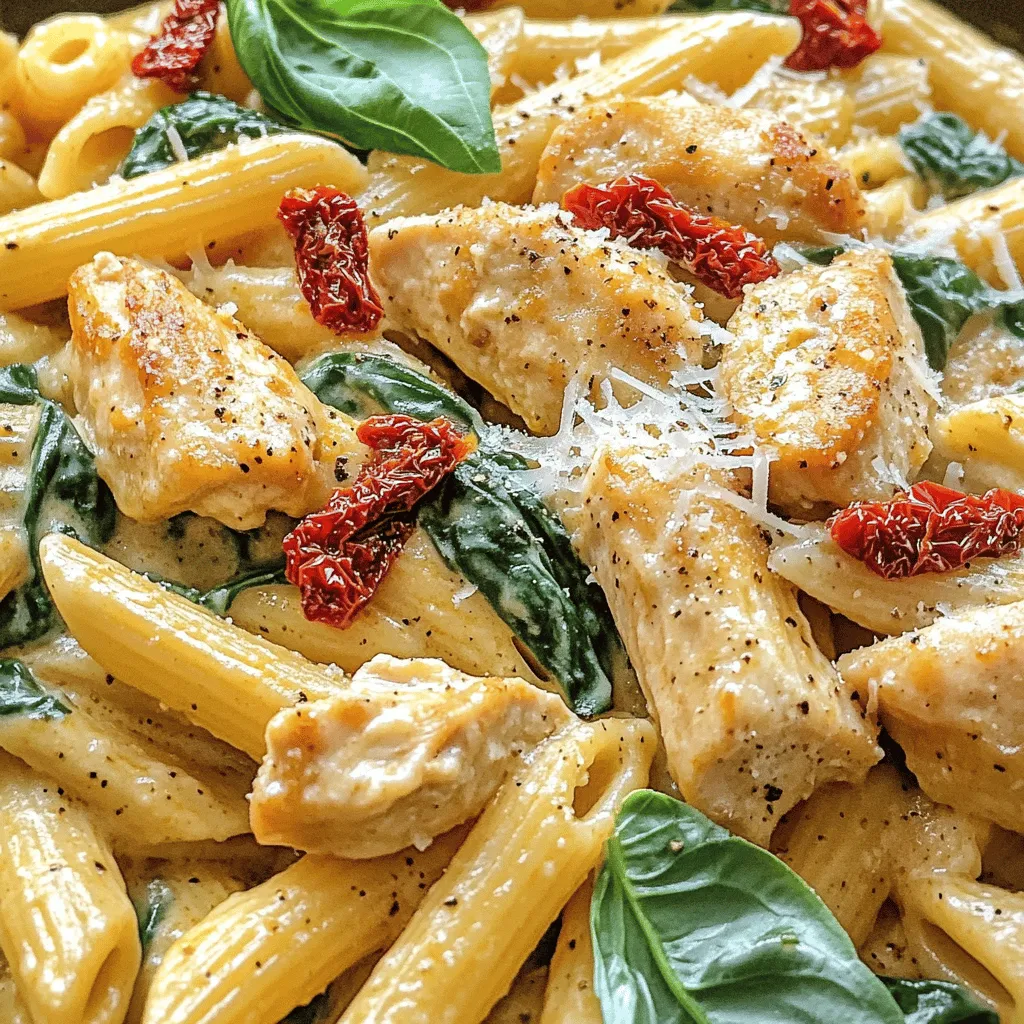
Looking to impress your special someone? The Marry Me Chicken Pasta Recipe is your answer! This dish blends tender chicken, creamy sauce, and pasta into a perfect romantic dinner. Whether …

Read more

Categories Dinner

Garlic Butter Steak Bites And Potatoes Perfectly Cooked

May 10, 2025May 4, 2025 by Chef Theo
To make Garlic Butter Steak Bites and Potatoes, you need these simple ingredients: - 1 lb sirloin steak, cut into bite-sized pieces - 1 lb baby potatoes, halved - 4 tablespoons unsalted butter - 6 cloves garlic, minced - 1 teaspoon dried thyme - 1 teaspoon smoked paprika - Salt and pepper to taste - Olive oil for drizzling - 2 tablespoons fresh parsley, chopped (for garnish) Each ingredient plays a key role in the dish. The sirloin steak gives you rich flavor and tenderness. Baby potatoes add a nice texture and heartiness. Unsalted butter and garlic create a delicious sauce that coats the steak bites. Dried thyme and smoked paprika bring warmth and depth. Salt and pepper enhance all the flavors, while olive oil helps roast the potatoes perfectly. Fresh parsley adds a pop of color and freshness at the end. To get the best taste, use high-quality ingredients. This ensures your dish shines with flavor. For the full recipe, check out the instructions that guide you through this mouthwatering dish step by step. - Preheat the oven to 400°F (200°C). - Toss halved baby potatoes with olive oil, salt, pepper, and smoked paprika. To make sure the potatoes cook well, coat them evenly. The olive oil helps them get crispy. The smoked paprika adds a nice touch of flavor and color. - Spread potatoes on a baking sheet and roast for 25-30 minutes. Check the potatoes halfway through. Give them a good toss to ensure they brown on all sides. You want them nice and crispy. - Season steak pieces with salt and pepper. - Sear in a skillet with melted butter. While the potatoes roast, let’s focus on the steak. Searing gives the steak a rich flavor. Make sure the skillet is hot before adding the steak. This helps seal in the juices. - Sauté minced garlic and add dried thyme. After cooking the steak, lower the heat to medium. Add more butter to the pan. The garlic will cook quickly, so watch it closely. You want it fragrant but not brown. - Toss the steak in the garlic butter and reheat. This step is key. The steak absorbs the garlic butter flavor, making each bite delicious. Toss well to coat all the pieces. - Arrange crispy potatoes and steak on a platter, garnished with parsley. Look for a nice serving dish. The contrast of the golden potatoes and steak looks great. A sprinkle of fresh parsley adds color and freshness. For the full recipe, check the detailed instructions above. Enjoy your meal! To cook steak bites just right, you need to focus on two main things: doneness and cut. How do I achieve the ideal doneness? - Use a meat thermometer. Aim for 130°F (54°C) for medium-rare. - Sear each side until it’s brown. This gives flavor and locks in juices. - Let the steak rest for a few minutes after cooking. This helps keep it tender. What cut of steak should I choose? - I recommend using sirloin or ribeye. Both are tender and flavorful. - Avoid tougher cuts like flank steak. They need longer cooking times. How can I add more herbs or spices? - Try adding rosemary or oregano for extra aroma. Just a pinch goes a long way. - For heat, mix in some crushed red pepper flakes. What are suggested marinades for steak? - A simple mix of olive oil, soy sauce, and garlic works wonders. - Let the steak marinate for at least 30 minutes for more flavor. How do I achieve maximum crispiness? - Make sure the potatoes are dry before seasoning. Moisture can make them soggy. - Spread them out on the baking sheet so they don’t touch. This helps them crisp up. What are alternative seasonings for potatoes? - Try garlic powder, onion powder, or even Parmesan cheese for a tasty twist. - You can also sprinkle some fresh herbs after baking for added freshness. These tips will help you create Garlic Butter Steak Bites and Potatoes that are perfectly cooked and bursting with flavor. For the complete recipe, check out the [Full Recipe]. {{image_2}} If you want to swap out steak, try chicken or shrimp. Both options work great. Cut chicken into bite-sized pieces. Use a similar cooking method as steak. For shrimp, make sure they are peeled and deveined. Cook them until they are pink and opaque. For a plant-based twist, use mushrooms or tofu. Portobello mushrooms add a rich flavor. Slice them into thick pieces and sauté them. Tofu brings a nice texture. Press and cube it before cooking. Season with salt, pepper, and garlic for an extra kick. Feel free to play with different spice blends or sauces. A touch of cumin can add warmth. Try chili powder for some heat. For sauces, teriyaki or barbecue can transform the dish. Mixing in fresh herbs like basil or cilantro can also enhance flavors. To store leftovers from Garlic Butter Steak Bites and Potatoes, cool them first. Place the steak and potatoes in an airtight container. They stay fresh in the fridge for up to three days. When you reheat, make sure they warm through evenly. You can freeze leftovers, too. First, let the steak bites and potatoes cool completely. Then, place them in freezer-safe bags. Remove as much air as possible before sealing. They can last up to three months in the freezer. To reheat, thaw overnight in the fridge. Warm them in a skillet over low heat until heated through. Meal prep can save time and effort. Cut the steak into bite-sized pieces ahead of time. Store them in the fridge with some seasoning. You can also wash and halve the potatoes in advance. Just keep them in a bowl of water to prevent browning. This way, your Garlic Butter Steak Bites and Potatoes come together quickly on a busy day. To cook steak bites perfectly, start by choosing sirloin or tender cuts. For rare, cook for 2-3 minutes on each side. For medium, aim for 3-4 minutes per side. For well-done, go for 5-6 minutes. Use a meat thermometer for accuracy. Aim for 130°F for rare, 145°F for medium, and 160°F for well-done. Remember, let the steak rest for a few minutes after cooking. This helps the juices stay inside. Yes, you can make Garlic Butter Steak Bites and Potatoes ahead of time. Cook the steak and potatoes, then let them cool. Store in airtight containers in the fridge for up to three days. Reheat them in a skillet over low heat. Add a bit more garlic butter to keep the flavors fresh. This method saves time for busy weeknights. These steak bites and potatoes pair well with several sides. Consider a fresh salad to add crunch and color. Grilled vegetables or steamed broccoli also work great. For a heartier meal, serve with rice or crusty bread. You can even add a dipping sauce for the steak. A chimichurri or garlic aioli adds extra flavor and fun. To make this recipe healthier, choose lean cuts of steak, like flank or tenderloin. Use less butter and replace it with olive oil. You can also add more vegetables. Try tossing in bell peppers or zucchini with the potatoes. For lower carbs, swap baby potatoes for cauliflower. These changes keep the dish tasty while making it more nutritious. Reheat leftover steak bites in a skillet over medium heat. Add a splash of broth or a little olive oil. This helps keep the meat moist and tasty. Stir often to heat evenly. You can also use a microwave, but be careful. Heat in short bursts to avoid overcooking. This keeps the steak juicy and full of flavor. For the full recipe, check out Garlic Butter Steak Bites & Crispy Potatoes. This recipe for Garlic Butter Steak Bites with Potatoes is simple and delicious. We discussed the key ingredients and step-by-step instructions. You learned tips for perfect steak and crispy potatoes. Variations let you explore new flavors or proteins. In summary, enjoy your meal and feel free to experiment! Cooking should be fun and tasty. Try new things and share with others. Happy cooking!

If you love quick and flavorful meals, you’ll adore my Garlic Butter Steak Bites and Potatoes recipe. With tender steak and crispy potatoes, this dish is simple enough for any …

Read more

Categories Dinner

Black Bean Corn Salad Simple and Flavorful Treat

May 10, 2025May 3, 2025 by Chef Theo
- 1 can (15 oz) black beans, rinsed and drained - 2 cups corn kernels (fresh or frozen) - 1 red bell pepper, diced - 1/2 red onion, finely chopped - 1 avocado, diced - 1/4 cup fresh cilantro, chopped - 3 tablespoons olive oil - 2 tablespoons lime juice - 1 teaspoon cumin - 1/2 teaspoon smoked paprika - Salt and pepper to taste When I make black bean corn salad, I focus on fresh, colorful ingredients. Each ingredient adds great flavor and texture. The black beans give protein and fiber. Corn adds a sweet crunch. The bell pepper and red onion bring color and a bit of spice. The avocado gives creaminess, making the salad feel rich. Fresh cilantro adds a bright note that lifts the dish. Olive oil and lime juice make a simple yet tasty dressing. Cumin and smoked paprika warm the flavors, giving depth. Each serving has about 200 calories. You get a good dose of fiber, protein, and healthy fats. Black beans pack protein and fiber, while corn gives you vitamins and minerals. Black beans are great for heart health. They lower cholesterol and keep you full. Corn is full of nutrients like vitamin C and magnesium. It helps with digestion and adds energy. Mixing the salad ingredients Start with a large bowl. Add the rinsed black beans and corn kernels. Next, toss in the diced red bell pepper, chopped red onion, and diced avocado. Make sure to mix these fresh ingredients gently to keep the avocado intact. Making the dressing In a separate small bowl, whisk together the olive oil, lime juice, cumin, smoked paprika, salt, and pepper. This dressing adds a zesty kick to the salad. Mix until well combined, and then pour it over the salad mixture. Layering vs. mixing methods You can layer the ingredients for a pretty presentation or mix them for a more uniform look. I prefer mixing to ensure every bite is full of flavor. Just be gentle when tossing to keep the avocado pieces whole. Recommended serving temperature Serve the salad chilled or at room temperature. Both options work well, but a slight chill enhances the flavors. Time to let flavors meld Let the salad sit for about 10 minutes after mixing. This short wait allows the flavors to blend together beautifully. If you want to make it ahead of time, you can prepare the salad, but add the avocado last to keep it fresh. For the full recipe, refer to the section above. Enjoy your Black Bean Corn Salad! For a twist on lime juice, you can try lemon juice. It adds a bright note with a different zing. You can also use vinegar, like apple cider vinegar, for a tangy kick. Each option gives the salad a fresh taste. Herbs can change your salad's flavor too. While cilantro is great, try fresh parsley or basil for a new vibe. Chopped green onions or dill also work well. Each herb brings its own flair. A large white bowl makes the colors pop. Serve the salad in this bowl for a stunning look. You can layer the ingredients too. Start with black beans, then corn, and top with avocado. This creates a colorful display. Garnishes add freshness and style. Use extra cilantro leaves, lime wedges, or diced avocado on top. These little touches make your salad even more inviting. To store leftovers, use airtight containers. This keeps the salad fresh in the fridge. It will last for about three days. If you see any browning on the avocado, just remove it. Reheating is not needed for this salad. Instead, repurpose it. Add it to tacos, or mix it with cooked rice for a new dish. The flavors stay vibrant even after a day in the fridge. {{image_2}} You can easily modify your black bean corn salad. Try adding jalapeño for a spicy kick. Diced cucumber adds a refreshing crunch. For a heartier salad, mix in cooked chicken or shrimp. These changes keep the salad exciting and flavorful. This salad is naturally vegan. All the ingredients are plant-based. If you want gluten-free options, you can enjoy the salad as is. It fits many diets. Feel free to check labels on canned goods to ensure they are gluten-free. In summer, use fresh corn and local tomatoes for a bright taste. You can even add diced mango for sweetness. For winter, swap in roasted vegetables like butternut squash. This keeps the salad warm and comforting. Seasonal changes make it fun to explore different flavors. Enjoy the fresh taste all year! To keep your Black Bean Corn Salad fresh, use an airtight container. This helps seal in flavors and keeps ingredients crisp. In the fridge, your salad lasts about 3 to 5 days. Make sure to check for any signs of spoilage before eating. You can freeze this salad, but it may change texture. To freeze, place the salad in a freezer-safe bag, pressing out excess air. When you're ready to eat, thaw it overnight in the fridge. To maintain flavor, avoid freezing avocado and fresh herbs, as they do not freeze well. Instead, add these after you thaw the salad. If you have leftovers, don't worry! You can use the salad in many ways. Try adding it to tacos or burritos for a tasty filling. It also works well as a topping for grilled chicken or fish. Pairing it with tortilla chips makes a great snack too. The vibrant flavors and textures will bring any meal to life! For the full recipe, check back to make this delightful dish again. Black Bean Corn Salad stays fresh for about 3 to 5 days in the fridge. Make sure you store it in an airtight container. This helps keep the flavors bright and tasty. If you notice any wilting or odd smells, it’s time to toss it. Always check for freshness before eating. Yes, you can make this salad ahead of time. I suggest preparing it a few hours before serving. This gives the flavors time to mix well. You can also prep the ingredients and store them separately. Combine everything just before serving to keep the avocado from browning. You can easily customize this recipe to suit your taste. Here are some ideas: - Add jalapeños for heat. - Swap in cherry tomatoes for sweetness. - Use lime zest for extra citrus flavor. - Add cooked chicken or shrimp for protein. Feel free to play around with ingredients to create your perfect Black Bean Corn Salad! For the full recipe, check out the earlier section. In this blog post, we explored a tasty black bean corn salad. We covered key ingredients, nutritional benefits, and step-by-step preparation. You learned how to enhance flavors and present the dish beautifully. We also shared storage tips and variations for different diets. This salad is fresh, healthy, and easy to make. You can customize it to fit your taste. Try it out today for a nutritious boost! Enjoy the flavors and make it your own.

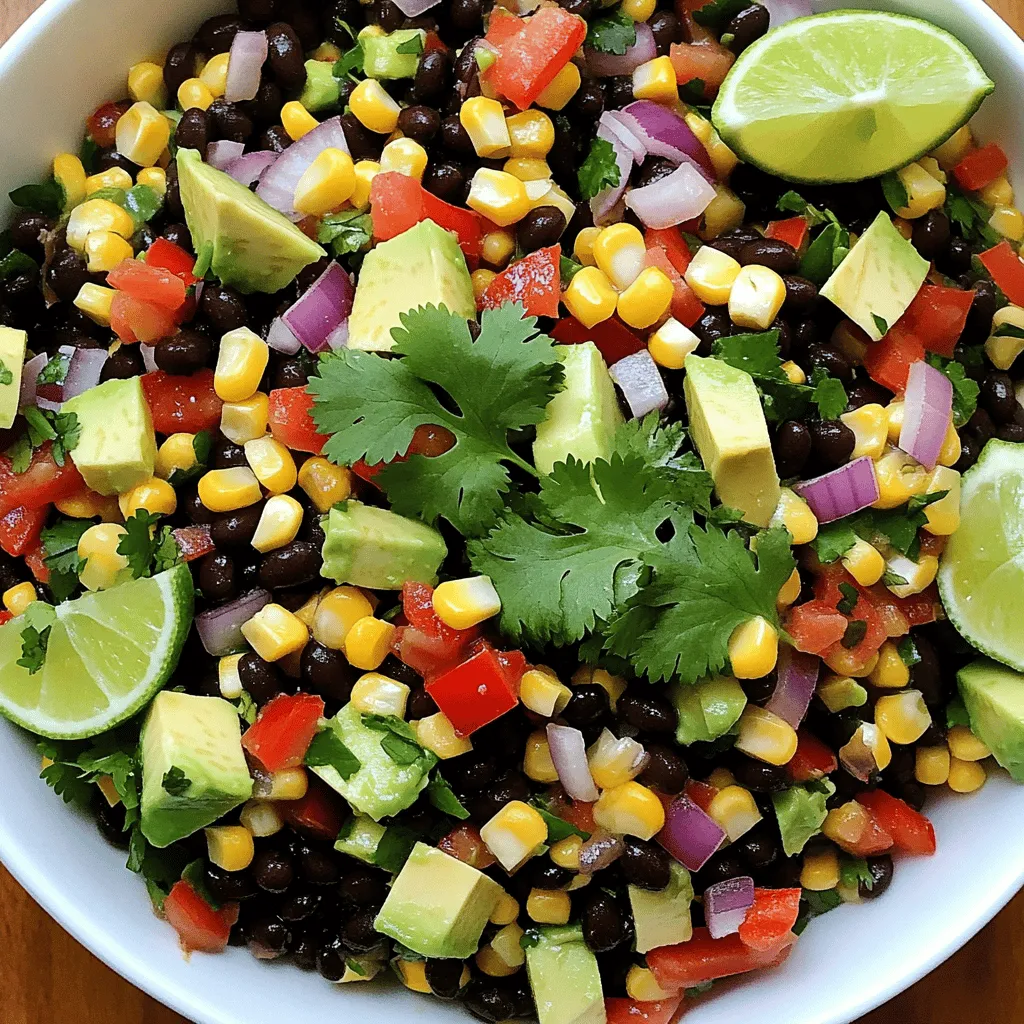
Looking for a deliciously simple salad that packs a punch? You’ve found it! Black Bean Corn Salad is fresh, flavorful, and easy to make. Perfect for any meal, it’s loaded …

Read more

Categories Salads

Crunchy Detox Salad Fresh and Healthy Delight

May 10, 2025May 3, 2025 by Chef Theo
- 2 cups kale, finely chopped - 1 cup red cabbage, shredded - 1 cup carrots, grated - 1 cucumber, diced - 1 bell pepper (red or yellow), diced - 1/2 cup cherry tomatoes, halved I love using fresh vegetables for this salad. Kale gives a nice crunch and is full of nutrients. Red cabbage adds a pop of color and a sweet taste. Grated carrots bring sweetness and bright orange color. Diced cucumber keeps things cool and crisp. You can choose red or yellow bell pepper for color and flavor. Cherry tomatoes add juicy bites that brighten the salad. - 1/4 cup sunflower seeds - 1/4 cup raw almonds, chopped Nuts and seeds give this salad a great crunch. Sunflower seeds add a nutty flavor and a nice bite. Raw almonds bring a hearty crunch and healthy fats. You can also toast them for extra flavor, but raw works well too. - 3 tablespoons lemon juice - 2 tablespoons olive oil - 1 tablespoon apple cider vinegar - Salt and pepper to taste The dressing is simple yet full of flavor. Lemon juice adds brightness and zest. Olive oil gives richness and smoothness. Apple cider vinegar adds a tangy kick that makes the salad pop. I always recommend adding salt and pepper to taste. This helps bring all the flavors together. For the full recipe, check out the Crunchy Detox Salad section. Enjoy your fresh and healthy delight! Start by washing all your fresh veggies. For the kale, remove the tough stems. Chop the kale into small pieces. The red cabbage should be shredded thinly. Grate the carrots using a box grater. Dice the cucumber and bell pepper into bite-sized pieces. Cut the cherry tomatoes in half. This mix of colors and textures makes your salad pop. Grab a large mixing bowl. Combine the chopped kale, shredded cabbage, grated carrots, diced cucumber, and diced bell pepper in the bowl. Add the halved cherry tomatoes. For a crunchy twist, toss in the sunflower seeds and chopped almonds. Stir everything gently to mix well. This creates a vibrant salad that is both nutritious and satisfying. In a small bowl, whisk together the lemon juice, olive oil, and apple cider vinegar. Season with salt and pepper to taste. This dressing is light and refreshing. It brings all the flavors together beautifully. Pour the dressing over the salad mixture. Toss gently again until all ingredients are coated. Let the salad sit for about 10 minutes. This allows the flavors to meld before serving. For the complete details, check out the Full Recipe. To make your salad extra crunchy, focus on how you chop the veggies. Use a sharp knife for clean cuts. This helps keep the water inside the vegetables. Cut the kale into small pieces, and shred the red cabbage thinly. Grate the carrots finely for a nice texture. Dice the cucumber and bell pepper into small bits. Each bite should be bright and crisp. You can add more depth with herbs and spices. Fresh herbs like parsley or cilantro work well. Try adding a pinch of cumin for warmth. Dill gives a nice twist, too. Experiment with different flavors until you find your favorite mix. You can even add a sprinkle of chili flakes for heat! Letting the salad sit is key for great taste. After mixing, give it about 10 minutes. This time allows the veggies to soak up the dressing. The flavors blend better when they sit together. This simple step makes a big difference in taste and enjoyment. For a full guide on making this salad, check out the Full Recipe. {{image_2}} To make your Crunchy Detox Salad more filling, add protein. You can use beans like chickpeas or black beans. They offer a nice texture and boost nutrition. If you prefer meat, grilled chicken works great. For a plant-based option, tofu is fantastic. Just sauté it or grill it for extra flavor. You can even try tempeh or edamame for a tasty change. Using seasonal vegetables makes your salad fresh and exciting. In spring, add asparagus or snap peas for crunch. Summer brings ripe tomatoes and sweet corn. In fall, try roasted butternut squash or apples. Winter vegetables like Brussels sprouts and radishes add a nice bite. This way, your salad stays vibrant and full of flavor all year round. If you want a dairy-free salad, you can easily swap out the dressing. Use a mix of tahini and lemon juice for a creamy texture. You can also try cashew cream for richness. Top your salad with seeds or nuts instead of cheese. Nutritional yeast adds a cheesy flavor without dairy. These options keep your salad tasty and vegan-friendly. Feel free to explore these variations to make the Crunchy Detox Salad uniquely yours! For the full recipe, check out the Crunchy Detox Salad section. To keep your Crunchy Detox Salad fresh, store it in an airtight container. Make sure to remove any avocado slices if you have leftovers. Avocado can brown quickly, changing the look and taste. Place the salad in the fridge right away. This keeps it crisp and tasty. The salad can last up to three days in the fridge. The dressing stays good for about a week. If mixed, the salad may lose its crunch after a day. Always check for signs of spoilage before eating. I do not recommend freezing the whole salad, as veggies can get mushy. However, you can freeze the dressing. Pour it into a freezer-safe container. It will last for up to three months. When ready to use, thaw it in the fridge overnight. This way, you can enjoy fresh flavors again! For the full details on making this salad, refer to the Full Recipe. The crunchy detox salad packs a big nutritional punch. It includes fresh green kale, which is rich in vitamins A, C, and K. Red cabbage adds antioxidants that help fight inflammation. Carrots give you beta-carotene, great for your eyes. Cucumbers are hydrating and low in calories. Bell peppers add vitamin C, while cherry tomatoes boost heart health. Sunflower seeds and almonds provide healthy fats and protein. The lemon juice and apple cider vinegar aid digestion. Overall, this salad supports your immune system and keeps your energy up. Yes, you can meal prep this salad! I recommend chopping the veggies and storing them in airtight containers. Keep the dressing separate to avoid sogginess. You can mix everything together just before eating. This way, your salad stays fresh and crunchy for days. It’s perfect for busy weekdays! Customizing your crunchy detox salad is easy! You can swap out any veggie you don’t like. For example, add spinach or arugula instead of kale. If you prefer a sweeter taste, toss in some diced apples or raisins. You can also change the nuts; try walnuts or pecans. Want more protein? Add cooked chicken, chickpeas, or tofu. Adjust the dressing by using lime juice or adding herbs like basil or parsley. Make it your own! You learned how to make a fresh, crunchy detox salad with vibrant vegetables and nuts. We went through each step, from chopping ingredients to making a tasty dressing. Remember to let the salad sit for a while to enhance the flavors. Feel free to add protein or seasonal veggies for extra variety. Store leftovers properly to keep them fresh. This salad is nutritious, easy to customize, and perfect for meal prep. With these tips and variations, you'll enjoy a delicious dish that supports your health goals.

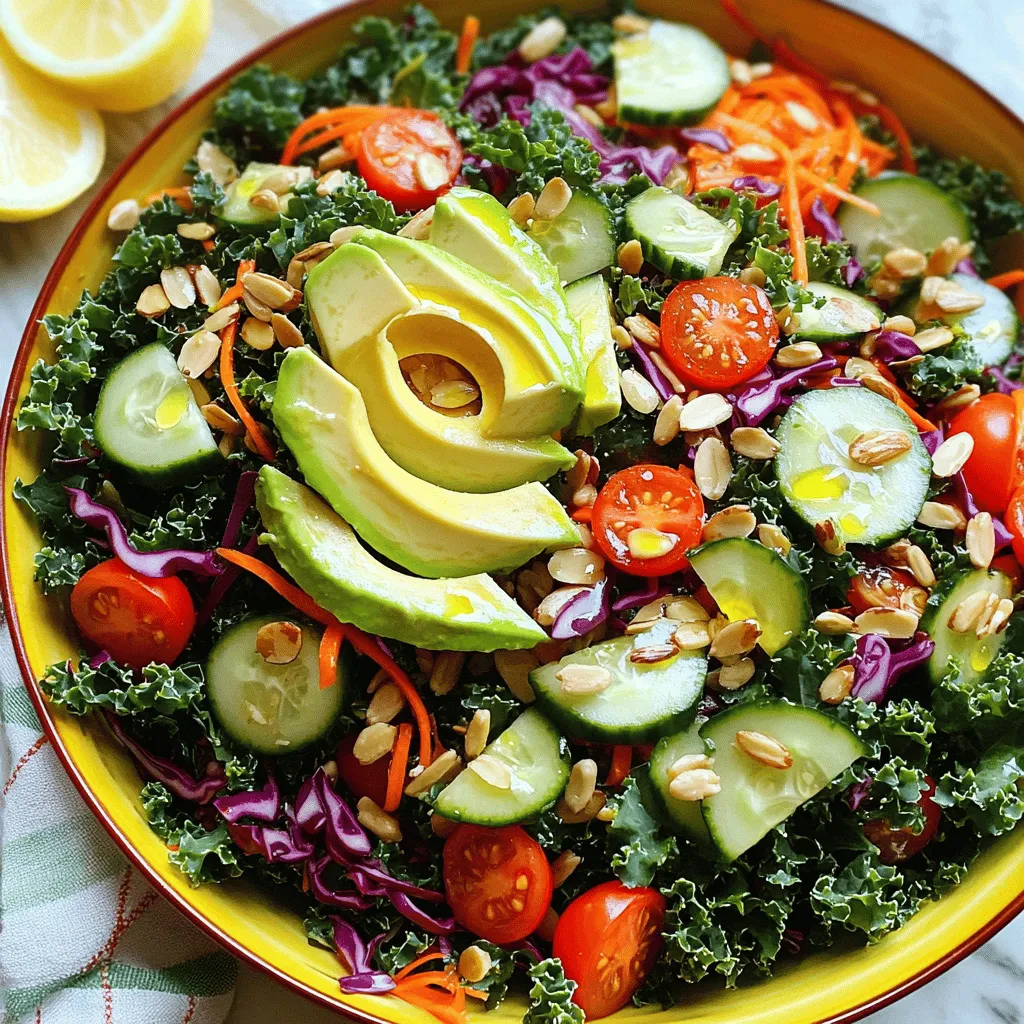
Are you ready to boost your health with a Crunchy Detox Salad? This vibrant dish, packed with fresh veggies and crunchy nuts, will delight your taste buds while nourishing your …

Read more

Categories Salads
Older posts
Newer posts
← Previous Page1 … Page83 Page84 Page85 … Page92 Next →

TOASTED RECIPES

Where ideas are warm, crisp, and ready to serve! 🍞

PAGES

Home About Contact Privacy Policy Terms & Conditions Cookie Policy GDPR Policy Copyright Policy Disclaimer

CATEGORIES

Appetizers Desserts Salads Breakfast Dinner

Contact

  • Pinterest
  • Mail
Copyright © 2025 Toasted Recipes. All rights reserved.