Bruschetta Delight Simple and Flavorful Appetizer
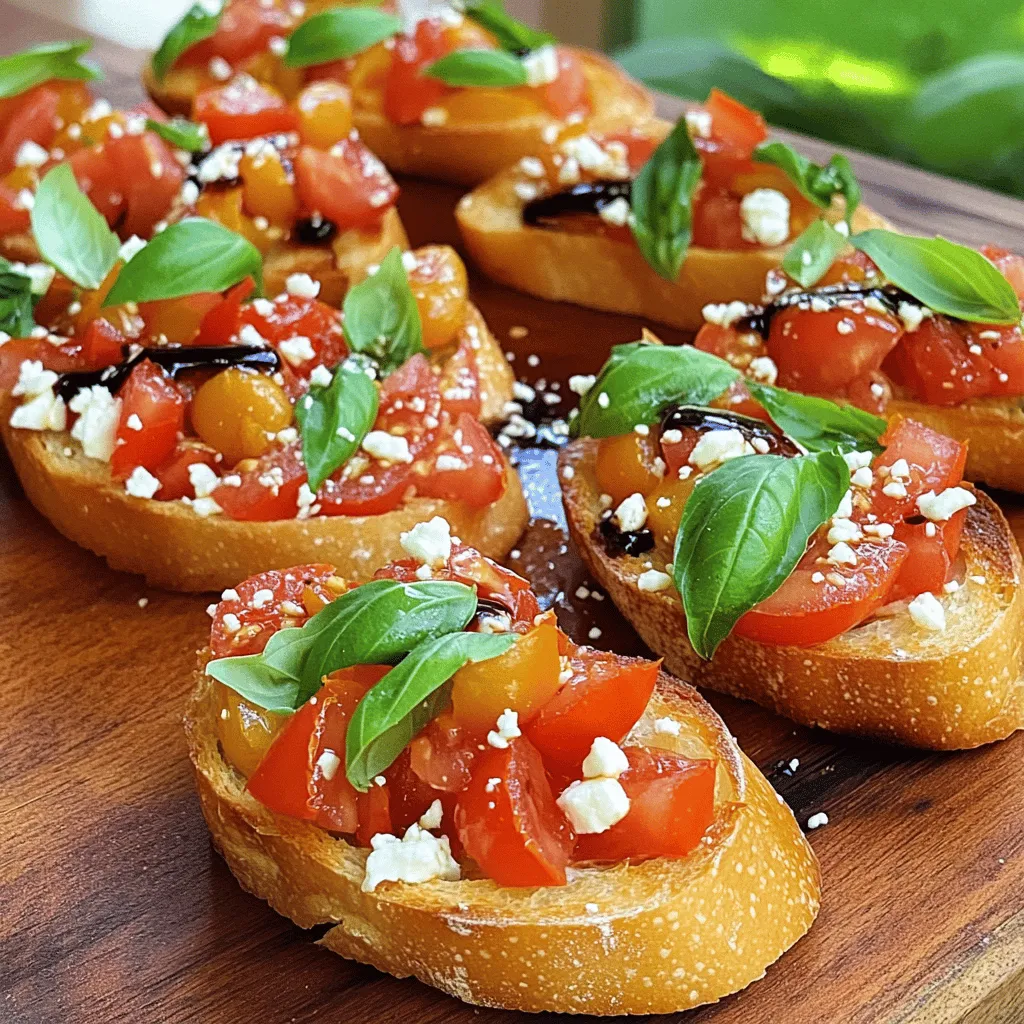
Bruschetta is the perfect appetizer that’s easy to make and packed with flavor. In this post, I’ll share my simple and delicious Bruschetta recipe, featuring fresh tomatoes, basil, and a …

![To make these cheesy bites, gather these key ingredients: - 1 cup shredded mozzarella cheese - 1/2 cup grated Parmesan cheese - 1/2 cup all-purpose flour - 1 large egg - 1/2 teaspoon garlic powder - 1/2 teaspoon dried Italian herbs (oregano, basil, thyme) - Salt and pepper to taste - 1/4 cup breadcrumbs (preferably panko for extra crunch) - Cooking oil for frying - Fresh parsley, chopped (for garnish) These ingredients create a perfect blend of flavor and texture. The mozzarella ensures that gooey, melty center, while the Parmesan adds a rich, savory taste. When choosing cheese, look for freshness. Check the sell-by date on the package. Fresh mozzarella should feel soft and moist. Parmesan should have a hard, dry texture. If possible, buy from a local cheese shop. You can often find better quality cheeses there. Ask for samples to taste before buying. This way, you can choose the best cheese for your bites. If you have dietary needs, there are substitutes. For a gluten-free option, use almond flour instead of all-purpose flour. Vegan cheese can replace mozzarella and Parmesan if you avoid dairy. Make sure to choose a brand that melts well. For egg-free bites, use flaxseed meal mixed with water as a binder. This way, you can still enjoy these cheesy bites without worry. These tips help you create Irresistible Cheesy Parmesan Mozzarella Bites that suit your needs. Use the [Full Recipe] for detailed steps to make them. First, grab a bowl. Add 1 cup of shredded mozzarella cheese and 1/2 cup of grated Parmesan cheese. Mix them well. This blend gives the bites their cheesy goodness. Make sure the cheeses are evenly combined. It helps when you shape the bites later. Now, take another bowl. Whisk together 1/2 cup of all-purpose flour, 1/2 teaspoon of garlic powder, and 1/2 teaspoon of dried Italian herbs. Add salt and pepper to taste. Set this bowl aside. In a small bowl, beat one large egg. This egg will help the coating stick. Take about a tablespoon of the cheese mixture and shape it into a ball. Repeat until you have 12-15 balls. Roll each cheese ball in the flour mixture. Then dip it into the beaten egg. Finally, coat it with 1/4 cup of breadcrumbs. Make sure every bite is covered well. In a deep skillet, heat about 1 inch of cooking oil over medium heat. The oil should be hot but not smoking. Carefully add a few mozzarella bites at a time. Fry them for about 2-3 minutes on each side. You want them golden brown. Use a slotted spoon to remove the bites. Place them on a paper towel-lined plate. This helps soak up any extra oil. Let them cool slightly before serving. Garnish with chopped fresh parsley for a fresh touch. For the full recipe, check the earlier section. Enjoy your cheesy bites! To get the best texture, focus on the cheese blend. Use fresh mozzarella for a gooey center. Grated Parmesan adds a rich, salty flavor. The mixture should feel sticky but not too wet. If it’s too wet, add a little flour. This helps the bites hold their shape when frying. Letting the bites chill for 15 minutes helps firm them up. One big mistake is overcrowding the pan. Fry only a few bites at a time. This keeps the oil hot and gives a crispy outer layer. Another mistake is not coating the bites well. Make sure each bite is fully covered in flour, egg, and breadcrumbs. This seals in the cheesy goodness. Lastly, don’t rush the frying time. Cook until golden brown for the best flavor. Use a deep skillet to fry these bites. A slotted spoon makes it easy to remove them. A thermometer helps check oil temperature. Aim for 350°F for even frying. Having paper towels ready helps soak up extra oil. A cookie sheet can hold the bites while they cool. These tools make the cooking process smooth and fun. For the complete recipe, check the Full Recipe section. {{image_2}} To add a kick to your cheesy bites, try adding jalapeños. Simply dice about one or two fresh jalapeños. Mix the diced jalapeños into your cheese mixture. This gives each bite a spicy surprise. Just be careful with the amount. You can always add more, but you can’t take it out! If you prefer a healthier option, you can bake these bites. Preheat your oven to 400°F (200°C). After coating the cheese balls, place them on a baking sheet lined with parchment paper. Spray or brush them lightly with olive oil. Bake for about 15-20 minutes, or until they are golden brown. This method cuts down on oil and keeps the bites crispy. You can elevate the flavor with fun add-ons. Crumbled bacon is a great choice. Just mix in a few tablespoons of cooked bacon into your cheese blend. Fresh herbs like chives or parsley also work well. These add a burst of fresh taste. Experiment with different flavors for a unique twist! For the full recipe, check the details above. Enjoy making these cheesy bites your way! To keep your cheesy Parmesan mozzarella bites fresh, store them in an airtight container. Place a paper towel at the bottom to absorb moisture. This helps maintain their crispy texture. You can keep them in the fridge for up to three days. If you want to enjoy them later, freezing is a great option. To reheat the bites, avoid the microwave. It makes them soggy. Instead, place them in a preheated oven at 350°F (175°C) for about 10 minutes. This helps them regain their crunch. You can also use an air fryer for about five minutes. This keeps them crispy and delicious. To freeze your mozzarella bites, first let them cool completely. Arrange them in a single layer on a baking sheet. Freeze for about an hour until they are firm. Then, transfer them to a freezer-safe bag. They can last up to three months in the freezer. When you’re ready to eat them, reheat straight from frozen. Adjust your cooking time as needed for best results. Don't forget to check out the Full Recipe for more details! Yes, you can use different cheeses! Cheddar or Gouda work well. Each cheese adds its unique flavor. You can mix cheeses for a fun twist. Just keep the texture in mind. Ensure they melt nicely, like mozzarella. Look for a golden brown color on the bites. They should take about 2-3 minutes on each side. The oil should be hot, but not smoking. A small test bite can help, too. If it’s gooey and soft, you’re good to go! These bites pair great with marinara sauce for dipping. You can also serve them with a fresh salad for balance. Try a side of garlic bread for a full meal. Enjoy them as a snack or appetizer! For the full recipe, check out the link. In this blog post, we explored how to make cheesy Parmesan mozzarella bites. We covered essential ingredients, tips for good cheese, and alternatives for dietary needs. I shared step-by-step instructions and valuable tips for a perfect texture. We also looked at fun variations and how to store leftovers. These bites are easy and fun to make. With some practice, you’ll master them in no time! Enjoy experimenting with flavors and impressing friends with your tasty creations.](https://toastedrecipes.com/wp-content/uploads/2025/05/dc1d6d50-cf2c-4741-9d5c-2474b0ce5987.webp)

![To make loaded tater tots, you need a few key ingredients: - 1 pound frozen tater tots - 1 cup shredded cheddar cheese - 1/2 cup sour cream - 1/2 cup cooked bacon bits (optional) - 1/4 cup green onions, chopped - 1/4 cup diced tomatoes - 1/4 cup jalapeños, sliced - 1/2 teaspoon garlic powder - 1/2 teaspoon paprika - Salt and pepper to taste This list gives you a great base for your dish. You can mix and match based on your taste. If you want to switch things up, here are some fun alternatives: - Tater Tots: Use sweet potato tots for a different flavor. - Cheese: Try pepper jack or mozzarella for a spicy twist. - Sour Cream: Greek yogurt works well for a healthier choice. - Bacon: Use turkey bacon or skip it for a vegetarian option. - Toppings: Feel free to add avocado, chili, or even cheese sauce. These swaps can make your loaded tater tots unique and delicious. Choosing the right tater tots can boost your dish. Here are my top tips: - Look for Quality: Choose brands that offer crispy and golden tots. - Check Ingredients: Fewer ingredients often mean better quality. - Frozen vs. Fresh: Frozen tots are convenient and stay crispy. Fresh can be harder to find. - Size Matters: Smaller tots can get crispier and hold toppings better. These tips will help you pick the best tater tots for your recipe. For the full recipe, check out the instructions above. To make loaded tater tots, start with the frozen tater tots. Preheat your oven to 425°F (220°C). Spread the tater tots out on a baking sheet. Ensure they are in a single layer for even cooking. Bake them for about 20 to 25 minutes. You want them golden and crispy. Once they are done, take them out and sprinkle shredded cheddar cheese on top. Put the tray back in the oven for 5 more minutes. This allows the cheese to melt perfectly. While the cheese melts, mix sour cream, garlic powder, paprika, salt, and pepper in a bowl. Stir until it is smooth. Set this aside for later. When the cheese is melted, take the tray out of the oven again. Drizzle the garlic sour cream mix over the tater tots. Add your toppings—bacon bits, green onions, tomatoes, and jalapeños. Finally, return the loaded tater tots to the oven for 2 to 3 more minutes. This warms the toppings just right. Then, let them cool slightly before serving. For the best crispy tater tots, use a preheated oven. Baking at the right temperature helps them crisp up nicely. Make sure to space them out well. If they touch, they will steam instead of crisp. You can also flip them halfway through baking for even crispiness. If you want an extra crispy finish, broil them for the last minute. Just watch them closely to avoid burning. The key to perfect loaded tater tots is timing. Bake them at 425°F (220°C) for the best results. It usually takes about 20 to 25 minutes at this temperature. When adding cheese, keep it in the oven for just 5 minutes. This ensures it melts without getting too brown. For the final warm-up with toppings, 2 to 3 minutes does the trick. Following these steps will give you crispy, flavorful loaded tater tots every time! For the full recipe, check out the detailed instructions above. To get your tater tots super crispy, follow these steps: - Use a baking sheet lined with parchment paper. This helps the tots crisp up nicely. - Spread the frozen tater tots in a single layer. Avoid stacking them to ensure even cooking. - Bake at 425°F (220°C) for about 20-25 minutes. Keep an eye on them, so they don’t burn. - Flip the tots halfway through baking. This helps both sides get golden and crunchy. - For extra crunch, give them a quick broil for 1-2 minutes at the end. Watch closely! Here are some pitfalls to steer clear of: - Don’t overcrowd the baking sheet. Too many tots will steam, not crisp. - Avoid using fresh tater tots. Frozen ones work best for a crunchy texture. - Don’t skip the cheese-melting step. It adds flavor and helps hold toppings in place. - Don’t rush the cooling process. Let them sit for a minute to firm up. To elevate your loaded tater tots, try these flavor tips: - Add spices like chili powder or cumin for a spicy kick. - Mix in a splash of hot sauce into your sour cream for added zest. - Use different cheeses, like pepper jack or mozzarella, for unique flavors. - Garnish with fresh herbs like cilantro or parsley for a fresh touch. For the full recipe, check out the [Full Recipe]. {{image_2}} You can make loaded tater tots even better with great toppings. Here are some popular picks: - Cheddar Cheese: This classic cheese melts well and adds a rich flavor. - Bacon Bits: Crispy bacon adds a nice crunch and a savory taste. - Sour Cream: A dollop of sour cream brings a cool creaminess. - Green Onions: Chopped green onions add a fresh bite and color. - Tomatoes: Diced tomatoes give a juicy texture and bright flavor. - Jalapeños: For some heat, sliced jalapeños bring a spicy kick. Mix and match these toppings to find your favorite combo. Loaded tater tots can easily fit different diets. For a vegetarian option, skip the bacon. You can add more veggies like bell peppers or olives. For a vegan twist, use vegan cheese and dairy-free sour cream. This way, everyone can enjoy a tasty treat! Tater tots can change based on where you are. In some areas, people love spicy toppings, like buffalo sauce and blue cheese. In other places, you might find tater tots topped with chili and cheese for a hearty meal. Each region adds its unique flair, giving you many tasty choices. You can explore these variations and make your loaded tater tots special! For a full recipe, check out the Loaded Tater Tots recipe above. To store leftover loaded tater tots, let them cool first. Place them in an airtight container. Make sure to separate layers with parchment paper. This keeps them from sticking. Store the container in the fridge. They will stay fresh for about 3 to 4 days. For the best taste, reheat your tater tots in the oven. Preheat your oven to 400°F (200°C). Spread the tater tots on a baking sheet. Heat them for about 10 to 15 minutes. This will help them regain their crispiness. You can also use an air fryer for faster results. Set it to 350°F (175°C) for about 5 to 7 minutes. You can freeze loaded tater tots for later use. First, let them cool completely. Then, place them in a single layer on a baking sheet. Freeze them for about 1 to 2 hours until firm. After that, transfer them to a freezer bag. They can last up to 2 months in the freezer. When you want to eat them, bake from frozen. Just add a few extra minutes to the cooking time. For the full recipe, check out the details above! Loaded tater tots are crispy potato bites topped with tasty ingredients. They often feature cheese, bacon, sour cream, and various veggies. The mix of flavors and textures makes them a crowd favorite. You can serve them as a snack or side dish. They are fun to make and even more fun to eat! Yes, you can use homemade tater tots. Just make sure they are crispy and well-cooked. Homemade tater tots can add a fresh taste. Plus, you can control the ingredients. If you decide to make your own, use my [Full Recipe] as a guide for toppings and cooking time. Many sauces pair well with loaded tater tots. Here are a few favorites: - Ranch dressing - Spicy ketchup - BBQ sauce - Chipotle mayo - Cheese sauce Each sauce adds a unique flavor to your tater tots. Feel free to mix and match! You now know how to make loaded tater tots. We covered the best ingredients, the steps for perfect cooking, and tips for extra crunch. You’ve learned how to store leftovers and even how to customize them with tasty toppings. Remember, the key is to experiment and find what you love. Whether you serve them as a snack or party dish, loaded tater tots can impress anyone. Enjoy your cooking and share these tips with friends!](https://toastedrecipes.com/wp-content/uploads/2025/05/247e2750-5334-4d68-a2b9-4fc64036a017.webp)
![For the perfect Blueberry Oatmeal Bars, gather these key ingredients: - 2 cups rolled oats - 1 cup whole wheat flour - 1/2 cup brown sugar, packed - 1/4 cup honey (or maple syrup) - 1/2 cup unsweetened applesauce - 1/2 teaspoon baking soda - 1/2 teaspoon cinnamon - 1/4 teaspoon salt - 1 1/2 cups fresh blueberries (or frozen, thawed) - 1/2 cup chopped nuts (walnuts or almonds) - 1/4 cup shredded coconut (optional) These ingredients blend to create a hearty and sweet snack. The oats provide fiber, while the blueberries add antioxidants. The honey gives a nice touch of natural sweetness. You can customize your bars to suit your taste. Here are a few ideas: - Add 1/4 cup of chia seeds for extra nutrition. - Swap blueberries for raspberries or chopped apples. - Use almond butter instead of applesauce for richness. - Mix in a dash of vanilla extract for a lovely aroma. These options let you play with flavors and textures, making the bars your own. Each bar provides a good balance of nutrients. Here’s a rough estimate per bar: - Calories: 150 - Protein: 3g - Fat: 5g - Carbohydrates: 25g - Fiber: 3g These bars are not only tasty but also nourishing. They make a great snack for kids and adults alike. For the full recipe, check out the details above. Start by preheating your oven to 350°F (175°C). This step is key for even baking. While the oven warms up, grab a 9x9 inch baking pan. Line it with parchment paper, leaving some paper hanging over the sides. This will help you lift the bars out later. In a large mixing bowl, combine the rolled oats, whole wheat flour, brown sugar, baking soda, cinnamon, and salt. Use a whisk or spoon to stir them together. Make sure everything is well mixed. This helps the flavors blend well in the bars. In another bowl, mix the honey (or maple syrup) with the applesauce. Stir until it is smooth and well combined. This mixture will add sweetness and moisture to your bars. Once it’s ready, pour it into the bowl with the dry ingredients. Mix everything until just combined. Be careful not to over-mix. Gently fold in the fresh blueberries and chopped nuts. If you want, you can also add shredded coconut. Spread the mixture evenly in the prepared pan and press it down with a spatula. Bake for 25-30 minutes. The edges should turn golden brown. To check if they are done, insert a toothpick in the center. If it comes out clean, your bars are ready! Allow them to cool for 10-15 minutes in the pan before lifting them out. Cut into squares or bars once completely cool. Enjoy your delicious Blueberry Oatmeal Delight Bars! For the complete recipe, check out the [Full Recipe]. To get chewy and soft bars, use rolled oats. They absorb moisture well. Mix your dry and wet ingredients gently. Over-mixing can make them tough. Press the mixture evenly in the pan. This helps the bars bake uniformly. Bake until the edges turn golden brown. This step adds a nice crunch. One common mistake is not measuring the ingredients. Accurate measurements ensure the right balance. Another mistake is using too much liquid. This can make the bars soggy. Don't skip the parchment paper. It helps with easy removal and prevents sticking. Lastly, let the bars cool before cutting. This helps them set properly. These blueberry oatmeal bars are great on their own. You can serve them with yogurt or a dollop of whipped cream. They pair well with a cup of tea or coffee. For a fun twist, add a scoop of ice cream on top. You can also pack them for a snack on the go. Enjoy them as a quick breakfast or a satisfying treat! For the full recipe, check out the details mentioned earlier. {{image_2}} You can make this recipe fit your diet. For gluten-free bars, use certified gluten-free oats and gluten-free flour. If you need a nut-free option, skip the nuts or replace them with seeds like sunflower seeds. You can also use mashed bananas instead of applesauce for a fruity twist. Want to jazz up the flavor? Try adding spices like nutmeg or ginger. You can also mix in different fruits, like diced apples or raspberries. If you like a crunch, add some chocolate chips or dried fruits. These changes keep the bars exciting and new. If you want less sugar, swap brown sugar for coconut sugar or a sugar substitute. Maple syrup is a great choice if you want a unique flavor. You can also use agave nectar for a milder sweetness. Just remember to adjust the wet ingredients slightly to keep the texture right. For the full recipe, check out the Blueberry Oatmeal Delight Bars section. To keep your blueberry oatmeal bars fresh, store them in an airtight container. This keeps them moist and tasty. You can place parchment paper between layers to prevent sticking. It helps maintain their texture. If you keep them at room temperature, they last about four days. For longer storage, the fridge is your best friend. Just remember to seal them tight. You can freeze these bars for up to three months. To do this, cut them into squares first. Then, wrap each piece in plastic wrap. Place the wrapped bars in a freezer bag. Label the bag with the date. This way, you’ll know when to enjoy them again. When you’re ready to eat, just thaw them in the fridge overnight. For a warm treat, reheat the bars in the microwave. Heat them for about 15 to 20 seconds. This brings back their soft texture. You can also warm them in the oven. Preheat the oven to 350°F (175°C) and heat for about 5 to 10 minutes. Serve them warm for a cozy snack. Enjoy these blueberry oatmeal bars at their best! Yes, you can use frozen blueberries. Just thaw them first. This keeps the bars moist and sweet. The flavor stays great, too! If you use frozen ones, they may make the mix a bit wet. Just remember to drain any extra juice. These bars can last up to one week. Store them in an airtight container at room temperature. If you want to keep them longer, freeze them. They can last up to three months in the freezer. Just make sure to wrap them well. Yes, these bars are a healthy snack choice. They have whole grains and fruits. The oats provide fiber, while blueberries add vitamins. Using honey or maple syrup gives a natural sweetness. You can also add nuts for protein. It’s a balanced snack for everyone! Absolutely! You can use gluten-free oats. They work just as well in this recipe. If you need them to be entirely gluten-free, check the labels. You can also try almond flour or coconut flour for a different texture. In this post, I shared how to make delicious blueberry oatmeal bars. We covered the key ingredients, step-by-step instructions, and helpful tips. You learned how to customize the recipe with variations and ensure proper storage. These bars are a tasty option for breakfast or snacks. Enjoy making them your own with flavors and toppings. Follow these tips to create a treat your family will love. Happy baking!](https://toastedrecipes.com/wp-content/uploads/2025/05/c5b58d6a-f8a4-4988-935a-b7b07346a85e.webp)
![To make Mediterranean Baked Feta Eggs, gather these fresh ingredients: - 200g feta cheese, crumbled - 4 large eggs - 1 medium zucchini, diced - 1 cup cherry tomatoes, halved - 1 bell pepper, diced - 2 cloves garlic, minced - 1 teaspoon dried oregano - 1 teaspoon smoked paprika - 2 tablespoons olive oil - Salt and pepper to taste - Fresh basil or parsley for garnish Each ingredient plays a vital role in this dish's flavor. The feta cheese adds creaminess, while the eggs bring richness. The zucchini, cherry tomatoes, and bell pepper add color and nutrition. Garlic provides depth, and herbs and spices elevate the taste. Using fresh ingredients ensures the best flavor. I find that high-quality feta and ripe tomatoes make a noticeable difference. Feel free to adjust the salt and pepper to fit your taste. These ingredients combine to create a dish that is both simple and satisfying. If you want the full recipe, check out the section on preparation. 1. Preheat the oven and prepare the baking dish. Start by preheating your oven to 375°F (190°C). This temperature helps cook the eggs just right. Grab a medium-sized baking dish. A glass dish works great for this recipe. 2. Add vegetables and seasonings to the baking dish. In your baking dish, add the diced zucchini, halved cherry tomatoes, and diced bell pepper. Drizzle 2 tablespoons of olive oil over the veggies. Sprinkle salt, pepper, and 1 teaspoon of dried oregano. Toss everything well, so the vegetables are coated in oil and spices. 3. Create wells for feta and eggs. Use a spoon to make small wells in the vegetable mix. Crumble 200g of feta cheese into these wells. Next, carefully crack 4 large eggs over the feta and vegetables, making sure the yolks stay whole. 1. Bake time and temperature. Place the dish in the oven. Bake for 20-25 minutes. You want the egg whites to be set, but the yolks should still be a bit runny. If you like firmer yolks, add a few extra minutes. 2. Tips for achieving perfect eggs. Keep an eye on the eggs during baking. Oven times can vary. If you want a creamier yolk, check them at 20 minutes. For firmer yolks, wait for the full 25 minutes. 1. How to serve Mediterranean Baked Feta Eggs. Once baked, let the dish cool for a couple of minutes. Garnish with fresh basil or parsley. This adds a pop of color and fresh flavor. Serve directly in the baking dish for a casual meal. 2. Pairing suggestions for sides or bread. Pair these eggs with crusty bread or pita. A simple green salad also works well. This dish is great for brunch or any meal of the day. You can find the full recipe to try this dish at home! To get the eggs just right, try baking them a bit longer. You can cook them for 30 minutes for firmer yolks. If you like runny yolks, stick to 20 minutes. Adjust to your taste. For crispy vegetables, cut them small. This helps them cook faster and caramelize nicely. Toss them in olive oil and seasoning before baking for extra flavor. If you want to switch up the cheese, try goat cheese or ricotta. They give a different but tasty flavor. For veggies, use what’s in season. Spinach, mushrooms, or asparagus all work well. Feel free to mix and match based on what you have at home. For baking, a medium-sized ceramic or glass dish works best. These materials help cook the eggs evenly. A sharp knife and cutting board make prep easy. Also, a spatula helps to serve the dish neatly. These tools will make your cooking experience smoother. For the full recipe, check out the main section. {{image_2}} You can make Mediterranean Baked Feta Eggs even more exciting. Try adding spices like cumin or chili flakes. These can bring warmth and depth to the dish. Fresh herbs such as dill or thyme also work great. They add a burst of freshness that enhances the flavors. You can switch up the cheese too. While feta is classic, goat cheese offers a tangy twist. Mozzarella brings creaminess, while sharp cheddar can add a nice bite. Each cheese gives a unique flavor profile, so feel free to experiment. If you follow a vegan diet, you can adapt this dish to suit your needs. Replace the eggs with silken tofu. Crumble the tofu and season it well to mimic the egg texture. Use nutritional yeast for a cheesy flavor without dairy. For gluten-free options, this recipe is already a winner. All the ingredients are gluten-free. Just make sure to double-check your cheese and other products to confirm they meet your dietary needs. Mediterranean Baked Feta Eggs can shine at any meal. For breakfast, serve it hot with crusty bread. It’s perfect for dipping and soaking up the egg yolks. For brunch, pair it with a light salad. The fresh greens balance the richness of the dish. If you meal prep, this recipe is great for that too. You can bake it in advance and store it in the fridge. Just reheat it quickly when you’re ready to enjoy. For the full recipe, check out the details provided earlier. To store leftovers of Mediterranean Baked Feta Eggs, let them cool first. Place them in an airtight container. This keeps the dish fresh and prevents odors from mixing. You can store it in the fridge for up to three days. If you want to enjoy this dish later, make sure to check for any signs of spoilage before eating. When reheating, you want to maintain the quality of the dish. The best way is to use an oven. Preheat the oven to 350°F (175°C). Place the eggs in a baking dish and cover with foil. Heat for about 10-15 minutes, or until warmed through. You can also use a microwave, but the eggs may become rubbery. To freeze Mediterranean Baked Feta Eggs, start by letting the dish cool completely. Cut it into portions and wrap each piece tightly in plastic wrap. Then, place them in a freezer bag. Make sure to label the bags with the date. These eggs can last up to three months in the freezer. When you're ready to eat, thaw the portions in the fridge overnight. Reheat them in the oven or microwave as mentioned earlier. This way, you can enjoy a quick and tasty meal anytime! For the full recipe, check the section above. You can tell when the eggs are done by looking at the whites. They should be set and not runny. The yolks can stay soft and slightly jiggly. If you want firmer yolks, bake a bit longer. The ideal cooking time is 20-25 minutes at 375°F (190°C). Yes! You can swap veggies easily. Try spinach, kale, or mushrooms. You can also add artichokes or olives for a twist. Mix and match based on what you have at home. Seasonal veggies add freshness and color to your dish. I love serving these eggs with crusty bread or pita. A side salad with greens and lemon dressing pairs well too. You can add roasted potatoes for a heartier meal. Don’t forget some fresh fruit for a sweet touch! Try this recipe for a delightful experience: [Full Recipe]. You can enjoy Mediterranean Baked Feta Eggs by following the steps outlined above. I shared how to prepare the ingredients, bake them, and serve delicious meals. With tips for perfecting texture and ingredient swaps, you can tailor this dish to your taste. You can even explore different flavor and dietary variations. Remember, storage and reheating techniques help keep leftovers fresh. Dive into this tasty recipe, and make it your own! Enjoy every bite and impress your friends and family.](https://toastedrecipes.com/wp-content/uploads/2025/05/3fba2d67-48a3-4dab-81d6-9a24f35c2242.webp)
![- 1 lb ground beef - 1 small onion, finely chopped - 2 garlic cloves, minced - 1 teaspoon cumin - 1 teaspoon chili powder - 1/2 teaspoon smoked paprika - Salt and pepper to taste - 8 small corn tortillas - 1 cup shredded lettuce - 1 cup diced tomatoes - 1/2 cup shredded cheese (cheddar or queso fresco) - 1 avocado, sliced - Fresh cilantro, for garnish - Lime wedges, for serving You need ground beef for a rich base. I prefer 80% lean, but you can use 90% if you want less fat. The onion and garlic add great flavor. Don't skip them! Spice it up with cumin, chili powder, and smoked paprika. These spices give depth and warmth to your tacos. For toppings, fresh ingredients are key. Shredded lettuce and diced tomatoes add crunch. Cheese, either cheddar or queso fresco, melts beautifully and enhances the taste. Slice up an avocado for creaminess. The cilantro brings a fresh finish, and lime wedges add zing. You’ll need small corn tortillas. They hold the filling well and taste great. If you want more, double the recipe. Check the Full Recipe for detailed steps on cooking and assembling your tacos. First, you want to cook your ground beef. Heat a large skillet over medium heat. Add 1 pound of ground beef. Cook it for about 5 to 7 minutes. Break it apart with a spatula as it cooks. You want it browned all over. Next, add 1 small finely chopped onion and 2 minced garlic cloves. Cook them together until the onion becomes soft and clear, about 3 to 4 minutes. This will make your filling taste rich and full of flavor. Now, it's time to add some spices. Stir in 1 teaspoon of cumin, 1 teaspoon of chili powder, and 1/2 teaspoon of smoked paprika. Don’t forget a pinch of salt and pepper! Cook this for an extra 2 minutes. This step helps the spices mix well with the beef. While the beef is cooking, heat another non-stick skillet over medium-high heat. Take one small corn tortilla and place it in the hot skillet. Warm it for about 30 seconds on each side. You want the tortilla to be soft and easy to fold. Repeat with the rest of the tortillas. To keep your tortillas warm, wrap them in a clean kitchen towel. This keeps them soft and ready to use when you assemble your tacos. Now comes the fun part—assembling your tacos! Take a warm tortilla and spoon in some of the beef mixture. Don’t be shy; add a good amount! Next, layer on your toppings. I love adding 1 cup of shredded lettuce, 1 cup of diced tomatoes, and 1/2 cup of shredded cheese. You can use cheddar or queso fresco for a nice touch. For a fresh twist, top each taco with slices of avocado. Garnish with fresh cilantro for that extra pop of flavor. Serve your tacos with lime wedges on the side. Squeeze some lime juice over the top when you eat them. Enjoy your savory pan fried beef tacos! For the complete steps, check the Full Recipe. For the best flavor in your tacos, use ground beef with 80% lean and 20% fat. This mix gives the meat a rich taste. Fat adds juiciness, making each bite delicious. Fresh spices also make a big difference. Use whole spices when you can. Grinding them right before cooking brings out their full flavor. Heat is key when cooking your beef. Start with medium heat to brown the meat well. If it cooks too fast, it may burn. Stir the beef often. This helps it cook evenly and prevents sticking. If you notice it beginning to brown too much, lower the heat a bit. Plating your tacos well makes them look great. Stack the tacos on a colorful plate. You can add a line of shredded lettuce under the tacos. This adds color and freshness. Garnish with cilantro on top. It adds a nice touch. Serve lime wedges on the side for a bright splash of flavor. Enjoy every bite of your tasty tacos! {{image_2}} You can easily swap out the ground beef for other meats. Ground turkey or chicken works well. They offer a lighter option while keeping the flavor. Use the same spices to keep it tasty. If you want a vegan option, try plant-based meat alternatives. Products like lentils or jackfruit can mimic the texture. They soak up the spices nicely, too. Add unique spices to your beef for a twist. Try coriander or smoked chili powder for depth. You can also play with fresh herbs like oregano or thyme. If you want a regional flavor, think about adding a touch of lime zest. You could even mix in some diced jalapeños for heat. Each region in Mexico has its own flair, so explore and enjoy! Pair your tacos with sides for a full meal. Rice and beans make great companions. They add heartiness and balance the flavors. For drinks, a cold Mexican beer or a tangy lime soda works well. You could also serve margaritas for a fun touch. These sides and drinks make your taco night even better! For the complete recipe, check out [Full Recipe]. To keep your leftover tacos fresh, store them in an airtight container. This helps keep moisture in and odors out. You can refrigerate them for up to three days. After three days, the quality may drop, so it's best to enjoy them soon. When it's time to eat your leftovers, you can reheat them in several ways. The best method is to use a skillet on medium heat. This keeps the tortillas crispy. Heat them for about 2-3 minutes, flipping halfway through. If you want to freeze your tacos, wrap each one tightly in foil or plastic wrap. They can last in the freezer for up to three months. To save time during the week, prep your ingredients ahead. Chop the onions, mince garlic, and season the beef in advance. Store them separately in the fridge. This way, you can quickly assemble your tacos. When you’re ready, just heat the beef and warm the tortillas for a fast meal. To make pan fried beef tacos, follow these simple steps: - Start with 1 lb of ground beef. - Heat a large skillet over medium heat. - Cook the beef for 5-7 minutes until it turns brown. - Add 1 chopped onion and 2 minced garlic cloves. - Sauté until the onion looks clear, about 3-4 minutes. - Mix in 1 teaspoon of cumin, 1 teaspoon of chili powder, and ½ teaspoon of smoked paprika. - Season with salt and pepper, cooking for 2 more minutes. - Warm 8 corn tortillas in a separate skillet for 30 seconds on each side. - Spoon the beef mix onto each tortilla and add toppings. This method keeps it quick and easy, perfect for beginners. For tasty toppings, I suggest: - Shredded lettuce for crunch. - Diced tomatoes for freshness. - Shredded cheese, either cheddar or queso fresco. - Sliced avocado for creaminess. - Fresh cilantro for a burst of flavor. - Lime wedges to squeeze over the tacos. These toppings make your tacos colorful and delicious! Yes, you can use flour tortillas. Flour tortillas have a softer texture. They often taste richer than corn. Corn tortillas add a nutty flavor and a slight chew. Each type offers a different taco experience. Try both to find your favorite! Using the right tortilla enhances the whole dish. For the full recipe, check the earlier section. We covered a lot about making pan-fried beef tacos. We looked at ingredients, step-by-step instructions, and tips for the best flavor. You learned about variations to fit different diets and storage tips for leftovers. Remember, cooking should be fun and easy. Experiment with flavors and toppings to make tacos your own. Enjoy making and sharing them with friends and family!](https://toastedrecipes.com/wp-content/uploads/2025/05/31d9781c-e43d-40b9-8934-cc29040e178e.webp)
![- 1 cup all-purpose flour - 2 tablespoons sugar - 1 tablespoon baking powder - 1/2 teaspoon salt - 1 ripe banana, mashed - 1 cup milk (dairy or non-dairy) - 1 large egg - 2 tablespoons melted butter or coconut oil - 1/2 teaspoon vanilla extract - 1/2 cup chocolate chips - Additional butter or oil for cooking Banana chocolate chip pancakes need simple ingredients. Each one plays a key role in the taste and texture. - All-purpose flour gives the pancakes structure. It makes them fluffy. - Sugar adds sweetness, balancing the rich chocolate. - Baking powder helps the pancakes rise. This makes them light and airy. - Salt enhances all the flavors in the batter. - Ripe banana is the star of the dish. It brings natural sweetness and moisture. - Milk binds the batter. You can use dairy or non-dairy milk. - Egg adds richness and helps with binding. - Melted butter or coconut oil adds flavor and moisture to the pancakes. - Vanilla extract gives a warm, sweet note. - Chocolate chips provide bursts of chocolate in every bite. - Additional butter or oil is for cooking. It prevents sticking and adds a nice crisp. With these ingredients ready, you can make the best banana chocolate chip pancakes. Check out the Full Recipe for details on how to combine these tasty items! Mixing Dry Ingredients Start by gathering your dry ingredients. In a large bowl, whisk together: - 1 cup all-purpose flour - 2 tablespoons sugar - 1 tablespoon baking powder - 1/2 teaspoon salt Mix them well until everything looks even. This step adds air to your pancakes. Combining Wet Ingredients In another bowl, mash one ripe banana with a fork. Then, add: - 1 cup milk (dairy or non-dairy) - 1 large egg - 2 tablespoons melted butter or coconut oil - 1/2 teaspoon vanilla extract Stir these until smooth. The banana adds moisture and flavor. Merging Dry and Wet Mixtures Pour the wet mixture into the bowl with the dry mixture. Gently stir until just combined. It's okay if the batter has lumps. Overmixing can make pancakes tough. Cooking the Pancakes Heat a non-stick skillet over medium heat. Add a little butter or oil to coat the pan. Pour about 1/4 cup of batter for each pancake. Cook until bubbles form on top, about 2-3 minutes. Sprinkle a few chocolate chips on top before flipping. Flip the pancake carefully. Cook for another 2-3 minutes until both sides are golden brown. Serving Suggestions Serve these warm pancakes on a plate. Top with maple syrup, sliced bananas, or whipped cream. You can also sprinkle more chocolate chips on top for extra sweetness. Enjoy your delicious banana chocolate chip pancakes! For the complete recipe, check out the [Full Recipe]. Avoiding Overmixing Mix the batter gently. Overmixing can make the pancakes tough. Stir until you see no dry flour. A few lumps are fine. This keeps them light and fluffy. Cooking Temperature Recommendations Heat your skillet to medium. If it's too hot, pancakes can burn. If too cool, they won’t cook evenly. A drop of water should sizzle on the skillet. Adjust the heat as you cook. Ensuring Even Cooking When you pour the batter, use a measuring cup. This helps keep the pancakes the same size. Cook until bubbles form on top. This shows they are ready to flip. Popular Toppings for Banana Chocolate Chip Pancakes Maple syrup is a classic choice. You can also try honey or agave. Fresh banana slices add great flavor. Whipped cream makes it feel special. Sprinkle some extra chocolate chips on top for fun! Alternative Serving Suggestions Serve with yogurt for a protein boost. A side of bacon or sausage pairs nicely. For a twist, add nuts or berries. These add crunch and flavor. You can even make a pancake stack with layers of toppings! You can find the Full Recipe linked above to guide you through the process. {{image_2}} Using Whole Wheat Flour You can swap all-purpose flour for whole wheat flour. Whole wheat adds fiber and nutrients. The pancakes will have a nuttier taste. They will still be soft and delicious. Just use the same amount as the white flour. Low Sugar Options If you want to cut sugar, reduce or skip the 2 tablespoons of sugar. The ripe banana adds natural sweetness. You can also use honey or maple syrup instead. This way, you keep the flavor while lowering the sugar. Adding Nuts or Berries You can make your pancakes even tastier by adding nuts or berries. Walnuts or pecans add a nice crunch. Blueberries or strawberries give a fresh burst of flavor. Just mix in about 1/4 cup of your choice right before cooking. Swapping Chocolate Types Feel free to change the type of chocolate chips you use. Dark chocolate chips offer a rich taste. Milk chocolate chips are sweeter and creamier. You can even try white chocolate for a fun twist. Mixing different types adds depth to the flavors. For more ideas, check the Full Recipe! After making your banana chocolate chip pancakes, you might have leftovers. Storing them right helps keep them fresh. - Refrigerating Leftover Pancakes: Place your pancakes in an airtight container. Store them in the fridge for up to three days. This keeps them soft and tasty. If you want to enjoy them warm later, make sure they cool down before sealing. - Freezing Pancakes for Later Enjoyment: To save pancakes for a while, freeze them. Stack the pancakes with a piece of parchment paper between each one. This prevents them from sticking together. Use a freezer bag or an airtight container. They can last up to two months in the freezer. When you're ready to eat your pancakes, reheating them is easy. - How to Reheat Pancakes Effectively: For a quick fix, use the microwave. Place a pancake on a microwave-safe plate. Cover it with a damp paper towel to keep it moist. Heat for 20-30 seconds. For a crispy outside, use a skillet. Heat a little butter on medium heat. Add the pancake and cook for about one minute on each side. Enjoy your warm pancakes just like they were fresh! Can I make Banana Chocolate Chip Pancakes gluten-free? Yes, you can. Use a gluten-free flour blend instead of regular flour. Many brands work well. Just check the label to confirm it is a 1:1 substitute. This way, everyone can enjoy these tasty pancakes. How ripe should the banana be for the best flavor? Look for bananas that are very ripe. They should have brown spots and feel soft. Ripe bananas bring out the best sweet taste. They also mash easily, which helps mix well into the batter. Can this recipe be doubled or halved? Yes, you can double or halve the recipe. If you double it, use two ripe bananas. For halving, use half the amount of each ingredient. This makes it easy to adjust for your needs. What are some common mistakes to avoid? Avoid overmixing the batter. A few lumps are okay. Also, make sure your skillet is hot enough before pouring the batter. Cooking at the right temperature helps the pancakes cook evenly. Lastly, don’t skip the chocolate chips; they are the star of this recipe! For the full recipe, check out the detailed steps above. You learned how to make delicious banana chocolate chip pancakes. We covered the ingredients, easy steps, and helpful tips. You also found ideas for healthy swaps and storage advice. Remember, don’t overmix your batter for light pancakes. Enjoy them fresh with your favorite toppings. I hope this recipe makes breakfast special. Now, it’s time to grab those ingredients and start cooking!](https://toastedrecipes.com/wp-content/uploads/2025/05/a564b558-0a85-46c8-b2f7-ab0bf43221ee.webp)