Skip to content
toastedrecipes.com
  • Home
  • Appetizers
  • Desserts
  • Salads
  • Breakfast
  • Dinner
  • Privacy Policy
  • Contact
  • About

Chef Theo

Easy Shrimp Tacos Quick and Flavorful Meal Idea

May 11, 2025 by Chef Theo
- 1 lb large shrimp, peeled and deveined - 2 tablespoons olive oil - 1 teaspoon paprika - 1 teaspoon cumin - 1/2 teaspoon garlic powder - Salt and pepper to taste - 8 small corn tortillas - 1 cup red cabbage, finely shredded - 1 avocado, sliced - 1/2 cup mango salsa (store-bought or homemade) - Fresh cilantro, for garnish - Lime wedges, for serving To make these easy shrimp tacos, you need fresh ingredients. Start with large shrimp that are peeled and deveined. This saves time and makes cooking easier. The olive oil helps the spices stick to the shrimp. Paprika adds a sweet flavor, while cumin gives a warm note. For seasonings, garlic powder adds depth. Don’t forget salt and pepper to taste. Adjust these as you like! Next, think about toppings. Small corn tortillas are perfect for holding all the goodies. Red cabbage gives a nice crunch and color. Sliced avocado adds creaminess, and mango salsa brings sweetness and tang. Finally, use fresh cilantro for a burst of flavor. Serve lime wedges on the side for a zesty finish. This combination of ingredients makes for a quick and tasty meal. For more detailed cooking steps, check out the Full Recipe. - In a medium bowl, combine the shrimp with 2 tablespoons of olive oil. - Add 1 teaspoon of paprika, 1 teaspoon of cumin, 1/2 teaspoon of garlic powder, salt, and pepper to taste. - Toss until the shrimp are evenly coated in the spices. This step brings out the flavors. - Heat a large skillet over medium-high heat. - Once hot, add the seasoned shrimp in a single layer. - Cook for 2-3 minutes on one side. They will turn pink and opaque. - Flip the shrimp and cook for another 1-2 minutes until fully cooked. - Remove from heat. The shrimp should be juicy and tender. - While the shrimp cooks, warm 8 small corn tortillas in a separate dry skillet. - Heat them for about 30 seconds on each side until they are pliable. - This step makes it easier to fold the tortillas without tearing them. - Place a few shrimp in the center of each tortilla. - Top with 1 cup of shredded red cabbage, slices of avocado, and a spoonful of mango salsa. - Garnish with fresh cilantro. Serve with lime wedges on the side. - Enjoy the vibrant flavors and colors of your tacos, a true feast for the senses! For the complete recipe, check out the Full Recipe section. To cook shrimp just right, aim for a high heat. A large skillet over medium-high heat works well. Cook the shrimp for 2-3 minutes on one side. They should turn pink and opaque. Then, flip them and cook for 1-2 minutes more. The shrimp are done when they curl into a C shape. For extra flavor, try adding cayenne pepper or chili powder. These spices will give your shrimp a nice kick. Marinating the shrimp is also key. Let them sit in the olive oil and spices for at least 15 minutes. This step helps the flavors soak in. When serving, arrange the tacos neatly on a platter. Stack the tortillas for a fun look. Top each taco with red cabbage for crunch, avocado for creaminess, and mango salsa for sweetness. Fresh cilantro adds a pop of color. Serve with lime wedges for a bright finish. For the full recipe, check the main section above. {{image_2}} You can easily swap shrimp for chicken or fish. Chicken works well with the same spices. Just make sure to cook it fully. For fish, choose a firm type like mahi-mahi or tilapia. Cook it gently so it doesn't fall apart. If you want a vegetarian option, try using grilled vegetables or tofu. These options soak up flavors nicely. They also add great texture and taste to your tacos. For a spicy shrimp taco, add some chili powder or cayenne pepper. This gives your tacos a nice kick. You can also mix in diced jalapeños for added heat. Another fun idea is to add a tropical twist with pineapple salsa. The sweetness of pineapple pairs well with shrimp. It adds a refreshing taste that brightens your meal. You can change up your toppings. Try adding cheese or sour cream for a creamier texture. Both options add richness to the tacos. Seasonal veggies are great too. Use fresh corn in summer or roasted peppers in fall. They give your tacos a fresh burst of color and flavor. To keep your shrimp tacos fresh, store them in an airtight container. Place the tacos in the fridge right after eating. This helps maintain their taste and texture. If you have leftover shrimp, it’s best to store them separately. This way, they won’t make the tortillas soggy. For the shrimp: - Let cooked shrimp cool. - Place them in a sealed container. - Use them within 2-3 days for best flavor. When you want to enjoy your shrimp tacos again, reheating is key. You can use a microwave or a skillet. Microwave: - Place tacos on a microwave-safe plate. - Heat for about 30-45 seconds. - Check if they are warm enough. Skillet: - Heat a skillet on low. - Add tacos and cover. - Warm for about 1-2 minutes on each side. The skillet method keeps the tortillas crispy. So, it’s my favorite way to reheat. If you want to save shrimp for later, freezing is a great option. Here’s how: - Place raw shrimp in a freezer bag. - Remove as much air as possible and seal tightly. - Label the bag with the date and use within 3 months. If you want to freeze assembled tacos: - Wrap each taco in plastic wrap. - Store in a freezer-safe container. - Thaw in the fridge overnight before reheating. This helps preserve flavor and freshness. Enjoy your easy shrimp tacos anytime! Remember to check the [Full Recipe] for more tips. You can make easy shrimp tacos in about 20 minutes. This includes 10 minutes for prep and 10 minutes for cooking. The shrimp cooks fast, so keep an eye on it. Yes, you can use frozen shrimp! Just make sure to thaw it first. To thaw, you can place the shrimp in cold water for about 15-20 minutes. After thawing, pat the shrimp dry before seasoning. This helps the spices stick better. If you don’t have corn tortillas, you can use flour tortillas. Other options include lettuce wraps or even pita bread. Each gives a different taste and texture, so feel free to explore! To make shrimp tacos gluten-free, use corn tortillas. They are naturally gluten-free. Also, check the labels on your ingredients like salsa and spices to ensure they are gluten-free. You can also use lettuce wraps as a fun alternative. For the full recipe, check the recipe section above! These easy shrimp tacos are packed with flavor and fun. You learned how to prepare shrimp, cook it perfectly, and assemble tasty tacos with vibrant toppings. Remember to try different proteins and flavor options for variety. Keep leftovers fresh and know how to reheat them right. Explore alternatives for tortillas and make the dish gluten-free. Enjoy these shrimp tacos at home or share with friends for a delightful meal!

Looking for a quick and tasty meal? These Easy Shrimp Tacos bring vibrant flavors to your table in just a few minutes! With juicy shrimp, fresh toppings, and zesty seasoning, …

Read more

Categories Dinner

Korean BBQ Meatballs with Spicy Mayo Dip Delight

May 11, 2025 by Chef Theo
- 1 lb ground beef - 1/2 lb ground pork (optional) - 1/4 cup Panko breadcrumbs - 1/4 cup green onions, finely chopped - 2 garlic cloves, minced - 1 tablespoon sesame oil - 2 tablespoons soy sauce - 1 tablespoon gochujang (Korean chili paste) - 1/2 cup mayonnaise - 2 tablespoons gochujang - 1 tablespoon lime juice - 1 teaspoon sesame oil - 1 teaspoon honey (or to taste) To make Korean BBQ meatballs, you need fresh ingredients. The ground beef gives a rich taste. You can add ground pork for more flavor if you like. Panko breadcrumbs keep the meatballs light. Finely chopped green onions add a nice crunch. For flavor, minced garlic is key. It brings a strong, aromatic taste. Sesame oil adds a nutty depth, while soy sauce gives a savory umami kick. Gochujang is a must for that spicy, sweet kick. For the spicy mayo dip, start with mayonnaise. It’s creamy and smooth. Adding gochujang gives it heat and flavor. Lime juice adds brightness. A touch of sesame oil deepens the taste, while honey balances the spice. Check out the Full Recipe for precise measurements and cooking tips. Enjoy crafting these delightful meatballs! - Combine all meatball ingredients in a mixing bowl. - Use your hands to mix thoroughly until well combined. Start with ground beef and, if you like, add ground pork. The pork adds flavor and moisture. Next, toss in Panko breadcrumbs, finely chopped green onions, minced garlic, egg, sesame oil, soy sauce, gochujang, grated ginger, salt, and black pepper. Mixing well is key. You want every meatball to be packed with flavor. - Preheat oven to 400°F (200°C). - Form into 1-inch meatballs and place on a lined baking sheet. - Bake for 20-25 minutes until browned. While the oven heats up, shape your mixture into small meatballs, about 1 inch in diameter. Place them on a lined baking sheet. This keeps them from sticking. Bake the meatballs for about 20 to 25 minutes. You want them to be fully cooked and slightly browned on the outside. - Whisk all dip ingredients together in a small bowl. - Adjust spice level with additional Sriracha if desired. In a small bowl, whisk together mayonnaise, gochujang, lime juice, sesame oil, and honey. This dip brings heat and creaminess to the table. If you like it hotter, add more Sriracha. Taste it as you go to find your perfect balance. Check out the Full Recipe for more details on this tasty dish. Mixing your ingredients well is key. When you combine the ground beef, pork, and other ingredients, do it gently but thoroughly. This ensures even flavor. For the best taste, choose a mix of ground beef and pork. The pork adds a juicy texture that elevates the flavor of your meatballs. To keep meatballs moist, avoid overbaking them. Bake at 400°F for 20-25 minutes. This time is just right for cooking without drying out the meat. An even baking surface is also important. Use a lined baking sheet to help with heat distribution and keep the meatballs from sticking. Serve the meatballs on wooden skewers for a fun twist. This makes them easy to grab and eat. For added flair, garnish with chopped green onions and sesame seeds. Place a small bowl of spicy mayo dip on the side. This not only looks great but gives your guests an easy way to enjoy the dip. {{image_2}} You can switch up the meat in these meatballs. Using turkey or chicken works great. These meats can make the dish lighter and still tasty. If you want a vegetarian or vegan option, try using lentils or chickpeas. These ingredients add protein and flavor. Use the same seasonings for a rich taste. The spicy mayo dip can change flavor too. Try using different sauces like sriracha or kimchi paste. You can also mix in sesame seeds or lime zest for more zest. Want extra flavor? Add garlic powder, onion powder, or fresh herbs like cilantro or basil into your meatball mix. This will give your dish a fun twist. Pair Korean BBQ meatballs with various side dishes. Serve them with rice or noodles for a full meal. You can also add a fresh salad or pickled veggies for crunch. A bowl of kimchi complements the flavors nicely. Get creative with your plate to make it a feast! After making your Korean BBQ meatballs, store any leftovers in an airtight container. Keep the meatballs in the fridge for up to four days. For longer storage, freeze them for up to three months. Be sure to label the container with the date. That way, you know how long they have been stored. To reheat meatballs, place them on a baking sheet. Heat them at 350°F (175°C) for about 10-15 minutes. This method keeps them juicy and tender. You can also microwave them for 1-2 minutes, but check to avoid overcooking. For the spicy mayo dip, reheat it gently in a small saucepan over low heat. Stir often to keep it smooth. If it thickens, add a bit of water or extra lime juice to restore the texture. Enjoy your meatballs fresh and flavorful! Yes, you can make these meatballs ahead of time. Cooked meatballs last in the fridge for about three to four days. If you want to keep them longer, freeze them. They can last for up to three months in the freezer. Just make sure to store them in airtight containers. To adjust the spice level in the mayo dip, you can add more or less gochujang. Start with a small amount and taste as you go. If you want more heat, mix in Sriracha. You can also add a bit of honey to balance out the spice. Yes, you can bake the meatballs instead of frying them. Baking is a healthier option. It makes the meatballs less greasy and keeps them moist. Plus, baking is easier and requires less attention than frying. You can serve these meatballs with steamed rice or noodles. Side dishes like pickled vegetables work well too. For drinks, try a light beer or a fruity soda. They pair nicely with the savory flavors of the meatballs. You can find the full recipe for Korean BBQ Meatballs with Spicy Mayo Dip [here](#). In this post, we explored how to make delicious Korean BBQ meatballs. We covered key ingredients, from ground beef and pork to flavor enhancers like gochujang. I shared step-by-step instructions for preparing, baking, and making a spicy mayo dip. Remember to mix well and choose the right meat for best results. Try variations based on your taste, and store leftovers properly. Enjoy these meatballs with your favorite sides for a tasty meal!

Are you ready to spice up your dinner with a twist? Korean BBQ Meatballs with a creamy Spicy Mayo Dip will do just that! Bursting with bold flavors and easy …

Read more

Categories Dinner

Flavorful 3 Ingredient Orange Chicken Recipe Made Easy

May 11, 2025 by Chef Theo
To make this tasty dish, you need just three main items: - 1 lb chicken thighs, cut into bite-sized pieces - 1 cup orange marmalade - 2 tablespoons soy sauce These ingredients work together to create a sweet and tangy flavor. The chicken thighs are juicy and cook quickly, making them perfect for this dish. The orange marmalade adds a bright sweetness, while the soy sauce gives depth and saltiness. You can make your orange chicken even better with a few simple garnishes: - Sliced green onions - Toasted sesame seeds These garnishes add crunch and color. They also enhance the dish's flavor. For the best look, sprinkle them on just before serving. For the full recipe, check out the detailed instructions in the Simple 3 Ingredient Orange Chicken section. This dish is easy to make and sure to impress! First, I start by making the sauce. In a mixing bowl, I combine 1 cup of orange marmalade with 2 tablespoons of soy sauce. I stir well until the mixture is smooth and evenly mixed. This sauce will give the chicken a sweet and tangy flavor. Next, I prepare the chicken. I cut 1 pound of chicken thighs into bite-sized pieces. This size helps the chicken cook evenly and absorb the sauce better. Now, I heat a large skillet over medium-high heat. Once hot, I add the chicken pieces to the pan. I cook them for about 6-8 minutes. I want them to get a nice golden-brown color. This browning adds flavor and makes the dish look appealing. After the chicken is browned, I pour the orange sauce over it. I stir the chicken to coat every piece evenly. I reduce the heat to medium and let it cook for 3-5 more minutes. This step helps the sauce thicken and stick to the chicken, making it extra tasty. Once the chicken is done, I remove it from heat and let it sit for a minute. This helps the sauce stick better to the chicken pieces. For plating, I like to serve the orange chicken over a bed of steamed rice or fluffy quinoa. I often garnish it with sliced green onions or toasted sesame seeds. These add flavor and make the dish look beautiful. For the full recipe, check the details above. Enjoy your cooking! - How to avoid overcooking chicken: To keep chicken juicy, use chicken thighs. Cook on medium-high heat. Check for doneness after about 6-8 minutes. The chicken should be golden brown and firm. If you cut a piece, the juice should run clear, not pink. - Tips for thickening the sauce: If your sauce is too thin, simmer it longer. This reduces the liquid. You can also add a cornstarch slurry. Mix one tablespoon of cornstarch with two tablespoons of water. Stir it into the sauce and cook for a few minutes. This will give it a nice, thick texture. - Best side dishes to pair with orange chicken: Serve your orange chicken with steamed rice. Fluffy quinoa is another great choice. You can also add stir-fried vegetables for color and crunch. Broccoli or bell peppers work well. - How to make the dish visually appealing: Presentation matters! Serve your chicken over a bed of rice. Garnish with sliced green onions or toasted sesame seeds. A sprinkle of these toppings adds color and texture. It makes your dish pop and look gourmet. For added flair, use a nice plate to serve. {{image_2}} You can change up the protein in this dish. Instead of chicken thighs, try chicken breast. You can also use shrimp or tofu for a fun twist. Both options cook quickly and absorb flavor well. For fruit preserves, orange marmalade is a classic choice. But you can use apricot or peach preserves as well. These swaps give the dish a new taste. Experiment with what you like best. Adding spices can elevate your meal. A pinch of garlic powder or ginger gives it a nice kick. You can also try adding red pepper flakes for some heat. Fresh herbs like cilantro or basil can brighten the dish. Incorporating vegetables can add nutrition and color. Bell peppers, broccoli, or snap peas work great. Toss them in the skillet with the chicken. They cook fast and blend well with the orange sauce. Using these tips can make your meal even better. For the full recipe, check out the [Full Recipe]. To store your leftover orange chicken, place it in an airtight container. Make sure the dish is cooled down to room temperature before sealing. This helps keep the chicken fresh. You can store it in the fridge for up to three days. After that, the flavor and texture may change. When you’re ready to enjoy the leftovers, heat them gently. The best method is using a skillet over medium heat. Add a splash of water or extra soy sauce to keep it moist. This way, the chicken won’t dry out. You can also reheat it in the microwave, but cover it to avoid splatters. If you want to save some for later, freezing is a great option. Just place the cooled chicken in a freezer-safe bag. Be sure to remove as much air as possible before sealing. It can last in the freezer for up to three months. When you’re ready to eat, thaw it overnight in the fridge before reheating. Check out the Full Recipe for more details on making this tasty meal! How do I make the sauce thicker? To thicken the sauce, cook it longer. As you simmer, it will reduce and become thicker. You can also add a cornstarch slurry. Mix one tablespoon of cornstarch with two tablespoons of cold water. Stir it into the sauce while it simmers until it thickens. Can I use other types of chicken cuts? Yes, you can use chicken breast or drumsticks. Just adjust the cooking time. Thighs are juicy, but other cuts work too. Ensure all pieces are cooked through and reach a safe temperature of 165°F. What if I don’t have soy sauce? If you lack soy sauce, try using teriyaki sauce or coconut aminos. Both give a similar salty flavor. You can also use a mix of water and salt as a last resort, but it won’t taste the same. How can I spice up the 3 Ingredient Orange Chicken? To add spice, mix in red pepper flakes or sriracha. You can also add ginger or garlic to the sauce for extra flavor. Experiment with these to find your perfect taste. Can I double the recipe for a larger group? Absolutely! Just double all the ingredients. Use a bigger skillet or cook in batches. Ensure the chicken cooks through to keep everyone safe. What’s the best way to ensure my chicken stays juicy? Cook the chicken over medium heat and avoid overcooking it. Chicken thighs stay moist, but check for doneness. Let it rest before serving to keep in the juices. This recipe for orange chicken offers an easy way to enjoy great taste. You learned about the main ingredients, simple cooking steps, and tips for the best results. Experiment with variations to fit your taste. Store any leftovers correctly to keep them fresh. With these pointers, you'll have a delicious meal that impresses everyone. Enjoy every bite of your creation!

Are you ready to whip up a delicious meal with just three simple ingredients? This Flavorful 3 Ingredient Orange Chicken Recipe is easy and quick, perfect for busy weeknights or …

Read more

Categories Dinner

Creamy Smothered Chicken and Rice Comforting Dish

May 11, 2025 by Chef Theo
- 4 boneless, skinless chicken thighs - 1 cup long-grain white rice - 2 cups chicken broth - 1 cup heavy cream - 1 medium onion, diced - 3 cloves garlic, minced - 1 teaspoon dried thyme - 1 teaspoon paprika - Salt and pepper to taste - 1 cup frozen peas and carrots - Fresh parsley, chopped (for garnish) When I make creamy smothered chicken and rice, I start with the main ingredients. The chicken thighs provide a juicy base. I use long-grain white rice for its fluffy texture. Chicken broth boosts the flavor, while heavy cream adds richness. Next, I turn to aromatics and seasonings. Diced onion and minced garlic create a sweet aroma. Dried thyme and paprika add warmth and depth. Salt and pepper enhance all the flavors. For a pop of color and nutrition, I often add frozen peas and carrots. Fresh parsley gives a bright finish when I serve the dish. You can find the full recipe above to guide you through each step. Enjoy the process of creating this comforting meal! Start by heating olive oil in a large skillet over medium-high heat. Use enough oil to coat the bottom. While the oil heats, season the chicken thighs with salt, pepper, paprika, and dried thyme. This will add nice flavor to the chicken. Once the oil is hot, add the chicken thighs to the skillet. Sear them for about 5-7 minutes on each side. You want them golden brown and cooked through. Next, remove the chicken and set it aside on a plate. In the same skillet, add diced onion and minced garlic. Sauté for about 2-3 minutes until the onion looks soft and clear. Now, add the rice to the skillet with the onion and garlic. Toast the rice for 1-2 minutes. This brings out its nutty flavor. Then, pour in 2 cups of chicken broth and 1 cup of heavy cream. Stir everything together, scraping up any tasty bits stuck to the bottom. Return the chicken to the skillet, ensuring it is mostly submerged in the liquid. Cover the skillet with a lid and reduce the heat to low. Let it simmer for about 20-25 minutes. Check that the rice is tender and the chicken has reached 165°F. During the last 5 minutes of cooking, add in 1 cup of frozen peas and carrots. This adds color and nutrition. Taste the dish and adjust the salt and pepper if needed. Let it sit for a few minutes before serving. For the full recipe, you can refer to the earlier section. To get a rich, creamy texture, heavy cream is key. It adds depth and smoothness to the dish. If you want even more flavor, try adding a bit of cream cheese. This combo creates a great base for the sauce. For perfect rice texture, rinse the rice before cooking. This removes excess starch and prevents it from becoming sticky. Use long-grain rice for the best results. It stays fluffy and absorbs the flavors well. To boost flavor, consider adding spices like garlic powder or onion powder. A pinch of cayenne pepper can add a nice kick. You can also mix in fresh herbs like thyme or rosemary for a fragrant touch. Let the dish sit for a few minutes before serving. This helps the flavors meld together for a richer taste. The rice will soak up more sauce, making each bite even better. For a beautiful presentation, serve the creamy chicken and rice in shallow bowls. Garnish with fresh parsley for a pop of color. Drizzle some creamy sauce on top for an elegant finish. Pair this dish with a simple salad or steamed veggies for a balanced meal. A glass of white wine or iced tea complements it nicely. Enjoy the comforting taste and lovely presentation! {{image_2}} For a lighter meal, consider lean chicken options. You can swap chicken thighs for chicken breasts. Breasts have less fat and still taste great. They will cook faster, so watch your timing. If you want a dairy-free version, use coconut milk or almond milk. These options will still give a creamy texture. You can also try cashew cream for a nutty flavor. To spice things up, try different blends. You can add Italian herbs like oregano and basil. For a kick, use chili powder or cayenne pepper. Adding veggies can change the dish, too. Bell peppers, spinach, or mushrooms are great choices. They add color and boost nutrition. You can give this dish a Creole twist. Just add some Cajun seasoning for heat. Bell peppers, celery, and onion make a classic "holy trinity." For a Mediterranean touch, use olives and feta cheese. Swap the broth for vegetable stock and add sundried tomatoes. This gives a fresh and zesty flavor. Try these variations to make your creamy smothered chicken and rice exciting and new. For the full recipe, check out the detailed instructions above. To store leftovers, place the creamy smothered chicken and rice in an airtight container. This method keeps the dish fresh. You can store it in the fridge for up to three days. Make sure to cool it to room temperature before sealing. This step helps prevent moisture build-up. You can freeze this dish for longer storage. First, let it cool completely. Then, transfer it to a freezer-safe container. Be sure to leave some space at the top because the rice expands when frozen. It can last up to three months in the freezer. To reheat, thaw in the fridge overnight. Once thawed, warm it in a skillet over low heat until hot. You might need to add a splash of broth or cream to bring back the creaminess. Leftover chicken and rice are versatile. You can add them to soups for a hearty meal. Just mix the leftovers into a pot of simmering broth with some vegetables. Another idea is to turn it into a casserole. Just layer it with cheese and bake until bubbly. This way, you enjoy different meals without wasting food. For more ideas, check out the Full Recipe for inspiration. Can I use brown rice instead of white rice? Yes, you can use brown rice. Just remember, brown rice takes longer to cook. You may need to add more liquid. It’s a bit chewier and has a nutty taste. What can I substitute for heavy cream? You can use half-and-half or coconut milk for a lighter option. Sour cream works too, but it will change the taste slightly. Just choose what you like best. How long does it take to cook chicken thighs? Cooking chicken thighs usually takes about 20-25 minutes when simmering. Always check for a golden color and juicy texture. What temperature should chicken reach? Chicken should reach an internal temperature of 165°F. This ensures it’s safe to eat and perfectly cooked. Can I make this recipe in a slow cooker? Yes, you can! Just brown the chicken first. Then, add all the ingredients to the slow cooker. Cook on low for 4-6 hours for a great meal. Is this dish suitable for meal prep? Absolutely! This dish stores well in the fridge. You can make it ahead and reheat it for lunch or dinner. Just keep it in an airtight container. This blog post covers a tasty chicken and rice dish. You learned about key ingredients, step-by-step cooking, and helpful tips. We explored variations to keep the dish fresh, along with storage methods. Remember, it’s all about flavor and comfort. With practice, you will impress family and friends. Enjoy making this dish and feel free to experiment!

Looking for a dish that warms your heart and fills your belly? Creamy Smothered Chicken and Rice is your answer! In this cozy meal, tender chicken thighs simmer with creamy …

Read more

Categories Dinner

Irresistible Sweet Chili Chicken Recipe to Savor

May 11, 2025 by Chef Theo
For this Irresistible Sweet Chili Chicken, you will need the following fresh ingredients: - 4 boneless, skinless chicken thighs - 1/2 cup sweet chili sauce - 2 tablespoons soy sauce - 1 tablespoon honey - 1 tablespoon garlic, minced - 1 tablespoon ginger, minced - 1/2 teaspoon black pepper - 1 tablespoon sesame oil - 1 red bell pepper, sliced - 1 cup broccoli florets - 2 tablespoons green onions, sliced (for garnish) - Sesame seeds for garnish These ingredients blend together to create a sweet and spicy dish. The chicken thighs provide rich flavor and juiciness. The sweet chili sauce adds a nice kick. Soy sauce and honey balance the flavors well. Fresh garlic and ginger give it a zesty punch. Broccoli and red bell pepper add color and crunch. Make sure to use fresh ingredients for the best taste. You can find most of these items at your local grocery store. Don’t skip the garnishes; they make your dish look nice and add extra flavor. For the full recipe, check out the details above. To start, mix the marinade ingredients. In a bowl, add 1/2 cup of sweet chili sauce, 2 tablespoons of soy sauce, 1 tablespoon of honey, 1 tablespoon of minced garlic, 1 tablespoon of minced ginger, and 1/2 teaspoon of black pepper. Stir until blended. Next, add 4 boneless, skinless chicken thighs to the bowl. Make sure each piece is well coated with the marinade. Cover the bowl and let it sit in the fridge for at least 30 minutes. If you have more time, let it marinate for up to 2 hours. This helps the chicken soak up all those tasty flavors. Now it’s time to cook the chicken. Heat 1 tablespoon of sesame oil in a large skillet over medium-high heat. Once the oil shimmers, carefully remove the chicken from the marinade, but keep the marinade for later. Place the chicken in the hot skillet. Cook the chicken for about 5 to 7 minutes on each side. You want it to turn golden brown and reach an internal temperature of 165°F (75°C). This ensures the chicken is safe to eat. Once cooked, take the chicken out and set it aside on a plate. Using the same skillet, add the sliced red bell pepper and 1 cup of broccoli florets. Sauté these veggies for about 3 to 4 minutes. You want them to become bright in color and slightly tender but still crisp. This will add a nice texture to your dish. Now, pour the reserved marinade into the skillet with the sautéed vegetables. Bring the mixture to a simmer. Let it cook for an additional 2 to 3 minutes. This helps the sauce thicken slightly and coat the veggies. Slice the cooked chicken into pieces and return it to the skillet. Toss everything together until the chicken is well coated with the sauce and vegetables. Serve your sweet chili chicken hot. Don’t forget to garnish with sliced green onions and a sprinkle of sesame seeds for a beautiful finish. Enjoy every bite! To boost flavor, consider adding spices like cayenne pepper or paprika. Just a pinch can add warmth and depth. You can also use fresh herbs like cilantro or basil for a fresh twist. Marination is key. It lets the chicken soak up all the tasty sauce. I always marinate for at least 30 minutes. If you have more time, try marinating for up to 2 hours. This extra time makes a big difference in flavor. You can cook your sweet chili chicken in a skillet or the oven. I love using a skillet. It gives the chicken a nice sear and keeps it juicy. If you prefer the oven, bake at 400°F (200°C) for about 20-25 minutes. Adjusting the heat is important. For a perfect sear, start on medium-high heat. This helps the chicken get that golden-brown color. After searing, lower the heat to cook it through without burning. Garnishing makes your dish pop. I like to sprinkle green onions and sesame seeds on top. It adds color and a nice crunch. For serving, try placing the chicken on a bed of rice or noodles. This way, the sauce soaks in and adds flavor to everything. Serve it hot for the best taste. For the complete recipe, check out the Full Recipe for all the details! {{image_2}} You can switch up the protein in this dish. Shrimp or tofu work well. Shrimp cooks quickly, so you need less time. Just sauté it for about 3-4 minutes until it turns pink. For tofu, press it to remove water and cut it into cubes. Pan-fry it for 5-7 minutes until golden brown. This gives you a tasty and satisfying meal. Sweet chili chicken pairs well with many sides. Rice is a classic choice. You can use white rice, brown rice, or jasmine rice for more flavor. Noodles are another great option. Try egg noodles or rice noodles for a fun twist. Both options soak up the sauce nicely, making every bite delicious. Want to spice things up? You can use spicy sauces for more heat. Sriracha or gochujang can add a nice kick. If you want to make your own sweet chili sauce, mix sugar, vinegar, and chili flakes. This way, you can control the heat and sweetness. Experimenting with sauces can give your dish a fresh twist. To keep your sweet chili chicken fresh, use airtight containers. Glass or plastic containers work well. Store your chicken in the fridge for up to four days. This way, you can enjoy it later without losing flavor. When it's time to enjoy your leftovers, use a skillet or microwave. For the skillet, heat it over medium heat. Add a splash of water or broth to keep it moist. Stir until warmed through, about 5 minutes. If using a microwave, place the chicken on a microwave-safe plate. Cover it with a damp paper towel to maintain moisture. Heat for 1-2 minutes, checking it often. You can freeze cooked sweet chili chicken for up to three months. To freeze, let the chicken cool completely. Then, place it in freezer bags, removing as much air as possible. For thawing, move the chicken to the fridge overnight. If you need it fast, you can use the microwave's defrost setting. Just be careful to avoid cooking it during thawing. You can use several options if you lack sweet chili sauce. Here are some good alternatives: - Homemade version: Mix equal parts of honey and hot sauce. - Thai sweet chili sauce: If you have a different brand, it works well too. - Sriracha with honey: This mix gives heat and sweetness. - BBQ sauce: Choose a sweet BBQ sauce for a different flavor. These substitutes can change the dish slightly but will still taste great. Yes, you can prepare sweet chili chicken in advance. Here are some meal prep tips: - Marinate the chicken: You can marinate it up to two hours before cooking. - Cook and store: Cook the chicken and veggies, then let them cool. Store them in an airtight container in the fridge. - Reheat when needed: Just reheat it in a skillet or microwave before serving. Making it ahead saves time and is perfect for busy days. To add some heat, try these ingredients: - Add red pepper flakes: Sprinkle them in the marinade. - Use spicy chili sauce: Swap sweet chili sauce for a spicy one. - Sriracha or hot sauce: Mix a tablespoon into the marinade. Feel free to adjust the spice level to your taste. Sweet chili chicken can be quite healthy. Here’s a quick overview: - Chicken thighs: They offer protein and healthy fats. - Vegetables: Adding broccoli and bell peppers boosts vitamins. - Less sugar: Use low-sugar or homemade sauce for a healthier option. You can also swap in skinless chicken breasts for less fat. Popular side dishes that pair well include: - Steamed rice: White or brown rice soaks up the sauce. - Noodles: Try egg noodles or rice noodles for a twist. - Salad: A crisp salad adds a fresh touch. These sides enhance the meal and balance the flavors. This blog post provides a simple way to make sweet chili chicken. We covered essential ingredients, marination, cooking, and even tips to boost flavor. You can switch proteins or sauces for variety, and we included storage and reheating tips. Enjoy this easy dish with your favorite sides. Cooking can be fun and delicious! With the right steps, you’ll impress everyone at your table. Try it today and share your results!

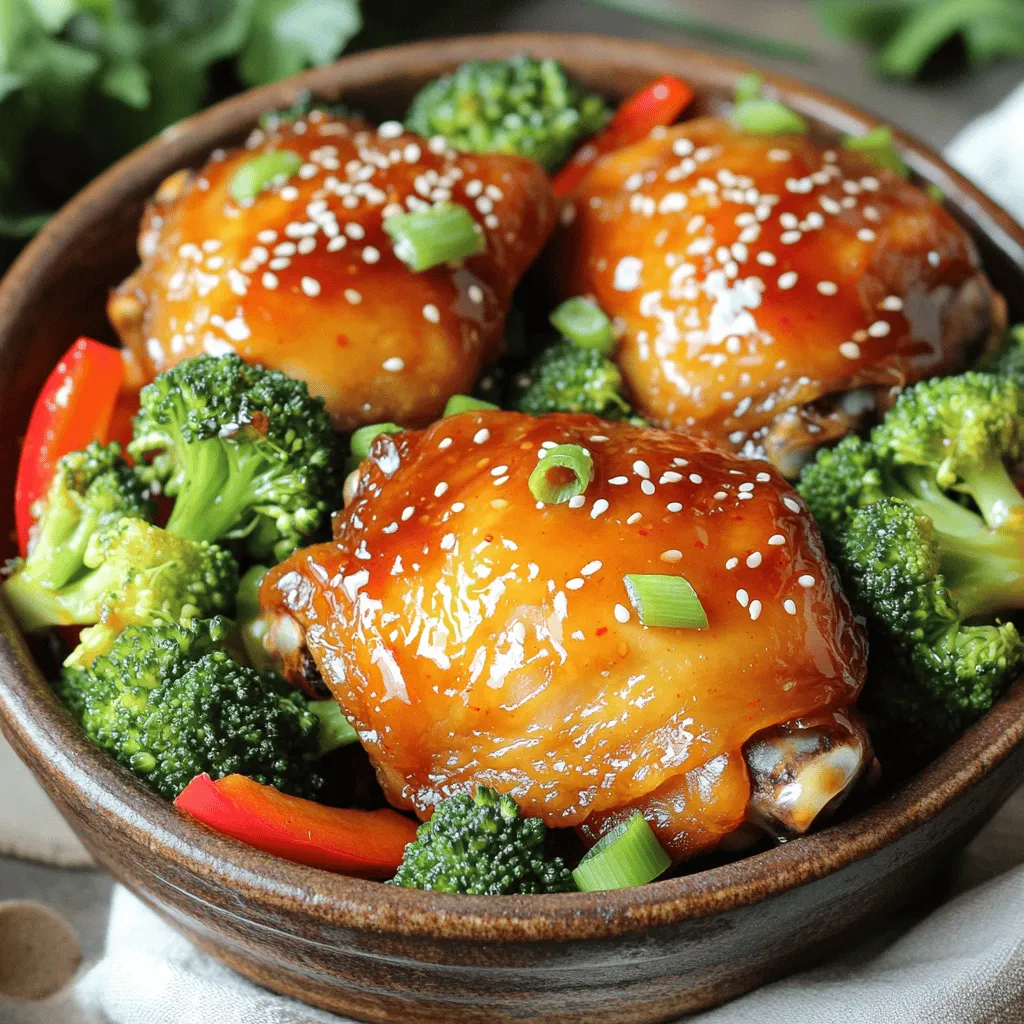
Craving a dish that’s both sweet and a little spicy? My Irresistible Sweet Chili Chicken Recipe is just what you need! This easy dish packs flavor and color, making it …

Read more

Categories Dinner

Baked Crunchy Hot Honey Chicken Flavor Boost Recipe

May 10, 2025May 9, 2025 by Chef Theo
- 4 chicken thighs, bone-in and skin-on - 1 cup buttermilk - 1 cup panko breadcrumbs - 1/2 cup all-purpose flour - 2 teaspoons garlic powder - 2 teaspoons paprika - 1 teaspoon onion powder - 1 teaspoon cayenne pepper - Salt and pepper to taste - 1/4 cup hot honey (store-bought or homemade) - Fresh parsley, chopped (for garnish) For this recipe, I use chicken thighs. They stay juicy while baking. Buttermilk is key for flavor and tenderness. It makes the chicken moist and adds a nice tang. Panko breadcrumbs help achieve that crunchy texture we all love. You will also need some basic tools: - A large bowl for marinating - Two mixing bowls for dry ingredients - A baking sheet lined with parchment paper - A whisk for mixing For the spices, balance is essential. Garlic powder and paprika add warmth. Onion powder gives depth, while cayenne adds heat. Adjust the cayenne to make it milder or spicier. To serve, chop fresh parsley for garnish. It adds color and freshness to the dish. For the full experience, check out the Full Recipe to see how everything comes together! Marinating the chicken in buttermilk Start by pouring 1 cup of buttermilk over 4 chicken thighs in a large bowl. Make sure each piece is well coated. Cover the bowl and place it in the fridge for at least 30 minutes. This helps the chicken become tender and flavorful. Mixing dry ingredients for coating In another bowl, combine 1 cup of panko breadcrumbs, 1/2 cup of all-purpose flour, and your spices: 2 teaspoons of garlic powder, 2 teaspoons of paprika, 1 teaspoon of onion powder, 1 teaspoon of cayenne pepper, and some salt and pepper. Mix these well so the spices are evenly spread. The coating process for crispy texture After marinating, take the chicken out of the buttermilk. Shake off any extra liquid. Now coat each thigh in the breadcrumb mixture. Press firmly to ensure the crumbs stick well. This will give your chicken that lovely crunchy texture. Setting the oven temperature and preparing the baking sheet Preheat your oven to 425°F (220°C). Line a baking sheet with parchment paper. This helps with easy cleanup and prevents sticking. Baking time and how to check for doneness Place your chicken on the baking sheet, skin side up. Bake for 30-35 minutes. To check if it’s done, use a meat thermometer. The chicken should reach an internal temperature of 165°F (75°C). The skin should look golden brown and crispy. Drizzling hot honey and optional additional garnishes In the last few minutes of baking, drizzle 1/4 cup of hot honey over the chicken. This adds a sweet and spicy kick. Let it caramelize slightly in the oven for the best flavor. Serving suggestions Once done, take the chicken out and let it rest for about 5 minutes. Garnish with fresh parsley for a pop of color. Serve on a rustic platter and drizzle with extra hot honey. Pair it with coleslaw or roasted veggies for a complete meal. For the full recipe, check out the ingredients and instructions provided earlier. To get that crispy texture, use panko breadcrumbs. They are lighter and airier than regular breadcrumbs. This helps the chicken stay crunchy after baking. When you spray oil on the chicken, it creates a nice golden crust. Use spray oil for a light touch. Olive oil also works but may weigh it down a bit. You can control the heat with cayenne pepper and hot honey. If you like it mild, cut back on cayenne. You can also mix in more honey for sweetness. For a spicier dish, add extra cayenne or drizzle on more hot honey. Taste as you go to find what you love. Marinate the chicken for at least 30 minutes. This helps the meat soak up flavor and stay juicy. You can marinate it overnight for even more taste. If you want to try different flavors, consider using yogurt or lemon juice. Both add a nice twist while keeping the chicken tender. {{image_2}} You can switch up the honey to change the taste. Try clover honey for a sweet touch. Or use wildflower honey for a more complex flavor. You can also mix in sauces. A dash of sriracha with honey gives a spicy kick. If you want less spice, use sweet barbecue sauce. Each option adds a unique twist to your chicken. You can also use different cuts of chicken. Chicken breasts are lean and cook fast. Drumsticks have more flavor and are fun to eat. Each cut will give a different taste and texture. Pair your Baked Crunchy Hot Honey Chicken with sides that balance the heat. Creamy coleslaw cools down the spice. Roasted veggies add color and nutrients to your plate. You can also serve it with fluffy rice or mashed potatoes. These sides soak up the hot honey flavor, making each bite better. To create a full meal, think about textures. Crunchy sides like corn on the cob add fun. A light salad can make your meal feel fresh. Mix and match sides based on your mood or season. Want a quicker option? Use an air fryer. Preheat it to 400°F (200°C). Cook the chicken for about 25 minutes. It gets just as crispy with less oil. If you crave a smoky flavor, try grilling. Marinate your chicken as usual. Then grill on medium heat for 20-25 minutes. Baste with hot honey while cooking for a nice caramelized finish. Grilling can take your chicken to the next level of flavor. To keep your Baked Crunchy Hot Honey Chicken fresh, store it in an airtight container. This will help keep moisture out and maintain its taste. You can refrigerate it for up to four days. When you are ready to eat, reheat it in the oven. Set the oven to 350°F (175°C) and bake for about 10-15 minutes. This method will help keep the skin crispy. You can freeze this chicken before or after baking. If you freeze it raw, marinate the chicken in buttermilk first. Then coat it and place it in the freezer. This way, you can bake it fresh later. If you freeze it after cooking, let it cool completely. Then wrap it tightly in foil or a freezer bag. This chicken stays good for about three months. When you're ready to cook frozen chicken, always thaw it in the fridge overnight. This helps keep the texture nice and prevents it from getting mushy. Cooking it straight from frozen can lead to uneven cooking. Make sure to check that the internal temperature reaches 165°F (75°C) for safe eating. Enjoy your delicious leftovers! To keep your chicken crispy, store it uncovered in the fridge. This helps the skin stay dry. When you reheat, use an oven instead of a microwave. Set the oven to 375°F (190°C) for best results. Bake until hot, about 10-15 minutes. You can also add a little oil before reheating for extra crunch. Yes, you can use skinless chicken thighs. However, you will miss out on that crispy skin. Skin-on thighs have more flavor and moisture. Skinless thighs may dry out quicker. You can still coat them well for crunch. Adjust your cooking time to avoid overcooking. Making hot honey is simple! Mix equal parts honey and your favorite hot sauce. You can also add chili flakes for more heat. Heat the mix gently in a pot until warm. Let it cool before using. This homemade hot honey adds a sweet and spicy kick to your chicken. Yes, you can bake without buttermilk. Use regular milk with a splash of vinegar instead. Let it sit for 5 minutes to sour. You can also use yogurt or almond milk. Adjust the marinating time if you're using less liquid. The chicken will still be tasty! For the full recipe, check out the Baked Crunchy Hot Honey Chicken section. We covered how to make Baked Crunchy Hot Honey Chicken, starting with essential ingredients and tools. You learned preparation steps, baking tips, and ways to add a flavor kick. We also explored variations, storage options, and frequently asked questions to enhance your experience. In the end, enjoy this dish as a versatile meal. It’s delicious, easy, and sure to impress. Try different flavors, find your favorite side, and make it your own. Happy cooking!

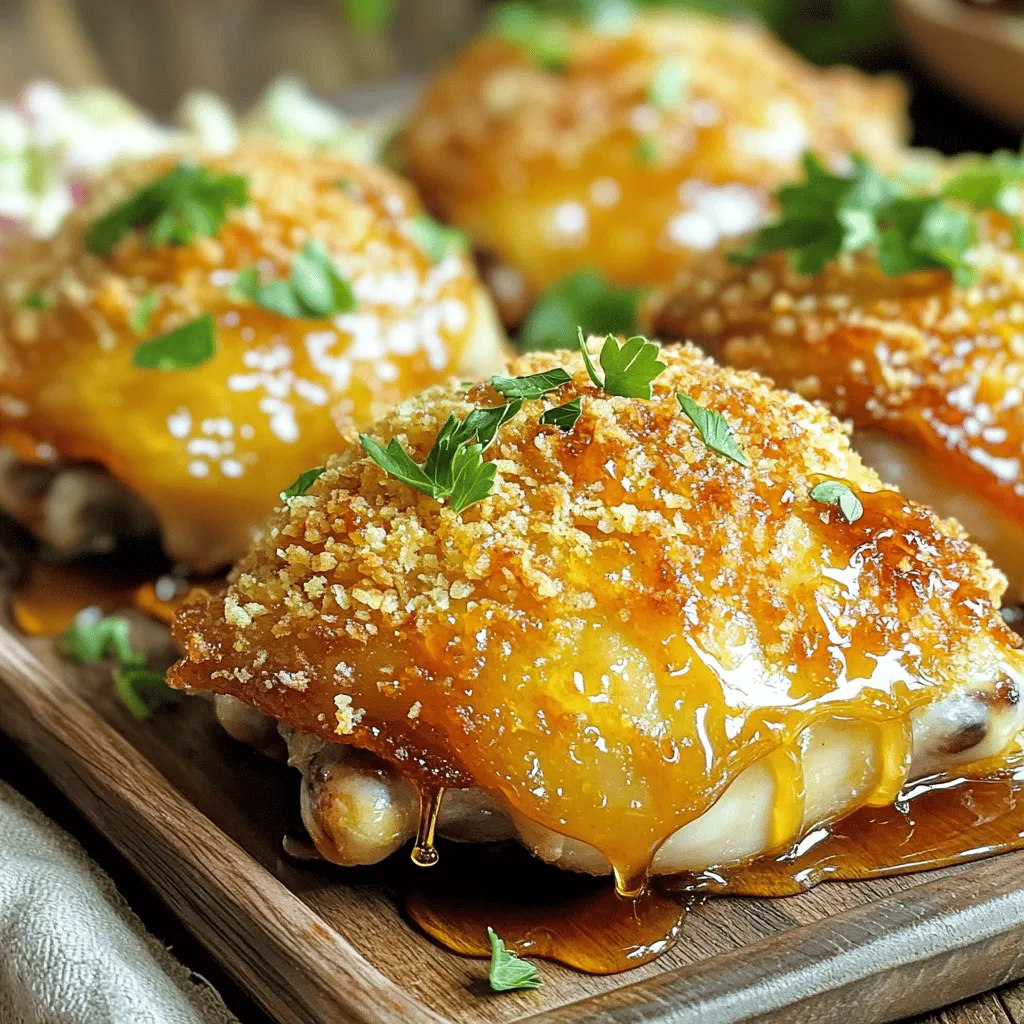
Looking to spice up dinner? Try my Baked Crunchy Hot Honey Chicken! This dish combines crispy chicken thighs with a sweet, spicy kick that makes each bite irresistible. I’ll guide …

Read more

Categories Dinner

Crispy Hot Honey Feta Chicken Flavorful and Easy Dish

May 10, 2025May 9, 2025 by Chef Theo
- 4 boneless, skinless chicken breasts - 1 cup feta cheese, crumbled - 1/4 cup hot honey (store-bought or homemade) - 1/2 cup all-purpose flour - 2 large eggs, beaten - 1 cup panko breadcrumbs - 1 tablespoon garlic powder - 1 teaspoon paprika - 1 teaspoon salt - 1/2 teaspoon black pepper - 1/4 teaspoon cayenne pepper (adjust for heat preference) When I create a dish like Crispy Hot Honey Feta Chicken, I focus on fresh, quality ingredients. The chicken breasts are the star. They need to be boneless and skinless for easy eating. Feta cheese adds a tangy kick that pairs perfectly with the sweetness of hot honey. Hot honey can be store-bought or homemade. If you want to make it yourself, mix honey with your favorite hot sauce. Next, we have some pantry staples. All-purpose flour helps the chicken stay crispy. Beaten eggs act as the glue for the breadcrumbs. Panko breadcrumbs add extra crunch that you will love. Seasoning is key for flavor. Garlic powder gives a savory depth. Paprika adds some warmth and color. Salt and black pepper enhance all the flavors, while cayenne pepper gives that nice spicy kick. Adjust the cayenne to suit your taste. This combination of ingredients makes Crispy Hot Honey Feta Chicken a mouthwatering dish. You can find the Full Recipe in the article above. 1. Preheat the oven and prepare the baking sheet. Set your oven to 400°F (200°C). Line a baking sheet with parchment paper or lightly grease it with cooking spray. This helps the chicken cook evenly and prevents sticking. 2. Mix dry ingredients in a shallow dish. In a shallow dish, combine the flour, garlic powder, paprika, salt, black pepper, and cayenne pepper. This mixture adds flavor and helps the chicken get crispy. 1. Dredge chicken breasts in flour, dip in eggs, and coat with breadcrumbs. Take a chicken breast and coat it in the flour mixture. Shake off any extra flour. Next, dip the chicken in beaten eggs, covering it completely. Finally, roll it in panko breadcrumbs until it’s well coated. Repeat this for each chicken breast. The panko gives a nice crunch. 1. Bake and add feta cheese in the final minutes. Place the coated chicken on your prepared baking sheet. Bake for 25-30 minutes or until the chicken is golden brown and the inside reaches 165°F (75°C). 2. Drizzle with hot honey and garnish. In the last 5 minutes of baking, sprinkle crumbled feta cheese on top of the chicken. When it’s done, take it out and drizzle hot honey over each piece. Garnish with fresh parsley for a pop of color. For the full recipe, follow the steps outlined above and enjoy this tasty dish! To get that perfect crunch, use panko breadcrumbs instead of regular ones. Panko is lighter and flakier. It gives your chicken a better texture. When you coat the chicken, follow these steps closely: - Dredge the chicken in flour to dry it out. - Shake off any excess flour. - Dip it in beaten eggs to help the breadcrumbs stick. - Roll it in panko until fully coated. This method locks in moisture and creates a crispy crust. To make your dish pop, you can boost the heat or sweetness. If you want more heat, add extra cayenne pepper or use a spicier hot honey. For sweetness, try adding a touch of maple syrup to the honey. If you need a feta substitute, try goat cheese or ricotta. They both melt nicely and add great flavor. Pair your chicken with simple sides. Roasted vegetables or a fresh salad work well. Mashed potatoes or rice can also be nice options. For a stunning presentation, serve the chicken on a large platter. Drizzle extra hot honey and sprinkle with parsley. This makes the dish look as good as it tastes. {{image_2}} You can change the flavor of your Crispy Hot Honey Feta Chicken easily. For a sweeter dish, use a mild hot honey. If you like heat, try a spicier version. You can even mix different types of hot honey to find your perfect balance. Adding herbs or spices can give your dish a unique twist. Rosemary, thyme, or even a hint of lemon zest can enhance the taste. Feel free to experiment with your favorite flavors to make this dish your own! If you want to switch up the protein, turkey or pork works well. They cook similarly and absorb flavors nicely. For a vegetarian option, tofu is a great choice. Coat it just like the chicken for a similar texture. Cauliflower also makes a fantastic substitute. Cut it into thick slices, and follow the same cooking method. These options allow everyone to enjoy this delicious recipe! For those who need a gluten-free version, use almond flour or gluten-free breadcrumbs. This keeps the crunch while fitting your diet. If you're avoiding dairy, you can skip the feta cheese or use a plant-based cheese instead. There are many tasty vegan cheeses available now. This way, you can still enjoy the flavors of crispy hot honey without the dairy. Making these adjustments helps everyone savor this dish! To keep your leftover Crispy Hot Honey Feta Chicken fresh, store it in an airtight container. This helps lock in moisture and flavor. You should place the container in the fridge right after the chicken cools down. Avoid leaving it out for too long. For best results, eat the chicken within three days. When reheating, aim to keep the chicken crispy. The oven works best for this. Preheat your oven to 375°F (190°C). Place the chicken on a baking sheet and heat for about 10-15 minutes. This keeps the crust crunchy. If you use a microwave, it may make the chicken soggy. If you must use the microwave, heat for a short time and enjoy right away. Freezing is a great option if you want to save some chicken for later. You can freeze the cooked chicken in an airtight container. It lasts about three months in the freezer. For the hot honey, store it in a separate container. When you’re ready to eat, thaw the chicken overnight in the fridge. Reheat it using the oven for that crispy texture. Yes, you can prepare this dish ahead. I suggest storing the chicken and the hot honey separately. First, coat the chicken and place it in the fridge for a few hours or overnight. This helps the flavors meld. You can bake it fresh when ready to serve. If you want to save time, you can also cook the chicken in advance. Just cool it, store it in an airtight container, and refrigerate. If you don't have hot honey, you can make your own. Mix regular honey with hot sauce. Start with one tablespoon of hot sauce for each quarter cup of honey. You can adjust this to match your heat level. Other options include agave nectar or maple syrup, but they won't add the same spice. Each will give a different sweetness. To check if the chicken is done, use a meat thermometer. The internal temperature should reach 165°F (75°C). Look for a golden-brown crust and juices running clear. If juices run pink, the chicken needs more time. Always test the thickest part of the breast for the best reading. Crispy Hot Honey Feta Chicken offers great flavors with simple steps. You need chicken, feta, hot honey, and a few staples. Dredging in panko ensures crispiness, while hot honey adds sweetness. Consider your own flavor twists or dietary needs. Store leftovers properly for future meals. Enjoy this dish with your favorite sides for a delicious feast. Get ready to share this recipe with family and friends!

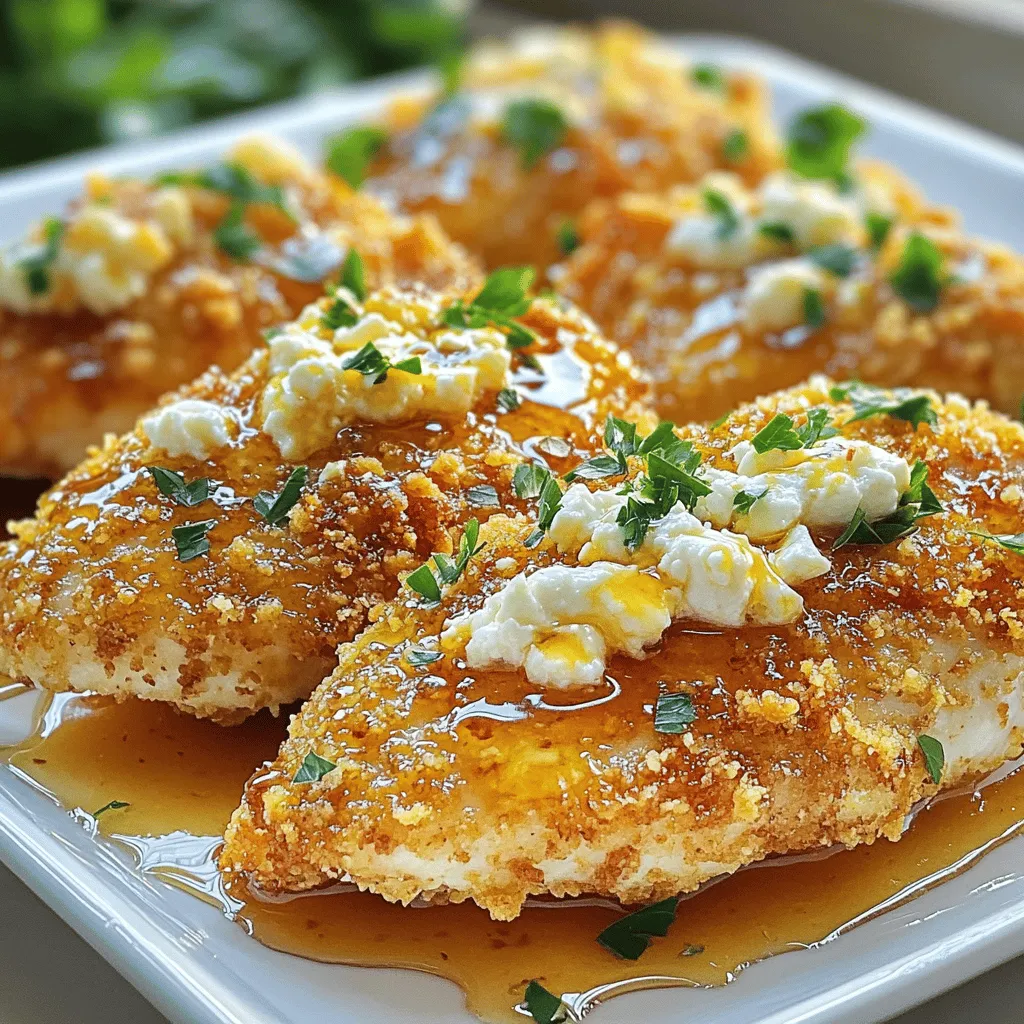
Get ready to elevate your dinner game with my Crispy Hot Honey Feta Chicken! This dish bursts with flavor and combines the right amount of heat and sweetness. With simple …

Read more

Categories Dinner

Dump-and-Bake Chicken Tzatziki Casserole Delight

May 10, 2025May 9, 2025 by Chef Theo
- 2 cups cooked chicken, shredded or diced - 1 cup uncooked orzo pasta - 2 cups chicken broth - 1 cup Greek yogurt - 1 tablespoon lemon juice - 1 clove garlic, minced - 1 cup diced cucumbers - 1 cup cherry tomatoes, halved - 1 cup crumbled feta cheese - Fresh parsley, chopped for garnish The main ingredients of this casserole make it easy and tasty. You start with cooked chicken, which adds protein. I love using shredded or diced chicken for a nice texture. Next, the orzo pasta cooks right in the dish. It absorbs all the flavors as it cooks. Chicken broth keeps everything moist and adds depth to the dish. For the tzatziki sauce, Greek yogurt is key. It gives a creamy base and a slight tang. The lemon juice brightens the flavor, and minced garlic adds a punch that complements the chicken. Finally, you can’t forget the fresh additions. Diced cucumbers add crunch, while cherry tomatoes bring sweetness. Crumbled feta gives a salty kick. Fresh parsley on top makes the dish look vibrant and fresh. This mix of ingredients creates a rich, flavorful casserole that is both filling and satisfying. Check out the Full Recipe for more details on how to put it all together! Preheat the oven to 375°F (190°C). This step is key for even cooking. In a large baking dish, combine the cooked chicken, uncooked orzo pasta, and chicken broth. Stir everything together until mixed well. This forms the base of our casserole. In a separate bowl, mix Greek yogurt, lemon juice, minced garlic, dried dill, and dried oregano. Add salt and pepper to taste. Stir until everything blends smoothly. This tzatziki sauce gives our dish a fresh and creamy flavor. Now, add the tzatziki sauce to the chicken and orzo mixture. Stir gently to ensure every piece is coated. Next, fold in the diced cucumbers and halved cherry tomatoes. These fresh veggies add crunch and color. Finally, sprinkle crumbled feta cheese on top for a salty finish. Cover the baking dish with foil and bake for 25 minutes. This helps keep the moisture in, making the orzo cook perfectly. After 25 minutes, remove the foil and bake for an additional 10-15 minutes. Watch for a golden top and tender orzo. Once done, let it sit for 5 minutes. This helps the flavors settle before serving. For the full recipe, check the link! To save time, you can use rotisserie chicken. It’s already cooked and adds great flavor. Just shred the meat and mix it into your casserole. Adjust the seasoning to suit your taste. If you like it spicy, add a pinch of red pepper flakes. Prefer it mild? Just stick to salt and pepper. Check the orzo for doneness as it bakes. It should be soft but not mushy. If it needs more time, add more broth. This extra liquid helps the orzo cook evenly and keeps it moist. Always taste-test before serving to ensure the texture is just right. For a pretty dish, use fresh herbs like parsley or dill. They add color and a burst of flavor. You can sprinkle them on right before serving. Pair the casserole with a simple side salad or crusty bread. This will make your meal feel complete and satisfying. {{image_2}} You can switch proteins in this dish. Turkey works great if you prefer it over chicken. Just use the same amount. If you want to try tofu, use firm tofu. Press it, then cut it into cubes. This gives a nice texture. Want to go vegetarian? Add more vegetables! Zucchini, bell peppers, and spinach all fit well. They add color and flavor. You can mix them in with the chicken or replace it entirely. Spice is where you can get creative. Adding paprika or cumin can enhance the flavor. Paprika adds a smoky taste, while cumin gives a warm note. Start with a teaspoon of either spice and adjust to your taste. Olives or sun-dried tomatoes are also great additions. They add a briny or tangy punch. Just chop them up and mix these into the casserole. Orzo is a classic choice, but you can switch it up. Quinoa or rice are both healthy and tasty. They also make the dish gluten-free. Just make sure to adjust the cooking time as needed. If you want a heartier option, try whole grain pasta. It adds fiber and a nutty flavor. Traditional pasta works too, so pick what you like best! For the full recipe, check out the details to make this dish your own. To keep your Dump-and-Bake Chicken Tzatziki Casserole fresh, cool it down quickly. Place the casserole in the fridge within two hours after baking. It will last up to three days in the fridge. Make sure to cover it well with plastic wrap or foil to prevent drying. If you want to freeze the casserole before baking, prepare it as usual but skip the oven step. Cover the dish tightly with foil or plastic wrap. Label it with the date and freeze it for up to three months. When you’re ready to bake, thaw it in the fridge overnight. This helps the flavors mix well as it thaws. You can reheat your casserole in two ways: the oven or the microwave. For the oven, preheat it to 350°F (175°C). Bake the casserole for about 20-25 minutes until it's hot throughout. In the microwave, heat it in short bursts of one to two minutes, stirring in between. This helps ensure it heats evenly. Always check that the casserole is heated to a safe temperature of 165°F (74°C) before serving to keep it tasty and safe. Yes, you can prep this dish in advance. Prepare the casserole up to the baking step. Cover it tightly and store it in the fridge. When you’re ready to bake, just pop it in the oven. This saves time on busy days. It also allows the flavors to blend nicely. This casserole pairs well with simple sides. Here are some great options: - Greek salad: Fresh and crunchy, it complements the dish. - Roasted vegetables: A mix of seasonal veggies adds color and nutrition. - Pita bread: Soft pita is perfect for scooping up the casserole. Yes, you can adjust the ingredients based on your needs. If you're lactose intolerant, use dairy-free yogurt. For a lighter meal, skip the feta cheese. You can also try adding more vegetables, like bell peppers or spinach, to fit your taste. The original recipe uses orzo, which is not gluten-free. To make this dish gluten-free, substitute orzo with gluten-free pasta or quinoa. Both options work well and keep the texture nice. Just ensure that your chicken broth is also gluten-free. This blog post covered how to make a tasty Chicken Tzatziki Casserole. We looked at main ingredients, step-by-step instructions, tips for success, and variations. You can easily make this dish your own by changing proteins or flavors. Remember, it’s simple to prepare and great for meals later. I hope you enjoy creating this dish as much as I do! It’s sure to become a family favorite.

Looking for a quick and delicious meal? Try my Dump-and-Bake Chicken Tzatziki Casserole Delight! This easy recipe features tender chicken, creamy tzatziki, and flavorful herbs. With just a few simple …

Read more

Categories Dinner

Irresistible Sweet Chili Chicken Recipe for Dinner

May 10, 2025May 9, 2025 by Chef Theo
- 4 boneless, skinless chicken thighs - 1/2 cup sweet chili sauce - 2 tablespoons soy sauce - 1 tablespoon sesame oil - 1 tablespoon fresh ginger, grated - 2 cloves garlic, minced - 1 red bell pepper, sliced - 1 cup snap peas, trimmed - 3 green onions, chopped Gathering the right ingredients makes all the difference in this sweet chili chicken recipe. I love using boneless, skinless chicken thighs for their juicy texture. The sweet chili sauce is the star here, adding a touch of sweetness and heat. Soy sauce brings in the salty depth that balances everything out. For added flavor, sesame oil gives a nutty richness. Fresh ginger and garlic create a fragrant base. The vegetables add color and crunch. Red bell pepper offers sweetness, while snap peas bring a snap that keeps things exciting. Finally, green onions are perfect for a fresh garnish. When you have these ingredients ready, you prepare for a delightful cooking experience. Don't forget to check the [Full Recipe] for complete instructions! Start by mixing the marinade. In a bowl, combine: - 1/2 cup sweet chili sauce - 2 tablespoons soy sauce - 1 tablespoon sesame oil - 1 tablespoon fresh ginger, grated - 2 cloves garlic, minced - Salt and pepper to taste Add the chicken thighs to the bowl. Coat each piece well in the marinade. Allow it to marinate for at least 30 minutes. For deeper flavor, marinate for up to 2 hours in the refrigerator. Heat a large skillet over medium-high heat. Once hot, add the marinated chicken thighs. Cook for about 5-6 minutes on each side. Check that the chicken is cooked through and has a nice golden sear. Remove the chicken from the skillet and set it aside. In the same skillet, add the sliced red bell pepper and snap peas. Stir-fry for about 3-4 minutes. You want them to be bright and slightly tender while still crisp. This step adds color and texture to your dish. Return the cooked chicken thighs to the skillet. Pour in the reserved marinade and bring it to a simmer. Cook for an additional 2-3 minutes. This helps the sauce thicken and coat the chicken and veggies nicely. Once everything is warm and well combined, sprinkle with chopped green onions and sesame seeds. Serve the sweet chili chicken over jasmine rice. Spoon some extra sauce from the skillet over the top for added flavor. Enjoy this delicious dish! For the complete recipe, check out the Full Recipe. Marinating the chicken is key for great flavor. It allows the meat to soak up the sweet chili sauce and spices. For the best results, I recommend marinating the chicken for at least 30 minutes. If you have more time, let it sit for up to 2 hours in the fridge. This extra time deepens the flavor. Trust me, your taste buds will thank you! For perfect chicken, heat is crucial. Start with medium-high heat when cooking the chicken. This helps achieve a nice sear while keeping the inside juicy. Cook the chicken for about 5-6 minutes on each side. Use a meat thermometer to check for doneness. The internal temperature should reach 165°F. This ensures the chicken is safe to eat and still tender. Sweet chili chicken pairs well with many sides. I love serving it over jasmine rice. The rice soaks up all the tasty sauce. You can also add stir-fried veggies on the side. Try pairing it with a fresh salad or some steamed broccoli for a healthy touch. Don’t forget to sprinkle extra sesame seeds on top for a nice crunch! For the full recipe, check out the details above. {{image_2}} You can switch up the proteins in this dish. Use shrimp, tofu, or pork. Each option adds its own flair. For sauces, try teriyaki or hoisin. They give a different taste but still work well. Want extra heat? Add diced jalapeños or crushed red pepper. You can also use sriracha sauce. Mix it into the marinade for a spicy kick. Adjust the amount based on your heat preference. Taste as you go, so it’s just right for you. To make a plant-based version, swap the chicken for extra-firm tofu. Press the tofu to remove excess water, then cut it into cubes. Marinate and cook just like the chicken. You can also add more veggies like broccoli or carrots. This keeps the dish colorful and tasty while fitting your diet. Store leftover sweet chili chicken in an airtight container. Let it cool before sealing. Keep it in the fridge for up to three days. To enjoy later, gently reheat it in a skillet over low heat. This method helps maintain the chicken's juicy texture. To freeze sweet chili chicken, place it in a freezer-safe bag or container. Ensure the bag is sealed tightly to prevent freezer burn. You can freeze it for up to three months. When you're ready to eat, thaw it overnight in the fridge. Reheat it in a skillet until heated through. Sweet chili chicken lasts about three days in the fridge and three months in the freezer. Always check for any changes in smell or color before eating leftovers. If it looks or smells off, it's best to toss it. Keeping track of storage dates helps ensure safe consumption. Yes, you can use other meats! Chicken thighs are juicy and tender, but you can try: - Boneless chicken breast - Pork tenderloin - Shrimp - Tofu for a vegetarian option Each will give a different flavor. Just adjust cooking times as needed. To make this dish gluten-free, swap the soy sauce for tamari. Here are some other swaps: - Use gluten-free sweet chili sauce - Check labels for hidden gluten in sauces - Serve with rice instead of noodles These changes keep the flavor while making it safe for gluten-free diets. Sweet chili chicken pairs well with many sides. I recommend: - Steamed jasmine rice - Stir-fried vegetables - Simple green salad - Quinoa for a healthy twist These sides balance the sweet and spicy flavors of the chicken. Yes, you can make this recipe in advance. Here are some tips: - Marinate the chicken a day before for extra flavor. - Cook the chicken and veggies ahead of time, then store in the fridge. - Reheat in a skillet over low heat to keep it juicy. This makes weeknight dinners easy and quick! To store cooked sweet chili chicken, follow these steps: - Place leftovers in an airtight container. - Refrigerate for up to four days. - For longer storage, freeze in portions for up to three months. When ready to eat, thaw in the fridge overnight and reheat as needed. For the full recipe, check the previous section! This post covered a tasty sweet chili chicken recipe. We went through the main and extra ingredients, cooking steps, and serving tips. I shared tricks for marinating and cooking the chicken perfectly. You also learned about variations, storage methods, and answers to common questions. In summary, this dish is versatile and easy to make. Whether you follow my tips or mix it up, you can enjoy a flavorful meal. Try it out and make it your own!

Looking for a quick dinner that packs flavor? Try my Irresistible Sweet Chili Chicken Recipe! With juicy chicken thighs, a sticky-sweet glaze, and fresh veggies, this dish is a winner …

Read more

Categories Dinner

Cowboy Butter Chicken Linguine Tasty Family Dinner

May 10, 2025May 9, 2025 by Chef Theo
For Cowboy Butter Chicken Linguine, gather these key ingredients: - 8 oz linguine pasta - 2 boneless, skinless chicken breasts, cut into bite-sized pieces - ½ cup unsalted butter - 4 cloves garlic, minced - 1 teaspoon smoked paprika - 1 teaspoon chili powder - ½ teaspoon cayenne pepper (adjust to taste) - Salt and black pepper to taste - 1 cup cherry tomatoes, halved - 2 cups fresh spinach - ¼ cup fresh parsley, chopped - Zest and juice of 1 lemon - Parmesan cheese, for serving You can swap some ingredients for your taste. Use whole wheat pasta for more fiber. If you prefer a meatless dish, try tofu or chickpeas instead of chicken. Instead of unsalted butter, you can use olive oil for a lighter option. If you don't have fresh garlic, garlic powder works in a pinch. Feel free to replace cherry tomatoes with sun-dried tomatoes for a different flavor. You can also use kale instead of spinach if that's what you have on hand. Using fresh ingredients makes a big difference in taste and health. Fresh garlic adds a strong flavor and has many health benefits. Fresh spinach packs in vitamins and adds color to your dish. When you use fresh herbs like parsley, you get a burst of flavor that dried herbs can't match. Plus, fresh tomatoes bring a juicy sweetness that enhances the overall dish. Eating fresh ingredients means you enjoy more nutrients, which is great for your body. 1. Cook the Linguine: First, fill a big pot with water and add some salt. Bring it to a boil. Add the linguine and cook it as the package says, usually about 8-10 minutes. When it’s ready, save ½ cup of the water. Then, drain the rest and set the pasta aside. 2. Prepare the Chicken: In a large skillet, put ¼ cup of butter over medium heat. Once it melts, add the chicken pieces. Sprinkle salt, black pepper, smoked paprika, chili powder, and cayenne pepper on top. Cook the chicken for about 6-8 minutes, until it’s brown and cooked through. 3. Sauté Garlic & Tomatoes: Add the rest of the butter and minced garlic to the skillet. Sauté this mix for 1-2 minutes until you can smell the garlic. Then, toss in the halved cherry tomatoes and let them cook for another 3-4 minutes until they soften. 4. Add Spinach: Now, stir in the fresh spinach. Cook it just until it wilts, about 1-2 minutes. 5. Combine with Linguine: Take the cooked linguine and add it to the skillet. Toss everything together. If it looks dry, slowly add some of the reserved pasta water until it feels just right. 6. Finish with Flavor: Add the lemon juice, lemon zest, and chopped parsley. Taste your dish and add more salt and pepper if it needs it. 7. Serve: Serve the cowboy butter chicken linguine hot. Top it off with grated Parmesan cheese and extra parsley if you want. - When boiling water, always add salt. It helps flavor the pasta. - Make sure the chicken is cut into even pieces. This helps it cook evenly. - Keep an eye on the garlic. It can burn quickly, which makes it taste bitter. - Make sure to stir the spinach just enough to wilt it. Overcooking can make it mushy. - Taste the dish at the end. Adjust the seasoning to match your flavor preference. - Use pre-cooked or rotisserie chicken to cut down on cooking time. - Chop your garlic and parsley while the pasta cooks. This saves you time later. - If you’re in a hurry, skip the lemon zest. Just use lemon juice for a quick flavor boost. - Prepare all your ingredients before starting. This is called mise en place and helps you move faster. - You can cook the pasta and chicken at the same time to save a few minutes. For the complete recipe, check the Full Recipe section. When making cowboy butter chicken linguine, some mistakes can spoil the dish. Here are a few to watch out for: - Overcooking the Chicken: Cook the chicken just until it is no longer pink. Overcooked chicken can become dry. - Adding Too Much Liquid: If the dish looks watery, go easy on the pasta water. You can always add more if needed. - Not Seasoning Enough: Don’t skip salt and pepper. They bring out the flavors in the dish. To take your cowboy butter chicken linguine to the next level, consider these tips: - Fresh Herbs: Use fresh parsley for a bright taste. You can even add basil for extra flavor. - Citrus Zest: The lemon zest adds a nice pop. It brightens up the rich butter and spices. - Cheese Choices: Try different cheeses. Feta or goat cheese can give a nice twist. Cooking chicken perfectly is key to this dish. Here’s how to do it well: - Cut Even Pieces: Cut chicken into bite-sized pieces. This helps them cook evenly. - Preheat Your Skillet: Make sure the skillet is hot before adding the chicken. This helps get a nice sear. - Don’t Crowd the Pan: If the pan is too full, the chicken will steam instead of brown. Cook in batches if needed. For the full recipe, check out the detailed instructions. {{image_2}} You can easily make this dish vegetarian. Swap the chicken for firm tofu or chickpeas. Both options soak up flavors well. For a vegan twist, use vegan butter instead of regular butter. This keeps the taste rich while keeping it plant-based. Feel free to get creative with veggies. You can add bell peppers, zucchini, or mushrooms. These vegetables bring color and crunch. Broccoli or asparagus also work great. Just sauté them with the garlic for a tasty boost. While linguine is perfect, other pasta shapes can shine too. You can try fettuccine, penne, or even whole wheat pasta. Each type brings its own charm and texture. Use what you have on hand for a fun twist. For full details on making this dish, check the Full Recipe. To store your Cowboy Butter Chicken Linguine, let it cool first. Place it in an airtight container. This keeps it fresh. You can keep leftovers in the fridge for up to three days. Make sure to label the container with the date. This way, you will know when to eat it. You can also freeze the linguine for longer storage. Use a freezer-safe container or bag. Remove as much air as possible. This helps avoid freezer burn. You can freeze it for up to three months. When ready to eat, just thaw in the fridge overnight before reheating. To reheat, you can use the microwave or stovetop. If using the microwave, place the linguine in a bowl. Add a splash of water to keep it moist. Heat in short bursts, stirring in between. For stovetop, add it to a pan over medium heat. Stir occasionally and add a bit of water if needed. Heat until hot. Enjoy your meal again! Cowboy butter is a rich and flavorful sauce. It combines butter with spices, garlic, and herbs. This sauce adds a bold taste to dishes, making them exciting. The blend of smoked paprika, chili powder, and garlic gives it a kick. You can use it on meats, veggies, or pasta. It makes any meal feel special and full of flavor. Yes, you can make cowboy butter chicken linguine ahead of time. Cook the pasta and chicken, then combine them. Store the dish in an airtight container. Keep it in the fridge for up to two days. When you're ready to eat, just reheat it. You may want to add a bit of water to keep it moist. You can serve this dish with a simple salad or garlic bread. A fresh green salad adds crunch and balance. Garlic bread is great for soaking up the cowboy butter sauce. You may also enjoy it with a side of roasted veggies. For drinks, pair it with a chilled white wine or lemonade. Each side enhances the meal's flavors and makes it even better. For the full recipe, check out the Cowboy Butter Chicken Linguine. Fresh ingredients enhance flavor and health. We covered these in our post. I shared step-by-step cooking tips and time-savers to help you. Avoid common mistakes to improve your dish. Consider variations like vegetarian options and extra veggies. Proper storage keeps leftovers tasty. I hope these insights help you enjoy making Cowboy Butter Chicken Linguine. Cooking should be fun and rewarding!

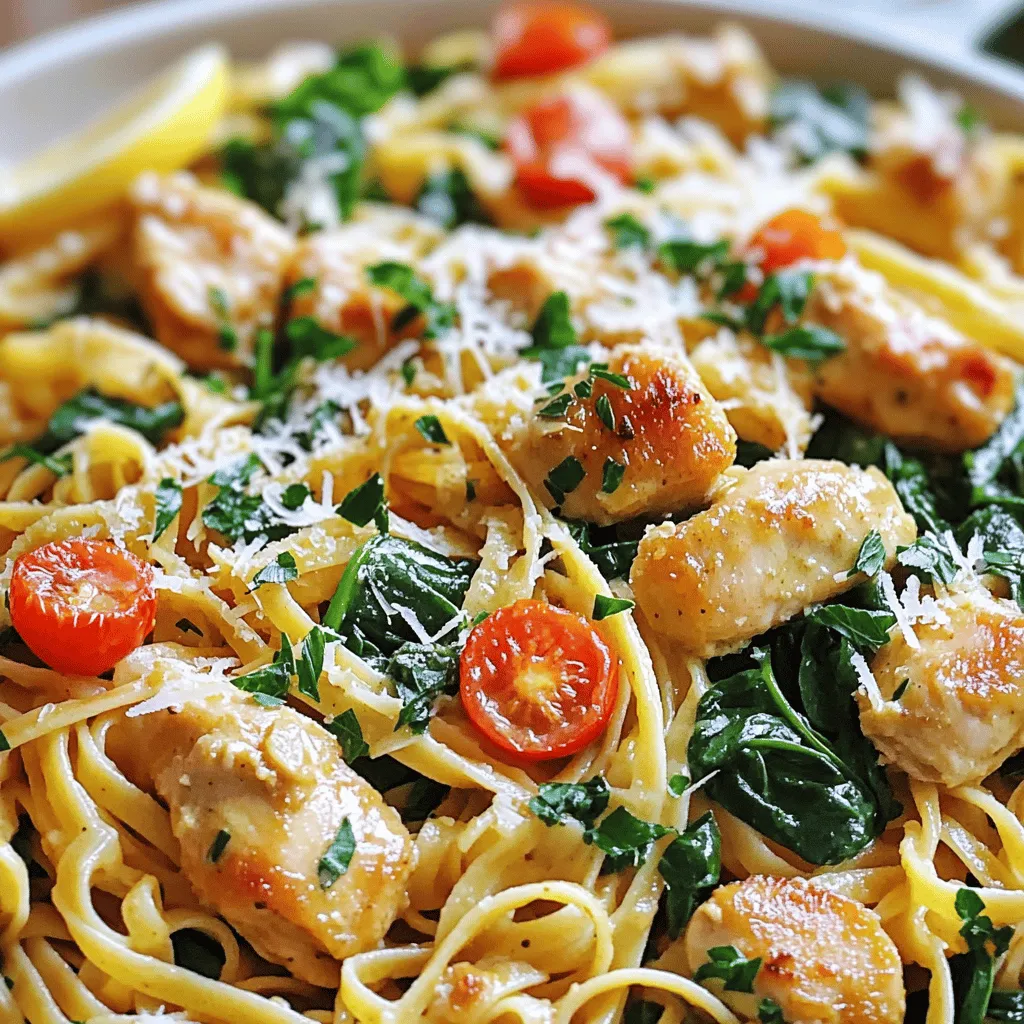
Ready to jazz up your family dinners? Cowboy Butter Chicken Linguine is a fun twist on a classic meal that everyone will love! With fresh ingredients and easy steps, you …

Read more

Categories Dinner
Older posts
Newer posts
← Previous Page1 … Page79 Page80 Page81 … Page94 Next →

TOASTED RECIPES

Where ideas are warm, crisp, and ready to serve! 🍞

PAGES

Home About Contact Privacy Policy Terms & Conditions Cookie Policy GDPR Policy Copyright Policy Disclaimer

CATEGORIES

Appetizers Desserts Salads Breakfast Dinner

Contact

  • Pinterest
  • Mail
Copyright © 2025 Toasted Recipes. All rights reserved.