Skip to content
toastedrecipes.com
  • Home
  • Appetizers
  • Desserts
  • Salads
  • Breakfast
  • Dinner
  • Privacy Policy
  • Contact
  • About

Chef Theo

Cozy White Bean Mushroom Stew (Vegan) Simple Delight

July 25, 2025 by Chef Theo
- 2 cups cooked white beans (cannellini or navy beans) - 1 cup cremini mushrooms, sliced - 1 medium onion, diced - 2 cloves garlic, minced - 2 carrots, diced - 2 celery stalks, diced - 4 cups vegetable broth - 1 cup diced tomatoes (canned or fresh) - 1 teaspoon dried thyme - 1 teaspoon dried rosemary - 1 bay leaf - Salt and pepper to taste - 2 tablespoons olive oil - Fresh parsley, chopped for garnish When I make my cozy white bean mushroom stew, I love using simple yet fresh ingredients. First, I include white beans. These are great for protein and fiber. I often use cannellini or navy beans because they are creamy and smooth. Next, I add cremini mushrooms. They bring a rich, earthy flavor to the dish. Slicing them thin helps them cook evenly. I also use a medium onion. Dicing it small allows it to blend well and add sweetness to the base. Then come my extra ingredients. I always use garlic for its bold flavor. Two cloves are just right. Carrots and celery add color and crunch. Dicing them keeps the texture nice. For the broth, I prefer vegetable broth. It keeps the stew vegan and adds depth. I never forget the diced tomatoes, either. They add acidity and a juicy texture. When it comes to herbs, dried thyme and rosemary work wonders. They give the stew a warm, comforting aroma. I finish with a bay leaf for a hint of complexity. Finally, I season with salt and pepper to taste. Olive oil adds a nice richness, and I like to garnish with fresh parsley. It brightens the dish and adds a pop of color. For the full recipe, you can check out Cozy White Bean Mushroom Stew. Enjoy cooking! 1. In a large pot, heat 2 tablespoons of olive oil over medium heat. 2. Add 1 medium diced onion. Sauté it for about 5 minutes. The onion should become soft and clear. 3. Next, add 2 minced garlic cloves. Cook for about 1 minute until it smells nice. 1. Stir in 2 diced carrots and 2 diced celery stalks. Cook them for 4-5 minutes. They should start to soften. 2. Mix in 1 cup of sliced cremini mushrooms. Cook for another 5-7 minutes. The mushrooms will release their juices and become tender. 1. Add 2 cups of cooked white beans, 1 cup of diced tomatoes, and 4 cups of vegetable broth to the pot. 2. Sprinkle in 1 teaspoon of dried thyme, 1 teaspoon of dried rosemary, and 1 bay leaf. Mix well. 3. Bring the pot to a boil. Then reduce the heat to low and cover it. 1. Let the stew simmer for 20-25 minutes. This allows all the flavors to mix. 2. Remove the bay leaf. Season with salt and pepper to taste. 3. Serve the stew hot, garnished with fresh chopped parsley. For the full recipe, check [Full Recipe]. To get the best flavor from your cozy white bean mushroom stew, focus on three key steps. First, sauté your onions and garlic well. This builds a strong flavor base. Second, let the mushrooms cook until tender. This brings out their rich taste. Third, add herbs like thyme and rosemary early. This helps them infuse into the stew. For substitutions, you can use other beans like chickpeas. They add a nice twist. If you don’t have cremini mushrooms, regular button mushrooms work too. You can also swap out vegetable broth for water if needed. This stew pairs well with crusty bread. The bread is perfect for dipping. You can also serve it with a fresh side salad. A mix of greens and a light vinaigrette works great. For garnishing, sprinkle fresh parsley on top. It adds color and freshness. You can drizzle a little olive oil on top for extra richness. Serve in deep bowls for a cozy feel. Preparing the stew in advance is a great idea. You can make it a day ahead. Just store it in the fridge after it cools. The flavors deepen overnight, making it even tastier. When reheating, do it slowly on the stove. This helps keep the flavors intact. If it’s too thick, add a splash of broth or water. Stir well and heat until warm. {{image_2}} You can make this stew even heartier. Adding plant-based proteins is a great choice. Try mixing in lentils, which cook quickly and add fiber. Quinoa also works well. It cooks fast and gives a nice texture. Both options boost protein without fuss. Feel free to swap out mushrooms or beans. If you don’t have cremini, try button mushrooms. They taste great too! For beans, black beans or chickpeas are fun options. You can also add seasonal veggies. Think of squash in fall or fresh peas in spring. This keeps the stew fresh and exciting. To spice things up, add extra spices for heat. A pinch of cayenne pepper can create warmth. If you prefer, use fresh herbs instead of dried. Fresh basil or parsley adds brightness. Just remember to add them at the end for the best flavor. Try these tips to make the stew your own and enjoy a cozy meal. For the full recipe, check the earlier section! To store leftovers, let the stew cool first. Once cool, place it in a container. Use an airtight container to keep it fresh. Glass or BPA-free plastic containers work best. These containers help maintain flavor and texture. To freeze the stew effectively, first, cool it completely. Ladle the stew into freezer-safe bags or containers. Leave some space for expansion. Seal tightly and label with the date. When you’re ready to eat, thaw it overnight in the fridge. To reheat, warm it on the stove until hot. Stir occasionally for even heating. The stew lasts about 3 to 5 days in the fridge. If frozen, it can last up to 3 months. Always check for signs of spoilage. Look for off smells, changes in color, or mold. If you see any of these signs, it’s best to discard it. Enjoy your cozy white bean mushroom stew while it’s fresh! For the full recipe, check out the earlier sections. Yes, you can use canned beans. They save time and add great flavor. Just rinse them well before adding to the stew. This step helps remove excess salt and makes the dish healthier. Canned beans are perfect for a quick meal. Yes, this stew is gluten-free. All the ingredients, like beans and vegetables, do not contain gluten. Just make sure your vegetable broth is also gluten-free. This makes it a great option for those with gluten sensitivity or celiac disease. To spice up your stew, add red pepper flakes. Start with a small amount, then taste. You can also add fresh jalapeños or hot sauce for extra heat. Experimenting with spices makes the dish exciting and unique to your taste. Absolutely! You can use any mushroom you like. Shiitake and portobello add rich flavors. Mix different types for a fun texture. Each type brings a special taste to the stew. Just remember to chop them into similar sizes for even cooking. This stew pairs well with crusty bread or rice. You can also serve it over quinoa for a healthy twist. A side salad adds freshness and crunch. These options enhance your meal and make it more filling. Don't forget to drizzle some olive oil on top for extra flavor! This stew recipe combines white beans, mushrooms, and fresh veggies for a hearty meal. You can make it your own by swapping ingredients or adding spices. Remember to store leftovers properly for future meals. With simple steps, you can create a dish that warms you up and tastes great. Enjoy cooking and sharing this delicious stew with friends and family. It offers comfort and creativity in one pot. Try it out, and make it a regular on your dinner table.

Are you craving a warm and filling dish that’s full of flavor? Look no further! My Cozy White Bean Mushroom Stew (Vegan) is packed with wholesome ingredients, like creamy white …

Read more

Categories Dinner

Caramel Apple Cupcakes Delightful and Simple Recipe

July 24, 2025 by Chef Theo
To make these tasty caramel apple cupcakes, gather these ingredients: - 1 ½ cups all-purpose flour - 1 tsp baking powder - ½ tsp baking soda - ½ tsp salt - ½ cup unsalted butter, softened - 1 cup brown sugar, packed - 2 large eggs - 1 tsp vanilla extract - 1 cup apples, peeled and finely chopped (Granny Smith or Honeycrisp) - ½ tsp ground cinnamon - ½ cup buttermilk - ½ cup caramel sauce (store-bought or homemade) - Whipped cream for topping (optional) - Additional caramel sauce for drizzling - Chopped pecans or walnuts for garnish (optional) If you don’t have some ingredients, don’t worry! Here are some swaps: - All-purpose flour: Use gluten-free flour for a gluten-free option. - Unsalted butter: You can use coconut oil or margarine instead. - Buttermilk: Mix milk with a bit of vinegar or lemon juice to create a buttermilk substitute. - Brown sugar: White sugar can work, but you’ll miss some flavor. To make your cupcakes even more special, consider these toppings: - Whipped cream: It adds a light, fluffy touch. - Extra caramel sauce: A drizzle on top makes it even sweeter. - Chopped nuts: Pecans or walnuts add crunch and flavor. - Apple slices: A few thin slices on top look pretty and fresh. These ingredients will help you create delightful caramel apple cupcakes. For the full recipe, follow the steps provided! First, you need to preheat your oven to 350°F (175°C). This step ensures the cupcakes bake evenly. While the oven heats, grab a 12-cup muffin tin. Line it with cupcake liners to make clean-up easy later. In a medium bowl, whisk together the dry ingredients. Combine 1 ½ cups of all-purpose flour, 1 tsp of baking powder, ½ tsp of baking soda, ½ tsp of salt, and ½ tsp of ground cinnamon. Mixing these first helps the baking powder and soda spread evenly. Next, take a large mixing bowl. Add ½ cup of softened unsalted butter and 1 cup of packed brown sugar. Beat them together until the mixture turns light and fluffy. This step adds air to your batter, making the cupcakes soft. Now, add the eggs, one at a time, to your butter-sugar mix. Mix well after each egg. Stir in 1 tsp of vanilla extract for flavor. Gradually, add the dry mixture to your wet mix, alternating with ½ cup of buttermilk. Start and end with the flour mixture. Finally, gently fold in 1 cup of finely chopped apples. Divide the batter evenly among the cupcake liners. Fill each liner about two-thirds full. Place the muffin tin in your preheated oven. Bake for 18-20 minutes. Use a toothpick to check if they are done. The toothpick should come out clean. Once baked, let the cupcakes cool in the pan for 5 minutes. Then, move them to a wire rack to cool completely. To fill them, take a small knife and carve out a core from the center of each cupcake. Fill the hole with ½ cup of caramel sauce. For an extra treat, top with whipped cream and a drizzle of caramel. Add chopped pecans or walnuts for crunch if you like! To make moist cupcakes, use room-temperature butter. Softened butter mixes well with sugar. This creates tiny air pockets and adds lightness. Be sure to cream the butter and sugar until fluffy. Mix the wet and dry ingredients slowly. Overmixing can make your cupcakes tough. Also, do not skip the buttermilk. It adds moisture and a slight tang. When choosing apples, Granny Smith and Honeycrisp are my top picks. Granny Smith offers a tart flavor that balances sweetness. Honeycrisp adds a juicy crunch that enhances each bite. You can also try Fuji or Braeburn apples for a sweeter taste. Chop the apples finely for even distribution in the batter. This ensures every bite has apple goodness. Presentation makes a big difference. For a fun touch, top your cupcakes with whipped cream. Drizzle caramel sauce on top for a sweet finish. You can also sprinkle chopped pecans or walnuts for crunch. Use a decorative platter for serving. Arrange the cupcakes with apple slices around them. Add a small bowl of caramel sauce for dipping. This makes your dessert look inviting and delicious. For the full recipe, check out the details above. {{image_2}} You can make these cupcakes gluten-free. Just use a gluten-free flour blend. Look for one that works well for baking. This swap lets everyone enjoy the treat. The flavor stays rich and sweet. If you want a vegan version, you have options. Replace eggs with flaxseed meal or applesauce. Use plant-based butter and non-dairy milk instead of buttermilk. You can also find vegan caramel sauce. This way, everyone can savor caramel apple goodness. Frosting adds a special touch. You can use cream cheese frosting for a tangy twist. A simple caramel drizzle is also great. For a fruity kick, try apple butter. Each option brings new flavors to your cupcakes. Be creative and mix it up! For the full recipe, check the provided link. To keep your caramel apple cupcakes fresh, store them in an airtight container. This way, they stay moist and tasty. If you plan to eat them in a few days, place them at room temperature. For longer storage, the fridge is a good option. Just make sure to wrap them well to avoid drying out. When stored properly, these cupcakes can last up to four days at room temperature. If you refrigerate them, they can stay fresh for about a week. Keep an eye on them for any signs of spoilage, like a change in smell or texture. If you want to save some cupcakes for later, freezing is a great option. Let the cupcakes cool completely before freezing. Wrap each one in plastic wrap and then in aluminum foil. Place them in a freezer-safe bag or container. They can last in the freezer for up to three months. To enjoy, thaw them in the fridge overnight. For a warm treat, you can heat them gently in the microwave. You’ll love how fresh they taste! To make caramel apple cupcakes from scratch, you need to gather your ingredients. Start with flour, baking powder, baking soda, salt, butter, brown sugar, eggs, vanilla, apples, cinnamon, buttermilk, and caramel sauce. Mix the dry ingredients in one bowl. In another bowl, cream the butter and sugar together. Add the eggs and vanilla. Then, mix in the dry ingredients and buttermilk. Fold in the apples last. Pour the batter into cupcake liners and bake. For full details, check the Full Recipe. Yes, you can use green apples. Green apples, like Granny Smith, give a nice tart flavor. This can balance the sweetness of the caramel and cake. They also stay firm when baked. If you prefer a sweeter taste, use red apples like Honeycrisp. Each type adds its own unique taste to the cupcakes. If you don't have buttermilk, you have options. You can mix one cup of milk with one tablespoon of vinegar or lemon juice. Let it sit for five minutes. This will mimic buttermilk's tangy flavor. Another option is to use plain yogurt or sour cream mixed with milk. Both will work well in the recipe. In this blog post, I covered how to make delicious caramel apple cupcakes. We started with the key ingredients and common substitutes. Then, I walked you through step-by-step instructions, from prepping the oven to baking the cupcakes. I also shared tips for moistness and best apple types. We explored variations for gluten-free and vegan options. Lastly, I provided storage tips to keep your cupcakes fresh. With these insights, you can create tasty treats that impress. Happy baking!

Are you ready to impress your friends with a delightful treat? Caramel apple cupcakes are simple to make and taste amazing! In this post, I will guide you through every …

Read more

Categories Desserts

Cinnamon and Spice Sweet Potato Bread Delightful Recipe

July 24, 2025 by Chef Theo
For this sweet potato bread, you will need: - 1 cup cooked and mashed sweet potatoes - 1/2 cup brown sugar - 1/4 cup granulated sugar - 1/2 cup unsweetened applesauce - 1/3 cup vegetable oil - 2 large eggs - 1 teaspoon vanilla extract - 1 1/2 cups all-purpose flour - 1 teaspoon baking soda - 1 teaspoon baking powder - 1 teaspoon ground cinnamon - 1/2 teaspoon ground nutmeg - 1/4 teaspoon ground ginger - 1/4 teaspoon salt These ingredients work together to create a soft and flavorful bread. The sweet potatoes add moisture and a hint of sweetness, while the spices bring warmth and depth. You can enhance this bread with optional ingredients like: - 1/2 cup chopped walnuts or pecans - 1/2 cup raisins or dried cranberries Adding nuts gives a nice crunch, while dried fruit adds a touch of sweetness. Feel free to mix and match based on your taste! If you have dietary needs, you can make a few swaps: - Use coconut oil instead of vegetable oil for a richer flavor. - Replace eggs with flax eggs (1 tablespoon flaxseed meal + 2.5 tablespoons water for each egg). - For gluten-free bread, use a 1:1 gluten-free flour blend. These substitutions let you enjoy this recipe while sticking to your diet. You can still savor the goodness of this sweet potato bread. Start by preheating your oven to 350°F (175°C). Grease a 9x5-inch loaf pan or line it with parchment paper. This helps with easy removal later. In a large mixing bowl, combine the cooked and mashed sweet potatoes with the brown sugar, granulated sugar, applesauce, vegetable oil, eggs, and vanilla extract. Mix these ingredients well until you achieve a smooth texture. In a separate bowl, whisk together the all-purpose flour, baking soda, baking powder, ground cinnamon, nutmeg, ginger, and salt. Make sure these dry ingredients are well blended. Gradually add the dry mix to the wet mix. Stir gently until just combined. It’s okay if there are a few lumps. If you like nuts, fold in chopped walnuts or pecans for extra flavor and crunch. Pour the batter into your prepared loaf pan. Smooth the top with a spatula. Now, let’s bake! Place the loaf pan in the preheated oven. Bake for 50 to 60 minutes. Keep an eye on it; if the top is browning too fast, cover it loosely with aluminum foil. To check if your bread is done, insert a toothpick into the center. If it comes out clean, your bread is ready! Once baked, take it out of the oven. Let it cool in the pan for about 10 minutes. After that, transfer it to a wire rack to cool completely. Enjoy your delicious Cinnamon and Spice Sweet Potato Bread, made with love! For the full recipe, check the earlier section. To make your bread moist, use fresh, cooked sweet potatoes. The sweet potato adds moisture and flavor. You can also add applesauce for extra softness. Mix your wet and dry ingredients gently. Overmixing can make the bread tough. This bread needs just a few lumps in the batter to stay tender. Store your bread in a sealed container at room temperature. This keeps it fresh for a few days. If you want it to last longer, wrap it in plastic wrap and freeze it. To reheat, slice a piece and pop it in the microwave for about 15-20 seconds. You can also toast it for a crunchy edge. Always preheat your oven for even baking. Use an oven thermometer to check the temperature. Grease your loaf pan well or use parchment paper for easy removal. Check for doneness by inserting a toothpick into the center. If it comes out clean, your bread is ready! Remember, every oven is different, so watch your bread closely. For the complete steps, refer to the Full Recipe. {{image_2}} You can easily make this sweet potato bread gluten-free. Use a gluten-free flour blend instead of all-purpose flour. Look for blends that have xanthan gum for the best texture. This way, you can still enjoy the soft bread without the gluten. To make this recipe vegan, replace the eggs. Use 1/4 cup of unsweetened applesauce for each egg. This keeps the bread moist and tender. You can also swap the vegetable oil with coconut oil for added flavor. Want to jazz up your bread? Add spices like cardamom or cloves for a warm twist. You can also stir in dried fruit such as raisins or cranberries. For a nutty crunch, try adding sunflower seeds or almonds. These changes will give your bread a unique taste every time. To keep your bread fresh, let it cool completely. Wrap it tightly in plastic wrap or foil. This way, it won’t dry out. Store it at room temperature for up to three days. If you want to keep it longer, consider freezing. Freezing is great for this bread. Slice it first for easy thawing. Wrap each slice in plastic wrap. Then, place the slices in a freezer bag. Make sure to remove as much air as possible. You can freeze it for up to three months. When you want a slice, just take it out and let it thaw. Use airtight containers for the best storage. Glass containers work well. They keep bread fresh and let you see inside. If you prefer plastic, use a container that seals tightly. Avoid using paper bags, as they let moisture escape and can dry out the bread. Yes, you can use fresh sweet potatoes. Start by peeling and chopping them. Then, boil or steam the pieces until soft. Once cooked, mash them well before adding to the batter. This step helps ensure the sweet potatoes blend smoothly in your bread. To reduce the sweetness, cut back on the sugars. You could use only 1/4 cup of brown sugar. You can also swap the applesauce for unsweetened applesauce. This change will not affect the moisture but will lower the sweetness. This bread pairs well with many things. Try spreading butter or cream cheese on top. You can also enjoy it with a warm cup of coffee or tea. For a fun twist, serve it with a scoop of vanilla ice cream. For the full recipe, you can refer to the Cinnamon & Spice Sweet Potato Bread section above. This gives you all the steps and ingredients needed to make this delightful treat! You learned about the key ingredients for Cinnamon and Spice Sweet Potato Bread. We covered optional add-ins and substitutions for special diets. The step-by-step guide helped you prep, bake, and test for doneness. I shared tips for moisture, storage, and best baking practices. You discovered variations for gluten-free and vegan options. Finally, storing and reheating tips will keep your bread fresh. Enjoy every bite!

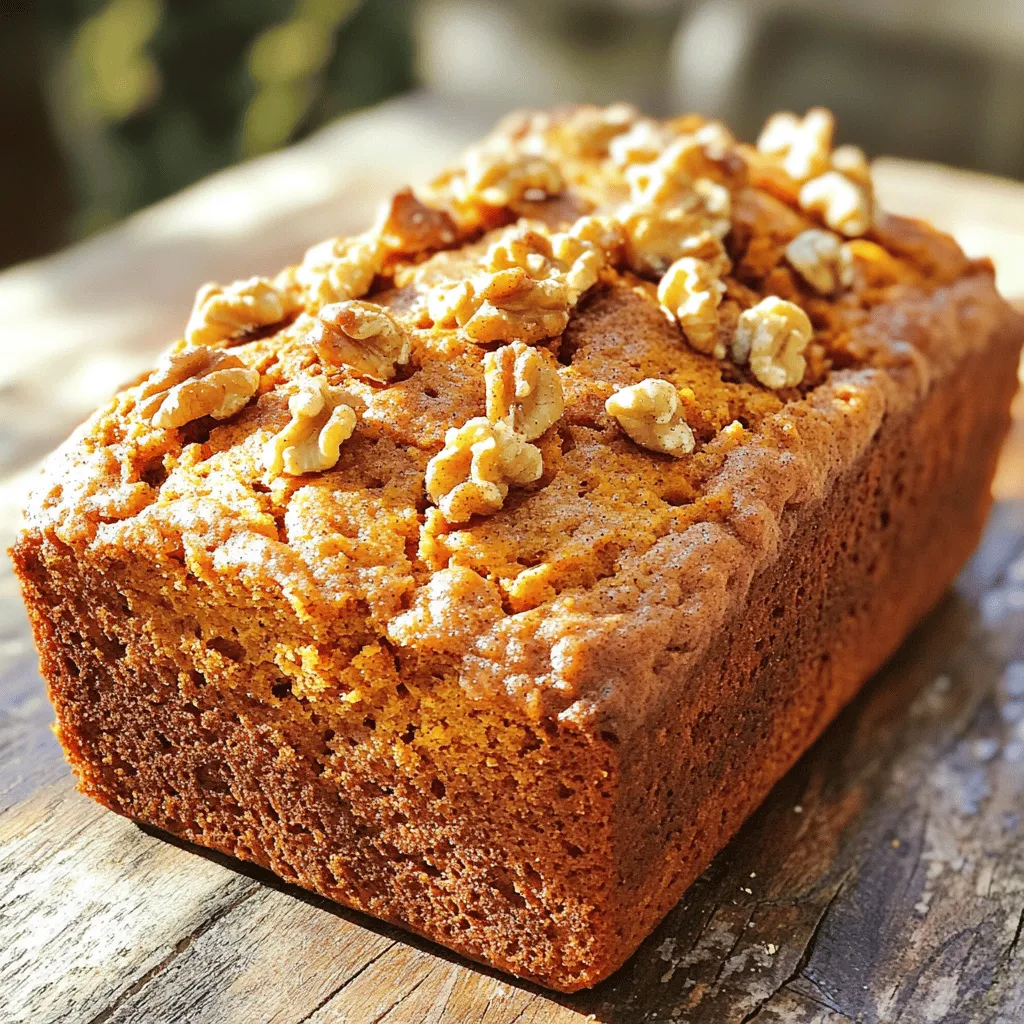
Get ready to delight your taste buds with my Cinnamon and Spice Sweet Potato Bread! This warm, moist bread is loaded with flavor and perfect for any occasion. Whether you’re …

Read more

Categories Desserts

Baking a Delicious Swedish Apple Cake Today

July 24, 2025 by Chef Theo
- 3 medium-sized apples, peeled, cored, and thinly sliced - 1 teaspoon cinnamon - 1 tablespoon lemon juice - 1 cup all-purpose flour - 1 cup granulated sugar - 1/2 cup unsalted butter, softened - 2 large eggs - 1 teaspoon baking powder - 1/2 teaspoon baking soda - 1/4 teaspoon salt - 1/2 cup milk - 1 teaspoon vanilla extract - Powdered sugar for dusting - 1 cup = 8 ounces - 1 teaspoon = 5 milliliters - Use honey or maple syrup instead of sugar. - Almond milk or coconut milk can replace regular milk. When I bake Swedish apple cake, I always gather my ingredients first. This makes the process smoother. The apples are the star here. I like to use tart apples like Granny Smith. They balance the sweet cake perfectly. Cinnamon adds warmth and flavor. A splash of lemon juice keeps the apples fresh. The butter should be soft to mix well with the sugar. For flour, I stick to all-purpose. It gives the cake a nice structure. Baking powder and baking soda work together for a fluffy texture. Always remember the salt! It brings out the flavors. Milk adds moisture, while vanilla gives a lovely aroma. Finally, don't forget the powdered sugar for that sweet finish. If you need to convert measurements, I made it easy. One cup equals eight ounces. A teaspoon is five milliliters. For substitutions, honey or maple syrup can sweeten the cake. If you're dairy-free, almond or coconut milk works well. This recipe is flexible and fun. You can use different flavors and ingredients. Enjoy the process and get creative! You can find the full recipe [here](link). First, preheat your oven to 350°F (175°C). This step is key! A hot oven helps the cake rise well. Next, grease a 9-inch round cake pan with butter. You can also use parchment paper if you prefer. This makes it easy to remove the cake later. Now, let’s prepare the apples. Take 3 medium-sized apples, peel, core, and slice them thinly. In a bowl, toss the apple slices with 1 teaspoon of cinnamon and 1 tablespoon of lemon juice. Let them sit. This will enhance their flavor and keep them from browning. For the batter, start by creaming together 1/2 cup of softened butter and 1 cup of granulated sugar. Mix until it looks light and fluffy. Then, add 2 large eggs, one at a time. Mix well after each addition. In another bowl, whisk together 1 cup of all-purpose flour, 1 teaspoon of baking powder, 1/2 teaspoon of baking soda, and 1/4 teaspoon of salt. Gradually add this dry mix to the butter mixture. Alternate it with 1/2 cup of milk. Finally, stir in 1 teaspoon of vanilla extract. To assemble, pour half of the batter into the prepared cake pan. Spread it evenly. Then, layer the marinated apple slices on top of the batter. Pour the remaining batter gently over the apples. Spread it out carefully to cover them. Now, place the cake in the preheated oven. Bake for 45-50 minutes. Check for doneness by inserting a toothpick in the center. If it comes out clean, the cake is ready. Once baked, remove the cake from the oven. Let it cool in the pan for about 10 minutes, then transfer it to a wire rack. This cooling step helps the cake set nicely. Enjoy the full recipe with all the details needed to make this delicious Swedish apple cake! To get the best texture for your cake, use room temperature ingredients. Cold butter and eggs can make your cake dense. Let your butter and eggs sit out for about 30 minutes before mixing. This simple step makes a big difference. Mix your batter just until combined. Overmixing can also lead to a dense cake. Remember, lumps are okay! They will bake out. You can add nuts or raisins for extra flavor and crunch. Chopped walnuts or pecans work great. If you enjoy a fruity bite, toss in some raisins as well. To make the cinnamon flavor pop, use fresh ground cinnamon. This can elevate the taste. You can also mix in a pinch of nutmeg for warmth. Dust your cake with powdered sugar for a lovely finish. This adds a touch of sweetness and a beautiful look. Use a fine sieve to sprinkle it evenly. For a fresh touch, use slices of apples as a garnish. Place them on top or around the cake. This will make your Swedish apple cake look even more inviting. {{image_2}} To make this cake gluten-free, you can use alternative flours. Here are some great options: - Almond flour - Coconut flour - Oat flour - Rice flour Using these flours can change the texture. Almond flour gives a moist, nutty flavor. Coconut flour absorbs more liquid, so adjust your liquids when using it. Oat flour offers a mild taste and works well in most recipes. Rice flour is light and gives a nice crumb. If you want a vegan version, you can replace the eggs and butter. Here are my favorite substitutes: - Use 1/4 cup unsweetened applesauce for each egg. - Swap butter with 1/4 cup coconut oil or vegan butter. These swaps keep the cake moist and tasty. The applesauce adds a hint of sweetness and keeps the cake light. Coconut oil gives a slight coconut flavor, making it unique. Adding spices can elevate the flavor of your Swedish apple cake. Consider these: - Cardamom - Nutmeg Cardamom adds a warm, sweet flavor and pairs well with apples. Just a pinch can make a big difference. Nutmeg brings a cozy, spicy touch. You can use these spices alongside cinnamon for a richer taste. Try adding these spices to your apple mix or directly to the batter. To keep your Swedish apple cake fresh, store it in the fridge. Use an airtight container or wrap the cake tightly in plastic wrap. This helps keep the cake moist and tasty. You can freeze slices of the cake if you want to save some for later. Wrap each slice in plastic wrap and place them in a freezer bag. Remove as much air as possible before sealing. When you want to eat a slice, take it out and let it thaw in the fridge overnight. For a warm treat, you can reheat it in the microwave for about 15-20 seconds. Your Swedish apple cake will stay fresh for about 3-4 days in the fridge. If frozen, it can last for 2-3 months. Just remember, the sooner you eat it, the better it will taste! Baking a Swedish apple cake takes about 45 to 50 minutes. This time allows the cake to rise and turn golden brown. Always check the cake a few minutes early to avoid overbaking. Yes, you can use different types of apples. Each type adds its own flavor. Tart apples like Granny Smith give a nice contrast to the sweet cake. Sweet apples, like Fuji or Honeycrisp, will make the cake sweeter. Experiment and find your favorite! If you don’t have vanilla extract, you have options. You can use almond extract for a nutty flavor. Another option is to add a bit of cinnamon for warmth and spice. Both will keep your cake tasting great! Yes, you can make this cake ahead of time. It stays fresh for a few days. Just store it in an airtight container at room temperature. You can also freeze it for a longer shelf life. To check if the cake is done, insert a toothpick into the center. If it comes out clean or with just a few crumbs, the cake is done. If it has wet batter on it, bake for a few more minutes. In this blog post, we shared the key ingredients for a delicious Swedish apple cake. You learned how to prepare the batter, layer your apples, and bake to perfection. Tips for texture, flavor, and presentation help your cake shine. We also discussed variations, storage methods, and answered common questions. Now, you have everything you need to create a sweet treat. Enjoy the baking process and share your tasty results!

Are you ready to create a warm, tasty treat that will impress your friends and family? Today, I’m sharing my go-to recipe for a delicious Swedish apple cake. With juicy …

Read more

Categories Desserts

Sweet Potato Tots Flavorful and Fun Snack Idea

July 24, 2025 by Chef Theo
Sweet Potato Tots Delight - 2 large sweet potatoes, peeled and cubed - 1/2 cup all-purpose flour - 1/4 cup grated Parmesan cheese (optional) - 1 teaspoon garlic powder - 1 teaspoon onion powder - 1/2 teaspoon smoked paprika - 1/4 teaspoon cayenne pepper (optional, for a kick) - Salt and pepper to taste - 1/2 cup breadcrumbs (for coating) - Oil for frying (canola or vegetable oil) The sweet potatoes are the star of this dish. They bring a rich flavor and a nice sweetness. Next, flour helps bind the mixture together. Parmesan cheese adds a touch of savory goodness, but you can skip it if you prefer. Garlic powder and onion powder give a nice depth of flavor. Smoked paprika adds a warm, smoky touch. The cayenne pepper gives it a subtle heat, but you can leave it out for less spice. If you want to switch things up, try these ideas: - Flour: Use whole wheat flour or almond flour for a different taste. - Cheese: Swap Parmesan for cheddar or mozzarella for a cheesy twist. - Breadcrumbs: Use panko for extra crunch or crushed cornflakes for a fun texture. - Oil: Try olive oil for a healthier option or bake instead of frying. These changes can help you make a recipe that fits your taste and diet. First, peel the sweet potatoes. Cut them into cubes. Place the cubes in a large pot. Add enough salted water to cover them. Boil the sweet potatoes for about 15 to 20 minutes. They should be tender when pricked with a fork. Drain the water and let the sweet potatoes cool. Once they are cool, mash them in a large bowl. Now it's time to mix! Add the flour, Parmesan cheese, garlic powder, onion powder, smoked paprika, cayenne, salt, and pepper to the mashed sweet potatoes. Mix it all together until smooth. Your hands will work best for this! Next, shape the mixture into small balls, about the size of a tablespoon. This is a fun part! Roll each ball into the breadcrumbs to coat them fully. You have three great ways to cook these tots. First, for frying, heat oil in a deep pan or fryer to 350°F (175°C). Carefully place the tots into the hot oil in batches. Fry them for 3 to 4 minutes or until they turn golden brown. Use a slotted spoon to remove them and place them on a paper towel-lined plate. For baking, preheat your oven to 425°F (220°C). Place the tots on a baking sheet lined with parchment paper. Bake for 20 to 25 minutes, flipping halfway through. They will be crispy and delicious! Lastly, for air-frying, preheat your air fryer to 400°F (200°C). Arrange the tots in a single layer and cook for 10 to 12 minutes. Shake the basket halfway through for even cooking. Each method will give you tasty sweet potato tots. Try them all to find your favorite! For the full recipe, check the previous section. To get sweet potato tots with the right crunch, start with the right potatoes. Choose large, firm sweet potatoes. Boil them just until soft, around 15 to 20 minutes. Overcooking can make them watery. After mashing, let the mix cool before shaping it into tots. This helps them hold their shape while frying. The key to tasty tots lies in the seasoning. Use garlic powder and onion powder for a savory kick. Smoked paprika adds a warm, smoky flavor. If you like some heat, add cayenne pepper. You can also mix in fresh herbs like parsley or chives for a fresh taste. Don’t forget to salt your mix well. This brings out the natural sweetness of the sweet potatoes. Store leftover sweet potato tots in an airtight container in the fridge. They will last about three days. To revive them, reheat in an oven at 400°F (200°C) for 10-15 minutes. This keeps them crispy. If you freeze them, shape the tots and freeze them on a tray first. Then, transfer them to a bag. When ready to eat, fry them straight from the freezer. This method gives you fresh, crispy tots every time. For the full recipe, check out the Sweet Potato Tots Delight . {{image_2}} Cheesy sweet potato tots add a rich flavor. To make them, mix in 1/4 cup of grated cheese. You can use sharp cheddar or mozzarella. This cheese melts beautifully, making the tots extra tasty. You can also sprinkle some cheese on top while frying for a crispy finish. For a kick, try spicy sweet potato tots. Add 1/4 teaspoon of cayenne pepper to the mix. You could also mix in some chopped jalapeños for heat. Serve these with a cool dip to balance the spice. They make a fun snack for those who love bold flavors. Herb-infused sweet potato tots bring freshness. Add 1 tablespoon of fresh herbs, like rosemary or thyme, to the mix. You can use dried herbs if fresh ones are not available. This twist brightens the tots and makes them aromatic. These are perfect for a light snack or appetizer. Explore these variations to find your favorite. Each one offers a different taste. You can easily switch up the recipe to suit your mood. For the complete recipe, check out the Full Recipe section. Sweet potato tots are a fun snack option packed with flavor. One serving, about six tots, has around 200 calories. This makes them a great choice for a tasty treat without too many calories. The main ingredients contribute to the calorie count. Sweet potatoes are nutrient-rich and offer natural sweetness, while flour and cheese add some calories too. Sweet potatoes are more than just tasty. They are full of vitamins and minerals. They provide fiber, which is good for digestion. Sweet potatoes are rich in vitamin A, which helps your eyes and skin. They also have antioxidants that protect your body from harm. Eating sweet potatoes can help boost your immune system and give you energy. You can enjoy sweet potato tots in many ways. They are great as a snack or side dish. Pair them with dips like garlic aioli or spicy ketchup. You can also serve them next to grilled meats or salads for a complete meal. Add a sprinkle of fresh herbs or a squeeze of lime for extra flavor. Explore different pairings to find your favorite way to enjoy these delightful bites. For the full recipe, check out the Sweet Potato Tots Delight recipe above. Yes, you can make Sweet Potato Tots ahead of time. Prepare the mixture and shape the tots. Place them on a baking sheet lined with parchment paper. Freeze the tots for a few hours until firm. Then, transfer them to a freezer bag. This way, you can fry or bake them later. Store leftover Sweet Potato Tots in an airtight container. Place parchment paper between layers if stacked. Keep them in the fridge for up to three days. To reheat, place them in the oven or air fryer. This helps keep them crispy. Sweet Potato Tots can be gluten-free. To make them gluten-free, simply use gluten-free flour. Also, check the breadcrumbs you use. Many brands offer gluten-free options. With these swaps, you can enjoy this tasty snack without worry! For the full recipe, check out the Sweet Potato Tots Delight. In this article, we covered how to make sweet potato tots. We discussed the right ingredients, including substitutions you can use. I shared step-by-step instructions for preparation, mixing, and cooking. You learned tips for perfect texture and flavor. We explored variations, like cheesy or spicy tots. We also looked at their nutritional value and common questions. Now, you can easily create tasty sweet potato tots at home. Enjoy them as a snack or side dish!

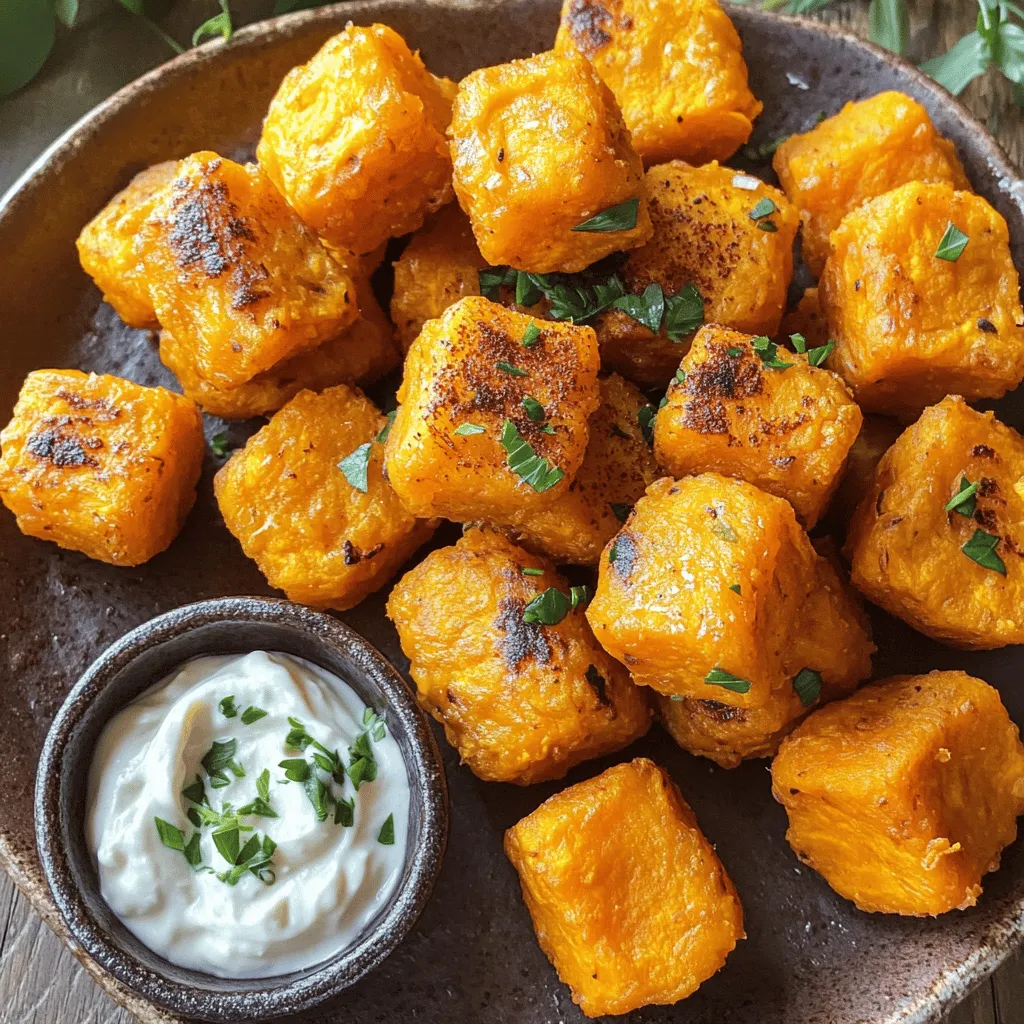
Looking for a fun snack that’s both tasty and easy to make? Sweet potato tots are the answer! They’re crispy on the outside and soft on the inside, making them …

Read more

Categories Appetizers

Delicious Pumpkin Snickerdoodle Cookies Easy to Make

July 24, 2025 by Chef Theo
To make these tasty cookies, gather the following ingredients: - 1 cup pumpkin puree - 1/2 cup unsalted butter, softened - 1 cup brown sugar - 1/2 cup granulated sugar - 1 large egg - 1 teaspoon vanilla extract - 2 cups all-purpose flour - 1 teaspoon baking soda - 1 teaspoon cream of tartar - 1/2 teaspoon cinnamon - 1/2 teaspoon nutmeg - 1/4 teaspoon salt - 1/4 cup granulated sugar (for rolling) - 1 tablespoon cinnamon (for rolling) These ingredients blend nicely to give your cookies that soft texture and rich flavor. The pumpkin puree adds moisture, while the sugars create a lovely sweetness. You can tweak the recipe for fun. Consider adding: - Chocolate chips - Chopped nuts like walnuts or pecans - Dried cranberries or raisins - A pinch of ginger for extra spice Adding these items can change the taste and texture of your cookies. Get creative and find what you like best! To make these cookies, you will need: - A mixing bowl - A whisk - A cookie scoop or spoon - A baking sheet - Parchment paper - An oven Having the right tools makes cookie-making easier. The parchment paper helps with easy cleanup and keeps cookies from sticking. For the best results, use a cookie scoop to keep the size even. For the complete recipe, check out the [Full Recipe]. First, gather all your ingredients. You will need pumpkin puree, butter, sugars, egg, and vanilla. Get your flour and spices ready too. Start by preheating your oven to 350°F (175°C). Line a baking sheet with parchment paper. This will help the cookies not stick. In a large bowl, cream the softened butter, brown sugar, and 1/2 cup of granulated sugar. Mix until it feels light and fluffy. Next, add the pumpkin puree, egg, and vanilla extract. Stir until everything is well mixed. In another bowl, whisk together all-purpose flour, baking soda, cream of tartar, cinnamon, nutmeg, and salt. Slowly add this dry mix to your wet ingredients. Stir until just combined. Be careful not to overmix. Now, in a small bowl, mix the remaining 1/4 cup of granulated sugar with 1 tablespoon of cinnamon. Take a cookie scoop or a spoon and portion out the dough. Roll each piece in the cinnamon-sugar mixture until it is fully coated. Place the dough balls on your baking sheet, leaving about 2 inches between each. Bake them in your preheated oven for 10-12 minutes. The edges should be lightly golden, while the centers will look soft. Once baked, take the cookies out of the oven. Let them cool on the baking sheet for about 5 minutes. After that, transfer them to a wire rack to cool completely. To store your cookies, keep them in an airtight container. They will stay fresh for up to a week. If you want to keep them longer, consider freezing them. Follow the full recipe for more details. Enjoy your delicious pumpkin snickerdoodle cookies! To get soft and chewy cookies, mix the dough just right. Overmixing can make them tough. Use room temperature butter and pumpkin puree for the best blend. This helps the cookies rise nicely. You want a dough that is soft but not sticky. If it feels too wet, add a bit more flour. Always use dry measuring cups for flour and sugar. Spoon the flour into the cup and level it off with a knife. Do not scoop directly from the bag; this packs the flour down. For brown sugar, pack it tightly into the cup. Accurate measuring helps your cookies turn out great every time. One big mistake is not preheating the oven. Always set it to 350°F (175°C) before baking. Another mistake is placing cookies too close together. Leave space for them to spread. Lastly, don't skip the cooling step. Letting them cool on a wire rack keeps them from getting soggy. Follow these tips, and you’ll enjoy perfect Pumpkin Snickerdoodle Cookies every time! For the full recipe, check out the complete instructions above. {{image_2}} You can make these cookies gluten-free easily. Just swap the all-purpose flour for a gluten-free blend. Many blends work well, but look for one that includes xanthan gum. This will help the cookies hold their shape. Follow the same recipe, and you’ll get tasty cookies without the gluten. To make vegan pumpkin snickerdoodle cookies, replace the egg with a flax egg. Mix one tablespoon of ground flaxseed with three tablespoons of water. Let it sit until it thickens. Use dairy-free butter instead of regular butter. This keeps the cookies soft and yummy without animal products. You can add fun flavors to your cookies. Try mixing in chopped nuts, like walnuts or pecans, for crunch. Or add chocolate chips for a sweet twist. You can swap cinnamon for pumpkin pie spice if you like a stronger flavor. These small changes can make your cookies unique and exciting. For the complete recipe, check out the Full Recipe section. To keep your Pumpkin Snickerdoodle Cookies fresh, use an airtight container. Place parchment paper between layers to avoid sticking. Store at room temperature for up to five days. If you want them to last longer, consider refrigerating them. Cold air slows down spoilage. Freezing is a great way to keep cookies fresh for weeks. First, let your cookies cool completely. Then, place them in a single layer on a baking sheet. Freeze for about an hour until firm. Once frozen, transfer them to a freezer-safe bag. They can last up to three months in the freezer. When you're ready to enjoy your cookies, reheat them for a few seconds in the microwave. Use a paper towel over them to keep moisture in. This makes them warm and soft again. You can also pop them in the oven at 350°F (175°C) for a few minutes. Enjoy your cookies warm and fresh! For the full recipe, check the earlier section. You can skip cream of tartar in your recipe. Use a mix of baking powder and baking soda instead. For each teaspoon of cream of tartar, use 1.5 teaspoons of baking powder. It helps to keep the cookies soft and fluffy. Just make sure to adjust the baking soda in your recipe. This change will keep the cookies light without altering the flavor much. Yes, you can use fresh pumpkin. First, cook the pumpkin until soft. You can roast or boil it. After cooking, scoop out the flesh and blend it until smooth. Make sure to drain any excess water. Fresh pumpkin gives a nice taste, but it might be wetter than canned puree. Adjust the flour in your recipe if needed to keep the cookie dough thick. Pumpkin Snickerdoodle Cookies stay fresh for about five days at room temperature. Store them in an airtight container to keep them soft. If you want to keep them longer, freeze them. They can last for up to three months in the freezer. Just thaw them at room temp before enjoying. For the best flavor, eat them within a week. Don't forget to check out the Full Recipe for more details! You learned how to make Pumpkin Snickerdoodle Cookies from start to finish. We covered the main ingredients, tools, and step-by-step instructions. I also shared tips for perfect texture and ways to store your cookies. Whether you prefer gluten-free or vegan options, there’s something for everyone. Remember, fresh cookies are best enjoyed right after baking. Now, it’s time to bake and enjoy these tasty treats!

Get ready to enjoy a warm, cozy treat! These Delicious Pumpkin Snickerdoodle Cookies are easy to make and perfect for fall. Packed with pumpkin spice flavor and a touch of …

Read more

Categories Desserts

Savory Slow Cooker French Onion Soup Recipe

July 24, 2025 by Chef Theo
- 4 large yellow onions, thinly sliced - 3 cloves garlic, minced - 4 cups beef broth (or vegetable broth) - 1 teaspoon sugar - 1 teaspoon salt - 1 teaspoon black pepper - 2 tablespoons balsamic vinegar - 1 tablespoon fresh thyme leaves (or 1 teaspoon dried thyme) - 1 bay leaf - 1 tablespoon olive oil - 1 baguette, sliced into 1-inch pieces - 2 cups shredded Gruyère cheese (or Swiss cheese) The onions are the star of this dish. They give the soup its sweet and rich flavor. Yellow onions work best because they caramelize nicely. Garlic adds depth to the soup. It brings a savory kick that balances the sweetness of the onions. Broth is crucial for a good soup. Beef broth adds a hearty taste, while vegetable broth keeps it light and fresh. Sugar helps to enhance the natural sweetness of the onions. Salt and black pepper season the soup just right. Balsamic vinegar adds a touch of acidity. It brightens the flavors and makes the soup more complex. Thyme brings a fragrant note that pairs well with the onions. A bay leaf adds a subtle earthiness. Olive oil helps to cook the onions until they are soft and golden. The baguette gives a nice crunch when toasted. Gruyère cheese melts beautifully and adds a creamy layer on top. You can easily adapt this recipe. For a vegetarian option, use vegetable broth instead of beef broth. If you’re lactose intolerant, try dairy-free cheese. Gluten-free bread works well if you need a gluten-free option. You can also leave out the sugar or use maple syrup for a natural sweetener. Start by slicing the onions thinly. Use a sharp knife for best results. I prefer yellow onions for their sweet flavor. Next, mince the garlic cloves. I find three cloves to be just right. Heat the olive oil in a skillet over medium heat. Add the sliced onions. Stir them gently for about 5 to 7 minutes. You want them to soften and turn light brown. Then, add the minced garlic and sugar. Let this cook for 2 more minutes until it smells great. After the onions and garlic are ready, transfer them to the slow cooker. Pour in the beef broth. If you want a vegetarian version, use vegetable broth. Add the salt, black pepper, balsamic vinegar, thyme, and a bay leaf. Stir everything together well. Cover the slow cooker and set it to cook. Select low for 6 to 8 hours or high for 3 to 4 hours. When it’s done, remove the bay leaf. Taste the soup and adjust the seasoning if needed. While the soup cooks, prepare the baguette slices. Preheat your oven to broil. Place the sliced baguette on a baking sheet. Toast the slices lightly for about 2 to 3 minutes per side. You want them golden brown but not burnt. When serving, ladle the soup into oven-safe bowls. Place a toasted baguette slice on top of each bowl. Sprinkle shredded Gruyère cheese over the bread. Broil the bowls for 2 to 3 minutes until the cheese melts and bubbles. Keep an eye on them to avoid burning. To boost the taste of your soup, use fresh herbs. Thyme adds depth. Try adding a splash of sherry or white wine for a rich note. A pinch of cayenne pepper brings warmth without too much heat. Toast the onions a bit longer for a sweeter flavor. Gruyère cheese is the classic choice. It melts well and adds a nice nutty flavor. Swiss cheese works too if you want a milder taste. For a fun twist, try a mix of cheeses. A bit of Parmesan can add a salty kick. Serve the soup hot in oven-safe bowls. Top each bowl with a toasted baguette slice. Make sure to add the cheese on top before broiling. This soup pairs well with a crisp green salad or a light sandwich. Enjoy with friends for a cozy meal! {{image_2}} You can make a tasty vegetarian version of French onion soup. Just swap out the beef broth for vegetable broth. This change keeps the rich flavor while ensuring it’s meat-free. Use the same ingredients and steps from the recipe. You still get the sweet onions and savory garlic. You can try different broths to change the taste. Chicken broth adds a lighter touch. Seafood broth brings a unique flavor twist. Each broth gives a new spin while keeping the soup warm and comforting. Experiment to find your favorite! Feel free to add extra ingredients for more flavor. Mushrooms add depth and a nice texture. Fresh herbs like parsley or rosemary can brighten the taste. You can even add a splash of white wine for a slight zing. Be creative and make the soup your own! To store leftover soup, let it cool first. Then, place it in an airtight container. You can keep it in the fridge for up to three days. Make sure to label the container with the date. To reheat, pour the soup into a pot over medium heat. Stir occasionally until it warms up. You can also use a microwave. Heat it in a microwave-safe bowl. Cover it loosely and heat in short bursts, stirring in between. You can freeze the soup for longer storage. Use freezer-safe containers or bags. Leave some space at the top for expansion. The soup will keep well for up to three months. To serve, thaw it overnight in the fridge before reheating. Enjoy the flavors again! The best onions for French onion soup are yellow onions. They have a sweet flavor when cooked. Their natural sugars caramelize well, giving the soup depth. You can also use sweet onions if you prefer a milder taste. Avoid red onions, as they can add an undesired sharpness to the soup. You can keep French onion soup in the fridge for about 3 to 5 days. Store it in an airtight container for the best results. If you notice any off smells or changes in color, it’s best to throw it away. Always reheat the soup to a safe temperature before enjoying it again. Yes, you can make French onion soup without a slow cooker. Use a large pot on the stove instead. Sauté the onions and garlic over medium heat, then add the broth and seasonings. Let it simmer for about 30 to 40 minutes. This method works well if you want a quicker version of the soup. You can find the complete Slow Cooker French Onion Bliss recipe [here](#). This recipe will guide you through each step for a rich and tasty soup. This blog shared the core ingredients for a tasty Slow Cooker French Onion Soup. We walked through each ingredient and how to prep them. You learned cooking steps and got useful tips, plus variations to meet your needs. I hope this inspires you to make this comforting dish. Enjoy the rich flavors and make it your own!

Craving a warm, hearty meal? Look no further! This Savory Slow Cooker French Onion Soup recipe is a game-changer. With its rich flavors and easy prep, you’ll make it again …

Read more

Categories Dinner

Pumpkin Chocolate Chip Bars Delightful Easy Treat

July 24, 2025 by Chef Theo
To make these delightful bars, gather these key items: - 1 cup pumpkin puree (canned or fresh) - 1 cup brown sugar, packed - 1/2 cup granulated sugar - 1/2 cup vegetable oil - 3 large eggs - 1 teaspoon vanilla extract - 1 1/2 cups all-purpose flour - 1 teaspoon baking soda - 1 teaspoon baking powder - 1 teaspoon ground cinnamon - 1/2 teaspoon ground nutmeg - 1/2 teaspoon salt - 1 cup chocolate chips (semi-sweet or dark) These ingredients create a moist and sweet batter that blends well together. You can make your bars unique by adding some optional ingredients: - 1/2 cup chopped walnuts - 1/2 cup dried cranberries - A dash of sea salt for topping These extras can enhance the texture and flavor of your bars. Having the right tools makes baking easier and more fun. Here are the tools you need: - 9x13 inch baking pan - Mixing bowls (large and medium) - Whisk or electric mixer - Spatula - Measuring cups and spoons - Parchment paper (optional for easy removal) These tools help you mix, bake, and serve your pumpkin chocolate chip bars with ease. For the full recipe, check [Full Recipe]. Start by preheating your oven to 350°F (175°C). This step is key for even baking. Next, grease and flour a 9x13 inch baking pan or line it with parchment paper. This makes it easy to remove the bars later. In a large bowl, mix together 1 cup of pumpkin puree, 1 cup of brown sugar, and 1/2 cup of granulated sugar. Add in 1/2 cup of vegetable oil, 3 large eggs, and 1 teaspoon of vanilla extract. Stir until the mixture is smooth and well-combined. In another bowl, whisk together 1 1/2 cups of all-purpose flour, 1 teaspoon of baking soda, 1 teaspoon of baking powder, 1 teaspoon of ground cinnamon, 1/2 teaspoon of ground nutmeg, and 1/2 teaspoon of salt. This blend gives the bars their warm flavor. Gradually add the dry mix to the wet mix. Stir gently until just combined. Avoid overmixing to keep the bars light and fluffy. Finally, fold in 1 cup of chocolate chips and 1/2 cup of chopped walnuts if you want some crunch. Now, pour the batter into your prepared pan. Use a spatula to spread it evenly. Place the pan in the preheated oven. Bake for 25 to 30 minutes. Check for doneness by inserting a toothpick in the center. If it comes out clean or with a few crumbs, your bars are ready. After baking, let the bars cool in the pan for 10 to 15 minutes. This helps them set. Then, transfer them to a wire rack to cool completely. This step is important for the best texture. Once cooled, cut the bars into squares. For a fun touch, dust them with powdered sugar. You can also drizzle some melted chocolate on top. A sprinkle of chopped walnuts adds elegance and flavor. Enjoy this delightful treat! For the full recipe, refer to the detailed cooking steps above. To keep your bars moist, use fresh pumpkin puree. It adds rich flavor and moisture. If using canned, check for quality. Avoid overmixing the batter. This makes the bars dense, not fluffy. Bake them just until a toothpick comes out clean. Overbaking dries them out. One common mistake is not measuring ingredients correctly. Use dry measuring cups for flour and sugars. Always pack brown sugar tightly. Another mistake is skipping the greasing step. Even with parchment paper, a little grease helps. Lastly, don’t skip the cooling time. Cutting too soon can make the bars fall apart. Use high-quality chocolate chips for a deeper taste. I recommend semi-sweet or dark chocolate. Adding spices, like cinnamon and nutmeg, enhances the pumpkin flavor. If you like nuts, choose walnuts or pecans for a great crunch. Finally, try a pinch of sea salt on top. It balances the sweetness beautifully. For a detailed recipe, check out the Full Recipe. {{image_2}} You can easily make these bars gluten-free. Just swap all-purpose flour with a gluten-free blend. Look for blends that include xanthan gum for the best texture. You can also use almond flour for a nutty flavor. Make sure all other ingredients are gluten-free, too. This way, everyone can enjoy these tasty treats without worry. To make these bars vegan, replace eggs with flax eggs. Mix one tablespoon of ground flaxseed with three tablespoons of water. Let it sit for five minutes to thicken. You can also swap vegetable oil with melted coconut oil or applesauce. Use vegan chocolate chips to keep it dairy-free. Your vegan friends will love this dessert! You can change the flavors to match the seasons. In fall, add extra spices like ginger or cloves for warmth. In winter, mix in some peppermint extract or crushed candy canes. For spring and summer, try adding lemon or orange zest for a fresh taste. These little changes keep the recipe exciting all year long! For the full recipe, check out Pumpkin Chocolate Chip Delight! To keep your Pumpkin Chocolate Chip Bars fresh, store them in an airtight container. This helps avoid moisture loss and keeps them soft. If you have leftovers, let the bars cool completely before sealing them up. You can also layer parchment paper between the bars to prevent sticking. For optimal taste, keep them at room temperature. If your home is warm, consider refrigerating them. When stored properly, these bars can last up to five days at room temperature. In the fridge, they can last up to a week. If you want to save them for longer, freeze them. Wrapped tightly in plastic wrap or foil, they can last for up to three months. Just remember to label the package with the date. If your bars become a bit firm after chilling, don’t worry! To soften them, simply microwave a piece for about 10-15 seconds. This will warm them up and restore some of their softness. You can also let them sit at room temperature for about 30 minutes before enjoying. They taste great warm, especially with a scoop of ice cream on top! Yes, you can use fresh pumpkin. Start by peeling, chopping, and roasting the pumpkin until soft. After cooling, blend it until smooth. This method gives a fresh taste. However, canned pumpkin is more convenient. It’s already cooked and ready to use. Both options work well in this recipe. If you don’t have chocolate chips, try using chopped chocolate bars. You can also use butterscotch chips or white chocolate chips. Nuts, like pecans or walnuts, can add texture and flavor. For a fruity twist, consider dried cranberries or raisins. Each option creates a new taste. To check if the bars are done, insert a toothpick into the center. If it comes out clean or with a few moist crumbs, the bars are ready. Keep an eye on the time, usually 25-30 minutes. If the edges look golden and pulled away from the pan, they are likely done. Enjoy the warm, sweet aroma while they bake! To wrap up this guide on Pumpkin Chocolate Chip Bars, we explored key ingredients, tools, and step-by-step baking instructions. I shared tips for moist bars and how to avoid common mistakes. We also covered variations for gluten-free and vegan options, along with smart storage practices to keep your bars fresh. Baking is fun and rewarding. With this knowledge, you can make delicious bars that suit your taste. Enjoy experimenting and sharing with others!

Are you ready for a delicious treat that brings fall flavors year-round? My Pumpkin Chocolate Chip Bars are a simple, tasty dessert that everyone will love. With just a few …

Read more

Categories Desserts

Cider Braised Chicken with Caramelized Onions Delight

July 24, 2025 by Chef Theo
- Chicken and Other Proteins - 4 bone-in, skin-on chicken thighs - Vegetables and Aromatics - 2 large yellow onions, thinly sliced - 3 cloves garlic, minced - Liquids and Seasonings - 2 tablespoons olive oil - 2 cups apple cider (non-alcoholic) - 1 cup chicken broth - 1 tablespoon Dijon mustard - 1 teaspoon dried thyme - 1 teaspoon salt - ½ teaspoon black pepper - 2 tablespoons apple cider vinegar - Fresh parsley for garnish These ingredients create a rich and flavorful dish. The chicken thighs provide juicy meat, while the onions turn sweet and tender. Apple cider brings a nice balance of tartness. Garlic and thyme add depth to the flavor. Each ingredient plays a key role in making this dish special. Make sure to use fresh ingredients for the best taste. Fresh parsley adds a pop of color and freshness. This recipe is great for family dinners or special occasions. You can find the full recipe to guide you through the cooking process. Searing the Chicken Start by heating 2 tablespoons of olive oil in a large skillet over medium heat. Season 4 bone-in, skin-on chicken thighs with 1 teaspoon of salt and ½ teaspoon of black pepper. Place them skin-side down in the hot skillet. Cook for about 4-5 minutes. You want the skin to be golden and crispy. Turn the chicken and cook for another 4-5 minutes. Remove the chicken and set it aside. Caramelizing the Onions In the same skillet, add 2 large, thinly sliced yellow onions. Sauté them over medium heat for around 10 minutes. Stir them often. They should become soft and caramelized. In the last minute, mix in 3 minced garlic cloves for added flavor. Mixing the Braising Liquid In a bowl, whisk together 2 cups of apple cider, 1 cup of chicken broth, 1 tablespoon of Dijon mustard, 1 teaspoon of dried thyme, and 2 tablespoons of apple cider vinegar. This mix adds a sweet and tangy flavor to our dish. Nestling the Chicken in the Sauce Pour the apple cider mix over the caramelized onions in the skillet. Nestle the chicken thighs back into the pan, skin-side up. Bring the mixture to a gentle simmer. Simmering and Cooking Time Cover the skillet with a lid and reduce the heat to low. Let it braise for 30-35 minutes. The chicken should be cooked through and tender. Reducing the Sauce Once the chicken is cooked, remove it from the skillet and keep it warm. Increase the heat to medium-high. Let the sauce reduce for about 5-10 minutes. It should thicken slightly. Plating the Dish Serve the chicken thighs with the caramelized onion sauce drizzled on top. This will make the dish look inviting. Garnish Options Before serving, add fresh parsley for a pop of color and freshness. Complementary Side Dishes Pair this dish with mashed potatoes or steamed green beans. These sides enhance the meal and balance the flavors. For the complete preparation details, check the Full Recipe section. - Achieving Perfectly Caramelized Onions Start with a large pan. Use medium heat and add olive oil. Add sliced onions and stir them often. Patience is key; let them cook slowly for about 10 minutes. This brings out their sweet flavor. You want them soft, golden, and slightly sticky. - Ensuring Juicy Chicken Thighs Use bone-in, skin-on chicken thighs. Season them well with salt and pepper. Sear them skin-side down for 4-5 minutes. This gives a nice, crispy skin. Flip them and cook for another 4-5 minutes. This method keeps the meat juicy inside while browning the outside. - Flavor Enhancement Tips Add garlic in the last minute of cooking onions. This gives a great depth of flavor. Use fresh herbs like thyme for a fragrant touch. The apple cider and broth mix adds a nice sweetness. Don’t rush; let everything meld together for better taste. - Overcooking the Chicken Keep an eye on the time. Cooking for too long will dry out the chicken. Use a meat thermometer. The perfect internal temp is 165°F. Remove the chicken when it reaches this point. - Skipping Essential Ingredients Don’t skip the Dijon mustard or apple cider vinegar. They add a tangy note that balances the dish. Each ingredient plays a role. If you leave one out, the flavor may suffer. - Not Allowing Sauce to Thicken After cooking the chicken, let the sauce simmer. This helps it thicken and concentrate flavors. It should take about 5-10 minutes. A thick sauce clings to the chicken and enhances each bite. Try these tips for a great Cider Braised Chicken with Caramelized Onions. For the complete recipe, see the Full Recipe section. {{image_2}} Alternative Chicken Cuts You can use different chicken pieces if you like. Try chicken drumsticks or breasts. Both will work well. Thighs are juicy, but other cuts will also taste great. Substituting for Different Liquids If you want to switch up the flavor, use white wine instead of cider. You can also use vegetable broth for a lighter touch. Both will add depth to the dish. Adding Seasonal Vegetables Feel free to add vegetables you love. Carrots or parsnips work well with this recipe. Just chop them up and add them when you cook the onions. They will soak up all the tasty juices. Sweetness Variations You can adjust the sweetness of the dish. Add a bit of brown sugar for more sweetness. Honey can also work. Just remember to add it in small amounts. Herbal and Spice Additions Want more flavor? Try adding herbs like rosemary or sage. Both bring a nice aroma. You can also use spices like paprika for a warm kick. Heat Level Customization If you like heat, add some red pepper flakes. Just a pinch will do. For a milder dish, skip the heat. Adjust the spices to match your taste. For the complete details on making this dish, check the Full Recipe. After enjoying your cider braised chicken, you may have some leftovers. To keep them fresh, follow these best practices for refrigeration: - Let the chicken cool to room temperature before storing. - Place the chicken and sauce in an airtight container. - Store in the fridge for up to 3 days. Using airtight containers helps lock in moisture and flavor. This way, your chicken stays tasty and safe to eat later. When it's time to enjoy your leftovers, safe reheating is key. Here are some methods for reheating your cider braised chicken: - Stovetop: Place the chicken and sauce in a skillet. Heat over low to medium heat, stirring occasionally. This helps keep the chicken juicy. - Microwave: Put the chicken in a microwave-safe dish. Cover it with a lid or a damp paper towel. Heat in short bursts, checking regularly to avoid overheating. To maintain flavor and texture, avoid using high heat. Slow reheating keeps your chicken tender and the onions delicious. For the full recipe, check out the Full Recipe. Can I use chicken breast instead of thighs? Yes, you can use chicken breast. However, chicken thighs stay juicier and more flavorful. Adjust cooking time to avoid drying out the breast. How do I make this dish gluten-free? To make this dish gluten-free, use gluten-free chicken broth. Check the Dijon mustard for gluten-free options. What can I serve with Cider Braised Chicken? Cider braised chicken pairs well with rice, mashed potatoes, or crusty bread. Add a side of green beans or a salad for freshness. Can I prepare this in advance? Yes, you can prepare this dish in advance. Cook and cool it, then store in the fridge. Reheat gently before serving. How to adjust the recipe for larger servings? To adjust for larger servings, increase each ingredient by 1.5 or 2 times. Ensure your pot is large enough to hold everything. What is the best way to store the caramelized sauce? Store the caramelized sauce in an airtight container in the fridge. It stays fresh for about three days. You can also freeze it for longer storage. For the full recipe, refer to the complete instructions above. This blog post covers every step to perfect cider-braised chicken. You learned about the key ingredients like chicken, vegetables, and seasonings. We went through preparation, braising, and serving tips. I shared helpful cooking techniques and common mistakes to avoid. Remember, you can adjust flavors and storage methods to suit your needs. Experimenting will make your dish unique and delicious. Cooking is fun, so enjoy your time in the kitchen!

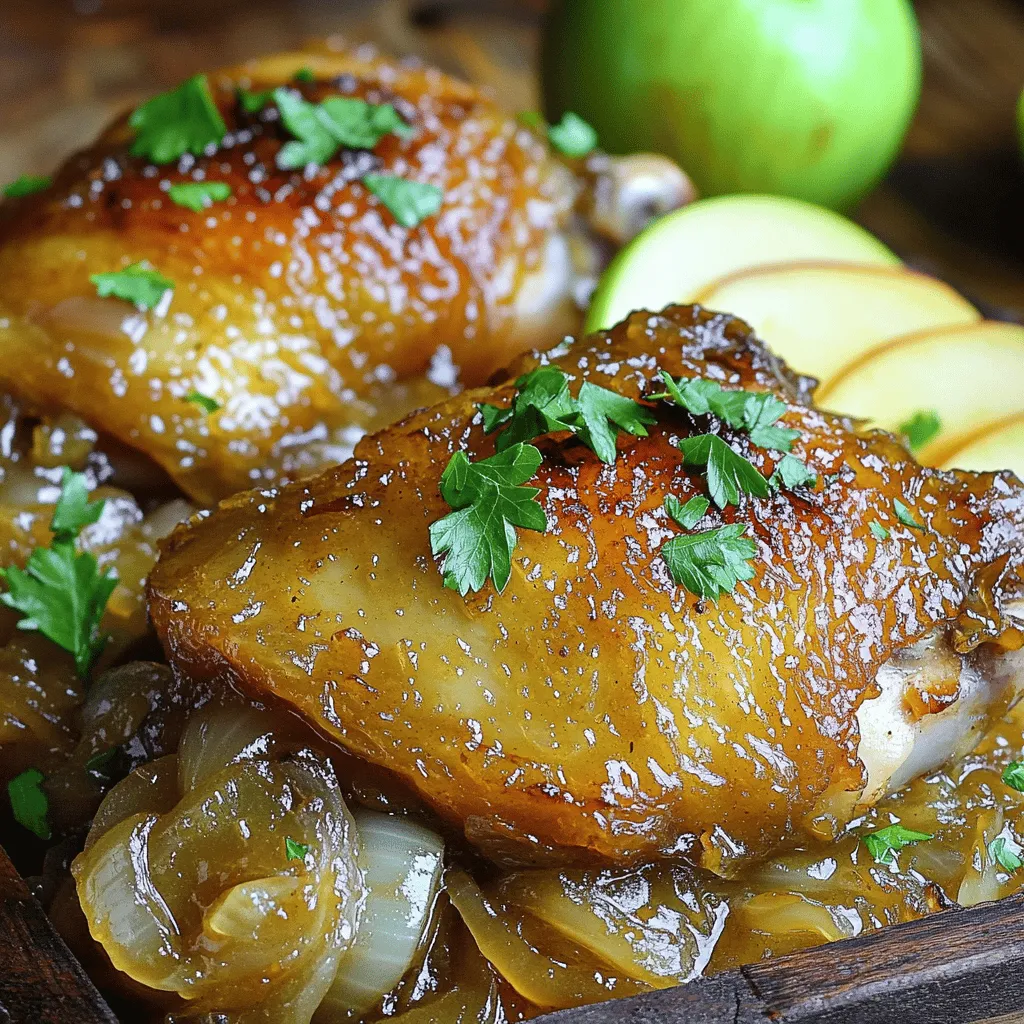
If you’re ready to elevate your dinner game, look no further than Cider Braised Chicken with Caramelized Onions. This dish combines tender chicken with sweet, rich onions, all smothered in …

Read more

Categories Dinner

Southern Fried Apples Irresistible Comfort Food Treat

July 24, 2025 by Chef Theo
To make Southern fried apples, you will need the following ingredients: - 4 medium-sized Granny Smith apples, peeled, cored, and sliced - 1 teaspoon lemon juice - 1/2 cup brown sugar - 1 teaspoon ground cinnamon - 1/4 teaspoon ground nutmeg - 2 tablespoons unsalted butter - 1 tablespoon vegetable oil - Pinch of salt You can enhance your dish with these optional ingredients: - Chopped pecans for garnish - Vanilla ice cream for serving When making fried apples, I always choose Granny Smith apples. They are tart and firm, which helps them hold their shape while cooking. Look for apples that are bright green and free of bruises. You can also try Honeycrisp or Fuji apples for a sweeter flavor. Just remember, the right apple makes all the difference in taste and texture. Start by peeling and coring the apples. Use four medium-sized Granny Smith apples for the best taste. Next, slice them into thin wedges. Place the apple slices in a large bowl. Add a teaspoon of lemon juice. This will keep the apples from turning brown and adds a nice zing. Toss the apples gently so they are well-coated with the juice. Now, let’s cook the apples! In a separate bowl, mix half a cup of brown sugar, one teaspoon of ground cinnamon, one-fourth teaspoon of ground nutmeg, and a pinch of salt. Stir these together until they blend well. Heat a large skillet over medium heat. Add two tablespoons of unsalted butter and one tablespoon of vegetable oil. Wait for the butter to melt and bubble. Carefully add the sliced apples to the skillet, spreading them out evenly. Sprinkle the brown sugar mixture over the apples. Gently stir to coat all the apple slices. Cook for about 10 to 12 minutes. Stir occasionally, so the apples don’t stick. They should become tender and caramelized, but not mushy. Once they are cooked, take the skillet off the heat and let the apples cool for a few minutes. Serve the warm apples right from the skillet. For a special touch, sprinkle chopped pecans on top. You can also add a scoop of vanilla ice cream for a creamy contrast. This recipe is comfort food at its best. Enjoy every bite of your Southern fried apples! For the full recipe, click [Full Recipe]. To get the best caramelized apples, follow these steps. Use Granny Smith apples, as they are tart and hold their shape. First, toss the sliced apples with lemon juice. This helps keep them fresh and bright. When cooking, use a mix of butter and vegetable oil. This mix prevents burning and adds flavor. Cook the apples on medium heat. Stir gently to avoid breaking them. Watch closely as they cook. You want them tender, not mushy. The key is to let the sugar mix melt and bubble around the apples. This forms a nice caramel layer. If you cook them too long, they will lose their shape. Here are some common mistakes to watch out for. First, do not skip the lemon juice. It brightens the flavor and keeps the apples from browning. Also, avoid using too much heat. High heat can burn the sugar and ruin the dish. Another mistake is not stirring enough. Stirring helps coat the apples evenly. If you don't stir, some apples may burn while others stay raw. Lastly, don't rush the cooking time. Give the apples enough time to soften and caramelize beautifully. Spices can really elevate your southern fried apples. Cinnamon is a must-have, but don’t stop there. Adding nutmeg gives a warm, earthy flavor that rounds out the dish. You can even try a pinch of ginger for a little kick. If you want to get creative, think about adding vanilla extract. Just a splash can make a big difference. You can also toss in some chopped pecans for crunch. Top it all off with vanilla ice cream for a treat that feels special. For the full recipe, check the details above. {{image_2}} You can make Southern fried apples even better by adding more ingredients. For a crunchy twist, toss in some chopped pecans. They add a nice texture and flavor. If you love vanilla, drizzle some over the apples while they cook. It makes them taste even sweeter. You could also add a splash of maple syrup for extra sweetness. Each of these options adds a unique touch to the dish. Southern fried apples can differ across regions. In some parts, folks add a splash of bourbon for a rich flavor. This gives the dish a nice kick. Others might use different apples, like Honeycrisp or Fuji, for a sweeter taste. Some might even throw in a pinch of cayenne pepper for heat. These regional twists show how versatile this dish can be. Southern fried apples pair well with many foods. They go great with breakfast dishes like pancakes or waffles. You can also serve them as a side with pork chops. The sweetness of the apples balances the savory meat. For dessert, try them with a scoop of vanilla ice cream. This mix makes for a delightful treat. You can find the full recipe and enjoy this comfort food treat in many ways! Let your fried apples cool to room temperature. This stops steam from making them soggy. Place them in an airtight container. Store them in the fridge for up to three days. If you want to keep them longer, freezing is a great option. To reheat, gently warm the apples on the stove over low heat. Stir them often to heat evenly. You can also use a microwave. Heat them in 30-second bursts, stirring in between. Add a bit of butter for extra flavor and moisture. To freeze, place the cooled apples in a freezer-safe bag. Remove as much air as you can. They will keep in the freezer for up to three months. When ready to use, thaw them in the fridge overnight. Reheat them on the stove or in the microwave for a tasty treat. For the full recipe, check the listed instructions above. Southern Fried Apples shine as a dessert. They pair well with vanilla ice cream. The warm apples contrast nicely with the cold ice cream. You can also serve them with pancakes or waffles. They add a sweet touch to breakfast. Some love them with biscuits or cornbread. They bring a taste of the South to any meal. Yes, you can use other apples. Granny Smith apples work best for their tartness. However, you can try Fuji or Honeycrisp apples. These apples add a nice sweetness. Just remember, the texture may change a bit. Softer apples might turn mushy when cooked. Stick with firm apples for the best results. Southern Fried Apples can last up to five days in the fridge. To store them, let them cool down first. Place them in an airtight container. This keeps them fresh and tasty. When reheating, use low heat to warm them up. They can taste just as good the next day! You can also find the Full Recipe for more detailed instructions. In this article, you learned how to make Southern fried apples, including needed ingredients and cooking steps. I shared tips for achieving the best caramelization and how to enhance flavor with spices. You also discovered variations that add new twists and how to store leftovers. Southern fried apples are tasty and fun to make. Enjoy your dish and share it with friends!

If you’re craving a warm, sweet treat that brings a taste of the South, you’ve come to the right place! Southern Fried Apples are the perfect comfort food to satisfy …

Read more

Categories Desserts
Older posts
Newer posts
← Previous Page1 … Page7 Page8 Page9 … Page92 Next →

TOASTED RECIPES

Where ideas are warm, crisp, and ready to serve! 🍞

PAGES

Home About Contact Privacy Policy Terms & Conditions Cookie Policy GDPR Policy Copyright Policy Disclaimer

CATEGORIES

Appetizers Desserts Salads Breakfast Dinner

Contact

  • Pinterest
  • Mail
Copyright © 2025 Toasted Recipes. All rights reserved.