Skip to content
toastedrecipes.com
  • Home
  • Appetizers
  • Desserts
  • Salads
  • Breakfast
  • Dinner
  • Privacy Policy
  • Contact
  • About

Chef Theo

Mini Key Lime Cheesecakes Delightful and Easy Recipe

May 11, 2025 by Chef Theo
- 1 cup graham cracker crumbs - 4 tablespoons unsalted butter, melted - 2 tablespoons granulated sugar - 16 oz cream cheese, softened - 1 cup powdered sugar - 1/2 cup sour cream - 1/3 cup freshly squeezed key lime juice - Zest of 2 key limes - 1 teaspoon vanilla extract - Whipped cream for topping - Fresh key lime slices and zest for garnish If you can't find key limes, use regular limes instead. They work well in this recipe. For a gluten-free crust, swap graham crackers for gluten-free crumbs. You can also use coconut oil instead of butter for a dairy-free version. If you want less sugar, reduce the powdered sugar by half. Each mini key lime cheesecake has about: - Calories: 180 - Total Fat: 12g - Saturated Fat: 7g - Cholesterol: 45mg - Sodium: 120mg - Total Carbohydrates: 16g - Dietary Fiber: 0g - Sugars: 10g - Protein: 2g These tasty treats are sweet yet tangy. Enjoy them as a light dessert! Check the Full Recipe for more details. Making mini key lime cheesecakes is simple. You start with the crust. This crust is made from graham cracker crumbs, melted butter, and sugar. Next, you blend the creamy filling with cream cheese, sugar, sour cream, and key lime juice. Gather your ingredients and be ready to create something delicious. 1. Preheat your oven to 325°F (160°C). Line a muffin tin with paper liners. 2. In a medium bowl, mix 1 cup of graham cracker crumbs, 4 tablespoons of melted butter, and 2 tablespoons of sugar. Stir until it feels like wet sand. 3. Press about 1 tablespoon of the mixture into the bottom of each muffin cup. This forms the crust. Bake for 5 minutes, then take it out to cool. 4. In a large bowl, beat 16 ounces of softened cream cheese. Use an electric mixer on medium speed until it's smooth. 5. Slowly add 1 cup of powdered sugar while mixing. Make sure it blends well. 6. Add 1/2 cup of sour cream, 1/3 cup of key lime juice, lime zest from 2 key limes, and 1 teaspoon of vanilla. Mix until smooth. 7. Spoon the filling into each crust, filling them about 3/4 full. 8. Bake for another 15 to 18 minutes. The edges should be set, but the centers need to jiggle slightly. 9. Turn off the oven and let the cheesecakes cool inside with the door slightly open for about 1 hour. 10. After cooling, place them in the fridge for a minimum of 4 hours or overnight for the best taste. 11. When ready to serve, top each cheesecake with whipped cream, a slice of key lime, and a sprinkle of zest from a key lime. This recipe is an easy way to impress your friends and family. Make sure to check out the Full Recipe for more details! When making mini key lime cheesecakes, small errors can happen. One big mistake is overbaking them. You want the centers to jiggle a bit when you take them out. Another mistake is not letting the cream cheese soften. Cold cream cheese can lead to lumps in your filling. Mixing too quickly can also add air. This can make your cheesecakes puff up and crack. Lastly, don’t skip chilling them. They need time to set properly. A smooth and creamy texture is key for great cheesecakes. First, always use room temperature cream cheese. This helps blend it easily with other ingredients. Use a hand mixer or stand mixer on medium speed. This keeps the mixture smooth and prevents air bubbles. Another tip is to add the eggs one at a time. This helps create a better mix without overworking the batter. Finally, gently fold in the sour cream and lime juice. This keeps the mixture light and fluffy. Presentation can make your mini key lime cheesecakes shine. Use a piping bag to add whipped cream on top. This gives a nice, polished look. For garnish, place a slice of fresh key lime on each cheesecake. A sprinkle of zest adds color and brightness. Serve them on a pretty platter for your guests. If you really want to impress, add a touch of edible flowers. These tips make your dessert stand out and look professional. For the full recipe, check out the details above. {{image_2}} You can change the flavor of mini key lime cheesecakes to suit your taste. Try adding berries like strawberries or blueberries. Just fold in about a cup of mashed berries into the cheesecake mix. This adds a sweet and tart twist. Another option is coconut. Add half a cup of shredded coconut to the filling. It gives a tropical taste that pairs well with key lime. If you need a gluten-free option, use almond flour instead of graham cracker crumbs. Mix one cup of almond flour with melted butter and sugar. Press it into the muffin tin as you would with the graham cracker crust. You can also use crushed gluten-free cookies for a different flavor. This way, everyone can enjoy these treats, no matter their diet. Toppings add a fun touch to your mini cheesecakes. Besides whipped cream, you can use fresh fruit or chocolate sauce. A layer of fresh berries on top looks great and tastes delicious. You can also drizzle chocolate sauce over the whipped cream. For a crunchy texture, sprinkle crushed nuts or caramelized sugar on each cheesecake. Each topping creates a unique dessert experience. For full instructions, check the [Full Recipe]. To keep your mini key lime cheesecakes fresh, place them in an airtight container. Store them in the fridge for up to five days. This will maintain their creamy texture and bright flavor. If you want to avoid soggy crusts, do not stack them. Use parchment paper between layers if needed. You can freeze these mini cheesecakes for up to three months. First, let them cool completely. Then, wrap each cheesecake in plastic wrap. Place the wrapped cheesecakes in a freezer-safe container. When ready to enjoy, simply move them to the fridge overnight to thaw. They will taste fresh and delightful! Reheating mini cheesecakes is not usually needed, but if you want them slightly warm, do so gently. Place them in a preheated oven at 300°F (150°C) for about 10 minutes. This will warm them without cooking them further. Be careful not to overheat, as this could change the texture. For best taste, serve them chilled with toppings. For the full recipe, please refer to the recipe section above. You can use regular limes if you can’t find key limes. They taste a bit different but still work well. The flavor will be less sweet and more tart. You can also mix lime juice with a bit of lemon juice for a similar taste. Just remember, key limes have a unique flavor. They are smaller and have more juice than regular limes. Mini cheesecakes can last about 5 days in the fridge. Store them in an airtight container to keep them fresh. If you notice any changes in texture or smell, it’s best to toss them. Enjoy them within this time for the best taste. Yes, you can make mini cheesecakes ahead of time! They are great for preparing in advance. Just remember to chill them for at least 4 hours or overnight before serving. This makes them set properly and taste even better. You can also freeze them for longer storage. Just thaw them in the fridge before serving. For the full recipe, check the earlier sections. In this blog post, we explored how to make mini key lime cheesecakes. We detailed the ingredients, offered substitutes, and shared nutritional facts. You learned step-by-step how to prepare, bake, and chill these treats. I gave you tips to avoid mistakes and achieve a creamy texture. We also discussed tasty variations and proper storage methods. Now, you can impress friends and family with this delicious dessert. Try your own twists and enjoy every bite!

Are you ready to indulge in a sweet treat that’s both fun and easy to make? Mini Key Lime Cheesecakes are the perfect bite-sized dessert for any occasion. With a …

Read more

Categories Desserts

Tarte Au Soleil Delightful and Simple Recipe Guide

May 11, 2025 by Chef Theo
To make a tasty Tarte Au Soleil, you need the following key ingredients: - 1 sheet of puff pastry, thawed - 200g ricotta cheese - 100g spinach, wilted and chopped - 100g feta cheese, crumbled - 1 egg, beaten - 1 clove garlic, minced - 1 teaspoon dried oregano - Salt and pepper to taste - 1 egg yolk (for egg wash) - Sesame seeds (for garnish) These ingredients create a rich and creamy filling that pairs perfectly with the flaky pastry. The spinach adds a nice color and nutrients. You can easily customize your Tarte Au Soleil with these options: - Sun-dried tomatoes for a sweet touch - Herbs like fresh basil for extra flavor - Different cheeses such as goat cheese or mozzarella - Chopped olives or artichokes for a Mediterranean flair Feel free to mix and match these ingredients to suit your taste. This is a fun way to make the dish your own. Gather these tools to make your cooking process smooth and easy: - A baking sheet - Parchment paper - Mixing bowl - Rolling pin - Sharp knife - Brush for egg wash Having the right tools helps you create this dish without any hassle. You can find the full recipe to guide you through the cooking process. Enjoy making this delightful dish! Start by preheating your oven to 200°C (400°F). This step is key for a nice, crispy crust. Line a baking sheet with parchment paper. This will keep your pastry from sticking. Take one sheet of puff pastry and let it thaw. Roll it out gently on a lightly floured surface. Aim for a circle about 30cm wide. This will be the base of your Tarte Au Soleil. In a mixing bowl, combine 200g of ricotta cheese, 100g of wilted and chopped spinach, and 100g of crumbled feta cheese. Add in one beaten egg, one minced clove of garlic, and one teaspoon of dried oregano. Don’t forget to season with salt and pepper. Mix well until everything is combined. This filling will be creamy and packed with flavor. Transfer the rolled-out puff pastry to your lined baking sheet. Use a sharp knife to cut the pastry into a sunburst pattern. Make cuts from the edge to the center, leaving a small circle in the middle. This circle will hold your filling. Spoon the cheese and spinach mixture into this center circle. Now, take each 'ray' of pastry and twist it over the filling. Alternate sides to create a sunburst look. Brush the top with the beaten egg yolk for a shiny finish. Sprinkle sesame seeds on top for a nice touch. Bake in your preheated oven for 25-30 minutes. The pastry should turn golden and puffed up. Let it cool slightly before slicing into wedges. Enjoy your Tarte Au Soleil! To get the best puff pastry, always keep it cold. Cold butter makes better layers. When you roll it out, do it gently. Avoid pressing too hard. This keeps the air in, which helps it puff up. If the dough warms up, chill it again for ten minutes before continuing. You can make this dish even better with a few tweaks. Try adding fresh herbs like dill or chives. These herbs boost the flavor and freshness. A pinch of nutmeg in the filling adds warmth too. For heat lovers, a dash of red pepper flakes works wonders. Don’t forget to taste as you mix. This ensures the perfect balance of flavors. For a beautiful presentation, serve the Tarte Au Soleil warm. Place it on a rustic wooden board. Garnish with fresh herbs like basil or parsley for a pop of color. You can also add a light side salad for contrast. Cut it into wedges for easy serving. This makes it fun and inviting for everyone. Enjoy your culinary creation! {{image_2}} You can change the filling to fit your taste. Try using cooked mushrooms or roasted peppers instead of spinach. For a meat option, add cooked chicken or ham. You can also use mixed cheeses like goat cheese or mozzarella. Each choice will give a new twist to the dish. Experimenting with flavors keeps it fresh and fun! While the sunburst shape is lovely, you can also create different styles. For a fun twist, try cutting the pastry into stars or hearts. You can make smaller, bite-sized versions for parties. This way, guests can enjoy them as finger food. The beauty of this dish lies in its versatility. Each shape adds a personal touch. Using seasonal ingredients can elevate your Tarte Au Soleil. In spring, add fresh asparagus or peas for a bright taste. Summer is perfect for tomatoes and zucchini. In fall, think of butternut squash or apple slices for a sweet hint. Winter calls for hearty root vegetables like carrots or parsnips. Seasonal picks not only taste better but also support local farms. You can find the full recipe to explore these variations! To keep your Tarte Au Soleil fresh, store it in the fridge. First, let it cool completely. Then, wrap it tightly in plastic wrap or place it in an airtight container. This will keep the pastry crisp for about three days. If you want to save it longer, consider freezing it. When it's time to enjoy your leftovers, reheating is easy. Preheat your oven to 180°C (350°F). Place the Tarte Au Soleil on a baking sheet. Heat it for about 10-15 minutes. This method helps the pastry regain its crispiness. Avoid using the microwave, as it can make the pastry soggy. If you want to enjoy Tarte Au Soleil later, freezing is a great option. Wrap the whole tart tightly in plastic wrap, then place it in a freezer bag. It can stay frozen for up to three months. When you're ready to eat it, thaw it overnight in the fridge before reheating. This way, you can savor those delightful flavors anytime. For more details, check the Full Recipe. Tarte Au Soleil comes from France. It means "sun tart." This dish is popular in French homes. It is often made for family meals or gatherings. The shape resembles the sun, with rays all around. The bright colors in the filling make it lively. Its charm lies in its playful design and tasty filling. Yes, you can prepare Tarte Au Soleil ahead of time. Make the filling and store it in the fridge. You can also cut the pastry and keep it covered. When you are ready, assemble and bake it. This way, you save time during your event. Just remember to bake it fresh for the best taste. Tarte Au Soleil goes well with many side dishes. Here are some great options: - A light green salad with vinaigrette - Roasted vegetables for added flavor - A bowl of fresh fruit for sweetness - Light soup for a cozy touch Each side adds a unique taste to your meal. Enjoy mixing and matching to suit your guests! You can find the full recipe with detailed steps to create this delightful dish. In this blog post, we explored the tasty Tarte Au Soleil. We covered essential and optional ingredients, plus tools you need. You learned step-by-step how to make puff pastry and filling, and how to assemble it all. To elevate your dish, we shared tips for perfect pastry, flavor, and presentation. Don't forget, you can customize fillings and shapes or use seasonal items. Lastly, we discussed storage, reheating, and freezing tips to keep leftovers fresh. Enjoy the process. Your Tarte Au Soleil will impress everyone!

Get ready to impress your taste buds with Tarte Au Soleil! This delightful and simple recipe guide will show you how to create this stunning dish. With easy-to-follow steps, you’ll …

Read more

Categories Appetizers

Chewy French Toast Cookies Irresistible Homemade Treat

May 11, 2025 by Chef Theo
- 2 cups all-purpose flour - 1 teaspoon baking powder - 1/2 teaspoon baking soda - 1/4 teaspoon salt - 1 teaspoon ground cinnamon - 1/2 teaspoon ground nutmeg - 1/2 cup unsalted butter, softened - 3/4 cup brown sugar, packed - 1/4 cup granulated sugar - 2 large eggs - 1 teaspoon vanilla extract - 1/4 cup milk - 1/2 cup maple syrup (plus more for drizzling) - 1/2 cup chopped pecans In this recipe, you will need a mix of dry and wet ingredients. First, gather your dry ingredients. The flour gives the cookies structure. The baking powder and baking soda help them rise. Salt brings out the flavors, while cinnamon and nutmeg add warmth. Next, for the wet ingredients, you want butter that is soft. This helps to create a creamy texture. The brown sugar adds a rich taste, while the granulated sugar gives a bit of crispness. Eggs bind everything together, and vanilla adds a lovely aroma. Milk keeps the dough moist, and maple syrup gives that classic French toast flavor. If you like nuts, toss in some chopped pecans. They add a nice crunch. For the full recipe, refer to the earlier section. Enjoy gathering these ingredients; they will make your cookies truly special! - Preheat oven to 350°F (175°C). - Prepare the baking sheet with parchment paper. Start by setting your oven to the right temperature. This step is key to getting the perfect cookies. While the oven heats, get your baking sheet ready. Parchment paper helps the cookies not stick and makes clean-up easy. - Whisk together dry ingredients in a medium bowl. In a medium bowl, mix the dry ingredients. You will need flour, baking powder, baking soda, salt, cinnamon, and nutmeg. Use a whisk to blend these well. This helps the cookies rise and taste great. - Mix softened butter with brown and granulated sugars. - Add eggs, vanilla extract, and milk. In a large bowl, combine softened butter with brown and granulated sugars. Beat them together until it gets light and fluffy. This will take about 2-3 minutes. Next, add the eggs, one by one. Then pour in the vanilla extract and milk. Mix until it is smooth and creamy. - Gradually mix in dry ingredients until just combined. - Stir in maple syrup and optional pecans. Now, slowly add the dry mix to the wet mix. Stir gently until it just comes together. Overmixing can make the cookies tough. Then, add maple syrup for that sweet touch. If you want, add chopped pecans for extra crunch. - Drop mounds of dough onto prepared baking sheet. - Bake for 10-12 minutes until edges are golden. Using a cookie scoop, drop mounds of the dough onto your prepared baking sheet. Make sure to leave space between each mound. This helps them bake evenly. Bake in the preheated oven for 10-12 minutes. Look for golden edges and soft centers. - Cool on baking sheet, then transfer to wire rack. - Drizzle extra maple syrup over cooled cookies. Once baked, let the cookies cool on the sheet for about 5 minutes. Then, move them to a wire rack. This helps them cool completely. For the final touch, drizzle extra maple syrup over the cookies. This gives them that classic French toast flavor. Enjoy your Chewy French Toast Cookies! For the full recipe, check the details above. To get that perfect chewy texture, you must not overmix the dough. Overmixing adds too much air and makes the cookies rise too much. You want them soft and chewy, not dry. Mix just until the flour disappears. Adjust baking time for chewiness too. Bake for 10-12 minutes. If you want them softer, try 10 minutes. If you prefer a firmer cookie, go for 12 minutes. Add spices or extracts for even more flavor. A sprinkle of nutmeg or a dash of vanilla can elevate your cookies. You can also try chocolate chips for a sweet twist. These mix-ins can make your cookies unique and fun. Don’t be afraid to experiment! Space out the cookie dough on your baking sheet. Leave about 2 inches between each mound. This helps them bake evenly. If you bake too many cookies at once, they can stick together. Using multiple baking sheets can also help. Bake one sheet at a time for best results. You’ll love how well they turn out! {{image_2}} You can easily change the flavor of your Chewy French Toast Cookies. For a cozy twist, try a pumpkin spice version. Just add pumpkin puree and a bit more cinnamon and nutmeg for that warm spice. You can enjoy these cookies in autumn or any time you crave that fall flavor. If you love chocolate, go for chocolate chip French toast cookies. Simply stir in some chocolate chips into your dough. The sweet chocolate pairs perfectly with the warm spices. If you need gluten-free options, swap the all-purpose flour for a gluten-free blend. Many blends work well, so choose one that fits your taste. This way, everyone can enjoy these cookies without worry. For vegan substitutes, replace the eggs with flax eggs. Mix one tablespoon of ground flaxseed with three tablespoons of water. Let it sit for five minutes. Use vegan butter instead of regular butter for a rich flavor. These swaps keep the cookies tasty and kind to all diets. You can also make seasonal twists with these cookies. For a holiday-themed version, try adding ginger and molasses. This gives you a gingerbread flavor that is perfect for winter. In the summer, add fresh berries to the dough. Blueberries or chopped strawberries work great. The berries add a burst of flavor and freshness. Enjoy these cookies year-round with these fun variations. For the full recipe, check out the instructions provided earlier! For short-term storage, keep your Chewy French Toast Cookies in an airtight container. This will help them stay fresh and soft. You can store them at room temperature for up to five days. If you want to keep them even longer, consider refrigerating them, but this may change the texture slightly. You can freeze unbaked dough if you want to bake cookies later. Just scoop the dough onto a baking sheet and freeze until solid. Then, transfer the dough balls to a freezer bag. They can stay frozen for up to three months. When you are ready to bake, add a few extra minutes to the baking time. For baked cookies, let them cool completely first. Then, place them in an airtight container or a freezer bag. Baked cookies can be frozen for about three months as well. Just remember to separate layers with parchment paper to prevent sticking. To reheat cookies, the best method is the oven. Preheat your oven to 350°F (175°C). Place the cookies on a baking sheet and warm them for about five minutes. This restores their soft texture. You can also use the microwave for a quick fix. Heat them for 10-15 seconds, but be careful not to overdo it. Enjoy the warm, chewy goodness! To make Chewy French Toast Cookies, follow these steps: 1. Preheat your oven to 350°F (175°C) and line a baking sheet with parchment paper. 2. In a medium bowl, whisk flour, baking powder, baking soda, salt, cinnamon, and nutmeg. 3. In a large bowl, cream softened butter with brown sugar and granulated sugar until light. 4. Add eggs, one by one, mixing in vanilla extract and milk until smooth. 5. Gradually mix in the dry ingredients until just combined. Avoid overmixing. 6. Stir in maple syrup and chopped pecans if you like. 7. Scoop mounds of dough onto the baking sheet, spaced about 2 inches apart. 8. Bake for 10-12 minutes or until the edges are golden, but the centers stay soft. 9. Let the cookies cool on the sheet for 5 minutes, then transfer them to a rack. 10. Drizzle more maple syrup on top for that tasty French toast flavor! Yes, you can make these cookies ahead of time. Here are some storage tips: - Store baked cookies at room temperature in an airtight container for up to one week. - For longer storage, freeze the cookies in a single layer before transferring them to a freezer-safe bag. They last for about three months. - If using unbaked dough, scoop the mounds onto a baking sheet, freeze until firm, then transfer to a bag. Bake from frozen, adding a couple of extra minutes to the time. If you don't have maple syrup, here are some substitutes: - Honey offers sweetness but may change the flavor slightly. - Agave syrup works well and is a good vegan option. - Brown sugar mixed with a little water can mimic maple syrup's texture and taste. - Use any flavored syrup you enjoy, like caramel or vanilla, for a fun twist. To keep your cookies soft and chewy, follow these tips: - Do not overmix the dough when combining wet and dry ingredients. - Bake the cookies just until the edges turn golden; the centers should look soft. - Let the cookies cool on the baking sheet for a few minutes before moving them. - Store cookies in an airtight container with a slice of bread to help retain moisture. This recipe yields about 24 cookies, depending on the size you make them. If you use a tablespoon to scoop, you’ll get roughly this amount. Adjust the size of your scoops to make more or fewer cookies as you wish. Absolutely! Adding chocolate enhances the sweetness. Here’s how to do it: - Mix in 1/2 cup of chocolate chips or chunks right after stirring in the maple syrup. - You can also use dark chocolate, white chocolate, or even a mix for variety. - For a richer flavor, try adding a little cocoa powder to the dry ingredients. Remember, these Chewy French Toast Cookies are a treat, and personal touches make them even better! For the complete recipe, check out the Full Recipe section. These Chewy French Toast Cookies blend warm spices and flavors. With simple steps, you can create this tasty treat. Remember to mix wet and dry ingredients gently for the best texture. You can even try different flavors or dietary swaps to make it your own. Store your cookies properly for long-lasting freshness. Enjoy the joy of baking and share these cookies with friends and family. Happy baking!

If you love the warm, comforting taste of French toast, you’ll adore these Chewy French Toast Cookies! Imagine biting into a soft, chewy cookie that tastes like your favorite brunch …

Read more

Categories Desserts

Roasted Asparagus & Carrots Flavorful Veggie Dish

May 11, 2025 by Chef Theo
Here’s what you need to make this tasty dish: - 1 bunch asparagus, trimmed - 4-5 medium carrots, peeled and cut into sticks - 3 tablespoons olive oil - 1 teaspoon garlic powder - 1 teaspoon onion powder - 1 teaspoon dried thyme - 1 teaspoon smoked paprika - Salt and pepper to taste - Zest of 1 lemon - Fresh parsley, chopped for garnish These ingredients bring together a mix of flavors and textures. Asparagus adds a nice crunch, while carrots bring sweetness. Olive oil helps them roast to perfection, creating a golden color. The spices elevate the dish, making it more interesting. Using fresh herbs and spices can make a big difference. The lemon zest gives a fresh touch, brightening the flavors. Fresh parsley adds color and a bit of earthiness as a garnish. This combination makes your roasted asparagus and carrots not only appealing but also tasty. For the full details on how to prepare this dish, check out the Full Recipe. First, preheat your oven to 425°F (220°C). This high heat helps your veggies get nice and crispy. Next, line a baking sheet with parchment paper. This makes cleanup a breeze and helps prevent sticking. In a large mixing bowl, combine the trimmed asparagus and carrot sticks. Make sure to use fresh veggies for the best taste. Drizzle the olive oil over the vegetables. This helps the seasonings stick and adds great flavor. Now, sprinkle on garlic powder, onion powder, dried thyme, smoked paprika, salt, and pepper. Toss everything together until the veggies are well-coated. This step is key to ensuring every bite is tasty. Now, spread the seasoned asparagus and carrots out in a single layer on your prepared baking sheet. This helps them roast evenly. Place the baking sheet in the oven and roast for about 20 to 25 minutes. Make sure to toss the veggies halfway through cooking. This way, they brown nicely on all sides. When they are tender and slightly caramelized, they are ready. Enjoy the delicious aroma filling your kitchen! For a full recipe, refer to the section above. To get the best texture, roast your veggies at 425°F (220°C). This high heat gives them a nice crunch. Roast the asparagus and carrots for about 20-25 minutes. Toss them halfway for even cooking. Make sure they are tender but not mushy. A good sign they are ready is a slight caramelization on the edges. Coating your vegetables evenly in olive oil is key. This helps them roast well and enhances the flavor. If you don’t coat them enough, some parts may dry out. Use a large bowl to mix the veggies with oil. This will ensure each piece gets a good amount. For added flavor, try using different herbs and spices. You can swap out dried thyme for oregano or rosemary. A pinch of cumin can bring warmth, while red pepper flakes add some heat. Feel free to experiment with what you have at home. When serving, you can add a squeeze of fresh lemon juice for brightness. A sprinkle of feta cheese pairs well too. Serve these roasted veggies with grains like quinoa or rice for a complete meal. They also go great as a side with grilled meats or fish. {{image_2}} You can make roasted asparagus and carrots even better. Try adding toppings like feta cheese or toasted nuts. These add a nice crunch and creaminess. You can also drizzle balsamic glaze on top for extra flavor. Seasonal veggies can change the dish too. In spring, use baby zucchini or radishes. In fall, sweet potatoes or Brussels sprouts work great. Mixing different vegetables keeps the dish fresh and exciting. If you want a vegan option, this dish is already plant-based! Just ensure all your seasonings are vegan. You can also use coconut oil instead of olive oil. This will add a unique taste. For gluten-free, this recipe fits perfectly. All the ingredients are naturally gluten-free. If you are watching carbs, swap carrots for zucchini or cauliflower. These options will cut down on carbs but keep the flavor high. Check out the Full Recipe for more details! To keep your roasted asparagus and carrots fresh, store them in an airtight container. Make sure they have cooled down before sealing. This helps lock in their flavors and keeps them crisp. I suggest placing a paper towel inside the container to absorb excess moisture. It can help keep them from getting soggy. You can store roasted asparagus and carrots in the fridge for 3 to 5 days. If you want to keep them longer, consider freezing them. However, freezing may change their texture. They will still taste good, but they may lose some crunch. When reheating, aim to keep the veggies crispy. The oven is my go-to method for reheating. Set it to 350°F (175°C) and spread the veggies on a baking sheet. Heat for about 10 minutes, or until hot. This method helps maintain their delicious texture. If you're in a hurry, the microwave works too. Place the vegetables in a microwave-safe dish and cover with a damp paper towel. Heat in short bursts of 30 seconds. Check often to avoid steaming them too much. The result might not be as crispy, but they'll still be tasty. You can find the full recipe [here](#). Can I use frozen asparagus and carrots for roasting? Yes, you can use frozen asparagus and carrots. However, fresh veggies give better taste and texture. If using frozen, thaw them first. Pat them dry to remove excess moisture. This helps them crisp up nicely. What are the best ways to season roasted vegetables? You can use many seasonings to enhance roasted vegetables. Here are some ideas: - Garlic powder adds a nice kick. - Onion powder gives a sweet flavor. - Dried herbs like thyme or oregano work well. - Spices like smoked paprika add depth. - Don’t forget salt and pepper to taste. Feel free to experiment with your favorite spices and herbs. This makes each dish unique! How do I know when asparagus is properly roasted? Asparagus is done when it is tender and slightly caramelized. It should be bright green and have a little bite. Use a fork to check. If it goes through easily, it’s ready! What can I do with leftover roasted asparagus and carrots? You can use leftovers in many ways. Try adding them to salads for extra flavor. They also work great in wraps or sandwiches. You can blend them into a soup or toss them with pasta. Get creative and enjoy! This blog post showed how to roast asparagus and carrots perfectly. You learned the best ingredients, like olive oil and seasonings, to make them tasty. The step-by-step guide made the process easy. Tips helped you avoid common mistakes. You also found out how to store leftovers and reheat them well. Roasting vegetables can be fun and healthy. Feel free to try new flavors and mixtures. Enjoy your cooking!

Are you ready to elevate your veggie game? Roasted Asparagus & Carrots is not just a dish; it’s a flavorful delight that your taste buds will thank you for. With …

Read more

Categories Salads

Savory Chicken Parmesan Pillows Deliciously Stuffed Treat

May 11, 2025 by Chef Theo
- 1 cup cooked chicken breast, shredded - 1 cup ricotta cheese - 1/2 cup grated Parmesan cheese - 1 cup shredded mozzarella cheese - 1 package of ready-made puff pastry (2 sheets) You need shredded chicken for this dish. Use cooked chicken breast, which you can shred easily. The cheeses are key too. I love using ricotta for creaminess, Parmesan for flavor, and mozzarella for that gooey texture. Don't forget the puff pastry. It puffs up nicely and creates a perfect shell for the filling. - 1 teaspoon garlic powder - 1 teaspoon Italian seasoning - Salt and pepper to taste - Fresh basil leaves, for garnish Seasoning adds depth to your dish. Garlic powder gives it a nice kick, while Italian seasoning brings in herbs that make it taste fresh. I always recommend adding salt and pepper to enhance all the flavors. Fresh basil leaves make a lovely garnish. They add color and a burst of flavor on top. - Baking Sheet - Mixing Bowl - Pastry Cutter You will need a baking sheet to hold the pillows while they bake. A mixing bowl is essential for combining all the filling ingredients. Lastly, a pastry cutter helps you cut the puff pastry easily. These tools make the process smooth and fun. You can find the full recipe at the bottom of the article to help you along the way. Preheating the Oven Start by preheating your oven to 400°F (200°C). This ensures the pillows bake evenly and get that nice golden color. While the oven heats, you can prepare your filling. Mixing the Filling Ingredients In a mixing bowl, combine the following ingredients: - 1 cup cooked chicken breast, shredded - 1 cup ricotta cheese - 1/2 cup grated Parmesan cheese - 1 cup shredded mozzarella cheese - 1 teaspoon garlic powder - 1 teaspoon Italian seasoning - Salt and pepper to taste Mix these well until you see a smooth blend. This filling will make your pillows rich and tasty. Cutting the Puff Pastry Roll out your puff pastry sheets on a floured surface. Cut each sheet into four equal squares. You should have eight squares in total. These will hold all that yummy filling. Filling and Sealing the Pastry Place a generous tablespoon of the chicken mixture in the center of each pastry square. Fold the pastry over to form a triangle or rectangle. Press the edges with a fork to seal them tight. This keeps the filling from leaking out while baking. Egg Wash Application Brush the tops of your pillows with the beaten egg. This gives them a beautiful golden finish when they bake. Baking Time and Temperature Place the pillows on a lined baking sheet. Bake them in the preheated oven for 20-25 minutes. They should turn golden brown and puff up nicely. Once done, remove them from the oven and let them cool slightly. Serve your Chicken Parmesan Pillows with warm marinara sauce. Enjoy this wonderful treat with family and friends. For the full recipe, check out the complete details above. Cheese Ratios Getting the cheese mix just right makes a big difference. I love using three cheeses: ricotta, Parmesan, and mozzarella. Ricotta brings creaminess, Parmesan adds a salty punch, and mozzarella melts beautifully. Here’s my go-to ratio: - 1 cup ricotta cheese - 1/2 cup grated Parmesan cheese - 1 cup shredded mozzarella cheese This mix creates a rich filling that stays moist. Adjust the cheese to your taste! Baking Sheet Preparation Always line your baking sheet with parchment paper. This step prevents sticking and helps with cleanup. Place the pillows on the sheet with enough space between each one. They need room to puff up nicely. Thawing Tips Thaw your puff pastry in the fridge overnight. This keeps it cool and easy to handle. If you're in a hurry, leave it on the counter for about 30 minutes. Just don’t let it get too warm, or it will be hard to roll out. Rolling Out Tips When rolling out the pastry, use a floured surface. This keeps it from sticking. Roll gently and evenly to about 1/8 inch thick. If the edges shrink back, let it sit for a few minutes before rolling again. Pairing with Marinara Sauce Serve these pillows with warm marinara sauce. The sauce adds a fresh flavor that complements the cheesy filling. Place a small bowl of sauce next to the pillows for dipping. Garnishing Ideas For a beautiful finish, sprinkle fresh basil leaves on top after baking. The bright green color adds a nice touch. Plus, it brings a burst of flavor that makes each bite special. Try these tips to make your Chicken Parmesan Pillows even better! For the full recipe, check out the complete guide. {{image_2}} Alternative Cheeses You can swap cheeses based on your taste. Try using goat cheese for a tangy kick. Cream cheese can give a rich texture. Mix in some cheddar for a sharper flavor. You can also use vegan cheese for a dairy-free option. Different Protein Options If you want to change the protein, use turkey or cooked beef. Shredded pork works great too. For a plant-based choice, try chickpeas or lentils. These options still pack a punch of flavor. Adding Vegetables Want to add more nutrition? Toss in some chopped spinach, bell peppers, or mushrooms. These veggies blend well with the filling. They add color and health benefits. Try roasted zucchini for a different texture. Using Pesto Mix in some pesto for a fresh twist. This herb-packed sauce boosts flavor and adds moisture. You can use store-bought or homemade pesto. Just fold it into your cheese mix for a new layer of taste. Making it Gluten-Free To make this dish gluten-free, use gluten-free puff pastry. Many brands offer this option. Always check the labels to be sure they are safe. This way, everyone can enjoy these tasty pillows. Creating a Vegetarian Version For a vegetarian meal, skip the chicken. Use more cheese and add veggies instead. You can also use plant-based protein crumbles. This keeps the recipe hearty and satisfying without meat. For the full recipe, be sure to check out the detailed steps to create these tasty Chicken Parmesan Pillows. After you make Chicken Parmesan Pillows, store any leftovers in the fridge. Use an airtight container to keep them fresh. They stay good for about three days. If you want to keep them longer, freezing is a great option. Wrap each pillow in plastic wrap and place them in a freezer bag. This way, they stay fresh for up to three months. When it's time to eat your leftovers, you can use the oven or microwave. The oven gives the best results. Preheat it to 350°F (175°C). Place the pillows on a baking sheet and heat for about 15-20 minutes. This keeps the texture nice and crispy. If you use the microwave, heat them for 1-2 minutes. The microwave is faster but can make the pillows soft. Chicken Parmesan Pillows are best enjoyed fresh. However, when stored properly, they last in the fridge for about three days. If frozen, they are good for three months. Always check for any signs of spoilage before eating. If they look or smell off, it's best to throw them away. This way, you can enjoy your pillows safely. For the full recipe, check out the earlier section! To reheat Chicken Parmesan Pillows, use the oven. Preheat it to 350°F (175°C). Place the pillows on a baking sheet. Heat for about 10-15 minutes. This keeps them crispy. If you use a microwave, they may get soggy. Use a microwave only if needed. Yes, you can make Chicken Parmesan Pillows ahead of time. Prepare them completely and store them in the fridge. Cover them with plastic wrap. They stay fresh for about 24 hours. You can also freeze them before baking. This way, they last for up to three months. Check the color and size of the pillows. They should be golden brown and puffed up. The baking time is usually 20-25 minutes at 400°F (200°C). A good tip is to poke one with a fork. If the filling is hot, they are ready to eat. Absolutely! Feel free to swap out the cheeses. Use cheddar for a sharper taste. You might also try goat cheese for something different. Just remember to keep the mix creamy. Marinara sauce is perfect for dipping. It adds a nice tangy flavor. You can also try ranch or garlic aioli. Both options give a fun twist. You can enhance the flavor with extra herbs. Try adding fresh parsley or thyme to the filling. You can also add crushed red pepper for some heat. Mix it up to match your taste. Yes, kids love these pillows! They are fun to eat and packed with flavor. You can let your kids help with the filling. It makes a great family cooking activity. This recipe makes eight pillows. It serves about four people if everyone has two. You can easily double the recipe for a larger crowd. You learned how to make Chicken Parmesan Pillows. We covered the main ingredients, seasonings, and equipment needed. Then, we went through step-by-step instructions for perfecting this dish. Tips on variations and storage help you customize and keep them fresh. These pillows are fun and easy to make. With practice, you can impress your friends and family. Enjoy crafting delicious meals and experimenting with flavors. Happy cooking!

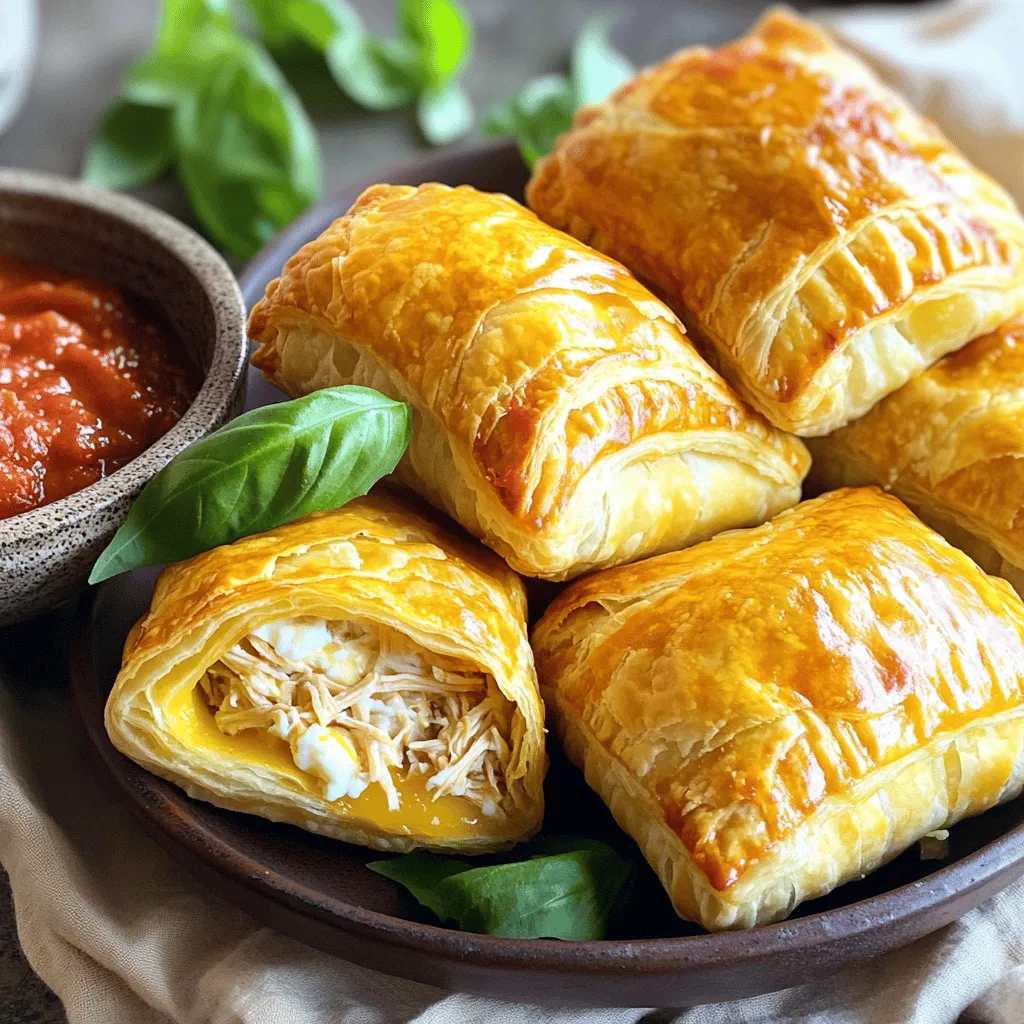
Craving a tasty treat that combines ease and flavor? Let me introduce you to Chicken Parmesan Pillows! These delightful bites are packed with shredded chicken, creamy cheeses, and savory seasonings, …

Read more

Categories Appetizers

Healthy Energy Balls Quick and Tasty Recipe Guide

May 11, 2025 by Chef Theo
- Rolled oats - Nut butter options - Sweeteners - Optional add-ins To make healthy energy balls, you need a few key ingredients. Let's break them down. Rolled oats form the base. They give energy and fiber. Use whole oats for the best taste. Nut butter options add creaminess and protein. Almond butter is my favorite, but peanut or cashew butter works too. Sweeteners make your energy balls yummy. Honey and maple syrup are great choices. They add just the right amount of sweetness. Optional add-ins can change the flavor. Try chia seeds for crunch or dark chocolate chips for a treat. Shredded coconut also adds nice texture. For the full recipe, see the section titled Nutty Power Bites. You will find all the steps to create these tasty energy balls. Mixing the base ingredients Start by taking a large mixing bowl. Add 1 cup of rolled oats, 1/2 cup of your favorite nut butter, and 1/4 cup of honey or maple syrup. Use a spatula or spoon to stir these ingredients together well. You want them to blend smoothly. This mix forms the base of your energy balls. Incorporating seeds and flavorings Next, add 1/4 cup of chia seeds, 1/4 cup of dark chocolate chips, and 1/2 teaspoon of cinnamon to the bowl. Sprinkle in a pinch of sea salt too. Stir everything until it is mixed evenly. This step adds flavor and nutrition to your energy balls. If you like coconut, fold in 1/2 cup of shredded coconut here. Forming the energy balls Now, it’s time to form the balls. Scoop out tablespoon-sized portions of the mixture using your hands. Roll them into round balls. You should make about 12-15 energy balls. Keep them compact so they hold together well. Refrigeration process Place the rolled energy balls on a baking sheet lined with parchment paper. This helps keep them from sticking. Now, you’ll want to refrigerate them for at least 30 minutes. This step helps them firm up. After they are set, you can enjoy them right away or store them in an airtight container in the fridge. They stay fresh for up to a week. For the full recipe, you can refer to the Nutty Power Bites section. Adjusting sweetness levels You can change the sweetness based on your taste. If you like it sweeter, add more honey or maple syrup. For less sweetness, cut back on these. Start with the amount in the Full Recipe. Taste as you mix. Choosing the right nut butter The nut butter can change the flavor and texture. Almond butter gives a nice, creamy feel. Peanut butter adds a classic taste. Sunflower butter is great for nut-free options. Pick what fits your taste or needs! Proper mixing techniques Mix well to blend all ingredients. Use a large bowl for easy stirring. I like to use my hands for the final mix. This helps combine everything well. You want a sticky texture to hold the balls together. Making in bulk Make a double batch to save time later. These energy balls are great for snacks. You will have them on hand for busy days. Just remember to adjust the storage time as needed. Storing for convenience Keep your energy balls in an airtight container. They last up to a week in the fridge. For longer storage, freeze them. Just take out what you need and let them thaw. This makes healthy snacking easy! {{image_2}} You can change up the flavor of your energy balls easily. Here are some great ideas: - Different nuts and seeds: Try using walnuts, pecans, or sunflower seeds. Each nut brings its own taste and health benefits. - Alternative sweeteners: Use agave syrup or coconut sugar instead of honey. These options can add unique flavors. - Unique flavor combinations: Mix in spices like ginger or nutmeg. You can also add vanilla extract for a warm taste. Many people have different diets. Here are ways to make energy balls fit those needs: - Vegan options: Swap honey for maple syrup. This keeps your energy balls vegan-friendly and just as tasty. - Gluten-free alternatives: Ensure your oats are gluten-free. This way, everyone can enjoy the treats. - Nut-free variations: Use sunflower seed butter instead of nut butters. This makes the recipe safe for those with nut allergies. By trying these variations, you can make energy balls that fit your taste and dietary needs. For the full recipe, check the Nutty Power Bites section above. To keep your energy balls fresh, use airtight containers. This keeps moisture out and flavor in. You can store them in the fridge or freezer. Refrigeration is great for short-term storage. If you want them to last longer, freeze them. Just remember to label the containers with the date. How long do they last? In the fridge, they stay good for about a week. If frozen, they can last up to three months. Signs of spoilage include a change in smell or a dry texture. Always check before you enjoy your Nutty Power Bites. How to make these energy balls vegan? To make these energy balls vegan, simply swap honey for maple syrup. Both sweeteners work well in this recipe. Also, ensure you use a plant-based nut butter. Almond, cashew, or peanut butter are all great choices. Can I substitute ingredients? Yes, you can easily substitute ingredients. If you don’t have rolled oats, try quick oats or even ground oats. Nut butter can be replaced with sun butter for a nut-free option. For chocolate chips, use dried fruit or seeds for a different flavor. What are the health benefits of energy balls? Energy balls offer many health benefits. They are rich in fiber, which helps digestion. They provide healthy fats from nuts and seeds, giving you long-lasting energy. Plus, the protein helps keep you full. Adding chia seeds boosts omega-3 intake as well. When to eat them You can enjoy energy balls at any time. They make a perfect snack before a workout or as a quick breakfast. They are great for lunchboxes or even as a sweet treat after dinner. Pairing suggestions for snacks or meals Pair them with yogurt or a smoothie for extra protein. You can also enjoy them with fresh fruit for a balanced snack. If you want a meal, add them to oatmeal or mix them into salad for a crunchy element. You learned how to create tasty, healthy energy balls. We covered ingredients, steps, and storage. You can easily adjust flavors and textures to fit your taste. Don’t forget to explore vegan or nut-free options. These bites are perfect for snacks or meals. They store well and last long when kept right. Enjoy making these energy balls in different ways. They are fun to share and great for any time!

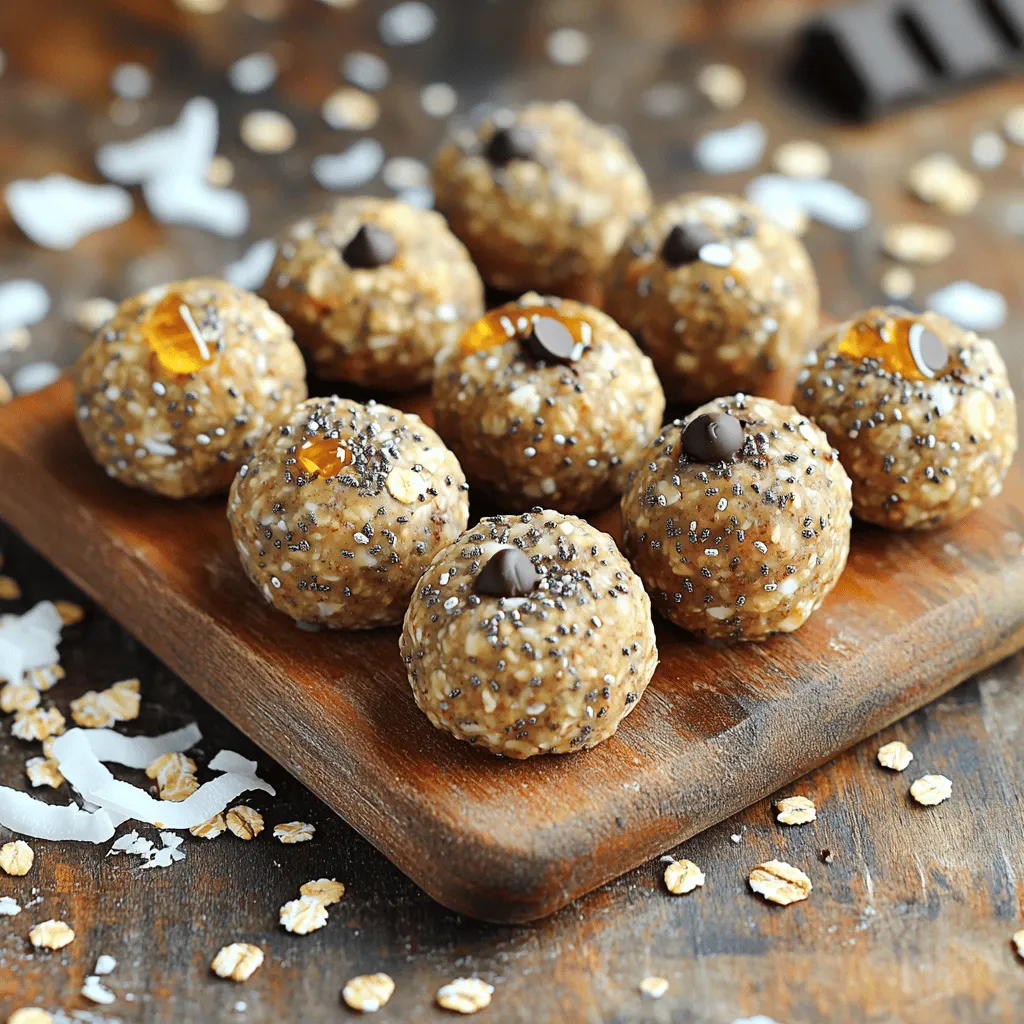
Are you looking for a quick, tasty snack that boosts your energy? You’ve come to the right place! In this guide, I’ll share my favorite recipes for healthy energy balls. …

Read more

Categories Appetizers

Fudgy Chocolate Brownie Cookies Rich and Chocolatey Treat

May 11, 2025 by Chef Theo
To make fudgy chocolate brownie cookies, gather these ingredients: - 1/2 cup unsalted butter, melted - 1 cup brown sugar, packed - 1/4 cup granulated sugar - 2 large eggs - 1 teaspoon vanilla extract - 1/2 cup all-purpose flour - 1/3 cup unsweetened cocoa powder - 1/2 teaspoon baking powder - 1/4 teaspoon salt - 1 cup semi-sweet chocolate chips - 1/2 cup chopped walnuts (optional) If you don’t have an ingredient, don’t worry! Here are some swaps: - Use coconut oil instead of butter for a dairy-free option. - Replace brown sugar with coconut sugar for a different flavor. - For eggs, try using a flaxseed meal or applesauce. Use 1 tablespoon of flaxseed mixed with 2.5 tablespoons of water per egg. - Use gluten-free flour instead of all-purpose flour for a gluten-free treat. - If you prefer, use dark chocolate chips instead of semi-sweet for a richer taste. Choosing the right ingredients makes a big difference. Here’s what to look for: - Use unsalted butter for better control over saltiness. - Select high-quality cocoa powder for a deeper chocolate flavor. - Choose fresh eggs for the best taste and texture. - Look for chocolate chips with 60% cocoa or higher for a richer flavor. - If using nuts, pick raw or lightly roasted walnuts for a fresh crunch. These tips help you create the best fudgy chocolate brownie cookies. For the full recipe, check the section above! To make these fudgy chocolate brownie cookies, start by gathering your ingredients. You will need: - 1/2 cup unsalted butter, melted - 1 cup brown sugar, packed - 1/4 cup granulated sugar - 2 large eggs - 1 teaspoon vanilla extract - 1/2 cup all-purpose flour - 1/3 cup unsweetened cocoa powder - 1/2 teaspoon baking powder - 1/4 teaspoon salt - 1 cup semi-sweet chocolate chips - 1/2 cup chopped walnuts (optional) Now, preheat your oven to 350°F (175°C). Line a baking sheet with parchment paper to prevent sticking. In a large bowl, mix the melted butter, brown sugar, and granulated sugar. Stir until you see no lumps. Next, add the eggs one at a time. Make sure to stir well after each egg. Then, mix in the vanilla extract. In another bowl, sift together the flour, cocoa powder, baking powder, and salt. This helps blend the dry ingredients. Gradually add the dry mix to the wet mixture. Stir just until combined. Be careful not to overmix; this keeps your cookies soft. Once your dough is ready, fold in the chocolate chips and walnuts if you’re using them. They add great texture and flavor. Using a tablespoon or cookie scoop, drop heaping tablespoons of dough onto your prepared baking sheet. Leave space between each cookie. They will spread while baking. Now, place the baking sheet in the preheated oven. Bake for 10 to 12 minutes. Look for the edges to set while the centers appear slightly underbaked. They will firm up as they cool. After baking, remove the cookies from the oven. Let them cool on the baking sheet for about 5 minutes. This makes them easier to move. Then, transfer the cookies to a wire rack to cool completely. For an extra special treat, serve these cookies warm. Add a scoop of vanilla ice cream on top. A drizzle of chocolate syrup makes it even better. You can find the full recipe for more details on how to enjoy these delicious cookies! To get that rich, fudgy texture, start with melted butter. It helps create moisture. Use brown sugar for a deeper flavor. Mix your dough just enough to combine all ingredients. Overmixing can lead to cake-like cookies, which we don’t want. Bake them until the edges are set. The centers should look a bit soft. This helps them stay fudgy after cooling. One mistake is using cold ingredients. Always use room temperature eggs for better mixing. Another common error is not measuring your ingredients correctly. Use a kitchen scale if you can. This ensures you have the right amounts. Don’t forget to let your cookies cool on the baking sheet for a few minutes. This helps them firm up without losing their fudgy centers. You can boost the flavor of your fudgy chocolate brownie cookies in fun ways. Add a pinch of espresso powder to intensify the chocolate. Try using dark chocolate chips for a richer taste. For a nutty twist, fold in walnuts or pecans. A sprinkle of sea salt on top before baking enhances the sweetness. These tips take your cookies from good to great! For the complete recipe, check the Full Recipe section. {{image_2}} To add a nutty twist, mix in chopped walnuts or pecans. Nuts add a nice crunch. They also enhance the flavor. You can use any nut you like. Almonds or hazelnuts work well too. Just be sure to chop them finely. This helps them blend with the cookie dough. You can swap out the semi-sweet chocolate chips for dark or milk chocolate. Each type brings a unique taste. Dark chocolate gives a rich, intense flavor. Milk chocolate offers a creamy sweetness. You can also use white chocolate chips for a fun twist. Try mixing different chocolates together for extra depth. Want to make these cookies gluten-free? Substitute all-purpose flour with almond flour or a gluten-free blend. For a dairy-free version, use coconut oil instead of butter. Make sure to choose dairy-free chocolate chips too. These changes still keep the cookies fudgy and delicious. You can enjoy the same great taste without any gluten or dairy. For the complete recipe, check out the Full Recipe section! To keep your fudgy chocolate brownie cookies fresh, place them in an airtight container. I like to layer parchment paper between the cookies. This helps to prevent them from sticking together. Store the container at room temperature. They will stay fresh for up to five days. If you want to keep them longer, consider freezing. If you want to freeze these cookies, first let them cool completely. Place them in a single layer on a baking sheet. Freeze them for about two hours. Once frozen, transfer the cookies to a freezer-safe bag. Be sure to remove as much air as possible. They can last in the freezer for up to three months. When you're ready to enjoy, thaw them at room temperature or warm them in the oven. To keep your cookies fresh, avoid exposing them to air. Use airtight containers or resealable bags. Adding a slice of bread inside the container can help keep them soft. Remember to store them away from heat sources. Heat can dry out cookies quickly. Always label your containers with the date you baked them. This way, you know how long they've been stored. For the full recipe, check back to create these delicious treats! Fudgy cookies have a rich, moist center. This comes from using melted butter and brown sugar. Brown sugar adds moisture and chewiness. The chocolate chips also melt during baking, creating pockets of gooey chocolate. When you bake them just right, the outside firms up, while the inside stays soft. That’s what makes every bite so delightful! Yes, you can use cocoa powder! It gives a deep chocolate flavor. However, cocoa powder alone may not create the same fudgy texture. To keep the fudgy quality, use a mix of cocoa powder and some melted chocolate. This combo will help your cookies stay rich and moist. These brownie cookies stay fresh for about a week at room temperature. Store them in an airtight container to keep them soft. If you want them to last longer, you can freeze them. Just place them in a freezer bag. They will stay good for up to three months. When you’re ready to enjoy, let them thaw on the counter. In this post, we covered how to make fudgy chocolate brownie cookies. We looked at key ingredients and how to choose the best ones. I gave tips on baking and cooling for the perfect texture. You learned how to avoid common mistakes and try fun variations like gluten-free options. Remember, fresh cookies taste best! Store them properly to keep that fudgy bite. Enjoy baking these cookies and sharing them with friends. You'll impress everyone with your skills!

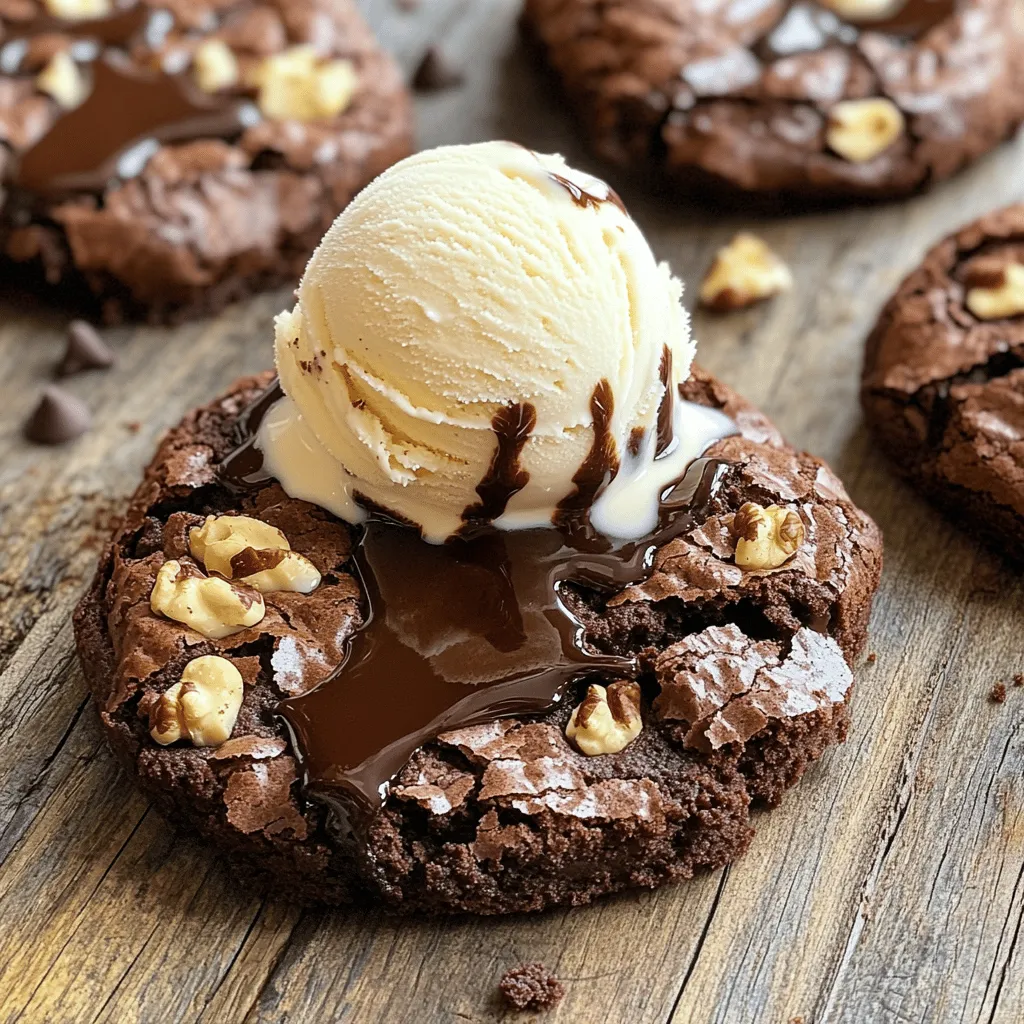
Get ready for a sweet adventure with my Fudgy Chocolate Brownie Cookies! These cookies blend the rich taste of brownies with the chewy goodness of cookies. In this post, I’ll …

Read more

Categories Desserts

Stunning Mongolian Ground Beef Noodles Delicious Recipe

May 11, 2025 by Chef Theo
Here’s what you need for stunning Mongolian ground beef noodles: - 1 lb ground beef - 8 oz egg noodles - 2 tablespoons vegetable oil - 1 onion, thinly sliced - 3 garlic cloves, minced - 1-inch piece ginger, minced - 1 bell pepper, sliced (any color) - 2 green onions, chopped - 3 tablespoons soy sauce - 1 tablespoon hoisin sauce - 1 tablespoon sesame oil - 1 teaspoon brown sugar - 1 teaspoon chili flakes (optional) - Salt and pepper to taste - Fresh cilantro for garnish To cook this dish well, gather these tools: - Large pot for boiling noodles - Skillet or wok for frying - Spatula for stirring - Measuring spoons for sauces - Knife and cutting board for chopping You can swap some ingredients if you need: - Use ground turkey or chicken instead of beef. - Try rice noodles if you prefer gluten-free. - Use any bell pepper color for a fun look. - If you don’t have hoisin sauce, soy sauce works too. - Green onions can be replaced with chives or shallots. This list gives you flexibility while keeping the dish tasty. For the full recipe, check the instructions above! To start, fill a large pot with water. Bring the water to a boil. Once boiling, add the egg noodles. Cook them based on the package instructions. You want them to be al dente, which means firm but cooked. After cooking, drain the noodles in a colander. Set them aside for now. Next, take a large skillet or wok. Heat two tablespoons of vegetable oil over medium-high heat. When the oil is hot, add one pound of ground beef. Cook it while breaking it apart with a spatula. You want it browned and fully cooked. If there’s extra fat, drain it off. This step keeps the dish light. Now, it's time to bring everything together. Add the sliced onion, minced garlic, and minced ginger to the beef. Sauté for about two to three minutes. You want the onion to look clear. Then, add the sliced bell pepper and half of the chopped green onions. Cook for another two to three minutes. The peppers should be tender. Next, stir in three tablespoons of soy sauce, one tablespoon of hoisin sauce, one tablespoon of sesame oil, and one teaspoon of brown sugar. If you like heat, add one teaspoon of chili flakes. Mix everything well. Finally, add the cooked noodles to the skillet. Toss everything together. You want the noodles to soak up all that tasty sauce. Cook for two more minutes to heat everything through. Taste and season with salt and pepper if needed. Serve hot, garnished with the remaining green onions and fresh cilantro. For the full recipe, check out the details above. To get the best noodles, cook them just right. Use boiling water and follow the package directions. You want them to be firm, not mushy. Drain the noodles well after cooking. Rinsing them with cold water helps stop the cooking. This keeps them from sticking together. Toss them in a bit of oil before mixing them with the beef. You can boost flavor with simple extras. Try adding more garlic or ginger for a kick. A splash of rice vinegar gives a nice tang. If you like spice, add more chili flakes to the mix. Fresh herbs like basil or mint also work well. They add brightness and freshness to the dish. Remember, balance is key, so taste as you go. When it's time to serve, make it look great! Use deep bowls to hold the noodles. Garnish with plenty of fresh cilantro and green onions. A sprinkle of sesame seeds adds a fancy touch. You can also serve with lime wedges for an extra zing. For a pop of color, add slices of red bell pepper on top. Check out the Full Recipe for more ideas! {{image_2}} You can make this dish without meat. Use mushrooms, tofu, or lentils. Each option adds unique flavors. For a hearty texture, try using portobello mushrooms. They absorb flavors well and offer a meaty bite. Tofu is another great choice. Press it to remove extra water, then cube it for cooking. Lentils can add protein and are very filling. Feel free to mix in your favorite veggies. Carrots, snap peas, or broccoli work great. Thinly slice carrots for a sweet crunch. Chop snap peas to add a fresh snap. Broccoli florets add color and nutrients. You can also use spinach or bok choy for a softer touch. Just add them when you cook the beef for best results. If you like heat, add more chili flakes. You can also use fresh chilies for more flavor. Sriracha or chili paste can spice things up too. Just stir in a bit when you mix the sauces. For a smoky flavor, try adding a dash of smoked paprika. Each spice can change the taste, so adjust to your liking. To keep your Mongolian ground beef noodles fresh, store them in an airtight container. Let the noodles cool down to room temperature before sealing. This helps prevent moisture buildup. Place the container in the fridge. Your dish will stay good for up to three days. When reheating, you have a few options. The microwave is quick and easy. Just place your noodles in a bowl, cover it, and heat for one to two minutes. Stir halfway through. You can also use a skillet. Heat a little oil over medium heat, add your noodles, and stir until hot. This way, you keep the texture nice. If you want to freeze your noodles, follow these steps. First, let them cool completely. Then, divide them into meal-sized portions. Use freezer bags or containers, making sure to remove as much air as possible. Label each bag with the date. Frozen noodles can last up to three months. When you’re ready to eat, thaw them overnight in the fridge. Reheat as mentioned earlier. Enjoy your meal! For the full recipe, check out the complete guide to making stunning Mongolian ground beef noodles. You can serve Mongolian ground beef noodles with simple sides. Try steamed broccoli or carrots for color and crunch. A fresh salad with a light dressing works well too. If you want more carbs, serve with rice or dumplings. Fresh cilantro on top adds a nice touch. Yes, you can make this dish gluten-free! Substitute regular soy sauce with tamari or coconut aminos. Use gluten-free egg noodles or rice noodles for a tasty swap. Check the hoisin sauce label too. Some brands offer gluten-free options. To change the spice level, start with fewer chili flakes. You can always add more if you want heat. For milder flavors, skip chili flakes altogether. If you like it spicy, try adding fresh chopped chili or a dash of hot sauce. Adjust to your taste for the perfect kick! This article shared key steps for making Mongolian Ground Beef Noodles. We discussed ingredients, tools, and cooking methods. You now have tips for better texture and flavor. I offered fun variations to try, plus storage and reheating advice. Remember, cooking is all about experimenting. Don't hesitate to make this recipe your own. Enjoy your cooking journey!

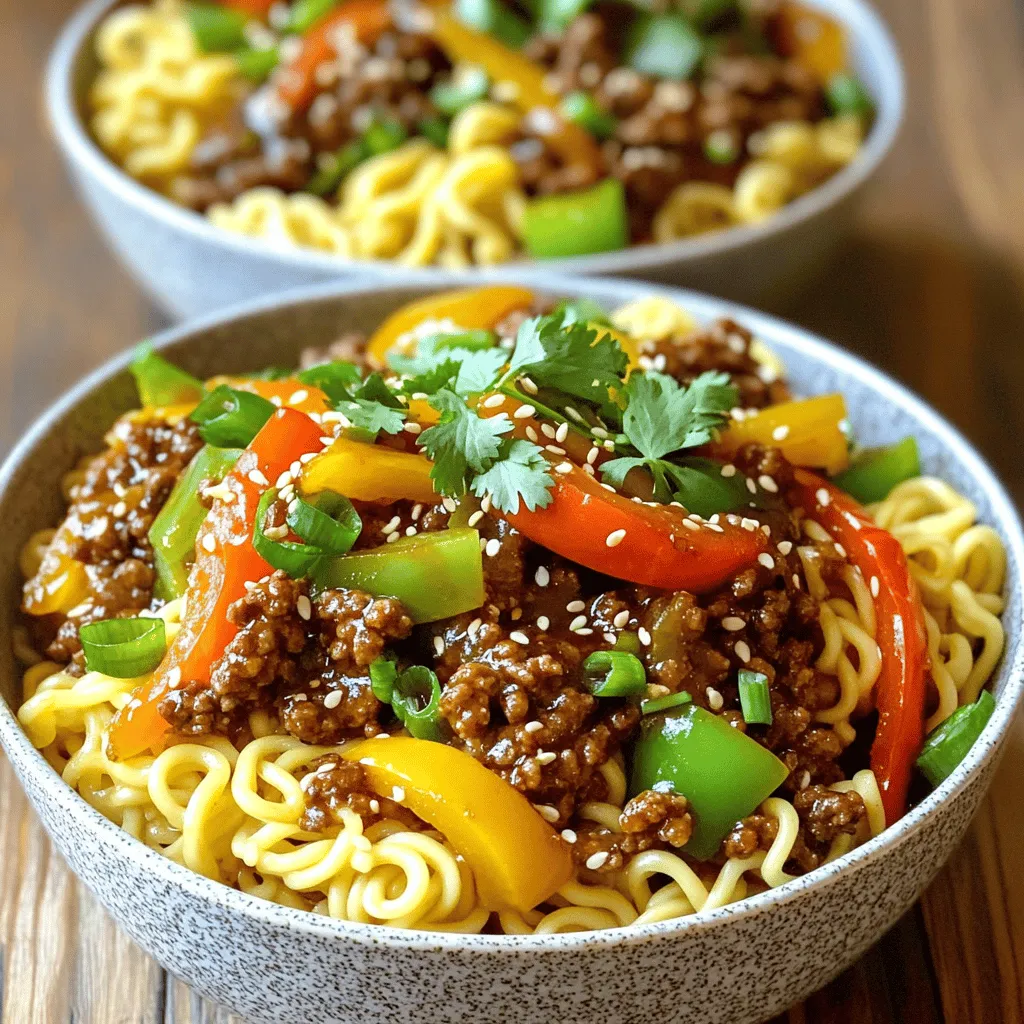
Are you ready to savor a delicious dish that will impress your family? This Stunning Mongolian Ground Beef Noodles recipe is easy to make and packed with flavor. You’ll learn …

Read more

Categories Dinner

Strawberry Danish Delight for Quick Sweet Treats

May 11, 2025 by Chef Theo
To make a delightful Strawberry Danish, gather these main ingredients: - 1 sheet of puff pastry (thawed) - 1 cup fresh strawberries, hulled and sliced - 1/4 cup sugar (plus more for sprinkling) - 1 tablespoon cornstarch - 1 teaspoon lemon juice - 1/2 teaspoon vanilla extract - 1 egg (for egg wash) - 4 oz cream cheese, softened - 2 tablespoons powdered sugar - 1 teaspoon almond extract - 1 tablespoon milk These ingredients create a sweet, flaky pastry filled with luscious strawberries and creamy cheese. If you want to add more flavor, consider these optional ingredients: - A pinch of salt enhances sweetness. - Fresh mint leaves for garnish brighten the dish. - A bit of cinnamon adds warmth and depth. These extras can elevate your Strawberry Danish to new heights. You can easily switch some ingredients for a twist: - Use frozen strawberries if fresh ones aren't available. - Swap cream cheese for mascarpone for a richer taste. - Try using a gluten-free puff pastry for a gluten-free option. Always keep your puff pastry cold before baking. This helps it puff up nicely. For a golden finish, brush the pastry edges with egg wash. Enjoy every bite of your Strawberry Danish! Start by preheating your oven to 400°F (200°C). Line a baking sheet with parchment paper. Take your thawed puff pastry and lay it on a lightly floured surface. Roll it out gently to smooth any creases. Cut the pastry into four rectangles. Place these rectangles on the lined baking sheet. In a bowl, mix 1 cup of sliced strawberries with 1/4 cup of sugar, 1 tablespoon of cornstarch, 1 teaspoon of lemon juice, and 1/2 teaspoon of vanilla extract. Toss the mixture until all the strawberries are coated. Let it sit for about 10 minutes. This will help the flavors blend and the strawberries to soften. In another bowl, combine 4 oz of softened cream cheese with 2 tablespoons of powdered sugar, 1 teaspoon of almond extract, and 1 tablespoon of milk. Mix this well until it's smooth and creamy. This mixture adds a rich layer to your danish. Using a knife, score a 1/2 inch border around each pastry rectangle. Be careful not to cut all the way through. This border will puff up nicely in the oven. Spread a spoonful of the cream cheese mixture in the center of each pastry, keeping it inside the scored border. Then, spoon the strawberry mixture over the cream cheese layer. Beat 1 egg in a small bowl for the egg wash. Brush the edges of each pastry with the egg wash and sprinkle a little sugar on top for extra sweetness. Bake in your preheated oven for 18-20 minutes. Watch for a golden brown color and puffy pastry. Once baked, remove them from the oven and let them cool slightly before serving. For more details, follow the Full Recipe. To make great puff pastry, keep it cold. Warm dough can lose its puff. Roll it out gently on a floured surface. This helps avoid tough spots. Always use a sharp knife for cutting. A dull knife crushes the layers. When baking, ensure your oven is fully heated. This helps the pastry rise beautifully. To avoid soggy pastries, use a thick filling. Drain any excess juice from fruits. You can also pre-bake the pastry for a few minutes. This gives it a head start. Brush the edges with egg wash. This seals in moisture and adds a nice shine. Serve your Strawberry Danish warm for the best taste. Dust with powdered sugar for a sweet touch. You can add fresh mint leaves on top. This adds color and a fresh flavor. Pair with a scoop of vanilla ice cream for a treat. For a fun twist, drizzle with chocolate sauce. Enjoy making your Strawberry Danish a showstopper! {{image_2}} You can switch up the filling for a creamy twist. Instead of just strawberries, use cream cheese. Just mix the cream cheese with some sugar and vanilla. This adds richness and a nice balance to the sweet strawberries. Spread the cream cheese mix on the pastry first. Then add your strawberry filling on top. This makes each bite extra tasty and creamy. For a nutty taste, try almond filling. You can make this by mixing almond paste with a bit of sugar and milk. Spread this mix on the pastry base. Layer the strawberries on top as usual. The almond flavor pairs well with the fruit. It gives a unique touch to your Danish and makes it stand out. If you need a gluten-free option, use gluten-free puff pastry. Many brands offer this now, and it works well. Follow the same steps in the Full Recipe. The taste and texture may vary a little, but you can still enjoy a delicious treat. Just make sure all your other ingredients are gluten-free too. This way, everyone can enjoy your Strawberry Danish! To keep your leftover Strawberry Danish fresh, place them in an airtight container. This helps prevent them from drying out. You can also wrap each Danish in plastic wrap before placing them in the container. Store them in the fridge for up to three days. To reheat your Danish, preheat your oven to 350°F (175°C). Place the Danish on a baking sheet. Heat for about 10-15 minutes until warm and crispy. You can use a microwave, but the pastry may turn soggy. If you prefer, you can cover the Danish with a damp paper towel in the microwave for about 20-30 seconds. If you want to save your Strawberry Danish for later, freezing works well. Wrap each one in plastic wrap, then place them in a freezer-safe bag. Label the bag with the date. You can freeze them for up to two months. To enjoy, thaw in the fridge overnight and reheat in the oven. For the full recipe, check out the Strawberry Bliss Danish! A Strawberry Danish is a sweet pastry made with puff pastry. It is filled with fresh strawberries and cream cheese. You bake it until golden brown. The result is a flaky, soft treat. It has a lovely mix of sweet and tangy flavors. Perfect for breakfast or dessert, it's a crowd-pleaser. You can find the full recipe online to try it at home. Yes, you can make some parts ahead. You can prepare the strawberry filling and the cream cheese mixture a day before. Store them in the fridge until you're ready to bake. However, I recommend baking them fresh for the best taste. The puff pastry puffs up nicely when baked just before serving. If stored properly, Strawberry Danish can last for about two days. Keep it in an airtight container at room temperature. For longer storage, you can freeze them. Just make sure to wrap them well to prevent freezer burn. When ready to eat, reheat in the oven for best results. Strawberry Danish pairs well with many things. You can serve it with whipped cream for extra sweetness. A scoop of vanilla ice cream is also a great choice. Additionally, fresh fruit or a drizzle of chocolate sauce adds a fun twist. Enjoy it with a cup of coffee or tea for a lovely treat! You learned about making a delicious Strawberry Danish. We covered the key ingredients, from the main ones to tasty variations. You now know how to prepare the puff pastry and the filling. You have tips for perfect results and ideas for storage. Remember, you can mix things up with different flavors. Enjoy creating your own version of this treat. Taking these steps will lead to a great pastry each time. Happy baking!

Are you craving a quick, sweet treat? Look no further! This Strawberry Danish recipe is simple, delicious, and perfect for satisfying your sweet tooth in no time. With a flaky …

Read more

Categories Desserts

Ground Beef Orzo Satisfying and Simple Recipe

May 11, 2025 by Chef Theo
To make a tasty Ground Beef Orzo, you need a few key ingredients. Here’s what you’ll need: - Ground beef - Orzo pasta - Vegetables (onion, garlic, bell pepper) - Canned or fresh tomatoes - Beef broth - Seasonings (oregano, paprika, salt, pepper) - Olive oil - Garnishes (parsley, Parmesan cheese) Each ingredient plays a special role. The ground beef adds flavor and protein. Orzo pasta gives the dish a nice texture. Fresh vegetables bring color and crunch. Tomatoes add moisture and tang. Beef broth enriches the taste. Seasonings boost the flavor. Olive oil helps cook the veggies and beef. Finally, parsley and Parmesan cheese make it look great and taste even better. Using fresh or high-quality ingredients makes a big difference. They can really enhance the dish. You can find most of these items at your local grocery store. If you want the full recipe, it’s easy to follow for a delicious meal! 1. Cooking the vegetables Start by heating olive oil in a large skillet over medium heat. Add the finely chopped onion and diced bell pepper. Sauté them for about 4-5 minutes until they soften. This step adds great flavor to your dish. 2. Browning the ground beef Next, add minced garlic and ground beef to the skillet. Cook the beef for 6-7 minutes. Break it up with a spoon as it cooks. You want it browned and fully cooked. Drain any excess fat if needed. 3. Combining ingredients Stir in the diced tomatoes and beef broth. Add dried oregano, paprika, salt, and pepper to taste. Bring everything to a simmer. This step melds the flavors together nicely. 4. Cooking the orzo Once simmering, add the orzo pasta to the pot. Stir everything well. Cover the pot and reduce the heat to low. Let it cook for about 10-12 minutes. Stir occasionally to prevent sticking. When the orzo is tender, take the pot off the heat. Let it sit for a few minutes. You can then sprinkle fresh parsley and serve with grated Parmesan cheese if you like. For the full recipe, check out the complete instructions. - How to prevent orzo from sticking To stop orzo from sticking, stir it often while it cooks. Also, using enough broth helps keep the pasta moist. If you find it sticks, add a small splash of water or broth. - Adjusting seasoning for taste Taste as you cook. Start with a pinch of salt and pepper. You can add more later. If you want a bolder flavor, try adding more paprika or oregano. - Using fresh vs. canned tomatoes Fresh tomatoes give a bright taste. They can be more juicy. Canned tomatoes are easy and quick. Both work well, so use what you have. - Prep work for efficiency Chop your veggies ahead of time. This cuts down on cooking time. You can also measure your spices before you start cooking. - One-pot cooking advantages Cooking everything in one pot saves time on cleanup. It also lets the flavors mix well. You get a tasty meal with less fuss! {{image_2}} You can switch up the meat in this dish. Turkey or chicken works well instead of beef. These meats are leaner but still tasty. Try ground turkey for a lighter option. If you want a vegetarian dish, use lentils or mushrooms. They add great texture and flavor. For gluten-free options, look for gluten-free orzo. Many brands offer this now, so you can still enjoy the pasta. You could also use rice or quinoa if you prefer. Both will soak up the flavors nicely. If you want to pack in more veggies, think about adding spinach or zucchini. You can even toss in some carrots for sweetness. Adding more vegetables makes the dish colorful and healthy. Pair your ground beef orzo with a fresh salad. A simple green salad with lemon vinaigrette works great. You can also serve it with crusty bread. This adds a nice crunch and helps soak up the sauce. For plating, consider using a shallow bowl. This allows the orzo to shine. Top it with fresh parsley for a pop of color. A sprinkle of grated Parmesan cheese adds richness. You could use a drizzle of olive oil for a touch of flavor. For the full recipe, check back to see how to make this dish come alive! To keep your ground beef orzo fresh, store it in an airtight container. This helps to lock in moisture and flavor. Place the container in the fridge if you plan to eat it within three days. For longer storage, freezing is great. To freeze ground beef orzo, let it cool completely. Then, divide it into portions and place them in freezer bags. Squeeze out as much air as you can before sealing the bags. Label them with the date and type of dish. This method can keep your meal good for up to three months. When it comes to reheating, you have two good options: the microwave or the stovetop. Microwave Method: - Place your portion in a microwave-safe dish. - Add a splash of water or broth to keep it moist. - Cover the dish with a microwave-safe lid or wrap. - Heat it for one to two minutes, stirring halfway through. Stovetop Method: - Add your orzo to a skillet over medium heat. - Pour in a bit of water or broth to help it heat evenly. - Stir it often until it’s heated through, usually about five to seven minutes. Both methods work well, but the stovetop keeps the texture better. Choose what fits your time and mood! For the full recipe, check the earlier sections. Can I make ground beef orzo ahead of time? Yes, you can make this dish ahead. Cook it fully and let it cool. Store it in a container. This way, you can reheat it later. It keeps well for busy days. How long does ground beef orzo last in the fridge? Ground beef orzo can last for about 3 to 4 days in the fridge. Store it in an airtight container. Always check for any signs of spoilage before eating. Can I adjust the spice level for ground beef orzo? Absolutely! You can add more spices or hot peppers for heat. If you prefer a milder taste, reduce the spices. Feel free to customize it to your liking. Caloric content per serving Each serving of ground beef orzo has about 450 calories. This is a hearty meal that will fill you up. Macronutrient breakdown - Protein: Approximately 25 grams - Carbohydrates: About 50 grams - Fat: Roughly 15 grams This dish gives a good balance of nutrients, making it a great choice for any meal. You can find the full recipe to try this delicious dish yourself! This blog post covered how to make a tasty ground beef orzo meal. We explored key ingredients, cooking steps, and useful tips. You learned about variations and serving ideas to make it your own. Proper storage and reheating methods were also discussed to keep your meal fresh. Cooking can be fun and easy with this recipe. Enjoy every bite and share it with friends! Remember, a good meal brings joy, so get cooking!

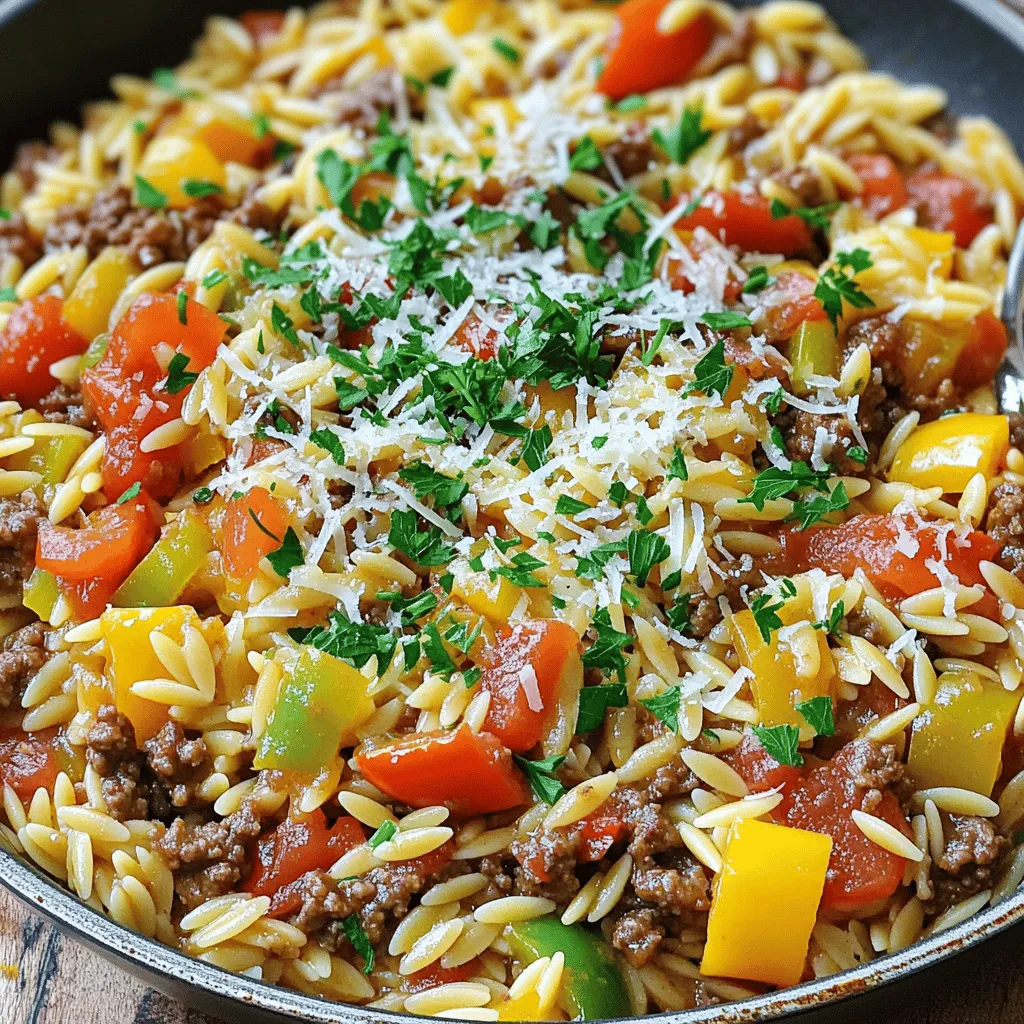
Looking for a meal that’s quick, tasty, and satisfying? Ground Beef Orzo is the perfect solution! This simple recipe combines hearty ground beef with tender orzo and fresh veggies, delivering …

Read more

Categories Dinner
Older posts
Newer posts
← Previous Page1 … Page78 Page79 Page80 … Page94 Next →

TOASTED RECIPES

Where ideas are warm, crisp, and ready to serve! 🍞

PAGES

Home About Contact Privacy Policy Terms & Conditions Cookie Policy GDPR Policy Copyright Policy Disclaimer

CATEGORIES

Appetizers Desserts Salads Breakfast Dinner

Contact

  • Pinterest
  • Mail
Copyright © 2025 Toasted Recipes. All rights reserved.