Skip to content
toastedrecipes.com
  • Home
  • Appetizers
  • Desserts
  • Salads
  • Breakfast
  • Dinner
  • Privacy Policy
  • Contact
  • About

Chef Theo

Creamy Garlic Tuscan Chicken Delightful Dinner Option

May 12, 2025 by Chef Theo
- 4 boneless, skinless chicken breasts - 2 tablespoons olive oil - 4 cloves garlic, minced - 1 cup heavy cream - 1 cup spinach, chopped - 1 teaspoon salt - 1/2 teaspoon black pepper - 1/2 cup chicken broth - 1/2 cup sun-dried tomatoes, chopped - 1/2 cup grated Parmesan cheese - 1 teaspoon dried Italian herbs In this recipe, the chicken breasts form the star of the dish. They cook up tender and juicy. Olive oil helps to get a nice sear on the chicken. Garlic adds a strong flavor that makes the dish special. Heavy cream gives the sauce its rich and creamy texture. Spinach brings in color and nutrition. To season, I use salt and pepper to enhance the chicken flavor. Chicken broth adds depth to the sauce. Sun-dried tomatoes introduce a sweet and tangy taste. Parmesan cheese melts beautifully, adding a savory finish. Dried Italian herbs tie all the flavors together, creating a truly delightful meal. For the full recipe, check out the complete instructions to bring this dish to life! 1. Season the chicken: Start by seasoning the chicken breasts with salt and black pepper on both sides. This simple step adds great flavor. 2. Sear the chicken: In a large skillet, heat olive oil over medium-high heat. When hot, add the chicken breasts. Cook for 5 to 7 minutes on each side. Look for a golden brown color. Once done, remove the chicken and set it aside. 1. Sauté garlic and veggies: In the same skillet, lower the heat to medium. Add minced garlic and sauté it for about one minute. You want it to smell great! Next, toss in the sun-dried tomatoes and chopped spinach. Cook for 2 to 3 minutes until the spinach wilts. 2. Make the cream sauce: Pour in the chicken broth. Use a wooden spoon to scrape any brown bits from the skillet. This adds flavor! Then, add the heavy cream and let it simmer gently. Stir in the grated Parmesan cheese and dried Italian herbs, letting the sauce thicken a bit. 1. Return chicken to sauce: Place the seared chicken back into the skillet. Spoon the creamy sauce over each piece. Let it simmer for about 5 minutes. This helps all the flavors mix well. 2. Serve and garnish: Plate each chicken breast individually. Drizzle some extra creamy sauce from the skillet over the top. Finish with fresh basil leaves for a pop of color and flavor. For the full recipe, check the details provided earlier. Enjoy this delightful dish! - Ensuring perfect sear: Start with a hot skillet and enough oil. This helps the chicken brown well. Place the chicken in the pan without crowding. Cook for 5-7 minutes on each side. Look for a golden color. This gives flavor and keeps the chicken juicy. - Checking chicken doneness: Use a meat thermometer. The internal temperature should reach 165°F (75°C). If you don’t have one, cut into the thickest part. The meat should be white, not pink. - Adding herbs or spices: You can mix in fresh or dried herbs. Basil, oregano, and thyme work well. Add them to the sauce for a flavor boost. You can also sprinkle some on the chicken while cooking. - Choosing cheese types: Parmesan cheese gives a rich taste. You can also try Asiago or Pecorino for something different. Just make sure to grate it finely so it melts easily. - Plating suggestions: Use a large plate to show off the chicken. Place it in the center and pour the creamy sauce around it. This makes the dish look more inviting. - Garnishing ideas: Fresh basil leaves add color and a fresh taste. You can also sprinkle some extra cheese on top. A few sun-dried tomatoes around the edge can make it pop. For more guidance, check out the Full Recipe. {{image_2}} You can change the protein in this dish. Turkey or shrimp works great. They both cook quickly and soak up flavors well. If you want a lighter option, try using chicken thighs instead of breasts. For a dairy-free choice, use coconut cream instead of heavy cream. This adds a sweet touch while keeping it creamy. Feel free to switch up the veggies. Adding bell peppers or mushrooms adds color and taste. You can also use kale instead of spinach for a different texture. Adjust the spice levels to your liking. If you enjoy heat, add red pepper flakes or cayenne pepper. For a milder dish, skip the extra spice. This creamy garlic Tuscan chicken shines over pasta or rice. The sauce clings nicely, making every bite delicious. You can also serve it in wraps or sandwiches. Just shred the chicken and mix it with the sauce. Add some fresh veggies for crunch, and you have a quick meal. Explore these options for fun twists on the dish. Check out the Full Recipe for more ideas. To store leftovers of creamy garlic Tuscan chicken, let it cool first. Place the chicken in an airtight container. This helps keep the flavors fresh. You can use glass or plastic containers. Both work well for storage. If you want to freeze it, use freezer-safe bags or containers. Portion the chicken into single servings. This makes it easy to thaw only what you need. When you are ready to eat, thaw it overnight in the fridge. This way, you keep the quality and taste. In the fridge, creamy garlic Tuscan chicken lasts for about three days. If you freeze it, it can last for up to three months. Just remember to label the containers with dates. This helps you keep track of freshness. Creamy Garlic Tuscan Chicken is a rich and tasty dish. It features chicken breasts cooked in a creamy garlic sauce. The sauce has sun-dried tomatoes and spinach, adding flavor and color. The Parmesan cheese thickens the sauce, making it smooth and delicious. This dish brings the tastes of Italy to your dinner table. Yes, you can prepare Creamy Garlic Tuscan Chicken ahead of time. Cook the chicken and sauce as usual. Let it cool, then store it in the fridge. When you’re ready to eat, just reheat it gently on the stove. This method saves time and keeps the flavors rich. You can serve this dish with many sides. Fresh pasta or rice works well to soak up the sauce. A crisp salad adds a nice crunch. Roasted vegetables also pair nicely, giving your meal balance. Garlic bread can help complete the meal, adding a comforting touch. To reheat, use a skillet on low heat. Add a splash of chicken broth or cream to keep it moist. Stir gently until it’s hot all the way through. You can also use a microwave. Heat in short bursts, stirring in between, to avoid overcooking. In this post, we explored how to make Creamy Garlic Tuscan Chicken. We covered key ingredients, like chicken, garlic, and spinach, and detailed the steps for cooking and serving. I shared tips to ensure perfect taste and great presentation. Variations help you customize the dish to fit your needs. Store leftovers properly to enjoy them later. I hope you feel ready to cook this simple, tasty dish today! It's perfect for any meal and sure to impress.

If you’re looking for a simple yet delightful dinner option, my Creamy Garlic Tuscan Chicken is your answer! This dish blends juicy chicken with rich flavors, creating a meal your …

Read more

Categories Dinner

Feta Spinach Stuffed French Bread Irresistible Treat

May 12, 2025 by Chef Theo
To make the best feta spinach stuffed French bread, gather these ingredients: - 1 large French bread loaf - 1 cup fresh spinach, chopped - 1 cup feta cheese, crumbled - 1/2 cup cream cheese, softened - 1/4 cup sour cream - 2 tablespoons olive oil - 2 cloves garlic, minced - 1/4 teaspoon red pepper flakes (optional) - Salt and pepper to taste - Fresh parsley, chopped (for garnish) Each ingredient plays a key role in creating a rich and tasty filling. The spinach adds freshness, while feta brings a salty bite. Cream cheese and sour cream make the mixture creamy and smooth. Olive oil helps sauté the garlic and spinach, adding depth to the flavors. You can adjust the red pepper flakes for a little heat, or skip them if you prefer milder tastes. Lastly, fresh parsley gives a beautiful touch when you serve your dish. For full details, check the Full Recipe. - Preheat your oven to 375°F (190°C). Line a baking sheet with parchment paper. - In a skillet, heat 2 tablespoons of olive oil over medium heat. Add 2 cloves of minced garlic. Sauté for about 1 minute until you smell the garlic. - Add 1 cup of chopped fresh spinach to the skillet. Cook until it wilts, about 2-3 minutes. Remove from heat and let it cool for a bit. - In a mixing bowl, combine the wilted spinach, 1 cup of crumbled feta cheese, 1/2 cup of softened cream cheese, and 1/4 cup of sour cream. If you want some heat, add 1/4 teaspoon of red pepper flakes. Mix well until all ingredients blend. Season with salt and pepper to taste. - Take 1 large French bread loaf and slice it in half lengthwise. This creates a top and bottom half. Hollow out some bread from the center of each half. This makes room for your filling. - Spread the spinach and feta mixture evenly on the bottom half of the French bread. Place the top half back on and gently press down. - Wrap the stuffed loaf in aluminum foil. Place it on your prepared baking sheet. Bake in the preheated oven for 15 minutes. - After 15 minutes, carefully remove the foil. Bake for an additional 10 minutes. This step makes the bread crispy and golden. - Once baked, remove from the oven and let it cool for a few minutes. Slice it into pieces before serving. - Garnish with chopped fresh parsley for a nice touch. Enjoy your Feta Spinach Stuffed French Bread! For the full recipe, refer to the instructions above. - Choosing the right bread: Use a large, fresh French bread loaf. A good crust adds flavor. Look for one that feels light and sounds hollow when tapped. This helps the stuffed bread hold up well. - Ensuring filling balance: Mix creamy and salty flavors. The feta and cream cheese create a smooth base. Add spinach for freshness and a pop of color. Adjust salt to taste, as feta is naturally salty. - Tips for hollowing out the bread: Slice the bread in half lengthwise. Use a sharp knife to remove some of the inside. Leave enough bread on the sides for support. This creates a nice pocket for the filling. - Pairing with sides or dips: Serve with a simple salad or a bowl of soup. A yogurt dip or tzatziki adds a cool touch. These pair well with the warm, savory bread. - Ideal occasions for serving: This dish shines at parties or casual gatherings. It's great for game day or family dinners. You can even serve it as a fun appetizer at a potluck. - How to garnish beautifully: After baking, sprinkle fresh parsley on top. This adds color and a fresh taste. You can also add a drizzle of olive oil for extra richness. This dish is a delightful treat that brings joy to any table. For the complete recipe, check the Full Recipe. {{image_2}} You can change the cheese for a new flavor. Try using goat cheese or ricotta. They add a creamy texture and taste great. You can also mix in herbs like dill or basil. A pinch of oregano gives a nice touch. If you love spice, add some cayenne pepper or smoked paprika for a kick. For veggies, consider mushrooms or bell peppers. They blend well with the spinach and cheese. If you want a vegan version, use tofu instead of cheese. You can blend the tofu with nutritional yeast for a cheesy taste. Substitute the cream cheese with cashew cream or coconut yogurt. For gluten-free bread, use gluten-free French bread. You can find this at many stores now. If you're on a low-carb diet, try using a cauliflower bread or a low-carb wrap. These swaps keep the dish tasty and fun for everyone! To keep your feta spinach stuffed French bread fresh, follow these easy tips: - Refrigeration: Wrap the leftover bread tightly in plastic wrap or aluminum foil. Store it in the fridge for up to 3 days. The bread will stay soft with this method. - Freezing: For longer storage, freeze the stuffed bread. Wrap it well in plastic wrap and then in foil. It can last up to 2 months in the freezer. Be sure to label it with the date. When you're ready to enjoy your leftovers, reheating is key. Here’s how to do it right: - Best methods for reheating: Preheat your oven to 350°F (175°C). Remove the wrapping and place the bread on a baking sheet. Heat for about 10-15 minutes. This keeps the bread crispy. - Avoiding sogginess or over-drying: If you notice the bread is getting soggy, place it on a wire rack while reheating. This allows air to circulate and keeps the crust nice. If it seems too dry, you can sprinkle a bit of water on the bread before wrapping it in foil. This helps it stay moist. How to make Feta Spinach Stuffed French Bread? To make this dish, you need to gather your ingredients. First, preheat your oven to 375°F (190°C). Sauté minced garlic in olive oil until fragrant, then add chopped spinach and cook until wilted. Mix this with feta, cream cheese, sour cream, and seasonings. Hollow out the French bread, fill it with the mixture, and bake wrapped in foil. After 15 minutes, uncover and bake for 10 more minutes until golden. Can I prepare this dish in advance? Yes, you can prepare it ahead. Make the filling a day prior and store it in the fridge. You can stuff the bread just before baking. This saves time and lets the flavors blend nicely. What are the best sides to serve with this recipe? This stuffed bread pairs well with a fresh salad or a bowl of soup. You can also serve it with a yogurt dip or a side of roasted veggies. The bread is filling, so lighter sides work best. What if my filling is too runny? If your filling is too runny, add more feta or cream cheese. You can also mix in some breadcrumbs to absorb excess moisture. This will help firm it up without losing flavor. How to fix overcooked French bread? If your bread is overcooked, you can try to revive it. Wrap the bread in a damp paper towel and microwave for a few seconds. This adds moisture back into the bread, making it softer. What to do if the bread is too crusty? If the bread is too crusty, slice it thinner next time. You can also add butter or oil on the crust before baking. This keeps it soft while still getting that nice golden color. For the full recipe, please check the earlier section in this article. You learned the key ingredients and steps to make Feta Spinach Stuffed French Bread. Remember, cooking is about balance and creativity. Use my tips for better results and tasty variations. Don’t forget to store leftovers properly! This dish is perfect for any occasion, from parties to family dinners. I hope you feel confident to try your version of this recipe. Enjoy your cooking adventure and make delicious memories!

Are you ready to elevate your snack game? Let’s dive into making Feta Spinach Stuffed French Bread, an irresistible treat that combines rich flavors and comforting textures. This quick and …

Read more

Categories Appetizers

Cheesecake Deviled Strawberries Delightful and Easy Treat

May 12, 2025 by Chef Theo
To make Cheesecake Deviled Strawberries, you need simple and fresh items. Here’s what you will need: - 12 large fresh strawberries - 8 oz cream cheese, softened - 1/4 cup powdered sugar - 1 teaspoon vanilla extract - 1/4 cup graham cracker crumbs - Zest of 1 lemon - Pinch of salt These ingredients create a creamy and sweet filling that pairs perfectly with strawberries. The cream cheese adds richness, while the lemon zest gives a bright, fresh taste. While the strawberries are great on their own, you can add some fun touches. Consider these optional garnishes: - Fresh mint leaves - Extra graham cracker crumbs - A drizzle of chocolate or caramel These add color and extra flavor to your treat. They also make your dessert look fancy! Having the right tools makes the process easy. Here are some helpful items: - Mixing bowl - Hand mixer or whisk - Small paring knife or melon baller - Piping bag or small spoon - Serving platter Using these tools will help you prepare and serve your Cheesecake Deviled Strawberries like a pro! For the full recipe, you can refer to the recipe list above. First, you need to wash the strawberries. Rinse them under cold water and pat them dry with a paper towel. Next, cut off the green tops. Be careful here! You want to keep the base intact. Now, take a small paring knife or a melon baller to hollow out the insides. Make sure to leave enough strawberry around the sides. This gives you a nice shell to hold the filling. In a mixing bowl, add the softened cream cheese. Then, pour in the powdered sugar and vanilla extract. Don’t forget the lemon zest and a pinch of salt! Mix these ingredients well. You want a smooth and creamy texture. A hand mixer works best, but a whisk will do. Once smooth, gently fold in the graham cracker crumbs. This gives a nice cheesecake texture to the filling. Now it’s time to fill the strawberries. Use a piping bag or a small spoon for this. Fill each hollowed strawberry generously. You want a good amount of that delicious cheesecake filling in every bite! After filling them all, place the strawberries on a serving platter. If you like, sprinkle some graham cracker crumbs on top for extra crunch. For a finishing touch, add fresh mint leaves on top. They look pretty and add a nice flavor. Enjoy your Cheesecake Deviled Strawberries! For the complete recipe, check the Full Recipe section. When picking strawberries, look for bright red color. The berries should feel firm but not hard. Check for a shiny skin without bruises or dark spots. Fresh strawberries smell sweet. Always choose berries with green leaves. They should not be wilted or brown. To make a smooth cheesecake filling, start with room temperature cream cheese. Cold cream cheese can make lumps in your mix. Blend well until it’s creamy. Use a hand mixer or a whisk for best results. Add powdered sugar and vanilla extract next. Mix until fully combined. This will give you a silky texture that fills the strawberries perfectly. To make your dessert look great, use a nice serving platter. Place the filled strawberries neatly on it. You can sprinkle graham cracker crumbs on top for extra flair. Garnishing with fresh mint leaves adds color and freshness. Lay the leaves near each strawberry. This will make your dish eye-catching and fun. For the full recipe, check the earlier section. {{image_2}} You can easily change the flavor of your cheesecake filling. Try adding chocolate or caramel for a sweet twist. Mix in melted chocolate chips or a swirl of caramel sauce. This will give your strawberries a rich taste. You can also use flavored extracts like almond or coconut. These small changes can add a big impact. While strawberries are great, you can use other fruits too. Ripe blueberries or raspberries work well. Other options include hollowed-out peaches or plums. Each fruit brings its own flavor and look. This gives you many ways to enjoy this treat. Think about what fruits are in season for the best taste. If you want a lighter treat, try using low-fat cream cheese. This keeps the same creamy texture but cuts down on calories. You can also use Greek yogurt for a different take. It adds a nice tanginess while still being rich. For a dairy-free option, look for vegan cream cheese. These choices make this recipe fit many diets. To keep your cheesecake deviled strawberries fresh, store them in an airtight container. Place parchment paper between layers to avoid sticking. Keep the container in the fridge. This helps maintain their flavor and texture. Avoid storing them at room temperature, as they spoil quickly. These tasty treats stay fresh in the fridge for up to two days. After that, the strawberries may lose their crunch. The cheesecake filling also may start to separate. For the best taste, enjoy them within this time frame. I do not recommend freezing cheesecake deviled strawberries. The strawberries lose their texture when thawed. However, you can freeze the cheesecake filling. Just store it in a sealed container or a freezer bag. When ready to use, thaw it in the fridge, then fill fresh strawberries. This way, you enjoy the best taste and texture! Yes, you can make Cheesecake Deviled Strawberries ahead of time. Prepare them a few hours in advance. Store them in the fridge to keep them fresh. This way, they stay cool and ready to enjoy. Just make sure not to fill them too early. The strawberries might get soggy if filled too soon. You can use other fruits like blueberries, raspberries, or peaches. These fruits add a unique twist. They also pair well with the cream cheese filling. For a fun mix, try using a variety of fruits. This adds color and flavor to your plate. To prevent strawberries from leaking, hollow them out carefully. Avoid cutting too deep into the sides. Use fresh strawberries that are firm and dry. If you fill them right before serving, they’ll stay intact. You can also place them in the fridge until serving time. Enjoy your Cheesecake Deviled Strawberries! For the complete recipe, check the Full Recipe. You learned how to make Cheesecake Deviled Strawberries using simple steps. We covered key ingredients, tools, and tasty variations to suit your taste. I shared tips for fresh strawberries and smooth filling, plus storage options for leftovers. These delightful treats are easy to prepare and sure to impress. Enjoy experimenting with flavors and garnishes to make them your own. Get ready to share these delicious bites with friends and family!

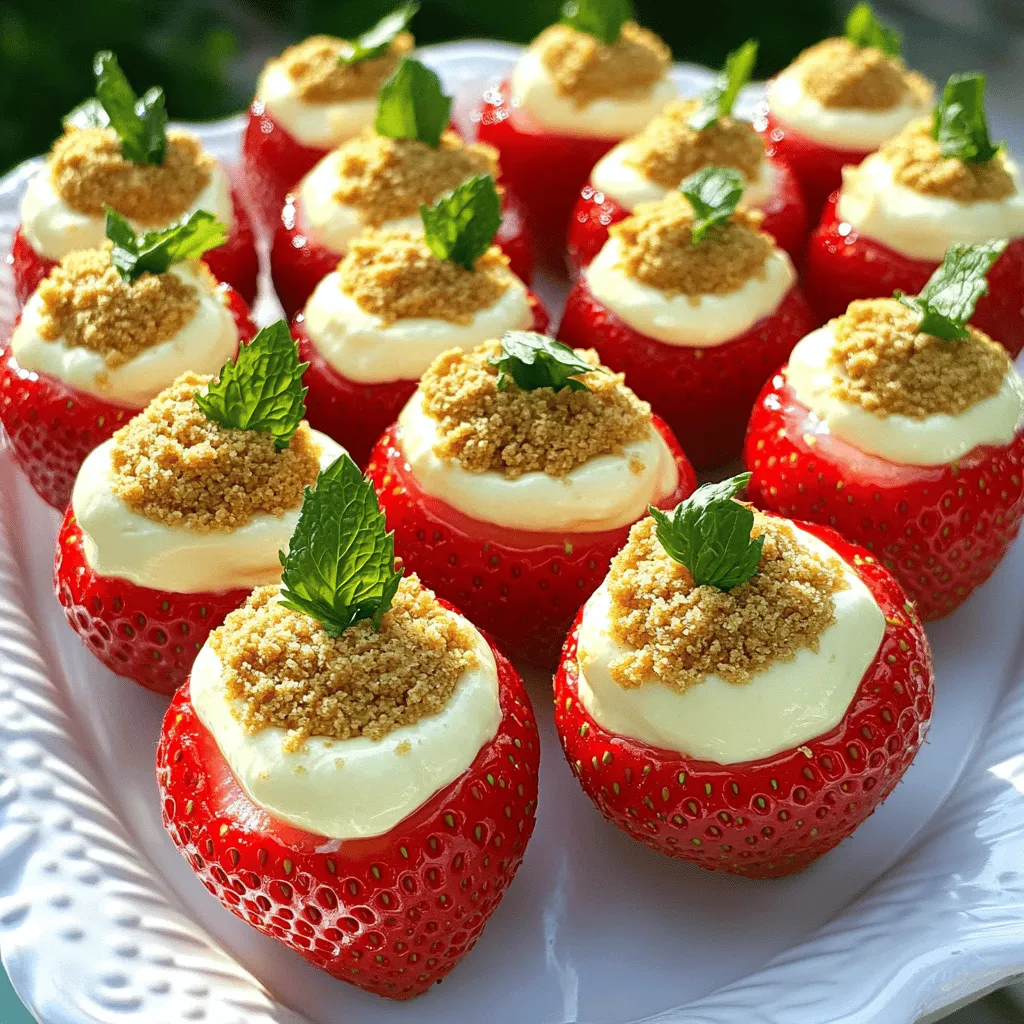
Looking for a fun and tasty treat? Cheesecake Deviled Strawberries are perfect for you! They combine sweet strawberries with a creamy cheesecake filling. Plus, they are quick and easy to …

Read more

Categories Desserts

Italian Custard Bomboloni Delightful and Soft Treat

May 12, 2025 by Chef Theo
To make these delightful treats, you will need: - 2 cups all-purpose flour - 2 tablespoons granulated sugar - 1 teaspoon instant yeast - 1/2 teaspoon salt - 1/2 cup whole milk, warmed - 2 tablespoons unsalted butter, melted - 2 large egg yolks - 1 teaspoon vanilla extract - Vegetable oil, for frying - Powdered sugar, for dusting - For the custard filling: - 1 cup whole milk - 1/4 cup granulated sugar - 2 tablespoons cornstarch - 2 large egg yolks - 1 teaspoon vanilla extract Each ingredient plays a key role in the magic of bomboloni: - Flour gives structure. All-purpose flour works best. - Sugar adds sweetness and helps the dough rise. - Yeast makes the dough light and fluffy. - Salt enhances flavor and balances sweetness. - Milk brings moisture and richness to the dough. - Butter adds a nice buttery flavor and softens the dough. - Egg yolks provide color and richness. - Vanilla extract adds warmth and sweetness to the custard. - Vegetable oil is essential for frying, giving the bomboloni that crispy outside. - Powdered sugar makes for a lovely finish and adds sweetness. If you have special dietary needs, here are some swaps: - Gluten-free flour can replace all-purpose flour for a gluten-free option. - Dairy-free milk, like almond or oat milk, works instead of whole milk. - Coconut oil can replace unsalted butter for a dairy-free option. - Egg substitutes, such as flaxseed meal or applesauce, can replace egg yolks for a vegan version. - Natural sweeteners, like honey or maple syrup, can replace granulated sugar for a healthier choice. These swaps help you enjoy bomboloni no matter your diet! For the full recipe, check the steps in this article. 1. Start by mixing your flour, sugar, instant yeast, and salt in a bowl. This is the dry mix. 2. In another bowl, whisk together the warmed milk, melted butter, egg yolks, and vanilla. This is your wet mix. 3. Slowly mix the wet ingredients into the dry mix. Stir until a soft dough forms. 4. Knead the dough on a floured surface for about 5-7 minutes. You want it smooth and elastic. 5. Place the dough in a lightly greased bowl. Cover it with a cloth and let it rise in a warm area for about 1 hour. It should double in size. 6. While waiting, let’s make the custard filling. Heat the milk in a saucepan until it just boils. Then remove it from heat. 7. In a separate bowl, whisk together the sugar, cornstarch, and egg yolks. 8. Slowly pour the hot milk into the egg mixture while whisking. This keeps the eggs from cooking too fast. 9. Put the mixture back in the saucepan over medium-low heat. Stir constantly until it thickens, about 2-3 minutes. Add the vanilla and mix well. 10. Transfer the custard to a bowl. Cover it with plastic wrap and let it cool completely. 11. Once the dough has risen, punch it down. Roll it out to about 1-inch thick. Cut circles with a cookie cutter or glass. 12. Place the circles on a floured surface. Cover them and let them rise for another 30 minutes. 13. Heat vegetable oil in a deep pan to 350°F (175°C). Fry the bomboloni in batches until golden brown, about 2-3 minutes on each side. 14. Remove them from the oil and drain on paper towels. 15. After they cool, fill a piping bag with custard. Inject it into each bomboloni through a small slit. 16. Dust with powdered sugar before serving. - Knead the dough until it feels smooth. This helps develop gluten for a better texture. - If your kitchen is cool, try placing the dough in an oven with the light on. The warmth helps the dough rise faster. - Don’t rush the rising process. A slow rise makes the dough fluffier and tastier. - Start with whole milk for a rich flavor. It makes the custard creamy. - Use cornstarch to thicken the custard. It gives a nice, smooth texture. - Always whisk the egg yolks and sugar first. This helps to combine them well before adding hot milk. - Be careful when adding hot milk to the egg mix. Whisking constantly prevents the eggs from curdling. - Once the custard thickens, cool it completely before filling the bomboloni. This keeps the dough from getting soggy. For the full recipe, check the detailed instructions and get ready to enjoy these delightful treats! To get light and fluffy bomboloni, use these tips: - Use fresh yeast: Fresh yeast helps the dough rise well. - Warm milk: Warm milk activates the yeast for a better rise. - Knead well: Knead the dough until it feels smooth and elastic. This helps develop gluten. - Let it rise twice: Allow the dough to rise once, then again after shaping. This makes it airy. Avoid these common errors for the best results: - Overworking the dough: This can make bomboloni tough. Knead gently. - Skipping the first rise: Don’t rush! Letting it rise is key to fluffiness. - Too hot oil: Oil that is too hot can burn the outside while leaving the inside raw. Aim for 350°F (175°C). - Not cooling the custard: If the custard is warm, it can melt the dough. Always cool it completely before filling. Filling bomboloni with custard can be tricky: - Use a piping bag: A piping bag makes it easier to fill each bomboloni. - Make a small slit: Create a tiny slit in the bomboloni to insert the tip of the piping bag. - Fill gently: Squeeze the custard inside slowly until you feel it fill up. Stop before it bursts! - Dust with powdered sugar: Dusting right before serving adds a nice touch and keeps them looking fresh. For a full recipe, refer to the section above. Enjoy your cooking adventure! {{image_2}} You can make your Italian custard bomboloni even more fun with different flavors! Here are some tasty ideas: - Chocolate: Add cocoa powder or melted chocolate to the custard mix. - Lemon: Mix in lemon zest and a touch of juice for a zesty kick. - Coffee: Use strong brewed coffee or espresso for a rich flavor. - Nutella: Fill your bomboloni with creamy Nutella for a sweet twist. These flavor combinations add a new layer to your bomboloni. You can mix and match to find your favorite! Toppings can change the whole look and taste of your bomboloni. Here are some ideas: - Sprinkles: Add colorful sprinkles for a festive touch. - Coconut: Dust with shredded coconut for a tropical vibe. - Cinnamon Sugar: Mix cinnamon and sugar for a warm, cozy flavor. - Chocolate Glaze: Drizzle melted chocolate on top for a rich finish. These options let you play with flavors and textures. You can even combine them for a tasty surprise! Serving your bomboloni can be a fun experience! Here are some ways to enjoy them: - Coffee or Tea: Pair your bomboloni with a hot cup of coffee or tea. - Fruit Compote: Serve with a side of berry compote for tartness. - Ice Cream: Top with a scoop of vanilla ice cream for a dessert delight. - Fresh Berries: Add fresh strawberries or raspberries for a fruity touch. These ideas help you create a delightful dessert spread. Feel free to mix and match your favorites. For more detailed instructions, check the Full Recipe. To keep bomboloni fresh, place them in an airtight container. This stops moisture from getting in. You should store them at room temperature for up to two days. If you want them to last longer, put them in the fridge. They will stay good for about a week in the fridge. Just remember, the longer they sit, the less soft they become. Always dust them with powdered sugar just before serving. If you have leftover bomboloni, you can reheat them easily. Use a microwave for about 10-15 seconds. This warms them up well. If you want them crispy again, use an oven. Preheat it to 350°F (175°C). Place bomboloni on a baking sheet for about 5 minutes. They will taste fresh and soft. You can freeze bomboloni for later use. Wrap each one tightly in plastic wrap. Then, put them in a freezer-safe bag. They can stay in the freezer for up to three months. For the custard, store it in a separate container. It will freeze well too. Just make sure it is cool before you freeze it. When you want to eat them, thaw in the fridge overnight. Reheat as mentioned above for the best taste. For a detailed recipe, check out the Full Recipe above. Bomboloni comes from Italy. These sweet treats are popular in Tuscany. They are often filled with creamy custard or jam. Many people enjoy them during festivals. They are also great for breakfast or dessert. The name "bombolone" means "big bomb." This refers to their round shape. Each bite is soft and delicious, making them a favorite for many. Yes, you can make Bomboloni ahead! You can prepare the dough a day before. Let it rise, then shape it into circles. Cover and store in the fridge overnight. The next day, let them rise again before frying. If you want to make them fully, fry and fill them. Store filled Bomboloni in an airtight container. They will stay fresh for one day. To make the custard thicker, use more cornstarch. Adding an extra tablespoon will help. For a creamier filling, use heavy cream instead of milk. You can also cook it longer to thicken. Stir constantly to avoid lumps. Whisk well for a smooth texture. If you want more flavor, add a bit more vanilla extract. This will enhance the taste and make it richer. In this article, we covered how to make delicious Italian Bomboloni. We explored the key ingredients and their roles, shared a step-by-step recipe, and provided helpful tips. You learned about variations, storage tips, and common questions. Making Bomboloni is simple and fun. Whether you stick to classic custard or try new flavors, these treats will impress. Have fun experimenting in the kitchen and enjoy every fluffy bite.

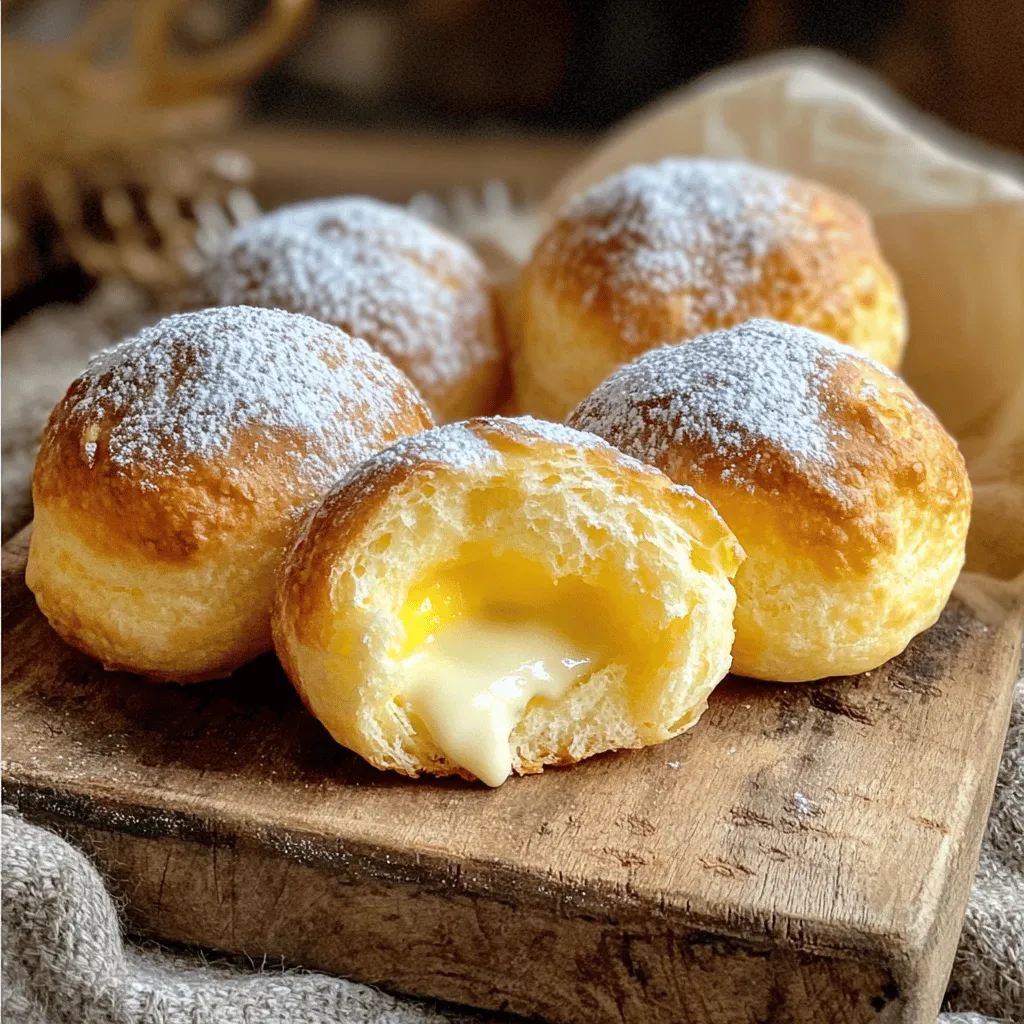
Are you ready to indulge in a sweet Italian treat? In this post, I’ll guide you through the magic of making Italian Custard Bomboloni. These soft, fluffy doughnuts filled with …

Read more

Categories Desserts

Mozzarella Pepperoni Croissant Rolls Easy and Tasty Snack

May 12, 2025 by Chef Theo
- 1 package (8 oz) refrigerated croissant dough - 1 cup fresh mozzarella cheese, shredded - 1 cup sliced pepperoni - 1/2 cup marinara sauce (for dipping) - 1 teaspoon Italian seasoning - 1 egg, beaten (for egg wash) - Fresh basil leaves for garnish (optional) - Olive oil spray - Baking sheet - Parchment paper - Small saucepan - Pastry brush When I make Mozzarella Pepperoni Croissant Rolls, I always gather my ingredients first. It keeps me organized and makes cooking easy. The dough is soft and flaky. Fresh mozzarella adds a creamy texture, while pepperoni brings a savory kick. I love to serve these rolls warm with marinara sauce for dipping. For tools, I use a baking sheet lined with parchment paper. The parchment keeps the rolls from sticking and makes cleanup a breeze. A small saucepan warms the marinara sauce nicely. The pastry brush helps spread the egg wash for a shiny finish. You really need these items to make cooking simple and fun. Using fresh and quality ingredients makes a big difference in taste. When you use the right tools, you set yourself up for success in the kitchen. These rolls are sure to impress family and friends. For the complete recipe, check out the Full Recipe section. - Set oven to 375°F (190°C). - Prepare baking sheet with parchment paper. - Unroll the croissant dough and separate it into triangles. - On the wide end, add about 2 tablespoons of shredded mozzarella cheese. - Place 2-3 slices of pepperoni on top of the cheese. - Sprinkle a pinch of Italian seasoning for extra flavor. - Start at the wide end and roll each croissant tightly towards the pointed end. - Make sure the filling stays inside while you roll. - Place each rolled croissant on the prepared baking sheet, leaving space between them. - Brush the tops with the beaten egg for a golden look. - Lightly spray with olive oil to make them crispy. - Bake for 12-15 minutes until golden brown. Enjoy these tasty bites warm with marinara sauce on the side for dipping. For the complete recipe, check the Full Recipe section. To get that perfect golden look, use an egg wash. Brush the tops of the croissants with the beaten egg. This gives them a shiny, crisp finish. You can also spray them lightly with olive oil. This step adds extra crunch and makes them golden. Want to spice things up? You can add more seasonings to the filling. Try garlic powder or red pepper flakes for some heat. You can also switch up the cheese. Cheddar or provolone can add a unique taste to the rolls. These rolls taste great with sides. Serve them with a fresh salad or crispy veggies. For presentation, place the rolls on a nice plate. Drizzle a little marinara sauce around them for a pop of color. You can even add fresh basil leaves on top for a touch of green. For the full recipe, check out the details above! {{image_2}} You can change the filling in your mozzarella pepperoni croissant rolls to mix things up. Try different meats like ham or turkey. You can also use veggies like spinach or mushrooms. For cheese alternatives, consider using cheddar or gouda. Each choice gives a new taste and texture. If you need a gluten-free option, use gluten-free croissant dough. Many brands make dough that tastes great and works well. For vegan substitutions, swap mozzarella with a plant-based cheese. You can replace pepperoni with vegan sausage or even marinated tofu. These changes keep the flavor while meeting dietary needs. These croissant rolls make great appetizer bites. Cut them into smaller pieces for easy sharing. They also work well as a main dish. Serve them with a salad or some roasted vegetables on the side. This allows you to create a full meal that everyone will enjoy. For the full recipe, check out the details above. To store leftover croissants, place them in an airtight container. This keeps them fresh longer. You can also wrap them in plastic wrap for extra protection. The croissants stay good in the fridge for about 2-3 days. After that, they may lose their taste and texture. To reheat your croissants, use an oven or toaster oven. Preheat the oven to 350°F (175°C). Place the croissants on a baking sheet. Heat for about 5-7 minutes. This method keeps them crispy. Avoid using the microwave. It makes them soft and chewy. For the best results, check them often. Enjoy your Mozzarella Pepperoni Croissant Rolls warm and tasty! To make these rolls, start with homemade dough. You will need flour, yeast, water, salt, and butter. Mix the yeast with warm water until it bubbles. Add flour and salt, then knead until smooth. Let it rise in a warm spot for an hour. Roll it out, fold in butter, and shape it into layers. Cut the dough into triangles, fill them, and roll as before. Yes, you can freeze the rolls. For best results, freeze them before baking. Place the filled rolls on a baking sheet and freeze until firm. Then transfer them to a freezer bag. When ready, bake them straight from the freezer. If you bake first, let them cool, then freeze. Reheat in the oven for crispiness. These rolls are great with many dips. Try using ranch or garlic butter. You can also serve them with pesto or a spicy aioli. Experiment with your favorite sauces to find what you love best. Each dip adds a fun twist to the flavors! This blog post provided a clear recipe for making mozzarella pepperoni croissant rolls. You learned about ingredients, cooking tools, and step-by-step instructions. I also shared tips on flavor variations and serving ideas. In conclusion, these rolls are easy to make and fun to share. Customize them to suit your taste and enjoy with friends and family. Don't forget to store leftovers properly for later! Happy cooking!

Craving a fun and tasty snack? Look no further! Mozzarella Pepperoni Croissant Rolls are easy to make and packed with flavor. Using just a few simple ingredients, you can whip …

Read more

Categories Appetizers

Salted Caramel Chocolate Cookies Irresistible Treat

May 12, 2025 by Chef Theo
- 1 cup all-purpose flour - 1/2 cup unsweetened cocoa powder - 1/2 teaspoon baking soda - 1/4 teaspoon salt - 1/2 cup unsalted butter, softened - 1/2 cup granulated sugar - 1/2 cup brown sugar, packed - 1 large egg - 1 teaspoon vanilla extract - 1 cup semi-sweet chocolate chips - 1/2 cup caramel sauce (store-bought or homemade) - Sea salt flakes for garnish For these salted caramel chocolate cookies, use simple and fresh ingredients. The dry ingredients create the cookie's base. Flour and cocoa powder give the cookie its structure and rich chocolate taste. Baking soda helps it rise while salt enhances the flavors. The wet ingredients include softened butter, which adds creaminess. Granulated sugar and brown sugar provide the right amount of sweetness. The egg binds everything together, and vanilla extract gives the cookies a warm flavor. Don’t forget the mix-ins! Semi-sweet chocolate chips add melty goodness. The caramel sauce brings a sweet and salty twist. Lastly, sea salt flakes on top make each bite truly special. For the full recipe, refer to the instructions above. Get ready to enjoy these delicious cookies! - Preheat the oven to 350°F (175°C). - In a medium bowl, whisk together: - 1 cup all-purpose flour - 1/2 cup unsweetened cocoa powder - 1/2 teaspoon baking soda - 1/4 teaspoon salt - In a large bowl, beat together: - 1/2 cup unsalted butter, softened - 1/2 cup granulated sugar - 1/2 cup brown sugar until light and fluffy. - Add to the butter mixture: - 1 large egg - 1 teaspoon vanilla extract. - Mix until smooth. - Gradually add the dry ingredients to the wet ingredients. - Fold in: - 1 cup semi-sweet chocolate chips. - Using a tablespoon, drop rounded balls of dough onto a baking sheet. - Space them about 2 inches apart. - Create small indentations in the center of each cookie. - Fill with: - 1/2 cup caramel sauce. - Bake for 10-12 minutes until the edges set. - Remove and sprinkle with sea salt flakes while warm. - Let cool for 5 minutes before transferring to a wire rack. I shared the full recipe so you can see how easy it is! Enjoy baking these delicious salted caramel chocolate cookies! To make your cookies soft and chewy, don't overmix the dough. Mix just until the dry ingredients disappear. This keeps the cookies tender. Chill the dough for at least 30 minutes. This helps the cookies hold their shape while baking. For added flair, drizzle extra caramel on top after baking. It makes for a nice presentation. Using flavored sea salt can elevate the taste. Try smoked salt or chocolate-infused salt for a fun twist. Overbaking or underbaking can ruin your cookies. Keep an eye on them during the last few minutes. Aim for slightly underbaked centers. Also, double-check your ingredient measurements. Even a small mistake can change the outcome of your cookies. For the full recipe, follow the steps closely to enjoy those delicious salted caramel chocolate cookies. {{image_2}} You can easily make these cookies even better. Try adding nuts or toffee bits for a crunch. Walnuts or pecans work great. You can also swap chocolate types. Use dark chocolate for a richer taste. White chocolate can give a sweet twist. If you need gluten-free cookies, use almond flour instead of regular flour. This change keeps the taste amazing. For vegan treats, you can replace butter with coconut oil. Swap the egg with flaxseed meal mixed with water. Both options work well and keep the cookies tasty. Want to celebrate the seasons? In fall, add pumpkin spice for a cozy flavor. Just a teaspoon is enough. For winter holidays, try peppermint extract. It adds a festive touch. You can even mix in crushed candy canes for extra fun. To keep your salted caramel chocolate cookies fresh, store them in an airtight container. This step keeps moisture out and helps maintain a chewy texture. If you live in a warm area, refrigeration is a good idea. Just make sure to allow them to come to room temperature before enjoying. You can freeze baked cookies to enjoy later. Place cooled cookies in a single layer in a freezer-safe bag. Make sure to seal it well to keep out air. When you want to eat one, take it out and let it thaw at room temperature for about 30 minutes. You can also pop it in the microwave for a few seconds to warm it up. These cookies last about a week at room temperature. Keep an eye on them for signs of staleness. If they feel hard or dry, it's time to toss them. The goal is to enjoy them while they’re still soft and delicious. If you need a butter substitute, try these options: - Coconut oil: Use it in equal amounts for a slight coconut flavor. - Vegan butter: This works well for a similar texture and flavor. These substitutes will keep your cookies rich and tasty. Yes, you can skip cocoa powder! Here are some ideas: - Vanilla extract: Increase the amount to enhance flavor. - White chocolate chips: Swap in for a sweet twist. You can still enjoy delicious cookies without cocoa. Making caramel sauce is easy! Follow these steps: 1. In a saucepan, heat 1 cup of sugar over medium heat. 2. Stir constantly until it melts and turns amber. 3. Carefully add 1/2 cup of heavy cream and stir until smooth. 4. Remove from heat and add a pinch of salt. Let it cool before using in your cookies. This sauce will add sweetness and a lovely texture. In this post, we covered a simple cookie recipe with dry and wet ingredients, mix-ins, and toppings. I shared tips for perfect texture and common baking mistakes to avoid. I also listed fun variations and storage info to keep your cookies fresh. With this knowledge, you can create delicious cookies that suit your taste. Enjoy baking and experimenting with flavors!

Get ready to indulge in the decadent world of salted caramel chocolate cookies! This recipe combines rich chocolate, gooey caramel, and a hint of sea salt for a treat you …

Read more

Categories Desserts

Pistachio and Coffee Mini Cheesecakes Tasty Delight

May 11, 2025 by Chef Theo
To make these delicious pistachio and coffee mini cheesecakes, you need: - 1 cup pistachios, shelled and chopped (plus extra for garnish) - 1 cup cream cheese, softened - 1/2 cup granulated sugar - 1/4 cup sour cream - 2 tablespoons coffee granules (dissolved in 2 tablespoons hot water) - 1 teaspoon vanilla extract - 1/2 teaspoon almond extract - 1/2 cup whipped cream (for topping) - 12 mini graham cracker crusts Each ingredient plays a key role in the taste and texture. The cream cheese gives the cheesecake its rich flavor. The sugar adds sweetness, while sour cream keeps it smooth. Coffee granules add a nice kick, and pistachios give a crunchy twist. The vanilla and almond extracts enhance the overall flavor. If you need swaps, here are some ideas: - You can use unsweetened Greek yogurt instead of sour cream. - For a nut-free option, replace pistachios with sunflower seeds. - Use decaf coffee granules if you want to skip the caffeine. - If you don’t have graham cracker crusts, try crushed cookies or even a sponge cake base. These substitutions help keep the spirit of the recipe alive while fitting your needs. First, gather all your ingredients. You need pistachios, cream cheese, sugar, sour cream, coffee granules, and extracts. The mini graham cracker crusts complete the recipe. Preheat your oven to 325°F (163°C). Line a muffin tin with mini cupcake liners to hold the cheesecakes. In a medium bowl, mix the cream cheese and sugar. Use a hand mixer on medium speed for about 2-3 minutes until it’s smooth and fluffy. Next, add the sour cream, dissolved coffee granules, vanilla extract, and almond extract. Blend them well until fully combined. Stir in the chopped pistachios, making sure they are mixed evenly in the batter. Now, it’s time to fill the crusts. Divide the cheesecake batter among the mini graham cracker crusts in your muffin tin. Bake them for 15-20 minutes. The edges should be set, but the centers can still jiggle a bit. This jiggle is key! After baking, let the mini cheesecakes cool in the pan for 10 minutes. This step is essential to prevent cracking. Then, transfer them to a wire rack to cool completely. Once cooled, refrigerate the mini cheesecakes for at least 2 hours. This time helps them set properly. After that, you can top each one with whipped cream and a sprinkle of chopped pistachios for extra flair. For the full recipe, refer to the earlier section. Enjoy your tasty delight! To make great mini cheesecakes, start with soft cream cheese. This helps mix well. Use a hand mixer for a smooth batter. Mix until it’s fluffy and light. Always preheat your oven to the right temperature. This ensures even baking. Don’t skip the cooling step. Let them rest in the pan before moving them to a wire rack. Refrigerate them for at least two hours. This helps the flavors blend and set. One big mistake is overbaking the mini cheesecakes. They should be slightly jiggly in the center when done. Another mistake is not letting them cool enough. If you rush this, they may crack. Avoid using cold cream cheese; it won’t mix well. Also, don’t skip the garnishing. A sprinkle of pistachios on top adds a nice look and flavor. The key to a creamy texture lies in the mixing. Blend your batter until it’s smooth and airy. Adding sour cream helps keep it rich and creamy. Use a gentle folding method when mixing in the pistachios. This keeps your batter fluffy. Finally, chilling the mini cheesecakes is crucial. The longer they chill, the firmer and creamier they become. For more detailed steps, check out the Full Recipe. {{image_2}} You can play with the flavors in these mini cheesecakes. Try swapping pistachios for walnuts or almonds. For a fruity twist, add raspberry or lemon zest to the batter. If you love chocolate, mix in cocoa powder or top with chocolate shavings. The coffee adds depth, but you can use espresso or flavored coffee for different notes. Each twist gives a new taste. You can make these mini cheesecakes fit your diet. For a gluten-free option, use gluten-free graham cracker crusts. If you want a vegan version, replace cream cheese with a plant-based alternative. Use coconut cream instead of sour cream and a vegan whipped topping. Make sure the coffee granules you choose are also vegan-friendly. These swaps keep the flavor while fitting your needs. Toppings can elevate your mini cheesecakes. You can use whipped cream for a classic look. Sprinkle extra chopped pistachios for crunch. Fresh berries, like strawberries or blueberries, add color and freshness. For a fancy touch, drizzle melted chocolate or caramel. You could also use edible flowers for a beautiful presentation. These details make each cheesecake a work of art. For the full experience, check out the Full Recipe for Pistachio & Coffee Mini Cheesecakes. To keep your pistachio and coffee mini cheesecakes fresh, place them in an airtight container. If they are not topped with whipped cream, they can stay in the fridge for a few days. If you have topped them with whipped cream, cover them gently to avoid squishing. Always use a clean spoon when serving to keep them safe from germs. These mini cheesecakes last for about 4 to 5 days in the fridge. After that, they might lose their flavor or get too soft. If you want them to last longer, freezing is the best option. To freeze your mini cheesecakes, place them in a single layer on a baking sheet. Freeze them until solid, about 2 hours. Once frozen, move them to a freezer-safe container. They can stay frozen for up to 2 months. When you're ready to enjoy, let them thaw in the fridge overnight. This keeps their texture and flavor intact. For the full recipe, check back to see how easy they are to make! You know your mini cheesecakes are done when the edges look set. The center should still jiggle a bit. This means they will firm up as they cool. Overbaking can make them dry, so keep an eye on them. I recommend checking at 15 minutes. If they look good, give them a few more minutes. Yes, you can make these mini cheesecakes ahead of time! They store well in the fridge for up to three days. Just make sure to cover them tightly. You can also freeze them for up to a month. When ready to eat, thaw them overnight in the fridge. This makes them perfect for parties or special events. If you don’t have coffee granules, try instant coffee instead. It gives a similar flavor. You can also use espresso powder for a stronger taste. If you want a coffee-free option, use cocoa powder for a chocolate twist. Just remember to adjust the amount based on your taste. For the full recipe, check the previous section! In this post, we covered the key steps to making perfect mini cheesecakes. We discussed the ingredients you need, how to prepare them, and the baking process. I shared tips to avoid common mistakes and achieve a great texture. Remember, you can make flavor variations and even adapt these for special diets. Store them properly to keep them fresh. With this guide, you're now set to bake delicious mini cheesecakes that everyone will love. Enjoy your baking and impress your friends!

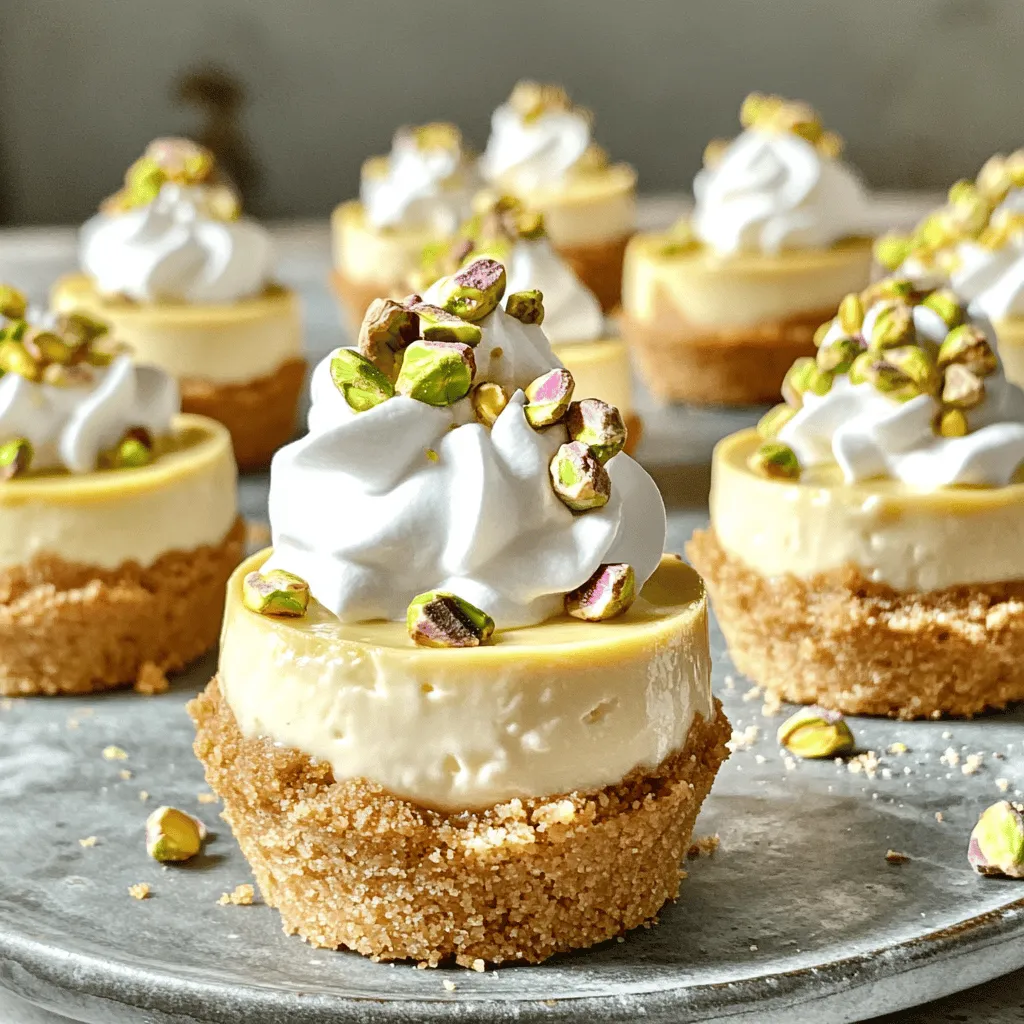
Indulge your sweet tooth with my Pistachio and Coffee Mini Cheesecakes Tasty Delight! These little bites pack a punch of flavor perfect for coffee lovers and dessert fans alike. In …

Read more

Categories Desserts

Philly Cheesesteak Cheesy Bread Flavorful Delight

May 11, 2025 by Chef Theo
To make Philly cheesesteak cheesy bread, you need the right ingredients. Here is the list: - Large baguette or Italian loaf - Ribeye steak, thinly sliced - Olive oil - Green bell pepper, sliced - Onion, sliced - Mozzarella cheese, shredded - Provolone cheese, shredded - Mayonnaise - Garlic powder - Salt and pepper - Fresh parsley, chopped for garnish (optional) Each ingredient plays a key role in creating that rich, savory flavor. The ribeye steak gives it a hearty base, while the cheeses add creaminess. The peppers and onions bring freshness and crunch, balancing the dish. Using good quality bread ensures a crispy crust that holds everything together. I recommend using a large baguette or Italian loaf for the best results. For more detailed steps, check out the Full Recipe. You will find the magic behind this tasty treat! 1. First, preheat your oven to 375°F (190°C). This is key for a perfect bake. 2. Gather your ingredients: ribeye steak, green bell pepper, onion, and cheese. 3. In a large skillet, heat 1 tablespoon of olive oil over medium-high heat. 4. Add the sliced green bell pepper and onion to the skillet. Cook for about 5 minutes until they soften. 1. Now, add the thinly sliced ribeye steak to the skillet. 2. Season with salt, pepper, and 1 teaspoon of garlic powder. 3. Cook until the steak is browned, about 3-4 minutes. 4. Mix well until everything is combined and remove from heat. 1. Cut the large baguette or Italian loaf in half lengthwise. 2. Hollow out some bread from the center to make a space for filling. 3. Spread 2 tablespoons of mayonnaise inside each half of the bread for extra flavor. 4. Spoon the steak mixture evenly into each half of the bread. 5. Top with 2 cups of mozzarella cheese and 1 cup of provolone cheese. Make sure to cover it well for that melty goodness. 1. Place the cheesy bread on a baking sheet. 2. Bake in the preheated oven for about 10-12 minutes. 3. Look for the cheese to be melted and bubbly. 4. Once done, remove from the oven and let it cool for a minute. 5. Slice into portions and enjoy your flavorful Philly cheesesteak cheesy bread. For a full experience, check the Full Recipe! To make the best Philly cheesesteak cheesy bread, you need the right bread. A large baguette or an Italian loaf works great. These breads are sturdy and can hold the filling well. Make sure to choose a bread with a nice crust. This adds flavor and texture. When hollowing the bread, use a serrated knife. Cut the bread in half lengthwise, then scoop out some of the soft inside. Leave enough bread on the sides to keep it strong. This will help keep your filling in place. Cooking the steak right is key to a tender bite. Use ribeye steak for its rich flavor and tenderness. Slice the steak thinly. This will help it cook quickly and evenly. Cook it in a hot skillet for just a few minutes. This way, you keep the juices in. For the cheese to melt perfectly, keep the oven at 375°F (190°C). This temperature is ideal for a nice, gooey melt. Bake the cheesy bread for 10 to 12 minutes. You want the cheese to bubble and turn golden. To make your cheesy bread pop, try adding spices. Garlic powder is a must for that extra kick. You can also add some black pepper and a pinch of salt. If you want a bit more flavor, consider adding a dash of smoked paprika or oregano. For serving, you can drizzle sauces on top. A bit of hot sauce gives a nice kick. You can also serve it with a side of ranch or marinara for dipping. These little touches make your dish even better! For the full recipe, check out the details above. {{image_2}} You can enjoy a scrumptious vegetarian version of Philly cheesesteak cheesy bread. Instead of ribeye steak, use mushrooms or tempeh. These ingredients add a hearty texture. You can also mix in vegetables like spinach or zucchini. They boost flavor and nutrition, making the dish vibrant and tasty. For a fiery twist, add jalapeños or a splash of hot sauce. These ingredients bring heat that pairs well with the cheese. Using pepper jack cheese instead of mozzarella is another great idea. This cheese adds a creamy texture and spicy kick. Your taste buds will thank you for this flavorful upgrade! Exploring different cheese blends can take your dish to the next level. Try using gouda or cheddar for a unique flavor. Each cheese offers a distinct taste that changes the dish. Mixing cheeses can create a creamy and rich topping. I recommend experimenting to find your favorite combo. Remember, cheese lovers can never go wrong! For the full recipe, check out the detailed instructions to make this delightful dish. To store leftovers, wrap the cheesy bread tightly in plastic wrap or foil. This keeps it fresh and prevents it from drying out. Place it in an airtight container for extra protection. When you want to reheat, preheat your oven to 350°F (175°C). Warm it for about 10 minutes. This will keep the bread crispy and the cheese melty. You can freeze Philly cheesesteak cheesy bread for later. First, let it cool completely. Wrap each piece in plastic wrap, then foil. This helps prevent freezer burn. You can store it in the freezer for up to three months. When you’re ready to eat, let it thaw in the fridge overnight before reheating. In the fridge, this cheesy bread lasts about three days. After that, it may lose its taste and texture. Always check for signs of spoilage. Look for mold or an off smell. If anything seems off, it’s best to throw it away. Enjoy your full recipe while it’s fresh! Yes, you can! If you don’t have ribeye, feel free to use other meats. Thinly sliced sirloin or chicken works well. For a twist, try pork or turkey. Each option adds its own flavor. Just make sure to season them well. This keeps the dish tasty and enjoyable. To keep the bread crispy, scoop out some of the inside before filling. This lets the bread hold up better. You can also toast the bread lightly before adding the filling. Baking it on a rack helps air flow, making it crispier. Lastly, serve it right away for the best texture. Many sides pair well with this dish! A fresh salad adds a nice crunch. Try a side of fries for a classic combo. You can also serve it with pickles for a tangy contrast. For something light, add some coleslaw. These options make a complete meal. Feel free to check out the Full Recipe for more details! This article covered how to make delicious cheesesteak cheesy bread with simple steps. You learned about the ingredients, cooking techniques, and storage tips. I shared variations, including vegetarian and spicy options. In the end, this dish is perfect for sharing or enjoying alone. Whether you keep it classic or try new flavors, your creation will be a hit. Enjoy every cheesy, flavorful bite!

Are you ready to take your taste buds on a cheesy adventure? This Philly Cheesesteak Cheesy Bread recipe combines all the savory flavors you crave. With ribeye steak, gooey mozzarella, …

Read more

Categories Dinner

Soft and Chewy Cinnamon Roll Sugar Cookies Delight

May 11, 2025 by Chef Theo
For these soft and chewy cinnamon roll sugar cookies, you need to gather the following ingredients: - 2 ½ cups all-purpose flour - 2 teaspoons baking powder - ½ teaspoon baking soda - ½ teaspoon salt - ¾ cup unsalted butter, softened - 1 cup granulated sugar - ½ cup brown sugar, packed - 1 tablespoon vanilla extract - 2 large eggs - 2 teaspoons ground cinnamon - ½ cup powdered sugar (for icing) - 2 tablespoons milk (for icing) - Additional garnishes (optional) These ingredients combine to create a delightful cookie experience. The mix of sugars gives the cookies a rich flavor. The butter adds a soft texture, while the eggs help bind everything together. Ground cinnamon brings warmth and spice, perfect for this cookie's theme. When you prepare to bake, measure your ingredients carefully. Accurate measurements lead to the best results. For the icing, using powdered sugar and milk creates a smooth finish. You can even add a sprinkle of cinnamon on top for a charming touch. If you're curious about the full process, check out the Full Recipe for detailed instructions. Happy baking! First, you need to preheat your oven to 350°F (175°C). This helps your cookies bake evenly. Next, prepare your baking sheets. Line them with parchment paper to prevent sticking. Now, whisk together the dry ingredients. In a medium bowl, mix 2 ½ cups of flour, 2 teaspoons of baking powder, ½ teaspoon of baking soda, and ½ teaspoon of salt. Set this aside for later. Now let's move to the fun part—mixing! Start by creaming ¾ cup of softened butter with 1 cup of granulated sugar and ½ cup of brown sugar in a large bowl. You want it light and fluffy. Then, add in 2 large eggs one at a time. Stir in 1 tablespoon of vanilla extract next. It adds a warm, sweet flavor. Gradually combine the dry and wet mixtures. Mix until just combined; don’t overdo it! Time to shape your cookies! Scoop out 1.5 tablespoons of dough and roll it into a ball. Next, roll the ball in cinnamon sugar, which is made by mixing 2 teaspoons of ground cinnamon with 2 tablespoons of granulated sugar. Place the cookie balls on the prepared sheets, leaving space in between. Bake them for 10-12 minutes. The edges should look lightly golden, and the centers will seem soft. This is okay; they will set as they cool. For the finishing touch, you can prepare the icing while the cookies cool. Mix ½ cup of powdered sugar with 2 tablespoons of milk until smooth. Drizzle this icing over your cookies for that sweet, cinnamon roll effect. Enjoy your Soft and Chewy Cinnamon Roll Sugar Cookies! If you want to see all the steps in one go, check out the Full Recipe. To make soft and chewy cookies, focus on the balance between softness and chewiness. Softness comes from the butter and sugars. Chewiness is from the flour and the eggs. When you mix the dough, stop as soon as you see no dry flour. Over-mixing can make cookies tough. Chilling the dough is key, too. It firms up the butter. This helps the cookies hold their shape while baking. I recommend chilling the dough for at least 30 minutes. It will pay off with a better texture. Icing adds a nice touch. You can drizzle the icing over the cookies or use a piping bag for more design. Mix powdered sugar and milk until smooth. Adjust the milk for your desired thickness. For plating, think colorful. Use a bright platter to show off your cookies. You can also sprinkle a little cinnamon on top for extra flair. This makes your cookies look as good as they taste! One big mistake is overbaking. These cookies look soft in the middle when done. Pull them from the oven when the edges are golden. They will set as they cool. Measuring flour correctly is also vital. Use a spoon to scoop flour into your cup, then level it off with a knife. This prevents too much flour, which can lead to dry cookies. Following these tips will make your cookies perfect every time! For the complete recipe, check out the Full Recipe section. {{image_2}} You can easily switch up the flavor of your cookies. Try adding nutmeg or cardamom for a warm twist. These spices blend well with cinnamon, giving your cookies a unique taste. If you love chocolate, mix in chocolate chips or butterscotch chips. These add a sweet richness that pairs nicely with the cinnamon. If you need gluten-free cookies, use a gluten-free flour blend. Look for a mix that includes xanthan gum to help with texture. For a vegan option, swap the butter for coconut oil and use flax eggs. Simply mix one tablespoon of ground flaxseed with three tablespoons of water for each egg. This gives your cookies the right binding. This cookie recipe can inspire many other treats. You can make cinnamon roll bars by spreading the dough in a pan instead of forming balls. Try using the dough to create a sweet cinnamon roll cake or even a layered dessert. Your options are endless! For the full recipe, check out the details above. To keep your soft and chewy cinnamon roll sugar cookies fresh, store them in an airtight container. This helps retain their softness and prevents them from drying out. You can store them at room temperature for up to one week. If you need them to last longer, you might want to refrigerate them. Just make sure to let them come to room temperature before enjoying. You can freeze these cookies either before or after baking. If you freeze the dough, scoop it into balls and place them on a baking sheet. Freeze until solid, then transfer them to a zip-top bag. They will last for about three months. When you’re ready to bake, just add a few extra minutes to the baking time. If you prefer to freeze baked cookies, let them cool completely first. Place them in a single layer in an airtight container or wrap them tightly in plastic wrap. When you want to eat them, thaw them at room temperature. For a warm treat, pop them in the microwave for a few seconds or reheat in the oven. Enjoy them fresh from the oven, even if they were frozen! For the full recipe, check out the details above! You can tell your cookies are done when the edges turn light golden brown. The centers will still look soft, which is okay. They will firm up as they cool. Set a timer for 10-12 minutes. Keep an eye on them for best results. Yes, you can make the dough ahead of time! Chill it in the fridge for up to three days. Just cover it tightly with plastic wrap. When you're ready to bake, scoop and roll the dough into balls. Roll them in cinnamon sugar before baking. If your dough feels dry, add a touch of milk or melted butter. Mix it in slowly. You want to reach a soft but not sticky texture. If it's too dry, it won't hold together well while baking. To boost the cinnamon flavor, add more ground cinnamon to the dough. You can also increase the cinnamon-sugar mixture you roll the cookies in. Try adding a pinch of nutmeg for a warm spice kick. For chewier cookies, use more brown sugar than granulated sugar. Brown sugar adds moisture. You can also chill the dough before baking. This helps create a softer, chewier texture. For the best results, follow the Full Recipe closely. In this post, we covered the ingredients and steps for perfect cookies. You learned about mixing, shaping, and baking techniques. I shared tips for ideal texture and decorating ideas. You can also explore variations and storage methods to keep your cookies fresh. Remember, practice makes perfect. Don’t hesitate to tweak the recipe to match your taste. Enjoy baking and share your creations with friends and family!

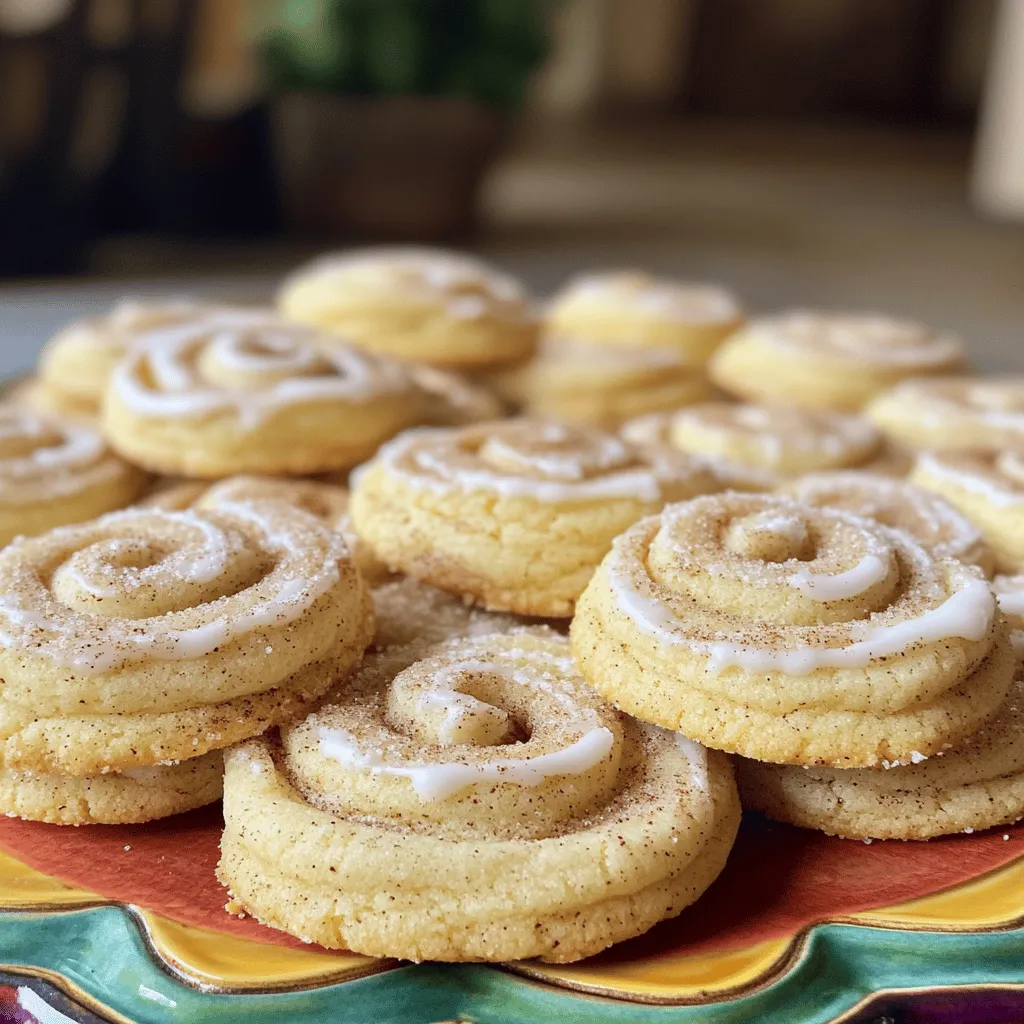
If you love soft and chewy cookies, you’re in for a treat! In this post, I’ll share a fun and easy recipe for Soft and Chewy Cinnamon Roll Sugar Cookies. …

Read more

Categories Desserts

Mini Lemon Cheesecakes Delightful and Easy Recipe

May 11, 2025 by Chef Theo
To make these delightful mini lemon cheesecakes, you will need: - 1 cup digestive biscuits, crushed - 1/4 cup unsalted butter, melted - 16 oz (450g) cream cheese, softened - 1/2 cup granulated sugar - 2 large eggs - Zest of 2 lemons - 1/4 cup fresh lemon juice - 1 teaspoon vanilla extract - 1/4 teaspoon salt - Fresh berries and mint for garnish Each ingredient plays a vital role in the flavor and texture of the cheesecakes. The digestive biscuits provide a crunchy and sweet base. The unsalted butter helps bind the crumbs together. Cream cheese is the star; it should be soft for a smooth filling. Granulated sugar adds sweetness, while eggs act as a binder. Lemon zest gives a bright flavor, and fresh lemon juice balances the sweetness. Vanilla extract enhances all the tastes, and salt brings everything together. You can swap digestive biscuits for graham crackers if you prefer a different crust flavor. Use coconut oil instead of butter for a dairy-free option. For a lighter cheesecake, consider using Greek yogurt in place of some cream cheese. If you want a sweeter cheesecake, add a little more sugar. For a fun twist, try adding a splash of berry puree to the cheesecake mix. Check out the Full Recipe for more insights and tips! Start by preheating your oven to 325°F (160°C). Line a muffin tin with paper liners. In a bowl, mix 1 cup of crushed digestive biscuits with 1/4 cup of melted butter. Stir until the crumbs are evenly coated. Next, take about a tablespoon of this mixture and press it into each muffin liner. Make sure it’s compact and smooth. In a large bowl, beat 16 oz of softened cream cheese with 1/2 cup of granulated sugar. Mix until the texture is smooth and creamy. Add 2 large eggs, mixing well after each one. Now, stir in the zest of 2 lemons, 1/4 cup of fresh lemon juice, 1 teaspoon of vanilla extract, and 1/4 teaspoon of salt. Ensure all ingredients are blended well. Pour the cheesecake filling over the crust in each muffin liner. Fill them about 3/4 full. Bake in the preheated oven for 18 to 20 minutes. The centers should be slightly jiggly, not liquid. After baking, remove the tray from the oven. Let the cheesecakes cool at room temperature. Then, refrigerate them for at least 2 hours to set. Once chilled, gently take them out of the muffin tin. You can garnish with fresh berries and mint before serving. For the complete recipe, check [Full Recipe]. To make sure your mini lemon cheesecakes are smooth, use room temperature cream cheese. Cold cream cheese makes lumps. Beat it well with sugar until creamy. Mix in eggs slowly. Add them one at a time. This helps avoid over-mixing, which can make them dense. Don't forget to mix in the lemon juice and zest gently. This way, you keep that light, creamy texture. One common mistake is not baking long enough. If they are too soft, they won’t set right. Check them when they jiggle slightly in the center. Another mistake is over-mixing your batter. This can make your cheesecakes tough. Lastly, be careful when cooling them. Let them cool at room temperature first before chilling. This helps prevent cracks on the surface. These mini lemon cheesecakes shine with fresh berries on top. Raspberries, strawberries, or blueberries add great color. A sprig of mint adds a lovely touch too. You can also serve them with whipped cream for extra fluff. For drinks, pair them with iced tea or lemonade. The lemon flavor will balance nicely. For a fun twist, try them with a berry sauce drizzled on top. Explore your creativity with these little delights! {{image_2}} You can change the flavor of these mini cheesecakes easily. Try using lime for a zesty twist. Coconut gives a tropical taste that pairs well with the cream cheese. For chocolate lovers, mix in melted chocolate or cocoa powder for rich flavor. You can also add fruit purees, like strawberry or raspberry, to the cheese mix. Each option brings a new taste and makes them exciting. If you need a gluten-free version, swap the digestive biscuits for gluten-free graham crackers. You can also use almond flour mixed with melted butter for the crust. This change keeps the base tasty and gluten-free. Always check labels to ensure all ingredients are safe for your diet. This way, everyone can enjoy these yummy treats. Presentation matters. To make your mini cheesecakes look special, use fresh berries on top. A sprig of mint adds color and freshness. You can also drizzle some fruit sauce on the plate before placing the cheesecake. Use a fancy cupcake liner for a touch of style. For a fun look, create a mini cheesecake tower by stacking them. These simple ideas make your desserts stand out. For the full recipe, make sure to follow the steps carefully and enjoy your creation! To keep your mini lemon cheesecakes fresh, store them in the fridge. Use an airtight container for best results. Place a piece of parchment paper between layers if stacking. This prevents them from sticking together. You can also cover them with plastic wrap. This keeps moisture out and flavors in. You can freeze mini lemon cheesecakes if you want to save some for later. First, let them cool completely. Then, wrap each cheesecake in plastic wrap tightly. After that, place them in a freezer-safe bag or container. Label the bag with the date. They can last in the freezer for up to three months. When ready to eat, thaw them in the fridge overnight. Mini lemon cheesecakes can last for up to five days in the fridge. Check for any signs of spoilage before serving. If you notice any changes in smell or texture, it's best to discard them. For the best taste and texture, enjoy them within the first three days. Always keep them covered to maintain freshness. For the full recipe, refer to the earlier sections. Yes, you can! Try using graham crackers or Oreo cookies. Both options add unique flavors. You can also use a nut crust for a gluten-free choice. Just crush the nuts finely and mix with melted butter. This will give your mini cheesecakes a tasty twist! Making these cheesecakes ahead is easy! Prepare them a day in advance. After baking, let them cool and chill in the fridge. They will taste even better after sitting overnight. Just remember to add toppings right before serving for the best look. Toppings can make these cheesecakes shine! Fresh berries like strawberries or blueberries add color and flavor. You can also use whipped cream for a creamy touch. Mint leaves bring a fresh pop. For a fun twist, try lemon curd or a drizzle of honey. Yes, you can use low-fat cream cheese. It will still taste great. The texture may be a bit different but will still produce a tasty cheesecake. Just ensure it’s softened to mix well. After baking, let the cheesecakes cool at room temperature for about 30 minutes. Then, refrigerate them for at least 2 hours. This cooling time helps set the cheesecake and allows flavors to blend well. Absolutely! Doubling the recipe is simple. Just make sure you have a larger muffin tin or use multiple tins. Adjust your baking time if needed. Always check for doneness using a toothpick. If you don’t have muffin liners, you can grease the muffin tin with butter or cooking spray. This will help the cheesecakes release easily after baking. Just be gentle when removing them to keep their shape. Cheesecakes are done when the edges are set, and the center is slightly jiggly. They will firm up as they cool. Avoid overbaking, as this can lead to cracks and a dry texture. These cheesecakes pair nicely with iced tea or lemonade. A light sparkling wine is also a great choice. These drinks complement the lemon flavor and keep things refreshing. For the full recipe, you can check the section above. Enjoy your baking! You now have everything needed to make delicious mini lemon cheesecakes. We covered the key ingredients, step-by-step instructions, and helpful tips. Remember, small details make a big difference. Avoid common mistakes for the best results. Don’t hesitate to try different flavors and toppings for fun. Lastly, store these treats properly to keep them fresh. Enjoy your cheesecake journey!

Craving a sweet treat that’s also easy to make? You’re in for a treat! Mini lemon cheesecakes are perfect for any occasion. With their creamy filling and zesty flavor, they …

Read more

Categories Desserts
Older posts
Newer posts
← Previous Page1 … Page76 Page77 Page78 … Page94 Next →

TOASTED RECIPES

Where ideas are warm, crisp, and ready to serve! 🍞

PAGES

Home About Contact Privacy Policy Terms & Conditions Cookie Policy GDPR Policy Copyright Policy Disclaimer

CATEGORIES

Appetizers Desserts Salads Breakfast Dinner

Contact

  • Pinterest
  • Mail
Copyright © 2025 Toasted Recipes. All rights reserved.