Skip to content
toastedrecipes.com
  • Home
  • Appetizers
  • Desserts
  • Salads
  • Breakfast
  • Dinner
  • Privacy Policy
  • Contact
  • About

Chef Theo

Tiramisu Delight Simple Recipe to Satisfy Cravings

May 14, 2025 by Chef Theo
To make a great tiramisu, you need some key ingredients. Here’s what you will need: - 2 cups strong brewed coffee, cooled - 1/2 cup sugar - 3 large eggs, separated - 1 cup mascarpone cheese - 1 teaspoon vanilla extract - 24 ladyfinger cookies - 1 tablespoon cocoa powder - 1/4 cup dark chocolate shavings (optional) These ingredients work together to create layers of flavor and texture. You can add some fun twists to your tiramisu. Consider using: - Dark chocolate shavings for extra richness - Coffee liqueur for a bolder coffee taste - Orange zest for a hint of citrus These options can enhance your dessert and impress your friends. If you have dietary needs, don’t worry! Here are some easy swaps: - Use coconut cream instead of mascarpone for a dairy-free option. - Replace ladyfingers with gluten-free cookies for a gluten-free treat. - For a vegan version, use silken tofu and a vegan whipped topping. These substitutes help you enjoy tiramisu no matter your diet. To start, brew 2 cups of strong coffee. Let it cool. In a small bowl, mix the cooled coffee with 1/2 cup of sugar. Stir well until the sugar dissolves completely. This mixture gives your tiramisu that rich coffee flavor. Now, take 3 large eggs. Separate the yolks from the whites. In a mixing bowl, beat the egg yolks until they turn pale and creamy. This takes about 3-4 minutes. Gradually add in 1 cup of mascarpone cheese and 1 teaspoon of vanilla extract. Mix until smooth. In another clean bowl, whip the egg whites until they form stiff peaks. Gently fold the whipped egg whites into the mascarpone mixture. This will give your tiramisu a light and airy texture. Next, quickly dip each ladyfinger into the coffee mixture. Turn them for just 1-2 seconds. Be careful not to soak them too long. In a 9x9 inch square dish, place half of the dipped ladyfingers at the bottom. Spread half of the mascarpone mixture over the ladyfingers evenly. Now repeat this process: another layer of dipped ladyfingers, followed by the rest of the mascarpone mixture. Cover the dish and refrigerate for at least 4 hours, or overnight for the best taste. Before serving, dust the top with cocoa powder and add dark chocolate shavings if you like. For the full recipe, check the earlier section. To make a light and airy mascarpone filling, follow these steps: - Use fresh eggs: Fresh eggs whip better and give more volume. - Whip egg whites: Ensure you whip the egg whites until stiff peaks form. This adds fluffiness. - Fold gently: When mixing the whipped egg whites with the mascarpone, fold gently. This keeps the air in the mixture. Each step helps create a smooth and creamy texture that melts in your mouth. For the best experience, serve tiramisu cold. Here are some ways to enhance your dish: - Garnish with cocoa powder: Dust the top with cocoa powder just before serving. - Add dark chocolate shavings: These give a nice touch of flavor and elegance. - Use a clear dish: A clear glass dish shows the lovely layers of tiramisu. This makes your dessert look as good as it tastes! Here are some common pitfalls and how to dodge them: - Soggy ladyfingers: Don’t soak the ladyfingers too long in coffee. Just a quick dip is enough. - Overly sweet mixtures: Taste your mixture before serving. You can adjust the sugar if it’s too sweet. - Skipping chill time: Letting tiramisu chill is key. It helps the flavors blend and sets the dessert. Avoiding these mistakes will lead to a perfect tiramisu every time. For the full recipe, check out the details provided earlier. {{image_2}} To make a vegan tiramisu, you can swap out some key ingredients. Here’s what you need: - 2 cups strong brewed coffee, cooled - 1/2 cup coconut sugar - 1 cup silken tofu - 1 cup coconut cream - 1 teaspoon vanilla extract - 24 vegan ladyfinger cookies - 1 tablespoon cocoa powder - 1/4 cup dark chocolate shavings (optional) Steps to create it: 1. Mix the cooled coffee and coconut sugar until the sugar dissolves. 2. Blend the silken tofu, coconut cream, and vanilla in a bowl until smooth. 3. Dip the vegan ladyfingers quickly into the coffee mix, just for a second. 4. In a dish, layer half of the dipped ladyfingers at the bottom. 5. Spread half of the tofu mixture over the ladyfingers. 6. Repeat with another layer of ladyfingers and the rest of the tofu mix. 7. Cover it and chill for at least 4 hours or overnight. 8. Dust with cocoa powder and add dark chocolate shavings if desired. If you need a gluten-free option, you can use gluten-free ladyfingers. Here are a few ideas: - Look for gluten-free ladyfingers in stores. - You can also make your own with almond flour or gluten-free flour. Simply follow the main recipe, using gluten-free ladyfingers in place of regular ones. This keeps the delicious taste while catering to dietary needs. You can change the flavor of your tiramisu easily. Here are some fun ideas: - Use flavored coffee, like hazelnut or mocha, for a twist. - Add liqueurs such as Kahlúa, Amaretto, or coffee liqueur for depth. - For a fruity touch, mix in a splash of orange liqueur. Get creative! Each variation can give you a new dessert experience. Enjoy experimenting with flavors to find your favorite. For the full recipe, check out the Dreamy Coffee Tiramisu section above. To store tiramisu, place it in the fridge. Use a cover to keep it fresh. Tiramisu stays good for up to 4 days. After that, the texture may change. It is best to enjoy it fresh. Always check for any signs of spoilage before eating. You can freeze tiramisu if you want to save some for later. First, cut it into portions. Wrap each piece tightly in plastic wrap. Then, place the wrapped pieces in a freezer-safe bag. When you want to eat it, move it to the fridge to thaw overnight. This way, it keeps its texture and flavor. Avoid microwaving, as it can make it soggy. Use airtight containers for storing tiramisu. Glass or plastic containers with tight lids work great. They prevent air from getting in and drying it out. Avoid using aluminum foil, as it can stick to the dessert. Keeping tiramisu in the right container helps keep it fresh. Enjoy your lovely treat! For more on making tiramisu, check the Full Recipe. You can store tiramisu in the fridge for up to four days. Make sure it stays covered. After four days, it may lose its fresh taste and texture. If you see any signs of spoilage, throw it away. Always check for any off smells or changes in color. Yes, but the flavor will change. Instant coffee lacks depth compared to brewed coffee. You may miss the rich taste that brewed coffee gives. If you use instant coffee, mix it with hot water until dissolved. This helps create a better flavor. Using raw eggs can be risky. They may carry harmful bacteria. To make it safer, use pasteurized eggs. They reduce the risk of foodborne illnesses. If you're worried, you can also skip the eggs. You will lose some creaminess but keep it safe. Look for local Italian bakeries or restaurants known for desserts. Ask for recommendations from friends or read online reviews. When shopping in stores, check the ingredients. Authentic tiramisu uses mascarpone and ladyfingers. If it has too many additives, it may not be the real deal. Tiramisu is a delightful dessert made with simple, key ingredients. We explored essential items like mascarpone cheese and ladyfingers. I shared options for substitutions and tasty variations, including vegan and gluten-free versions. Remember, proper assembly and storage keep your tiramisu flavorful and fresh. Use the tips provided to avoid common mistakes. Now you’re ready to create your own perfect tiramisu masterpiece. Enjoy the process and share your results with friends!

Tiramisu is a classic dessert that never fails to please. If you crave a simple recipe that bursts with flavor, you’re in the right place. I’ll guide you step-by-step to …

Read more

Categories Desserts

Blueberry Cheesecake Swirl Rolls Irresistible Treat

May 14, 2025 by Chef Theo
To make these rolls, you will need a few key items: - 2 ½ cups all-purpose flour - ¼ cup granulated sugar - 1 packet (2 ¼ teaspoons) active dry yeast - ½ teaspoon salt - ½ cup milk, warmed - 2 tablespoons unsalted butter, melted - 1 large egg - 1 cup fresh blueberries These ingredients create a soft, fluffy dough that holds the sweet, creamy filling. For the cheesecake filling, gather these simple items: - 8 oz cream cheese, softened - ¼ cup sugar - 1 teaspoon vanilla extract - 1 egg yolk This filling gives the rolls their rich, creamy taste. Be sure to beat the cream cheese well so it is smooth. To finish these rolls with a sweet touch, you will need: - 1 cup powdered sugar - 2 tablespoons milk - ½ teaspoon vanilla extract The glaze adds a perfect sweetness and makes the rolls look even more appealing. You can find the full recipe to guide you through each step. Enjoy making these delightful rolls! To start, mix the warm milk, sugar, and yeast in a small bowl. Let it sit for about 5-10 minutes until it looks frothy. In a large bowl, combine the flour and salt. Make a well in the middle and add the yeast mix, melted butter, and a large egg. Stir until it forms a rough dough. Knead this dough on a floured surface for 5-7 minutes until it feels smooth. Place it in a greased bowl and cover with a damp cloth. Let it rise in a warm spot for about 1 hour, or until it doubles in size. While the dough is rising, it’s time to make the cheesecake filling. In a bowl, beat the softened cream cheese, sugar, vanilla extract, and egg yolk. Mix until it’s smooth and fluffy. This filling adds a creamy layer to your rolls, making them special. Set it aside while you wait for the dough to rise. After the dough has risen, roll it out on a floured surface into a rectangle, about 12x18 inches. Spread the cheesecake filling evenly, leaving a small border. Next, sprinkle the fresh blueberries over the filling. Starting from one long side, roll the dough tightly into a log. Pinch the seams to seal. Cut the log into 12 equal pieces. Place the rolls in a greased 9x13 inch baking dish and cover with a cloth. Let them rise again for 30 minutes. Preheat your oven to 350°F (175°C). Bake the rolls for 25-30 minutes until they turn golden brown. While they bake, whisk together powdered sugar, milk, and vanilla extract for the glaze. Once the rolls cool slightly, drizzle the glaze on top. For the full recipe, check out the complete guide. To make your rolls light and fluffy, follow these tips: - Use warm milk: Warm milk helps activate the yeast. Aim for about 110°F (43°C). - Knead well: Knead the dough for 5-7 minutes. This helps develop gluten, which gives structure. - Let it rise: Give the dough time to rise. It should double in size, which takes about an hour. - Don’t rush: Allow the second rise. This step makes the rolls airy and soft. Sometimes things don’t go as planned. Here are solutions to common problems: - Dough won't rise: Check the yeast. If it’s old, it may not work. Always use fresh yeast. - Rolls are dense: This can happen if you over-knead or add too much flour. Use just enough flour for a soft dough. - Filling leaks: Make sure to seal the edges tightly when rolling. This keeps the filling inside. Adding extra flavor can make your rolls even better. Here are some ideas: - Add lemon zest: Mix in some lemon zest to the cheesecake filling for a fresh taste. - Use spices: Try a pinch of cinnamon in the dough for warmth. - Experiment with toppings: Consider adding crushed nuts or coconut flakes to the glaze for texture. For a full recipe of Blueberry Cheesecake Swirl Rolls, check out the details above. {{image_2}} You can swap blueberries for other berries. Try raspberries, strawberries, or blackberries. Each berry brings a unique taste. Raspberries add a tart flavor. Strawberries give a sweet touch. Blackberries offer a juicy bite. Mix and match for fun. You can even blend berries for a colorful swirl. To make these rolls vegan, use plant-based milk. Almond, oat, or soy milk works well. Replace cream cheese with vegan cream cheese. You can also use coconut cream for a rich filling. Substitute the egg with a flaxseed egg or applesauce. These changes keep the taste delicious and creamy without dairy. Spices can elevate your rolls. Consider adding cinnamon to the dough for warmth. A pinch of nutmeg will add depth. For a twist, try cardamom or ginger. You can also mix lemon zest into the filling for a bright flavor. These spices can make your rolls unique and special. For the complete recipe, check out the [Full Recipe]. To keep your leftover Blueberry Cheesecake Swirl Rolls fresh, place them in an airtight container. This helps lock in moisture and keeps them soft. You can also wrap them in plastic wrap before placing them in the container. Store them at room temperature for up to three days. If you want them to last longer, consider refrigerating them. This will keep them good for up to a week. Freezing is a great option for long-term storage. Allow the rolls to cool completely after baking. Then, wrap each roll tightly in plastic wrap. After wrapping, place them in a freezer-safe bag or container. You can freeze the rolls for up to three months. Label your bag with the date so you can keep track. To enjoy your frozen rolls, remove them from the freezer and unwrap them. Place them on a baking sheet and let them thaw at room temperature for about 30 minutes. Preheat your oven to 350°F (175°C). Bake the rolls for about 10-15 minutes until warm. If you've stored them at room temperature, simply reheat in the oven for 5-10 minutes. You can also use the microwave for quick heating, but they may not be as soft. Always drizzle with glaze before serving to enhance the flavor. To make your rolls softer, you can add more fat. Use extra butter or oil. This helps keep the dough moist. Also, avoid over-kneading. Knead just until smooth. Let the dough rise in a warm spot. A good rise makes for softer rolls. Yes, you can use frozen blueberries! Just remember to thaw and drain them first. This stops extra moisture from making the dough soggy. Toss the thawed berries in a bit of flour to help them stay in place. They will still give you that burst of flavor. If your dough doesn’t rise, check the yeast. Make sure it is fresh and active. Warm milk should feel like a warm bath, not hot. If the dough is too cold, it won’t rise. Try letting it sit in a warmer area. If all else fails, you can start over with new yeast. Feel free to dive deeper into the full recipe to get all the details you need! You now have all the steps to make delicious blueberry cheesecake swirl rolls. We covered the main ingredients, how to prepare the dough, and the cheesecake filling. I shared tips for fluffy rolls and ways to fix common problems. You also learned about fun variations and how to store leftovers. In conclusion, enjoy experimenting with flavors and techniques. Your rolls will be a hit.

If you love sweet treats, you must try these Blueberry Cheesecake Swirl Rolls! They are soft, fluffy, and filled with creamy cheesecake and juicy blueberries. This recipe is simple and …

Read more

Categories Desserts

S’mores Dip in the Oven Easy and Fun Recipe

May 12, 2025 by Chef Theo
- 1 cup semi-sweet chocolate chips - 1 cup mini marshmallows - 1 cup graham cracker crumbs - 1/4 cup unsalted butter, melted - 1 teaspoon vanilla extract - Pinch of salt - Additional graham crackers for serving - You can use dark chocolate or milk chocolate instead of semi-sweet chocolate. - For a vegan option, try using coconut oil instead of butter and vegan marshmallows. - If you need gluten-free, look for gluten-free graham cracker brands. Using these substitutions can help you enjoy this dish, no matter your diet. I love to mix and match ingredients to find new flavors. The key is to keep it fun and tasty! 1. Preheat your oven to 350°F (175°C). This makes sure your dip cooks evenly. 2. In a medium bowl, mix the graham cracker crumbs, melted butter, vanilla extract, and a pinch of salt. Stir until the mixture is well combined. 3. Press this crumb mixture into the bottom of an 8-inch oven-safe dish. This will form a nice crust for your dip. 1. Next, layer the semi-sweet chocolate chips evenly over the graham cracker crust. 2. Sprinkle the mini marshmallows on top of the chocolate layer. Use a good amount for a gooey effect. 3. Bake in the preheated oven for about 10-15 minutes. Watch for the marshmallows to turn golden brown. This is your cue that it’s ready. 4. Remove the dish from the oven. Let it cool for a couple of minutes. Then, use a spatula to gently swirl the chocolate and marshmallow together for a great look. 1. Serve the dip warm for the best experience. It tastes amazing right out of the oven. 2. Pair it with extra graham crackers on the side for dipping. You can also try it with fruit or cookies! 3. Enjoy it with a glass of milk or hot cocoa for a cozy treat. This easy and fun recipe makes s'mores dip a hit at any gathering! For the complete recipe, check out the [Full Recipe]. To get the best s'mores dip, focus on the right marshmallow and chocolate ratio. Use equal parts of chocolate chips and marshmallows. This way, each bite is sweet and gooey. For a golden top, bake the dip until the marshmallows puff up and turn brown. Keep an eye on it, so it doesn’t burn. Serve your s'mores dip in fun, decorative dishes. A clear dish lets guests see the layers. You can also sprinkle crushed graham crackers on top for a nice look. A few chocolate shavings or mini chocolate bars can add a gourmet touch. Watch out for overbaking your dip. If you leave it too long, the marshmallows will harden. Underbaking can lead to a cold, hard dip that’s not enjoyable. Layering is also key; if you put too much chocolate or marshmallows, they won’t melt evenly. Follow the recipe for the best results. For the full recipe, check out the instructions above. {{image_2}} You can easily change up the flavor of your s'mores dip. Adding nuts or peanut butter gives it a fun twist. I love using chopped almonds or walnuts. For a nutty taste, mix in a spoonful of peanut butter with the chocolate. It adds creaminess and flavor. You can also infuse flavors with extracts or spices. Try adding a drop of peppermint extract for a minty kick. Cinnamon works well too, giving it warmth and depth. These small tweaks can make your dip unique. You can make a healthier version of this dip with low-calorie alternatives. Use dark chocolate chips instead of semi-sweet ones. They have less sugar and more flavor. Greek yogurt can replace the butter for a lighter touch. It adds creaminess without all the fat. If you need a vegan or gluten-free option, swap the chocolate chips for dairy-free ones. Use coconut oil instead of butter. For gluten-free, choose gluten-free graham crackers. These changes let everyone enjoy this tasty treat. Serving your s'mores dip in mini portions or jars makes it fun and cute. Individual servings are perfect for parties. Just layer the dip in small jars and let everyone dig in. You can also serve it with fruit or cookies instead of graham crackers. Strawberries, bananas, or pretzels add a nice twist. Each dipper gives a new flavor and texture. You can find even more ideas in the Full Recipe. To store leftover s'mores dip, let it cool first. Cover it tightly with plastic wrap or foil. You can also use an airtight container. This way, it will stay fresh. The dip lasts up to three days in the fridge. When you’re ready to enjoy the dip again, use the oven or microwave. For the oven, preheat it to 350°F. Place the dip in an oven-safe dish. Heat it for about 10 minutes. This keeps the texture nice and smooth. For the microwave, warm it in short bursts. Heat for 20 seconds, then check. Stir to keep the flavor even. Yes, you can freeze s'mores dip! To freeze, let it cool completely first. Spoon it into a freezer-safe container. Press a piece of plastic wrap against the dip to avoid freezer burn. It can last up to two months. To thaw, move it to the fridge overnight. Reheat it using the instructions above for the best taste. Yes, you can prepare the dip ahead. Mix your ingredients and layer them in the dish. Cover it tightly and store it in the fridge for up to a day. When you're ready, bake it straight from the fridge. It may take a few extra minutes to cook. Serve S'mores Dip warm with graham crackers on the side. You can also add fruit or pretzels for fun dippers. Use a spatula to mix the melted chocolate and marshmallows before serving. This makes it look inviting and tasty. Absolutely! You can use milk chocolate, dark chocolate, or even white chocolate. Each type gives a unique flavor. Try mixing different chocolates for a fun twist. Just keep in mind that some chocolates melt differently, so watch the baking time. Look for golden brown marshmallows on top. They should be puffy and slightly toasted. If the marshmallows are not golden, bake for a few more minutes. Keep an eye on them to avoid burning. This article covered all the steps for a tasty S'mores Dip. We explored the key ingredients and even offered substitutions. I shared simple steps for prep, baking, and serving. You learned tips to avoid common mistakes too. Remember, you can customize it with flavors or dietary needs. Serve it warm, and it will be a hit! Enjoy making this fun treat with family and friends. Happy baking!

Are you ready to enjoy a delicious twist on the classic campfire treat? This S’mores Dip in the Oven recipe is both easy and fun! With just a few simple …

Read more

Categories Desserts

Teriyaki Chicken Stir-Fry Quick and Tasty Meal Guide

May 12, 2025 by Chef Theo
To make a tasty Teriyaki Chicken Stir-Fry, you need fresh and simple ingredients. Here’s what you will need: - 1 lb (450g) boneless, skinless chicken thighs, sliced into thin strips - 2 tablespoons soy sauce - 2 tablespoons honey - 1 tablespoon rice vinegar - 1 tablespoon sesame oil - 1 red bell pepper, sliced - 1 yellow bell pepper, sliced - 1 cup broccoli florets - 2 cloves garlic, minced - 1 tablespoon ginger, minced - 2 green onions, chopped (for garnish) - 2 tablespoons sesame seeds (for garnish) - Cooked jasmine or brown rice (for serving) These ingredients give you a great mix of taste and nutrition. The chicken thighs are juicy, while the bell peppers and broccoli add crunch. You can add extra ingredients to boost the flavor. Some great choices include: - Carrots, sliced thin - Snow peas or snap peas - Mushrooms, sliced - Baby corn - Cashews or peanuts for crunch These add-ins can make your stir-fry even more colorful and tasty. Feel free to mix and match based on what you have at home. To serve Teriyaki Chicken Stir-Fry, I recommend plating it over a bed of rice. The rice soaks up the sauce and adds a nice texture. You can also serve it with: - A side of steamed vegetables - A fresh salad with a light dressing - Egg rolls for a crunch Try garnishing with chopped green onions and sesame seeds for a pop of color. This makes your dish look as good as it tastes! For the full recipe and cooking instructions, check out the [Full Recipe]. First, gather your ingredients for Teriyaki chicken stir-fry. You will need: - 1 lb boneless, skinless chicken thighs, sliced into thin strips - 2 tablespoons soy sauce - 2 tablespoons honey - 1 tablespoon rice vinegar - 1 tablespoon sesame oil - 1 red bell pepper, sliced - 1 yellow bell pepper, sliced - 1 cup broccoli florets - 2 cloves garlic, minced - 1 tablespoon ginger, minced - 2 green onions, chopped (for garnish) - 2 tablespoons sesame seeds (for garnish) - Cooked jasmine or brown rice (for serving) Start by slicing your chicken into thin strips. This helps it cook fast and evenly. Next, chop your veggies. Slice the red and yellow bell peppers. Break the broccoli into small florets. Mince the garlic and ginger finely. This makes their flavors strong in the dish. In a medium bowl, mix soy sauce, honey, rice vinegar, and sesame oil. Whisk these together until they blend well. Set this sauce aside for later. Heat a large skillet or wok over medium-high heat. When it's hot, add the sliced chicken. Stir-fry the chicken for about 5-7 minutes. Cook it until the chicken turns golden and no longer pink. Once the chicken is done, add the minced garlic and ginger. Stir these in for about 30 seconds. You want to smell their yummy aroma. Then, toss in the sliced bell peppers and broccoli florets. Keep stirring for another 3-4 minutes. The veggies should stay bright and crisp. Now, pour the teriyaki sauce over the chicken and veggies. Make sure everything gets coated nicely. Cook this for another 2 minutes. This will help the sauce thicken a little. When everything is ready, remove the skillet from heat. Serve the teriyaki chicken stir-fry over a bed of cooked jasmine or brown rice. This adds a nice base to your dish. For the final touch, sprinkle chopped green onions and sesame seeds on top. This adds color and crunch. You just made a delicious meal that is quick and tasty! If you want to see all the steps again, check the Full Recipe. To make your teriyaki chicken even tastier, use a marinade. Mix soy sauce, honey, rice vinegar, and sesame oil. Let the chicken soak in this mix for at least 30 minutes. This step adds deep flavor. You can even marinate it overnight. The longer, the better. For a great stir-fry, focus on texture. Use high heat and work quickly. Cut the chicken into thin strips. This helps it cook fast and stay juicy. When adding veggies, keep them crisp. Broccoli and bell peppers should be bright and fresh. Stir constantly to prevent burning. One mistake is overcrowding the pan. If you add too much chicken at once, it steams instead of fries. Cook in batches if needed. Another mistake is not prepping ingredients first. Have everything ready before you start cooking. This way, you won’t rush and miss steps. Remember these tips for a perfect dish! {{image_2}} You can easily make a vegetarian or vegan teriyaki stir-fry. Instead of chicken, use tofu or tempeh. Both options soak up flavors well. Press tofu to remove extra water. Cut it into cubes before cooking. Cook the tofu until golden brown for the best taste. You can also use seitan for a meat-like texture. For sauce, replace honey with maple syrup or agave for sweetness. If you want to switch proteins, consider shrimp, beef, or pork. Shrimp cooks quickly and adds a nice flavor. For beef, use thin slices of flank steak or sirloin. Cook it over high heat for a tender bite. Pork tenderloin works well too; slice it thinly for a quick cook. Always adjust cooking times based on the protein you choose. Feel free to mix and match your veggies for a unique stir-fry. Snap peas, carrots, and mushrooms are great choices. You can also use zucchini or asparagus for a fresh twist. Just ensure they are cut evenly for even cooking. Adding nuts like cashews or almonds can add crunch and flavor too. Explore seasonal vegetables for the freshest taste. For more ideas, check out the Full Recipe. To keep your Teriyaki Chicken Stir-Fry fresh, store it in an airtight container. Place the stir-fry in the fridge if you plan to eat it within three days. Make sure to let it cool down before sealing it. For longer storage, you can freeze the dish. Just remember to separate the rice from the stir-fry to avoid mushiness. When you're ready to enjoy your leftovers, reheat them on the stove for the best flavor. Heat a skillet over medium heat. Add a splash of water or broth to keep it moist. Stir the chicken and veggies until they are hot. You can also use a microwave, but be careful not to overheat. Heat in short bursts, stirring in between. To freeze the Teriyaki Chicken Stir-Fry, use freezer-safe containers. Portion out servings to make it easy later. Label each container with the date. It can last up to three months in the freezer. When you want to eat it, thaw it overnight in the fridge. Reheat as mentioned above for a tasty meal. Enjoy your delicious Teriyaki Chicken Stir-Fry anytime! For the full recipe, check the main article. If you need a honey substitute, use maple syrup or agave nectar. Both options bring sweetness and work well in the sauce. If you want no added sugar, try using coconut aminos. It adds a mild sweetness and a rich flavor. Your Teriyaki Chicken Stir-Fry can last about 3 to 4 days in the fridge. Store it in an airtight container to keep it fresh. Make sure to cool it down before placing it in the fridge. Yes, you can prepare the chicken and vegetables ahead of time. Chop your veggies and marinate the chicken a few hours or even a day before. When ready to cook, just stir-fry and add the sauce from the Full Recipe for a quick meal. Teriyaki chicken stir-fry is simple to make and full of flavor. We covered key ingredients, cooking steps, and tips for great results. You learned about tasty add-ins and easy storage methods. Don’t forget to try different proteins and veggies to switch things up. This dish is perfect for quick meals at home. With practice, you will master it and impress your family and friends. Enjoy each bite of your homemade stir-fry!

If you want a quick and tasty dinner, you’re in the right place! This Teriyaki Chicken Stir-Fry is simple to make and packed with flavor. With just a few key …

Read more

Categories Dinner

Berry Smoothie Bowl Energizing and Delicious Recipe

May 12, 2025 by Chef Theo
To make a great berry smoothie bowl, you need fresh and tasty ingredients. Here is the list of what you will need: - 1 cup frozen mixed berries (blueberries, raspberries, strawberries) - 1 banana, sliced - 1 cup almond milk (or any milk of choice) - 1 tablespoon chia seeds - 1 tablespoon honey or maple syrup (adjust for sweetness) - 1/2 teaspoon vanilla extract These ingredients help create a creamy and flavorful base. The frozen mixed berries give a nice chill and fruity taste. The banana adds creaminess and sweetness. Chia seeds provide fiber and a healthy boost. Toppings make your smoothie bowl fun and colorful. Here are some great choices to try: - Fresh berries (strawberries, blueberries, raspberries) - Sliced banana - Granola - Shredded coconut - Nuts (almonds, walnuts, or pecans) You can mix and match these toppings as you like. They add texture and extra flavor to your bowl. If you want to change things up, you can swap out some ingredients. Here are some ideas: - Milk: Use coconut milk, oat milk, or soy milk instead of almond milk. Each type has its own taste and creaminess. - Sweeteners: If you don’t have honey or maple syrup, try agave syrup or stevia. Just make sure to adjust the amount to fit your taste. These substitutions let you customize your smoothie bowl to match your needs or preferences. You can use the full recipe to guide your creation. To start, gather your ingredients. You will need: - 1 cup frozen mixed berries (blueberries, raspberries, strawberries) - 1 banana, sliced - 1 cup almond milk (or any milk of choice) - 1 tablespoon chia seeds - 1 tablespoon honey or maple syrup (adjust for sweetness) - 1/2 teaspoon vanilla extract In your blender, add the frozen berries, sliced banana, almond milk, chia seeds, honey, and vanilla. Blend these on high speed. Keep blending until the mix is smooth and creamy. If it’s too thick, add more almond milk. You want it just right for a bowl. To get a great texture, think about these tips: - Use frozen berries for a cold, thick mix. - Adjust the almond milk for your preferred thickness. - Blend longer if you want it super smooth. If it feels too runny, add more frozen fruit. For a thicker mix, less liquid is key. Once your smoothie is blended, pour it into a bowl. Smooth the top with your spoon. Now comes the fun part—adding toppings! Use fresh berries, sliced banana, granola, shredded coconut, and nuts. Arrange them nicely for a pretty look. Enjoy your Berry Bliss Smoothie Bowl right away. It’s a refreshing way to start your day! For more details on making this dish, check the Full Recipe. You can prepare your berry smoothie bowl in advance. It saves time on busy mornings. To do this, blend your smoothie base and store it in the fridge. Use a sealed container. It stays fresh for up to two days. When ready to eat, just pour it into a bowl. Add your toppings, and enjoy! Want to boost the taste and health? Add spinach or kale to your mix. They blend well with berries and add nutrients. You can also try adding nut butter for extra creaminess. This adds protein and healthy fats. For a sweet touch, try adding a bit of maple syrup or honey. Adjust the sweetness to your liking. A beautiful bowl looks good and makes eating fun! Smooth the top of your smoothie with a spoon. Arrange your toppings in a creative way. Use fresh berries, sliced bananas, and nuts. You can sprinkle some granola for crunch. A drizzle of honey adds a nice touch. Snap a photo before you dig in! {{image_2}} You can mix berries in many fun ways. Try using just strawberries for a sweet bowl. If you like tangy flavors, use raspberries. Blueberries add a nice color and taste. You can also use blackberries for a deep flavor. Mixing different berries gives you a unique taste each time. Adding spinach to your smoothie bowl boosts nutrition. Spinach has many vitamins and minerals. It blends well with berries and does not change the taste much. Just a handful of fresh spinach will work. Blend it in with your berries for a healthy twist. To make this bowl vegan, swap the honey for maple syrup. Use almond milk or oat milk instead of dairy milk. You can also try coconut yogurt as a base for creaminess. These changes keep your smoothie bowl tasty and plant-based. You can still enjoy a delicious bowl with these simple swaps. Check the Full Recipe for more detailed instructions. After making your berry smoothie bowl, you might have some left. You can store it in the fridge. Use an airtight container for best results. Keep it in the fridge for up to one day. The texture may change, so it’s best fresh. If you want to save it longer, consider freezing. To freeze smoothie packets, prepare your berries and other ingredients. Place them in freezer bags. Measure your ingredients for easy use later. Make sure to remove as much air as possible to avoid freezer burn. Label each bag with the date and contents. It is best to use them within three months. When you are ready to enjoy your smoothie, take a packet from the freezer. Let it thaw in the fridge overnight for best results. If you are in a hurry, you can thaw it in cold water for about 30 minutes. Once thawed, blend it with a splash of milk or water to restore its creamy texture. To make a thicker smoothie bowl, use less liquid. Start with one cup of almond milk. Add more frozen berries. You can add ice cubes too. Blend until it’s thick and creamy. If it’s too thin, add more frozen fruit. This gives your bowl a nice texture. Yes, you can use fresh berries. However, your smoothie bowl may be thinner. Frozen berries make the bowl cold and thick. If using fresh, add ice to help with thickness. Fresh berries can taste great too! Just remember to adjust the liquid. Berries are packed with vitamins and antioxidants. They help fight free radicals in your body. They are low in calories and high in fiber. This means they can keep you full longer. Berries also support heart health and boost your immune system. Adding them to your smoothie bowl is a tasty way to get these benefits. To make this smoothie bowl paleo-friendly, swap almond milk for coconut milk. Use honey or maple syrup as your sweetener. Ensure all toppings are paleo-friendly too. Use nuts, seeds, and fresh fruits as toppings. Avoid granola unless it’s made with paleo ingredients. Check labels to be safe. In this post, we explored how to craft a delicious berry smoothie bowl. We covered essential ingredients, step-by-step instructions, and tips to enhance flavor and nutrition. You learned about tasty variations and how to store your creations for later. Remember, experimenting with flavors can lead to great discoveries. A perfect smoothie bowl combines health and fun. Keep trying new recipes and enjoy!

Are you ready to fuel your day with a tasty treat? A berry smoothie bowl is the perfect blend of energy and flavor. It’s quick to make and packed with …

Read more

Categories Breakfast

Cinnamon Roll Cake with Cream Cheese Frosting Delight

May 12, 2025 by Chef Theo
To make the perfect cinnamon roll cake, gather these key items: - 2 cups all-purpose flour - 1 cup granulated sugar - 1 tablespoon baking powder - 1/2 teaspoon salt - 1/2 cup unsalted butter, softened - 1 cup milk - 2 large eggs - 1 tablespoon vanilla extract - 1 tablespoon ground cinnamon - 1/2 cup brown sugar, packed These ingredients combine to create a soft and fluffy cake base. The cinnamon and brown sugar add a sweet swirl that makes each bite special. For the creamy topping, you will need: - 8 oz cream cheese, softened - 1/2 cup unsalted butter, softened - 2 cups powdered sugar - 1 teaspoon vanilla extract - A pinch of salt This frosting adds a rich and smooth layer on top of the cake. It balances the spices and sweetness, making every slice irresistible. To take your cake up a notch, consider adding: - 1/2 cup chopped pecans - A dash of nutmeg or allspice - A sprinkle of sea salt on top These extras enhance the flavor and texture. Nuts provide a nice crunch, while spices add warmth. Feel free to customize based on your taste! For the full recipe, check out the details above. Start by gathering all your ingredients. You will need: - 2 cups all-purpose flour - 1 cup granulated sugar - 1 tablespoon baking powder - 1/2 teaspoon salt - 1/2 cup unsalted butter, softened - 1 cup milk - 2 large eggs - 1 tablespoon vanilla extract - 1 tablespoon ground cinnamon - 1/2 cup brown sugar, packed - 1/2 cup chopped pecans (optional) For the frosting, get: - 8 oz cream cheese, softened - 1/2 cup unsalted butter, softened - 2 cups powdered sugar - 1 teaspoon vanilla extract - A pinch of salt Now, preheat your oven to 350°F (175°C) and grease a 9x13-inch baking dish. In a large bowl, whisk together the flour, sugar, baking powder, and salt. This mix helps the cake rise and taste sweet. Then, add the softened butter, milk, eggs, and vanilla extract. Mix until it’s smooth and well combined. In a separate bowl, create the cinnamon swirl. Combine the ground cinnamon, brown sugar, and optional chopped pecans. This adds a delightful crunch and flavor. Pour half of the cake batter into the prepared baking dish. Spread it evenly across the bottom. Next, sprinkle the cinnamon mixture over this layer, creating a nice even spread. Pour the remaining batter over the cinnamon layer. Gently spread it to cover completely. Now comes the fun part! Using a knife or spatula, swirl the batter gently. This mixes the cinnamon layer into the cake, making beautiful patterns. Bake in your preheated oven for 25-30 minutes. Check if it’s done by inserting a toothpick in the center. It should come out clean. While the cake bakes, prepare the cream cheese frosting. In a mixing bowl, combine the softened cream cheese, softened butter, powdered sugar, vanilla extract, and a pinch of salt. Beat this mix until smooth and creamy. After baking, let the cake cool in the dish for 10 minutes. Then, transfer it to a wire rack to cool completely. Once cool, spread the cream cheese frosting evenly over the top of the cake. For a lovely presentation, slice the cake into squares. Serve on a decorative platter and garnish with a sprinkle of cinnamon and a few pecan halves. Enjoy your cake with a nice cup of coffee or tea! To get that perfect swirl in your cake, you need to be gentle. After you layer the cinnamon mix, pour the rest of the batter on top. Use a knife or spatula to swirl through the layers. Do not overdo it! You want to see the layers, not mix them all together. Just a few gentle swirls will do the trick. This gives you beautiful, defined swirls. Baking a cake can be tricky, but these tips can help. Always preheat your oven to 350°F (175°C). This ensures even baking. Use a clean, dry mixing bowl. Mix your batter until smooth but don’t overmix. Overmixing can make your cake tough. Check doneness by inserting a toothpick in the center. If it comes out clean, your cake is ready. When serving your cinnamon roll cake, slice it into squares. A decorative platter adds a nice touch. You can sprinkle some cinnamon on top for extra flavor. Pecan halves also make a great garnish. Serve it warm or at room temperature. Pair it with coffee or tea for a delightful treat. You can find the Full Recipe for more details on this tasty dessert. {{image_2}} You can switch up the flavors in your cinnamon roll cake. Here are a few ideas: - Chocolate Swirl: Add cocoa powder to the cinnamon mixture for a rich twist. - Pumpkin Spice: Mix in pumpkin puree and pumpkin spice for a fall favorite. - Apple Cinnamon: Fold in diced apples for a fruity bite. - Nutmeg: Add a pinch of nutmeg to the cinnamon for extra warmth. These variations bring new life to the classic recipe. You can explore different tastes with each bite. You can easily adjust this recipe to fit your dietary needs: - Gluten-Free: Use a 1:1 gluten-free flour blend instead of all-purpose flour. - Vegan: Replace the eggs with flax eggs (1 tablespoon of flaxseed meal + 2.5 tablespoons of water per egg). Use almond milk and non-dairy butter for the frosting. These changes help everyone enjoy the cake without worry. You can still savor each slice, no matter your diet. Toppings can make this cake even more special. Try these ideas: - Chopped Nuts: Sprinkle chopped walnuts or pecans on top for crunch. - Chocolate Drizzle: Drizzle melted chocolate over the frosting for extra sweetness. - Fresh Fruit: Add sliced strawberries or raspberries on top for color. - Coconut Flakes: Sprinkle toasted coconut for a tropical vibe. These toppings not only look great, but they add exciting flavors. You can mix and match to find your favorite combinations. To keep your cinnamon roll cake fresh, let it cool completely. Once cooled, cover the cake with plastic wrap or foil. This helps keep moisture in and prevents it from drying out. You can also place the cake in an airtight container for added protection. Store it at room temperature for up to three days. If you want to keep it longer, consider freezing it. To freeze your cake, first slice it into squares. Place the slices on a baking sheet and freeze them for about an hour. Once frozen, wrap each piece in plastic wrap. Then, put the wrapped slices in a freezer bag or airtight container. This method helps keep them fresh for about three months. When you're ready to enjoy, just thaw the slices in the fridge overnight. For best results, use airtight containers made of glass or plastic. These containers block air and moisture, keeping your cake fresh longer. You can also use freezer-safe bags for frozen slices. Label the bags with the date, so you know when to enjoy them. Happy baking! Yes, you can make the cake ahead of time. I suggest baking it a day before serving. Once it cools, wrap it tightly in plastic wrap. This keeps it fresh. You can frost it the next day. This method saves time and makes serving easy. The cream cheese frosting lasts about one week in the fridge. Store it in an airtight container. If you have leftover frosting, you can also freeze it. Just place it in a freezer-safe container. It can last up to three months in the freezer. Some common mistakes can lead to cake troubles. Here are a few to watch for: - Not measuring ingredients correctly: Use measuring cups and spoons. - Skipping the preheating step: Always preheat your oven for even baking. - Overmixing the batter: Mix just until combined for a fluffy cake. - Not checking for doneness: Use a toothpick to test the center. By avoiding these errors, your cake will turn out great. For the full recipe, check the earlier section. This blog post covered how to make a tasty cinnamon roll cake. We looked at key ingredients, steps to bake, and frosting tips. You learned how to create unique flavors and store any leftovers. Using the tips will help you bake with ease and joy. Don’t be afraid to try new toppings or flavors. Enjoy every delicious bite and share it with friends and family. Now, go ahead and make your own cinnamon roll cake!

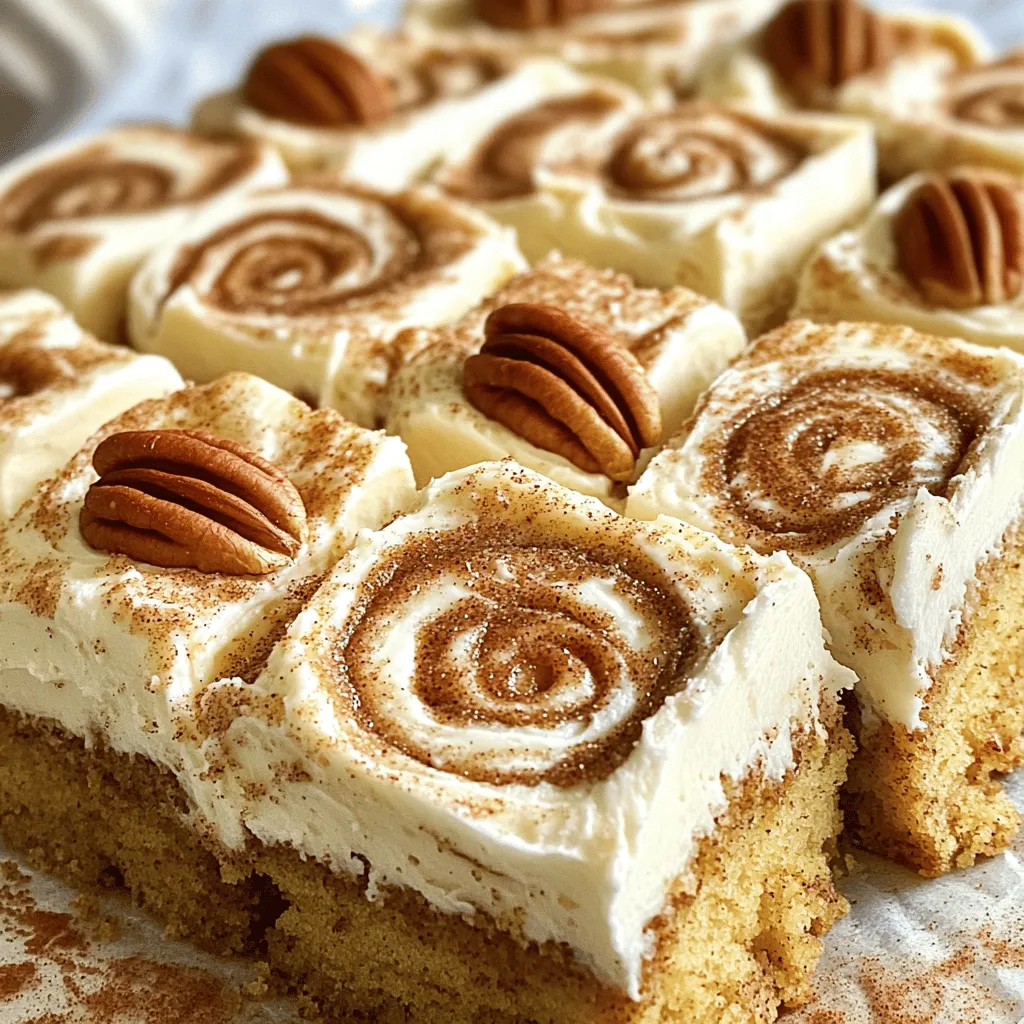
Are you ready to dive into a sweet indulgence? My Cinnamon Roll Cake with Cream Cheese Frosting is pure heaven. Imagine soft, fluffy cake swirled with warm cinnamon and topped …

Read more

Categories Desserts

Cheesy Garlic Breadsticks Irresistible Homemade Treat

May 12, 2025 by Chef Theo
To make cheesy garlic breadsticks, you need these simple ingredients: - 2 cups all-purpose flour - 1 packet (2 1/4 tsp) instant yeast - 3/4 cup warm water (110°F/43°C) - 1/2 teaspoon sugar - 1 teaspoon salt - 2 tablespoons olive oil - 3 tablespoons unsalted butter, melted - 4 cloves garlic, minced - 1 cup shredded mozzarella cheese - 1/2 cup grated Parmesan cheese - 1 tablespoon dried oregano - Fresh parsley, chopped (for garnish) - Pinch of red pepper flakes (optional) Using good ingredients makes a big difference. Fresh garlic gives a strong flavor that sets these breadsticks apart. Good cheese melts well and creates that stretchy, gooey texture we all love. Quality flour helps the dough rise nicely. Always check expiration dates on yeast; you want it to be active for a great rise. For best results, choose high-quality olive oil and butter. They enhance flavor and aroma, making your breadsticks even tastier. You can swap some ingredients if needed. For a gluten-free option, use gluten-free flour. This may change the texture a bit but should still taste great. If you don’t have Parmesan cheese, try using Pecorino Romano or even nutritional yeast for a vegan twist. For a different flavor, add herbs like thyme or basil instead of oregano. You can also use garlic powder if you don’t have fresh garlic on hand. These tweaks can help you make the recipe work for your taste and pantry. First, we need to make the dough. In a small bowl, mix warm water, sugar, and yeast. Let it sit for about 5 minutes. You want it to look frothy. This shows the yeast is alive. In a large bowl, combine flour and salt. Make a well in the center. Add the yeast mixture and olive oil. Mix until a dough forms. Knead the dough on a floured surface for 5 to 7 minutes. It should feel smooth and elastic. Place the dough in a greased bowl. Cover it with a damp cloth. Let it rise in a warm spot for about one hour or until it doubles in size. Once your dough has risen, preheat your oven to 425°F (220°C). Roll out the dough on a floured surface into a rectangle. Aim for about 1/2 inch thick. In a small bowl, mix melted butter, minced garlic, and oregano. Brush this mixture generously over the dough. Then, sprinkle mozzarella and Parmesan cheese evenly on top. If you want a kick, add red pepper flakes. Cut the dough into strips, about 1-2 inches wide. Carefully transfer the strips to a lined baking sheet. Bake in the preheated oven for 12 to 15 minutes. They should turn golden and the cheese should be bubbly. After baking, remove the breadsticks from the oven. Garnish them with freshly chopped parsley for color and flavor. Serve them warm, alongside a small bowl of marinara sauce for dipping. For a rustic touch, arrange the breadsticks in a basket lined with a clean cloth. Enjoy your cheesy garlic breadsticks as a perfect snack or side dish! For the full recipe, check out the section above. One key mistake is not letting the dough rise enough. Let it double in size. This step makes the breadsticks soft and fluffy. Another mistake is using cold water. Warm water helps the yeast wake up. If you skip the yeast, your breadsticks won't rise. Also, make sure to measure the flour correctly. Use a spoon to scoop it into the cup, then level it off. Too much flour can make the dough dense. For the best texture, knead the dough well. This develops the gluten, which gives bread a nice chew. Aim for about 5 to 7 minutes of kneading. If the dough is sticky, sprinkle a bit more flour. For great flavor, don't skip the garlic butter mix. Use fresh, minced garlic for a stronger taste. After baking, let the breadsticks cool slightly. This helps enhance the flavors, making each bite better. To boost the garlic flavor, add more minced garlic to the butter. For cheese, try mixing different types. Cheddar or Gouda can offer a nice twist. If you want a bit of heat, add red pepper flakes to the cheese mix. Finally, fresh herbs like basil or thyme can bring extra flavor. You can mix them right into the dough or sprinkle them on top before baking. For even more yum, serve with marinara sauce for dipping. For the full recipe, check out the detailed steps above. {{image_2}} You can change up the cheese for fun. Try cheddar for a sharp bite. Fontina adds creaminess, while gouda gives a smoky flavor. Mix mozzarella with a bit of blue cheese for a bold twist. You can even use a blend of cheeses for unique tastes. Just keep the total amount around one and a half cups. This way, your breadsticks will still be cheesy and delicious. Adding herbs and spices makes your breadsticks exciting. Fresh basil or thyme adds a nice touch. You can mix in some garlic powder for extra flavor. A pinch of Italian seasoning works well too. For a little heat, try adding crushed red pepper flakes. Just be careful with the amount. You want to enhance the flavor, not overpower it. If you need gluten-free breadsticks, use a gluten-free flour blend. Look for one that includes xanthan gum for the best texture. For a vegan version, swap dairy cheese for your favorite plant-based cheese. You can also use olive oil instead of butter. This way, everyone can enjoy these tasty treats. Don't forget to check the ingredient labels for hidden animal products. For the full recipe, follow the instructions above! To keep your cheesy garlic breadsticks fresh, store them in an airtight container. Place a piece of parchment paper between layers if you stack them. This helps prevent them from getting soggy. Keep the container at room temperature for up to two days. For longer storage, the fridge is fine, but it may dry them out. When it's time to enjoy your leftover breadsticks, the oven is best. Preheat the oven to 350°F (175°C). Place the breadsticks on a baking sheet. Heat them for about 10 minutes, or until warm. You can also microwave them for 30 seconds. However, the microwave may make them chewy, not soft. If you want to save your cheesy garlic breadsticks for later, freezing is a great option. Wrap them tightly in plastic wrap, then place them in a freezer-safe bag. They can stay in the freezer for up to three months. To eat them, thaw in the fridge overnight and reheat as mentioned above. For a quick fix, you can bake them directly from frozen. Just add a few extra minutes to the bake time. Enjoy your homemade treat anytime! For the full recipe, check the earlier section. To make Cheesy Garlic Breadsticks from scratch, start by mixing warm water, sugar, and yeast. Let it sit for five minutes. In a big bowl, combine flour and salt. Make a well and add the yeast mix and olive oil. Mix until the dough forms. Knead it for about five to seven minutes until smooth. Let it rise in a greased bowl for one hour. Roll it out into a rectangle, brush with garlic butter, and top with cheese. Cut into strips and bake at 425°F for 12 to 15 minutes. For the full recipe, check the earlier section. Yes, you can use other cheeses! While mozzarella and Parmesan are classic choices, feel free to mix it up. Cheddar adds a sharp flavor, while Gouda gives a smoky touch. You can even try feta for a tangy twist. Just remember, when choosing cheese, aim for a good melt. This will keep your breadsticks gooey and delicious. Cheesy Garlic Breadsticks pair well with many dishes. You can serve them with marinara sauce for a classic dip. They also go nicely with a fresh salad for a light meal. If you want some protein, try them with a hearty soup or pasta. You can also enjoy them as a snack on their own. In this article, we explored how to make perfect cheesy garlic breadsticks. We covered the best ingredients, step-by-step instructions, and tips for flavor. I discussed fun variations for different diets and how to store extras. Remember, using fresh ingredients leads to the best taste. Avoid common mistakes for the perfect texture. Enjoy making these breadsticks as a snack or side. With practice, you’ll impress everyone with your skills. Now, go ahead and bake!

If you’re craving a warm, cheesy treat, you’ve come to the right place! My homemade Cheesy Garlic Breadsticks are simple to make and utterly delicious. With the right ingredients and …

Read more

Categories Appetizers

Spicy Honey Garlic Shrimp Flavorful and Easy Recipe

May 12, 2025 by Chef Theo
To make a delicious dish of Spicy Honey Garlic Shrimp, you need these simple ingredients: - 1 pound large shrimp, peeled and deveined - 3 tablespoons honey - 2 tablespoons low sodium soy sauce - 4 cloves garlic, minced - 1 teaspoon fresh ginger, grated - 1 teaspoon red pepper flakes - 2 tablespoons olive oil - 1 tablespoon lime juice - Salt and pepper to taste - Chopped scallions and sesame seeds for garnish Each ingredient adds a unique taste. The honey gives sweetness. Soy sauce adds a savory flavor. Garlic and ginger bring warmth and spice. Red pepper flakes give a kick. Olive oil helps cook the shrimp. Lime juice brightens the dish. Salt and pepper enhance all the flavors. For a stunning finish, use scallions and sesame seeds as a garnish. They add both color and crunch. You can find the full recipe at the beginning of this article. Start by making the marinade. In a mixing bowl, combine honey, soy sauce, minced garlic, grated ginger, red pepper flakes, olive oil, and lime juice. Whisk these ingredients well until they blend into a smooth mixture. This marinade brings sweetness and heat to the shrimp. Once mixed, add your shrimp to the bowl. Toss them gently to coat each shrimp with the marinade. Let them sit for about 20 to 30 minutes. This waiting time allows the shrimp to absorb all those great flavors. Next, heat a large non-stick skillet over medium-high heat. Once the skillet is hot, add the marinated shrimp. Remember to keep some marinade aside for later. Cook the shrimp for about 2 to 3 minutes on each side. You want them to turn pink and opaque. Be cautious not to overcook them, as they can become rubbery. After the shrimp are done cooking, pour the reserved marinade into the skillet. Let it come to a gentle simmer and cook for another 2 to 3 minutes. This helps the sauce thicken slightly and coat the shrimp beautifully. Now, it’s time to serve your spicy honey garlic shrimp. For a great presentation, use a shallow bowl. Drizzle the thickened honey garlic sauce over the shrimp. Garnish with chopped scallions and a sprinkle of sesame seeds. These toppings add color and crunch. You can pair the shrimp with steamed rice or quinoa. This helps soak up the tasty sauce. For the full recipe, check out the details above. Enjoy your meal! To make the best marinade, focus on balance. Honey brings sweetness and garlic adds depth. Ginger gives a fresh kick. I suggest using fresh ginger for a brighter taste. Mixing these flavors well is key. Allow the shrimp to soak for at least 20 minutes. Longer marinating intensifies the flavor. Cook the shrimp in a hot, non-stick skillet. This helps them sear nicely. Searing locks in moisture and flavor. Cook them quickly, just 2-3 minutes on each side. Watch closely; shrimp cook fast. Overcooking makes shrimp tough, not tender. After cooking, add the reserved marinade. Let it simmer briefly to thicken. Garnishes add a nice touch. I love using chopped scallions and sesame seeds. They add color and crunch. For a bit of zest, squeeze fresh lime on top. You can also add sliced chilies for more heat. Serve the shrimp in a shallow bowl. It makes for a lovely presentation. Check out the Full Recipe for full details! {{image_2}} You can change ingredients to fit your taste or what you have. If you want a different sweet flavor, try maple syrup instead of honey. You can use tamari sauce if you need a gluten-free option. For a kick of zest, swap lime juice with lemon juice. If you don't have fresh ginger, ground ginger works too, but use less. You can cook Spicy Honey Garlic Shrimp in many ways. Grilling adds a nice smoky flavor. Just marinate the shrimp like in the full recipe and thread them on skewers. Grill for about 2-3 minutes on each side until pink. Baking is simple too! Place the marinated shrimp on a baking sheet and bake at 400°F for 8-10 minutes. Both methods keep the shrimp juicy and full of flavor. You can easily change the heat level in this dish. If you like it mild, cut the red pepper flakes in half. For more heat, add more flakes or some diced jalapeños. If you're feeling bold, try a splash of hot sauce in the marinade. Taste as you go to find the right level for you. After cooking, let your spicy honey garlic shrimp cool down. Store them in an airtight container. Place the container in the fridge. The shrimp will stay fresh for up to three days. Make sure to keep them away from other strong-smelling foods. If you want to save your shrimp for later, you can freeze them. First, let them cool completely. Then, place them in a freezer-safe bag or container. Remove as much air as possible. Label the bag with the date. You can freeze them for up to three months. When you're ready to eat, thaw them in the fridge overnight before cooking. When you’re ready to enjoy your leftovers, reheat them gently. You can use a skillet over low heat. Add a splash of water or broth to keep them moist. Stir often to prevent sticking. You can also microwave them, but do it in short bursts. This keeps the shrimp from becoming tough. Enjoy your meal again with all its wonderful flavors! You can serve Spicy Honey Garlic Shrimp with many tasty sides. Here are some great options: - Steamed rice - Quinoa - Stir-fried vegetables - Noodles - A fresh salad These sides help balance the sweet and spicy flavors of the shrimp. Each option adds its own texture and taste to the meal. To tell if shrimp are cooked, look for a few key signs. The shrimp should turn pink and opaque. They should also curl into a “C” shape. If they curl tightly into an “O,” they may be overcooked. Generally, cooking shrimp takes about 2-3 minutes on each side. Yes, you can use frozen shrimp for this recipe. Just remember to thaw them first. To thaw shrimp, place them in a bowl of cold water for about 15-20 minutes. Once thawed, pat them dry before adding them to the marinade. This helps them soak up the flavors better. You can find the Full Recipe for more details on preparing the shrimp. This blog covered a tasty Spicy Honey Garlic Shrimp recipe. We discussed key ingredients, easy steps, and tasty tips to make it your own. Remember to experiment with flavors that excite you. Storage tips help keep your shrimp fresh longer. Enjoy serving this dish with friends and family. It’s sure to impress everyone at your table. Cook with confidence, and make it a fun experience! You have the tools to create a delicious meal.

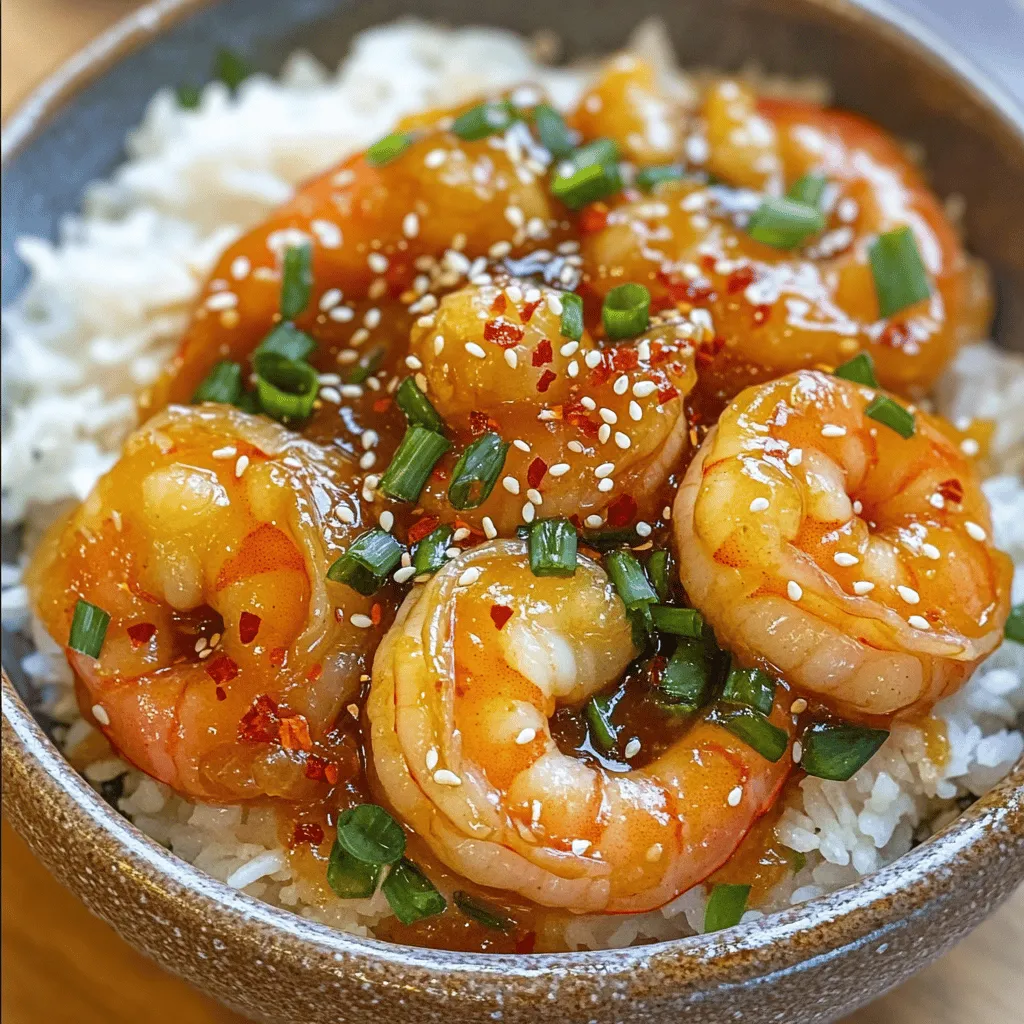
Are you ready to spice up your dinner routine? This Spicy Honey Garlic Shrimp recipe is perfect for you! It combines sweet honey and zesty garlic to create an irresistible …

Read more

Categories Dinner

Instant Pot Beef Stew Hearty Comfort in a Bowl

May 12, 2025 by Chef Theo
- 2 lbs beef chuck, cut into 1-inch pieces - 1 large onion, diced - 3 cloves garlic, minced - 4 medium carrots, sliced - 4 medium potatoes, diced - 1 cup frozen peas - 1 tablespoon olive oil - 2 cups beef broth - 1 tablespoon tomato paste - 1 teaspoon dried thyme - 1 teaspoon dried rosemary - Salt and pepper to taste - 2 bay leaves - Prep Time: 15 minutes - Total Time: 1 hour - Servings: 6 Gathering the right ingredients makes cooking easier. Start with fresh beef chuck. This meat gives the stew a rich flavor. Cut it into 1-inch pieces for even cooking. Next, chop one large onion and mince three cloves of garlic. These add a sweet and savory base to the dish. For a hearty bite, slice four medium carrots and dice four medium potatoes. These veggies help fill you up and provide great texture. Finish it off with one cup of frozen peas. They add a pop of color and sweetness at the end. Next, don't forget your pantry staples. Use one tablespoon of olive oil to sauté the beef and aromatics. Two cups of beef broth form the stew's base. One tablespoon of tomato paste adds depth. Season with one teaspoon of dried thyme and one teaspoon of dried rosemary. Add salt and pepper to taste. Lastly, toss in two bay leaves for extra flavor. This recipe serves six, making it perfect for family meals. You can whip it up in just an hour, with only 15 minutes of prep. For the full recipe, click here [Full Recipe]. - Set the Instant Pot to Sauté mode and heat olive oil. - Sear beef chuck pieces until browned, then set aside. First, you want to make sure your Instant Pot is ready. Set it to Sauté mode, then add the olive oil. Let it heat up for a moment. When the oil shimmers, it’s time to add the beef. Add your beef chuck pieces in batches. Sear them until they are a nice brown color. This step adds flavor to your stew. Once browned, take the beef out and set it aside on a plate. - Sauté diced onion until translucent. - Add minced garlic and cook for 1 additional minute. Next, keep the pot on Sauté mode. Toss in the diced onion. Cook it until it turns translucent. This takes about three to four minutes. Then, add the minced garlic. Stir it in and let it cook for one more minute. The smell will be wonderful at this point! - Stir in tomato paste, return beef to the pot. - Add remaining vegetables, broth, and spices. - Close lid and set to Manual for cooking. Now it's time to bring everything together! Stir in the tomato paste and mix well. Then, return the browned beef to the pot. Add in the sliced carrots, diced potatoes, beef broth, thyme, rosemary, and season with salt and pepper. Give everything a good stir to combine. Place the bay leaves on top without stirring them in. This helps add flavor. Close the Instant Pot lid and set it to Manual for 35 minutes. Make sure the valve is set to Sealing. For the full flavor experience, follow the [Full Recipe]. To make your stew taste amazing, start with quality beef chuck. This cut has the right fat and flavor. It breaks down well during cooking, giving your dish richness. Before serving, always taste and adjust seasoning. A pinch more salt or pepper can elevate the flavors. You have two methods to release pressure: natural and quick. Natural release lets the pot cool down on its own. This can take about 10-20 minutes. It keeps the stew moist. Quick release is faster. Just turn the valve to venting. Be careful! Use a kitchen towel to protect your hand from steam. To open the Instant Pot safely, ensure the pressure is fully released. Wait for the pin to drop. Then, turn the lid to open it away from you. This helps avoid steam burns. For a deeper flavor, add a splash of red wine. It really boosts the taste! You can also stir in fresh herbs like parsley or thyme right before serving. They add freshness and a pop of color. These simple steps make your stew shine. For the full recipe, check the details above. {{image_2}} You can change the meat! Try chicken or pork instead of beef. Each option brings a unique taste. For veggies, swap in whatever is fresh. Use sweet potatoes, green beans, or even mushrooms. This stew is flexible! Want to make it gluten-free? Just check your beef broth. Some brands add gluten. If you prefer a vegan version, use plant-based meat alternatives. You can still enjoy that hearty flavor without the meat. If you don't have an Instant Pot, don't worry! You can use a slow cooker instead. Just follow the same steps but cook on low for about 6-8 hours. You can also make it on the stovetop. Start by browning the beef in a pot, then add the rest of the ingredients. Let it simmer for about 1.5 to 2 hours until everything is tender. This stew is made for comfort, no matter how you cook it! To store leftover Instant Pot beef stew, first cool it to room temperature. Then, place it in an airtight container. This keeps the stew fresh for up to three days in the fridge. Glass containers work best, as they do not stain and are easy to clean. If you want to keep the stew longer, consider freezing it. To freeze beef stew, follow these steps: - Allow the stew to cool completely. - Portion it into freezer-safe bags or containers. - Remove as much air as possible to prevent freezer burn. - Label the containers with the date. For thawing, place the stew in the fridge overnight. This keeps the texture and flavor intact. You can also thaw it in the microwave on low power if you need it faster. When reheating, you have two main options: the stove or the microwave. If using the stove, heat the stew in a pot over medium heat. Stir often until it’s hot. If using the microwave, use a microwave-safe bowl. Heat in short bursts, stirring in between, until hot. To maintain flavor and texture, avoid boiling the stew. Gently warming it keeps the meat tender and the veggies from getting mushy. Enjoy your hearty comfort in a bowl! For more details, check the Full Recipe. Yes, you can make this stew ahead of time. It tastes better the next day! To store, let it cool down first. Then, put it in an airtight container. You can keep it in the fridge for up to three days. If you want to store it longer, freeze it. It keeps well for about three months in the freezer. Just make sure to label it with the date. To thicken your stew, you have a few options. You can mash some of the potatoes in the pot. This adds creaminess without extra steps. Another option is to mix a bit of cornstarch with cold water. Stir this mixture into the stew and cook for a few minutes. This method works fast and gives a nice thickness. Many sides complement this stew well. You can serve it with crusty bread for dipping. A fresh green salad also adds a nice crunch. If you want something warm, try mashed potatoes or rice. These sides soak up the flavorful broth. They enhance your meal and make it more filling. You now know how to make a delicious Instant Pot beef stew. This stew uses fresh and pantry ingredients to create great flavor. You can easily customize it with different meats or veggies. Remember to store your leftovers properly for later enjoyment. With these tips and tricks, you can impress anyone who tries your dish. Enjoy each bite of your hearty meal, and feel free to explore new variations. Cooking can be fun and rewarding, so dive in and make it your own!

There’s nothing quite like a warm bowl of beef stew on a chilly day. In my latest post, “Instant Pot Beef Stew: Hearty Comfort in a Bowl,” you’ll discover how …

Read more

Categories Dinner

No-Bake Peanut Butter Bars Simple and Delicious Treat

May 12, 2025 by Chef Theo
The key to making no-bake peanut butter bars is using simple ingredients you might already have. Here’s what you need to gather: - 1 cup creamy peanut butter - 1/2 cup honey or maple syrup - 1 cup rolled oats - 1/2 cup coconut flour - 1/4 cup chocolate chips - 1 tsp vanilla extract - A pinch of salt These ingredients work together to create a sweet, nutty, and satisfying treat. The peanut butter adds creaminess, while the oats give it structure. You can choose between honey or maple syrup for sweetness. Coconut flour adds a nice texture, and chocolate chips provide a delightful touch. The vanilla extract and salt enhance all these flavors. Make sure to use quality ingredients for the best taste. Fresh peanut butter, pure vanilla, and good chocolate chips can really elevate your bars. If you want to learn how to combine these ingredients into a delicious treat, check out the Full Recipe. Start by mixing the peanut butter and honey in a medium saucepan. Heat this on low. It’s key to stir continuously. This keeps the mix smooth and prevents burning. Once it blends well, remove it from the heat. Add the vanilla extract and a pinch of salt. This adds flavor and depth. Next, in a large bowl, mix rolled oats and coconut flour. Pour the warm peanut butter mixture over the dry ingredients. Stir well until they blend. You want a nice, even mixture. Now, it’s time to fold in the chocolate chips. Use a spatula to gently combine them without breaking them. This step is vital for even chocolate distribution. Prepare an 8x8 inch baking dish by lining it with parchment paper. Leave some paper hanging over the edges. This helps with easy removal later. Transfer the mixture into the dish. Press it down firmly and evenly. This forms a solid layer, ensuring the bars hold together. Place the baking dish in the refrigerator. Let it chill for at least 1-2 hours. The bars need to set completely. You’ll know they are ready when they feel firm to the touch. Once set, lift the bars out using the parchment paper. Cut them into squares or rectangles. Enjoy your tasty, no-bake peanut butter bars! For the complete recipe, check out the [Full Recipe]. To get the right texture, you can adjust your ingredients. If you want thicker bars, add more coconut flour or oats. For chewier bars, use less coconut flour. You can even play with the peanut butter amount. More peanut butter makes the bars richer and softer. Adding spices or extracts boosts flavor. Try cinnamon for warmth or a dash of nutmeg for depth. If you want a twist, swap chocolate chips for dried fruit or nuts. This change makes the bars even more fun. For serving, cut the bars into squares or rectangles. You can sprinkle some sea salt on top for a fancy touch. If you are gifting, package them in cute boxes or wrap them in parchment. Tie them with a ribbon for a personal touch. These small details make your bars stand out. For a full recipe of these delightful treats, check out the [Full Recipe]. {{image_2}} If you want a nut-free treat, you can swap peanut butter for sun butter or soy nut butter. Both options give a tasty flavor without nuts. For sweetening, try agave nectar or brown rice syrup. These options add a nice twist and keep the bars sweet. To make these bars gluten-free, choose certified gluten-free oats. This step ensures you avoid any cross-contamination. You can also add nuts or seeds like pumpkin or sunflower seeds. These add crunch and more flavor to each bite. For a vegan twist, use maple syrup instead of honey. This keeps it plant-based and sweet. To maintain a good texture, make sure to use coconut oil along with the peanut butter. This addition helps bind the bars without milk or cream. These variations let you enjoy no-bake peanut butter bars in many ways. Don't hesitate to get creative with the flavors and ingredients! For the full recipe, check the earlier section. To keep your no-bake peanut butter bars fresh, store them in an airtight container. This will help prevent them from drying out. Place a piece of parchment paper between layers to avoid sticking. Keeping them in the fridge is best. The cold will help maintain their shape and flavor. If you follow these steps, your bars can last up to a week. You can freeze these bars for later. First, cut them into squares or rectangles. Then, wrap each piece tightly in plastic wrap. Place them in a freezer-safe bag or container. When you want to enjoy a bar, take it out and let it thaw at room temperature for about 30 minutes. You can also thaw them in the fridge overnight for a tasty treat when you’re ready. These bars can stay good at room temperature for about two days. After that, it’s best to store them in the fridge. Look for any signs that the bars have gone bad. If they smell off or have a change in color, it’s time to toss them. Keeping an eye on freshness will ensure you enjoy every bite. No-bake peanut butter bars last about a week when stored in the fridge. To keep them fresh, use an airtight container. Make sure to check for any signs of spoilage, like a change in smell or texture. Yes, you can substitute peanut butter with almond or cashew butter. These alternatives can change the taste and texture slightly. Almond butter offers a nuttier flavor, while cashew butter is creamier and milder. Both options still work well in this recipe. You can use maple syrup or agave nectar instead of honey. Both are great vegan options. If you want a low-sugar choice, consider using stevia or erythritol. Just remember, these may affect the bars' taste and texture differently. You learned how to make tasty no-bake peanut butter bars. We covered the ingredients, step-by-step preparation, tips for texture, and fun variations. Each part helps you create a perfect treat that fits your needs. With the right techniques, you can tailor these bars to your taste. Save them in a cool spot or freeze extras for later. Enjoy your yummy bars and impress your friends with your skills!

Craving a sweet and easy snack? Look no further! My No-Bake Peanut Butter Bars are a simple treat you can whip up in no time. With just a handful of …

Read more

Categories Desserts
Older posts
Newer posts
← Previous Page1 … Page75 Page76 Page77 … Page94 Next →

TOASTED RECIPES

Where ideas are warm, crisp, and ready to serve! 🍞

PAGES

Home About Contact Privacy Policy Terms & Conditions Cookie Policy GDPR Policy Copyright Policy Disclaimer

CATEGORIES

Appetizers Desserts Salads Breakfast Dinner

Contact

  • Pinterest
  • Mail
Copyright © 2025 Toasted Recipes. All rights reserved.