Overnight Crème Brûlée French Toast Delicious Recipe
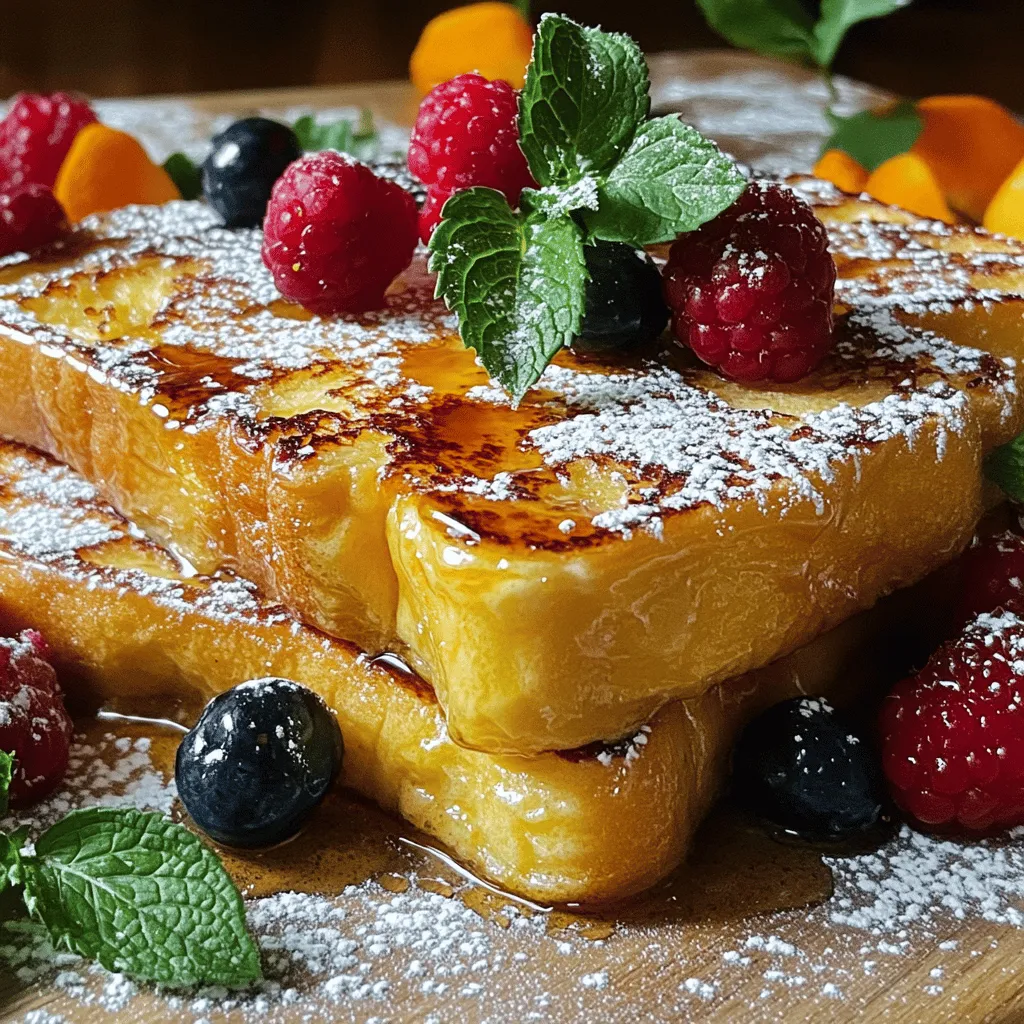
Looking to impress at your next brunch? Overnight Crème Brûlée French Toast is the answer! This dish combines creamy custard and crispy caramel topping for a delicious treat you can …
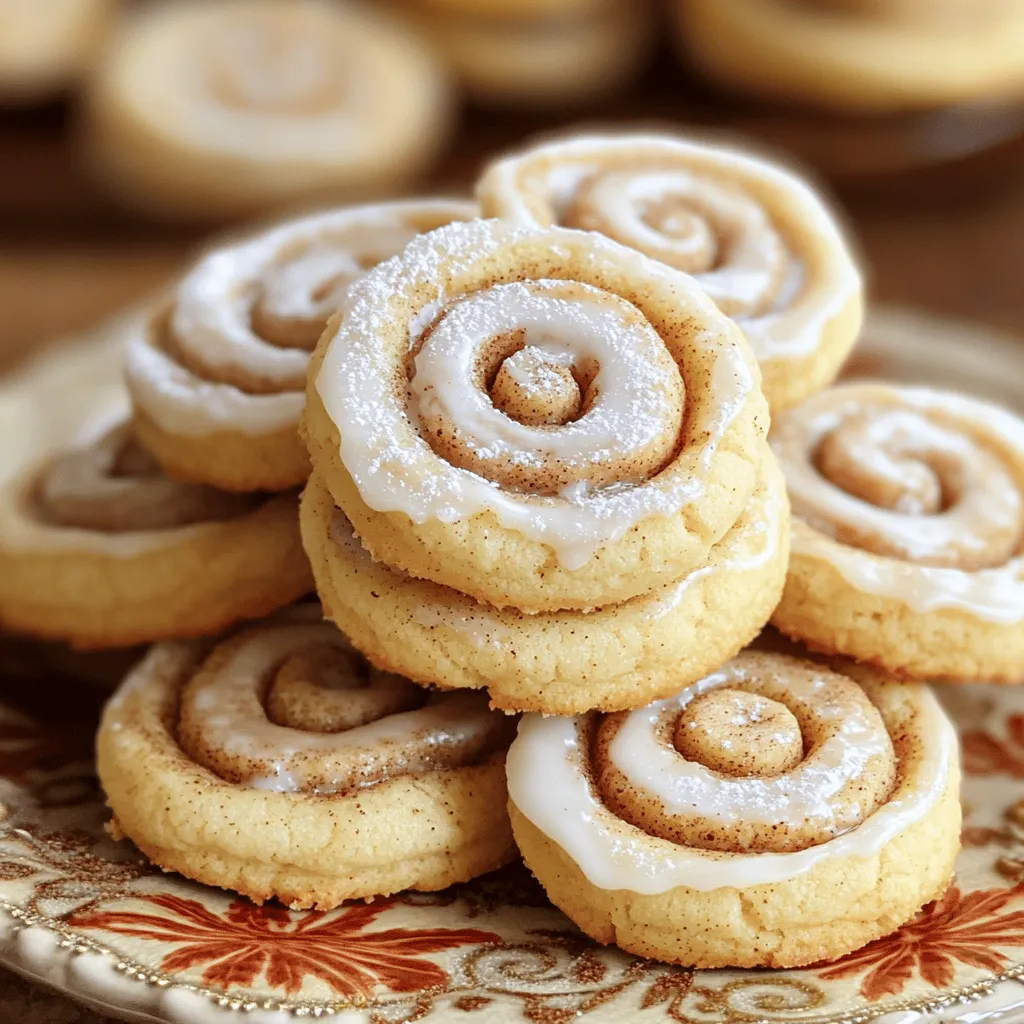
![To make Soft & Chewy Cinnamon Roll Cookies, you need some key ingredients. Here’s what you will gather: - 2 1/4 cups all-purpose flour - 1/2 teaspoon baking soda - 1 teaspoon baking powder - 1/2 teaspoon salt - 1 teaspoon ground cinnamon - 3/4 cup unsalted butter, softened - 1 cup brown sugar, packed - 1/2 cup granulated sugar - 1 large egg - 1 tablespoon vanilla extract - 1/2 cup powdered sugar (for icing) - 1-2 tablespoons milk (for icing) These ingredients create a soft and chewy cookie that tastes just like cinnamon rolls. The blend of butter, sugars, and cinnamon gives these cookies a rich flavor. The soft butter helps the dough mix well, making it easy to work with. The baking soda and baking powder give the cookies their rise. The egg adds moisture and binds everything together. Ground cinnamon is the star flavor here, making each bite taste warm and inviting. Once baked, you’ll drizzle icing made from powdered sugar and milk on top. This sweet touch completes the cookies and adds a nice finish. For the full recipe, check the [Full Recipe] details. First, you need to preheat your oven to 350°F (175°C). This helps the cookies bake evenly. While the oven heats, line a baking sheet with parchment paper. This makes clean-up easy and keeps the cookies from sticking. Now, in a mixing bowl, whisk together these dry ingredients: - 2 1/4 cups all-purpose flour - 1/2 teaspoon baking soda - 1 teaspoon baking powder - 1/2 teaspoon salt - 1 teaspoon ground cinnamon Mix well and set this bowl aside. Next, we’ll work on the dough. In a large bowl, cream together the softened butter and sugars. You can use a hand mixer or a stand mixer for this. Mix until the batter looks light and fluffy. Then, add one large egg and one tablespoon of vanilla extract to the butter mix. Stir until everything is well combined. This will give your cookies a rich flavor. Now, it’s time to combine the dry and wet ingredients. Gradually add the bowl of dry ingredients to the butter mixture. Be sure to mix gently until it's just combined. Over-mixing can make the cookies tough. Using a cookie scoop or a tablespoon, drop the dough onto your prepared baking sheet. Space each cookie about 2 inches apart. This allows them room to spread while baking. Bake them for 10-12 minutes. The edges should turn slightly golden, while the centers may look a bit underbaked. They will firm up as they cool. While the cookies bake, prepare the icing by mixing together 1/2 cup of powdered sugar and 1-2 tablespoons of milk. Whisk until smooth. Once the cookies cool slightly, drizzle the icing on top. You can find the full recipe [here] for more details on these soft and chewy cinnamon roll cookies! - Importance of not over-mixing: When you mix the dough, stop as soon as you see no dry flour. Over-mixing makes cookies tough instead of soft and chewy. - Checking for doneness: Look for slightly golden edges. The centers may look underbaked, but they will firm up as they cool. - Arranging cookies for visual appeal: Place cookies on a nice plate with space between them. This makes them look inviting and ready to eat. - Enhancing flavor with cinnamon sprinkles: After icing, sprinkle a little cinnamon on top. This adds color and boosts the cinnamon flavor. - Mismeasuring ingredients: Use a kitchen scale or measuring cups carefully. Too much flour or sugar can change the cookie's texture. - Not allowing cookies to cool properly: Let cookies cool on the baking sheet for a few minutes first. This helps them set before moving to a wire rack. {{image_2}} You can make your cinnamon roll cookies even better by adding nuts or chocolate chips. - Adding nuts: Chopped walnuts or pecans add crunch and flavor. Mix in about 1/2 cup of nuts when you combine your dry and wet ingredients. - Incorporating chocolate chips: Add 1/2 cup of chocolate chips to the dough. The sweet chocolate pairs well with cinnamon and makes each bite special. The right frosting can elevate your cookies. Here are some tasty options. - Cream cheese icing option: For a rich taste, mix 4 ounces of softened cream cheese with powdered sugar and a little milk. This gives a tangy twist to your cookies. - Glaze variations: You can create a simple glaze. Just mix powdered sugar with lemon or vanilla extract and a bit of milk. This adds a fresh flavor to the cookies. If you have special dietary needs, you can still enjoy these cookies. - Gluten-free flour alternatives: Use a 1:1 gluten-free flour mix instead of all-purpose flour. This keeps the texture soft and chewy. - Vegan adaptations: To make the cookies vegan, replace the egg with a flax egg. Mix 1 tablespoon of ground flaxseed with 2.5 tablespoons of water. Let it sit until it thickens. Also, use vegan butter in place of regular butter. These variations let you customize your soft and chewy cinnamon roll cookies. Explore these ideas to find your favorite twist on this classic treat. For detailed instructions, check the Full Recipe. To keep your cookies fresh, store them in an airtight container. You can use glass jars or plastic containers. Place parchment paper between layers if stacking them. This helps avoid sticking and keeps them soft. Store them at room temperature away from heat and moisture. You can freeze cookie dough for later use. Scoop the dough into balls and place them on a baking sheet. Freeze the balls for about an hour. Once frozen, transfer them to a zip-top bag. You can store them for up to three months. When you're ready to bake, just take them out and let them thaw for 20 minutes. Bake them as directed, adding a couple of extra minutes to the time. At room temperature, these cookies last about a week. If you store them well, they can stay soft and tasty. Look for signs of spoilage, like hardening or a strange smell. If they feel dry or crumbly, it’s time to toss them. Enjoy the Soft & Chewy Cinnamon Roll Cookies, but always keep an eye on freshness! You can tell when the cookies are done by checking the edges. Look for a light golden color around the edges. The centers may look a bit soft, and that is normal. This slight underbaking helps keep them chewy. When you take them out, they will continue to cook on the baking sheet. Yes, you can make the dough ahead of time. Prepare the dough and shape it into a log. Wrap it in plastic wrap and refrigerate for up to three days. You can also freeze the dough for up to three months. Just slice and bake when you are ready for fresh cookies. If you need to replace butter, you have options. You can use coconut oil, vegetable oil, or even margarine. Each option changes the flavor a bit, but they all work well. Just ensure that the fat is softened before mixing to keep your cookies soft and chewy. To keep your cookies soft, do not over-mix the dough. Mix just until the dry ingredients are combined. Also, take them out of the oven when they look slightly underbaked. The cookies will set as they cool, keeping them soft. Another tip is to store them in an airtight container to lock in moisture. This blog post covered all you need to know about baking cookies. We started with the list of ingredients, which sets a solid base. Next, I shared step-by-step instructions for making the dough and tips for baking. Common mistakes could ruin your cookies, so I highlighted important things to avoid. We also explored fun variations, storage advice, and answers to frequently asked questions. Now you’re ready to bake perfect cookies with ease! Enjoy your time in the kitchen and treat yourself.](https://toastedrecipes.com/wp-content/uploads/2025/05/da5cd735-b9da-47c2-a3f9-4339e8164594.webp)

![Raspberry Lemon Heaven Cupcakes need simple ingredients. Here’s what you will need: - 1 ½ cups all-purpose flour - 1 cup granulated sugar - ½ cup unsalted butter, softened - 2 large eggs - ½ cup buttermilk - 1 tablespoon lemon zest - 1 tablespoon fresh lemon juice - 1 teaspoon baking powder - ½ teaspoon baking soda - ¼ teaspoon salt - 1 cup fresh raspberries (plus extra for garnish) - Optional: powdered sugar for dusting These ingredients work together to create a light and fluffy cupcake. The lemon zest adds brightness, while the raspberries offer a burst of flavor. Each bite feels like a little party in your mouth! You can find the full recipe above to guide you through the steps. First, preheat your oven to 350°F (175°C). This step is key for baking. While the oven heats, line a muffin tin with cupcake liners. This makes for easy cleanup and pretty cupcakes. Next, take a large mixing bowl. Add the softened butter and granulated sugar. Use a hand mixer on medium speed. Mix until the mixture is light and fluffy, which takes about 3-4 minutes. This step adds air to your batter, giving the cupcakes a nice rise. In a separate bowl, whisk together the buttermilk, lemon zest, and lemon juice. This mix adds flavor and moisture. In another bowl, combine the flour, baking powder, baking soda, and salt. Mixing these dry ingredients helps them blend well. Now, it's time to combine everything. Gradually add the dry mix to the butter mix, alternating with the buttermilk mix. Stir until just combined. Do not overmix! Lastly, gently fold in the fresh raspberries. Be careful not to crush them too much. You want nice chunks of raspberry in each cupcake. Divide the batter evenly among the cupcake liners, filling each about two-thirds full. Bake in the preheated oven for 18-20 minutes. Check if a toothpick comes out clean from the center. Once done, let them cool in the tin for 5 minutes. Then, transfer the cupcakes to a wire rack to cool completely. For the final touch, dust with powdered sugar and add a fresh raspberry on top. Feel free to explore the Full Recipe for more details! To make the best Raspberry Lemon Heaven Cupcakes, follow these tips: - Use Room Temperature Ingredients: Bring butter, eggs, and buttermilk to room temp. This helps batter mix better. - Don’t Overmix: Mix just until combined. Overmixing makes cupcakes dense and tough. - Measure Accurately: Use measuring cups and spoons. This ensures proper ingredient ratios. - Fill Liners Correctly: Fill each cupcake liner about 2/3 full. This gives enough room to rise. - Check for Doneness: Insert a toothpick in the center. If it comes out clean, they are done. Avoid these common mistakes for perfect cupcakes: - Skipping the Baking Powder: This is key for the cupcakes to rise. - Using Cold Ingredients: Cold ingredients can lead to uneven mixing. - Not Cooling Properly: Let them cool in the tin for a few minutes. Then, transfer to a wire rack. - Ignoring the Raspberries: Gently fold them in to keep them whole and juicy. - Neglecting to Preheat: Always preheat your oven. This ensures even baking. Make your cupcakes look as good as they taste: - Powdered Sugar Dusting: Lightly dust with powdered sugar for a sweet touch. - Fresh Raspberries: Add fresh raspberries on top for color and flavor. - Lemon Zest Garnish: Sprinkle lemon zest for a bright, vibrant look. - Whipped Cream Swirls: Top with whipped cream for a fluffy texture. - Cupcake Toppers: Use fun themed toppers for special occasions. For the complete recipe, check out the Full Recipe section. {{image_2}} You can easily make these cupcakes gluten-free. Just swap all-purpose flour with a gluten-free mix. Look for a blend that includes xanthan gum. This will help the cupcakes rise and hold together. Follow the same recipe steps. You will still enjoy that light and fluffy texture. To create a vegan version, replace eggs with flax eggs. Mix 1 tablespoon of ground flaxseed with 2.5 tablespoons of water. Let it sit for about five minutes until it thickens. Use coconut oil in place of butter. You can also use almond milk instead of buttermilk. These swaps keep the flavor and texture delightful. Want to boost the flavor even more? Add a splash of vanilla extract to the batter. You can also mix in lemon extract for a stronger lemon taste. For a fun twist, try adding white chocolate chips or a bit of lemon curd inside the cupcakes. These small changes can make a big difference in your treat. For the full recipe, check out the [Full Recipe]. After baking your Raspberry Lemon Heaven Cupcakes, let them cool fully. Place them in an airtight container. This keeps them fresh for up to three days at room temperature. If you have leftover cupcakes, store them in the fridge for up to a week. Remember, cupcakes are best enjoyed fresh! To freeze your cupcakes, first cool them completely. Wrap each cupcake in plastic wrap. Then, place them in a freezer-safe bag or container. They will stay fresh for about three months. When you're ready to enjoy, thaw them in the fridge overnight. To keep your cupcakes moist, avoid leaving them uncovered. Always use airtight containers. If you plan to frost them later, store the frosting separately. This keeps that fluffy texture perfect. Lastly, if you want to add powdered sugar, do it right before serving for a lovely touch. For the full recipe, check out the details above. To make these cupcakes, start by preheating your oven to 350°F (175°C). Line a muffin tin with cupcake liners. Cream together ½ cup of softened butter and 1 cup of granulated sugar until light and fluffy. Mix in 2 large eggs, one at a time. In another bowl, combine ½ cup of buttermilk, 1 tablespoon of lemon zest, and 1 tablespoon of fresh lemon juice. In a separate bowl, mix 1 ½ cups of all-purpose flour, 1 teaspoon of baking powder, ½ teaspoon of baking soda, and ¼ teaspoon of salt. Gradually add the flour mix to the butter mix, alternating with the buttermilk mix. Gently fold in 1 cup of fresh raspberries. Fill the liners ⅔ full. Bake for 18 to 20 minutes. Check with a toothpick. Let cool and enjoy! Yes, you can use frozen raspberries. Just make sure to thaw and drain them first. This prevents adding excess moisture to the batter. Frozen raspberries may break apart more easily, so fold them in gently. Your cupcakes will still taste great! If you don't have buttermilk, you can make a quick substitute. Mix ½ cup of milk with 1 tablespoon of vinegar or lemon juice. Let it sit for about 5 minutes. This will sour the milk and work just like buttermilk in the recipe. These cupcakes can last for about 3 days at room temperature. Make sure to store them in an airtight container. If you want to keep them longer, you can refrigerate them for up to a week. They may last even longer if you freeze them. Yes, you can turn this cupcake recipe into a cake. Pour the batter into a greased cake pan instead of cupcake liners. Adjust the baking time to about 25 to 30 minutes. Check with a toothpick to see if it's done. Enjoy your raspberry lemon cake! You now have a clear guide to making delicious Raspberry Lemon Heaven Cupcakes. We covered the simple ingredients, thorough steps, and helpful tips. Remember to enjoy the process and have fun with flavors. Try different options, like gluten-free or vegan, to suit your needs. Storing them properly can help keep them fresh. With practice, you’ll bake perfect cupcakes every time. Let your creativity shine and impress everyone with your tasty treats!](https://toastedrecipes.com/wp-content/uploads/2025/05/a2e94e1a-3bbe-4469-83ec-a6fde1ce2c5a.webp)

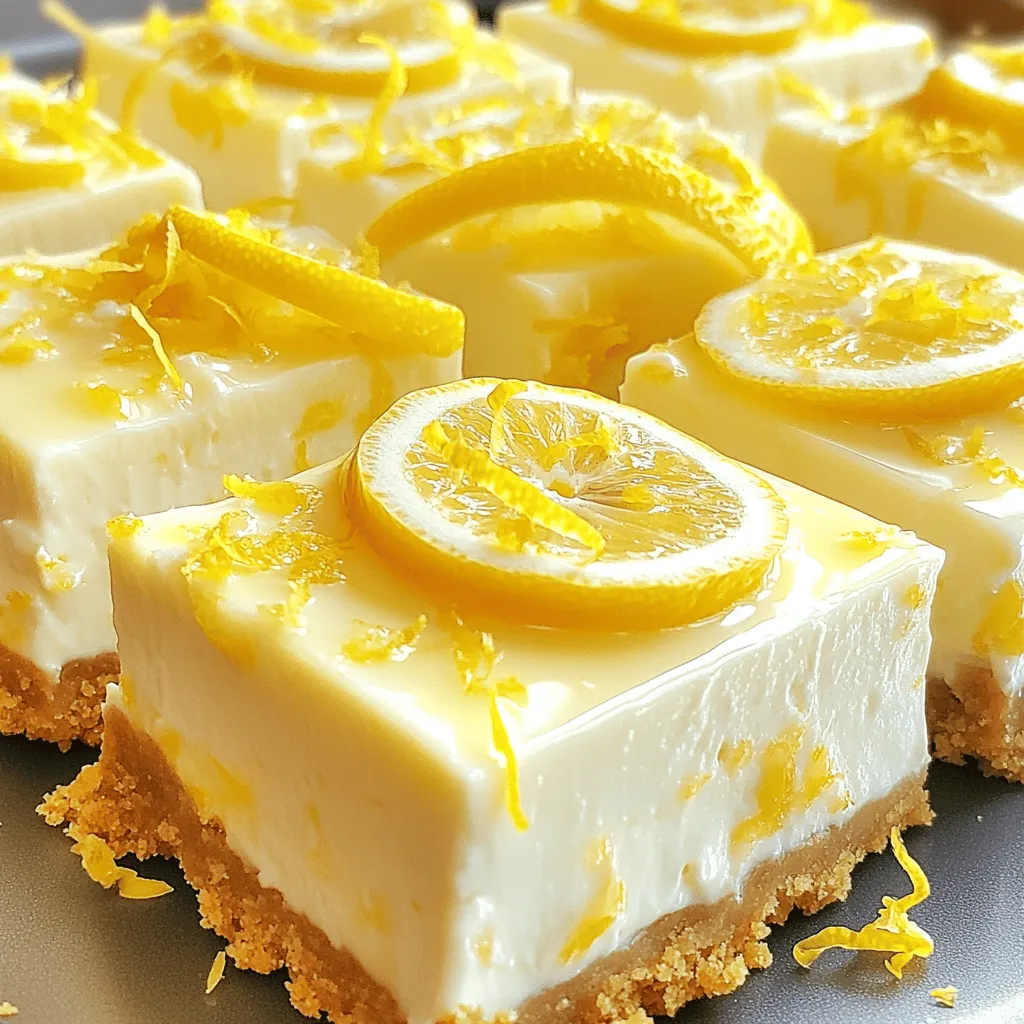
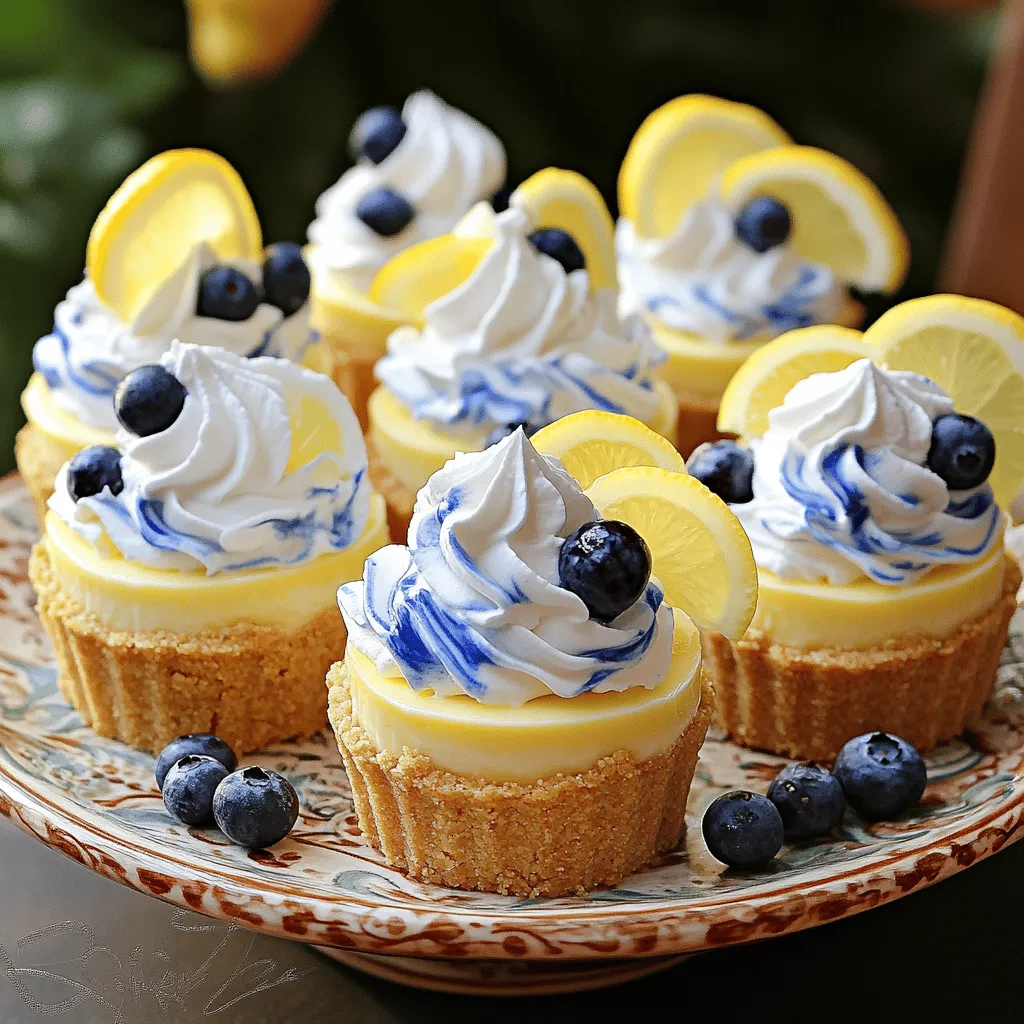
![To make these creamy mini lemon cheesecakes, gather the following simple ingredients: - 1 cup graham cracker crumbs - 1/4 cup granulated sugar - 1/2 teaspoon ground cinnamon - 1/4 cup unsalted butter, melted - 16 oz cream cheese, softened - 1 cup powdered sugar - 2 large eggs - 1/4 cup fresh lemon juice - Zest of 1 lemon - 1 teaspoon vanilla extract - Fresh berries for garnish (optional) - Whipped cream for topping (optional) Each ingredient plays a key role in creating the perfect mini cheesecake. The graham cracker crumbs form a sweet and crunchy crust. The sugar adds sweetness, while the cinnamon gives a warm touch. Cream cheese is the star of this dessert, providing that rich and creamy texture. The eggs help bind everything together, creating a smooth filling. Fresh lemon juice and zest brighten the flavor, making it refreshing. Lastly, the vanilla extract enhances the overall taste. You can also add fresh berries and whipped cream on top for a fun touch. This makes each bite feel special. If you'd like more details on how to make these cheesecakes, check out the Full Recipe. To make the crust, start by combining graham cracker crumbs, sugar, and cinnamon in a bowl. This blend gives the crust a sweet and warm flavor. Next, add melted butter and mix well. The butter binds the crumbs and sugar together. Press about one tablespoon of this mixture into each muffin liner. Make sure it forms a solid base. Bake the crusts in a preheated oven at 325°F (160°C) for about 8 to 10 minutes. You want them to be lightly golden. Once baked, let them cool while you make the filling. In a large bowl, beat the softened cream cheese until it is smooth and creamy. This is the key to a great texture. Gradually add the powdered sugar and mix until well combined. Now, add in the eggs one at a time. Beat well after each addition to ensure a smooth filling. Next, mix in the fresh lemon juice, lemon zest, and vanilla extract. These ingredients add a bright flavor to your cheesecake. Once everything is mixed together, pour the cheesecake filling into the cooled crusts. Fill each cup about three-quarters full to allow for some expansion while baking. Bake the mini cheesecakes for 18 to 20 minutes. They should be set but still have a slight jiggle in the center. This jiggle means they are just right. After baking, let them cool at room temperature. Once cooled, transfer them to the refrigerator. Chill for at least 2 hours to let them fully set. This step is important for the best texture and flavor. After chilling, your creamy mini lemon cheesecakes are ready to serve! For a special touch, top them with whipped cream and fresh berries if you like. Enjoy your delicious treat! For the complete recipe, check out the [Full Recipe]. To get the best cheesecake, soften your cream cheese first. Cold cream cheese can make your mix lumpy. Let it sit out for about 30 minutes before you start. When you add the eggs, mix just until combined. Overmixing can make your cheesecake dense instead of light. You can elevate the taste of your mini cheesecakes by adding more citrus zest. Try mixing in some lime or orange zest for a fun twist. Instead of just whipped cream, think about using fresh berries or lemon curd on top. These options add color and flavor. Watch the baking time closely. Underbaking means a gooey center, while overbaking can lead to cracks. Aim for a slight jiggle in the center when you take them out. After baking, let them cool at room temperature. Chilling in the fridge for at least two hours is key for the right texture. {{image_2}} You can make a no-bake version of mini lemon cheesecakes. Start by using cream cheese, powdered sugar, and lemon juice. Instead of baking, chill the mixture in the fridge. This gives a creamy, soft texture. Chilling takes about 4 hours. You will enjoy a fresh, tangy taste without using the oven. Try mixing in other citrus fruits like lime or orange. You can also add zest for a stronger flavor. Want a unique twist? Infuse the filling with fresh herbs like basil. This mix of flavors creates a fun and bright dessert. It surprises your taste buds while keeping the lemon base. For gluten-free mini cheesecakes, swap out regular graham crackers for gluten-free options. Many brands make gluten-free crumbs. Adjust the sugar used to fit your diet. Coconut sugar or other options can be great substitutes. These changes help everyone enjoy this tasty treat. To keep your mini lemon cheesecakes fresh, store them in the fridge. First, let them cool completely after baking. Then, place them in an airtight container. This helps prevent them from drying out and keeps their creamy texture. If you want to save space, you can stack them with parchment paper between layers. You can freeze these mini cheesecakes for later enjoyment. Start by wrapping each cheesecake in plastic wrap. Then, place them in a freezer-safe bag or container. This keeps them safe from freezer burn. When you are ready to eat, thaw them in the fridge overnight. This method helps maintain their smooth texture and bright flavor. In the fridge, your mini cheesecakes will last about five days. Always check for signs of spoilage. If you see any mold or if they smell off, it’s best to throw them away. Keeping an eye on them ensures you enjoy these tasty treats at their best. For the full recipe, check the earlier section. Yes, you can use low-fat cream cheese. It will change the flavor and texture a bit. Low-fat cream cheese makes the cheesecake less rich and creamy. If you prefer a lighter dessert, it works well. Just know it may not be as smooth as the full-fat type. You can make these cheesecakes healthier easily. Here are some ideas: - Use Greek yogurt instead of cream cheese for a protein boost. - Substitute honey or maple syrup for granulated sugar. - Choose whole grain graham crackers for the crust. - Add less sugar to the filling for a less sweet treat. If you don’t have muffin liners, don’t worry! You can bake these mini cheesecakes without them. Just grease the muffin tin with butter or cooking spray. This will help the cheesecakes come out easily after baking. You can also use silicone muffin cups for easy removal. Yes, you can prepare the filling a day ahead. Just store it in the fridge. When you are ready to bake, pour the filling over the crusts. This makes it easy to get the cheesecakes ready quickly. However, I suggest baking the cheesecakes fresh for the best taste and texture. These mini cheesecakes taste great with several drinks and sides. Here are some tasty ideas: - Serve with a cup of herbal tea or lemonade. - Pair with fresh berries like strawberries or blueberries for extra flavor. - A scoop of vanilla ice cream complements the lemon flavor well. - A drizzle of chocolate sauce adds a fun twist and makes it special. For the full recipe, check out the main article! These mini lemon cheesecakes are both tasty and fun to make. We covered the key ingredients, steps for prep, and tips for better results. You can try variations, whether you prefer no-bake or gluten-free. Proper storage helps keep your treats fresh and great for later. Remember to have fun experimenting with flavors and textures. Enjoy your baking adventure!](https://toastedrecipes.com/wp-content/uploads/2025/05/9a792772-0f0b-4845-b9d3-82eaf1d38b97.webp)