Skip to content
toastedrecipes.com
  • Home
  • Appetizers
  • Desserts
  • Salads
  • Breakfast
  • Dinner
  • Privacy Policy
  • Contact
  • About

Chef Theo

Delicious Crab & Cheese Crescents Perfect for Parties

May 19, 2025 by Chef Theo
- 1 can (8 oz) refrigerated crescent roll dough - 1 cup cooked crab meat (fresh or canned) - 1/2 cup cream cheese, softened - 1/2 cup shredded sharp cheddar cheese To make delicious crab and cheese crescents, you need a few key ingredients. First, the refrigerated crescent roll dough serves as the perfect base. It gives a flaky texture and golden color. Next, you will need cooked crab meat, which adds a rich flavor. You can use fresh or canned crab meat based on what you have. Cream cheese adds creaminess, while shredded sharp cheddar cheese gives a nice kick. - Fresh herbs like dill - Garlic powder and lemon juice For those who crave more flavor, consider adding some optional ingredients. Fresh herbs, like dill, bring brightness to the dish. Garlic powder adds a savory note, and a splash of lemon juice enhances the crab's natural taste. These ingredients can take your crescents to the next level. - Mixing bowl - Baking sheet - Parchment paper You will need a few simple tools to prepare these crescents. A mixing bowl is essential for combining your filling ingredients. A baking sheet will hold your crescents in the oven. Lining it with parchment paper makes cleanup easy and helps prevent sticking. With these ingredients and tools, you’re on your way to creating a great party snack. For the full recipe, check out the provided details. 1. Preheat the oven and prepare the baking sheet: Start by preheating your oven to 375°F (190°C). While the oven heats, grab a baking sheet and line it with parchment paper. This will help prevent the crescents from sticking. 2. Mix the filling ingredients: In a mixing bowl, combine the cooked crab meat, softened cream cheese, shredded cheddar cheese, green onions, lemon juice, garlic powder, salt, and pepper. Use a fork to mix everything until it’s well blended. This filling is the heart of your crescents, so make sure it’s creamy and flavorful. 1. Unrolling and cutting the dough: Take the refrigerated crescent roll dough and unroll it on a clean surface. You will see lines that show where to cut. Carefully separate the triangles along these lines. 2. Filling and rolling the crescent triangles: Take about a tablespoon of the crab mixture and place it at the wide end of each triangle. Gently roll the dough from the wide end to the narrow tip, folding the filling inside. Pinch the edges to seal them well. This step is crucial to keep the filling from leaking out while baking. 1. Brushing with egg wash: Once all the crescents are rolled, place them on your prepared baking sheet. Brush the tops with the beaten egg. This will give them a shiny, golden finish when baked. 2. Baking time and cooling tips: Bake in your preheated oven for 12-15 minutes. Keep an eye on them until they puff up and turn golden brown. After baking, let them cool for a few minutes on the sheet. This allows the flavors to settle before serving. Enjoy these delicious crab and cheese crescents warm for the best taste! For the full recipe, check out the earlier section. To get the best results, ensure your dough is at room temperature. Cold dough can be hard to roll and may not bake evenly. Allow it to sit out for 15 to 20 minutes before using. Adjust the seasoning to your taste. You can add a pinch more salt or a dash of hot sauce if you like it spicy. Remember, the crab meat's flavor is delicate, so don’t overpower it. For a great presentation, serve the crescents warm on a colorful platter. Add lemon wedges and a small bowl of garlic dipping sauce on the side. This adds flavor and makes the dish look inviting. Consider pairing the crescents with a light salad or a vegetable platter. Fresh veggies add crunch and balance to the rich flavors of the crab and cheese. To store leftovers, allow the crescents to cool completely. Place them in an airtight container and keep them in the fridge for up to three days. For reheating, preheat your oven to 350°F (175°C). Place the crescents on a baking sheet and heat for about 10 minutes. This keeps them crispy and delicious. {{image_2}} You can change the crab meat for other options. Shrimp or lobster work great too. If you want a vegetarian choice, use artichokes or mushrooms. These swaps keep the dish tasty and fun. For cheese, think beyond cheddar. Creamy goat cheese adds a tangy twist. Mozzarella gives a stretchy texture. Mix different cheeses for a unique flavor profile. If you need gluten-free options, use gluten-free crescent rolls. Many brands provide great alternatives. Ensure the rest of your ingredients are also gluten-free for safety. Want a vegan version? Use a plant-based cream cheese instead of dairy. You can also try using tofu or cashews blended to a smooth cream. Both options keep the filling rich and creamy. Adding spices can boost the taste. Try a pinch of cayenne for heat or smoked paprika for depth. You can also toss in some chopped bell peppers or spinach for extra flavor and nutrition. Fresh herbs like parsley or chives elevate the dish. Dill pairs well with crab and adds brightness. Feel free to experiment with what you love for a personal touch. For the full recipe, check out the main section. Enjoy creating your own unique twists on these delicious crab and cheese crescents! This recipe for delicious crab and cheese crescents is simple and fun. You need just a few ingredients to make a tasty snack. Here’s what you need: - 1 can (8 oz) refrigerated crescent roll dough - 1 cup cooked crab meat (fresh or canned) - 1/2 cup cream cheese, softened - 1/2 cup shredded sharp cheddar cheese - 1/4 cup green onions, finely chopped - 1 tablespoon lemon juice - 1/2 teaspoon garlic powder - Salt and pepper to taste - 1 egg, beaten (for egg wash) - Fresh dill for garnish (optional) You’ll mix the ingredients, fill the dough, and bake. The whole process takes about 30 minutes. You can make 8 crescents, perfect for parties or gatherings. For perfect crescents, keep a few things in mind. - Use room temperature cream cheese for easy mixing. - Make sure to seal the dough well to avoid leaks. - Brush the tops with egg for a nice golden color. Garnishing with fresh dill adds flavor and looks great. You can also serve them with lemon wedges for a fresh twist. I recommend taking photos while you make these crescents. A video tutorial can also help. Showing each step makes it easier for you and others. Share your creations online for extra fun! Yes, you can use frozen crab meat. Just make sure to thaw it first. Frozen crab works well in this recipe. It saves time and often tastes great. If you use frozen crab, check for any excess water. Drain it before mixing to keep your crescents from getting soggy. You can store crab and cheese crescents for about three days in the fridge. Make sure to keep them in an airtight container. For longer storage, freeze them. Wrap each crescent in plastic wrap and place them in a freezer bag. They will last up to three months in the freezer. When you want to eat them, just reheat them in the oven. Dips add fun and flavor to your crab and cheese crescents. Here are some great options: - Garlic Aioli: A creamy garlic sauce pairs well with the rich filling. - Lemon Butter Sauce: This bright and zesty dip adds a nice touch. - Spicy Sriracha Mayo: For those who like a kick, this dip is perfect. - Tartar Sauce: A classic choice that complements seafood nicely. Feel free to explore more dips to find your favorite! In this blog post, we explored the key ingredients for creating delicious crab and cheese crescents. We looked at essential items, cooking tips, and variations to enhance flavor. Remember to prepare your dough and filling properly for the best results. Also, try different herbs or cheeses to make these bites your own. With these guidelines, you can impress guests at any gathering. Enjoy your cooking and let your creativity shine!

Looking for a crowd-pleaser for your next party? Try my Delicious Crab & Cheese Crescents! These savory bites are quick to make and full of flavor. With simple ingredients and …

Read more

Categories Appetizers

Korean BBQ Meatballs with Spicy Mayo Dip Delight

May 19, 2025 by Chef Theo
- 1 lb ground beef (or a mix of beef and pork) - 1/2 cup breadcrumbs - 2 green onions, finely chopped - 2 cloves garlic, minced - 2 tablespoons soy sauce - 1 tablespoon sesame oil - 1 tablespoon ginger, grated - 1 tablespoon brown sugar - 1 egg, lightly beaten - 1/4 teaspoon black pepper - Sesame seeds for garnish For the meatballs, I use a mix of ground beef and pork. This adds flavor and keeps them juicy. Breadcrumbs work well as a binder. They help hold everything together without making the meatballs too dense. Green onions and garlic bring a fresh taste. They add a nice crunch and aroma. - 1/2 cup mayonnaise - 1 tablespoon Sriracha (adjust to taste) - 1 teaspoon lime juice - Pinch of salt For the spicy mayo dip, I use mayonnaise as the base. It's creamy and smooth. Sriracha adds heat, but you can adjust it to your liking. A little lime juice gives it a tangy kick. Salt enhances the flavors, making everything pop. Feel free to tweak the spice levels to fit your taste. You can find the full recipe linked above to explore step-by-step instructions for these delicious Korean BBQ meatballs with spicy mayo dip. First, set your oven to 400°F (200°C). This temperature helps cook the meatballs evenly. A hot oven makes the outside crispy while keeping the inside juicy. Line a baking sheet with parchment paper. This step prevents sticking and makes cleanup easy. Grab a large bowl. Here, combine the ground beef, breadcrumbs, green onions, and minced garlic. Add soy sauce, sesame oil, grated ginger, brown sugar, beaten egg, and black pepper. Mix everything well. I find using your hands works best for this. Make sure every ingredient is evenly distributed. This step is key for great flavor. Now, take small amounts of the mixture and shape them into meatballs about 1 inch wide. Place them on the baking sheet with some space between them. This helps them cook evenly. Bake in the oven for 20-25 minutes. Look for a golden brown color and ensure they are cooked through. These cues tell you when they are ready to enjoy. For the full recipe, check the earlier section. To make moist meatballs, use a mix of beef and pork. This mix helps keep them juicy. You can also add a little water to the meat mixture. If you want to skip breadcrumbs, try crushed crackers or oats. Both work well and add nice flavor. To boost flavor, add spices like garlic powder, onion powder, or even chili flakes. Fresh herbs like cilantro or basil can also brighten the taste. For a deeper flavor, marinate the meat mixture for a few hours. This step lets the spices soak in, making each bite a delight. When serving, use a nice plate to make the meatballs pop. A colorful platter adds fun. For garnishing, sprinkle sesame seeds on top. You can also drizzle extra spicy mayo around the meatballs. This adds flair and makes it look tasty. For the full recipe, check out the details above. {{image_2}} You can switch up the meat in this recipe. Ground turkey or chicken offers a leaner option. They keep the meatballs moist and flavorful. If you want more texture, try adding finely chopped veggies. Grated carrots or diced bell peppers work well. They add color and nutrition without changing the taste too much. Spicy mayo is a fantastic dip, but you can explore more options. Consider a sweet soy glaze for a new twist. Mix honey with soy sauce and a bit of garlic. This gives a rich, sweet flavor. You could also try a peanut sauce. It adds a nutty taste that pairs great with meatballs. Why not blend flavors from different kitchens? Korean BBQ meatballs can take on Italian flair. Add Italian herbs like basil or oregano to the mix. Serve with marinara sauce for a fun Italian twist. You can also try other Asian-inspired dips. A teriyaki sauce or a soy-sesame blend will add depth. The options are endless! For the full recipe, check out the Korean BBQ Meatballs with Spicy Mayo Dip. To keep your Korean BBQ meatballs fresh, store them in the fridge. Place them in an airtight container. They will stay good for about 3 to 4 days. For longer storage, freeze the meatballs. Spread them out on a baking sheet first. Once frozen, transfer them to a freezer bag. They can last up to 3 months in the freezer. When it's time to enjoy leftovers, reheating is key. The stovetop method works best to keep them moist. Just add a little water or broth to a pan and cover it. Heat on low until warm. If you use a microwave, place them in a bowl with a damp paper towel. Heat in short bursts, checking often. This helps prevent them from drying out. The spicy mayo dip lasts about a week in the fridge. Store it in a sealed container. If you want to refresh it, stir in a bit more lime juice or Sriracha. This adds flavor back in. If you need to reheat it, do so gently on the stovetop. Avoid using the microwave, as it can change the texture. Yes, you can make Korean BBQ meatballs ahead of time. For meal prep, mix the ingredients and form the meatballs. Place them on a baking sheet and cover with plastic wrap. Store them in the fridge for up to 24 hours. You can also freeze the uncooked meatballs. Just freeze them on the baking sheet first. Once frozen, transfer them to a freezer bag. When ready to cook, bake from frozen, adding a few extra minutes to the cooking time. Korean BBQ meatballs pair well with various side dishes. You can serve them with steamed rice or fried rice. A fresh salad with sesame dressing adds crunch. Kimchi provides a spicy and tangy kick. You might also enjoy them with pickled vegetables for a crisp contrast. For a fun twist, serve them in lettuce wraps. The spicy mayo dip is adjustable to your taste. It starts with mayonnaise and Sriracha. If you want less heat, use less Sriracha. You can also add a little lime juice to balance the spice. If you love heat, increase the Sriracha. Taste as you go to find your perfect level. Spicy mayo is versatile and delicious in many dishes. You can use it as a sandwich spread for extra flavor. It works well on sushi or in poke bowls. Try it as a dip for veggies or chips too. You can even drizzle it over grilled meats or tacos for a tasty twist. Yes, you can make a gluten-free version easily. For breadcrumbs, use gluten-free options like crushed rice crackers or almond flour. For soy sauce, choose a gluten-free brand or use tamari. This way, you can enjoy the same great taste without gluten. Korean BBQ meatballs are fun and easy to make. We covered all the key ingredients, from ground beef to green onions. You learned how to prepare, shape, and bake them for the best texture. We also discussed tips for enhancing flavor and suggested some tasty variations. Try these meatballs with different dips or cuisines for a twist. Whether you store or reheat leftovers, you now have a solid plan in place. Enjoy making this dish your own!

Are you ready to transform your next meal? Our Korean BBQ Meatballs with Spicy Mayo Dip are sure to impress! These juicy meatballs pack a punch of flavor and are …

Read more

Categories Appetizers

Five Cheese Ziti Al Forno Flavorful Comfort Meal

May 19, 2025 by Chef Theo
- 1 pound ziti pasta - 2 cups marinara sauce - 1 cup ricotta cheese - 1 cup mozzarella cheese, shredded - 1 cup gouda cheese, shredded - 1/2 cup parmesan cheese, grated - 1/2 cup goat cheese, crumbled - 2 tablespoons olive oil - 2 cloves garlic, minced - 1 teaspoon dried oregano - Salt and pepper to taste - Fresh basil for garnish When it comes to creating Five Cheese Ziti Al Forno, picking the right ingredients makes all the difference. I love using ziti pasta because it holds sauce well and has a nice bite. For the cheeses, I blend ricotta, mozzarella, gouda, parmesan, and goat cheese. This mix gives a rich, creamy texture and a burst of flavor. Marinara sauce is key. It adds a bright, tangy taste and pairs perfectly with the cheesy goodness. I always use quality olive oil and fresh garlic to enhance the sauce. Dried oregano brings in warmth and depth, while salt and pepper balance everything out. For a finishing touch, fresh basil adds color and a fresh taste. You can find all these ingredients in most grocery stores. Check out the Full Recipe for exact measurements and steps. 1. Cooking ziti pasta Start by boiling water in a large pot. Add salt to the water. Once the water boils, add 1 pound of ziti pasta. Cook it for about 6 to 8 minutes, until it is al dente. Drain the pasta and set it aside in a bowl. 2. Sautéing garlic and combining with sauce In a large skillet, heat 2 tablespoons of olive oil over medium heat. Add 2 cloves of minced garlic to the pan. Sauté it for about 1 minute until it smells good. Next, stir in 2 cups of marinara sauce and 1 teaspoon of dried oregano. Let this mixture simmer for 5 minutes so the flavors mix well. 3. Mixing cheeses In a big mixing bowl, combine the cooked ziti, 1 cup of ricotta cheese, half of 1 cup of shredded mozzarella cheese, 1 cup of shredded gouda cheese, 1/2 cup of grated parmesan cheese, and half of 1/2 cup of crumbled goat cheese. Add salt and pepper to taste. Mix everything gently until well combined. 4. Baking the dish Pour the marinara sauce over the pasta and cheese mix. Stir it well to coat everything. Transfer this mixture into a greased 9x13-inch baking dish. Sprinkle the rest of the mozzarella and goat cheese on top. Cover the dish with aluminum foil and bake it in a preheated oven at 375°F (190°C) for 25 minutes. After that, remove the foil and bake for another 15 minutes until the cheese bubbles and turns golden. Let it rest for 5 to 10 minutes before serving. Garnish with fresh basil leaves. This method ensures you create a hearty and delicious Five Cheese Ziti Al Forno. For a detailed list of ingredients, be sure to check the Full Recipe. - Cooking pasta al dente Cook the ziti until it is al dente. This means it should be firm, not soft. It will finish cooking in the oven. This helps keep the pasta from becoming mushy. - Adding creaminess with cheeses Use a mix of cheeses for great flavor. I love ricotta for its smoothness. Mozzarella adds stretchiness, while gouda brings a smoky touch. Goat cheese adds tang, and parmesan gives a salty kick. The blend makes every bite creamy and rich. - Controlling baking time for optimal texture Cover your dish with foil for the first part of baking. This keeps the moisture in. Then, remove the foil to brown the cheese. Bake until golden and bubbly. This gives the top a crispy texture while keeping the inside soft. These tips will elevate your Five Cheese Ziti Al Forno to a new level. If you want to dive deeper into the cooking process, check out the Full Recipe for all the details! {{image_2}} You can make Five Cheese Ziti Al Forno even more fun. Here are some ideas to change it up. - Adding vegetables or protein: Try adding spinach, mushrooms, or zucchini. These veggies add color and taste. You can also mix in cooked chicken, sausage, or ground beef. This makes your dish heartier and more filling. - Alternative cheese combinations: If you want to switch the cheese, go for it! Try adding fontina or provolone. These cheeses melt well and add unique flavors. You can also use vegan cheese if you prefer a plant-based option. - Spicy ziti options: For those who like a kick, add red pepper flakes or jalapeños. This adds heat and makes the dish exciting. You can even mix in spicy sausage for extra flavor. Feel free to experiment with these ideas. Each twist brings a new taste, making your ziti special every time. You’ll find that there is no limit to what you can create! For the full recipe, check out the details above. After you enjoy your Five Cheese Ziti Al Forno, store any leftovers properly. First, let the dish cool down at room temperature. Then, place it in an airtight container. This helps keep the flavors fresh. In the fridge, it lasts about three to four days. If you want to save it for a longer time, freezing works great. Cut the ziti into portions and wrap each piece in plastic wrap. Then, put the wrapped pieces in a freezer-safe bag. This keeps them safe for up to three months. When you're ready to eat again, let it thaw in the fridge overnight. Reheat the ziti in the oven at 350°F (175°C) for about 20 minutes. Cover it with foil to prevent drying out. Or use the microwave in short bursts. The key is to heat it evenly. Enjoy your delicious comfort meal again soon! You can find the Full Recipe above if you need a reminder of the steps. Can I make it ahead of time? Yes, you can make Five Cheese Ziti Al Forno ahead of time. Simply prepare the dish up to the baking step, cover it, and store it in the fridge. You can bake it later. It saves time and still tastes great. What can I substitute for ricotta cheese? If you need a ricotta cheese substitute, try cottage cheese or cream cheese. Both create a creamy texture like ricotta. You can also use a tofu blend for a dairy-free option. Can Five Cheese Ziti Al Forno be made vegetarian? Absolutely! To make it vegetarian, just use a meat-free marinara sauce. All the cheeses are already vegetarian, so you’re set. Feel free to add vegetables like spinach or mushrooms for extra flavor. How do I reheat leftovers? To reheat leftovers, place your Five Cheese Ziti Al Forno in an oven-safe dish. Cover it with foil to keep it moist. Heat at 350°F (175°C) for about 20-25 minutes or until warmed through. Enjoy! Five Cheese Ziti Al Forno is a rich, tasty dish. We covered ingredients, preparation steps, and tips for perfecting your ziti. You learned ways to add your own twist and how to store leftovers properly. This dish is easy to make and gives room for creativity. Enjoy your cooking and impress your family and friends with your delicious ziti. Happy cooking!

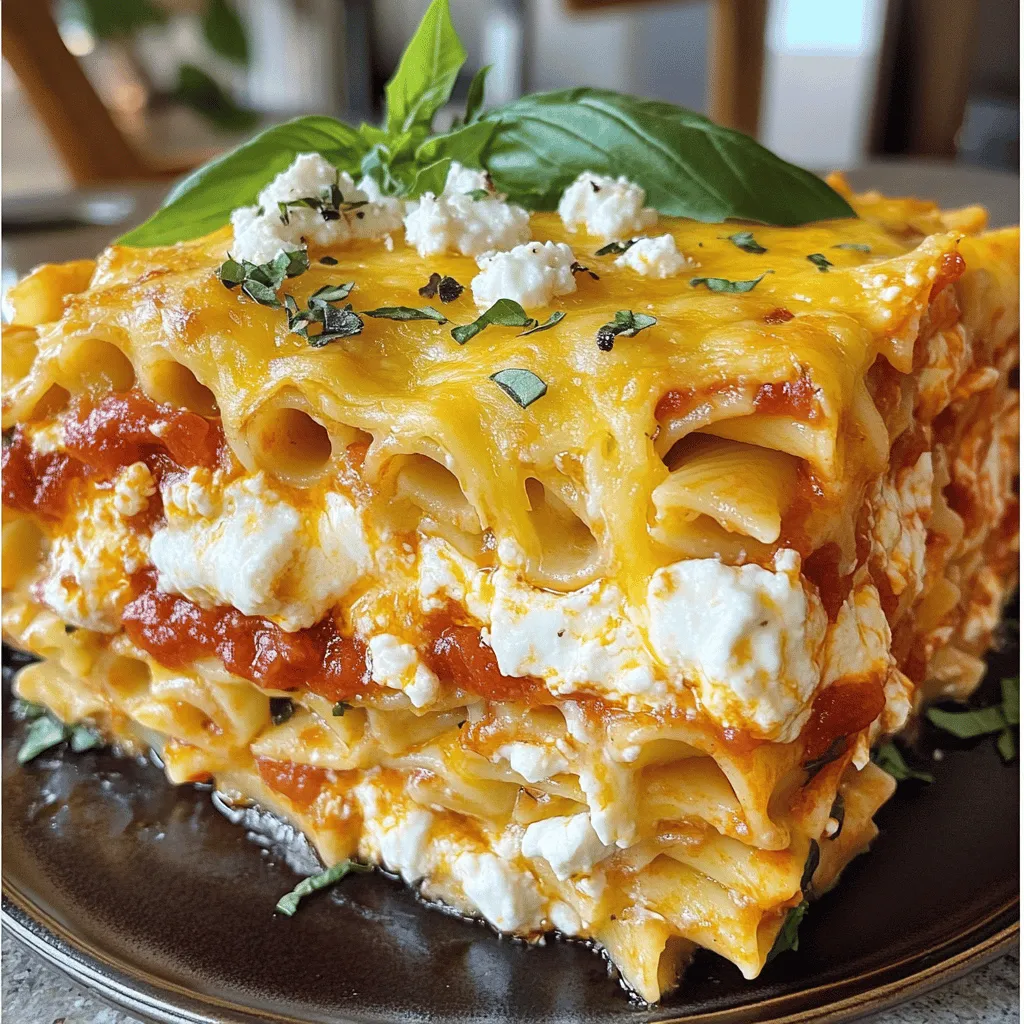
If you’re craving a warm, cheesy hug in a dish, Five Cheese Ziti Al Forno is your answer. This comforting meal pairs creamy cheeses with ziti pasta in a way …

Read more

Categories Dinner

Cheese Puffs Delightful and Easy Snack Recipe

May 19, 2025 by Chef Theo
To make perfect cheese puffs, you need a few key ingredients. Here’s what you’ll need: - 1 cup all-purpose flour - 1/2 cup unsalted butter - 1 cup water - 1 cup shredded cheddar cheese - 4 large eggs - 1/2 teaspoon garlic powder - 1/4 teaspoon cayenne pepper (optional) - Salt to taste - Fresh parsley, chopped (for garnish) The flour gives the puffs structure. Butter adds richness and flavor. Water helps form the dough. Cheddar cheese is the star, bringing a delightful taste. Eggs help the puffs rise and create a light texture. You can take your cheese puffs to the next level. Here are some optional ingredients: - 1/4 teaspoon onion powder - 1/4 cup grated Parmesan cheese - Fresh herbs like chives or thyme Adding onion powder gives a savory depth. Parmesan brings a sharp kick. Fresh herbs add brightness and aroma. If you have dietary needs, you can still enjoy cheese puffs. Consider these substitutions: - Use gluten-free flour for a gluten-free option. - Substitute vegan butter and cheese for a dairy-free version. - Use egg replacers like flaxseed meal or applesauce for egg-free puffs. These swaps keep the flavor while meeting dietary needs. For the full recipe, check out the complete instructions. 1. Preheat the oven. Set it to 400°F (200°C). Line a baking sheet with parchment paper. 2. Melt butter and water. In a saucepan, mix the butter and water. Heat it on medium until the butter melts. 3. Add flour. Pour the flour into the saucepan. Stir it well until the dough forms a ball. It should pull away from the pan. Then, remove it from heat. 4. Cool and mix in eggs. Let the dough cool for five minutes. Add eggs one by one. Mix well after each egg until the batter is smooth. 5. Incorporate cheese and seasonings. Stir in the shredded cheddar cheese, garlic powder, cayenne pepper (if using), and salt. Mix until everything is combined. 6. Shape the puffs. Use a piping bag or spoon to drop tablespoon-sized mounds of batter onto the baking sheet. Space them about two inches apart. 7. Bake. Place the sheet in the oven. Bake for 20-25 minutes until the puffs are golden and puffed up. 8. Cool and garnish. Take them out of the oven. Let them cool slightly. Garnish with fresh chopped parsley before you serve. - Use fresh cheese. Freshly shredded cheese melts better and adds more flavor. - Mix well. Make sure the eggs blend smoothly into the dough. This helps the puffs rise. - Don’t open the oven. Keep the oven closed while baking. Opening it lets heat escape and can cause puffs to deflate. - Skipping the cooling step. Don’t rush to add eggs. If the dough is too hot, it can cook the eggs and ruin the texture. - Not spacing them out. If you place puffs too close, they will merge into one big puff while baking. - Underbaking. If you remove them too soon, the centers may be gooey. They should be golden all over for the best result. For a detailed overview of the ingredients, check out the Full Recipe. To make the best cheese puffs, focus on the dough. After you mix the butter and water, let the dough cool. This step helps the eggs blend better. Add eggs slowly, mixing after each one. This keeps your puffs airy. If your batter is too thick, they won’t puff well. Aim for a thick but smooth texture. Serve your cheese puffs warm. They taste best when fresh from the oven. Arrange them on a bright platter to catch the eye. If you have leftovers, store them in an airtight container. They can stay fresh for about two days. For longer storage, freeze them. Just reheat in the oven when you're ready to enjoy. Pair cheese puffs with fun dips. Marinara sauce or ranch dressing works great. For a kick, try spicy aioli or hot sauce. Fresh herbs can also add flavor. Consider using parsley, chives, or basil for garnish. You can even sprinkle some cheese on top before serving for extra flair. For the full recipe, check out the detailed steps above. Enjoy making these delightful snacks! {{image_2}} You can make cheese puffs gluten-free. Use gluten-free flour instead of all-purpose flour. This swap keeps the texture right. Follow the same steps in the full recipe. Enjoy the same taste without gluten! You can change the flavor of cheese puffs. Want spice? Add more cayenne pepper. For herbs, mix in dried basil or thyme. If you want a sweet twist, try adding a touch of sugar. These changes give you a fun new snack. Mix different cheeses for special flavors. Cheddar is a classic choice, but you can try mozzarella for a gooey bite. Parmesan adds a nice savory touch. Blend gouda or pepper jack for a kick. Experiment with your favorite cheeses for unique puffs! To keep your cheese puffs fresh, let them cool completely. Place them in an airtight container. You can store them at room temperature for up to two days. For longer storage, use the fridge. They will last up to a week in the fridge. Make sure to separate layers with parchment paper to avoid sticking. When you want to enjoy leftover cheese puffs, the oven is your best friend. Preheat your oven to 350°F (175°C). Place the puffs on a baking sheet. Heat for about 10 minutes, or until warm and crispy. This method revives their fluffy texture. You can also use a microwave, but they may become soft. If you choose the microwave, heat in short bursts, about 15 seconds at a time. Freezing cheese puffs is simple. After they cool, place them in a single layer on a baking sheet. Freeze them for about an hour. Once frozen, transfer them to a freezer bag. They can stay in the freezer for up to three months. When ready to eat, bake them straight from the freezer. Just add a few extra minutes to the cooking time. Enjoy this tasty treat anytime with these easy storage tips! You can make cheese puffs from scratch using simple steps. First, gather your ingredients: flour, butter, water, cheese, eggs, and seasonings. Next, melt the butter with water in a pot. Once melted, add the flour and stir until it forms a dough. After that, let it cool for a short time. Then, beat in the eggs one by one. Finally, mix in the cheese and seasonings. Pipe or spoon the dough onto a baking sheet and bake until golden. You can find the Full Recipe for more details. Homemade cheese puffs contain various nutrients. Each puff has calories from flour, butter, and cheese. The amounts depend on how many you eat. Generally, one puff has about 100 calories. It offers protein from the cheese and eggs. It also has fat from the butter and cheese. For exact numbers, check the ingredients used. Yes, you can use different types of cheese in cheese puffs. Cheddar is a classic choice, but you can try mozzarella, gouda, or even feta. Each cheese adds a unique flavor and texture. Mixing cheeses can create a tasty twist. Just ensure the cheese melts well for the best result. Cheese puffs last about 2 to 3 days in the fridge. Store them in an airtight container to keep them fresh. If you want to keep them longer, consider freezing them. They can stay fresh in the freezer for up to a month. Just reheat them in the oven when you want to enjoy. You’ve learned about the key ingredients and step-by-step instructions for cheese puffs. Remember the tips for the best texture and how to avoid common mistakes. Variations and substitutions make this dish friendly for everyone. Store cheese puffs well to keep them fresh, and don’t hesitate to play with flavors. Making cheese puffs is fun, and they are a hit at any gathering. Enjoy creating your perfect cheese puffs.

Are you ready to whip up a tasty treat? Cheese puffs are a delightful snack that’s easy to make at home. In this guide, I will share my favorite cheese …
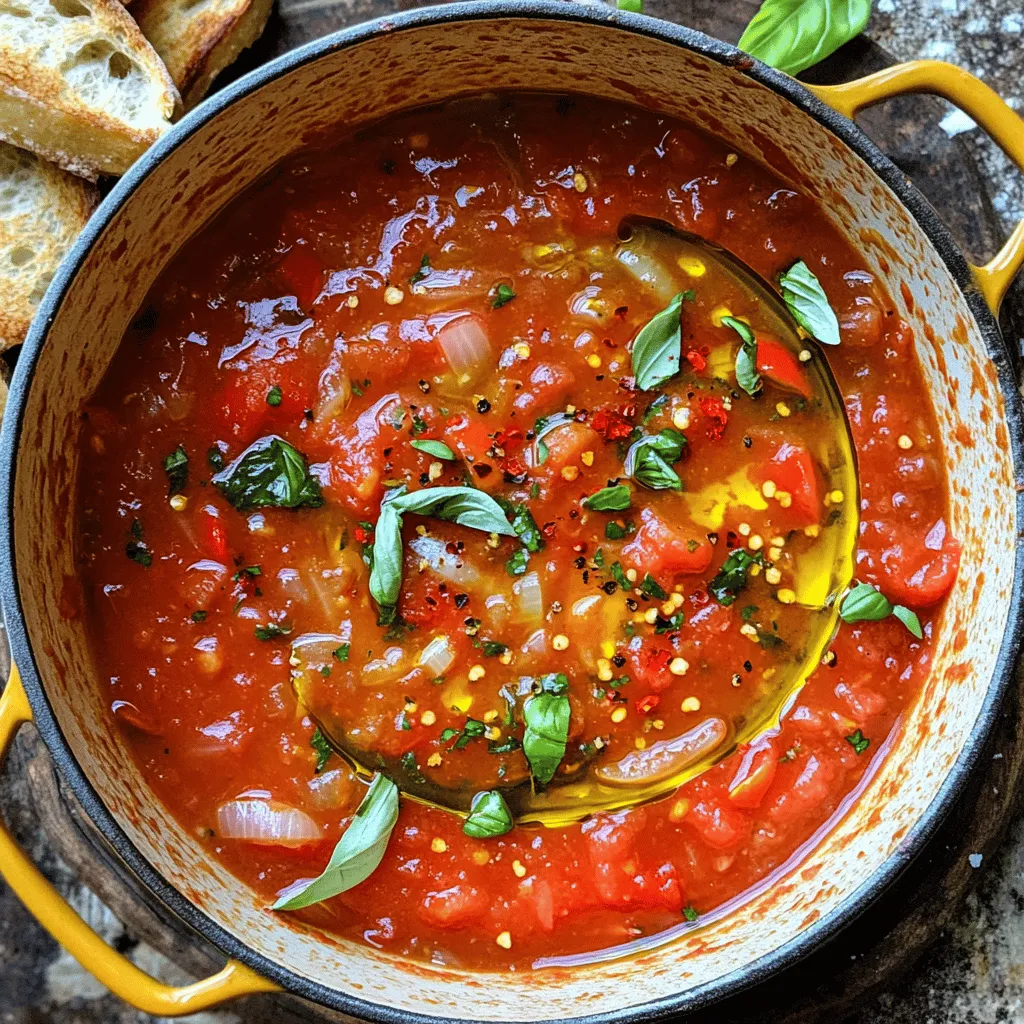
Read more

Categories Appetizers

Savory Tomato Basil Bruschetta on Toasted Crostini

May 19, 2025 by Chef Theo
- 6 ripe tomatoes, finely diced - 1 cup fresh basil leaves, chopped - 2 cloves garlic, minced - 2 tablespoons extra virgin olive oil - 1 tablespoon balsamic vinegar - Salt and pepper to taste - 1 baguette, sliced into 1/2-inch thick pieces - 1/4 cup grated Parmesan cheese (optional) - Baking sheet - Mixing bowl - Knife and cutting board - Oven - Calories per serving: About 150 - Macronutrient breakdown: - Protein: 4g - Carbs: 18g - Fats: 7g Using fresh, quality ingredients makes your bruschetta sing. Ripe tomatoes bring sweetness, while basil offers a fragrant touch. You can choose any fresh herbs, but basil is classic for a reason. Use good olive oil for a rich flavor. Keep garlic minced to blend well. Don't skip the balsamic vinegar; it adds a nice zing. The baguette is key! It makes a perfect crostini. Slice it evenly for even toasting. Don't forget to add cheese if you like it creamy. The optional Parmesan is a great finishing touch. For tools, a baking sheet is needed to toast the bread. A mixing bowl helps you combine the fresh ingredients easily. Use a sharp knife and cutting board for safe chopping. Finally, your oven will help achieve that crispy texture on the crostini. This recipe is not just tasty; it's also simple to make. You can enjoy it as a snack or serve it at gatherings. For the full recipe, don't forget to check the details above. Start by dicing the ripe tomatoes. Place them in a bowl. Next, add the chopped basil and minced garlic. Drizzle in the olive oil and balsamic vinegar. Season with salt and pepper. Mix it all well. Let this mixture rest for 15 minutes. This wait allows the flavors to blend nicely. Now, preheat your oven to 400°F (200°C). Take the baguette and slice it into 1/2-inch thick pieces. Arrange the slices on a baking sheet. Brush each slice lightly with olive oil. Bake them in the oven for about 10 minutes. They should turn golden brown and crispy. Once the crostini are toasted, let them cool slightly. Top each toasted slice generously with the tomato mixture. If you like, sprinkle some grated Parmesan cheese on top for extra flavor. For a nice touch, garnish with a few extra basil leaves. Enjoy your savory tomato basil bruschetta on toasted crostini! For the full recipe, check out [Full Recipe]. To get the best taste, let the tomato mixture rest for about 15 minutes. This waiting time helps all the flavors mix well. I love using ripe tomatoes like heirloom or Roma. They add sweetness and depth to the dish. Bruschetta pairs well with a light white wine, like Sauvignon Blanc. It also goes great with other appetizers, such as cheese or olives. For parties, serve the bruschetta on a platter with fresh basil leaves. This adds a pop of color and freshness. One big mistake is over-toasting the bread. You want it crispy but not hard. Also, avoid using unripe tomatoes. They lack flavor and can ruin your bruschetta. Stick to ripe, flavorful tomatoes for the best results. {{image_2}} You can switch up the cheese. Provolone or mozzarella works well in place of Parmesan. They melt nicely and add rich flavor. You can also boost taste by adding avocado or roasted peppers. Both give a creamy texture and a sweet twist. Try different herbs to make your bruschetta unique. Oregano or thyme can add depth. You can also use flavored balsamic vinegar instead of plain. This small change can elevate your dish and surprise your guests. If you're gluten-free, look for gluten-free baguette options. Many stores carry these now. For a vegan version, simply skip the cheese. You won’t miss it, especially with all the fresh flavors. To keep your tomato mixture fresh, store it in an airtight container. This method helps lock in flavor and moisture. The mixture stays fresh in the fridge for up to three days. After that, the tomatoes may lose their crispness and flavor. Always check for any noticeable changes before use. Yes, you can freeze the tomato mixture! However, freezing may change the texture. To freeze, place the mixture in a freezer-safe bag. Remove as much air as possible before sealing. For crostini, it’s best to freeze them before toasting. Slice the baguette, brush with olive oil, and freeze the slices in a single layer. Once frozen, transfer them to a bag. To reheat toasted crostini, use the oven for best results. Preheat your oven to 350°F (175°C). Place the crostini on a baking sheet and heat for about 5-7 minutes. This method keeps the crostini crispy. Avoid using a microwave, as it can make them chewy. Always check your crostini to ensure they stay crunchy and delicious. You can store the tomato basil mixture in the fridge for up to three days. Keep it in an airtight container. For the best taste, eat it fresh. The tomatoes will lose their crunch over time. If you store the toasted crostini, they will get soft. It’s best to keep the mixture and bread separate until serving. Yes, you can make the tomato mixture a few hours before serving. Just mix the diced tomatoes, basil, garlic, olive oil, balsamic vinegar, salt, and pepper. Cover it and let it sit in the fridge. This helps the flavors blend together. If you make it too early, the tomatoes may become mushy. The best bread for bruschetta is a crusty baguette. It has a firm texture and toasts well. You can also use ciabatta or sourdough. These breads hold up against the juicy topping. Make sure to slice them thick enough for a good crunch. For a fun twist, try using garlic bread for added flavor. In this article, we explored how to make delicious Tomato Basil Bruschetta. We covered key ingredients, handy tools, and detailed step-by-step instructions. You learned how to prepare, toast, and assemble the bruschetta for maximum flavor. Remember, resting the mixture boosts its taste, and choosing the right tomatoes makes a difference. Whether you keep it simple or experiment with variations, this dish is sure to impress. Enjoy crafting your own bruschetta, and share it with friends for a perfect snack or appetizer!

Looking for a quick and tasty appetizer? You’ve found it! Savory Tomato Basil Bruschetta on Toasted Crostini is a simple, fresh dish perfect for any gathering. With juicy tomatoes and …

Read more

Categories Appetizers

Pomodoro Sauce Fresh and Flavorful Recipe Guide

May 19, 2025 by Chef Theo
To make a great Pomodoro sauce, you need ripe, tasty tomatoes. I love using: - 2 pounds ripe tomatoes (Roma or San Marzano), roughly chopped - 1 medium onion, finely chopped - 4 cloves garlic, minced - 1/4 cup extra virgin olive oil - Salt and pepper to taste - 1/4 cup fresh basil leaves, chopped (plus extra for garnish) - 1 teaspoon dried oregano These fresh ingredients create a rich flavor. The tomatoes form the base. The onion and garlic add sweetness and depth. The olive oil brings richness. The herbs brighten the sauce. You can adjust the sauce to suit your taste. Consider adding: - 1 teaspoon sugar (optional, to balance acidity) - 1/4 teaspoon red pepper flakes (optional for heat) The sugar helps balance the tomatoes’ acidity. Red pepper flakes add a lovely kick. Use these as you see fit. To make cooking easier, gather these tools: - A large pot - A wooden spoon - A knife and cutting board - An immersion blender (if you prefer a smooth sauce) Having the right tools makes your cooking experience smooth. A large pot gives you space to stir and simmer. A wooden spoon is great for mixing. The immersion blender helps create the texture you want. For the full recipe, check out the Pomodoro Bliss section! First, gather your ingredients. You will need ripe tomatoes, an onion, garlic, olive oil, and spices. Wash the tomatoes well and chop them roughly. Peel and finely chop the onion. Mince the garlic cloves, too. This prep takes about 10 minutes. Next, heat olive oil in a large pot over medium heat. Add the chopped onion and cook it for about five minutes. You want it to look soft and clear. After that, add minced garlic and cook for one to two minutes. Be careful not to burn it. Then, stir in the chopped tomatoes. Bring this mix to a gentle boil. Once it boils, lower the heat. Add sugar, salt, pepper, oregano, and red pepper flakes if you want some heat. Let the sauce cook for 30 to 35 minutes. Stir it now and then. You will notice it thickening as it cooks, and the flavors will blend beautifully. When the sauce is ready, remove it from the heat. Stir in the fresh basil leaves for great flavor. If you like a smoother sauce, use an immersion blender. Blend it gently until you reach your desired texture. You can serve this sauce over pasta or as a dip for bread. For a lovely touch, garnish your dish with more fresh basil and a drizzle of olive oil. For the full recipe, check out the Pomodoro Bliss section above. To make your Pomodoro sauce shine, focus on your tomatoes. Choose ripe, juicy ones. Roma and San Marzano tomatoes bring natural sweetness. These types give the sauce a rich taste. When cooking, add fresh basil near the end. This keeps its bright flavor. A pinch of sugar can help balance acidity. Taste as you go and adjust salt and pepper. This ensures each bite is perfect. For a smooth sauce, blend it after cooking. An immersion blender works great for this. If you want a chunkier sauce, skip blending. You can also add a splash of pasta water. This helps the sauce cling to your pasta. For creaminess, stir in a touch of heavy cream. You can also use grated cheese for added richness. One common mistake is overcooking garlic. It can turn bitter if burnt. Always add it after the onion is soft. Also, don't rush the simmering time. Letting the sauce cook longer allows flavors to deepen. Avoid using canned tomatoes as your main ingredient. Fresh tomatoes yield the best taste. Lastly, don’t forget to taste! Adjusting as you go is key to a great sauce. For a complete recipe, check the Full Recipe section. {{image_2}} Classic Pomodoro sauce is simple and pure. It shines with fresh tomatoes, garlic, and basil. The key is using ripe tomatoes. Roma or San Marzano work best. This sauce is perfect over pasta. You can also use it as a base for other dishes. Want some heat? Try spicy Pomodoro. Just add red pepper flakes. You can adjust the amount. Start with 1/4 teaspoon for mild heat. For more spice, add more flakes. This sauce pairs great with spicy sausage or grilled chicken. It adds a nice kick to any dish. Add veggies for a healthy twist. Chop bell peppers, zucchini, or mushrooms. Sauté them with onions and garlic. This adds texture and flavor. You can use any vegetables you like. This version is great over whole grain pasta. It makes your meal colorful and nutritious. For a full recipe, check out Pomodoro Bliss. Enjoy exploring these tasty variations! After making your Pomodoro sauce, let it cool first. Once cool, you can store it in a clean jar. Seal it tightly and place it in the fridge. This sauce lasts about five days in the refrigerator. Always check for any off smells before using. If it smells fine, you can enjoy it again. If you want to keep your Pomodoro sauce longer, freezing is a great option. Pour the sauce into freezer-safe bags or containers. Leave some space at the top for expansion. Label each bag with the date for easy tracking. Your sauce can stay fresh for up to three months in the freezer. When ready to use, thaw overnight in the fridge. To reheat, you have a few options. You can use a pot on the stove over low heat. Stir often to prevent sticking. You can also use a microwave-safe bowl. Cover it and heat in short bursts, stirring in between. Make sure it’s hot all the way through before serving. Enjoy your sauce with pasta or as a dip! For the full recipe, check out the details above. Pomodoro sauce is simple and fresh. It uses: - 2 pounds ripe tomatoes (Roma or San Marzano), roughly chopped - 1 medium onion, finely chopped - 4 cloves garlic, minced - 1/4 cup extra virgin olive oil - 1 teaspoon sugar (optional, to balance acidity) - Salt and pepper to taste - 1/4 cup fresh basil leaves, chopped (plus extra for garnish) - 1 teaspoon dried oregano - 1/4 teaspoon red pepper flakes (optional for heat) These ingredients come together to create a vibrant sauce. The tomatoes bring sweetness, while the garlic adds depth. Fresh basil gives a nice aroma. To make your Pomodoro sauce less acidic, you can add sugar. Start with 1 teaspoon and taste. You can also use carrots when cooking. Grate a carrot and add it to the sauce. The natural sweetness from the carrot helps balance acidity. Another option is to use sweeter tomatoes, like San Marzano. Always taste as you cook. Adjust until it feels right for you. Pomodoro sauce is smooth and rich. It focuses on fresh tomatoes and simple flavors. Marinara sauce is chunkier and often has more herbs and spices. Marinara usually includes ingredients like crushed red pepper and sometimes olives. It has a bolder flavor. Both sauces are great, but they offer different tastes and textures. For more details, check the Full Recipe. This guide covers making Pomodoro sauce from start to finish. We looked at fresh and optional ingredients, plus the right tools. I shared clear steps for preparing, cooking, and blending the sauce. I also offered tips for flavor and texture, along with common mistakes to avoid. You can try classic, spicy, or veggie versions. Remember to follow storage tips for freshness. With practice, you'll master this simple yet tasty sauce. Enjoy your cooking journey and make it your own!

Are you ready to make the best Pomodoro sauce you’ve ever tasted? This fresh and flavorful recipe guide will walk you through simple steps to craft a sauce bursting with …

Read more

Categories Dinner

Taquitos Packed with Flavor and Crunchy Goodness

May 19, 2025 by Chef Theo
- 1 can (15 oz) black beans, drained and rinsed - 1 cup corn kernels (fresh, canned, or frozen) - 1 small red onion, finely chopped - 2 cloves garlic, minced - 1 teaspoon ground cumin - 1 teaspoon chili powder - Salt and pepper to taste - 1 tablespoon olive oil - 8 small corn tortillas - 1 cup shredded cheese (cheddar or a blend) These ingredients create a rich and tasty filling. The black beans add protein and fiber, while corn gives sweetness. The red onion and garlic bring depth to the flavor. Ground cumin and chili powder enhance the dish with warm spices. - Fresh cilantro - Lime wedges - Additional spices (if desired) I love adding fresh cilantro for a burst of freshness. Lime wedges give a zesty kick that brightens each bite. Feel free to mix in other spices to suit your taste. - Skillet - Baking sheet - Parchment paper You will need a skillet to sauté the onions and garlic. A baking sheet lined with parchment paper helps with easy cleanup. This simple equipment makes the cooking process smooth and fun. For the full recipe, check out the complete details on how to make these delicious taquitos! - Preheat the oven to 400°F (200°C) and line a baking sheet with parchment paper. - In a medium skillet, heat the olive oil over medium heat. - Add the chopped red onion and sauté until softened, about 3-4 minutes. - Next, add the minced garlic, cumin, chili powder, salt, and pepper. Cook for one minute until fragrant. - Stir in the black beans and corn, mixing well. Cook for 3-5 minutes until heated through. - Remove the skillet from heat. Place tortillas on a flat surface. - Spoon a generous amount of the black bean mixture down the center of each tortilla. - Sprinkle shredded cheese on top of the mixture. - Roll each tortilla tightly around the filling. Place seam-side down on the prepared baking sheet. - Bake the taquitos in the oven for about 15-20 minutes. They should be crispy and golden brown. - Once done, remove from the oven and let them cool slightly. - Garnish with chopped fresh cilantro. Serve with lime wedges for a zesty kick. For the full recipe, check the detailed instructions above. Enjoy the crunch and flavor in every bite! To make your taquitos crispy, set your oven to 400°F (200°C). This high heat helps them brown nicely. For best results, use a baking sheet lined with parchment paper. It keeps them from sticking and allows for even cooking. To prevent your tortillas from cracking, warm them first. You can heat them in a pan for a few seconds on each side. This softens them and makes rolling easier. If you prefer, wrap them in a damp cloth and microwave for about 30 seconds. Prepping ingredients ahead of time saves you effort when you cook. You can chop your veggies and mix the black bean filling earlier in the day. Just store them in the fridge until you’re ready to make taquitos. If you want to freeze your taquitos, assemble them first and place them on a lined baking sheet. Freeze them until firm, then transfer them to a freezer bag. They will keep well for up to three months. When you’re ready to eat, bake them straight from the freezer. Just add a few extra minutes to the baking time. Taquitos shine when paired with delicious sides. Some great options include fresh guacamole, salsa, or a crisp salad. These sides add freshness and balance the flavors of the taquitos. For dips, try sour cream or a zesty lime crema. A spicy chipotle sauce can also kick things up a notch. These dips enhance the flavor and make your meal more fun. Enjoy exploring different combinations with your taquitos! {{image_2}} You can fill taquitos with many proteins. Here are some popular choices: - Chicken taquitos: Shred cooked chicken for a tender bite. You can use rotisserie chicken for ease. - Beef taquitos: Ground beef adds rich flavor. Season it well with spices for a tasty kick. - Vegetarian and vegan alternatives: Try black beans, lentils, or mushrooms for a meatless option. These ingredients are packed with protein and flavor. Spice up your taquitos easily. Here are some fun ways to add flavor: - Adding different spices: Experiment with smoked paprika, cayenne, or oregano for a unique twist. These spices can brighten your filling. - Incorporating additional vegetables: Bell peppers, spinach, or zucchini add color and texture. Plus, they boost nutrition without much effort. How you serve taquitos changes the vibe of your meal. Here are some ideas: - Taquitos as appetizers: Serve them with salsa or guacamole for a fun snack. Guests will love the crunch! - Plated entrees or party snacks: Arrange taquitos on a platter with dips. This makes an impressive dish for gatherings. Feel free to explore these variations and enhancements in the Full Recipe for Zesty Black Bean Taquitos! To keep your taquitos fresh, store them in the fridge. Place them in an airtight container. They taste best within three days. After that, they may lose their crunch. For longer storage, freeze your taquitos. Place them in a freezer-safe container or bag. Make sure to remove air to prevent freezer burn. When you're ready to eat, reheat them in the oven at 375°F (190°C) for about 15-20 minutes. This keeps them crispy and tasty. Use glass or plastic containers with tight lids. You can also use freezer bags. Clearly label each container with the date. This way, you can track how fresh your taquitos are. Taquitos are small rolled tacos. They are usually filled with meat, cheese, or beans. The name "taquito" means "small taco" in Spanish. They originated in Mexico and are popular in many regions. You can fry or bake them for a crispy texture. Taquitos are great for snacks, parties, or casual meals. They are often served with salsa, guacamole, or sour cream. Yes, you can make taquitos in an air fryer. Here’s how: - Preheat your air fryer to 400°F (200°C). - Place the rolled taquitos in a single layer in the basket. - Cook for 8-10 minutes until they are golden brown. - Shake the basket halfway to ensure even cooking. Using an air fryer makes them crispy with less oil. It’s a healthier way to enjoy taquitos. You can customize taquitos with many fillings. Here are some ideas: - Use shredded chicken or beef for protein. - Add sautéed vegetables like bell peppers or zucchini. - Try different beans, like pinto or refried beans. - Mix in cheese for extra flavor. Experiment with spices like taco seasoning or cumin. This lets you create your favorite flavor profiles. Look for local taquerias or Mexican markets for great taquitos. Many food trucks also serve tasty options. Check reviews on food apps for popular spots. If you travel, ask locals for their favorite taquito places. You might discover hidden gems! Try the recipe for Zesty Black Bean Taquitos from this article for a homemade option. Zesty Black Bean Taquitos are easy to prepare and full of flavor. You learned about the main ingredients, cooking steps, and tips for crispiness. You can customize them with various proteins and flavors. These taquitos can be stored for short or long terms, making them a great meal prep option. Enjoy making these tasty snacks or meals. Whether for a party or a cozy night in, they’re sure to impress. Happy cooking!

Looking for a tasty snack? You’ll love these taquitos, loaded with flavor and crunch! I’ll walk you through making zesty black bean taquitos that are simple and fun to prepare. …

Read more

Categories Appetizers

Easy Spinach Chicken Pasta Simple and Tasty Recipe

May 19, 2025 by Chef Theo
Here’s what you need to make this dish: - 8 oz (225g) penne pasta - 1 tablespoon olive oil - 2 boneless, skinless chicken breasts, diced - 2 cups fresh spinach, chopped - 3 cloves garlic, minced - 1 teaspoon Italian seasoning - 1 cup heavy cream - ½ cup grated Parmesan cheese - Salt and pepper to taste - Fresh basil leaves for garnish These ingredients blend well to create a creamy and tasty pasta dish. If you lack an ingredient, here are some easy swaps: - Pasta: You can use any pasta shape like fusilli or rotini. - Olive oil: Try using avocado oil for a different flavor. - Chicken: Substitute with shrimp or tofu for a new twist. - Spinach: Kale or arugula can work in place of spinach. - Heavy cream: Use half-and-half or a dairy-free cream alternative. - Parmesan cheese: Nutritional yeast gives a cheesy flavor for vegan options. These swaps keep the dish delicious while catering to your pantry. Each serving of Easy Spinach Chicken Pasta includes: - Calories: 480 - Protein: 30g - Carbohydrates: 45g - Fat: 22g - Fiber: 3g This meal offers a good balance of nutrients while being satisfying and tasty. Enjoy making this dish as a wholesome option! For the complete cooking instructions, check the [Full Recipe]. This recipe is simple and quick. You will need about 30 minutes. Start by gathering your ingredients. Chop the spinach, dice the chicken, and mince the garlic. This makes cooking faster and easier. 1. Cook the Pasta: First, bring a large pot of salted water to a boil. Add 8 oz of penne pasta. Cook according to the package instructions until it is al dente. Drain the pasta and set it aside. 2. Prepare the Chicken: In the same pot, heat 1 tablespoon of olive oil over medium heat. Add 2 diced chicken breasts. Season with salt, pepper, and 1 teaspoon of Italian seasoning. Sauté until the chicken is golden and cooked through, about 5-7 minutes. 3. Add Garlic: Add 3 minced garlic cloves to the pot. Cook for about 1-2 minutes until you smell the garlic’s strong flavor. 4. Add Spinach: Stir in 2 cups of chopped spinach. Cook until the spinach wilts, which should take about 2-3 minutes. 5. Make the Sauce: Pour in 1 cup of heavy cream. Bring it to a gentle simmer. Cook for about 3-4 minutes, stirring often, until the sauce thickens a little. 6. Combine Everything: Add the drained penne pasta to the sauce. Toss in ½ cup of grated Parmesan cheese. Mix well so the pasta is fully coated in the creamy sauce. 7. Season and Serve: Taste the dish. Add more salt and pepper if needed. Serve it hot with fresh basil leaves on top for color and flavor. - Use fresh ingredients. Fresh spinach and garlic will give the best flavor. - Don’t overcook the pasta. It should be firm, or al dente. - Adjust the cream for a richer or lighter sauce. You can use less if you prefer. - Consider adding other veggies like bell peppers or mushrooms for more taste. - Always taste before serving to adjust seasoning. For the complete recipe, check out the Full Recipe. One common mistake is overcooking the pasta. Always cook it al dente. This helps the pasta stay firm and not mushy. Another mistake is not seasoning the chicken. Season it well with salt, pepper, and Italian seasoning. This adds flavor. Lastly, don’t skip the garlic. It adds a nice taste and aroma to the dish. You can prepare this dish ahead of time. Cook the pasta and chicken as directed. Let them cool before storing. Keep the sauce separate in the fridge. When ready to eat, combine them and heat gently. This makes meal prep easy. You’ll save time on busy nights. Serve this dish hot for the best taste. Pair it with a fresh salad for a balanced meal. Garlic bread goes well with it, too. You can also add a sprinkle of extra Parmesan cheese on top. This adds a nice touch and more flavor. Enjoy your Easy Spinach Chicken Pasta! For the full recipe, check the main article. {{image_2}} You can easily switch ingredients in this dish. If you want a lighter sauce, swap heavy cream for Greek yogurt. This change keeps the dish creamy but cuts calories. You can also use chicken thighs instead of breasts. They add great flavor and stay moist. For a tangy touch, try adding sun-dried tomatoes or artichoke hearts. To make this dish vegetarian, replace the chicken with mushrooms or chickpeas. They both add protein and texture. If you want a vegan version, use cashew cream or coconut milk instead of heavy cream. Nutritional yeast can replace Parmesan cheese for a cheesy taste. Add more veggies like bell peppers or zucchini for extra nutrients. While penne works great, you can use other pasta shapes. Fusilli or farfalle are good choices. They hold sauce well and add fun to your plate. You can also try whole wheat or gluten-free pasta for a healthier option. Just cook them according to the package directions. This way, you can enjoy Easy Spinach Chicken Pasta in many tasty ways! For the complete instructions, check the Full Recipe. To store leftovers, let the pasta cool to room temperature. Then, place it in an airtight container. This keeps the pasta fresh for up to three days in the fridge. Make sure to seal it well to avoid any odors from other foods. If you want to keep it longer, freezing works great too. To freeze Easy Spinach Chicken Pasta, portion it into freezer-safe bags. Remove as much air as possible before sealing. You can freeze it for up to three months. When you are ready to eat, just thaw it overnight in the fridge. This helps maintain the flavor and texture. Reheating is simple. For the best results, use the stovetop. Add a splash of water or broth to the pan to add moisture. Heat on low, stirring often until warmed through. You can also use the microwave. Heat in short bursts, stirring in between. This way, your pasta stays creamy and tasty. For more details, check the Full Recipe. To make Easy Spinach Chicken Pasta gluten-free, use gluten-free penne pasta. Many brands offer great options. Check the labels to ensure they meet your needs. The cooking steps stay the same. Just cook the gluten-free pasta according to the package. The sauce and chicken remain gluten-free as well. Yes, you can prepare this dish in advance. Cook the pasta and chicken as normal. Store them separately from the sauce. Keep both in airtight containers in the fridge. When ready to eat, combine everything in a pan. Heat it up until warm. This makes it easy to enjoy later. Easy Spinach Chicken Pasta pairs well with many sides. A simple garden salad adds freshness. Garlic bread complements the creamy sauce nicely. You could also serve cooked vegetables for extra nutrients. For a special touch, try a light white wine. It enhances the meal, making it even more enjoyable. Enjoy your meal! In this article, we explored the key ingredients for Easy Spinach Chicken Pasta, focusing on smart substitutions and nutritional facts. We provided clear, step-by-step instructions to help you master the dish. I also shared tips to avoid common mistakes and enhance your cooking experience. You learned about variations and how to store leftovers for later enjoyment. When you try this recipe, you'll create a delicious meal. Remember, good food brings joy. Enjoy your cooking journey!

Are you looking for a quick and tasty meal? You’ve come to the right place! This Easy Spinach Chicken Pasta recipe combines fresh spinach, tender chicken, and pasta in a …

Read more

Categories Dinner

Mini Bundt Cakes for Every Occasion Delicious Delight

May 18, 2025 by Chef Theo
- 1 cup all-purpose flour - 1/2 cup granulated sugar - 1/2 teaspoon baking powder - 1/4 teaspoon baking soda - 1/4 teaspoon salt - 1/2 cup unsalted butter, softened - 2 large eggs - 1 teaspoon vanilla extract - 1/4 cup buttermilk To make these mini bundt cakes, you need some key ingredients. Start with all-purpose flour and granulated sugar, which form the base of the cake. Baking powder, baking soda, and salt help your cakes rise. Unsalted butter adds a rich flavor. You will also need eggs for structure and vanilla extract for taste. Buttermilk adds moisture and helps create a tender crumb. - 1/2 cup chocolate chips - Zest of 1 lemon (for lemon bundt) - 1/4 cup fresh blueberries (for blueberry bundt) - 1/2 teaspoon cinnamon (for spiced bundt) You can add different flavors to your mini bundt cakes. For a chocolate version, fold in chocolate chips. If you like lemon, add the zest of one lemon. For a fruity twist, toss in fresh blueberries. Want a warm spice? Use cinnamon for a cozy flavor. These variations let you customize your treats for any event. - Icing sugar for dusting - Optional toppings and decorations To finish your mini bundt cakes, dust them with icing sugar to add sweetness. You can also use optional toppings. Consider fresh fruit, nuts, or even a drizzle of chocolate. These little touches turn a simple cake into a delightful dessert. For the complete recipe, check out the Full Recipe section. 1. Preheat your oven to 350°F (175°C). 2. Grease and flour your mini bundt pans. This helps the cakes release easily. 3. In a large bowl, whisk together the flour, sugar, baking powder, baking soda, and salt. 4. In another bowl, beat the softened butter until creamy. 5. Add the eggs, one at a time. Mix in the vanilla extract and buttermilk after. 1. Gradually add the dry mix to the wet mix. Stir just until combined. 2. Be careful not to overmix; this keeps your cakes light and fluffy. 3. If you want, fold in chocolate chips, lemon zest, fresh blueberries, or cinnamon. 1. Pour the batter into the prepared mini bundt pans. Fill each about two-thirds full. 2. Bake for 15-20 minutes. Check doneness with a toothpick. It should come out clean. 3. Cool the cakes in the pans for about five minutes. 4. Then, transfer them to a wire rack to cool completely. 5. Once cooled, dust with icing sugar for a sweet finish. For the Full Recipe, check out the complete details. Enjoy your mini bundt cakes! To bake perfect mini bundt cakes, mix your batter well but avoid overmixing. Overmixing can make the cakes tough. You want a light and fluffy texture. To get the best results, grease your pan well. Use butter or cooking spray, then dust with flour. This way, your cakes will slide out easily after baking. Mini bundt cakes are great for many occasions. They shine at birthday parties, holiday gatherings, and casual get-togethers. Serve them with a scoop of ice cream or a dollop of whipped cream for extra delight. Pair these cakes with coffee, tea, or milk for a satisfying treat. Get creative when decorating your mini bundt cakes! You can use fruits like fresh berries or citrus slices. Chopped nuts add a nice crunch too. For a sweeter touch, drizzle icing or dust with icing sugar. Match your decorations to the theme of your event. For example, use pastel colors for spring or bright hues for summer. For more details, check out the [Full Recipe]. {{image_2}} Mini bundt cakes shine at every celebration. For birthdays, you can make fun flavors. Try chocolate with sprinkles for kids. Adults might enjoy a rich red velvet. Holiday-themed flavors add cheer. Pumpkin spice is perfect for fall gatherings. For winter, peppermint bundts bring joy. You can even try eggnog flavor for that festive touch. At weddings, mini bundts can be elegant. Use vanilla or lemon for a light treat. Decorate them with fresh flowers or simple icing. They make lovely favors too! For those with special diets, mini bundt cakes can adapt. You can make them gluten-free using almond flour. Just swap out regular flour for a great taste. Vegan mini bundts are also easy to create. Use applesauce instead of eggs. Coconut oil can replace butter for a rich flavor. If you want to cut back on sugar, use ripe bananas. They add sweetness and moisture. Honey or maple syrup are great natural options too. Seasonal fruits or spices add joy to mini bundts. In summer, fresh berries can brighten flavors. Fold blueberries or raspberries into your batter for fun. In autumn, spices like nutmeg and cinnamon work wonders. A spiced cake with apples or pears makes a warm treat. For winter, think of festive flavors. Gingerbread with molasses creates cozy vibes. You can also use citrus zest for a bright, fresh taste. Explore these variations and make your mini bundts unique for every occasion. Check out the Full Recipe for ideas and inspiration! To keep your mini bundt cakes fresh, follow these tips: - Cool the cakes completely before storing. - Wrap each cake in plastic wrap tightly. - Place wrapped cakes in an airtight container. - Store at room temperature for short-term freshness. If you want to enjoy them later, freezing is a great option: - Wrap cakes in plastic wrap and then foil. - Place in a freezer bag to avoid freezer burn. - Label with the date, and use within three months. In the refrigerator, mini bundt cakes last about five days. To reheat, follow these steps: - Preheat your oven to 350°F (175°C). - Unwrap the cake and place it on a baking sheet. - Heat for about 10-15 minutes until warm. This keeps the cake moist and delicious without drying it out. To tell if mini bundt cakes have gone bad, check for these signs: - An off smell or sour odor indicates spoilage. - Look for mold or discoloration on the surface. - If the texture feels very dry or hard, it’s time to toss it. Always remember to be safe: - If unsure, it’s best to avoid eating it. - When in doubt, throw it out! What is the best way to prevent sticking? Greasing and flouring your mini bundt pans is key. Use unsalted butter for greasing. After greasing, add flour and shake the pan to coat the sides. This step helps your cakes slide out easily. Can I make the batter ahead of time? Yes, you can make the batter ahead. Store it in the fridge for up to 24 hours. Just remember to mix it gently before pouring it into the pans. This keeps the batter fresh and helps with rising. What are the best flavor pairings for mini bundt cakes? Mini bundt cakes shine with many flavors. Chocolate pairs well with mint or raspberry. Vanilla is great with lemon zest or fresh berries. For something warm, try adding cinnamon or nutmeg. Each choice can create a special treat. How can I customize flavors for different occasions? You can customize flavors easily. For birthdays, use chocolate with sprinkles. For holidays, think about pumpkin spice or peppermint. Use seasonal fruits like blueberries in summer or cranberries in winter. Match the flavors to the event for a great touch. Why did my mini bundt cakes sink? Cakes may sink due to overmixing or too much liquid. Make sure to mix just until combined. Also, check your oven temperature with a thermometer. If it’s too low, cakes may not rise properly. How do I fix mini bundt cakes that are too dry? If your cakes are dry, you can add moisture. A simple syrup can help. Mix equal parts sugar and water, then heat until the sugar dissolves. Brush this syrup on the cooled cakes to make them moist and sweet. Mini Bundt cakes are a joy to make and eat. They blend simple ingredients into delightful bites. Ingredients: - 1 cup all-purpose flour - 1/2 cup granulated sugar - 1/2 teaspoon baking powder - 1/4 teaspoon baking soda - 1/4 teaspoon salt - 1/2 cup unsalted butter, softened - 2 large eggs - 1 teaspoon vanilla extract - 1/4 cup buttermilk - 1/2 cup chocolate chips (optional) - Zest of 1 lemon (for lemon bundt) - 1/4 cup fresh blueberries (for blueberry bundt) - 1/2 teaspoon cinnamon (for spiced bundt) - Icing sugar for dusting To make these cakes, start by preheating your oven to 350°F (175°C). Grease and flour your mini bundt pans to avoid sticking. In a bowl, whisk together the dry ingredients. In another bowl, beat the butter until creamy, then add eggs and wet ingredients. Mix until smooth. Now, fold in any optional flavors, like chocolate or fruit. Pour the batter into the pans, filling each about two-thirds full. Bake for 15-20 minutes. Check with a toothpick to see if they are done. Once baked, let them cool before transferring to a rack. Dust with icing sugar for a sweet touch. For a full recipe with detailed steps, visit the link to "Mini Bundt Cakes for Every Occasion". Mini bundt cakes are delightful treats you can make for any occasion. You learned about essential ingredients, flavor variations, and creative garnishing ideas. I shared step-by-step instructions that guide you through baking and cooling. Tips on serving and decorating help you impress your guests. You can even adapt recipes for special diets or seasons. Store your cakes properly to keep them fresh. Now, it’s time for you to bake and share these tasty delights! Enjoy the process, and delight in your creations.

Looking for the perfect dessert for any gathering? You’re in the right place! In this guide, I’ll show you how to make delightful mini bundt cakes that fit every occasion. …

Read more

Categories Desserts

Reuben Balls with Spicy Dipping Sauce Delight

May 18, 2025 by Chef Theo
For Reuben balls, you need the following main ingredients: - 1 cup cooked corned beef, chopped finely - 1 cup sauerkraut, drained and chopped - 1 cup shredded Swiss cheese - 1/2 cup cream cheese, softened - 1 teaspoon garlic powder - 1 teaspoon onion powder - 1/2 teaspoon black pepper - 1/2 cup breadcrumbs - 1 egg, beaten - Oil for frying To make the spicy dipping sauce, gather these ingredients: - 1/2 cup mayonnaise - 2 tablespoons Dijon mustard - 1 tablespoon Sriracha sauce (adjust for spice tolerance) - 1 teaspoon honey - Salt and pepper to taste Choosing fresh ingredients is really important. Here are some tips: - Corned Beef: Look for bright pink color and a firm texture. Avoid any gray spots. - Sauerkraut: Choose sauerkraut that smells fresh and tangy. The crunchier, the better! - Swiss Cheese: Pick cheese that feels moist and has a smooth surface. - Cream Cheese: Ensure it is soft and creamy. Check the expiration date. - Spices: Use fresh spices for the best flavor. Old spices lose their taste. These fresh ingredients will help you create the best Reuben balls. For the complete recipe, check the Full Recipe section. To start, gather all your ingredients. You will need cooked corned beef, sauerkraut, Swiss cheese, and cream cheese. Also, have garlic powder, onion powder, black pepper, breadcrumbs, and one egg ready. In a large mixing bowl, add the chopped corned beef, drained sauerkraut, shredded Swiss cheese, and softened cream cheese. Sprinkle in the garlic powder, onion powder, and black pepper. Mix everything well until combined. Once mixed, shape the mixture into small balls, about one inch wide. This should make around 12 to 15 balls. Roll each ball in breadcrumbs to coat them evenly. Place the coated balls on a tray and refrigerate for about 30 minutes. This helps them firm up, making frying easier. Next, heat oil in a deep frying pan over medium heat. Make sure the oil is hot but not smoking. Carefully add the chilled Reuben balls to the hot oil. Fry them in small batches to avoid crowding. Cook each batch for 3 to 4 minutes. Look for a nice golden brown color on all sides. Once done, use a slotted spoon to remove the balls from the oil. Drain them on a paper towel to remove excess oil. This step ensures your Reuben balls stay crispy and delicious. While the Reuben balls cool, prepare the spicy dipping sauce. In a small bowl, whisk together mayonnaise, Dijon mustard, Sriracha sauce, and honey. Adjust the Sriracha to match your spice level. Add a pinch of salt and pepper for taste. Mix until smooth and creamy. Serve the hot Reuben balls with the spicy dipping sauce on the side. Enjoy this tasty treat! For the full recipe, check out the details above. To fry Reuben balls just right, heat your oil to medium. Use enough oil to cover the balls halfway. This helps them cook evenly. Fry in small batches to avoid crowding the pan. This keeps the heat steady. Cook for about 3-4 minutes until they turn golden brown. Remember to flip them halfway for an even color. One common mistake is not chilling the balls before frying. Chilling helps them hold their shape. Another mistake is using too much oil. If the oil is too hot, the outside cooks fast, but the inside stays cold. Lastly, don’t skip the breadcrumbs. They give a nice crunch and keep the filling moist. To keep the filling moist, use cream cheese. It adds a rich texture. Mix the filling just until combined; overmixing can dry it out. You can also add a splash of broth or a bit more cream cheese if needed. This keeps the balls juicy and flavorful. {{image_2}} You can switch up the filling in your Reuben balls for fun. Try pastrami instead of corned beef for a twist. You can also use turkey for a lighter version. If you want a veggie option, use mushrooms and spinach. This keeps the dish fresh and exciting. While the spicy dipping sauce adds heat, other sauces can change the game. Consider a creamy ranch for a cool dip. A tangy garlic aioli also pairs well with the balls. For a zesty kick, try a chipotle mayo. These options keep your guests guessing and delighted. Reuben balls shine at parties. Serve them on a large platter with toothpicks. This makes them easy for guests to grab. Pair them with a variety of dipping sauces for choice. You can also add a side of pickles for extra crunch. These ideas make your dish the star of the show. After enjoying your Reuben balls, store any leftovers in an airtight container. Keep them in the fridge. They will last for about 3-4 days. Make sure they cool down before sealing. This helps keep them fresh. To reheat, use the oven for the best texture. Preheat your oven to 350°F (175°C). Place the Reuben balls on a baking sheet. Heat them for about 10-15 minutes. This method keeps them crispy and delicious. You can also use a microwave, but this may make them soggy. You can freeze Reuben balls for later. First, let them cool completely. Then, place them in a single layer on a tray. Freeze until solid, about 1-2 hours. After that, transfer them to a freezer bag. They can last up to 3 months in the freezer. When ready to eat, thaw in the fridge before reheating. This way, you keep the flavor and texture intact. If you want a different meat, try pastrami or roast beef. Both give a nice flavor. You can also use turkey or chicken for a lighter option. These meats work well with the sauerkraut and cheese, keeping that Reuben taste. To make these Reuben balls gluten-free, swap regular breadcrumbs for gluten-free ones. You can also use crushed gluten-free crackers or oats. Check that the corned beef and sauces you use are gluten-free too. This way, everyone can enjoy them! Yes, you can bake Reuben balls! Preheat your oven to 400°F (200°C). Place the balls on a baking sheet lined with parchment paper. Bake for 20-25 minutes, turning halfway through. They won’t be as crispy as fried ones, but they’ll still taste great. For the full recipe, check out the steps to make these delicious Reuben balls! We explored the key ingredients for tasty Reuben Balls, along with a spicy dipping sauce. I shared tips for selecting fresh ingredients and avoiding common mistakes. You learned preparation and cooking steps, plus creative twists for variations. Storage tips will help keep leftovers fresh. Remember, great Reuben Balls start with quality ingredients. Stay confident in your cooking, and enjoy making these fun bites for your next gathering.

Get ready to impress your friends and family with these tasty Reuben Balls paired with a zesty spicy dipping sauce! This easy recipe combines all the classic flavors of a …

Read more

Categories Appetizers
Older posts
Newer posts
← Previous Page1 … Page70 Page71 Page72 … Page94 Next →

TOASTED RECIPES

Where ideas are warm, crisp, and ready to serve! 🍞

PAGES

Home About Contact Privacy Policy Terms & Conditions Cookie Policy GDPR Policy Copyright Policy Disclaimer

CATEGORIES

Appetizers Desserts Salads Breakfast Dinner

Contact

  • Pinterest
  • Mail
Copyright © 2025 Toasted Recipes. All rights reserved.