Blueberry Buckle Delightful and Easy Recipe
. {{image_2}} You can change up the fruit in your buckle. Try raspberries, strawberries, or blackberries. Each fruit brings its own flavor. Use whatever is fresh and in season. This keeps your buckle exciting and new. You can also mix different berries for a fun twist. To make a gluten-free version, swap the all-purpose flour. Use a gluten-free flour blend instead. Make sure it has a good mix of starches. This will help your buckle hold together well. The taste will still be yummy, and you won’t miss the gluten. For a vegan twist, replace the eggs and butter. Use flax eggs made from ground flaxseed and water. Swap the regular milk for almond or oat milk. This makes the buckle plant-based. It still tastes great, and everyone can enjoy it. For the full recipe, check out the Blueberry Buckle Bliss section. After you enjoy your Blueberry Buckle, store leftovers in an airtight container. This keeps the moisture in and the buckle fresh. Place it at room temperature for one day. If you need to keep it longer, move it to the fridge. It will stay good for up to five days in the fridge. To reheat, slice a piece and place it on a plate. Microwave it for 20 to 30 seconds. This warms it without drying it out. If you prefer, you can also use the oven. Preheat the oven to 350°F (175°C). Wrap the buckle in foil and heat for about 10 minutes. This helps keep the topping nice and crisp. For longer storage, you can freeze Blueberry Buckle. First, let it cool completely. Then, wrap it in plastic wrap and foil. This will protect it from freezer burn. Place it in a freezer bag or container. It can last up to three months in the freezer. When you want to eat it, thaw it in the fridge overnight before reheating. This way, it tastes fresh and delicious. Blueberry Buckle comes from New England. This treat dates back to the 19th century. It mixes cake and fruit in a unique way. The name "buckle" comes from the way the cake rises and "buckles" around the blueberries. Many families have their own recipes, often passed down through generations. To boost flavor, try adding lemon zest. This brightens the blueberries and adds freshness. You can also mix in different spices, like nutmeg or cardamom. For a twist, add a splash of orange juice. Using ripe, sweet blueberries will enhance the taste too. You can even swirl in some jam for added sweetness. Yes, you can make Blueberry Buckle ahead of time. Bake it and let it cool completely. Then, wrap it tightly in plastic wrap or foil. Store it in the fridge for up to three days. You can also freeze it for up to three months. Just remember to thaw it in the fridge before serving. For the best taste, reheat it gently in the oven. Enjoy it fresh like the first day! Blueberry buckle is a delicious treat with many options. We discussed its main and optional ingredients, plus substitutions for dietary needs. I shared step-by-step instructions to guide you through baking. With tips for mixing, choosing blueberries, and baking, you can create the best texture. Explore variations like gluten-free and vegan options. Lastly, storing and reheating methods keep your buckle fresh longer. Enjoy this delightful dessert and make it your own!](https://toastedrecipes.com/wp-content/uploads/2025/05/855f8887-2fd1-43c8-a6ba-7956bcd36028.webp)
Craving a sweet, fruity treat that’s easy to make? Look no further! Blueberry Buckle is a delicious dessert you can whip up in no time. In this post, I’ll share …
Craving a sweet, fruity treat that’s easy to make? Look no further! Blueberry Buckle is a delicious dessert you can whip up in no time. In this post, I’ll share …
![To make blueberry muffin cookies, you need some simple ingredients. Here’s a complete list: - Fresh or frozen blueberries - All-purpose flour - Baking soda, baking powder, salt - Unsalted butter - Granulated sugar - Large egg - Vanilla extract - Almond extract - Buttermilk (or milk + lemon juice) - Optional ingredients: cinnamon, rolled oats, colored sugar These ingredients come together to create a delightful treat. Fresh blueberries add a burst of flavor. If you don’t have fresh ones, frozen work just as well. The flour and baking powder help the cookies rise and stay fluffy. Unsalted butter gives the cookies a rich taste. Granulated sugar adds sweetness, while the egg binds everything together. Adding vanilla and almond extracts gives a wonderful aroma. Buttermilk makes the cookies moist and tender. You can also add cinnamon for warmth or rolled oats for a chewy texture. Lastly, colored sugar on top makes your cookies look fun and inviting. Using these ingredients, you can create a batch of blueberry muffin cookies that your friends and family will love. For the full recipe, you can check out the complete instructions for making these tasty treats. - Preheat your oven to 350°F (175°C). Line a baking sheet with parchment paper; set aside. - In a medium bowl, mix together the flour, baking soda, baking powder, salt, and optional cinnamon. Whisk until everything combines well. - In a large bowl, cream the softened butter and granulated sugar together. Do this for about 3 to 4 minutes until it looks light and fluffy. - Add the egg, vanilla extract, and almond extract to the butter-sugar mixture. Mix everything until it blends well. - Gradually add the dry ingredients to the wet mixture. Alternate adding the buttermilk, starting and ending with the flour. Mix until just combined to keep the cookies soft. - Gently fold in the blueberries and rolled oats. Make sure they are evenly spread throughout the dough. - Using a cookie scoop or tablespoon, drop mounds of dough onto the prepared baking sheet. Space them about 2 inches apart for even baking. - If you want, sprinkle colored sugar lightly on top for a fun look. - Bake in the preheated oven for 12 to 15 minutes. Look for lightly golden edges as a sign they are done. - Let the cookies cool on the baking sheet for 5 minutes. After that, move them to a wire rack to cool completely. For a detailed overview, see the Full Recipe. To make soft blueberry muffin cookies, avoid overmixing your dough. Mix until just combined. This keeps the cookies tender. Use the spoon-and-level method for measuring flour. This helps avoid too much flour, which can cause tough cookies. For the perfect texture, be sure to use room temperature butter. It mixes better with sugar and creates a nice, fluffy base. When serving blueberry muffin cookies, think outside the box! Present them on a rustic wooden board or a bright platter. You can garnish with fresh blueberries for a fun touch. Pair these cookies with a glass of cold milk or a cup of tea. They also taste great with a scoop of vanilla ice cream for dessert! To keep your cookies fresh, store them in an airtight container. This helps prevent them from getting dry. You can freeze these cookies for later. Just place them in a freezer-safe bag. When you're ready to eat, let them thaw at room temperature. Enjoy your tasty treats anytime with these simple tips! For the full recipe, check the detailed instructions above. {{image_2}} You can easily boost the flavor of your blueberry muffin cookies. Adding lemon zest gives a bright, citrus twist. It wakes up the flavors and pairs well with blueberries. You might also like to toss in chocolate chips or white chocolate chunks. The rich chocolate adds a nice contrast to the fruity taste. These fun tweaks can make your cookies even more special. If you need a gluten-free option, don't worry! You can substitute all-purpose flour with gluten-free flour. Just make sure to use a blend that works well for cookies. You may also need to adjust other ingredients. For example, check if you need to add more liquid or a binder like xanthan gum. With these swaps, you can enjoy tasty cookies without gluten. For a healthier twist, try reducing the sugar in the recipe. You can use alternative sweeteners like honey or maple syrup. They can add sweetness with fewer calories. Another option is to use whole wheat flour or oats. Whole wheat flour boosts fiber, and oats add texture. These changes not only make the cookies healthier but also keep them delicious. The Blueberry Muffin Cookies recipe is simple and fun. First, you gather your ingredients. Use fresh or frozen blueberries, flour, sugar, and butter. Then, preheat your oven to 350°F (175°C). Line a baking sheet with parchment paper. Next, mix dry ingredients in a bowl. This includes flour, baking soda, baking powder, salt, and cinnamon if you like. In another bowl, cream the butter and sugar together. Add in the egg and extracts. Mix until it's nice and smooth. Now, alternate adding the dry mix and buttermilk to the wet mix. Be careful not to overmix, as you want soft cookies. Gently fold in blueberries and rolled oats. Using a scoop, drop dough mounds on your prepared sheet. Space them about 2 inches apart. If you want, sprinkle colored sugar on top for fun. Bake for 12-15 minutes until golden brown. Let them cool for a few minutes before moving them to a rack. For detailed instructions, check the [Full Recipe]. Enjoy your tasty treats! Can I use frozen blueberries instead of fresh? Yes, you can use frozen blueberries. Just add them straight to the dough. Frozen blueberries may make the dough a bit wetter, but they will still taste great. How do I know when the cookies are done baking? Look for light golden edges. The center may be soft, but that’s okay. They will firm up as they cool. Can I substitute buttermilk with regular milk? Yes, you can use regular milk. Add one teaspoon of lemon juice to every half-cup of milk. This will mimic the tangy taste of buttermilk. How long do these cookies last? These cookies will stay fresh for about a week at room temperature. Store them in an airtight container to keep them soft. Can I freeze the cookies, and if so, how? Yes, you can freeze them! Place the cookies in a single layer on a baking sheet. Freeze them until solid, then transfer to a freezer bag. They will last for about three months. Can I make these cookies vegan? Absolutely! You can replace the egg with a flaxseed egg. Use 1 tablespoon of ground flaxseed mixed with 2.5 tablespoons of water. Let it sit for a few minutes to thicken. What else can I add to the cookies for extra flavor? You can add lemon zest for a fresh kick. Chopped nuts or white chocolate chips also work well for a tasty twist. For an extra crunch, try mixing in some rolled oats. Blueberry Muffin Cookies blend flavors and textures perfectly. I walked you through selecting ingredients, preparing dough, and baking. Remember to measure carefully for the best outcome. Feel free to experiment with flavors or make them healthier. Store extras for later, or share with friends! Baking these cookies is a fun journey full of creativity. Enjoy your sweet success each time you bake!](https://toastedrecipes.com/wp-content/uploads/2025/05/43a3382f-0e2a-41b3-9b1d-b6b02d72be92.webp)
If you love the sweet and tangy taste of blueberries, you’ll adore these Blueberry Muffin Cookies. They combine the joy of fresh-baked blueberry muffins with the fun of cookies. I’ll …
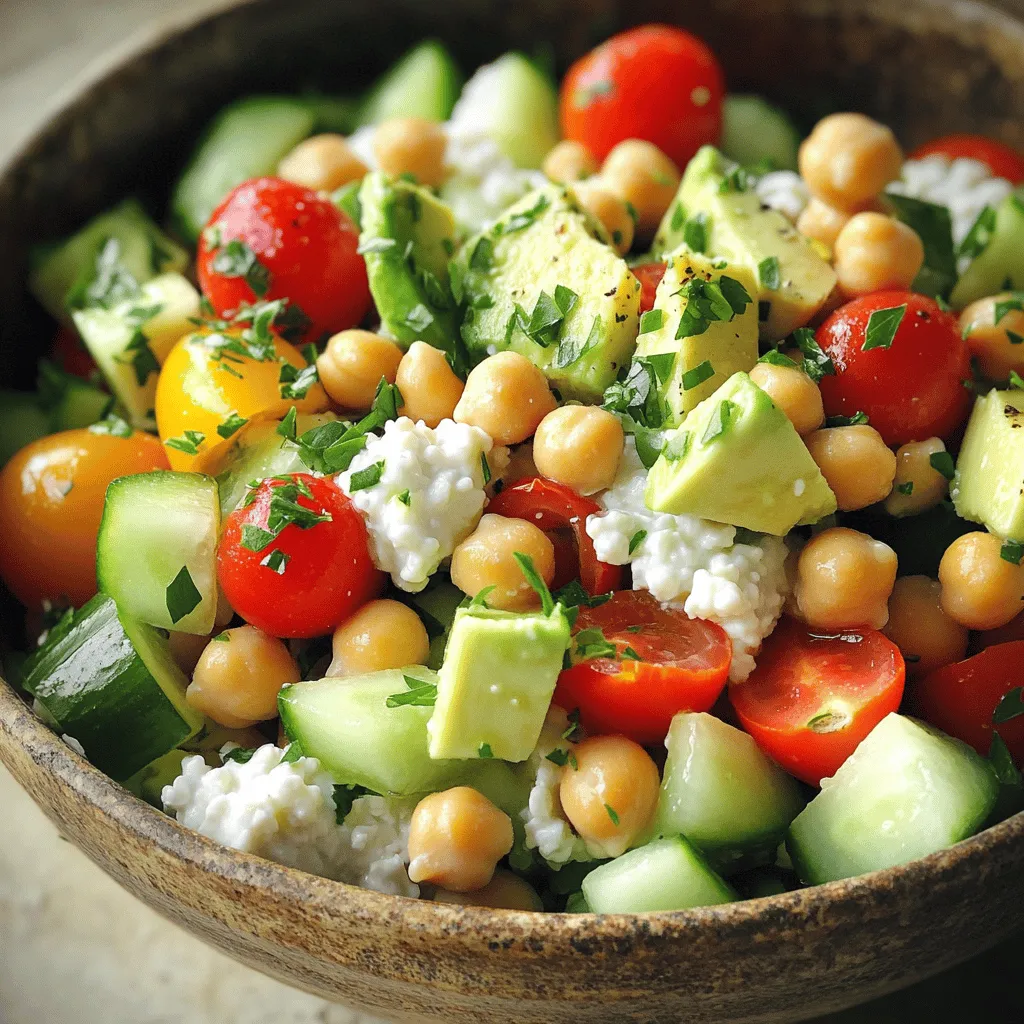
Looking for a fresh and tasty dish that’s easy to make? This Cottage Cheese and Chickpea Salad is your answer! With just a few simple ingredients, you can whip up …
![To make this soup, you need some key ingredients. Here’s what you will use: - 1 tablespoon olive oil - 1 pound Italian sausage (mild or spicy, casings removed) - 1 small onion, diced - 2 cloves garlic, minced - 2 medium carrots, diced - 2 celery stalks, diced - 4 cups chicken broth - 1 can (14.5 oz) diced tomatoes, drained - 1 cup heavy cream - 1 cup ditalini pasta - 1 cup fresh spinach - 1 cup grated Parmesan cheese - 1 teaspoon dried oregano - 1 teaspoon dried basil - Salt and pepper to taste - Fresh parsley for garnish These ingredients work together for a rich and creamy taste. The Italian sausage adds a nice kick. The ditalini pasta gives the soup a fun shape. You can add some optional ingredients to boost the flavor. Consider these options: - Red pepper flakes for heat - A splash of white wine for depth - Fresh herbs like thyme or rosemary - Chopped bell peppers for sweetness These add-ins can change the flavor profile. Feel free to mix and match! When you shop for ingredients, freshness matters. Here are some tips: - Choose Italian sausage from a trusted butcher or deli for the best taste. - Look for firm, fresh vegetables. They should be bright in color. - Select high-quality chicken broth. Homemade is best, but store-bought works too. - Use freshly grated Parmesan cheese for a richer flavor. Finding quality ingredients makes a big difference. It enhances the whole dish and makes your soup shine. For the complete preparation, check out the Full Recipe. To start, gather all your ingredients. This makes cooking easier and more fun. You will need olive oil, Italian sausage, onion, garlic, carrots, celery, chicken broth, diced tomatoes, heavy cream, ditalini pasta, spinach, Parmesan cheese, oregano, basil, salt, pepper, and parsley. Chop your vegetables into small pieces. This helps them cook evenly. For the sausage, you can choose mild or spicy based on your taste. First, heat the olive oil in a large pot over medium heat. Add the Italian sausage, breaking it into small pieces. Cook it until it turns brown, about 5 to 7 minutes. Next, add the diced onion, carrots, and celery. Sauté these for about 5 minutes. You want the vegetables to soften but not lose color. Then, stir in the minced garlic and cook for one more minute until you smell its aroma. Now, pour in the chicken broth. Add the drained diced tomatoes, oregano, and basil. Bring this mixture to a simmer. Once it simmers, toss in the ditalini pasta. Cook it according to the package instructions, usually about 8 to 10 minutes until it's al dente. After the pasta is ready, stir in the heavy cream. Allow it to heat through while gently mixing to blend the flavors. Finally, mix in the fresh spinach and grated Parmesan cheese. Stir until the spinach wilts and the cheese melts. Add salt and pepper to taste. When serving, ladle the soup into bowls. Garnish with fresh parsley and an extra sprinkle of Parmesan if you like. This adds a nice touch and a burst of flavor. Enjoy your creamy Parmesan Italian sausage ditalini soup! For full instructions, check out the Full Recipe. You can make this soup your own! Here are some fun ideas: - Add beans: White beans or kidney beans add heartiness. - Spice it up: Use spicy sausage or add red pepper flakes. - Veggie boost: Toss in bell peppers or zucchini for extra flavor. - Herb twist: Fresh herbs like thyme or rosemary can brighten the taste. Great flavor comes from simple steps. Here’s how to enhance it: - Sauté vegetables: Always cook your onions and garlic well. This builds rich flavor. - Season in layers: Add salt and pepper as you cook to deepen the taste. - Creamy finish: Stir the heavy cream in at the end for a silky texture. - Finishing touches: A squeeze of lemon juice adds brightness to each bowl. Having the right tools helps you cook with ease. Here’s what I recommend: - Large pot: A sturdy pot is key for even cooking. - Wooden spoon: Use this for stirring. It prevents scratching. - Measuring cups: Accurate measurements make a big difference. - Ladle: A ladle helps you serve the soup without spills. You can follow the [Full Recipe] for more details on each step. Enjoy your cooking! {{image_2}} To make a gluten-free version of this soup, swap the ditalini pasta. Use gluten-free pasta instead. You can also check the broth for gluten. Many brands offer gluten-free options. This way, everyone can enjoy this creamy delight. For a vegetarian or vegan soup, skip the sausage. Use plant-based sausage or mushrooms for a hearty feel. Replace the heavy cream with coconut milk or cashew cream for rich flavor. Add more veggies like zucchini or bell peppers for extra texture and taste. You can try different pasta shapes for fun. Shells or small elbows work well in this soup. Each shape gives a new bite and feel to the dish. Mix and match to find your favorite. For an even heartier option, add grains like quinoa or farro. These choices add a nice twist and keep the meal filling. Explore the full recipe for more details on making this comforting soup at home! To keep your soup fresh, let it cool first. Use an airtight container for storage. This helps prevent spoilage and keeps flavors intact. Store the soup in the fridge if you plan to eat it within three days. If longer storage is needed, freezing is best. To freeze the soup, portion it into freezer-safe containers. Leave some space at the top for expansion. Label the containers with the date. The soup can last in the freezer for up to three months. When you're ready to use it, just take it out and thaw in the fridge overnight. Reheat the soup on the stove over medium heat. Stir often to avoid sticking. If it seems thick, add a splash of broth or water. Heat until steaming, but do not boil. This helps keep the cream smooth and the flavors bright. Enjoy your soup warm, just like the first day! Ditalini pasta is small, tube-shaped pasta. It works great in soups because it holds sauce well. You can find ditalini in most grocery stores. Look in the pasta aisle, near other small pasta types. If you can’t find it, feel free to use another small shape, like elbows or shells. Yes, you can! This recipe works with mild or spicy Italian sausage. You can also try chicken or turkey sausage for a lighter option. Just make sure to cook it until it's fully browned before adding other ingredients. The sausage adds a rich flavor to the soup. If you want a lighter version, you can use half-and-half or whole milk. For a dairy-free option, try coconut milk or a nut-based cream. Each choice will change the flavor a bit, but they all create a creamy texture. Just be careful not to boil the soup after adding milk, as it can curdle. For the full recipe and step-by-step instructions, check out the [Full Recipe]. This article covered how to make creamy Parmesan Italian sausage Ditalini soup. We discussed essential ingredients and tips for sourcing them, plus step-by-step cooking instructions. You learned ways to customize the soup and storage tips to keep it fresh. In conclusion, this recipe is flexible, tasty, and easy to prepare. Enjoy making it your way, and don't hesitate to share your own twists!](https://toastedrecipes.com/wp-content/uploads/2025/05/45e50d44-ab5f-4d7f-9caf-65a4ebc4296c.webp)
Welcome to a world of comfort with my Creamy Parmesan Italian Sausage Ditalini Soup Delight! This rich and savory soup blends hearty sausage and creamy cheese to create a dish …
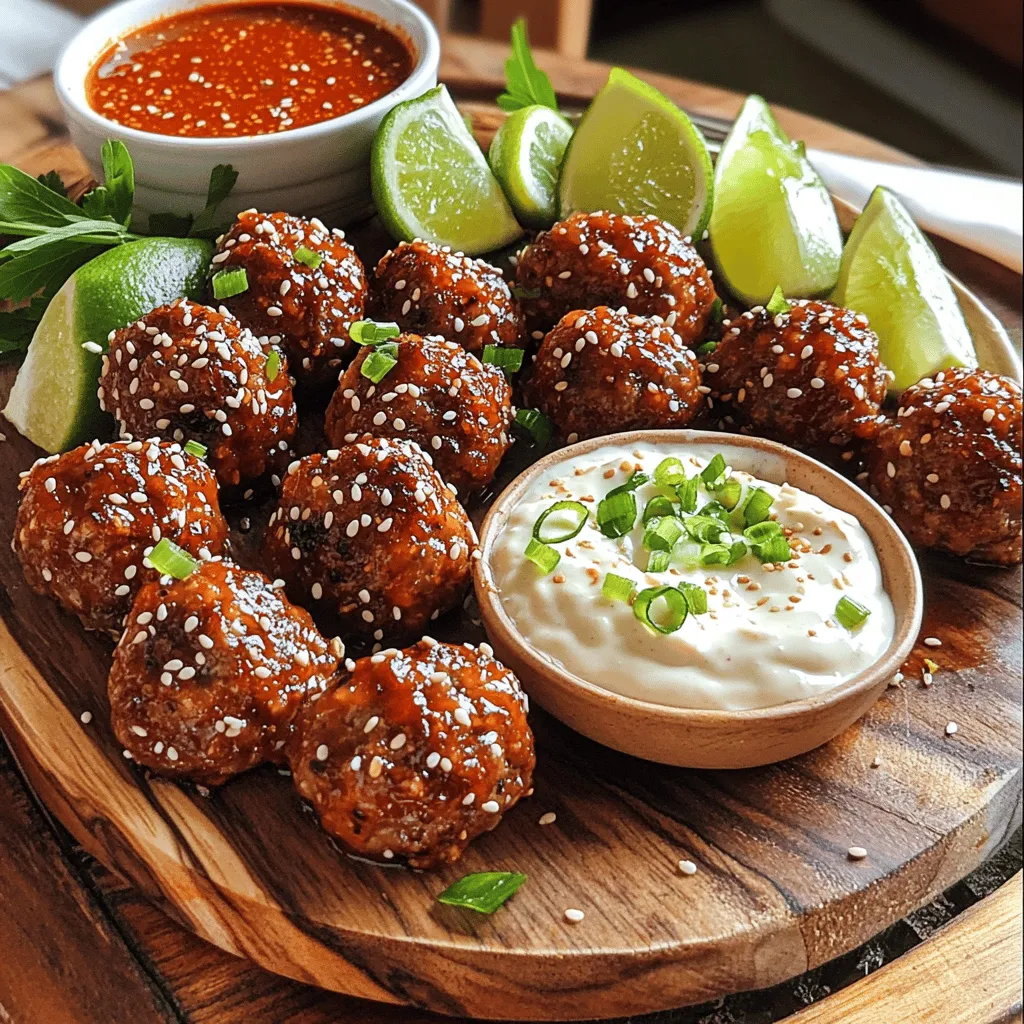
Are you ready to elevate your snack game? These Korean BBQ Meatballs with Spicy Mayo Dip are packed with bold flavors and are super easy to make! In this post, …
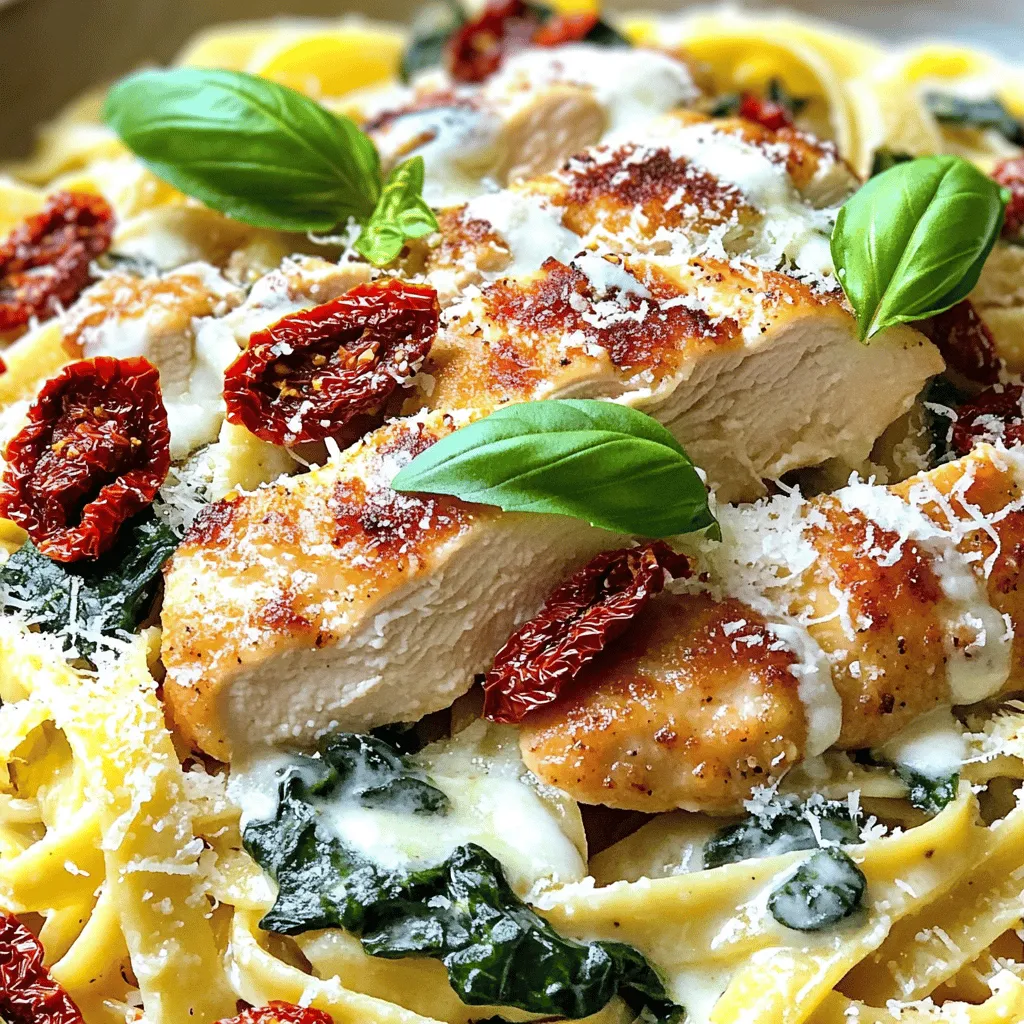
Are you ready to impress your loved ones with a meal that could lead to a proposal? Welcome to my easy and delicious Marry Me Chicken Pasta recipe! This hearty …
![For the Sweet Chili Chicken Bowl, you will need: - 2 boneless, skinless chicken breasts, cubed - 1 cup sweet chili sauce - 2 tablespoons soy sauce - 1 tablespoon sesame oil - 1 tablespoon fresh ginger, grated - 2 cloves garlic, minced - 1 cup jasmine rice - 1 cup water or chicken broth - 1 red bell pepper, thinly sliced - 1 cup snap peas, trimmed - 2 green onions, sliced - 1 tablespoon sesame seeds - Salt and pepper to taste These ingredients create a great base for the dish. The chicken provides protein, while the sweet chili sauce gives it a unique taste. The vegetables add color and crunch. Jasmine rice acts as the perfect base for all these flavors. You can also customize your bowl with optional ingredients like: - Additional proteins such as shrimp or tofu - Toppings and garnishes like cilantro or lime wedges - Alternative vegetables such as broccoli or carrots These options let you tailor the dish to your taste. If you want extra protein, shrimp or tofu work well. Adding lime gives a fresh burst of flavor. You can find the full recipe [here]. To marinate chicken, start by mixing the sweet chili sauce, soy sauce, sesame oil, grated ginger, minced garlic, and salt and pepper in a bowl. This mix packs a punch of flavor. Then, add the cubed chicken and stir well to coat every piece. It’s important to let the chicken sit in the marinade for at least 30 minutes in the fridge. This resting time lets the flavors seep in deeply, making your dish even tastier. First, rinse the jasmine rice under cold water until the water runs clear. This step removes excess starch and helps the rice cook evenly. For cooking, you can use either a stovetop method or a rice cooker. If you choose the stovetop, combine the rinsed rice with water or chicken broth in a medium saucepan. Bring it to a boil, reduce to a simmer, and cover. Cook for about 15 minutes until all the liquid is absorbed. Let it sit covered for another 5 minutes to finish steaming. Heat a large skillet over medium-high heat. Pour in the marinated chicken along with the marinade. Cook for about 5-7 minutes until the chicken is browned and fully cooked. To check the temperature, the chicken should reach 165°F. After the chicken is cooked, add the sliced red bell pepper and snap peas to the skillet. Sauté them for 3-4 minutes until they are tender-crisp. This timing ensures the veggies stay vibrant and crunchy, adding great texture to your bowl. For the complete recipe, check out the [Full Recipe]. For a tasty marinade, switch up the sweet chili sauce. Try adding lime juice for a zesty kick. You could also mix in a bit of honey for extra sweetness. To make the chicken juicy, sear it on high heat first. This locks in the juices and adds color. When you serve the bowl, layer the rice first. Then, add the chicken and veggies on top. This makes it look nice and helps keep everything warm. For sides, consider a fresh cucumber salad or edamame. They add crunch and balance the sweetness. One mistake is overcooking the chicken. This makes it dry and chewy. Keep an eye on the cooking time and remove it from the heat when it’s just done. Another mistake is under-seasoning. Always taste your dish before serving. Adjust the seasoning if it seems bland. {{image_2}} You can change the sweet chili sauce for a zesty twist. Try adding sriracha for heat or lime juice for zing. Mixing honey with soy sauce creates a sweet-savory blend. You can also use a teriyaki sauce for a different taste. For a health-conscious swap, look for low-sugar sweet chili sauce. You can even make your own sauce using fresh ingredients. This option cuts down on processed sugars and boosts flavor. If you want a change from chicken, use shrimp or pork. Both cook quickly and add great flavor. For a vegetarian option, swap chicken for tofu. Firm tofu works best. Just be sure to press it to remove excess water before cooking. You can also try a mix of beans for added protein in a vegan bowl. Chickpeas or black beans are good choices. They add texture and nutrients without meat. Change your veggies based on the season. In spring, use asparagus or peas for a crisp bite. In fall, swap in roasted squash or Brussels sprouts for warmth. This keeps your bowl fresh and exciting all year. You can also adapt the dish for special events. For a summer cookout, serve it cold as a salad. In winter, add warmer spices like cinnamon or nutmeg for a cozy feel. Embrace the seasons for a unique twist every time! To keep your Sweet Chili Chicken Bowl fresh, cool it down quickly. Place it in a shallow container. This helps the dish chill faster and stay safe. In the fridge, it lasts up to three days. Just make sure you cover it tightly to prevent drying out. If you want to save some for later, freeze it! Use an airtight container or freezer bag. Remove as much air as you can. This helps prevent freezer burn. Your chicken bowl can stay good for up to three months. When you’re ready to eat, thaw it in the fridge overnight. Reheat in a skillet for the best taste. This keeps the chicken juicy and the veggies crisp. Want to make meal prep easier? Prepare the chicken, rice, and veggies ahead of time. Store each item in separate containers. This way, you can mix and match for quick meals. Cooked rice keeps well in the fridge for about five days. You can also chop veggies in advance. Just store them in a sealed bag to keep them fresh. This makes assembling your Sweet Chili Chicken Bowl a breeze! For the full recipe, check out the detailed cooking steps above. To make a sweet chili chicken bowl, follow these steps: 1. Marinate the Chicken: Mix sweet chili sauce, soy sauce, sesame oil, ginger, and garlic. Coat cubed chicken and let it marinate for 30 minutes. 2. Prepare Rice: Rinse jasmine rice until clear. Boil with water or broth, then simmer for 15 minutes. 3. Cook Chicken: In a skillet, heat the marinated chicken over medium-high heat until cooked through, about 5-7 minutes. 4. Add Vegetables: Stir in sliced bell pepper and snap peas. Cook for another 3-4 minutes. 5. Assemble Bowls: Fluff rice, divide into bowls, and top with chicken and veggies. 6. Garnish: Finish with green onions and sesame seeds. For the full recipe, check above. Yes, you can use various proteins in this dish. Here are some options: - Turkey: Use ground turkey for a leaner choice. - Pork: Thinly sliced pork works well with the sweet sauce. - Beef: Use flank steak for a rich flavor. - Tofu: For a vegetarian option, marinated tofu is great. Each protein absorbs flavors well, making the dish versatile. The sweet chili chicken bowl can be healthy. Here’s a quick breakdown: - Chicken: Lean protein source. - Vegetables: Bell peppers and snap peas add fiber and vitamins. - Rice: Jasmine rice provides carbohydrates for energy. For a healthier option, reduce sweet chili sauce or use brown rice instead. To make this dish gluten-free, follow these tips: - Soy Sauce: Use gluten-free soy sauce or tamari. - Sweet Chili Sauce: Check for gluten-free brands. - Rice: Jasmine rice is naturally gluten-free, so it’s a safe choice. These switches ensure you enjoy the bowl without gluten. Here are some side dishes and drinks that pair well with sweet chili chicken bowls: - Steamed Broccoli: Adds crunch and color. - Cucumber Salad: Fresh and light to balance flavors. - Spring Rolls: A tasty appetizer to start the meal. - Green Tea: A refreshing drink that complements the dish. These options enhance your dining experience. You now have everything you need to make a tasty sweet chili chicken bowl. Remember, using fresh ingredients and following the steps will give you great results. Customize your bowl with different proteins or veggies to match your taste. Avoid common mistakes, and your dish will shine. Enjoy a flavorful meal, whether for dinner or meal prep. With these tips, you can create this dish many times while keeping it exciting!](https://toastedrecipes.com/wp-content/uploads/2025/05/c1d7e77b-6b7d-423e-a933-ac14048d9ce8.webp)
Are you craving a quick, tasty meal? Look no further than the Sweet Chili Chicken Bowl! With tender chicken, fresh veggies, and a sweet and spicy sauce, this dish offers …
![- 1 cup cooked jasmine rice - 2 chicken breasts, grilled and sliced - 1 cup corn kernels (fresh or frozen) - 1 tablespoon olive oil - 1 teaspoon chili powder - 1/2 teaspoon smoked paprika - 1/2 teaspoon garlic powder - Salt and pepper to taste - 1/2 cup crumbled feta cheese - 1 avocado, sliced - 1/4 cup fresh cilantro, chopped - Juice of 1 lime - 1/4 cup sour cream (optional) - 1 tablespoon hot sauce (optional) For this recipe, I focus on fresh, simple ingredients. The jasmine rice serves as a great base. It has a light and fragrant quality. The grilled chicken gives protein and flavor. You can use fresh or frozen corn kernels. Both options work well. The toppings add layers of taste and texture. Olive oil is essential for cooking the corn. It helps achieve a nice char. The spices, like chili powder and smoked paprika, bring heat and depth. Garlic powder adds a nice savory note. Don’t forget salt and pepper for balance. Feta cheese adds a creamy touch. Avocado brings richness and healthy fats. Fresh cilantro brightens the dish. The lime juice gives a zesty finish. If you want to make it extra creamy, add sour cream. Hot sauce can add a fun kick. This Street Corn Chicken Rice Bowl is colorful and vibrant. It is perfect for any meal. You can find the full recipe at the end of this article. Enjoy creating this flavorful delight! - Heat 1 tablespoon of olive oil in a skillet over medium-high heat. - Add 1 cup of corn kernels to the skillet. Cook until they are slightly charred. This takes about 4-5 minutes. - Season the corn with 1 teaspoon of chili powder, 1/2 teaspoon of smoked paprika, 1/2 teaspoon of garlic powder, and salt and pepper to taste. Stir and cook for an additional 2 minutes. Remove from heat and set aside. - In a bowl, layer the cooked jasmine rice as your base. You need 1 cup of jasmine rice. - Add the grilled chicken. Use 2 chicken breasts, grilled and sliced. Then, add the charred corn on top. - Finish this layer with sliced avocado and 1/2 cup of crumbled feta cheese. - Squeeze the juice of 1 lime over the bowl for a fresh kick. - Sprinkle with 1/4 cup of fresh cilantro, chopped for added flavor. - If you like, add dollops of 1/4 cup of sour cream and drizzle with 1 tablespoon of hot sauce for extra zest. This is how you create a Street Corn Chicken Rice Bowl full of flavor. Enjoy your vibrant meal! For the complete recipe, check out the [Full Recipe]. To grill chicken well, start with even thickness. This helps it cook evenly. You can pound the chicken breasts to achieve this. Marinate the chicken for extra flavor. A mix of lime juice, olive oil, and spices works great. Grill over medium heat for about 6-7 minutes per side. Use a meat thermometer to check for doneness. The internal temperature should reach 165°F. Let the chicken rest before slicing. This keeps it juicy and tender. When choosing corn, fresh is best, but frozen works too. If using fresh corn, strip the kernels from the cob. For frozen corn, thaw it first. To get a good char, heat olive oil in a skillet over medium-high heat. Add the corn and let it sit without stirring for a few minutes. This allows it to brown nicely. Season the corn with chili powder, smoked paprika, and garlic powder for a burst of flavor. This dish pairs well with lime wedges and a fresh salad. You can also serve it with tortilla chips for a crunch. For drinks, try a light beer or a refreshing lemonade. The bowl is perfect for casual dinners or festive gatherings. It brings bright colors and flavors to any table. Enjoy this meal on a sunny day or during a fun get-together with friends. {{image_2}} You can easily swap out ingredients in your Street Corn Chicken Rice Bowl. For protein, try tofu or shrimp if you want a change. Both options work great with the other flavors. When it comes to cheese, feta is tasty but not your only choice. You can use queso fresco or even a dairy-free cheese. Both will still give you that creamy texture. Want more flavor? Add some spices! You can use cayenne pepper or smoked paprika for extra heat. A pinch of cumin will also give it a nice twist. Homemade sauces can take your bowl to the next level. Try mixing yogurt with lime juice and garlic for a fresh taste. Or make a spicy salsa to drizzle on top. Both options add great zing. If you want a vegan option, replace chicken with grilled jackfruit or chickpeas. Both are hearty and soak up flavors well. For cheese, skip the feta and try avocado or a nut-based cream. It gives a rich, creamy touch without the dairy. For creamy toppings, use cashew cream or a simple tahini sauce. Store your Street Corn Chicken Rice Bowl in an airtight container. This keeps the flavors fresh. Place it in the fridge right after serving. It can last for about three days. After that, the taste and texture may change. When you want to enjoy your leftovers, heat them in the microwave. Use a microwave-safe bowl. Cover it with a damp paper towel to keep moisture in. Heat for one to two minutes, checking often. This helps keep the rice tender and the chicken juicy. Yes, you can freeze this dish! To freeze, pack the bowl in a freezer-safe container. Make sure to leave some space for expansion. It will stay good for up to three months. When you're ready to eat, thaw it in the fridge overnight. Reheat it in the microwave or on the stove. This keeps most of the flavors intact. You can easily tailor this dish to fit your needs. For dietary preferences, try these options: - Protein swaps: Use tofu or shrimp instead of chicken. - Grains: Replace jasmine rice with quinoa or brown rice. - Vegan options: Skip the chicken and cheese for a plant-based meal. You can also add extra ingredients for fun flavors: - Beans: Black beans or pinto beans add protein. - Veggies: Bell peppers, jalapeños, or zucchini can boost nutrition. - Nuts and seeds: Add pumpkin seeds or chopped nuts for crunch. Pair your bowl with sides that balance the meal: - Salad: A simple green salad with lime vinaigrette complements the bowl. - Chips: Serve tortilla chips for a satisfying crunch. - Street corn: Grilled corn on the cob brings extra flavor. For drinks, consider these refreshing beverages: - Margaritas: A classic choice that adds fun. - Lemonade: Sweet and tart lemonade cools the palate. - Iced tea: Unsweetened iced tea pairs well with the spices. To boost the heat, try these methods: - Hot sauce: Drizzle your favorite hot sauce on top. - Spices: Add cayenne pepper or red pepper flakes while cooking. - Jalapeños: Toss in fresh or pickled jalapeños for extra kick. Some recommended hot sauces are: - Sriracha: A perfect blend of heat and garlic flavor. - Chipotle sauce: Smoky and spicy for depth. - Tobasco: A classic hot sauce that adds vinegar zing. For the full recipe, check the main article. Enjoy your cooking adventure! This blog post covered how to make a tasty Street Corn Chicken Rice Bowl. You learned the key ingredients like grilled chicken, jasmine rice, and charred corn. The step-by-step guide helps you prepare and assemble the bowl easily. Tips for grilling chicken and customizing the dish add value. Remember, cooking should be fun and creative. Enjoy experimenting with flavors and toppings to make it your own!](https://toastedrecipes.com/wp-content/uploads/2025/05/3892f726-c1df-4ac4-862b-82a0e5f6d654.webp)
Are you ready to savor a burst of flavor with the Street Corn Chicken Rice Bowl? This simple and tasty recipe combines juicy grilled chicken, fresh corn, and zesty toppings …

Welcome to the delightful world of Lemon Coconut Heaven Cookies! These irresistible treats burst with zesty lemon and sweet coconut flavors. I’ll share simple steps to create cookies that are …
![- 2 cups cooked chicken, shredded or diced - 1 cup shredded mozzarella cheese - 1 cup cream cheese, softened - 3 cloves garlic, minced - 1 teaspoon Italian seasoning - 4 large flour tortillas - 1/2 cup fresh spinach, chopped - 1/4 cup sun-dried tomatoes, chopped (optional) - Salt and pepper to taste - Olive oil, for cooking Gather these tasty ingredients to make your Easy Cheesy Chicken Garlic Wraps. Start with cooked chicken. You can use leftover chicken or rotisserie chicken. Next, grab mozzarella cheese to add that nice melty goodness. Cream cheese adds creaminess, while garlic gives a wonderful flavor boost. Italian seasoning adds depth. You can adjust it to your taste. Fresh spinach adds color and nutrients. If you like, add sun-dried tomatoes for a sweet touch. Don’t forget salt and pepper for seasoning. Finally, olive oil helps crisp up the wraps when cooking. You’re all set with these simple ingredients. For the full recipe, check the recipe section above. In a large mixing bowl, you will mix the cooked chicken, cheeses, garlic, and seasonings. Start with 2 cups of cooked chicken. You can shred or dice it. Next, add 1 cup of shredded mozzarella cheese and 1 cup of softened cream cheese. Then, toss in 3 cloves of minced garlic and 1 teaspoon of Italian seasoning. Finally, season with salt and pepper to taste. Stir until everything combines well. Now it's time to assemble your wraps. Lay out 4 large flour tortillas on a clean surface. Take a generous spoonful of the chicken-cheese mixture and place it in the center of each tortilla. You can add 1/2 cup of chopped fresh spinach and, if you like, 1/4 cup of sun-dried tomatoes. These add great flavor! Next, fold the sides of the tortilla in and roll it up tightly from the bottom to enclose the filling. Repeat this for all tortillas. Heat a skillet over medium heat. Once hot, add a drizzle of olive oil. Place the wraps seam side down in the skillet. Cook for 3-4 minutes until they turn golden brown. Flip the wraps and cook the other side for another 3-4 minutes. You want both sides to be crispy and heated through. Remove them from the skillet and let them cool for a minute. Slice them in half to serve. Enjoy your Easy Cheesy Chicken Garlic Wraps! For the full recipe, check out the details above. To make your Easy Cheesy Chicken Garlic Wraps crispy, follow these tips: - Dry Ingredients: Use cooked chicken that is not too moist. This helps keep the wrap crisp. - Heat Level: Cook on medium heat. This ensures the wraps get golden brown without burning. - Use Olive Oil: A light drizzle of olive oil in the skillet adds flavor and helps achieve that crunchy outside. For even cooking, use these skillet methods: - Single Layer: Place wraps seam-side down. This keeps the filling inside and helps them cook well. - Monitor Cook Time: Flip the wraps gently after 3-4 minutes. This ensures both sides get that perfect crunch. You can swap out ingredients to fit your taste or needs: - Cheese Alternatives: Try cheddar or pepper jack cheese for a different flavor. - Protein Swaps: Use grilled shrimp or tofu for a tasty twist. To customize with vegetables, consider: - Add Peppers: Sliced bell peppers add color and crunch. - Zucchini or Mushrooms: These add moisture and flavor to your wraps. Serving your wraps well makes them even more appealing: - Slice Them Up: Cut each wrap in half to show the colorful filling. - Dipping Sauce: Serve with marinara or ranch dressing for extra flavor. - Garnish Smartly: Sprinkle fresh parsley or basil on top for a pop of color and freshness. For the full recipe, check out the [Full Recipe]. {{image_2}} You can easily change up the taste of your wraps. For a spicy version, try adding jalapeños or a drizzle of hot sauce. This adds a nice kick to every bite. If you prefer a Mediterranean twist, swap out the mozzarella for feta cheese. You can also add olives for a briny flavor that pairs well with chicken. Both options give a fresh twist to the classic wrap. If you need gluten-free options, look for gluten-free tortillas at your store. They work just as well for this recipe. For a vegetarian alternative, use plant-based protein instead of chicken. You can try crumbled tofu or chickpeas. This makes the wraps tasty and suitable for everyone at the table. To save time, you can make these wraps ahead and freeze them. Prepare the wraps as normal, then wrap them in foil or plastic wrap. Place them in a freezer bag and store them in the freezer. When you're ready to eat, just thaw them overnight in the fridge. Then, cook them in a skillet until heated through. This way, you have a quick meal ready to go whenever you need it. Check out the Full Recipe for more cooking tips. To keep your Easy Cheesy Chicken Garlic Wraps fresh, store leftovers in an airtight container. This helps keep moisture out and keeps the flavors intact. Ideally, eat them within three days. If you notice any odd smells or textures, it’s best to toss them. If you want to freeze your wraps, it’s easy! First, wrap each one in plastic wrap. Then, place them in a freezer bag or container. Be sure to squeeze out any air. This will help prevent freezer burn. You can freeze the wraps for up to three months. When you’re ready to eat, simply thaw them in the fridge overnight. To reheat your wraps, the skillet method works best. Heat a skillet over medium heat. Place the wraps seam side down and cook for about three to four minutes. This keeps them crispy. Flip and heat for another three to four minutes. You can also use an oven set at 350°F for about 10-15 minutes, but this may not be as crispy. Enjoy your Easy Cheesy Chicken Garlic Wraps warm! These wraps last about three days in the fridge. To keep them fresh, store them in an airtight container. If you want to avoid soggy wraps, place a paper towel inside the container. This towel absorbs extra moisture and helps keep the wraps crisp. No, you cannot use raw chicken in this recipe. You need to cook the chicken first. Cooked chicken gives the wraps better flavor and texture. You can use grilled, rotisserie, or leftover chicken. Just make sure it’s shredded or diced before mixing it with the other ingredients. You can pair these wraps with many tasty sides. Here are some ideas: - Fresh salad: A light green salad with a tangy dressing works well. - Dips: Marinara sauce or ranch dressing add extra flavor. - Vegetable sticks: Carrot and cucumber sticks are a crunchy addition. - Fries: Sweet potato fries or regular fries add a fun crunch. Feel free to mix and match these sides to suit your taste! For the complete recipe of Easy Cheesy Chicken Garlic Wraps, check out the [Full Recipe]. In this blog post, I shared how to make Easy Cheesy Chicken Garlic Wraps. We covered the main ingredients, preparation steps, tips for cooking, and meal variations. Cooking these wraps is simple and fun. You can customize them to fit your tastes. Remember to store leftovers properly for later enjoyment. Whether you enjoy spicy flavors or prefer a vegetarian option, these wraps are versatile. Try them out, and I hope they become a go-to meal for you. Happy cooking!](https://toastedrecipes.com/wp-content/uploads/2025/05/8921906f-1bb6-4828-8477-eba631c828bf.webp)
Looking for a quick meal that’s packed with flavor? You’re in the right place! My Easy Cheesy Chicken Garlic Wraps are a breeze to make and taste incredible. With tender …