Tater Tot Breakfast Bowl Satisfying and Hearty Meal

Are you ready for a fun and filling breakfast? The Tater Tot Breakfast Bowl is a satisfying and hearty meal that transforms your morning routine. With crispy tater tots, eggs, …
Are you ready for a fun and filling breakfast? The Tater Tot Breakfast Bowl is a satisfying and hearty meal that transforms your morning routine. With crispy tater tots, eggs, …
![- 1 package pizza dough (store-bought or homemade) - 1 cup ribeye steak, thinly sliced - 1 small onion, thinly sliced - 1 small green bell pepper, thinly sliced - 2 tablespoons olive oil - 1 teaspoon garlic powder - Salt and pepper to taste - 1 cup provolone cheese, shredded - 1 cup mozzarella cheese, shredded - 1 egg, beaten (for egg wash) - 1 tablespoon fresh parsley, chopped (for garnish) Choosing the right ribeye steak makes a big difference. Look for bright red meat with good marbling. This fat adds flavor and helps keep the meat juicy. For cheese, I suggest using provolone and mozzarella. Provolone adds a nice sharp taste, while mozzarella gives that gooey melt. You can mix in some cheddar for extra flavor too. If you want to make your own pizza dough, that’s great! But store-bought works well too. Just make sure to let it rest before rolling it out. This keeps it from shrinking back while you shape it. - Preheat your oven to 425°F (220°C). - In a skillet, heat 2 tablespoons of olive oil over medium heat. Add the sliced onion and green bell pepper. Sauté until soft, about 5-7 minutes. Remove and set aside. - In the same skillet, add 1 cup of thinly sliced ribeye steak. Season with 1 teaspoon of garlic powder, salt, and pepper. Cook for about 4-5 minutes until the steak is just cooked through. - Add the sautéed onions and bell peppers back to the skillet. Mix everything well. - On a lightly floured surface, roll out the pizza dough into a large rectangle, about ¼ inch thick. - Sprinkle half of the provolone and mozzarella cheese evenly over one half of the dough. - Add the steak and vegetable mixture over the cheese layer. Top with the remaining cheese. - Fold the dough over the filling to create a stuffed breadstick shape. Pinch the edges to seal completely. - Cut the stuffed dough into equal-sized strips. Place them on a baking sheet lined with parchment paper. - Brush the tops with the beaten egg for a golden finish. - Bake in the preheated oven for 12-15 minutes or until the breadsticks are golden brown and the cheese is melted. - Once baked, let them cool slightly. Sprinkle with chopped parsley before serving. You can find the full recipe above to guide you through this delicious process! Serve your Philly cheesesteak stuffed cheesy breadsticks warm. I love pairing them with marinara sauce. The rich tomato flavor goes well with the cheesy breadsticks. For a nice touch, add fresh parsley on the side. Arrange the breadsticks on a colorful platter. This makes them look even more tempting. Avoid overstuffing your breadsticks. If you add too much filling, they may burst open. Make sure to seal the dough properly. Pinching the edges well keeps all the goodness inside. A good seal helps your breadsticks stay intact while baking. You can add spices or herbs to the steak for more flavor. Try using Italian seasoning or a pinch of red pepper flakes. These add a nice kick. Mix different cheese blends for a fun twist. Using cheddar or gouda with provolone enhances the taste. Experiment with cheese and spices to find your favorite combination. {{image_2}} You can change the meat in your breadsticks. Try chicken or turkey instead of ribeye. These swaps give a new taste while keeping it easy. For a vegetarian option, use mushrooms or eggplant. They bring great flavor and texture. You can also mix in your favorite veggies, like spinach or zucchini. Want some heat? Add jalapeños to the mix. They make the dish spicy and fun. You can also try different cheeses for new flavors. Pepper jack adds a kick, while gouda gives a smoky taste. Mixing cheeses can make every bite unique. If you need gluten-free breadsticks, look for gluten-free pizza dough. Many stores sell it now. You can also make your own using almond flour or cauliflower. For the filling, use gluten-free meats and veggies. Just check labels to be sure they are gluten-free. To keep your Philly cheesesteak stuffed cheesy breadsticks fresh, store them in an airtight container. Place a paper towel inside to absorb moisture. They will last for about 3 to 4 days in the fridge. Always cool them down before sealing the container. This prevents sogginess. You can freeze these breadsticks before or after baking. If freezing before baking, wrap each one tightly in plastic wrap. Place them in a freezer bag to prevent freezer burn. They can last up to 3 months this way. To freeze after baking, wait until they cool completely, then store in an airtight container. For thawing, move them to the fridge overnight. This helps maintain their texture. You can also thaw them at room temperature for about 1-2 hours if you're in a hurry. To reheat without losing quality, use an oven. Preheat it to 350°F (175°C) and place the breadsticks on a baking sheet. Heat for about 10-12 minutes. This ensures they get warm and crispy. Avoid using a microwave, as it can make them chewy. Keep an eye on them to prevent burning. Enjoy them warm for the best taste! To make these stuffed breadsticks, start by preheating your oven to 425°F (220°C). Sauté thinly sliced onions and green peppers in olive oil until soft. Cook thinly sliced ribeye steak with garlic powder, salt, and pepper until done. Roll out pizza dough into a rectangle. Sprinkle half the provolone and mozzarella cheese on one half of the dough. Layer the steak mixture on top and add the remaining cheese. Fold the dough over, seal the edges, and cut into strips. Bake for 12-15 minutes until golden brown. [Full Recipe] Yes, you can make these breadsticks ahead of time. Prepare the filling and dough separately. Store the filling in the fridge for up to two days. You can also assemble the breadsticks and keep them in the fridge. Bake them just before serving for the best taste. I love serving these breadsticks with marinara sauce. It adds a nice, tangy flavor. You can also try ranch dressing or a spicy aioli for a fun twist. These sauces enhance the breadsticks and make them even better. You can change the filling to suit your taste. Try using chicken or turkey instead of ribeye steak. For a vegetarian option, add mushrooms, spinach, or zucchini. Mixing in different spices or herbs can also add unique flavors to the filling. Provolone cheese is a classic choice for cheesesteaks. It melts well and has a mild flavor. You can also use mozzarella for extra creaminess. For something different, try adding pepper jack for a spicy kick, or gouda for a rich taste. You can create tasty Philly cheesesteak stuffed cheesy breadsticks with easy steps. Start with high-quality ingredients like ribeye and flavorful cheeses. Follow the preparation and baking instructions to avoid common mistakes. Remember, you can personalize these breadsticks with different meats or veggies. In the end, these breadsticks make a fun dish for any meal. Enjoy the flavor and impress your friends with your cooking skills!](https://toastedrecipes.com/wp-content/uploads/2025/05/16b9f63d-d5a7-4449-9acf-a7af0421a90c.webp)
Are you ready to take your snacking game to new heights? In this post, I’m sharing my recipe for Philly Cheesesteak Stuffed Cheesy Breadsticks Delight! Imagine warm, gooey cheese and …
![- 1 cup white or brown rice: Use white rice for a softer texture or brown rice for more fiber. - 1 pound ground beef or turkey: Choose turkey for a leaner option or use plant-based crumbles for vegetarian. - 1 tablespoon taco seasoning: You can make your own or use a store-bought mix. - 1 can (15 oz) black beans, drained and rinsed: Beans add protein and fiber. Swap with pinto beans if you prefer. - 1 cup corn kernels (fresh or frozen): Fresh corn gives a sweet crunch, while frozen is convenient and quick. - 1 cup cherry tomatoes, halved: They add sweetness and color. Replace with regular tomatoes if needed. - 1 avocado, diced: For creaminess, use guacamole if you don’t have fresh avocados. - 1 cup shredded cheddar cheese: Cheddar is classic, but you can use any cheese you like. - 1 cup lettuce, chopped: Romaine or iceberg works well. Use spinach for a twist. - 1 cup Doritos, crushed (any flavor): For crunch, try tortilla chips if you want a healthier option. - ½ cup sour cream or Greek yogurt: Both add creaminess; Greek yogurt is a great lower-fat choice. - ¼ cup salsa: Choose your favorite salsa. Fresh salsa adds a nice touch. - 2 tablespoons olive oil: Use any oil you prefer for cooking. - Salt and pepper to taste: Essential for enhancing all flavors in the dish. These ingredients blend together to create a tasty and colorful meal. The key flavors come from the taco seasoning and the crunch from the Doritos. Feel free to mix and match based on your preferences and what you have at home. You can find the full recipe to guide you through making this dish. To cook the rice, start by measuring 1 cup of white or brown rice. Rinse the rice under cold water. This helps remove excess starch. In a medium saucepan, add the rinsed rice and 2 cups of water. Bring it to a boil over high heat. Once boiling, lower the heat and cover the pot. Let it simmer for about 15 minutes for white rice or 40 minutes for brown rice. After cooking, turn off the heat and let it sit for 5 minutes. This resting time helps the rice become fluffy. Fluff the rice with a fork before serving. For the meat, use either 1 pound of ground beef or turkey. Heat 2 tablespoons of olive oil in a skillet over medium heat. Add the meat and break it apart with a spoon. Cook it evenly until it is browned, about 6-8 minutes. Drain any excess fat from the skillet. Then, stir in 1 tablespoon of taco seasoning. Add ¼ cup of water to the meat. Let it simmer for 3-4 minutes until the sauce thickens. This makes the meat more flavorful and moist. Now it’s time to assemble your taco rice bowl! Start with a base of cooked rice in each bowl. Layer the seasoned meat over the rice. Next, add a mixture of 1 can of black beans, 1 cup of corn, halved cherry tomatoes, and diced avocado. This mix adds color and nutrition. Top it with shredded lettuce and 1 cup of cheddar cheese. For extra fun, add a dollop of sour cream or Greek yogurt and a spoonful of salsa. Just before serving, sprinkle crushed Doritos on top for crunch. Serving in vibrant bowls makes it visually appealing. Arrange the toppings in sections for a colorful display. Try this [Full Recipe] to enjoy a tasty taco rice bowl with Doritos! To boost the taste of your Taco Rice Bowl, think about spices and toppings. I recommend using cumin, paprika, and chili powder for extra depth. If you love heat, add jalapeños or a splash of hot sauce. For a milder dish, skip the heat and focus on fresh herbs like cilantro or parsley. A squeeze of lime juice adds brightness and freshness. Prepping your ingredients in advance can save you time. Cook the rice a day before and store it in the fridge. You can also brown the meat ahead of time and keep it in the fridge. If you have leftover proteins or veggies, feel free to use them. Shredded chicken or roasted veggies work great in this bowl. For sides, I recommend crispy tortilla chips or a simple green salad. You can also serve this bowl with a side of guacamole for a creamy touch. If you're planning a party, make mini bowls for guests. Everyone can build their own Taco Rice Bowl for a fun and interactive meal. For meal prep, store each component separately to keep everything fresh. For the full recipe, check out the details above! {{image_2}} You can easily make this dish vegetarian. Just swap out the meat for plant-based proteins. Options like lentils or black bean burgers work great. They add texture and flavor. Add your favorite toppings for a vegetarian twist. Try diced bell peppers, jalapeños, or roasted corn. Fresh cilantro or avocado can bring extra taste. For a gluten-free version, use corn tortillas or rice as your base. These options fit right in with the bowl's flavors. You’ll still get that satisfying crunch! Choose gluten-free taco seasoning for the best taste. Many brands offer this option. Just check the labels to be sure. Get creative and mix in different spices or sauces. Try adding cumin or coriander for a warm flavor. Chipotle sauce can give it a smoky kick. For toppings, think beyond the usual. Add kimchi for a Korean twist or salsa verde for a zesty finish. These small changes can make your Taco Rice Bowl a global dish. For the full recipe, check out the Taco Rice Bowl with Doritos. To keep your Taco Rice Bowl with Doritos fresh, store it in an airtight container. This keeps out air and moisture. Refrigerate your leftovers right after serving. You can safely keep them in the fridge for up to three days. If you want to store it longer, consider freezing. When you reheat your bowl, use the microwave for quick results. Place it in a microwave-safe dish. Cover it with a damp paper towel to keep it moist. Heat for one to two minutes, stirring halfway. You can also use a skillet on low heat. This method helps keep the rice and meat from drying out. Always check that it’s heated to at least 165°F for safety. You can freeze your Taco Rice Bowl before or after cooking. If you freeze it before cooking, assemble the ingredients in a container. This way, you can cook it fresh later. If you freeze it after cooking, let it cool completely first. Use meal prep containers that are safe for freezing. Make sure to label them with the date. This keeps your meals organized and fresh for up to three months. Making a Taco Rice Bowl with Doritos takes about 30 minutes. You need around 15 minutes for prep and another 15 minutes for cooking. This quick time makes it perfect for busy days. Absolutely! You can add heat in a few ways. Use spicy taco seasoning or add diced jalapeños. Hot sauce is another great way to bring the heat. Just drizzle some on top or mix it in the meat. Adjust the spice to your taste and enjoy! If you want a crunch without Doritos, try tortilla chips or crushed corn chips. You can even use pita chips for a different flavor. Just make sure they are crunchy to keep the fun texture. Yes, this recipe is very kid-friendly! Kids usually love the mix of flavors and textures. You can let them pick their toppings, which makes it more fun. Consider using less spicy seasoning and adding cheese and sour cream to appeal to picky eaters. Garnishes can make your dish pop! Use fresh cilantro or chopped green onions for color. Lime wedges add a bright touch and zing. You can also drizzle some extra salsa or sour cream on top for added flavor. Make it look as tasty as it is! This article provided a clear guide to creating a tasty Taco Rice Bowl. We covered essential ingredients, detailed cooking steps, and tips for enhancing flavors. You can easily adapt the dish to fit your diet, whether vegetarian or gluten-free. I shared storage techniques to keep your leftovers fresh. Finally, I answered common questions to make your cooking experience smooth. Now, you have the tools to impress your family and friends with a delicious meal. Enjoy experimenting with your Taco Rice Bowl!](https://toastedrecipes.com/wp-content/uploads/2025/05/8763d560-193f-4749-917a-4be428cabb99.webp)
Are you looking for a fun and tasty meal that’s easy to make? The Taco Rice Bowl with Doritos brings together bold flavors and crunch in every bite. You’ll love …
![- 1 cup cornmeal - 1 cup all-purpose flour - 1 tablespoon baking powder - ½ teaspoon salt - 1 tablespoon sugar - 1 cup buttermilk - 2 large eggs - 1/4 cup melted butter - 1 cup corn kernels (fresh or frozen) - 1/2 cup honey - 1/4 cup unsalted butter (softened) - Waffle maker - Mixing bowls - Measuring cups and spoons Gather these ingredients to make cornbread waffle bites with honey butter syrup. Each item plays a key role. The cornmeal gives the waffles their signature taste. The buttermilk keeps them moist and fluffy. Make sure to use fresh corn kernels for extra sweetness. You will also need some basic tools. A waffle maker is essential for cooking. Mixing bowls help combine everything smoothly. Measuring cups and spoons ensure accuracy, which is vital for baking. You can find the full recipe above to help you create these tasty treats. Enjoy cooking! 1. Preheat your waffle maker according to the manufacturer's instructions. This step ensures a crispy outside and soft inside. 2. In a large bowl, whisk together the cornmeal, all-purpose flour, baking powder, salt, and sugar. Mixing these dry ingredients well is key for even flavor. 1. In another bowl, mix together the buttermilk, eggs, and melted butter until well combined. This helps create a smooth batter. 2. Pour the wet ingredients into the dry ingredients. Stir gently until just combined. Be careful not to overmix. Overmixing can make the waffles tough. 3. Fold in the corn kernels gently. This adds sweet pops of flavor in every bite. 1. Lightly grease the waffle maker with non-stick spray or melted butter. This keeps the waffles from sticking. 2. Pour a ladleful of batter into the waffle maker. The amount depends on your specific maker. Close the lid and cook until golden brown, about 4-5 minutes. 3. While the waffle bites cook, prepare the honey butter syrup. In a small bowl, combine softened unsalted butter and honey. Mix until smooth and creamy. 4. Once cooked, carefully remove the cornbread waffle bites from the waffle maker. Keep them warm while you repeat with the remaining batter. 5. Serve the warm cornbread waffle bites drizzled with the honey butter syrup for a sweet finish. For the full recipe, including tips for best results, check out the [Full Recipe]. - Ensure not to overmix the batter. Overmixing makes the waffle bites dense. - Adjust cooking time based on your waffle maker. Some cook faster than others. - Stack a few waffle bites on a plate. Drizzle them generously with honey butter syrup. - Garnish with fresh herbs like chives or parsley. This adds color and flavor. - To get light and fluffy waffle bites, use room temperature ingredients. - Try adding toppings like fresh fruit or nuts for extra flavor. You can also use whipped cream for a treat. For more on how to make these delightful bites, refer to the Full Recipe. {{image_2}} You can easily tweak this recipe. For those who need gluten-free options, swap the all-purpose flour with a gluten-free blend. Many brands mix flours that work well in baking. Just ensure the blend includes xanthan gum. If you prefer dairy-free alternatives, use almond milk or oat milk instead of buttermilk. You can also replace the melted butter with coconut oil for a dairy-free option. These simple swaps keep the flavor while catering to different diets. You can jazz up your cornbread waffle bites with spices or herbs. Try adding a pinch of cayenne for heat or a teaspoon of garlic powder for depth. Fresh herbs like cilantro or green onions can also brighten the flavor. For something sweet, toss in some chocolate chips or blueberries. If you want a savory twist, consider adding crumbled bacon or shredded cheese to the batter. This gives you options for breakfast or snacks. Cornbread waffle bites shine as a side dish with meats like fried chicken or pulled pork. They provide a nice contrast to savory flavors. You can also serve them as a fun breakfast option. Drizzle with honey butter syrup for a sweet start to the day. As a snack, consider serving them with dips like salsa or guacamole. This adds variety and makes them perfect for parties or gatherings. You can enjoy cornbread waffle bites any time of day! To store cornbread waffle bites, let them cool completely. Place them in an airtight container. This keeps them fresh in the fridge for up to three days. If you want to save them longer, freeze the bites. Wrap each waffle bite in plastic wrap. Then, place them in a freezer bag or container. They can last up to three months in the freezer. When ready to eat, you can reheat the waffle bites. The best way is in an oven or toaster oven. Preheat the oven to 350°F. Place the bites on a baking sheet and heat for about 10 minutes. This method keeps them crispy. You can also use a microwave, but they might lose some crunch. Serve leftover waffle bites with more honey butter syrup for extra flavor. In the fridge, cornbread waffle bites last about three days. Check for signs of spoilage before eating. If they smell bad or have mold, throw them away. Always trust your nose and eyes. Keeping these tips in mind will help you enjoy your cornbread waffle bites from the [Full Recipe] longer! Can I make the batter ahead of time? Yes, you can make the batter ahead. Just mix the dry and wet ingredients separately. Store them in the fridge. When ready, combine them and cook the waffle bites. This saves time on busy days. What’s the best way to reheat cornbread waffle bites? Reheat them in a toaster or an oven. Set the toaster to medium and toast until warm. For the oven, preheat to 350°F (175°C) and heat for about 10 minutes. This keeps them crispy and tasty. Are cornbread waffle bites suitable for vegetarians? Yes, these waffle bites are vegetarian-friendly. They use simple ingredients like cornmeal, flour, and buttermilk. So, anyone can enjoy them! How can I make this recipe low-sugar? To lower sugar, reduce the sugar in the batter. You can also use sugar substitutes like stevia or monk fruit. They will keep the sweet taste without the calories. What can I serve with honey butter syrup? Honey butter syrup pairs well with many items. Try serving it with fresh fruit like berries or sliced bananas. It also goes great with bacon or sausage for a savory twist. Can I use other types of flour in this recipe? Yes, you can swap all-purpose flour with other flours. Use whole wheat or gluten-free flour for different flavors. Make sure to adjust the liquid if needed. This helps keep the texture right. You now have all the tools to create delicious cornbread waffle bites. We covered essential ingredients, tools, and step-by-step instructions. Remember, adjust cooking time based on your waffle maker for the best results. Feel free to experiment with variations and substitutions to suit your taste. Whether for breakfast or a snack, these waffles offer great flavor and texture. Store and reheat them properly to enjoy each bite fresh. Dive in and enjoy the cooking adventure!](https://toastedrecipes.com/wp-content/uploads/2025/05/8b930bb3-87c2-44db-8ecc-a77a5d57025a.webp)
Are you ready to elevate your snack game? I’m excited to share my recipe for Cornbread Waffle Bites with Honey Butter Syrup! These are not your ordinary waffles; they combine …

Looking for a fun, tasty snack that’s super easy to make? You’ve found it! These Easy Bang Bang Salmon Bites are quick to whip up and packed with flavor. Whether …
![To make these tasty snacks, you need a few key ingredients: - 1 lb ground beef - 1 cup shredded sharp cheddar cheese - 1 cup shredded mozzarella cheese - 1 tablespoon garlic powder - 1 teaspoon onion powder - 1 teaspoon salt - 1 teaspoon black pepper - 1 can (16 oz) refrigerated biscuit dough - 1/2 cup grated parmesan cheese - 2 tablespoons fresh parsley, chopped (for garnish) - 1 tablespoon olive oil These ingredients come together to create a rich and cheesy filling that everyone will love. The ground beef offers a hearty base, while the cheeses add creaminess and depth. Garlic and onion powders give a lovely flavor kick. Finally, the biscuit dough wraps it all up in a warm, golden hug. Want to make your Garlic Parmesan Cheeseburger Bombs even better? Try these optional ingredients: - Additional cheeses like pepper jack or gouda - Spices like paprika or cayenne for extra heat - Your favorite dipping sauces, like ranch or spicy ketchup Customizing your bombs can lead to new flavor experiences. You can mix and match cheeses or add spices to make them truly your own. Each serving of Garlic Parmesan Cheeseburger Bombs has around 400 calories. Here’s a quick look at the macronutrient breakdown: - Protein: 25g - Fat: 25g - Carbs: 30g This snack packs a punch with its protein and flavor. You’ll feel satisfied while enjoying a tasty treat. Mixing the beef and cheese filling Start by putting the ground beef in a large bowl. Add shredded sharp cheddar and mozzarella cheese. Then, sprinkle in the garlic powder, onion powder, salt, and pepper. Mix everything until it’s well blended and looks like one smooth mixture. Preparing the biscuit dough Next, open your can of refrigerated biscuit dough. Carefully pull apart the biscuits. You want to flatten each biscuit into a circle, about four inches wide. This makes it easy to hold the filling later. Shaping the biscuit and stuffing Now it's time to assemble! Place a generous tablespoon of your beef and cheese mix in the center of each biscuit. Be careful not to overfill; a tablespoon is just right. Sealing the edges correctly Fold the biscuit edges over the filling. Pinch them together tightly to seal the bombs. This step is crucial. If they aren’t sealed well, the filling might leak out while cooking. Searing and baking instructions Heat olive oil in a skillet over medium heat. Once hot, place the sealed biscuit balls in the skillet. Sear them for about two minutes on each side until they turn golden brown. This step adds flavor and texture. After searing, transfer them to a baking sheet lined with parchment paper. Ensuring doneness Sprinkle grated parmesan cheese on top of the bombs before baking. Pop them in the oven set at 375°F (190°C). Bake for 15 to 18 minutes. You want them golden brown and cooked all the way through. When done, let them cool slightly before serving. For the full recipe, you can refer to the earlier sections. Enjoy the tasty Garlic Parmesan Cheeseburger Bombs! To keep your filling juicy, use fresh ground beef. Lean beef can dry out. Mix well so the cheese melts into the meat. This adds great flavor. For even cooking, sear the bombs before baking. Browning them locks in moisture. Place them on a lined baking sheet for heat flow. This helps them cook evenly. Garnish your bombs with chopped parsley. This adds color and freshness. A drizzle of olive oil can enhance the look and taste. Serve them on a warm platter. Sprinkling extra parmesan on top makes them pop. Pair with your favorite dipping sauces for an extra touch of flavor. Be careful not to overfill the biscuits. Too much filling can cause them to burst. Stick to a generous tablespoon for the best results. Make sure to seal the edges tightly. If not sealed, the filling may leak during cooking. Pinching the edges well will keep all that cheesy goodness inside. For the full recipe and step-by-step guidance, check the [Full Recipe]. {{image_2}} You can change the protein in Garlic Parmesan Cheeseburger Bombs. Ground turkey or chicken works well. They add a lighter twist while still being tasty. You can also mix cheeses. Try using pepper jack for a spicy kick or gouda for a smoky flavor. The cheeseburger bombs will surprise your taste buds. If you need gluten-free options, look for gluten-free biscuit dough. Many brands offer this tasty choice. You can also make a vegetarian version. Use black beans or lentils instead of meat. Add mushrooms for a savory touch. These options let everyone enjoy this snack. Garlic Parmesan Cheeseburger Bombs are great as a snack or meal. Serve them with fries or a fresh salad for a full dinner. They also work well as appetizers at parties. You can present them on a platter with dips like ketchup or ranch. Each bite will be a hit with your guests. For the full recipe, check out the details above! To keep your Garlic Parmesan Cheeseburger Bombs fresh, store them in the fridge. Place them in an airtight container. This helps lock in moisture and flavor. They can stay fresh in the fridge for about 3-4 days. If you want to keep them longer, freezing is a great option. Wrap each bomb tightly in plastic wrap. Then, place them in a freezer-safe bag. They can last for up to 3 months in the freezer. To reheat, simply thaw them in the fridge overnight. Then, bake at 350°F (175°C) for about 10-12 minutes. This will help regain their crispy outer layer. Always check for signs of spoilage. If you see mold or notice an off smell, it’s time to toss them. It’s best to avoid eating leftovers that have been in the fridge for more than 4 days. Remember, safety first! Enjoy your Garlic Parmesan Cheeseburger Bombs while they’re fresh and tasty. Making Garlic Parmesan Cheeseburger Bombs takes about 40 minutes. You will spend around 20 minutes prepping the ingredients and about 20 minutes cooking them. The time includes mixing, shaping, and baking. Yes, you can use frozen biscuit dough. Thaw it before you start. You can follow the same steps for shaping and baking. Just ensure the dough is soft enough to flatten easily. These cheeseburger bombs go great with many sauces. Some tasty options include: - Ketchup - Mustard - Ranch dressing - BBQ sauce - Garlic aioli Each sauce adds a unique flavor, enhancing your snack experience. You can prepare the cheeseburger bombs in advance. Assemble them, then place them in the fridge. For best results, bake them on the same day. If you want to store them longer, freeze them before baking. Just thaw and bake when ready. For the full recipe, check the details above. Garlic Parmesan Cheeseburger Bombs are tasty and easy to make. This blog covered the key ingredients, step-by-step instructions, and tips for perfecting your dish. You now know how to customize flavors and store any leftovers. In the end, feel free to experiment with ingredients. Enjoy the process and share these fun bites with family and friends. With these tips, you’ll create a dish that impresses everyone. Happy cooking!](https://toastedrecipes.com/wp-content/uploads/2025/05/6c53df0a-a5d5-4d29-beb2-1747369b6d2d.webp)
Are you ready to indulge in a delicious snack? Garlic Parmesan Cheeseburger Bombs are a fun twist on classic flavors. Picture juicy beef, melted cheese, and savory garlic all wrapped …
. 1. Preheat your oven to 350°F (175°C). Grease and flour a 15x10-inch sheet pan. 2. In a large bowl, whisk together: - 2 cups all-purpose flour - 2 cups granulated sugar - 1 teaspoon baking soda - 1/2 teaspoon salt 3. In a medium saucepan, melt 1 cup unsalted butter over medium heat. Stir in 1 cup water and 1/2 cup unsweetened cocoa powder. Bring to a boil, then remove from heat. 4. Pour the warm chocolate mixture into the flour mixture. Stir to combine well. 5. In a small bowl, whisk together: - 1/2 cup buttermilk - 2 large eggs - 1 teaspoon vanilla extract 6. Add the wet ingredients to the dry mix. Stir until you have a fully mixed batter. 7. Pour the batter into the prepared sheet pan. Spread it evenly and bake for 20-25 minutes. A toothpick should come out clean when done. 8. While the cake bakes, prepare the frosting. In a saucepan, melt 1/2 cup unsalted butter over medium heat. Stir in 2/3 cup unsweetened cocoa powder until smooth. 9. Remove from heat and add: - 3 cups powdered sugar - 1/3 cup milk - 1 teaspoon vanilla extract Whisk until creamy. 10. Once the cake is done, let it cool for 10 minutes. While warm, pour the frosting over the cake. Spread it evenly. Allow the cake to cool completely before slicing. For more detailed instructions, refer to the Full Recipe. - Ensuring proper oven temperature: Always preheat your oven to 350°F (175°C). An accurate temp is key for a perfect cake. Use an oven thermometer if you doubt your oven's heat. - Checking for doneness: After 20 minutes, check your cake with a toothpick. Insert it into the center. If it comes out clean, your cake is ready. If not, give it a few more minutes. - Adjusting for altitude: If you live in a high-altitude area, you may need to tweak your recipe. Reduce baking soda slightly and add a bit more flour. This helps your cake rise properly. - Achieving creamy consistency: For a smooth frosting, melt the butter first. Whisk in cocoa powder until it blends well. Then add powdered sugar and milk slowly. This mix will make the frosting creamy and easy to spread. - Tips for spreading frosting evenly: Use a spatula to spread the frosting. Start from the center and move outward. A turntable can help you get an even finish. - Serving suggestions for gatherings: Cut the cake into squares and place them on a large platter. This makes it easy for guests to grab a piece. You can serve it with a scoop of vanilla ice cream for a treat. - Decorating tips for added flair: Add some chocolate shavings or sprinkles on top for a fun look. Fresh berries can contrast nicely with the chocolate. This adds color and flavor to your dessert. For a detailed recipe, you can refer to the Full Recipe. {{image_2}} To make your cake even more special, try adding instant coffee. This will give deep flavor to the chocolate. Just one or two teaspoons can make a big difference. You can also switch up the frosting. Use cream cheese frosting for a tangy twist. Or try a peanut butter frosting for a nutty flavor. If you need a gluten-free option, almond flour works great. It adds a nice nutty taste and keeps the cake moist. For a vegan cake, replace butter with coconut oil. You can use flax eggs instead of regular eggs. Just mix one tablespoon of flaxseed meal with three tablespoons of water for each egg. This cake shines when served with ice cream. Vanilla or coffee ice cream pairs well with the rich chocolate. You can also get creative with toppings. Add chopped nuts for crunch or colorful sprinkles for fun. Fresh berries can also add a nice touch and balance the sweetness. Store leftover Chocolate Texas Sheet Cake in a tight container. Use an airtight container to keep it fresh. If you do not have one, wrap it well with plastic wrap. This keeps the cake moist and tasty. You can store it at room temperature for a day or two. For longer storage, put it in the fridge. To freeze the sheet cake, cut it into squares. This makes it easy to thaw only what you need. Wrap each square in plastic wrap. Then, place them in a freezer bag or container. This helps prevent freezer burn. When you want to enjoy a piece, take it out and place it in the fridge overnight. This way, it thaws slowly and keeps its texture. The Chocolate Texas Sheet Cake stays fresh for about 3 to 4 days at room temperature. In the fridge, it can last up to a week. Look out for dry spots or an off smell, which means it has spoiled. If the frosting looks hard or changes color, it’s best to toss it. For the best taste, eat it fresh! This cake stands out due to its rich, deep chocolate flavor. The use of unsweetened cocoa powder brings a bold taste. I also add buttermilk, which gives the cake a lovely moist texture. The balance of sugar and cocoa creates a sweet yet not overpowering dessert. Many people in my cooking classes rave about this recipe. It has a high rating among home bakers and professionals alike. The cake is easy to make and yields a large portion, perfect for gatherings. Yes, you can prepare this cake in advance. I recommend baking the cake a day before your event. Let it cool completely and store it in an airtight container. This helps keep it moist and fresh. For the frosting, you can make it a few hours ahead. Just store it in the fridge. When you're ready to serve, let the frosting sit at room temperature before spreading it on the cake. You can tell the cake is done when it's springy to touch. It should not look wet on top. The edges may pull slightly from the pan too. To be extra sure, use a toothpick. Insert it in the center of the cake. If it comes out clean or with just a few crumbs, the cake is ready. This method is simple and very reliable for all cakes. This blog post covered every step to make a great Chocolate Texas Sheet Cake. We discussed key ingredients, essential baking steps, and helpful tips to ensure success. I shared ways to personalize your cake with flavor variations and dietary options. Lastly, I included storage tips to keep your cake fresh. Remember, baking is both a science and an art. Enjoy experimenting and sharing your delicious results!](https://toastedrecipes.com/wp-content/uploads/2025/05/db8430da-0f6a-4a7c-af54-6ad4f1ba13f9.webp)
If you love chocolate, you’re in for a treat! This recipe for the BEST Chocolate Texas Sheet Cake is rich, moist, and so easy to make. With simple ingredients and …
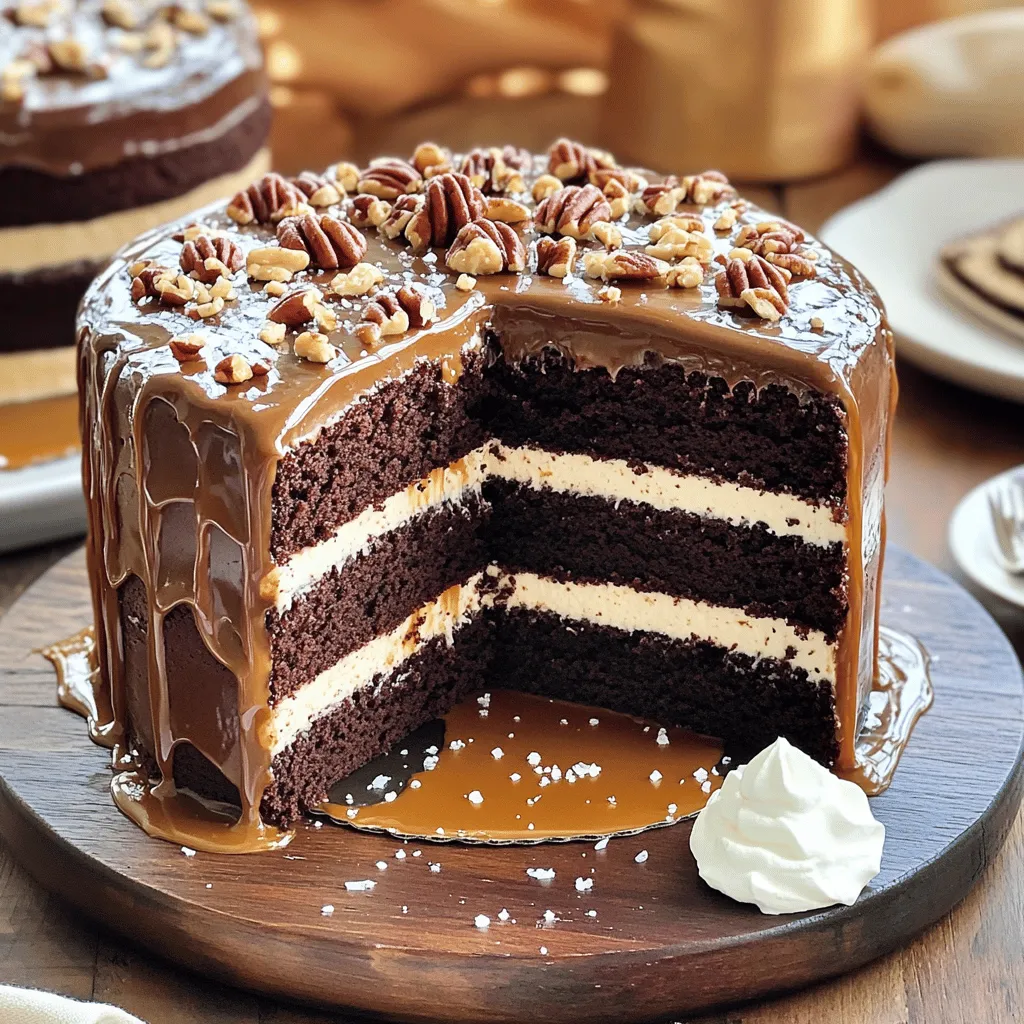
If you love rich and sweet desserts, you’re in for a treat. I’m excited to share my Turtle Chocolate Layer Cake with you. This cake combines soft chocolate layers, smooth …
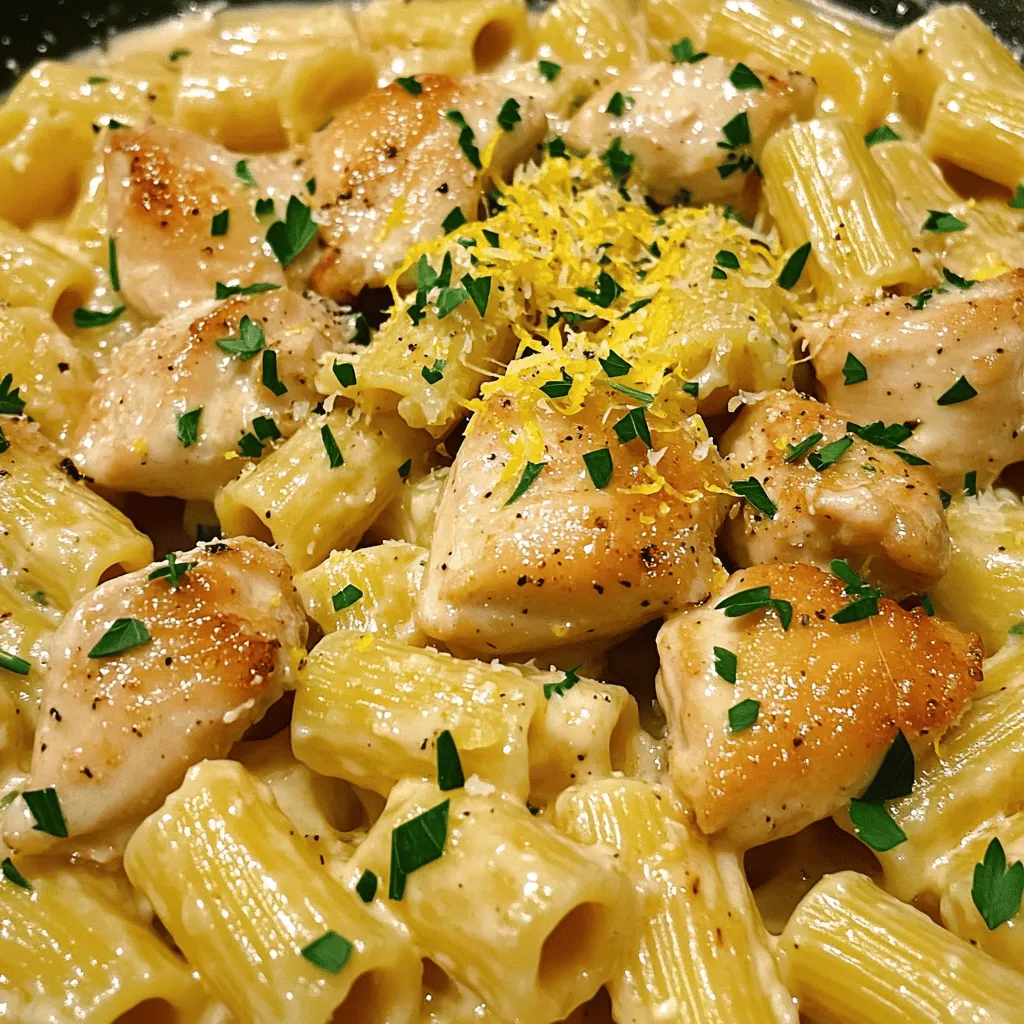
If you crave a simple yet flavorful dish, you’re in for a treat! My Garlic Butter Chicken with Rigatoni combines tender chicken and rich garlic butter sauce, creating a savory …
![- 2 cups frozen tater tots - 4 large eggs - 1/2 cup shredded cheddar cheese These main ingredients create the base for a hearty meal. Tater tots are crispy and golden, which makes them perfect for breakfast. The eggs add protein and richness. The cheddar cheese brings flavor and creaminess. - 1/4 cup diced green onions - 1/2 cup diced bell peppers (any color) - 1/4 cup cooked and crumbled sausage You can customize your bowl with optional add-ins. Green onions add a fresh crunch. Bell peppers bring color and sweetness. If you like meat, add sausage for extra flavor. Each add-in makes the dish more exciting! - 1/4 cup sour cream - Salt and pepper to taste - Olive oil for cooking Seasoning is key to a tasty breakfast bowl. Use salt and pepper to enhance flavors. The olive oil helps cook the veggies and adds a nice touch. Sour cream on top gives a cool contrast to the hot ingredients. This makes every bite delicious! For the full recipe, check out the [Full Recipe]. 1. Preheat your oven to 425°F (220°C). 2. Spread 2 cups of frozen tater tots evenly on a baking sheet. 3. Bake the tater tots for 25-30 minutes. They should be golden and crispy. Flip them halfway for even cooking. 1. While the tater tots bake, heat a non-stick skillet over medium heat. Add a drizzle of olive oil. 2. Add 1/2 cup of diced bell peppers to the skillet. Sauté for about 3-4 minutes. They should be slightly soft. 3. If you want a meaty touch, add 1/4 cup of cooked, crumbled sausage. Cook for 3-4 more minutes until browned. 4. Crack 4 large eggs into a bowl and whisk them until frothy. Season with salt and pepper. 5. Pour the eggs into the skillet. Stir gently, cooking until just set but still creamy, about 3-4 minutes. 1. When the tater tots are done, take them out of the oven. 2. Spoon the scrambled egg mixture right on top of the tater tots. 3. Sprinkle 1/2 cup of shredded cheddar cheese over the eggs. Let it melt for about 1-2 minutes. 4. Garnish with 1/4 cup of diced green onions and a dollop of 1/4 cup sour cream before serving. For the full recipe, check out the detailed instructions. Enjoy your tasty Tater Tot Breakfast Bowl! To make the best tater tots, I recommend baking them at 425°F (220°C). This high heat helps them get that nice, crispy texture we all love. Bake for 25-30 minutes. Flip them halfway through for even crispiness. For extra crunch, try this tip: coat the baking sheet with a bit of olive oil. This small step can make a big difference. For creamy scrambled eggs, whisk your eggs well before cooking. Make sure to add a pinch of salt and pepper for flavor. Cook them over medium heat and stir slowly. This helps keep them soft and fluffy. If you want to try an alternative, you can bake the eggs in the oven. Just whisk them with some milk, pour into a greased pan, and bake at 350°F (175°C) until set. Garnishing your Tater Tot Breakfast Bowl can be fun! You can use diced green onions for a fresh touch. Try adding salsa or hot sauce for some heat. A dollop of sour cream adds creaminess that balances the dish. Feel free to mix and match toppings for your own signature bowl. {{image_2}} For protein, you have many choices. If you want a vegetarian option, skip the sausage. You can add black beans or chickpeas for protein. These beans are tasty and fill you up. If you prefer meat, you can use bacon or ham. Cook them until crispy, then chop and mix them in. You can also try turkey sausage for a lighter choice. Each protein gives a unique taste to your bowl. To boost flavor, add spices and herbs. A dash of paprika or cayenne pepper adds a nice kick. You can also sprinkle in some garlic powder for more depth. Fresh herbs like cilantro or parsley make your meal pop. Cheese is key for flavor, too. While cheddar is great, try pepper jack for heat. Feta cheese gives a tangy twist, while mozzarella offers a creamy texture. Each cheese choice can change the whole dish. Pair your Tater Tot Breakfast Bowl with sides. Fresh fruit or a simple salad balances the meal. You can also serve it with toast for a classic touch. Turn your bowl into a brunch platter. Create mini bowls for friends with different toppings. This way, everyone can customize their meal. It's a fun way to enjoy breakfast together. To store leftovers, let your Tater Tot Breakfast Bowl cool down first. Place it in an airtight container. This keeps it fresh for about 3 to 4 days. I recommend using glass containers. They help to keep the food from absorbing smells. For the best reheating method, use an oven. Preheat it to 350°F (175°C). Place the bowl on a baking sheet, and cover it with foil. Heat for about 15-20 minutes until warm. This method keeps the tater tots crispy. You can also use a microwave. Just heat in short bursts, stirring often. This helps maintain the texture. You can freeze both cooked and uncooked versions. For cooked, let it cool completely. Then, place it in a freezer-safe container. Use it within 2 to 3 months for the best taste. When freezing uncooked, assemble the bowl without cooking. You can thaw it overnight in the fridge before baking. This way, you can cook right from frozen. Simply add an extra 5-10 minutes to the bake time. To make a vegetarian Tater Tot Breakfast Bowl, simply skip the meat. You can use extra veggies, like mushrooms or zucchini, to add flavor and texture. Here are some good substitutions for meat: - Use 1/4 cup cooked and crumbled tempeh - Add 1/4 cup diced mushrooms - Replace sausage with black beans or chickpeas For protein sources, consider these options: - Scrambled tofu - Cooked quinoa - Sliced avocado on top These swaps will keep your bowl hearty and tasty! Yes, you can use fresh potatoes! Just peel and dice them into small cubes. For a crispy texture, you'll need to boil them first for about 5 minutes. Then, spread them on a baking sheet. Adjust your cooking time to about 35-40 minutes at 425°F. Check for golden brown color to ensure they are crispy. Fresh potatoes give a nice, homemade feel to your dish. Leftovers are a great way to get creative! Here are some ideas for repurposing your breakfast bowl: - Make a breakfast burrito by wrapping leftovers in a tortilla. - Use the mix as a filling for stuffed peppers. - Create a hash by frying them up with more veggies. These ideas let you enjoy your meal in new ways! This blog post outlined a fun and easy recipe for a Tater Tot Breakfast Bowl. We covered the main ingredients, optional add-ins, and how to perfectly combine them. I shared tips for crispy tater tots, creamy scrambled eggs, and creative garnishes. You learned about different variations to suit your taste and how to store leftovers wisely. These bowls are not just tasty; they are versatile and great for any meal. Enjoy making your own personalized Tater Tot Breakfast Bowl!](https://toastedrecipes.com/wp-content/uploads/2025/05/75c7b97c-06c1-4393-9182-b71f02300005.webp)
Are you ready to elevate your breakfast game? The Tater Tot Breakfast Bowl is not just a meal; it’s a hearty, filling delight that will kickstart your day. With crispy …